With the holiday coming up real soon, I figured this would be a great opportunity to create and post some cool effects for your LED strips. Maybe you can be your own Griswold (National Lampoon’s Christmas Vacation) with these!
You’ve got to check out the Fire effect with toilet paper – looks pretty cool!
Please consider disabling your ad blocker for our website. We rely on these ads to be able to run our website. You can of course support us in other ways (see Support Us on the left).
LEDEffects
Below an overview of this article.
All these effects work with NeoPixel and FastLED, and with each effect I made a little demo video.
UPDATE – All effects in one sketch
Bij popular demand, I’ve written an article how all these effects can be placed in one sketch, allowing you to toggle effects.
Read more about it in this article: Arduino – All LED effects in one Sketch. (updated the link)
Please consider disabling your ad blocker for our website. We rely on these ads to be able to run our website. You can of course support us in other ways (see Support Us on the left).
Preparing your Arduino and your LED strip
Please keep in mind that these effects are here for you to play with and hopefully invite you to create your own cool effects …
For your convenience, you can download all sources here as well:
For this article I have used the Arduino IDE 1.6.6, which (after you installed either FastLED or NeoPixel) will show a message to update either of these (and possibly others) libraries. Please do so.
Arduino Connected to PC
The following I use for when the Arduino is connected to my PC:
Arduino & WS2812 – USB and External Power
Arduino Standalone
After you’ve uploaded your variation of effects into the Arduino, and you’d like it to run standalone, then this setup is what you need. Without a connection to your computer, the Arduino will need +5V from the external power supply.
This is for stand-alone ONLY so when the Arduino is NOTconnect to a PC!
Arduino & WS2812 – Only running on external power supply
Helpful tool: Color Picker
This tool might be helpful when picking colors:
LED colors are build up out of 3 numbers: red, green and blue (RGB).
Each number is a byte so it each has a range of 256 values (Decimal: 0 … 255, Hexadecimal: 00 … FF).
Now the human brain (usually) doesn’t work with RGB numbers, so I’ve added this little tool to pick colors.
You can select the color and it should give you the hexadecimal value of the selected color.
Please note that the LED colors might be slightly off – after all they are not calibrated.
Color picker:
Usage:
Click the input box and a popup will show a color picker. Choose your color, and the hexadecimal value will appear.
To use this in your Arduino Sketch:
The first 2 characters represent RED,
the second set of twocharacters is for GREEN and
the last 2characters represent BLUE.
Add ‘0x‘ in front of each of these hex values when using them (‘0x’ designates a hexadecimal value).
Example:
This purple is B700FE.
The hexadecimal values: red is B7, green is 00 and blue is FE.
As the Arduino can work straight away with hexadecimal number, you will need to type “0x” in front of it – so it can see the difference between regular decimal number and these hexadecimal numbers.
So for example a NeoPixel strip.Color() call would look something like this:
strip.Color(0xB7,0x00,0xFE);
Ad Blocking Detected
Please consider disabling your ad blocker for our website. We rely on these ads to be able to run our website. You can of course support us in other ways (see Support Us on the left).
Make your effects cooler: Diffuse Light (toilet paper magic)
I love playing with these LED strips, but sometimes they feel a little too … I don’t know how to say it.
With some effects you’d prefer to not see the individual LEDs light up.
To remedy that without too much effort, you can diffuse the light – make it more fuzzy.
There are different techniques for that, anywhere from using ping-pong balls (which works great for one or two LEDs), frosted glass (tube light!) or plastic tubes, cloth sheets etc.
I had none of these available – I used to have ping ping balls but my dog decided it to be awesome for chasing and chewing. So I’m out of those.
To my surprise, regular toilet paper (yes!) actually does a pretty good job with the diffusing as well. Naturally, I had only “fancy” toilet paper with a print on it, and neutral toilet paper would have looked even better, but you get the idea when you se these two examples.
Just make sure to keep the toilet paper roughly an inch (2 to 3 centimeter) above the LEDs – don’t let the LEDs touch the toilet paper.
Note: Both examples look better when held vertical, but without much assistance in my house, I had to do it horizontally.
The Fire Effect is my favorite and shows best in a darker environment, but look at what the toilet paper is doing … I love it!
The Red, White and Blue bouncing balls look a lot more interesting when diffused as well.
Required Library – NeoPixel or FastLED ?
Since both are pretty good, but are not used in the same way – ie. they are not drop-in replacements for each other. That’s why I decided to create a few “generic” functions so that the “effect” function here can be generic as well, so these functions work with either of these 2 libraries.
Note : FastLED seems slightly faster. In the tests I’ve run I would estimate that FastLED is about 15% faster than NeoPixel. You will notice this with large amounts of LEDs (as I experienced with 300+ LEDs). On the other hand, NeoPixel seems to take less memory on your Arduino. Also note that the functions in FastLED are far superior to NeoPixel.
Now I wrote tiny wrappers around some of the basic functions of NeoPixel and FastLED – and I’m sure there is room for improvement. Suggestions are welcome.
Basic framework
For each of the LEDStrip effects, we will use a basic framework of code which we reuse in each of the effects. It is important that you pay attention to these since the basic settings for your strip is being done there.
Now in this framework I’ve also defined 3 generic functions.
These functions will automatically grab the code needed for the library you’re using (when compiling).
showStrip();
This function simply applies the recent changes to pixel colors and makes them visible.
It calls strip.show (NeoPixel) or FastLED.show (FastLED).
setPixel(Pixel, red, green, blue);
With this function we set the color of an individual pixel (LED).
You will need to pass the pixel number (start counting at zero) and the RGB values.
For NeoPixel it will call setPixelColor, and for FastLED it will assign values to the leds array.
setAll(red, green, blue);
This function sets the entire strip to a give color. You can use it to set the entire strip to a given color or for example with setAll(0,0,0) to black (off).
The code we present, with each of the effects, is simple replacing this part of the code in the framework code:
1 2 3 4 5 6 7
// *** REPLACE FROM HERE *** void loop(){ // ---> here we call the effect function <--- }
// ---> here we define the effect function <--- // *** REPLACE TO HERE ***
So in our effects code examples you will only see the loop() section and the effect function.
Settings and the 3 wrapper functions will not be displayed, but are most certainly needed!
FastLED Framework
This is the basic code for use with the FastLED library.
Here we include the needed library (line 1), define the number of LEDs (line 2), define the Arduino pin used (line 4), and define some strip specific settings (line 8) like color order (RGB, GRB etc.).
// *** REPLACE FROM HERE *** void loop(){ // ---> here we call the effect function <--- } // ---> here we define the effect function <--- // *** REPLACE TO HERE ***
For NeoPixel we use a similar framework for each of the effects.
Line 1 includes the NeoPixel library, line 2 defines the used Arduino pin (6), the comment lines explain a little about the parameters used in line 10, and in line 10 we define strip specifics.
#include <Adafruit_NeoPixel.h> #define PIN 6 #define NUM_LEDS 60 // Parameter 1 = number of pixels in strip // Parameter 2 = pin number (most are valid) // Parameter 3 = pixel type flags, add together as needed: // NEO_KHZ800 800 KHz bitstream (most NeoPixel products w/WS2812 LEDs) // NEO_KHZ400 400 KHz (classic 'v1' (not v2) FLORA pixels, WS2811 drivers) // NEO_GRB Pixels are wired for GRB bitstream (most NeoPixel products) // NEO_RGB Pixels are wired for RGB bitstream (v1 FLORA pixels, not v2)
Adafruit_NeoPixel strip = Adafruit_NeoPixel(NUM_LEDS, PIN, NEO_GRB + NEO_KHZ800);
void setup(){
strip.begin();
strip.show();// Initialize all pixels to 'off' }
// *** REPLACE FROM HERE *** void loop(){ // ---> here we call the effect function <--- } // ---> here we define the effect function <--- // *** REPLACE TO HERE ***
Please consider disabling your ad blocker for our website. We rely on these ads to be able to run our website. You can of course support us in other ways (see Support Us on the left).
LEDStrip Effect – Fade In and Fade Out: Red, Green and Blue
With this effect, we use fixed colors for all LEDs, in sequence: Red, Green and Blue.
We will slowly increase brightness and when the maximum brightness has been reached, we will start decreasing the brightness again until the LEDs are OFF.
Since the function is in the loop(), it will keep repeating itself.
void RGBLoop(){ for(int j =0; j <3; j++){ // Fade IN for(int k =0; k <256; k++){ switch(j){ case0: setAll(k,0,0);break; case1: setAll(0,k,0);break; case2: setAll(0,0,k);break; }
showStrip();
delay(3); } // Fade OUT for(int k =255; k >=0; k--){ switch(j){ case0: setAll(k,0,0);break; case1: setAll(0,k,0);break; case2: setAll(0,0,k);break; }
showStrip();
delay(3); } } }
LEDStrip Effect – Fade In and Fade Out Your own Color(s)
Now fading in and out only red, green and blue is nice, but what about fade in and out your own color?
If you’re not sure how to determine your own color, check out the previously mentioned Color Picker.
As with all of these effects, you can mix and match whatever you like. But if you’re in a patriotic mood, then there is not much better than our belowed red, white and blue. You can accomplish that by calling the function for each individual color. So, for example, by replacing the loop() with the following:
1 2 3 4 5 6 7 8 9
...
void loop(){
FadeInOut(0xff,0x00,0x00);// red
FadeInOut(0xff,0xff,0xff);// white
FadeInOut(0x00,0x00,0xff);// blue }
for(int k =0; k <256; k=k+1){
r =(k/256.0)*red;
g =(k/256.0)*green;
b =(k/256.0)*blue;
setAll(r,g,b);
showStrip(); }
for(int k =255; k >=0; k=k-2){
r =(k/256.0)*red;
g =(k/256.0)*green;
b =(k/256.0)*blue;
setAll(r,g,b);
showStrip(); } }
Ad Blocking Detected
Please consider disabling your ad blocker for our website. We rely on these ads to be able to run our website. You can of course support us in other ways (see Support Us on the left).
LEDStrip Effect – Strobe
Now, this effect quickly flashes all LEDs a number of time and then pause a certain time after that.
I made this one more configurable, so you determine how much time should be paused between flashes, and how much the “end pause” should last.
The function takes 6 parameters.
The first 3 are the same red, green and blue we have seen in the previous effect so you can define your own color – see the Color Picker above for picking a color. In the example I used White.
The next parameter (StrobeCount) indicates how many flashes you’d like to see.
Parameters 5 (FlashDelay) and 6 (EndPause) are for delays between each individual flash and how long the function should wait once it completed all flashes.
Be careful with the strobe effect – it may cause epileptic seizures!
Well, this one is for those amongst us who like a good Halloween decoration – it shows two red eyes at a random spot on the strip that fade away.
I created this function to be somewhat flexible, and as you can see in the example code, I did use the random function a bit to make it more suitable for a Halloween setup.
Anyhow, theHalloweenEyes() function takes quite a few parameters.
Again I’ve used the option to pass your preferred color by passing Red, Green and Blue (see also: Color Picker).
Usually one would probably pick red as the eye color (0xff, 0x00, 0x00).
HalloweenEyes Parameters
Parameter
Purpose
Examples
red
Red Color
0xFF
green
Green Color
0x00
blue
Blue Color
0x00
EyeWidth
How many LEDs per eye
1
EyeSpace
Number of LEDs between the eyes
2
Fade
Fade out or not
true
false
Steps
Number of steps on fade out
10
FadeDelay
Delay between each fade out level
100
EndPause
Delay after everything is completed
1000
As you can see in the code as straight forward call would be:
In the more advanced call example, we make the fade out steps and fade out delays a little random. So some eyes disappear faster than others. And the “EndPause” delays has been made random as well, so that in the end eyes will appear more random.
Using Random numbers …
The Arduino random(Min,Max) function returns a random number between “Min” and “Max”.
Calling the randomSeed() function just makes things a little bit better more random.
You can use the calls to random() in the parameter of the functions presented here. You’ll see me do this occasionally to give the effect a more fun appearance.
void HalloweenEyes(byte red, byte green, byte blue, int EyeWidth,int EyeSpace,
boolean Fade,int Steps,int FadeDelay, int EndPause){
randomSeed(analogRead(0));
int i; int StartPoint = random(0, NUM_LEDS -(2*EyeWidth)- EyeSpace ); int Start2ndEye = StartPoint + EyeWidth + EyeSpace;
for(i =0; i < EyeWidth; i++){
setPixel(StartPoint + i, red, green, blue);
setPixel(Start2ndEye + i, red, green, blue); }
showStrip();
if(Fade==true){ float r, g, b;
for(int j = Steps; j >=0; j--){
r = j*(red/Steps);
g = j*(green/Steps);
b = j*(blue/Steps);
for(i =0; i < EyeWidth; i++){
setPixel(StartPoint + i, r, g, b);
setPixel(Start2ndEye + i, r, g, b); }
showStrip();
delay(FadeDelay); } }
setAll(0,0,0);// Set all black
delay(EndPause); }
Ad Blocking Detected
Please consider disabling your ad blocker for our website. We rely on these ads to be able to run our website. You can of course support us in other ways (see Support Us on the left).
LEDStrip Effect – Cylon
I suppose not all of us know what a Cylon is, but I grew up with those cool robots and I for sure wanted to have one.
My familiar with Knight Rider (although that’s about the same era)? It’s kind-a similar.
This type of “scanner” is often referred to as a Larson scanner is named after Glen Larson, the man responsible for producing both the original Battlestar Galactica and Knight Rider television shows.
Anyhow, here an effect that simulates the moving “eye” of a Cylon: A red “eye” moves from left to right and back, over and over again. Kind-a ike a bouncy ball haha.
The Cylon() function takes 6 parameters, where the first 3 are you preferred color (a Cylon has a red “eye”, but you can pick whatever you like with the Color Picker). The 4th parameter (EyeSize) determines how many LEDs run around, or: the width of the “eye” (outer 2, faded, LEDs not counted).
The 5th parameter (SpeedDelay) influences how fast the eye moves, higher values means slow movement.
The last parameter (ReturnDelay) sets how much time it should wait to bounce back.
In this comeback the KITT scanner started behaving differently. Instead of bouncing back and forth it now follows this pattern:
New Larson Scanner (KITT) directions
I had no clue about the change – I guess the revived show didn’t make that much of an impression – so I did get this pattern from the earlier mentioned KITT-duino Instructable.
As you can see, all steps repeat so I decided to make separate functions for the repeating patterns.
All these functions take the same parameters – so you can use them individually as well.
Obviously first the color definition (red, green and blue), then the size of the “moving eye”, the speed delay and how long we’d like to wait when the LEDs bounce.
NewKITT() calls for the complete routine of earlier mentioned pattern, where as CenterToOutside(), OutsideToCenter(), LeftToRight() and RightToLeft() do their fraction of the pattern. Again: they can be used on their own, so feel free to mix and match.
Please consider disabling your ad blocker for our website. We rely on these ads to be able to run our website. You can of course support us in other ways (see Support Us on the left).
LEDStrip Effect – Twinkle
This effect will blink one or more LEDs in a given color.
The function takes the usual color parameters, which you can determine with the Color Picker.
The 4th parameter (Count) determines how many pixels will be done in one run, where as the 5th parameter determines how much time will be paused between individual pixels (speed).
The 6th parameter (OnlyOne) should be true if you want to see only one LED at a time.
If it’s set to false then all “Count” number of LEDs will be visible (added one at a time).
This is a variation on the Twinkle() effect.
The only difference is that the colors are now randomly generated, and therefor the first 3 color parameters are no longer of use and have been removed.
So we use only 3 parameters:
The first parameter (Count) determines how many pixels will be done in one run, where as the second parameter determines how much time will be paused between individual pixels (speed).
The last parameter (OnlyOne) should be true if you want to see only one LED at a time.
If it’s set to false then all “Count” number of LEDs will be visible (added one at a time).
Please consider disabling your ad blocker for our website. We rely on these ads to be able to run our website. You can of course support us in other ways (see Support Us on the left).
LEDStrip Effect – Sparkle
With this one, a variation of Twinkle, I had Christmas in mind.
The function only lights up one LED and switches it off right after that.
When placed in the loop() it will continuously do that.
Again the usual parameters: Color and SpeedDelay.
If you’d prefer random colors, then you can could Sparkle as such:
Sparkle(random(255), random(255), random(255),0);
The effect code, with white as the selected color:
This variant of Sparkle is intended to look like snow with to occasional sparkle.
Having snow in mind, the first 3 parameters (the background color) should be a more dim white and that’s why I choose 10 10 10 – but feel free to pick your own color.
The 4th parameter, SparkleDelay, indicates how long a “sparkle” will be visible. Do not set it too short, otherwise you’d barely notice anything happening.
The last parameter indicates how much time should be waited after a sparkle has been made visible and has been removed.
You could use a fixed interval for that:
SnowSparkle(0x10,0x10,0x10,20,200);
I like it better though when it’s more random. For that I’ve added the random function again to the function call where (in this example) the wait time between sparkles is a random number between 100 and 1000 milliseconds (1/10th of a second and a full second).
Please consider disabling your ad blocker for our website. We rely on these ads to be able to run our website. You can of course support us in other ways (see Support Us on the left).
LEDStrip Effect – Running Lights
This effect makes multiple groups of LEDs chase each other. Kind-a like the running lights you’d use to see in stores during the holidays.
It takes 4 parameters, of which the first 3 define the color (roughly).
The last parameter indicates how much delay is put in the loop, the higher the number, the slower it will go.
You could of course play with the colors, for example on a theme night:
1 2 3 4 5
void loop(){
RunningLights(0xff,0,0,50);// red
RunningLights(0xff,0xff,0xff,50);// white
RunningLights(0,0,0xff,50);// blue }
I took this one from the NeoPixel library. It sets one LED after the other to a give color. The result being a full strip in a given color if you’d run it only once.
In the example below I actually call this function twice, the first one to set all LEDs to green and the second on to set each LED to black (OFF), so we get a chaser like effect.
The function parameters are simple; the usual color parameters (see color picker), and a delay time (the higher this number, the slower it will go).
Please consider disabling your ad blocker for our website. We rely on these ads to be able to run our website. You can of course support us in other ways (see Support Us on the left).
LEDStrip Effect – Rainbow Cycle
Again one I took from the NeoPixel library.
This function cycles rainbow colors, where the only parameter is the speed delay.
Another one converted from the NeoPixel library.
With this effect LEDs are chasing each other like what you’d see in an old Theatre.
Parameters are again color and speed delay.
void theaterChase(byte red, byte green, byte blue,int SpeedDelay){ for(int j=0; j<10; j++){//do 10 cycles of chasing for(int q=0; q <3; q++){ for(int i=0; i < NUM_LEDS; i=i+3){
setPixel(i+q, red, green, blue);//turn every third pixel on }
showStrip();
delay(SpeedDelay);
for(int i=0; i < NUM_LEDS; i=i+3){
setPixel(i+q,0,0,0);//turn every third pixel off } } } }
Ad Blocking Detected
Please consider disabling your ad blocker for our website. We rely on these ads to be able to run our website. You can of course support us in other ways (see Support Us on the left).
LEDStrip Effect – Theatre Chase Rainbow
Another one from NeoPixel, which combines Rainbow and TheatreChase.
for(int j=0; j <256; j++){// cycle all 256 colors in the wheel for(int q=0; q <3; q++){ for(int i=0; i < NUM_LEDS; i=i+3){
c = Wheel((i+j)%255);
setPixel(i+q,*c,*(c+1),*(c+2));//turn every third pixel on }
showStrip();
delay(SpeedDelay);
for(int i=0; i < NUM_LEDS; i=i+3){
setPixel(i+q,0,0,0);//turn every third pixel off } } } }
This effect looks best when hanging your LED strip vertical and it simulates a one LED wide “fire”, and is adapted from an example in FastLED, which is adapted from work done by Mark Kriegsman (called “Fire2012”).
Note that this effect looks awesome when using diffuse light!
This function takes 3 parameters.
The first one (Cooling) indicates how fast a flame cools down. More cooling means shorter flames, and the recommended values are between 20 and 100. 50 seems the nicest.
The Second parameter (Sparking), indicates the chance (out of 255) that a spark will ignite. A higher value makes the fire more active. Suggested values lay between 50 and 200, with my personal preference being 120.
The last parameter (SpeedDelay) allows you to slow down the fire activity … a higher value makes the flame appear slower.
You’ll have to play a little with that, but personally I like a value between 0 and 20.
// Step 2. Heat from each cell drifts 'up' and diffuses a little for(int k= NUM_LEDS -1; k >=2; k--){
heat[k]=(heat[k -1]+ heat[k -2]+ heat[k -2])/3; }
// Step 3. Randomly ignite new 'sparks' near the bottom if( random(255)< Sparking ){ int y = random(7);
heat[y]= heat[y]+ random(160,255); //heat[y] = random(160,255); }
// Step 4. Convert heat to LED colors for(int j =0; j < NUM_LEDS; j++){
setPixelHeatColor(j, heat[j]); }
showStrip();
delay(SpeedDelay); }
void setPixelHeatColor (int Pixel, byte temperature){ // Scale 'heat' down from 0-255 to 0-191
byte t192 = round((temperature/255.0)*191);
// calculate ramp up from
byte heatramp = t192 &0x3F;// 0..63
heatramp <<=2;// scale up to 0..252
// figure out which third of the spectrum we're in: if( t192 >0x80){// hottest
setPixel(Pixel,255,255, heatramp); }elseif( t192 >0x40){// middle
setPixel(Pixel,255, heatramp,0); }else{// coolest
setPixel(Pixel, heatramp,0,0); } }
Ad Blocking Detected
Please consider disabling your ad blocker for our website. We rely on these ads to be able to run our website. You can of course support us in other ways (see Support Us on the left).
LEDStrip Effect – Bouncing Balls
This effect looks best with the LEDstrip vertical, and shows one or more bouncing balls in a given color.
This effect is an adapted version of bouncing balls by Danny Wilson.
The parameters are as usual the color of (all) the balls, and the last parameter is the number of balls you’d like to see bounce.
for(int i =0; i < BallCount ; i++){
setPixel(Position[i],red,green,blue); }
showStrip();
setAll(0,0,0); } }
LEDStrip Effect – Multi Color Bouncing Balls
This is a more complex variant of the Bouncing Balls effect.
Instead of just one color, it allows the use of multiple colors, each defined by you.
This makes the function call a little bit more complex, since I wanted it to work for any number of balls you’d like set. The problem would be how to pass the color for each ball.
To accomplish this you will have to define a so called multi dimensional array – which may sound scary, but I’ll walk you through that.
Let’s first look at the effect itself.
The function BouncingColoredBalls() takes only two parameters. The number of balls and that scary array of colors. Easy so far, right?
Now, let’s say we want to use 3 balls and use a red, white and blue ball. So 3 balls, requires 3 colors.
The first line defines the variable “colors” as a 3 x 3 array of bytes: byte colors[3][3] (downside: you can only use up to 255 balls)
We want 3 balls, so we need 3 sets of 3 values to define their colors. So the first “3” indicates the number of Balls.
Remember the Color Picker? Each color has 3 values: red, green and blue. So the second “3” indicates the 3 colors for each ball.
I guess I didn’t think that one through … argh … oh well I’ll show you some examples with a different number of balls.
We’d like to assign these values right away and in C we have a specific notation for that. For a regular array we use { value1, value2, ... valuen } …. so for 3 values this could be {1,2,3} , enclosed with accolades ( { and } ) .
Since we have a multi dimensional array – an array that has arrays as values – we will need to pass the arrays (colors) as values, so for a 3 balls and 3 colors array we need to do something like this: {{ value1, value2, value2 }, { value1, value2, value2 }, { value1, value2, value2 }} .
See the pattern? { value1, value2, value2 } is a set of 3 values (bytes) for one color.
Here an example if we would use only 2 balls, say for Christmas we use red and green balls:
1 2
byte colors[2][3]={{0xff,0,0}, {0,0xdd,0}};
2 Balls, each having a red, green and blue value (3).
Now to make this work we have to make 100% sure that the first number (2 in the 2 ball example) of the array matches with the first parameter we pass to the function. So the 2 ball Christmas example would be called as such:
for(int i =0; i < BallCount ; i++){
setPixel(Position[i],colors[i][0],colors[i][1],colors[i][2]); }
showStrip();
setAll(0,0,0); } }
Ad Blocking Detected
Please consider disabling your ad blocker for our website. We rely on these ads to be able to run our website. You can of course support us in other ways (see Support Us on the left).
LEDStrip Effect – Meteor Rain
This effect, based on a request by Hendrik, has been added almost 2 years (Januari 1st 2018) after writing this article – the video could have been done better and this effect should be vertical. None the less … here it is. This effect came with it’s own challenge since FastLED has a great function for dimming LEDs, NeoPixel however does not.
As you can see, it’s a kind of meteor falling from the sky.
An example of how to call this meteor effect:
meteorRain(0xff,0xff,0xff,10,64,true,30);
As with some of the previous examples, you can use the red, green and blue parameters to set the color of your meteor – you can use the Color Picker to find a color (even though it’s not perfect – it will get you in the right direction).
After the color, we can set the meteor size – the number of LEDs that represent the meteor, not counting the tail of the meteor.
The 5th parameter sets how fast the meteor tail decays/ disappears. A larger number makes the tail short and/or disappear faster. Theoretically a value of 64 should reduce the brightness by 25% for each time the meteor gets drawn.
Since meteors are not perfect, I’ve added the 6th parameter to mimic some sorts of difference in debris by making the decay a little random. If this value is set to “true” then some randomness is added to the rail. If you set the value to “false” then the tail will be very smooth.
Finally there is the last parameter, which basically indicates how much the drawing speed has to be delayed. A value of zero (0) means maximum speed. Any value above zero indicates how many milliseconds (1000 milliseconds in a second) the drawing will be delayed.
Your support is very much appreciated, and can be as easy as sharing a link to my website with others, or on social media.
Support can also be done by sponsoring me, and even that can be free (e.g. shop at Amazon). Any funds received from your support will be used for web-hosting expenses, project hardware and software, coffee, etc.
Thank you very much for those that have shown support already! It's truly amazing to see that folks like my articles and small applications.
Please note that clicking affiliate links, like the ones from Amazon, may result in a small commission for us - which we highly appreciate as well.
Please consider disabling your ad blocker for our website. We rely on these ads to be able to run our website. You can of course support us in other ways (see Support Us on the left).
Please consider disabling your ad blocker for our website. We rely on these ads to be able to run our website. You can of course support us in other ways (see Support Us on the left).
There are 1086 comments. You can read them below. You can post your own comments by using the form below, or reply to existing comments by using the "Reply" button.
Very good tutorial, but I think there is an error on the picture 2 “Arduino & WS2812 – Only running on external power supply”. I guess when you connect Arduino to external power supply in this case external +5V (DC) should be connected to Vin pin of the Arduino, but on your chart it is connected to +5V (that i theory should be used to supply detectors connected to Arduino).
I guess you’re right that usually Vin is being used, instead of +5V. And even though the displayed setup works just fine (I’ve been using this setup for almost 2 years now on a daily basis), I should probably look into changing the picture to be really 100% correct.
The problem is that I’m traveling until next month, so I won’t be near my stuff in the next weeks to make the modifications …
Actually the VIN pin is connected to the voltage regulator, which at least on the UNO is supposed to be fed with 7-16V. When using a (regulated?) 5V source the 5V terminal can be properly used as an input.
[…] códigos para programar los Leds fueron sacados de Tweaking4all.com para los que quieran practicar y aplicar otros diseños de Leds para reemplazar ornamenta […]
Fantastic site! I just got a Arduino Uno starter kit from Amazon and waiting for a 1m strip of WS2812 lights to arrive as I have a project I am working on for a holistic friend of mine. I’m 50 and new to all of this, but from my research, using the Arduino and the light strip is my best way to go here, so I am learning as I go now.
I have to create a 7 led light strip that goes in the following order LED1 always red, number 2 always orange, 3=yellow, 4=green, 5=blue, 6=indigo and 7=violet.
What I need the sketch to do is run for about 10 minutes in a random format where 1 of the 7 led lights will light up for a second or two and other lights remain off and then the next random led lights up. Then after 10 minutes, I need the strip to then run a continuous simple chase format where LED1 lights up for a second or two (all other lights off), then goes off. Then LED 2 goes on (all others off) , then the pattern continues #3 thru #7 then start over again at #1.
I’ll be reading more of your posts, but any advice on how to proceed would be greatly appreciated!
Maybe (considering the potential code we’d be posting) it’s better to start a topic in our Arduino Forum. Any post in the forum, I read … It does not sound like this would be a very complicated project, so I most certainly am willing to help you with this.
I am a complete novice but have made some limited progress with some modifications as you will see from the attached code. I would be extremely grateful if you could point the way with the next stage as a variation on your Strobe code. I have so far modified it to produce the following: –
1. A second strobe function including and an additional integer that I have called BlackDelay which needs to have a different integer value to the FlashDelay.
2. Corresponding duplicate function and statement blocks for the second strobe function.
What I would like to do is make each Pixel individually addressable with a predetermined fixed colour/colour combination and strobe sequence. At the moment I am using 5 PL9823 addressable RGB LEDS for testing but will eventually require >100.
Not every one of the intended 100 or so Pixels will be unique, as in some Pixels may share the same colour/colour combination and strobe sequenceI and I am assuming that if there are say 80 variants, that these could be configured in setup and then called from a loop function for each Pixel?
My modified code is as follows:
#include <Adafruit_NeoPixel.h> #define PIN 6 #define NUM_LEDS 5 // Parameter 1 = number of pixels in strip // Parameter 2 = pin number (most are valid) // Parameter 3 = pixel type flags, add together as needed: // NEO_KHZ800 800 KHz bitstream (most NeoPixel products w/WS2812 LEDs) // NEO_KHZ400 400 KHz (classic 'v1' (not v2) FLORA pixels, WS2811 drivers) // NEO_GRB Pixels are wired for GRB bitstream (most NeoPixel products) // NEO_RGB Pixels are wired for RGB bitstream (v1 FLORA pixels, not v2) Adafruit_NeoPixel strip = Adafruit_NeoPixel(NUM_LEDS, PIN, NEO_RGB + NEO_KHZ800);
void setup() { strip.begin(); strip.show(); // Initialize all pixels to 'off' }
I’d recommend taking this to the forum. On top of that: I’m traveling so I won’t be able to give you anything good until I get back home, which will be in a few days. If you decide to move this to the forum; – Post a link to the Forum post here would be great for others that might be interested – I do see every post in the forum, so I won’t forget or miss it
Hmm, you should be able to create a new topic. Can you try reloading the page and try again (if you haven’t done that already)? If not then that would be a problem – I just checked your user profile and it’s set to “participant”, so you should be able to create a new topic.
I did notice however that the login dialog doesn’t always seem refresh the page as it should, after loggin in. Please let me know if this issue persists. I’ll do some investigating on my end as well.
May 26, 2018 - 10:34 PM - Richard Amador Comment Link
Hello i have a question, first off thank you for all the code and great job, second I try to put the code into Arduino and compile it, it keeps saying ‘meteorrain’ was not declared in this scope any idea of how i could fix that?
it’s a little hard to determine why you get this message without seeing the code. Please do not post the full code here though, rather use the forum for that to avoid that the comment sections gets too long. The most common reasons why you’d see that message:
1) You copied the code from this website and are one of the very unlucky users where the Arduino IDE is doing something goofy with it.
fix: Copy and Paste the sketch from the website into Notepad, Copy again from there and paste it in the Arduino IDE – this typically filters invisible characters causing issues.
2) You’ve typed the code and made a typo somewhere.
fix: Look around the “void meteorRain(…)” function definition. You may have missed a “}” or a “;” (quite common).
I tested it here with a fake username in Chrome and Safari – it worked just fine unfortunately. So I’m guessing it was a caching issue. I’ll keep an eye on it and take a better look once I get back home. Maybe one or the other thing is caching where it shouldn’t.
nice effects and thanks for writing such a informative tutorial.
But i am here with a stupid question :D
how to display a static color using arduino?
i want to make led strip (ws2812b) to show a static color lets say only red. So that when i start arduino my led strip would only display red color and continue to display it.
Running Arduino 1.6.3 with FastLED 3.0, Arduino Nano 3, 328 atmega, WS2812B leds. LEDs, when setup with RGB ordering, output green for red, and red for green. Blue is fine.Switching to GRB ordering, all the LEDs in my strip turn green, with hints of other colors (ie a flashing “red” LED will be a slightly pulsing fully lit green LED.The coloring of the strip does not occur in the RGB ordering – but obviously, the colors are backwards.Any thoughts?
there are several ways of ordering the LED colors, not sure why some (often Chinese) manufacturers choose a different order. You’ve already tried RGB and GRB, if I understand you comment correctly. As far as I can see, these combinaties should be valid, and you’d have to test which one works for your strip: RGB, RBG, GRB, GBR, BRG, and BGR.
Since I haven’t ran into this issue, I would not be able to predict which one would work for you.
Note: When you set all LEDs to WHITE then the color scheme should not matter, since all values (R, G and B) should be FF. However ,… if you strip does not light up white, then there might be another problem.
Mar 30, 2016 - 2:17 PM - Nils-Johnny Friis Comment Link
I am “newbie” with Ardunio and my English is not sooooo good (I read better than I write). So I have to use Google translator to help me to write to you. But I hope you can help me.
I visited this site: //www.tweaking4all.com/hardware/arduino/adruino-led-strip-effects/. I liked what I saw and tried out all the sketch on this site.
So my question is: Can I find a sketch/Framework that contains all the effect-sketch in the Framework?
I want to teach me the use of functions (I would think that I have to use functions to “connect” sketch together?), but still has a lot before I understand their use. Unless there is a sketch which shows that use of all smal sketch in the Framework.
I would be very grateful if you could write me the sketch to show me all the effect-sketch in use in Framework.
You can also post it on your site so that other people can use it. :)
I want to study how you put together all the sketch and run them together, and use off function to be beeter to write code. I want to make myself a great Christmas stuff! :)
I use Adafruit_NeoPixel library. I would be very happy for your help.
you’re English is actually pretty good – with or without help from Google
I suppose theoretically, you could put all effects into one sketch. It might be however, that you run out of memory (depending on the Arduino model you’re using). First you’d have to copy all the functions I have mentioned here into the same sketch – just keep adding them at the end each time.
Next you’ll have to look at the “loop()” function where we call these functions – this is where you have to be creative and see how you’d like to call them (what order etc).
Posting the entire code here would be a bit large, so I did post it in the forum … You’ll find the FastLED and NeoPixel versions in this post.
OMG…you know how cool it is when you find EXACTLY what you are looking for on the magical interwebs? Thanks so much for sharing your knowledge on this…just got my first set of pixels to make a marquee sign, and have been trying to explore both of the libraries you use here on my own…this write-up pulled it all together for me! Now I have them doing exactly what I want, and have come up with some different ideas that I never would have thought of…
These LED routines are all great. I’m trying to combine a few of them into one program and have a variable chose which one to display. I’ve only tested a few so far, but I found that the Bouncing colored balls gets stuck and does not return to the loop. I added a line after showstrip; to break if the variable is not set to the value for that routine. I thought I’d mention this in case someone else is attempting to do the same thing.
Glad you’re having fun with LED strips haha (so do I!).
I have not run into this issue before, but it makes sense since we keep the balls bouncing using “while(true)”. You could of course add a timer or something and then modify the while to something that checks if it has been bouncing for a certain time.
A few other users have been toying with combining the effects, see this forum post and this one. Not sure how helpful they will be of course for your project, just thought I should mention it …
If you have created a cool project, feel free to post it in the forum! I’m sure others might enjoy it as well – but it’s totally optional of course …
I added the Cylon and New Kitt to my Program and noticed every time these routine starts over, most of the leds briefly flash white. I cant see anything in the code that could be causing this. Any ideas?
It turns out that the control voltage needs to be in close match with the supply voltage. I used a transistor, with the arduino connected to the base (with a 100k pulldown resistor) and the supply voltage on the collector, then connected the strip to the emitter and all the glitches went away.
Maybe you could just use a pulldown resistor on its own, thinking about it. The glitches do seem to be data rate associated.
I figured it out. I forgot to put a break in between one of my “switch case” statements. It was briefly going to a function that just called up all white leds.
I got it to do exactly what I wanted. I was already using the bouncing color ball routine, so I used the array to call up the different colors as it switches from left to right, outside to center, etc. I’m just started learning this arduino stuff. I’ve been programming pic micros in assembly language for the past 25 years. Using these addressable LEDs is a great way to learn a new language. FYI, I’m using a Teensy 3.2 as my processor.
Hey, for me, a lot of this stuff is new as well. I used to play with the BASICStamp (far from as advanced as using assembly) for a while, but the Arduino made things a lot easier. Also good to know that Teensy pulls this off!
Does anyone know how to program these effects so that you can select a button for each or one button to scroll thru each with a random selector as well?
I built a crosley type jukebox with digital screen and Kodi with 4 pairs of WS2811 LED’s. 10 LED’s on 2 strings vertical and 9 LED’s on 2 strings horizontal.
I have tried piecing together Fastled Multiple string code with Fastled DEMO100 code but only the first effect lights up.
(Apologies: due to the length of the code, I had to move it to the forum: see this post)
Utterly fantastic. Thank you so much for taking the time to create, write up, and share all of these fantastic light displays with us! You have a true gift and a generous heart.
Since your code has saved me at least a day’s worth of work, I would happily donate to your site for your time and effort, but I’d rather all of the funds go directly to you (instead of 90% through Flattr). Are there alternatives (like PayPal) or something similar? I’m US-based, if that makes a difference.
Thank you for your kind compliments – that is always a motivator to keep going . You can donate through PayPal, although it’s not required yet very much appreciated. Unfortunately, PayPal did not allow me to have a donate button but I do have a PayPal account. I’ll email you the details.
May 18, 2016 - 8:56 PM - abarrelofmonkeys Comment Link
Absolutely Amazing! You truly are the keymaster of NeoPixels. I absolutely love WS2812’s and have been playing with them for about 6 months now. This is by far the best use of them I have found. I was hoping you could point me to an example that uses your examples with a switch. I have been trying for a few days now to get your code with “all effects” to operate through a switch case instead of time delays. I have had no luck getting a switch to control even two shows. I must be missing something very simple like checking my switch at the wrong times. Hopefully there is something out there for me? Otherwise you have made a wonderful contribution to NeoPixels.
Thank you very much for the compliment. As for using a switch, I recall another user asking for something like this as well (see this comment, this forum topic might get you started as well).
Unfortunately, I’m traveling for work, so I have little chance and time to help you on your way. I should be back in about 2 weeks, which would clear my schedule a little more …
I could use a drink right now haha (it’s super hot here right now). You can donate through PayPal (email: hans at luijten dot net) … pick a subject like “drink” or “LEDs”. PayPal doesn’t allow me to place a Donate Now button on my website ….
Hahaha once you get the hang of it … you WILL go overboard with the LED strips … don’t forget to send pictures!!!! It’s awesome stuff to play with …
Yes, I read your post about PP saying that you couldn’t use a link, it’s a real shame.
You’re quite right, LEDs are seriously addictive, I have been playing with them for a couple of years. This is one of my creations https://youtu.be/oiXbXCQdf8c
But thanks to you, I am getting better at the coding side of it.
Is there a list of the NeoPixel or FastLED commands anywhere?
Oh wow! Love the YouTube video you posted – that’s so cool! I better start looking into an effect like that as well …
As for lists of available commands, I found this keyword list for NeoPixel, and this FastLED reference. The one for FastLED actually had a good explanation with it. Hope that helps …
Hi, I’m new to all of this LED and Audrino stuff, I was wondering if it is at all possible to create a “Chase” effect or any of the effects posted here for that matter, using a single color LED strip with UV LED’s?
I would assume this is very well possible,… if you can find a LED strip with UV LED’s. Then the next question would be finding a library that supports that particular LED strip.
Unfortunately, I have not yet seen a LED strip with just UV LEDs.
First off, thank you Hans for writing back so quickly. I really do appreciate it and your your time. So yes to, there are lots of strip out there with UV LED’s but to my understanding they are all analog. I can’t seem to find a single color digital strip anywhere let alone one that is UV. This is basically for a computer build that I’m putting together. The other question I came up with is permanent placement of the arduino in side the computer. Is it possible/ok to, substitute the external 5v power supply you in your diagram with a molex connection to the 5v 30a DC rail on a ATX computer psu?
I think the problem with Analog strips is that you cannot address the LEDs individually, so making that work with an Arduino might not be possible. I did find this Arduino Forum Topic, which might be of interest.
As for powering the Arduino+LEDs with your computers PSU; that should work (5V 30A is definitely enough). Just make sure that you get a PSU with some extra watts available to power your PC (mainboard, disks, videocard, etc) and the LEDs. Placing the Arduino itself in the case would not be a problem though.
So I went and got an Arduino UNO Starter kit, ordered a whole mess of led strips (waiting for them to be delivered). Downloaded the Arduino Software and the Fast LED Library. No matter what i do whether its open a file from the fast led library or just copy and past it from here. All I get are error messages. I have to say beyond the simple downloading and uploading of files or copying and pasting the code. I truly have no clue as to what I’m doing or looking at, or even what I’m doing wrong. Whatever help you can give would be greatly appreciated.
I can totally understand the frustration … it’s too bad that the Arduino IDE doesn’t handle GitHub ZIP’s all that well (see also here). You could try that older FastLED library and the Arduino IDE could automatically update it to the latest version.
So I quickly started up a Windows virtual machine to describe it for you., and installed the latest Arduino IDE (1.6.9). After the application started, I went to the menu: Sketch -> Include Library -> Manage Libraries. This will open a window, which takes a bit to load everything it can find. But once it’s done, you can type “fastled” in the “Filter your search…” box. FastLED should appear here. Click it and the button “install” will appear. Installation takes seconds. Once done, click “Close” and the FastLED library should be available.
Ok, so I was able to find the library and install it through the IDE like you said. Much to my delight, the effects that I want to use are not included…… sigh……The effects that I’m looking for are:
Newkitt, Strobe, RunningLights, Bouncing balls multi color
My Project: I’m building a new High End Gaming Computer, with a custom liquid cooling system, of which the main focal point of the system will be the a custom built reservoir tank. Everything inside the case will be visible through large side panel windows. I plan on cutting the led strip down to length, to fit inside a sealed tube, inside the center of the reservoir and have the LED’s running the desired effects while the coolant is swirling around the reservoir.
So obviously I will have to change the led count from 60 to whatever it is that’s on the strip after I cut it. Correct? Hopefully……..
I ordered 2 strips of Waterproof WS2812 LEDS one with a 60 LED count, One with a 144 LED count. Again in theory either should work as long as I change the LED count in the sketch accordingly?
I also “get” the part in the code, on how to tweak the colors.
So simply put, where can I get the the code, for the examples I gave from beginning to end, simply copy and paste into a sketch, save it, use it, and works?
Hi Anthony … good to hear you’ve got the library running now
Looks like you’re starting an interesting project (send pictures when you’re done!!). Yes you’d have to reduce the LED count to make it fit the strip/LED count you’re actually using. The examples can be found in the code here as well. There is pretty much no overhead in my code – I just made it so it can be used with both libraries.
As for combining effects, take a look in the Tweaking4All Arduino Forum (goor place to ask questions too). It’s not super extensive, but this topic for example discusses how to put multiple effects together. For most effects, it’s a matter of copy and paste, for a few others it takes a little bit more work … but it can be done!
I don’t think I’m going as far as combining effects. Just switching them around as the mood suits me. I’ll definitely be posting up some pics soon as I get things up and running. Might even do a you tube videos on the build too.
you forgot to copy the “framework” (link = see above).
In the framework code (depending which library you choose, in your case FastLED), you’ll need to replace the following code with the code for the effect:
// *** REPLACE FROM HERE ***
void loop() {
  // ---> here we call the effect function <---
}
// ---> here we define the effect function <---
// *** REPLACE TO HERE ***
Looking for major help, I have made an intinity mirror which is using 205 ws2812B what I would like to do is use the fire sketch (which i can of course) but what i cannot do or maybe its not possiable is to have 2 starting point with the flames using 100 leds.
starting point (1) leds 1 to 100
starting point (2) leds 205 to 105
The idea is that it looks like the flames are starting at the same point and lapping round the mirror
I really enjoy working with the arduino and leds but sometimes its so bloody frustating :)
If you think its not possiable let me know as i will then give up on that idea, on a postive note if it is any help would be much appreciated
I wouldn’t think of it as impossible, would it be OK if both sets behave the same with the fire effect? Or should they be different?
p.s. it’s better to discuss this in our Arduino Forum, otherwise the comments in this topic become too much – I took the liberty to start this topic for you question.
Thank you for your reply, if they were the same for a start then I dont think that would matter if I like the effect , I was trying a sort of New Kitt with the flames instead of the chasing lights but you guessed I could get it to work
I posted a code suggestion in this forum topic. Give it a try – it should mimic what you’d like to see – but I’m unable to test this, since I don’t have my hardware with me.
Im back on here as im unable to login on the forum username ap0ll0 password as been sent but unable to get logon
do you know i have been trying on and off for 3 weeks to do what you have just put on the forum yes its working the only problem is the start point for 0 to 99 is starting at 99
I just emailed you a new password – I have no idea why the forum acts up every now and then. Time to start looking for a new forum for WordPress I suppose.
As for being able to do this your self; practice … and believe me, I’m not a great coder either … it just takes a lot of playing with code to get a feel for it.
I want to combine different effects in 1 sketch, but Bouncing Balls effect (that I rly like) is endless. What shall I change in code to limit number of Bouncing Balls cycles?
for (int i = 0 ; i < BallCount ; i++) { setPixel(Position[i],red,green,blue); }
showStrip(); setAll(0,0,0); }
Just a crude example of how we make the infinite look (while(true)) a finite loop.
ps. If you’d like to discuss the code, please consider starting a forum topic in the Arduino Forum. Just to avoid that the comments here become very long.
I’ve been trying to utilize your hint about random numbers in order to run different functions every time I switch on the arduino, but I keep getting error messages. I try to tie if and if else statements to different functions and numbers but I’ve been unsuccessful. Can you please let me know a better way to think about calling random functions?
Hi Hans! Just joining in the chorus of voices expressing gratitude for your tutorial and examples. Thank you for your time and energy. It certainly helps to add light to my day! Keep it up!
A while back I posted about using an RS-422 ic to extend the wiring between and arduino and a strip of addressable LEDs to 1000 feet.
Since then I’ve added remote control using a Sony IR codes, a music interface, and made a high power LED pixel using a WS2811 IC and power Mosfets. I was thinking of making an arduino shield that would contain these features as well as a circuit board to make the high power pixel. I put a video on youtube that shows the music interface in action and the high power pixel thats made up of 3 watt red, green and blue LEDs.
i appreciate you taking the time to upload this, alot of it looks cool, but… i am very much a beginner to this and it looks very unfriendly to me, i have tried with both NeoPixel and FastLED library, and get the same errors no matter what, yet, virtually no explanation on how to fix it :( i get either, NUM_LED not defined or SetAll not defined, and it is frustrating me :(
i have a strong of 50 WS2811 12mm LEDs i want to make use of for christmas :(
I can understand that this might be challenging for beginners, but no worries – I’ll try to help get you started.
First of all, the general idea was to have a few functions available which are defined in this part (FastLED as an example).
#include "FastLED.h" #define NUM_LEDS 60 CRGB leds[NUM_LEDS]; #define PIN 6 void setup() { FastLED.addLeds<WS2811, PIN, GRB>(leds, NUM_LEDS).setCorrection( TypicalLEDStrip ); } // *** REPLACE FROM HERE *** void loop() { // ---> here we call the effect function <--- } // ---> here we define the effect function <--- // *** REPLACE TO HERE *** void showStrip() { #ifdef ADAFRUIT_NEOPIXEL_H // NeoPixel strip.show(); #endif #ifndef ADAFRUIT_NEOPIXEL_H // FastLED FastLED.show(); #endif } void setPixel(int Pixel, byte red, byte green, byte blue) { #ifdef ADAFRUIT_NEOPIXEL_H // NeoPixel strip.setPixelColor(Pixel, strip.Color(red, green, blue)); #endif #ifndef ADAFRUIT_NEOPIXEL_H // FastLED leds[Pixel].r = red; leds[Pixel].g = green; leds[Pixel].b = blue; #endif } void setAll(byte red, byte green, byte blue) { for(int i = 0; i < NUM_LEDS; i++ ) { setPixel(i, red, green, blue); } showStrip(); }
Paste this in the Arduino IDE editor.
Now select this section in this code:
// *** REPLACE FROM HERE *** void loop() { // ---> here we call the effect function <--- } // ---> here we define the effect function <--- // *** REPLACE TO HERE ***
and replace it with the function you found with the effect you’d like to use, for example for the FadeInOut effect:
yes, ginormous LED VU meters is something on my to-do list … unfortunately, all the little projects I’m working on plus and my fulltime job do conflict constantly. I actually prefer working on projects here over my actual job, but … my actual job pays the bills
Hey, I’ve been playing around with the Fire code, i’ve been running into problems getting it to start and end within a pixel range. Any idea what I need to change to achieve this? Thanks for all of this has been really helpful!!
In essence you’d need to change the “for” loops in fire() function. For example (untested):
void Fire(int Cooling, int Sparking, int SpeedDelay, int FirstLED, int LastLED) { static byte heat[NUM_LEDS]; int cooldown;
// Step 1. Cool down every cell a little for( int i = FirstLED; i < LastLED; i++) { // <-- Changed cooldown = random(0, ((Cooling * 10) / NUM_LEDS) + 2);
You should open the lightita.ino on the Arduino IDE and the effects.ino should be opened automatically on another tab inside the IDE. The effects.ino file contains all the effects, I separated on two different files to keep things organized.
Although a very cool and fantastically laid out article, I find a lot of the code needlessly complex. To me, the big no no’s in an animation that may have button or other controls include:
Nested loops
Floats
Blocking delays
My other big issue is counting pixels up and down and I’ll use the cylon as an example. Why have all that code to count up and down, when you could just use some basic high school math and use sine waves instead? You could use it to go back and forth, you could use phase shifting and have waves, you could clip it and so on. In addition, with FastLED’s beatsin8() function, you don’t even need delays at all.
thank you very much for your input, and you’re right about the ability to optimize this much more. If I’d be writing this just for me, things would look very different. However … the intend is that everybody (as far as possible) can follow all this just fine, or at least with minimal effort. And yes, there is always room for improvements, and I’m very open to that, so please feel free to post modified sources that have been optimized. I’m confident that certain users will definitely be interested.
Also keep in mind; I’m trying to target everybody and I have found that explaining a sinus to my 11 year old nephew proved challenging, not to mention that quite a few users have no programming background.
I would like to invite you though to post optimized alternatives here – It would be welcome for sure.
Marvelous amount of information – thanks. I’ve bookmarked your site for additional reading.
I am into light painting photography, using tri-color LEDs for years, with a bank of logic switches to control color. Just read a magazine article about Arduino’s and have gone crazy looking for new light patterns and codes. I have a two part question:
First, I want to build several light painting props, where I can turn on a “GO” switch and then select one of the switch positions of a 4 or 5 position switch. Should I go with the “HIGH/LOW” logic or put resistors between the 5 positions and push 0, 1.25, 2.5, 3.75 or 5 volts to the input and do voltage logic?
In either case, what would the: if, then else logic look like, directing the Arduino to run program1 … program5?
I went to the forum and read imdr5534 logic, but that was for a system generated number and not a selected input.
Thank you for the compliment, and … Wow, I had never heard about light painting photography – that looks great!
I’d probably go for using several pins and maybe a rotary switch. You’ll need a wire from GND with a resistor to a pin or several pins (see basic diagram here – you’ll find some basic code there as well on how to read a switch/button state), then a wire for each pin to a switch which shorts to +5V. I’d probably consider using a rotary switch so we do not switch multiple switches at the same time.
Then in code it could look something like this:
if (firstswitch==high) { starteffect1(); } else if (secondswitch==high) { starteffect2(); } ... etc
It could be done more elegant of course, but this would probably be an easy start.
Thanks, That’s the way I was leaning, but with only a few weeks of coding, my first test loop was only working for switch position 1 and 2 and not 3, 4 and 5. It may have been a bread board or jumper wire issue too, now that I think of it. Adafruit has an article on using pixel strips, to paint with, search for: Jabberwock.
I’d go with what feels right for you, especially when you’re just starting with the Arduino. You can always try to find more elegant solutions once you get more experienced with Arduino coding – at least that’s how it works for me. This way I get a better feel for what I’m doing as well …
I’ll take a looksy and see what Jabberwock stuff I can find (some links I found so far: Overview, and this one). So far I like it
Jan 7, 2017 - 8:55 PM - Claire Tompkins Comment Link
Hi, Hans,
You helped me a few years ago with a sketch and now I’m back for more. . I’m making a cloud lamp and I’d like to have a lightning effect inside. I have an Arduino Mega and a short strip of WS2812B NeoPixels. I want the effect to be random, like real lightning. For example, three quick flashes, dark for several seconds, then a slower flash fading up; that kind of thing. I thought I could edit the strobe sketch or the Halloween eyes, but I don’t understand how to use the random function. Would love some help!
Where the first 3 parameters define the color (0xff), The 4th parameter sets the number of flashes (10 flashes), The 5th parameter sets the delay between flashes (50 ms), and finally the 6th parameter determines how long we’d like to wait after the flashes have been done (1000 ms).
So this function is responsible for a one time effect. In the example: 10 white flashes with 50ms pause between each flash, and once done a 1 second delay (1,000 ms = 1 second).
Now, since it’s placed in the “void loop() { … }” this function will be called over and over again, with the same parameters. So just a rinse and repeat of the same effect. To add randomness to this we could modify the function call and use the Arduino “random()” function.
An illustration how we we could use this (can be done much more compact – but this way it’s easier to read and understand):
In the beginning of the sketch, just before the “void setup {” line, define the following variables:
byte red = 0xff; byte green = 0xff; byte blue = 0xff;
int numberOfFlashes; int delayBetweenFlashes; int pauseAfterEffect;
… and change the “void loop() {” to something like this:
void loop() { numberOfFlashes=random(10); // random number between 0 and 10 delayBetweenFlashes=random(100); // random number between 0 and 100 pauseAfterEffect=random(1000); // random number between 0 and 1000 Strobe(red, green, blue, numberOfFlashes, delayBetweenFlashes, pauseAfterEffect); }
Note: the Arduino doesn’t really do random numbers very well, since it always starts with the same “seed”. We can however change the seed by a more random number whenever the sketch starts by adding the “randomSeed()” function to the “void setup() { … }”.
void setup(){ // if analog input pin 0 is unconnected, random analog noise will cause the call to randomSeed() to generate // different seed numbers each time the sketch runs. randomSeed() will then shuffle the random function. randomSeed(analogRead(0)); }
Just an idea to add more randomness to the whole thing: make the color brightness intensity random as well:
void loop() { numberOfFlashes=random(10); // random number between 0 and 10 delayBetweenFlashes=random(100); // random number between 0 and 100 pauseAfterEffect=random(1000); // random number between 0 and 1000 red = random(30, 255); // random number between 30 and 255 Strobe(red, red, red, numberOfFlashes, delayBetweenFlashes, pauseAfterEffect); }
You might notice that I introduced two things here. First of all “random(x);” produces a random number between zero and x. “random(x,y);” generates a random number between x and y. You might want to use that in the other variables as well, to make sure that a minimum delay is observed. The other thing I did is set the color to “red, red, red” – I’m packing a random number between 30 and 255 for the variable red. Since you might want to keep a “white” like color, we would need to have red, green and blue to be the same number. So I’m just recycling the variable for green and blue as well – I hope that doesn’t make it too confusing.
Jan 10, 2017 - 10:03 PM - Claire Tompkins Comment Link
Thanks! But I need some more hand holding, I’m afraid. Are you suggesting editing the Strobe sketch? I added the six suggested lines to the top of the sketch and replaced the void loop section as you wrote. But I don’t know what to do with the other two sections of code, void setup and void loop. Claire
maybe it’s better to start a forum topic – so we can post full size code and such without disrupting the comment section here. I already started a topic here …
FYI, I pulled the code from the Forum page and pasted into the Arduino editing program, made a the changes for NUM_LEDS and PIN and tried to compile it – got a couple of error messages (240 and 300?). Did a re-type of code and still the same error messages and then I stated to look at the “error lines” and found several referenced lines as blank lines, more online searches and found copy/paste can add hidden code. So if the error referenced line 15, I did a control L and enter 15, moved the cursor to the stated of line 16 and hit back space until the cursor was at the last character in line 14, then “enter”, “enter” and that error line disappeared. After doing this several times, the Forum code worked beautifully, so I started to tweak the code for my “Light Painting” sticks.
Could find a place to comment on the Forum page, so I’m doing it here.
You’ll have to register (free) to be able to post comments in the forum. It’s a little inconvenient, I know, but unfortunately a fully open forum invites spammer and script-kiddies to come pollute the forum with none-sense, trolling, advertising, misleading information, etc. — my sincere apologies that I made it that users need to sign up …
Anyhoo; you did indeed catch the issue with the error codes. As mentioned below; copy the code, paste it into Notepad, copy all from Notepad, paste it into your Arduino IDE – this should strip all excessive characters.
Under what operating system did you see this happen and with which browser? (can’t reproduce it with Google Chrome on MacOS)
Hello, i am a beginner with WS2812B LED strips with an Arduino nano and I would like to use the KITT effect. I try to use it but I get an error. Are you able to help me please, thank you. The error message is:Arduino: 1.8.1 (Windows 10), Board: “Arduino Nano, ATmega328”
sketch_jan14c:8: error: stray ‘\302’ in program
 FastLED.addLeds<WS2811, PIN, GRB>(leds, NUM_LEDS).setCorrection( TypicalLEDStrip );
first off the friendly request to post large source codes, logs, or other lengthy outputs in the forum
Coming back to your issue: I suspect you might have copied and pasted the code into the Arduino IDE? The “stray ‘\240′” and “stray ‘302’” refer to characters in your code that may not be visible, but do interfere with the code. I tried finding some reference for you: this is one at Stack Exchange.
Now, what I usually do (I assume you’re working under Windows) is copy code, then paste it into Notepad, select everything in Notepad and copy it again. Now excessive characters are gone … now paste it into your code editor and try again …
I would like to ask you if it is possible (how) to change the colour of the moving strip from red to another colour on the cyclon effect. Also how can I do it so the strips start moving from both sides and bounce like this one but from both sides not just one. So it would look like this:
——–> <——–
<——————>
——–> <——–
Explained:
From both ends the leds will move towards the other side passing each other in the centre (not bouncing apart) then at the ends they bounce back and pas each other again etc.
Thanks, I hope you can help me as that would be amazing (I’m only a beginner so need to learn these codes)
Changing the color of the running LED is easy. You can pass it to the function in the “void()” section. For example:
Red:
CylonBounce(0xff, 0, 0, 4, 10, 50);
Green:
CylonBounce(0, 0xff, 0, 4, 10, 50);
Blue:
CylonBounce(0, 0, 0xff, 4, 10, 50);
The first 3 parameters are hex RGB (red green blue) colors (see also the color picker in this article).
As for your second question; this is kind-a what the New KITT effect does, just a little more elaborate. You’d have to modify this a little bit for the NewKITT() function (so copy the NEW Kitt code and replace the “void NewKITT(…)” function with thsi):
void NewKITT(byte red, byte green, byte blue, int EyeSize, int SpeedDelay, int ReturnDelay){ OutsideToCenter(red, green, blue, EyeSize, SpeedDelay, ReturnDelay); CenterToOutside(red, green, blue, EyeSize, SpeedDelay, ReturnDelay); }
I have not tested any of these, but I’m confident this will do the trick …
That is kind of what I wanted, but I wanted it to not bounce apart in the middle. Like the Cylon but from both sides so it will start on left and right and go to the opposite sides and then bounce at the end of the strip and bounce back again to the opposite sides instead of bouncing in the middle.
I think I know what you might mean haha … so we have 2 “runners”, one starts on the left and bounce on the right, back the to left where it bounces again to the right etc. In the meanwhile the other one does the exact opposite?
We could tweak one or the other function together for that;
void BounceBothWays(byte red, byte green, byte blue, int EyeSize, int SpeedDelay, int ReturnDelay) { for(int i = 0; i < NUM_LEDS-EyeSize-2; i++) { setAll(0,0,0); setPixel(i, red/10, green/10, blue/10);
setPixel(NUM_LEDS-i, red/10, green/10, blue/10); // opposite side
for(int j = 1; j <= EyeSize; j++) { setPixel(i+j, red, green, blue);
setPixel(NUM_LEDS-(i+j), red, green, blue); // opposite side }
setPixel(i+EyeSize+1, red/10, green/10, blue/10);
setPixel(NUM_LEDS-(i+EyeSize+1), red/10, green/10, blue/10); // opposite side
showStrip(); delay(SpeedDelay); } delay(ReturnDelay); }
I have not been able to test this though … but it might get you started. You’d call it in the void loop.
Hi, i need some help. I’m clueless when it comes to programming so I’m kinda lost. I have an issue, whatever is meant to fade out and then in to change, is blinking and changing instead. Is my strip faulty, or am i doing something wrong. Using arduino nano clone and ws2812b 5050 led tape (60 led), Arduino nano, ATmega328
I’d first see if the LED strand test works, just to make sure Arduino, LEDs and powersupply play nice. I have only played with the Uno, and I tend to stay away from clones since they can create all kinds of issues.
Hans, Windows 10 and Microsoft Edge gave me the 302 and 240 error messages. As for the Forum, I thought I was logged in, as it showed my IP address, login name.
Oh boy, yeah … I really cannot recommend Microsoft browsers for any purpose. Rather use something like Google Chrome, Apple Safar, FireFox or Opera.
Thanks for posting this though, since others might run into the same issue!
As for the forum; maybe this is browser related as well – I have not tested Microsoft Edge with my website yet. Would you mind checking again? When logged in, you should see (at the bottom of a topic) a text editor to post replies.
Hello Hans, First, thank you very much for this superb page. (The best on the web ). Difficult to find information on the implementation of “NeoPixel” (Adafruit).
I am a beginner in programming (Arduino IDE) and I realized an e-textile project (ATtiny85 + 1x LED RGB WS2812B) with one of your script (NeoPixel) that works well.
The base comes from: “Blinking Halloween Eyes”. (My script not posted as requested). But I would like to work with 2-3 colors like: “Fade In and Fade Out Your own Color(s)”.
Since “Blinking Halloween Eyes”, so I would like to add 2-3 colors and a Fade-in. (Existing Fade-out). Currently I come back with another color with function: [setAll(0,0,0);]. I want to keep the random side for the whole !
I tried to mix these two scripts unsuccessfully. Can you help me ? Thank you in advance – I would be so happy. (If it’s simpler with the “FastLED” Framework. I can also try).
Greetings from Switzerland PS: My current project uses only one LED RGB, but in the future why not 2-3 LEDs – which would have a different sequence.
First off: thank you for the very nice compliment – that’s always appreciated and definitely a motivator! Thank you so much for observing the code posting request, if you’d like, you can post the code in our Arduino forum.
I’m not sure I understand what you’d like to accomplish though (sorry – it’s early in the morning here so I probably need more coffee) … I guess I’m getting a little confused; do you want a each “eyes” to appear in different colors? Or a different color to fade in/out? And you’re using only one LED? or one LED Strip? Since I’m sure I can help, I did start this forum topic so we can chat about code and how to implement it. (you’d have to register, but it’s free)
I registered yesterday and had the same issue you have. Seems that admins must approve your account before you can post on the forum. I could not create a topic right after registering but this morning it was ok.
I’m sorry to hear you’re running into issues with the forum (I’m getting pretty fed up with the forum software ). Admins do not need to approve your account, but I did notice that on rare occasions a page needs to be reloaded for the text box to appear so you can add or reply to a post.
Please let me know if you run into more issues with the forum – I’m already looking for a replacement forum.
I noticed that sometimes the forum is acting up, so I’m already looking into replacing it with another forum. Occasionally the user has to reload the page to be able to post a new topic or reply to a topic. It’s quite aggravating since I can’t seem to find a fix for it.
Hello Hans, After many tests yesterday – I’m now logged (Yesterday by selecting a link in the history of the browser, I was logged – but only on this page of course – Then by clicking on the link of the other subject I was losing the log-in).
The problem: when you do the log-in, the Menu at the top right is always as if you were not logged in. (You do not see the user – [User Menu]). It seems that at this moment, by making a refresh of page one becomes logged ! Then I repeatedly got the message (Top of Chrome): “WebGL encountered a problem” – [Ignore] [Refresh]. (Never seen this message before with other sites). To be continued…
After log-in according to the trick: refresh the page, I have posted 3 times without success ! The image I wanted to attach was too big !? (Max 4MB). I went from 3.6MB to 1.5MB then 960KB – Every time with the error message (Chrome):
Request Entity Too Large: The requested resource /forums/topic/blinking-halloween-eyes-with-different-colors/ does not allow request data with GET requests, or the amount of data provided in the request exceeds the capacity limit. Additionally, a 413 Request Entity Too Large error was encountered while trying to use an ErrorDocument to handle the request.
I attempted to send the image alone (960KB) with the same error. My Post is now Online – but no picture
Oh wow, I better check my settings then … I did set it to 4Mb max, so the images should have worked, and I have never seen this error message before.
Just verified the settings, both PHP and bbPress are set to 4Mb per file max, and max 4 files per post. I’ll try uploading something myself and see what that does …
Again apologies for the problems you’re running into and thanks for sticking around
I think you saw, I was able to download 2 images (2.7MB and 450KB) without problems. (Chrome Win7Ux64). Your changes seem to be conclusive PS: I can now read: “Your account has the ability to upload any attachment regardless of size and type.”
I wanted to thank you for all these examples, it made me want to have fun with those LEDs. I actually had a DAC project ongoing and I’m using these ideas (and the way they’re coded since I’m in uncharted territory here).
I actually have a problem but since I modified the code to fit my plans I’m going post my code on the forum so anyone can help me understand what’s wrong :D
Thanks again for the ideas and the very well explained code there is on this page, it is very educational.
I registered but couldn’t create topic so I’ll explain my problem here, code is there.
It seems that dutch people inspired me on this project since my DAC board is based on Doede Douma DDDAC with differences on components (all SMD to gain size). an output buffer has been added as well as a FIFO buffer followed by a reclock board.
First, context. I’m making myself a DAC and I was looking into VHDL and PWM for a little while but as I expected, last time I used VHDL was in school more than 10 years ago and I suck a lot at it! I have a bit better knowledge of C.
Back to subject of interest. I found this article which made me hopeful (almost a better man!). My idea of the result goes through phases (I used switch/case ).
1st phase: Start-up lighting to actually signify to user it started. I used fade in/out code, I only modified the brightness increasing with sine wave instead of linear. 2nd phase: RaspberryPi starts and look for a connection to my NAS. I used twinkle effect. 3rd phase: When NAS is found, the RaspberryPi updates its output and my arduino goes back to almost the same fade in/out as in phase 1 except it doesn’t go back to LEDs off but stays to 50% (I don’t want too much light and I like how it looks to go high and a little back down). 4th phase: Steady lighting at defined brightness. If connection to NAS is lost, it goes back to phase 2.
Seems nice but it only half works. phase 1 and 2 works perfectly fine but when I connect my wire to simulate the input from the RaspberryPi it goes crazy. It’s like the switch/case is broken and I have all code executed at the same time and it looks badI could make a video to clear things up if required. I’ve got to mention I don’t arduino but a smaller Adafruit Pro Trinket with 10 LEDs.
I just uploaded, to the Forum, my modified Button Cycle .ino, where every time I press a normally open switch, the sketch jumps to the next loop (case) segment and does a different light pattern sequence. The problem is if I am doing a photography workshop and the people want loop #5 repeated, I have to power down and restart at loop #1, pressing the button time and again until I get to loop #5 (each loop creates a 35 second light show). I have tried to modify that sketch to take a keypad input of 5 to jump to that case (Keypad_Test), but I have two (2) lines that keep giving me error messages. I have re-typed those lines and many other lines above and below the error lines, plus lines in the define section and have cleared many other error messages (I’m using Windows 10) and from previous posts see where I should have possibly saved the code to Notepad and then copied it into IDE. If that is the answer, then so be it, but if I am doing something stupid, then tell me – thanks.
I solved the issue, with the 2 lines of code that were giving me error messages, it seems that “Fat Fingers” had creeped in and I had an extra character in the define line. I now have a working 3 X 4 matrix keypad., where I can press any one of the 12 keys and that case/loop runs. A sample video has been posted on YouTube https://youtu.be/t14OyY58YNY and I’ll post the full code on the Forum page https://www.tweaking4all.com/forums/topic/lightning-effect/
Hans, thanks for the comments, to get me thinking correctly.
Sorry. I now to coding and i am zero. Of course i have a long road to go and for now i m just trying to het the logic. I just want to ask this ; i see j and k and i integers. I didnt get what are these because i dont see that we define these letters as integer names in void setup. Are they predefined in library or what? Thanks. Sorry for my english. I m not native talker. So i guess u also understand why its hard to understand that kind of articles for me.
these variables are defined on the fly. For example:
for(int k = 0; k < 256; k++) { ...
This says: start a loop where we count 0-256, by using the integer variable k. See the “int” in front of it? Here we define “k” as an integer (see also the for-loop section of my mine course).
The definition of variables is done based their scope.
So for example, a variable that needs to be available everywhere, is defined way at the beginning of your code. If the variable is only needed in for example the “setup()” function, then we define it only there, ideally in the beginning of the code. If however, the variable is only need briefly, for example for counting in a loop, then we can choose to define it right there (as seen in the example).
Yes Hans i see int goes for integer but i disnt know we Define k in here. I was thinking we Want k to do something in ur code. So its a Define code, not a Do code. Umm okay. Thanks for ur very fast reply that was so nice of u. I will dig on that in my mind. I m a newbee. Thanks again. I guess i need another article that teachea Coding from zero and the logics of it.
No worries, we all had to start at some point in time … This might be helpful to get started: Arduino Programming for Beginners. I wrote it for those with no programming experience, so maybe it’s helpful for you as well. Enjoy! And feel free to ask question if you have any (either under the related article or in the forum).
Wow. This cant be real. I email and wrote so messages on some websites and i wait for days long but was no reply. And you show me road to start and tell me to feel free to ask if i have some to. My friend i would like to give a handshake to u. I m so happy to hear this friensly sentences from u. I do thank you. Now i have more energy to sit and learn this. (I am web&graphic designer and in love with electronics from childhood times and i want to combine them in my interior design lighting projects). Peace..
I got my Arduino unit mid-November and beat my head against the wall too. My best advise is think of coding as a good book – Introduction, Table of Content and the individual chapter or chapters.
What I wanted to do was create a “Light Painting Stick” for photography, where I could press one of the keys, on a 3 X 4 keypad and have that sub-loop/sketch run. With a few comments from Hans, it all came together for me and if you read the above Feb. 5 post, there is a link to the finished code – enjoy this site.
You’re most welcome – I try to answer as fast as I can … sometimes that’s right away, sometimes it’s a day later (timezone difference and of course sometimes my daytime job interferes ).
i want to make a rainbow code of the color wipe. i mean that the color stable to show out like a rainbow in 16 LED lights. i dont want to make a rainbow run. can u suggest for me? thank you very much.
If I understand correctly, you want LED ‘0’ (first LED) to be red and the last LED to be violet? If so consider defining each of the 16 LED’s like this (you need to enter color code as desired). This is copied from another program, so verbiage may have to be changed to suit. Have to run for an appointment, but will check later today.
If we indeed mean a static rainbow, then that code would work, and I’m sure there would be a smart calculation for it as well but using array like that is easier to understand.
yes, i want LED ‘0’ (first LED) to be red and the last LED to be violet which show out at the same time in 16 LED’s. But the colors are not run in the 16 LED
But the above code, where can i put it?
Otherwise, i want to adjust the code. when i load the program to my arduino, my other function I2C display can not show out out and detect sensor must delay to read the data, can you give me some suggest?
That would work very well of course! Thanks Gbonsack!
Candy; you’ll just have to expand this to 16 LEDs – you can use the color picker and split the hexadecimal number into 3 sections. For example B5FF8A would become (the first parameter – 1 – is the LED number):
strip.setPixelColor(1, 0xB5, 0xFF, 0x8A);
So B5FF8A becomes: B5, FF, and 8A. to let the Arduino know this is not a normal number, but a hexadecimal number, add “0x” (zero-X) in front of each of the numbers (this would save you from having to think too much about hexadecimal number and convert them).
I’m sorry that I had to remove all the code you posted, but this became a little too much for the comment section. Could you place your question in our Arduino forum please? I’d be happy to take a look and see where I can help. But with long codes being posted here, other users would have to scrolls for days to find something.
// *** REPLACE FROM HERE *** void loop() { // ---> here we call the effect function <--- } // ---> here we define the effect function <--- // *** REPLACE TO HERE ***
Your next question is to combine the code with controlling a display and reading sensors. This makes things a little bit more complicated and we’d need to see the code for those peripherals. Since this might become a rather longer topic, I recommend starting a topic in our Arduino Forum.
since I do not see the entire sketch you’re using (and pretty please do not post it here – the forum is the place to post large pieces of code), I can only guess that you didn’t copy the framework. See this section: FastLED Framework.
The idea was to have a framework depending on the library you’d like to use – FastLED (recommended) or NeoPixel. The “framework” is the base for all sketches, and where indicated you have to paste the effect code into this framework code.
I find cutting the output of the LED’s to 25 to 50% gives me better color saturation and doesn’t burn out the video colors.
I now have the 121 keypad code working, as well as the multiple position and pushbutton advance switch code. Thanks again to you Hans, for your direction and tips.
Mar 9, 2017 - 2:19 PM - Ben Linsenmeyer Comment Link
Hi there, I’m very new to all of this. I have completed the strand test and uploaded a couple effects. My question is: if I want to make a standalone strip that cycles through effects with the push of a button, where would I begin? As in, I want to give the whole assembly a power cord, and just use a button to cycle through effects, how would I do so?
cycling through effects has been requested a few times (which makes me want to write an article about it, but simple do not seem to get to actually finding time to do it). A few users have been working on the same question in the Arduino Forum – that would be a great starting point.
Feel free to join a conversation there or post your own question.
Ben, thanks to a few comments from Hans, I have created several different light painting sticks, using the Arduino Uno Board and either a 12 button keypad, a 5 position switch or a normally open push button (9 sub-sketches). Sample video’s can be seem on my YouTube page “Gerald Bonsack”. I have found that as the 9V battery gets weak, the Arduino wants to do it own thing and not follow my written code. I have posted one or two of the .ino files, on the Forum page and will post others, if requested. For the 5 position switch, I have the 10k resistor between the ground and the common connection between the 5V supply and the switch – output from the switch goes to INPUT PINS, on the board. Since I started playing with the Arduino only a couple of months ago, my code my not be pretty, but it works.
Hello! I am trying out these sketches using an Adafruit Trinket as my microcontroller. For some reason, no matter if I try the Neopixel library, or the Fast LED library, all I am getting when I upload any sketch, say the Fire sketch, is just all white LEDs. The Neopixel sketches from Adafruit work fine. Any ideas?
ehm, I’m not familiar with the AdaFruit Trinket. As far as I can read from the specs, there is a 3V and a 5V version – so it might be related to that, since the LEDs might expect 5V for their data, then again, you said that the NeoPixel examples do work.
The next thing might be in the initialization – verify that with the ones used in the NeoPixel examples:
Thanks for the reply. I will say upfront, that I am a Arduino newbie. However, using the code you posted gave me the white LEDs again. I compared that code to a working Neo Pixel sketch, and noticed some differences that pertain to the Trinket. I modified the code with those bits, and now when I run it, all the LEDs go black. Here is the modified code:
#include <Adafruit_NeoPixel.h> #ifdef __AVR__ #include <avr/power.h> #endif #define PIN 0 #define NUM_LEDS 60 // Parameter 1 = number of pixels in strip // Parameter 2 = pin number (most are valid) // Parameter 3 = pixel type flags, add together as needed: // NEO_KHZ800 800 KHz bitstream (most NeoPixel products w/WS2812 LEDs) // NEO_KHZ400 400 KHz (classic 'v1' (not v2) FLORA pixels, WS2811 drivers) // NEO_GRB Pixels are wired for GRB bitstream (most NeoPixel products) // NEO_RGB Pixels are wired for RGB bitstream (v1 FLORA pixels, not v2) Adafruit_NeoPixel strip = Adafruit_NeoPixel(NUM_LEDS, PIN, NEO_GRB + NEO_KHZ800); void setup() { // This is for Trinket 5V 16MHz, you can remove these three lines if you are not using a Trinket #if defined (__AVR_ATtiny85__) if (F_CPU == 16000000) clock_prescale_set(clock_div_1); #endif // End of trinket special code
strip.begin(); strip.show(); // Initialize all pixels to 'off' } // *** REPLACE FROM HERE *** void loop() { // ---> here we call the effect function <--- } // *** REPLACE TO HERE *** void showStrip() { strip.show(); } void setPixel(int Pixel, byte red, byte green, byte blue) { strip.setPixelColor(Pixel, strip.Color(red, green, blue)); } void setAll(byte red, byte green, byte blue) { for(int i = 0; i < NUM_LEDS; i++ ) { setPixel(i, red, green, blue); } showStrip(); }
no worries, we all had to start at some point right? Hey! You caught the same difference I did!
This code would indeed not do much since you didn’t include an effect, but I think you’re getting closer! Replace this code with the effect you’d like to use (unless you already did that):
// *** REPLACE FROM HERE *** void loop() { // ---> here we call the effect function <--- } // *** REPLACE TO HERE ***
#include <Adafruit_NeoPixel.h> #ifdef __AVR__ #include <avr/power.h> #endif #define PIN 0 // Parameter 1 = number of pixels in strip // Parameter 2 = Arduino pin number (most are valid) // Parameter 3 = pixel type flags, add together as needed: // NEO_KHZ800 800 KHz bitstream (most NeoPixel products w/WS2812 LEDs) // NEO_KHZ400 400 KHz (classic 'v1' (not v2) FLORA pixels, WS2811 drivers) // NEO_GRB Pixels are wired for GRB bitstream (most NeoPixel products) // NEO_RGB Pixels are wired for RGB bitstream (v1 FLORA pixels, not v2) // NEO_RGBW Pixels are wired for RGBW bitstream (NeoPixel RGBW products) Adafruit_NeoPixel strip = Adafruit_NeoPixel(60, PIN, NEO_GRB + NEO_KHZ800); // IMPORTANT: To reduce NeoPixel burnout risk, add 1000 uF capacitor across // pixel power leads, add 300 - 500 Ohm resistor on first pixel's data input // and minimize distance between Arduino and first pixel. Avoid connecting // on a live circuit...if you must, connect GND first. void setup() { // This is for Trinket 5V 16MHz, you can remove these three lines if you are not using a Trinket #if defined (__AVR_ATtiny85__) if (F_CPU == 16000000) clock_prescale_set(clock_div_1); #endif // End of trinket special code
strip.begin(); strip.show(); // Initialize all pixels to 'off' } void loop() { // Some example procedures showing how to display to the pixels:
rainbowCycle(5);
}
// Slightly different, this makes the rainbow equally distributed throughout void rainbowCycle(uint8_t wait) { uint16_t i, j; for(j=0; j<256*5; j++) { // 5 cycles of all colors on wheel for(i=0; i< strip.numPixels(); i++) { strip.setPixelColor(i, Wheel(((i * 256 / strip.numPixels()) + j) & 255)); } strip.show(); delay(wait); } }
// Input a value 0 to 255 to get a color value. // The colours are a transition r - g - b - back to r. uint32_t Wheel(byte WheelPos) { WheelPos = 255 - WheelPos; if(WheelPos < 85) { return strip.Color(255 - WheelPos * 3, 0, WheelPos * 3); } if(WheelPos < 170) { WheelPos -= 85; return strip.Color(0, WheelPos * 3, 255 - WheelPos * 3); } WheelPos -= 170; return strip.Color(WheelPos * 3, 255 - WheelPos * 3, 0); }
the only exceptional things I see in this working code is:
#ifdef __AVR__ #include <avr/power.h> #endif
...
#if defined (__AVR_ATtiny85__) if (F_CPU == 16000000) clock_prescale_set(clock_div_1); #endif
I’d assume you have to bring that over to the demo code from this article as well, which would make it like so (note: your code says PIN 0!): (I hope I got all the differences, and this would be the “base” code of course – just didn’t want to post very lengthy code, that would be better in the forum, if we want to continue the topic)
Hope this helps
#include <Adafruit_NeoPixel.h> #ifdef __AVR__ #include <avr/power.h> #endif #define PIN 6 #define NUM_LEDS 60 // Parameter 1 = number of pixels in strip // Parameter 2 = pin number (most are valid) // Parameter 3 = pixel type flags, add together as needed: // NEO_KHZ800 800 KHz bitstream (most NeoPixel products w/WS2812 LEDs) // NEO_KHZ400 400 KHz (classic 'v1' (not v2) FLORA pixels, WS2811 drivers) // NEO_GRB Pixels are wired for GRB bitstream (most NeoPixel products) // NEO_RGB Pixels are wired for RGB bitstream (v1 FLORA pixels, not v2) // Adafruit_NeoPixel strip = Adafruit_NeoPixel(NUM_LEDS, PIN, NEO_GRB + NEO_KHZ800); Adafruit_NeoPixel strip = Adafruit_NeoPixel(60, PIN, NEO_GRB + NEO_KHZ800);
void setup() { // This is for Trinket 5V 16MHz, you can remove these three lines if you are not using a Trinket #if defined (__AVR_ATtiny85__) if (F_CPU == 16000000) clock_prescale_set(clock_div_1); #endif // End of trinket special code strip.begin(); strip.show(); // Initialize all pixels to 'off' }
// *** REPLACE FROM HERE *** void loop() { // ---> here we call the effect function <--- } // ---> here we define the effect function <--- // *** REPLACE TO HERE ***
void showStrip() { #ifdef ADAFRUIT_NEOPIXEL_H // NeoPixel strip.show(); #endif #ifndef ADAFRUIT_NEOPIXEL_H // FastLED FastLED.show(); #endif }
void setPixel(int Pixel, byte red, byte green, byte blue) { #ifdef ADAFRUIT_NEOPIXEL_H // NeoPixel strip.setPixelColor(Pixel, strip.Color(red, green, blue)); #endif #ifndef ADAFRUIT_NEOPIXEL_H // FastLED leds[Pixel].r = red; leds[Pixel].g = green; leds[Pixel].b = blue; #endif }
void setAll(byte red, byte green, byte blue) { for(int i = 0; i < NUM_LEDS; i++ ) { setPixel(i, red, green, blue); } showStrip(); }
Thanks for all the help Hans. I’ll look back into it once I get another Trinket in.
My original intent was to use the Neopixels to fix the lighting in a friends jukebox. Most of the lighting effects on it were made by using fluorescent tubes, and color wheels. The color wheels have long since quit working, and are expensive to replace. I like the fire effect example here, but as I wasn’t able to get it working (yet), so we went with another fire effect I found @ Adafruit. Anyways, the end result looks much better than I anticipated. We ended up using two of the Neopixel rings for the “ends” of the top of the jukeboxe, a strip behind the “compact disc” area, and two strips going verticle up the leg areas (that’s where the fire is). I still think the fire example here will look better, and once I figure it out, I can easily upload it.
Yeah I dabbled for a bit with 3D printers, and have to say that I’m probably not patient/accurate enough to work with 3D printers (LeapFrog) just yet haha … Maybe one of these days I’ll pick it up again.
Well, I ordered a bunch of Nanos, and have been playing around with them. All the sketches work fine in them, so I think I’ll use the Trinket for something else. I appreciate everyone’s help!
One last tweak needed to get the lights to run in reverse, setting the Position to the end and decreasing it:
void RunningLights(byte red, byte green, byte blue, int WaveDelay) {
int Position=NUM_LEDS; // this also needs to start high and decrease
for(int j=(NUM_LEDS*2)-1; j>=0; j--) // this may work
{
Position--; // = 0; //Position + Rate; // use -- to decrease the position instead of increase
for(int i=NUM_LEDS-1; i>=0; i--) { // and here
setPixel(i,((sin(i+Position) * 127 + 128)/255)*red,
((sin(i+Position) * 127 + 128)/255)*green,
((sin(i+Position) * 127 + 128)/255)*blue);
}
showStrip();
delay(WaveDelay);
}
}
the sin() function is a standard function that comes with the Arduino IDE (link). Since the code looks OK, my first guess would be to update your Arduino IDE to the latest version (link).
I have never worked with that tool, and unfortunately it seems required that one has to signs up. Maybe other users/visitors are familiar with this tool and can assist?
hi im new to coding on Arduino but iv been trying to do the KITT effect (Cylon) for ages and just found this site yesterday iv managed to get it working but not liking the look of the KITT effect when i slow it down, iv set the speed to about “70” as i want it to look like the real KITT car but i can see the LED’s are not fading into the red as its going along.. it looks as if its just turning the led’s on from 0% brightness to 100% also the faded sides of the eye that I’m guessing jumps from 0% to 50% brightness.. so my question is can i make the effect better by fading the LED’s in as they go along.. for example each LED will not jump straight to 100 instead 10% 20% 30% 40% 50% 60% 70% 80% 90% 100% brightness.. any help il be much appreciated.
that would most certainly be possible, maybe we should try to find a video that displays the 100% correct effect. I did play a little with fading (happened to be for a bouncing ball project), and selecting 10, 20,…,90, 100% is a little tricky since brightness does not behave in a linear way with LEDs.
Mar 26, 2017 - 4:42 PM - Moreno Antunes Comment Link
Hello there Hans, and thank you very very much for this guide!
I just started learning how to use the arduino, my idea was to have custom led configs on my pc case for fun, and I found out learning arduino with 2812b leds is a much better way to do this than lets say buying a retail product like NZXT Hue+.
I have a question, I got it all working, but I need a way to either update the arduino data to change effects.
Is there a way to have many effects on the memory and by an USB command change between it? Or perhaps a way to double click a shortcut and it will directly upload a sketch to it?
I used this program (https://github.com/CalcProgrammer1/KeyboardVisualizer) and got it to control the lighting via the COM port in real time, works great based on the music, is there a way to do it to change effects??
Once again, thank you very much for the hard work!!
glad to hear you’re having fun with these LEDs as well. In our Arduino forum, you’ll find a few topics covering the combining of all effects in one sketch. I’m planning on writing a dedicated article for that, but just simply haven’t gotten to it yet.
So, it’s very well possible, just might take some work to get it going …
delay (50); }
// I have never used the brightness function of either NeoPixel or FastLED, so I hope this works. void setBrightness(byte value) { #ifdef ADAFRUIT_NEOPIXEL_H // NeoPixel strip.setBrightness(value); #endif #ifndef ADAFRUIT_NEOPIXEL_H // FastLED FastLED.setBrightness(value); #endif }
This code should replace the following lines in the base code of this article:
// *** REPLACE FROM HERE *** void loop() { // ---> here we call the effect function <--- } // ---> here we define the effect function <--- // *** REPLACE TO HERE ***
Please note that I did not have the opportunity to test this code, please let us know how well this does (or does not) work. Also note that I changed the variable names to make it more readable, and … keep in mind that I might have made typos …
Also keep in mind that the original code only uses 3 LEDs (see comments in the loop() section).
Apr 2, 2017 - 7:58 PM - Jeffrey T Pruitt Comment Link
Thank you thank you thank you!!!!This did exactly what I was looking for, I’m just starting with Arduino, neopixel etc, so I’m still trying to figure out coding things so this is a HUGE help. Thanks again!
it depends on what RGB strips you’re using. The WS2811 and WS2812 are RGB LED strips running on 5V (typically). There are some cheap knock offs that use a different color order (GRB for example), but in essence that works just the same.
I can’t guarantee that. It states it’s RGB, but since sellers post whatever they like, there is no guarantee – one thing I noticed is that these LEDs are 12V, so I would not recommend using them.
I just ordered some strips from AliExpress – I had ordered from this seller before and they work very well. They are also very affordable. See this link.
I always pick the 5 Meter strand with 60 LEDs per meter, with black PCB and IP65 (5M 60 IP65).
The LEDs are waterproof and casted in some kind of solid transparent silicone, which makes it very well protected against dust, water, bugs etc etc. It also makes it look really nice with the black “PCB”. It’s $22.73 for a 5 meter strand – different sizes are available – at the time of this writing.
if each color works, then white would be when all colors are ON. this should work for all types of LED strands. Now if the strand is not really a WS2811, it might become tricky to control the LED colors. Quite a lot of sellers advertise wrong or misleading information. Did you try some test code from the “Controlling LEDs with Arduino” article?
Hi tweaking4all.com. My English translator level is Google, I apologize for the mistakes.
– I googled a lot about LED on WS2812b, and came across your magic site, which helped me a lot in mastering. But I have a few questions, tell or send me to the desired section of your forum. I
downloaded “AllLEDEffects-FastLED” unlocked ALL effects, but in the
case of “Bouncing Balls Multi Color” and just Bouncing Balls it stays on
this effect and that’s it. In the case of “Fire” if something is unlocked in addition to this effect, then “Fire” simply does not play.
Questions: 1. How to remove these shortcomings? 2. How to make a random effect switching time, or every 10 minutes? 3. In the “Bouncing Balls Multi Color” effect, do random colors?
well, I’d start with making those 2 effects work properly. You can create the code from scratch by copying the initial framework, for the library you want to use, and then paste in the effect code.
As for multiple effects in one sketch, consult our Arduino Forum, there are a few topics on this, for example this one, that should help get you started.
hi guys is anyone can help me i jst wanna add two pir sensor with these codes top and bottom im bit confuse with wiring and coding is anyone knows how to do it thx
It is best to start a forum topic in our Arduino forum for this. I monitor this daily, and it would keep off-topic and long source codes away from these comment sections. Do however feel free to post the link to the forum topic here to grab the attention of others.
The project i m working on is stair project one PIR sensor bottom stair and one top so when bottom sensor activate the light start from bottom to top when top sensor activate the light start top to bottom and also how to do the wiring also thx
Could you let me know which Operating System and which browser versions you’re using? I have seen the videos causing issues with old Android devices, but with Windows and Mac I have not seen any issues yet.
If you have an older OS, consider trying Google Chrome.
Hello friends!I
have very little knowledge on the subject but, I would like to join
several of these codes mentioned in several strips of Led, say, 8;Therefore, how can the code be assembled in this way?
I’m a complete novice with Arduino and Neopixels, and by novice I mean I’ve never coded anything before! I’ve picked up some bits and pieces but I’ve found that most tutorials jump through stages without actually explaining the basics, pretty much just copy and paste code which isn’t great for learning! I’ve been attempting the Rainbow Cycle sketch but I get an error message saying the the number of LEDs has not been declared, where do I put this value in the code?
I’m also hoping to loop 5 rainbow cycles and then run a colour wipe through every colour on my RGBW Neopixels before returning to the rainbow cycle, is this possible to run on the Arduino as one sketch?
you’re probably right about the lack of detailed info, since most assume some basic knowledge. Maybe this little intro course is useful, in case you want to dig a little deeper.
As for the number of defined LEDs, the line
#define NUM_LEDS 60
defines the number of LEDs in your strand. You’ll see it in both examples (NeoPixel and FastLED).
Doing 5x rainbow, and then a colour wipe for several colors is most certainly possible.
As you might see; I combined the code of both effects, and call them in the loop(). It does the 5xrainbow, wipe for Red, wipe for Green, wipe for Blue. After it completed that, it will do the loop again, so effectively do 5xRainbow, and 3x wipe.
Keep in mind that the code needs to be pasted in the framework, replacing the text between the lines (maybe you forgot that earlier):
// *** REPLACE FROM HERE ***
and
// *** REPLACE TO HERE ***
If you want to add more colors, you can add a line like this for each color you’d want:
colorWipe(0x00,0xff,0x00, 50); // red, green, blue, here: Green
If you want a ton of colors for the colour wipe, then consider using for-loops (see also the little course). For example:
I’ve been messing about with all of this and I seem to be getting a warning message saying that I have created a compound expression list after dealing with a declaration problem, will this cause any problems with the neopixels? See below;
Users/Daniel/Documents/Arduino/RainbowCycle/RainbowCycle.ino: In function ‘void rainbowCycle(int)’:
/Users/Daniel/Documents/Arduino/RainbowCycle/RainbowCycle.ino:35:40: warning: expression list treated as compound expression in initializer [-fpermissive]
int setPixel(i, *c, *(c+1), *(c+2));
^
/Users/Daniel/Documents/Arduino/RainbowCycle/RainbowCycle.ino: In function ‘void colorWipe(byte, byte, byte, int)’:
/Users/Daniel/Documents/Arduino/RainbowCycle/RainbowCycle.ino:65:38: warning: expression list treated as compound expression in initializer [-fpermissive]
First off, thank you so much for this resource!! So great!
Question: Using the “Fire” code to create a flame inside an outdoor lamp post w/diffuser to simulate a flame. I’d like to change the flame colors to have more orange and less red. Also would like less white and more yellow? Could you recommend changes to the Fire code to modify the output as such?
I have not tested this, but in the last procedure used by the fire code (setPixelHeatColor()), you could play a little with the “Red” value when the pixel colors are calculated, worse thing that can happen is that the colors will be off
void setPixelHeatColor (int Pixel, byte temperature) { // Scale 'heat' down from 0-255 to 0-191 byte t192 = round((temperature/255.0)*191);
// calculate ramp up from byte heatramp = t192 & 0x3F; // 0..63 heatramp <<= 2; // scale up to 0..252
// figure out which third of the spectrum we're in: if( t192 > 0x80) { // hottest // original: setPixel(Pixel, 255, 255, heatramp); setPixel(Pixel, 200, 255, heatramp); // changed res 255 to red 200 } else if( t192 > 0x40 ) { // middle // original: setPixel(Pixel, 255, heatramp, 0); setPixel(Pixel, 200, heatramp, 0); // changed red 255 to red 200 } else { // coolest setPixel(Pixel, heatramp, 0, 0); } }
I am new to this project.I don’t have any idea about coding but i want to run all this code on a neopixel stripe. How to combine all these codes to run in one single sketch.
there have been a few requests for this and some of the users have worked on it in the forum – however, it will take some work and reading to get this done, which might not be the easiest for a beginner.
If users could tell me how they would like to see then, then I’ll try to create code to include all effects. Do we prefer toggling effects with a push button? Or based on a predefined pattern?
thank you for the very nice compliment. It’s very much appreciated and definitely a motivator to keep working on more articles. And the relaxed attitude is what I’m going for. I like to show folks how things can be done, in a fun way. The more folks that participate with the same mindset, the more fun it will be for all of us …
Thank you for sharing your fantastic work. I arrived here after searching or neopixel fire. I wanted to bring a big picture of a rocket to life on my sons wall. I plan on using a shorter strip, so I think with a few little tweaks your code will be work great for me.
I love the other effects too, so I’m going to have to think of where I can use them.
Thank you for taking the time to post a thank-you – it’s very much appreciated. Glad to hear you’re having fun! I guess I should have placed a warning, the darn LED strips can be very addicting!
Hi, and thank you for your examples they really have made it easier for me to get some good effects as I start getting my christmas led displays ready (it’s my first year doing my own). And in response to Daniel and Dhiraj’s question, I have created a single sketch that includes all your examples as their own functions and then call them in the order I prefer in the loop section, I now have my pro-mini running my first example string with hours of different effects before they get repeated. These have saved me a huge amount of time and I can’t praise you enough. Thank You. :)
That’s awesome and thanks for sharing! Feel free to post the sketch if you’re comfortable doing that – once I get the time to play with that, I’ll try to write an article on how to do that and your input would be very welcome.
Here is my sketch that I have been using to get the timings sorted out (Sorry if it is too long), I have had to make a few adjustments to your demos to prevent infinite loop in BouncingBalls and BouncingColoredBalls , which is now simply a for loop which runs the amount of times specified in the extra parameter “timesToRun”. Also there are some short routines that would need a for loop in the main loop to make them run a certain amount of times (like I have done for the Fire function). I also added a colorWipeReverse function which as the name suggests simply goes the other way.
You will notice I have a couple of Serial.print(millis());, one at the beginning of the main loop and one at the end, this is to tell me the timing of each loop as I change settings. I am doing that so that I can set each effect to last X amount of time.
There are a couple of other changes you may find from your examples although I did not make note of what I was changing but I’m sure you will spot them.
I hope this is of some use to others as it is just the beginning of setting my own strings, so not perfect, but usable.
And just a note about hardware, I am using Arduino Uno for testing (as it is easer) and then a pro-mini in the actual project. The led string I am using with these have 3 leds from each ws2811 IC so the 14 pixels listed are actually 42 on the test string, this may make the timings I have used a little more understandable.
void loop(){ Serial.println(millis()); //next two together // byte colors[3][3]={{0xff,0,0},{0xff,0xff,0xff},{0,0,0xff}}; // BouncingColoredBalls(3,colors,1000); // BouncingBalls(0xff,0,0,3,1000); // for(int count=0;count<500;count++){ // Fire(55,120,15); // } // theaterChaseRainbow(100); // theaterChase(0xff,0,0,100); // rainbowCycle(20); //next two together colorWipe(255,0,0,100); colorWipe(0,0,0,100); //next two together colorWipeReverse(0,128,0,100); colorWipeReverse(0,0,0,100); // RunningLights(0,0,128,300); // SnowSparkle(0,0,0,20,random(100,1000)); // Sparkle(random(255),random(255),random(60),200); // TwinkleRandom(20,100,false); // Twinkle(0xff,0,0,20,100,false); // NewKITT(0xff,0,0,1,100,100); // CylonBounce(0xff,0,0,2,100,0); // HalloweenEyes(0xff,0x00,0x00,1,2,true,random(5,50),random(50,150),random(1000,10000)); // Strobe(255,0,0,10,50,1000); // FadeInOut(0xff,0x00,0x00); // red // FadeInOut(0xff,0xff,0xff); // white // FadeInOut(0x00,0x00,0xff); // blue // RGBLoop(); Serial.println(millis()); }
void BouncingColoredBalls(int BallCount, byte colors[][3], int timesToRun) { float Gravity = -9.81; int StartHeight = 1; float Height[BallCount]; float ImpactVelocityStart = sqrt( -2 * Gravity * StartHeight ); float ImpactVelocity[BallCount]; float TimeSinceLastBounce[BallCount]; int Position[BallCount]; long ClockTimeSinceLastBounce[BallCount]; float Dampening[BallCount]; for (int i = 0 ; i < BallCount ; i++) { ClockTimeSinceLastBounce[i] = millis(); Height[i] = StartHeight; Position[i] = 0; ImpactVelocity[i] = ImpactVelocityStart; TimeSinceLastBounce[i] = 0; Dampening[i] = 0.90 - float(i)/pow(BallCount,2); } for (int a = 0;a<timesToRun;a++) { for (int i = 0 ; i < BallCount ; i++) { TimeSinceLastBounce[i] = millis() - ClockTimeSinceLastBounce[i]; Height[i] = 0.5 * Gravity * pow( TimeSinceLastBounce[i]/1000 , 2.0 ) + ImpactVelocity[i] * TimeSinceLastBounce[i]/1000; if ( Height[i] < 0 ) { Height[i] = 0; ImpactVelocity[i] = Dampening[i] * ImpactVelocity[i]; ClockTimeSinceLastBounce[i] = millis(); if ( ImpactVelocity[i] < 0.01 ) { ImpactVelocity[i] = ImpactVelocityStart; } } Position[i] = round( Height[i] * (NUM_LEDS - 1) / StartHeight); } for (int i = 0 ; i < BallCount ; i++) { setPixel(Position[i],colors[i][0],colors[i][1],colors[i][2]); } showStrip(); setAll(0,0,0); } }
void BouncingBalls(byte red, byte green, byte blue, int BallCount, int timesToRun) { float Gravity = -9.81; int StartHeight = 1; float Height[BallCount]; float ImpactVelocityStart = sqrt( -2 * Gravity * StartHeight ); float ImpactVelocity[BallCount]; float TimeSinceLastBounce[BallCount]; int Position[BallCount]; long ClockTimeSinceLastBounce[BallCount]; float Dampening[BallCount]; for (int i = 0 ; i < BallCount ; i++) { ClockTimeSinceLastBounce[i] = millis(); Height[i] = StartHeight; Position[i] = 0; ImpactVelocity[i] = ImpactVelocityStart; TimeSinceLastBounce[i] = 0; Dampening[i] = 0.90 - float(i)/pow(BallCount,2); } for (int a = 0;a<timesToRun;a++) { for (int i = 0 ; i < BallCount ; i++) { TimeSinceLastBounce[i] = millis() - ClockTimeSinceLastBounce[i]; Height[i] = 0.5 * Gravity * pow( TimeSinceLastBounce[i]/1000 , 2.0 ) + ImpactVelocity[i] * TimeSinceLastBounce[i]/1000; if ( Height[i] < 0 ) { Height[i] = 0; ImpactVelocity[i] = Dampening[i] * ImpactVelocity[i]; ClockTimeSinceLastBounce[i] = millis(); if ( ImpactVelocity[i] < 0.01 ) { ImpactVelocity[i] = ImpactVelocityStart; } } Position[i] = round( Height[i] * (NUM_LEDS - 1) / StartHeight); } for (int i = 0 ; i < BallCount ; i++) { setPixel(Position[i],red,green,blue); } showStrip(); setAll(0,0,0); } }
void Fire(int Cooling, int Sparking, int SpeedDelay) { static byte heat[NUM_LEDS]; int cooldown; // Step 1. Cool down every cell a little for( int i = 0; i < NUM_LEDS; i++) { cooldown = random(0, ((Cooling * 10) / NUM_LEDS) + 2); if(cooldown>heat[i]) { heat[i]=0; } else { heat[i]=heat[i]-cooldown; } } // Step 2. Heat from each cell drifts 'up' and diffuses a little for( int k= NUM_LEDS - 1; k >= 2; k--) { heat[k] = (heat[k - 1] + heat[k - 2] + heat[k - 2]) / 3; } // Step 3. Randomly ignite new 'sparks' near the bottom if( random(255) < Sparking ) { int y = random(7); heat[y] = heat[y] + random(160,255); //heat[y] = random(160,255); } // Step 4. Convert heat to LED colors for( int j = 0; j < NUM_LEDS; j++) { setPixelHeatColor(j, heat[j] ); } showStrip(); delay(SpeedDelay); }
void setPixelHeatColor (int Pixel, byte temperature) { // Scale 'heat' down from 0-255 to 0-191 byte t192 = round((temperature/255.0)*191); // calculate ramp up from byte heatramp = t192 & 0x3F; // 0..63 heatramp <<= 2; // scale up to 0..252 // figure out which third of the spectrum we're in: if( t192 > 0x80) { // hottest setPixel(Pixel, 255, 255, heatramp); } else if( t192 > 0x40 ) { // middle setPixel(Pixel, 255, heatramp, 0); } else { // coolest setPixel(Pixel, heatramp, 0, 0); } }
void theaterChaseRainbow(int SpeedDelay) { byte *c; for (int j=57; j < 256; j++) { // cycle all 256 colors in the wheel for (int q=0; q < 3; q++) { for (int i=0; i < NUM_LEDS; i=i+3) { c = Wheel( (i+j) % 255); setPixel(i+q, *c, *(c+1), *(c+2)); //turn every third pixel on } showStrip(); delay(SpeedDelay); for (int i=0; i < NUM_LEDS; i=i+3) { setPixel(i+q, 0,0,0); //turn every third pixel off } } } }
void theaterChase(byte red, byte green, byte blue, int SpeedDelay) { for (int j=0; j<10; j++) { //do 10 cycles of chasing for (int q=0; q < 3; q++) { for (int i=0; i < NUM_LEDS; i=i+3) { setPixel(i+q, red, green, blue); //turn every third pixel on } showStrip(); delay(SpeedDelay); for (int i=0; i < NUM_LEDS; i=i+3) { setPixel(i+q, 0,0,0); //turn every third pixel off } } } }
Thank you Spike, I’m glad you like it, but the thanks should go to Hans as it is 99% his code, I just copy/pasted it all into one sketch ( with a couple of very minor tweaks. )
Thanks for your examples! These were a great inspiration to me.
So now, I want to show a rainbow, but not cycling from right to left or left to right. All 150 LEDs should show the same color value and change the rainbow colors.
The modification for that shouldn’t be too hard. Try something like this:
void rainbowCycle(int SpeedDelay) { byte *c; uint16_t i, j; for(j=0; j<256*5; j++) { // 5 cycles of all colors on wheel c=Wheel(((i * 256 / NUM_LEDS) + j) & 255); // color selection used to be in the "i" loop for(i=0; i< NUM_LEDS; i++) { setPixel(i, *c, *(c+1), *(c+2)); } showStrip(); delay(SpeedDelay); } }
You see the two for loops? The first one cycles colors (j), and the second one addresses each LED (i). Instead of doing a color change for each LED, I moved the color selection out of that loop (i). So it selects a color and then applies it to all LEDs. Now, I did not test this (I’m traveling) so it might need a little tweaking, but it will get you started. If you have a working sketch, then please feel free to post it here.
I have this sketch that is part of a sequence I am testing at the moment, not a finished one but might be useful to you. Obviously you will need to change the settings for your own pixel type and quantity but it works on my test strip. You can change the colour sequence in the sketch in each “colorStep” using RGB values.
void fader(){ for( int colorStep=0; colorStep <= 255; colorStep++ ) { int r = 255; int g = 0; int b = colorStep; for(int x = 0; x < NUM_LEDS; x++){ leds[x] = CRGB(r,g,b); } delay(10); FastLED.show(); } for( int colorStep=255; colorStep >= 0; colorStep-- ) { int r = colorStep; int g = 0; int b = 255; for(int x = 0; x < NUM_LEDS; x++){ leds[x] = CRGB(r,g,b); } delay(10); FastLED.show(); } for( int colorStep=0; colorStep <= 255; colorStep++ ) { int r = 0; int g = colorStep; int b = 255; for(int x = 0; x < NUM_LEDS; x++){ leds[x] = CRGB(r,g,b); } delay(10); FastLED.show(); } for( int colorStep=255; colorStep >= 0; colorStep-- ) { int r = 0; int g = 255; int b = colorStep; for(int x = 0; x < NUM_LEDS; x++){ leds[x] = CRGB(r,g,b); } delay(10); FastLED.show(); } for( int colorStep=0; colorStep <= 255; colorStep++ ) { int r = colorStep; int g = 255; int b = 0; for(int x = 0; x < NUM_LEDS; x++){ leds[x] = CRGB(r,g,b); } delay(10); FastLED.show(); } for( int colorStep=255; colorStep >= 0; colorStep-- ) { int r = 255; int g = colorStep; int b = 0; for(int x = 0; x < NUM_LEDS; x++){ leds[x] = CRGB(r,g,b); } delay(10); FastLED.show(); } }
I see you have used the ws2811 in your sketch, and I’m fairly new at this, so please bear with me.
I’ve been running various test sketches using WS2812 and a 144 pixel strip. Fascinating what can be done with one data wire!
If you have a couple of minutes, could you comment on my question, below?
If I were to change “#define NUM_LEDS 14” to “#define NUM_LEDS 144”, and “LEDS.addLeds<WS2811,DATA_PIN,BRG>(leds,NUM_LEDS);” to the specification line for the WS2812, could I expect the sketch to work?
It will work just fine with the 2812 as well. You are right though that some of the settings need to be modified to match the 2812 and the LED count you’d like to use. The “addLeds” line might not need to be changed, since i seem to have used that as well even though I have a 2812 strip hahah …
Got the sketch working just fine. Now comes the fun of tweaking it!
A question on the lines below:
RunningLights(0,0,128,300);
Strobe(255,0,0,10,50,1000);
FadeInOut(0xff,0x00,0x00); // red
FadeInOut(0xff,0xff,0xff); // white
FadeInOut(0x00,0x00,0xff); // blue
Why do some lines use Hex color designation, and some use the RGB color names? Are they interchangeable, or are there coding reasons why one or the other is used? Thanks.John
Very good question … I guess that is my sloppiness ie. not always working consistently, especially when a project takes several days and effects have been written on different days.
Anyhoo … Decimal numbers and hex numbers are indeed interchangeable.
Just to add that if you copied my sketch there would be some that I have changed as I have got used to using decimals for the brightness level and have changed some of them to make it easier for me to understand.
Multi Color Bouncing Balls Hi !Could show me in the code of “Multi Color Bouncing Balls” how to invert the show. For easy wiring of my strip led , I want that the first led is the number 15 ” Starting led is 15 instead of 0″ Please explain me ! thank a lot !fred
for (int i = 0 ; i < BallCount ; i++) { setPixel((NUM_LEDS - 1) - Position[i],red,green,blue); // <-- changed this line }
showStrip(); setAll(0,0,0); } }
Only one line did get changed, where we simply flip the LED order by subtracting the original position from the total number of LEDs. So position 0 becomes 15-0=15, position 1 becomes 15-1=14, position 2 becomes 15-2=13, etc. The “-1” is added since we count 15 LEDs, but we humans start counting with “1” where as the LED array starts counting with “0”. So the 15th LED actually is position 14 in the LED array in the code.
Glad to hear it worked out for you. Just in case you post a YouTube video or something like that; then please feel free to share the link here as well. Always cool to see what other people do!
I’d play with them and see what the effect is. I’m not quite sure what you mean with desynchronize but I assume you mean: so they don’t look too much alike.
another place to look to make different for each strand: for (int i = 0 ; i < BallCount ; i++) { ClockTimeSinceLastBounce[i] = millis(); Height[i] = StartHeight; Position[i] = 0; ImpactVelocity[i] = ImpactVelocityStart; TimeSinceLastBounce[i] = 0; Dampening[i] = 0.90 - float(i)/pow(BallCount,2); }
You could modify the calculation for “Dampening[i]” … say change 0.90 to 0.50 or 1.0. Either way I have not tested, but you should be able to mimic or trigger different behavior.
Of course the values have to be different per strand, so I’d probably start with testing which gives you the desired effect and the use the value used for that as a parameter to pass to the function.
This way the “gravity” will be slightly different each time the function will be called. I have not tested this, but this is what I’d play with – maybe the notation of the random float can be done better. It basically adds 9 + “a random number between 0…99 divided by 100” (so we get a fraction of “1”) and after that make it a negative number, so that -9.81 is a possible outcome. Or better set -9 … -9.99 is a possible outcome.
I am new to Arduino. I want to add multiple sketch in one . How can I do this. As a Arduino can run only one sketch at a time. If I want to run multiple led function in one sketch then what is the solution for it?
You can only run one sketch on your Arduino at a time. To get the multiple sketches to work, you’ll have to rewrite the code so all of it is in one single sketch. In this case (LED effects) you’ll have to combine them, like for example in this post.
First off, thanks for the really well written and highly nutritive tutorial. I’m using the FadeInOut code broken up into two chunks like below. Curious as to how I can change the speed the leds fade up and down. Very new to Arduino and coding so my attempts experimenting with different values have resulted in undesired results. –E
void FadeIn(byte red, byte green, byte blue){ float r, g, b; for(int k = 0; k < 256; k=k+1) { r = (k/256.0)*red; g = (k/256.0)*green; b = (k/256.0)*blue; setAll(r,g,b); showStrip(); }} void FadeOut(byte red, byte green, byte blue){ float r, g, b; for(int k = 255; k >= 0; k=k-2) { r = (k/256.0)*red; g = (k/256.0)*green; b = (k/256.0)*blue; setAll(r,g,b); showStrip(); }}
first off: thank you very much for the compliment, it’s much appreciated!
As for changing speed, the procedure you use is pretty much at the max of it’s speed. We can delay it though by adding delays in the loops, for example by using the delay() function. Of course it would be nice to be able to pass the “delay” value in the function, so I modified the functions a little bit to accommodate that. The delayvalue is expressed in milliseconds (1 second = 1,000 milliseconds).
void FadeIn(byte red, byte green, byte blue, int delayvalue) // added the delayvalue parameter
{
float r, g, b;
for(int k = 0; k < 256; k=k+1) {
r = (k/256.0)*red;
g = (k/256.0)*green;
b = (k/256.0)*blue;
setAll(r,g,b);
showStrip();
delay(delayvalue); // <-- here we add the delay
}
}
void FadeOut(byte red, byte green, byte blue, int delayvalue) // added the delayvalue parameter
{
float r, g, b;
for(int k = 255; k >= 0; k=k-2) {
r = (k/256.0)*red;
g = (k/256.0)*green;
b = (k/256.0)*blue;
setAll(r,g,b);
showStrip();
delay(delayvalue); // <-- and here again
}
}
So basically when a color changes, we apply (setAll) and show (ShowStrip) it, and right after that we wait an x number of milliseconds.
If I’m understanding correctly that would add a delay between the fade up and fade down. What I would like to do is slow down the time it takes for the Led to go from black to the desired brightness level and correspondingly light to dark. I’m using the code in a motion activated light sensing night light. So, fading on and off slowly is what I’m after.
No this would add a delay between each color “step”, effectively making the transition slower. So FadeIn and FadeOut would be slower, depending on the value you pass for “delayvalue”. Give it a try. DelayValue-0 is the same as the original speed. DelayValue=1000 will make it that the fade will take about 255 seconds (dee the “for” loop).
Tried adding DelayValue=x and got errors. Mind showing how you would use it and why it causes the speed change. Thanks Hans!!
void FadeIn(byte red, byte green, byte blue){ float r, g, b; for(int k = 0; k < 256; k=k+1) { r = (k/256.0)*red; g = (k/256.0)*green; b = (k/256.0)*blue; setAll(r,g,b); showStrip(); } }
Code below where I’m calling FadeIn
void loop() { if (analogRead(lightPin) < threshold && (digitalRead(pirPin) == HIGH)) { if (lockLow) {
//makes sure we wait for a transition to LOW before any further output is made: lockLow = false; Serial.println("---"); Serial.print("motion detected at "); Serial.print(millis() / 1000); Serial.println(" sec"); Serial.println(analogRead(lightPin)); FadeIn(0xff, 0x00, 0x00); //Wait until Serial print work is done before activating strip delay(50); } takeLowTime = true; }
Thanks for your easy to follow no-nonsense explanations, very straightforward to follow.
I want to build some hanging outdoor Christmas decoration with my children (to get them interested in electronics and coding), using either Adafruit DotStar LED strip APA102 144LEDs/m or Adafruit NeoPixel RGBW 144LEDs/m and a 5V DC Trinket Pro (small size, easy to waterproof). I want to drive three two-metre strips independently (same effect, but different velocity/randomness). Does this mean I need three 5V DC PSUs and three Adafruit Trinkets? Or is there an alternative solution to drive three strips independently but from a single larger/more capable microcontroller?
On another note – what is the limit of the length of cable if one wants to keep the microcontroller and the LED strips at a distance, say, four metres?
Thanks for the compliment – it’s much appreciated.
Well, the easiest would indeed be with 3 Trinkets yet. Two major challenges might be, when using just one, are: 1) Addressing the LEDs in 3 blocks, but with some coding tricks that might not be the hardest part. 2) Having the effects on the 3 “strips” behave indecently. Arduino’s are usually not use in a multi-task setup, so they usually do things in sequence. Again, with so code skills you could consider using interrupts, but I’m sure that would make it difficult and possible undermine the enthusiasm of your kids.
As for the length, I assume you mean the wires between Arduino and strip; 4 meters might work just fine. It will be a matter of testing, but I wouldn’t expect any issues.
The PSU and Trinket will go in the enclosure to withstand the winter weather. We can’t wait for the parts to arrive. With the help of your forum here, we hope to get the coding just right.
Sounds like you’re ready for a cool project – your kids will love it! And you’re right, don’t want to make it too complicated, otherwise they’ll loose interest and that would be a shame. Keep us posted on the progress!
I found this page while googling other led animation stuff led animations and thought it would be useful to others to know a way to have their arduino’s use a non-blocking method to display animations. I am using this to allow a button press to change animations (in progress) and so far it looks very promising. I haven’t had time to convert any of your animations yet (but I’m sure to try soon) but I do think it would work with a little tweaking.
Here is a code snippet example showing both ways to code the same display, I’m not sure if either are the best way to do this but it’s code I am trying at the moment.
NON-BLOCKING METHOD
#include<FastLED.h> #define NUM_LEDS 14 int i = 0; CRGBArray<NUM_LEDS> leds;
Both of these move a trail of pixels from outside edge to the middle, but the non-blocking method allows the arduino to do other stuff in between (like checking sensors, reading button presses etc).
Anyway I hope it is useful to someone else and thanks again for the inspiration gained from this site.
That’s a pretty cool project, I’ve bookmarked it for when I get my ESP8266! I’m currently using arduino pro minis for my strings as they are cheap and can control around 600 (ish) pixels depending on the code, but I think the ESP8266 has more possibilities. I might try adjusting your code to see if I can get an Arduino Mega with ethernet board working with it. I like to code in python and think if I get this working it would mean I could use some scripting to get all the effects I could possibly need (for now anyway :) ) Thanks for posting this.
I’ve been playing around with some different effects for a few strings of NEOPIXELS running on an Arduino Pro Mini and have found that theatreChaseRainbow function will prevent any further effects being displayed. I have adjusted my effects to put this one last and it works for now but I must put it last in the list and have also noticed that the millis() count is reset to Zero after this effect finishes. I don’t know if this is possibly a memory limit reached causing a reset or something like that but thought I would post in case somebody had noticed (and maybe fixed) it.
void theaterChaseRainbow(int SpeedDelay) { byte *c; for (int j=0; j < 256; j++) { // cycle all 256 colors in the wheel for (int q=0; q < 3; q++) { for (int i=0; i < NUM_LEDS; i=i+3) { c = Wheel( (i+j) % 255); setPixel(i+q, *c, *(c+1), *(c+2)); //turn every third pixel on } showStrip(); delay(SpeedDelay); for (int i=0; i < NUM_LEDS; i=i+3) { setPixel(i+q, 0,0,0); //turn every third pixel off } } } }
void Sparkle(byte red, byte green, byte blue, int SpeedDelay) { int Pixel = random(NUM_LEDS); setPixel(Pixel,red,green,blue); showStrip(); delay(SpeedDelay); setPixel(Pixel,0,0,0); }
void FadeInOut(byte red, byte green, byte blue, int timer){ float r, g, b; for(int k = 0; k < 256; k=k+1) { r = (k/256.0)*red; g = (k/256.0)*green; b = (k/256.0)*blue; setAll(r,g,b); showStrip(); delay(timer); } for(int k = 255; k >= 0; k=k-2) { r = (k/256.0)*red; g = (k/256.0)*green; b = (k/256.0)*blue; setAll(r,g,b); showStrip(); delay(timer); } }
If I comment out the theatreChaseRainbow effect then the millis() count is normal (keeps adding after each cycle). Any body have any ideas?
Also what I haven’t shown here is if you put the theatreChaseRainbow in the middle of the list it will display the effects before it but then resets after it and the following effects do not show (it starts from the beginning again without completing the main loop)
I couldn’t find anything weird that might trigger these issues. millis() will not reset until it has run for about 50 days (according to the documentation). Resetting the clock used by millis() isn’t even that easy (see this post).
So now I’m left guess, and what might do the trick is where you use “NUM_LEDS”, and use “NUM_LEDS-1” instead, so try the theaterChaseRainbow with this code (I changed 2 lines):
for (int j=0; j < 256; j++) { // cycle all 256 colors in the wheel for (int q=0; q < 3; q++) { for (int i=0; i < NUM_LEDS-1; i=i+3) { // <-- change here c = Wheel( (i+j) % 255); setPixel(i+q, *c, *(c+1), *(c+2)); //turn every third pixel on } showStrip();
delay(SpeedDelay);
for (int i=0; i < NUM_LEDS-1; i=i+3) { // <-- change here setPixel(i+q, 0,0,0); //turn every third pixel off } } } }
Maybe not exactly the correct programmers way to do this, but worth a test.
Thank you Hans, that has worked on a small test with only three effects, but when i put the full script in place it seems to go back to previous behaviour (resetting the millis count and starting from the beginning…) I am guessing at this point that there would be a memory full error which might cause a reset because it is not happening when I use less effects, but thank you for trying and I might have to reduce the number of effects for these strings or I might use another method to get similar effect.
Yes, I think it is a simple out of memory error, and thanks to your link I may be able to fix it using PROGMEM for some fixed variables, although I will have to come back to it when I’ve finished a few other bits .
I did try with theaterChase Rainbow at the beginning and the results are the same, that is, if I only have one (or maybe two) other effects it works as expected, but if I have more effects (and the associated Serial.print statements that I’m using for tests) then theaterChaseRainbow will trigger a restart (not directly but because of the memory issue). So I’m sure that it can be overcome with a little coding change on my part.
Thanks for the great help and advice, it is much appreciated
I thought I had better post the solution to my particular problem in case it might be of use to others with a similar issue, I decided to try and “shorten” or “shrinkify” the theaterChaseRainbow sketch and this is what I ended up with :-
void theaterChaseRainbow(int SpeedDelay) { for (int j=0; j<256; j++) { for (int q=0; q<3; q++) { for (int i=2; i<NUM_LEDS-2; i=i+3) { c = Wheel(j); setPixel(i+q, *c, *(c+1), *(c+2)); } showStrip(); fadeall(15); delay(SpeedDelay); } } }
This makes use of the fadeall function I am using in another sketch to turn off the lights after they have been displayed, it can be set differently to have the lights go off almost immediately to make the pattern more like the original one you (Hans) posted.
Anyway, everything is working as it should and I am again a happy bunny
We got our setup (Pro Trinket 5V and APA102C 144 LEDs/m strip) working and are now wondering how we could achieve something along the monochromatic/polychromatic “twinkle” or “sparkle” effects shown above, but more subtle and continuous, also taking into account that the brightness of LEDs should fade in/out sinusoidal or, rather, logarithmic (human brightness perception)? Here’s one code-less example of “random twinkling” that shows what we’re after… do you have some ideas how that could be done? Thanks for some hints!
As for the desired effect; I like the idea, but I have not code readily available to do this. i’d have to sit down and set everything up to do some testing to see what works best. Unfortunately, I do not have my gear readily available so it would take quite some time before I’d have code available …
You could try this sketch I think it goes some way towards what you want, it uses the TwinkleRandom sketch with some minor modifications, you can enter the fade speed using the extra parameter I added. You will probably need a longer fade value for longer strings as I have only been using this on a 14 pixel string at the moment. Also this doesn’t fade pixels in but does fade them out. Hope this helps towards finding something useful.
after going through the FastLED 3.1 codebase on Github, I found a good solution, which is nicely twinkling, glittering or sparkling; maybe useful for others, too.
/* * * Glitter adapted from Mark Kriegsman's FastLED demo reel * */
#include "FastLED.h"
#define LED_DATA 3 // Data pin #define LED_CLOCK 4 // Clock pin #define COLOR_ORDER BGR // GRB for WS2812 and BGR for APA102 #define LED_TYPE APA102 // Using APA102, WS2812, WS2801 - don't forget to adapt "LEDS.addLeds..." #define NUM_LEDS 144uint8_t max_bright = 231; // Overall brightness definition struct CRGB leds[NUM_LEDS]; // Initialize LED array
void setup() {
delay(1000); // Soft start
LEDS.addLeds<LED_TYPE, LED_DATA, LED_CLOCK, COLOR_ORDER>(leds, NUM_LEDS); // For WS2801 or APA102
FastLED.setBrightness(max_bright);
}
void loop() { fadeToBlackBy( leds, NUM_LEDS, 1); //third variable determines how quickly the LEDs fade addGlitter(32); //changing this variable will increase the chance of a new "star" popping up FastLED.show();
#include "FastLED.h" // FastLED library. Please use the latest version
// Fixed definitions. Cannot be changed interactively #define LED_DATA 3 // Data pin #define LED_CLOCK 4 // Clock pin #define COLOR_ORDER BGR // GRB for WS2812 and BGR for APA102 #define LED_TYPE APA102 // Using APA102, WS2812, WS2801 - don't forget to change LEDS.addLeds #define NUM_LEDS 144 // Number of LEDs
// Global variables. Can be changed interactively uint8_t max_bright = 128; // Overall brightness uint8_t hue = 0;
struct CRGB leds[NUM_LEDS]; // Initialise LED array
void setup() {
delay(1000);
LEDS.addLeds<LED_TYPE, LED_DATA, LED_CLOCK, COLOR_ORDER>(leds, NUM_LEDS); // For WS2801 or APA102
FastLED.setBrightness(max_bright);
}
void loop() { fadeToBlackBy( leds, NUM_LEDS, 1); // Third variable determines how quickly the LEDs fade addGlitter(37); // Changing the number will increase the chance of a "star" popping up FastLED.show();
}
void addGlitter( fract8 chanceOfGlitter) { if( random8() < chanceOfGlitter) { //leds[ random16(NUM_LEDS) ] += CRGB::Snow;} // Glitter colour fixed leds[ random16(NUM_LEDS) ] += CHSV(random8(192,255), 255, random8(64,255));} // Glitter colour hue and brightness randomised in a range }
As for the “while(true)” – this keeps the loop going until the end of time (unless power gets disrupted of course. I did this to avoid having to look for an elegant exit. To change that you’d have to change the while-loop.
while (true) { for (int i = 0 ; i < BallCount ; i++) { TimeSinceLastBounce[i] = millis() - ClockTimeSinceLastBounce[i]; Height[i] = 0.5 * Gravity * pow( TimeSinceLastBounce[i]/1000 , 2.0 ) + ImpactVelocity[i] * TimeSinceLastBounce[i]/1000;
for (int i = 0 ; i < BallCount ; i++) { setPixel(Position[i],red,green,blue); }
showStrip(); setAll(0,0,0); }
This will make the balls do 100 “steps”. To make it more elegant, untested though, you could try to make the balls stop once they do not bounce beyond a certain height;
boolean started=false; // to avoid that we stop too early
boolean canstop=false; // once this is true, and started=true, we can stop and exit the loop
while (!canstop) { // while not canstop for (int i = 0 ; i < BallCount ; i++) { TimeSinceLastBounce[i] = millis() - ClockTimeSinceLastBounce[i]; Height[i] = 0.5 * Gravity * pow( TimeSinceLastBounce[i]/1000 , 2.0 ) + ImpactVelocity[i] * TimeSinceLastBounce[i]/1000;
for (int i = 0 ; i < BallCount ; i++) { setPixel(Position[i],red,green,blue);
started = started || Position[i]>4; // arbitrary number (4) - depends a little on the length of your LED strip
canstop = (Position[i]<3) && started; // did we start? and did a ball go below 2? Then we exit the loop }
showStrip(); setAll(0,0,0); }
The idea being; if one of the balls has passed a position higher than LED #4 then we set “started” to true (meaning; we can now start looking for when a ball goes below LED #3). “canstop” will become true when “started” is true AND we found a ball below LED #3. Again the numbers 3 and 4 are arbitrary chosen, you’ll have to play with that to see what value works for you.
Hope this will get you started – feel free to ask questions and/or share your findings.
//Your code: //started=started||Position[i]>4; //arbitrary number(4), depends on the length of the LED strip //canstop=(Position[i]<3)&&started; //did we start? and did a ball go below 2? Then we exit the loop
//My Idee (not working): unsigned long curMillis=millis(); if(Position[i]==0 && curMillis - prevMillis > 500) {canstop=true;} prevMillis=curMillis; }
Awesome fix Daniel – can’t believe I totally overlooked that one.
Yeah with multiple balls you’ll have a challenge. Maybe it would be good (with 3 balls) that a ball stops bouncing once it’s done with it’s bounce(s), until all balls are done.
for (int i = 0 ; i < BallCount ; i++) {
canstop = true; // start with assuming none of the balls are bouncing
if(ImpactVelocity[i] > 0) { // changes here
setPixel(Position[i],colors[i][0],colors[i][1],colors[i][2]);
canstop = false; // still ate least one ball bouncing, so do not stop
} }
showStrip(); setAll(0,0,0); }
Since ImpactVelocity will never be below 0, we could abuse that – set it to -1 when the bounce is done. Not sure what the impact will be of not setting the ball … but I figured it may remain “at the bottom”? Again; untested, but maybe it’s helpful …
Good morning! Thanks a lot for this awesome and helpful site. The toilet paper hack is my favourite
I used your code for my attiny85 with a WS2812 strip. A motion sensor turns the effect on and off after a short delay. Now here comes my question and it would be great if you could help me, because I want to use this for an infinity mirror as a christmas present!
Question: Do you have an idea how to go through all effects instead of repeating only one? So, whenever the sensor detects a new motion, he does not show the previous effect but a new one. Do you think this is possible?
Thank you very much for your answer! It worked out and my parents-in-law were very happy about their present. I used it for an infinity mirror with a motion sensor and two magnetic key holders. It was fun doing the project, so thanks for your help and sharing for knowledge
The next one will be better, but this was very good to learn all the differents tasks from cutting ikea mirrors to coding the neopixels! Thanks to your great descriptions, videos and explanations
Thanks for the YouTube links,… and thanks for keeping traffic on my website going, it’s very much appreciated.
As for the code for the meteor rain; I’ll have to do some tinkering – mostly finding my Arduino and LED strips. It doesn’t look like this would be super complicated though. I’ll try to make some time this week to write some code for this, and maybe combine that with some extras to cycle through all the effects mentioned in this post. Might take a little though,…
I hope you like this one; it’s currently only for one strip though.
The function meteorRain takes 6 parameters:
For the color of the meteor: red, green, blue
– meteorSize: size of the meteor (including trail)
– meteorIntensity: intensity of the trail, or how fast the trail fades (1=fast fade, 10=slow fade)
– speedDelay: how fast the meteor moves by setting a delay value (so higher value = slower)
I have the meteor fade all the way, so even if the meteor is out of sight (past the end of the strip) then the trail will keep going until it’s totally gone.
// *** REPLACE FROM HERE *** void loop() { meteorRain(0xff,0xff,0xff,40,5,20); }
void meteorRain(byte red, byte green, byte blue, byte meteorSize, byte meteorIntensity, int SpeedDelay) {
showStrip(); delay(SpeedDelay); } } // *** REPLACE TO HERE ***
Give it a shot an see what you think. I’m sure there is room for improvement (for example; dividing colors to mimic a fade is OK but can be done better). I did try this with a 60 LED strip and looked pretty good. Then again; I never payed much attention to the meteor rain effect in the past.
Let me know what you think, and if it’s worthy I’ll add it to the list above – if not, then we’ll do some tweaking …
hans
Dec 28, 2017 - 7:27 AM - Henrik Lauridsen Comment Link
Hi Hans,
Thank you very much for your time and solution. Its looking good and in my opinion absolutely worthy to join the list above.
Of course it would be great with an option to support more strip syncron or asyncron and a wait state before the meteor started all over.
Again thank you and please keep up the good work, Henrik
here’s one with a sparkling and adjustable length trail. Colour can be fixed or change, too. Happy Easter!
#include "FastLED.h" // FastLED library. Please use the latest version
// Fixed definitions. Cannot be changed interactively #define LED_DATA 3 // Data pin #define LED_CLOCK 4 // Clock pin #define COLOR_ORDER BGR // GRB for WS2812 and BGR for APA102 #define LED_TYPE APA102 // Using APA102, WS2812, WS2801 - don't forget to change LEDS.addLeds #define NUM_LEDS 234 // Number of LEDs set higher than strip length to have trail vanish fully
int head_led = 0;
// Global variables. Can be changed interactively uint8_t max_bright = 32; // Overall brightness uint8_t tHue = 0; // the trail's hue starting point; set also if no hue change desired struct CRGB leds[NUM_LEDS]; // Initialise LED array
void setup() {
delay(1000);
LEDS.addLeds<LED_TYPE, LED_DATA, LED_CLOCK, COLOR_ORDER>(leds, NUM_LEDS); // For WS2801 or APA102
FastLED.setBrightness(max_bright);
}
void loop() {
//EVERY_N_SECONDS(2) { tHue = tHue + 3; } // uncomment to shift hue periodically by a certain amount EVERY_N_MILLISECONDS(24)
Glad you liked it. As for your suggestion; Hey, it wouldn’t be fun if we couldn’t improve this right? The option to add more strips would of course be great, but that would no longer fit this “generic” approach I’m afraid.
Since I love playing with LED strips, a variant that might be better;
This one only works with FastLED since NeoPixel has no function to fade LEDs (by my knowledge).
I’ve added a few options like the size of the meteor (excl. tail), how fast the tail decays, if the tail LEDs should decay at random (leaving little pieces that decay less fast). Play a little with the values and to add randomness – play with random values as well.
As for a random start when using multiple Arduino’s and/or strands; you could do a “delay(random(12345));” before the meteorRain() call. You’d probably need to set randomSeed() in the setup function, for example:
void setup(){ ... randomSeed(analogRead(0)); }
// *** REPLACE FROM HERE *** void loop() { meteorRain(0xff,0xff,0xff,10, 64, true, 30); } void meteorRain(byte red, byte green, byte blue, byte meteorSize, byte meteorTrailDecay, boolean meteorRandomDecay, int SpeedDelay) { // red/green/blue = meteor color // meteorSize = #LEDs for the meteor (main part, excluding the trail) // meteorTrailDecay = fading speed of the trail. 64 = dim by 25% (64/256ths); lower number = longer tail // meteorRandomDecay = true of false. False = smooth tail, true = tail that breaks up in pieces // SpeedDelay = pause in ms after drawing a cycle - lower number = faster meteor
setAll(0,0,0);
for(int i = 0; i < NUM_LEDS+NUM_LEDS; i++) { // fade brightness all LEDs one step for(int j=0; j<NUM_LEDS; j++) { if( (!meteorRandomDecay) || (random(10)>5) ) { leds[j].fadeToBlackBy( meteorTrailDecay ); } }
Got it to work for NeoPixel as well … so I’ll add it to the article;
// *** REPLACE FROM HERE *** void loop() { meteorRain(0xff,0,0,10, 64, false, 30); } void meteorRain(byte red, byte green, byte blue, byte meteorSize, byte meteorTrailDecay, boolean meteorRandomDecay, int SpeedDelay) { // red/green/blue = meteor color // meteorSize = #LEDs for the meteor (main part, excluding the trail) // meteorTrailDecay = fading speed of the trail. 64 = dim by 25% (64/256ths); lower number = longer tail // meteorRandomDecay = true of false. False = smooth tail, true = tail that breaks up in pieces // SpeedDelay = pause in ms after drawing a cycle - lower number = faster meteor
Unfortunately, it would not fit in the “generic” approach of this article, but for those who are looking for this effect: highly recommend trying this one!
Finally found the time to combine all sketches into one single sketch. I’ve created it such a way that you can toggle effect (fast!) with a single button.
Hi Hans. I am incredibly grateful for the code and help you’ve added with this post. So very much appreciated. Is there any way to learn the language you’ve used to program these sketches?
Don’t be afraid to ask if you have questions … we are all beginners at some point, and I’m 100% sure there are better programmers than me out there that can teach me a few things as well.
We can always do what we do better ;). I’m learning from the bottom up and your tutorial is gold for that. I’m also trying to implement the lighting effects into some of my projects at the same time. e.g. https://youtu.be/R-_Mn9t1OoE
Have you ever done a sketch that results in 2 different effects to two different sets of neopixels (of different lengths) at the same time?
I’d like to have the core pulse randomly separate to the circle that I want a superfast spinning effect on.
That’s a cool project, which initially (since I forgot to read the “Iron man” text) made me think of a LED ring around a speaker responding to music. Anyhoo – both fun projects!
I have not played with multiple strips yet – I’ve always used math to set the LEDs so it looks like 2 strands. FastLED however does support multiple strands, but I can imagine it to be challenging to have 2 or more effects to run in parallel. I’m thinking about timing issues and such.
I guess I would start using 2 Arduino’s for that – to get max speed as well.
Then again, if you’d make one procedure handling the spinning – just 1 step, and another one doing just one step of the other effect, and then call them in a certain sequence in loop(); might work.
in my practical experience, 300 x 20mA would work or is at least worth a test. This works since not all LEDs are on and at max brightness all the time for a long period of time. Which would suggest a 6A power supply could pull this off.
If you’d like to use individual PSU’s, then your approach looks good; common GND, Vcc for each strip.
However if all strips have a common data pin 6, then they most likely all will display the exact same effect. Not sure if that’s what you had in mind.
If this is NOT what you had in mind then connect the Din of the first strip to Pin 6 of the Arduino. At the end of the first strip you’ll find a Dout pin (follow the arrows) which can be connected to Din of the second strip, and so on, daisy chaining the strips. Power still can still be done per individual LED strip.
Jan 26, 2018 - 9:52 AM - Henrik Lauridsen Comment Link
Hi Hans,
Thank you for your reply.
If this is NOT what you had in mind then connect the Din of the first strip to Pin 6 of the Arduino. At the end of the first strip you’ll find a Dout pin (follow the arrows) which can be connected to Din of the second strip, and so on, daisy chaining the strips. Power still can still be done per individual LED strip.
Just adding my contribution. The enclosed sketch is based on the Hero Powerplant sketch done my Tony Sherwood for Adafruit Industries.
I modified it to allow for 2 sets of Neopixels (1 for the circle – RGBW and another for the core RGB) with different colors running off different pins.
Feb 8, 2018 - 5:20 PM - Sharon Noordermeer Comment Link
Hello! You have a great website, very fascinating stuff on here! I am an art student looking to do a sculpture project involving light, and I am stuck because I am using Adadfruit’s drum sound sensor code. Of course, all it is is a sound reactive digital 30 Neopixel light using GEMMA MO and Electret Microphone amplifier. I am using varying pixels because they will be wrapped around trees like belts, and whenever someone speaks, it should light up. Problem is I do not want simple bars and rainbow lighting as the code is given, I want something like your last demo the Meteor light or something simpler like a trail of light across the strip. Could you help me customize this code? The project is due next Wednesday (Valentine’s day).
* LED “Color Organ” for Adafruit Trinket and NeoPixel LEDs.
Hardware requirements:
– Adafruit Trinket or Gemma mini microcontroller (ATTiny85).
– Adafruit Electret Microphone Amplifier (ID: 1063)
– Several Neopixels, you can mix and match
o Adafruit Flora RGB Smart Pixels (ID: 1260)
o Adafruit NeoPixel Digital LED strip (ID: 1138)
o Adafruit Neopixel Ring (ID: 1463)
Connections:
– 5 V to mic amp +
– GND to mic amp –
– Analog pinto microphone output (configurable below)
– Digital pin to LED data input (configurable below)
Written by Adafruit Industries. Distributed under the BSD license.
This paragraph must be included in any redistribution.
*/
#include <Adafruit_NeoPixel.h>
#define N_PIXELS 27 // Number of pixels you are using
#define MIC_PIN A1 // Microphone is attached to Trinket GPIO #2/Gemma D2 (A1)
#define LED_PIN 0 // NeoPixel LED strand is connected to GPIO #0 / D0
#define DC_OFFSET 0 // DC offset in mic signal – if unusure, leave 0
#define NOISE 100 // Noise/hum/interference in mic signal
#define SAMPLES 60 // Length of buffer for dynamic level adjustment
#define TOP (N_PIXELS +1) // Allow dot to go slightly off scale
// Comment out the next line if you do not want brightness control or have a Gemma
//#define POT_PIN 3 // if defined, a potentiometer is on GPIO #3 (A3, Trinket only)
byte
peak = 0, // Used for falling dot
dotCount = 0, // Frame counter for delaying dot-falling speed
volCount = 0; // Frame counter for storing past volume data
int
vol[SAMPLES], // Collection of prior volume samples
lvl = 10, // Current “dampened” audio level
minLvlAvg = 0, // For dynamic adjustment of graph low & high
maxLvlAvg = 512;
// if POT_PIN is defined, we have a potentiometer on GPIO #3 on a Trinket
// (Gemma doesn’t have this pin)
uint8_t bright = 255;
#ifdef POT_PIN
bright = analogRead(POT_PIN); // Read pin (0-255) (adjust potentiometer
// to give 0 to Vcc volts
#endif
strip.setBrightness(bright); // Set LED brightness (if POT_PIN at top
// define commented out, will be full)
// Color pixels based on rainbow gradient
for(i=0; i<N_PIXELS; i++) {
if(i >= height)
strip.setPixelColor(i, 0, 0, 0);
else
strip.setPixelColor(i,Wheel(map(i,0,strip.numPixels()-1,30,150)));
}
strip.show(); // Update strip
vol[volCount] = n; // Save sample for dynamic leveling
if(++volCount >= SAMPLES) volCount = 0; // Advance/rollover sample counter
// Get volume range of prior frames
minLvl = maxLvl = vol[0];
for(i=1; i<SAMPLES; i++) {
if(vol[i] < minLvl) minLvl = vol[i];
else if(vol[i] > maxLvl) maxLvl = vol[i];
}
// minLvl and maxLvl indicate the volume range over prior frames, used
// for vertically scaling the output graph (so it looks interesting
// regardless of volume level). If they’re too close together though
// (e.g. at very low volume levels) the graph becomes super coarse
// and ‘jumpy’…so keep some minimum distance between them (this
// also lets the graph go to zero when no sound is playing):
if((maxLvl – minLvl) < TOP) maxLvl = minLvl + TOP;
minLvlAvg = (minLvlAvg * 63 + minLvl) >> 6; // Dampen min/max levels
maxLvlAvg = (maxLvlAvg * 63 + maxLvl) >> 6; // (fake rolling average)
}
// Input a value 0 to 255 to get a color value.
// The colors are a transition r – g – b – back to r.
uint32_t Wheel(byte WheelPos) {
if(WheelPos < 85) {
return strip.Color(WheelPos * 3, 255 – WheelPos * 3, 0);
} else if(WheelPos < 170) {
WheelPos -= 85;
return strip.Color(255 – WheelPos * 3, 0, WheelPos * 3);
} else {
WheelPos -= 170;
return strip.Color(0, WheelPos * 3, 255 – WheelPos * 3);
}
}
Thank you so much for putting this lot together an incredible resource. I am trying to work out how to run three of these effects from three different pins. I am building a brain storming hat for a party that has a Cloud which i would like to have the Multi colour sparkle. Then two Tubes with LEDs in that will run the Meteor sequence down to two 16 pixel rings that will Cycle up in colour showing the “charge” in the helmet. I was hoping to add sound and some Other lights in the cloud to strobe to signify Lightning ( but time is not on my side)
. Any help or directions to Previous topics that might help would be greatly appreciated thank you all very much.
I’m learning about arduino for pixels in trying to build a home theater marquee. I’ve used your code example and got a basic marquee chase working but I’m confused one a couple things. I’m not understanding how to set the speed delay. My brain just isn’t processing the code for it.
I’m also trying to figure out how to use multiple pixels as one, like 2 or 3 pixels count as 1 unit with the units chasing.
Lastly, I’ve seen a video on YouTube with someone doing a similar project and he was able to run 4 or 5 different versions of a chase off 1 board, all switched with a simple button press. Any idea how that might work?
apologies for the late response … (I’m in the middle of a move from the US to Europe)
The speed delay basically is the time “consumed” between each step. See it as: LED1 on, wait x milliseconds, LED1 off, LED2 on, wait x milliseconds, LED2 off, LED3 on, wait x milliseconds, etc. The higher the number, the slower the chase will be.
I don’t have my equipment near me (it’s in a big container somewhere on the ocean hahah), but I’d look in this part of the code:
for (int j=0; j < 256; j++) { // cycle all 256 colors in the wheel for (int q=0; q < 3; q++) { // <--- look in this for loop for (int i=0; i < NUM_LEDS; i=i+3) { c = Wheel( (i+j) % 255); setPixel(i+q, *c, *(c+1), *(c+2)); //turn every third pixel on } showStrip();
delay(SpeedDelay);
for (int i=0; i < NUM_LEDS; i=i+3) { setPixel(i+q, 0,0,0); //turn every third pixel off } } } }
I’ve marked the 5th line, in this for-loop you will have to do some coding to make a single LED become “bigger”. While thinking about this, there maybe a more elegant way to do this … I’d probably make a virtual LED array, populate it as done in this code (so instead of “setPixel”). Then call my own procedure that “translates” the virtual LED to a set of 3 LEDs. This does require some extra work of course.
I have yet to experiment with multiple strands on one board. Libraries like FastLED so support this though, but your loop will become a little more complex since you want to effects to work independently. If they do not need to run independently and you’re OK with all strips doing exactly the same thing, then things become more simple: you can connect all LED strips in parallel (so the Din wire of all strips tied together and connected to the same pin on the Arduino).
I may not have been clear in my first post. I understand what a delay is, just not how to read it within this code. The language is very Greek to me. Not trying to become an expert either but tinkering a bit for a couple projects.
I think what I’m trying to achieve is one block of code with 3-5 different chase-style patterns/colors that can easily be changed with the press of an auxiliary button. I do have some chasing EL wire that I need to control as well and if 1 arduino nano can handle both that would be perfect but if I have to use a second controller it’s not a huge deal.
I will tinker some more and ask if I have anymore questions.
Just digging into the project again after having to shelf it for a bit.
I’ve found your posting on combining multiple effects into one string that can then be changed with a SPST switch. Got that working but now Im tweeking the theater chase modes. I’m doing different light timings but still not sure how to adjust the speed delay.
Is it also possible to reverse the direction?
lastly, and maybe this requires all new coding but can the chase be set so all lights are on at a “dim” level and the chase lights are just turned up brighter”.
Any help is appreciated. I unfortunately don’t have the time to invest in learning as much code as possible right now but would like to put some cool lights to good use!
To reverse the TheatreChase, you’ll have to reverse the for-loop, for example, like so:
void theaterChase(byte red, byte green, byte blue, int SpeedDelay) { for (int j=0; j<10; j++) { //do 10 cycles of chasing for (int q=0; q < 3; q++) { for (int i=0; i < NUM_LEDS; i=i+3) { setPixel(NUM_LEDS-i+q, red, green, blue); //turn every third pixel on } showStrip();
delay(SpeedDelay);
for (int i=0; i < NUM_LEDS; i=i+3) { setPixel(NUM_LEDS-i+q, 0,0,0); //turn every third pixel off } } } }
(I have not tested this, but it seemed the easiest fix)
To have the strand have dimmed lights instead of OFF, you could do this:
#define ChaseBaseBrigthness 10
...
void theaterChase(byte red, byte green, byte blue, int SpeedDelay) { for (int j=0; j<10; j++) { //do 10 cycles of chasing for (int q=0; q < 3; q++) { for (int i=0; i < NUM_LEDS; i=i+3) { setPixel(NUM_LEDS-i+q, red, green, blue); //turn every third pixel on } showStrip();
delay(SpeedDelay);
for (int i=0; i < NUM_LEDS; i=i+3) { // 2nd loop!! setPixel(NUM_LEDS-i+q, ChaseBaseBrigthness,ChaseBaseBrigthness,ChaseBaseBrigthness); //turn every third pixel off } } } }
I have not tested this one either (play with the value of ChaseBaseBrightness, and you may have to so a “setAll(ChaseBaseBrigthness,ChaseBaseBrigthness,ChaseBaseBrigthness)” before calling the function.
In the second for-loop you could define a color instead as well (instead of 2xChaseBaseBrigthness). If the dimmed color has to match the red,green,blue, then you may have to do a calculation to determine the dimmer value for red, green and blue.
About ready to put your awesome code into action and your below help got the “always” on function for the theater chase working.
However I’ve not been able to figure out how to possibly reverse the direction of the theater chase. I compared the code you posted to what I had but didn’t see any differences that changed the actions.
I’m actually working with your full sketch of all functions and picking out the ones that work best for my set-up. I have the button working to change functions but I’m curious if a second button can be added to go backwards through the list?
And I am also hoping to be able to reverse the direction of the RunningLights as until my project is fully built I’m not sure what will look best and currently the Theater Chase runs one direction and the Running Lights go the other!
Sorry for the late reply; it took me a little bit to catch up again
Basically what you’d want to do, is have the for-loop count in the opposite direction. Either by reversing the loop, or by calculating the LED pixel at ShowPixel(). Maybe I’m not awake enough yet … let me try again – I do not have any hardware near by to test.
void theaterChase(byte red, byte green, byte blue, int SpeedDelay) { for (int j=0; j<10; j++) { //do 10 cycles of chasing for (int q=2; q >= 0; q--) { // I think this may give the reverse look for (int i=0; i < NUM_LEDS; i=i+3) { setPixel(i+q, red, green, blue); //turn every third pixel on } showStrip();
delay(SpeedDelay);
for (int i=0; i < NUM_LEDS; i=i+3) { setPixel(i+q, 0,0,0); //turn every third pixel off } } } }
For RunningLights you could try this;
void RunningLights(byte red, byte green, byte blue, int WaveDelay) { int Position=0;
for(int j=(NUM_LEDS*2)-1; j>=0; j--) // this may work { Position++; // = 0; //Position + Rate; for(int i=NUM_LEDS-1; i>=0; i--) { // and here setPixel(i,((sin(i+Position) * 127 + 128)/255)*red, ((sin(i+Position) * 127 + 128)/255)*green, ((sin(i+Position) * 127 + 128)/255)*blue); }
showStrip(); delay(WaveDelay); } }
Apologies if this doesn’t work out right away – after doing so much work on ApplePi-Baker (one of my projects) I’m experiencing a little brain-fog
As always, thanks for taking the time to look into this. I will give your code examples a shot.
I was hoping to be able to program the Arduino with a few functions, firstly controlling the LEDs but secondly to control an IR LED performing a few functions of a TV remote. Basically upon powering on, having the Arduino send a Power On signal to the TV and possibly upon main losing power having enough charge built up in a capacitor to fire off a Power Off signal to the TV. I wanted to integrate a 3×4 Matrix keypad in to be able to select the lighting sequences and use a few other commands for the TV like volume and input. I’ve tried asking for some help elsewhere but it seems there’s a lot of expectation for people to learn full programming languages when they only want to figure out a few small things so I very much appreciate that you took the time to write your code and tutorials and continue to provide support to us who keep asking for help.
Sounds like an interesting project you’re working on!
Sending IR to your TV at startup should not be a big problem (I’ve never done it though). Sending a signal on power loss could be a little more challenging, since the Arduino would need to somehow detect the power loss. I can come up with a few solutions to consider, but I would need to know more about the setup. For example, you could add a relay to the power source of whichever power source you want to monitor. If powered, the relay switches ON, and on power loss it would switch OFF. Your Arduino would be able to detect that. But that’s running ahead of what you’re working with I suppose
Thanks for the great tutorial. Helps a lot when you get started with led stuff.
I would like to run a NeoPixel LED matrix (8×64 pixel) and NeoPixel LED strip (144 LEDs) at the same time off one Arduino.
I can upload the program for running either one just fine. What the best way (code wise) to run both in parallel in a loop? Or do I need a second Arduino?
thank you for the nice compliment and thank-you note – it’s much appreciated!
As for running two strips at the same time; I know the FastLED library (works with NeoPixel strips/matrix as well) can handle more than one strip at a time. The problem however is to program things in such a way that both are handled in parallel (or very fast in sequence). This may become a little tricky – but it’s not impossible.
I guess it also depends on the complexity of what you’re trying to do and how fast it needs to “move”.
Since Arduino’s get cheaper and cheaper, you may want to consider using 2 instead.
[…] Quality software development examples can be hard to come by. Sure, it’s easy to pop over to Google and find a <code> block with all the right keywords, but having everything correctly explained can be hit or miss. And the more niche the subject, the thinner the forum posts get. Bucking the downward trend [HansLuijten] provides an astoundingly thorough set of LED strip patterns in his comprehensive post titled Arduino LED strip effects. […]
[…] Quality software development examples can be hard to come by. Sure, it’s easy to pop over to Google and find a <code> block with all the right keywords, but having everything correctly explained can be hit or miss. And the more niche the subject, the thinner the forum posts get. Bucking the downward trend [HansLuijten] provides an astoundingly thorough set of LED strip patterns in his comprehensive post titled Arduino LED strip effects. […]
[…] Quality software development examples can be hard to come by. Sure, it’s easy to pop over to Google and find a <code> block with all the right keywords, but having everything correctly explained can be hit or miss. And the more niche the subject, the thinner the forum posts get. Bucking the downward trend [HansLuijten] provides an astoundingly thorough set of LED strip patterns in his comprehensive post titled Arduino LED strip effects. […]
[…] Quality software development examples can be hard to come by. Sure, it’s easy to pop over to Google and find a <code> block with all the right keywords, but having everything correctly explained can be hit or miss. And the more niche the subject, the thinner the forum posts get. Bucking the downward trend [HansLuijten] provides an astoundingly thorough set of LED strip patterns in his comprehensive post titled Arduino LED strip effects. […]
[…] Quality software development examples can be hard to come by. Sure, it’s easy to pop over to Google and find a <code> block with all the right keywords, but having everything correctly explained can be hit or miss. And the more niche the subject, the thinner the forum posts get. Bucking the downward trend [HansLuijten] provides an astoundingly thorough set of LED strip patterns in his comprehensive post titled Arduino LED strip effects. […]
[…] Quality software development examples can be hard to come by. Sure, it’s easy to pop over to Google and find a <code> block with all the right keywords, but having everything correctly explained can be hit or miss. And the more niche the subject, the thinner the forum posts get. Bucking the downward trend [HansLuijten] provides an astoundingly thorough set of LED strip patterns in his comprehensive post titled Arduino LED strip effects. […]
[…] for everything from simple single color fades and classic Cylon eyes to effects that look like meteors falling from the sky. Seriously! Check out the video after the break. Those chasing lights you see around theater signs? […]
[…] Quality software development examples can be hard to come by. Sure, it’s easy to pop over to Google and find a <code> block with all the right keywords, but having everything correctly explained can be hit or miss. And the more niche the subject, the thinner the forum posts get. Bucking the downward trend [HansLuijten] provides an astoundingly thorough set of LED strip patterns in his comprehensive post titled Arduino LED strip effects. […]
[…] Quality software development examples can be hard to come by. Sure, it’s easy to pop over to Google and find a <code> block with all the right keywords, but having everything correctly explained can be hit or miss. And the more niche the subject, the thinner the forum posts get. Bucking the downward trend [HansLuijten] provides an astoundingly thorough set of LED strip patterns in his comprehensive post titled Arduino LED strip effects. […]
Thanks so much for this article! I have used it to get started with 2812 LEDs. So much good information.
I have tried to modify the Fire sketch to split a strip in half and make it look like the fire starts in the center and flows out to the ends. My programming skills are not up to the task. Any help would be appreciated!
In your case, you could connect the strands in parallel. For example if each strand is 30 LEDs, then set the LED count to 30. Connect the 3 wires of both strands together to the Arduino.
Both strands should now give the exact same effect.
Yes I considered using two strings but I want to use this as one setting on a string of lights that will be on my Hexacopter. I build a lot of multirotors and airplanes for night flying and I want to add 2812 LEDs to my tool box. Woodie Copter Thread
The plan is for the LED strip to wrap around the craft with the center of the strip on the nose of the craft and the two ends at the back. This will allow for different color patterns and I think the fire would look good coming from the center and down each side. I could even pass it a speed parameter so the flames grew longer as the airspeed increased.
That looks like an awesome project! A hexacopter – Nice!! I just sold my DJO Vision (only quad copter, I know) since I wasn’t using it for a few years now. But; it’s awesome gear to play with (if you’re allowed to use it in your area haha).
Did you want the “2” flames to behave differently? Or is it OK that they behave identical. If identical is OK, then you could place 2 strands (or more) in parallel. If they should behave differently, then coding may become a challenge and using 2 ESP’s or Arduino’s maybe much easier (although I’m aware that it will add unwanted weight).
Saut Hans Merci de m’avoir répondu aussi rapidement. J’ai corrigé en mettant leds avec minuscule toujours pareil message d’erreur ( leds does not name a type )
At the beginning of your code, you should see this:
#include "FastLED.h" #define NUM_LEDS 60 CRGB leds[NUM_LEDS]; // <--- this is the line where you made a typo #define PIN 6
void setup() { FastLED.addLeds<WS2811, PIN, GRB>(leds, NUM_LEDS).setCorrection( TypicalLEDStrip ); }
Your error message however seems related to another issue. Can you post the fadeout function you have in your code?
Very good learning tool. Thank you. I am having issue with The New KITT. I split the program to just use the outside to inside and inside to outsideI also split the lights using 2 – 8×5050 adafruit LED. I have set the LEDS to //0xff, F175FF, 0xff, 1, 50, 10 it all works, but my problem is that the number 8 LED blinks on and off going to and returning from the number 9 LED.any ideas how to remedy this? If i make the eye bigger am sure it might work but using such a small amount of LEDS will take away the effect
I use a Teensy 3.2 with the OCTOWS2811 adaptor for my Christmas light and wanted to use some of these effects for it. I came up with this bit of a modification for anyone wanting to use the OCTOWS2811 Library for the Teensy. I’m still new to the coding side but this works a treat for my display.
Oh and the 5 Colour Bouncing balls looks great on the house !
thanks for the compliment and awesome that you’re posting your modification for the Teensy/OCTOWS2811 combination as well! Well done and I’m sure others will benefit from this!
And as for the bouncing balls on the house; one user here used it on the side of his house, running along the roofline – it looks absolutely awesome!
[…] played around with some code I found online. I combined some different code from Tweaking4all and came up with four different LED light modes. One calm, one semi calm, one a bit hectic and one […]
Im trying to use the running lights effect with an arduino uno and a ws2812B led strip, but the leds are only flickering. I’ve copied the base code and the code for running lights but it doesnt seem to work for me. What could i possibly have done wrong?
It seems to be something wrong with the running lights code, because all the other effects are working fine. I´ve gone through the five suggestions u gave me, but it doesnt seem to help.
Anyone else having problem with the running light effect?
Hi Hans And as everybody here I am very happy for your thorough tutorials here! I as a newbie have a question that I am struggling with, have tried different ideas here in this thread but none works… I have a neopixel strip that I would have the whole strip showing a rainbow transition with the FadeinOut function but the “pause” between the color shifts are very fast! cant think of any more ways to try this… Any help would be great!
#include <Adafruit_NeoPixel.h> #define PIN 6 #define NUM_LEDS 217 // Parameter 1 = number of pixels in strip // Parameter 2 = pin number (most are valid) // Parameter 3 = pixel type flags, add together as needed: // NEO_KHZ800 800 KHz bitstream (most NeoPixel products w/WS2812 LEDs) // NEO_KHZ400 400 KHz (classic 'v1' (not v2) FLORA pixels, WS2811 drivers) // NEO_GRB Pixels are wired for GRB bitstream (most NeoPixel products) // NEO_RGB Pixels are wired for RGB bitstream (v1 FLORA pixels, not v2) Adafruit_NeoPixel strip = Adafruit_NeoPixel(NUM_LEDS, PIN, NEO_GRB + NEO_KHZ800); void setup() { strip.begin(); strip.show(); // Initialize all pixels to 'off' } void loop() { FadeInOut(0xff, 0x77, 0x00); FadeInOut(0xff, 0x00, 0x00); FadeInOut(0x00, 0x1a, 0xff); FadeInOut(0xff, 0x08, 0xff); FadeInOut(0x09, 0xff, 0x00); FadeInOut(0xff, 0x59, 0x59); FadeInOut(0x85, 0xf7, 0xff); FadeInOut(0xff, 0xff, 0xff); FadeInOut(0x00, 0xff, 0x11); FadeInOut(0xb8, 0xff, 0x3d); FadeInOut(0xff, 0xa3, 0xf3); FadeInOut(0xa2, 0x94, 0xff); FadeInOut(0xe6, 0x00, 0xff); } void FadeInOut(byte red, byte green, byte blue){ float r, g, b;
for(int k = 0; k < 256; k=k+1) { r = (k/256.0)*red; g = (k/256.0)*green; b = (k/256.0)*blue; setAll(r,g,b); showStrip(); delay(5); }
for(int k = 0; k < 256; k=k+1) { r = (k/256.0)*red; g = (k/256.0)*green; b = (k/256.0)*blue; setAll(r,g,b); showStrip(); delay(5); // <--- change this number: Higher = slower }
for(int k = 255; k >= 0; k=k-2) { r = (k/256.0)*red; g = (k/256.0)*green; b = (k/256.0)*blue; setAll(r,g,b); showStrip(); delay(5); // <--- change this number as well: Higher = slower } }
Hi Hans And thanks for reply! Right now I am not with my led strip so cant try your suggestions but I know how to slow down the fadin/out speed, so it is going nice and soft but when the motion changes color it changes it fast, like a hickup.. so I will try your first tip, did not know that one could place a delay in between the colors. Is there a third way of making the transition from one color to another smoother and still have control over the overall length? I imagine the motion like breathing in and out slowly…. like a sinus curve and not a bouncing ball. Hope you understand what I mean?!
when using FastLED, you could try the build-in functions of FastLED to FadeIn and FadeOut – which will probably be smoother. I do not have my gear near me either, but I can provide a link to the FastLED documentation on Dimming and Brightening Colors. Hope this helps.
Note: FastLED in general seems better than NeoPixel when it comes to these kind of things.
Hi Hans Will check it out! When using FastLED is it just to put in the led-type (ws2812) or do I have to specify something more than that? And a second question: Is there a way to make FastLED to loop all through a rainbow spectrum (not specify every specific color) and fade out/in on every color-change? Because now it seams that neopixel goes more fast past the yellow and red color then the blues and greens…
I have posted the changes in this article for FastLED – it should work right away if you copied the code here (just make sure to include FastLED of course). Pretty straight forward.
FastLED can work with a long list of other LED strips, not just the WS2812.
When I worked on the Meteorrain, I noticed that FastLED performs MUCH better. Experiment with it and you’ll see
[…] Last Tuesday we went down to talk to Halfdan in the intermedia lab, and he gave use a Ledstrip which we could use. It meant that I needed to figure out how we could control the led strip. I figured that three states would be fitting for the light, to create the interaction we want. A stage where no light is turned on, a stage that turns the LEDs on, one at a time (to give a time aspect), and a pulsating stage that creates a puls between the users. Here I went to find some inspiration on the internet. I found a great site, which had a code, and a lot of LEStrip effects, I could use to find an effect that fits our need. https://www.tweaking4all.com/hardware/arduino/adruino-led-strip-effects/ […]
This is all incredible, thanks so much for putting it up!
I was looking at the fade in / fade out function… I wanted to adjust how quickly the fade happens but as I’m not much of a coder I couldn’t really figure out what part of the code controlled how quickly the transition happened?
Thanks so much! adding the delay was just what I needed! Much appreciated!
Still need to figure out how it works though…, is ‘FadeInOut’ a function, called into this script? Would it be possible to get the fade out to only go half way? ie. LEDS stay lit, just get brighter and dimmer?
Apologies for my basic code knowledge, hopefully that vaguely makes sense?
thank you very much for the compliment and the thank-you note!
The function FadeInOut() is indeed a function called from the main loop(). However, the FadeOut part is based on what the FadeIn is doing. So if you’d take out just the FadeOut part, then you may not get the desired effect. In other words, lets say that you do a FadeInOut for the color red, then the FadeOut part is based on that you start with the color red.
for(int k = 0; k < 256; k=k+1) { r = (k/256.0)*red; g = (k/256.0)*green; b = (k/256.0)*blue; setAll(r,g,b); showStrip(); }
for(int k = maxBrightness; k >= minBrightness; k=k-2) { // <-- change r = (k/256.0)*red; g = (k/256.0)*green; b = (k/256.0)*blue; setAll(r,g,b); showStrip(); } }
I have not tested this, but I’m pretty confident this works. The function is called the same way as FadeInOut(). p.s. if you change “k=k-2” to “k=k-1” the fade will go slower and “k=k-3” will make it go faster.
I must say what a great tutorial.I am a total beginner and also 60 so please try to bear with me.I would very much like to get the Running Light program running.When I try to compile it I am getting several error messages including one saying something like “can not be compiled for Arduino Uno.What I am after is your running light effect but with a gap of say 8 led’s in between each moving bank.I do have a small sketch that will run one bank of 4 led’s but I can not work out how to have multiple banks running at the same time i.e chasing.Sorry if that doesn’t make sense.
Welcome to Tweaking4all and thank you so much for the compliment!
Compiler errors: Some older Arduino IDE’s show some bugs/issue that may cause this, so I’d start with downloading the latest version. You can find the latest version of the Arduino IDE here. If that doesn’t resolve the issue, the please feel free to post the error message here. If it’s a very long list, then please consider posting it in the forum (just to avoid that the comments do not become too lengthy here).
Running strands in parallel: The easiest way to do this is by connecting the strands in parallel. So connect GND to GND of both strands, +5V to +5V (or Vcc) or both strands, and Di (Data input) to both strands. They should run identical after that. In the sketch you only have to enter the length of one strand. For example, you have to strands of 8 LEDS (16 total), det the number of LEDs to 8.
Just wanted to say thank you very much. I bought a set of strip LEDs based on sk6812 RGBW and I had problems finding sketches that would work with them properly. Thanks to you and the neopixel side of things these work great. If you own these sk6812 RGBW LED strip just change the pixel type to:
Count me in as an “other” who benefited. I tried to get FastLED to work with my SK6812 RGBW, including one of the published tweaks to wedge in the extra byte, but was unsuccessful. Was quite frustrated, until I found this posting.
Mysticforce’s ‘type’ line worked on the first try! (using NeoPixel’s strandtest sample code)
It was your code for the running light on here. Running Lights I will have to re run the code to get the errors again.I am using an Arduino Uno by the way.
can you post the error messages here? (unless it’s really long, then please consider using the forum, or email me at webmaster at tweaking4all dot com)
Sorry for the late reply.I compiled the sketch again and I do not know why but it compiled fine no error messages (strange).Though it compiled all leds were off.
If the LEDs remain off: verify the GND, +5V (Vcc) and Din connections from Arduino to LED strip. Make sure Din is connect at the correct end of the strip. If there are arrows, then the arrows should point away from the pin.
Hi there. Thank you SO much for these tutorials and codes, and I see that you are extremely helpful in answering questions.
I’m new at this and just barely bought my arduino and lights, haven’t even started learning to code yet, but I think I’ll catch on quickly.
I want to do the Cylon with a twist. I want to have each individual LED to have a dedicated color. For example, Maybe LED’s 1-4 be Blue, 5-10 be Red, 11-24 be Pink, etc. And the light then bounces but those LED’s don’t change colors at all – each LED stays the same color at all times when illuminated.
I assume that’s an easy fix for someone who knows what they’re doing?
thank you very much for the “Thank you” note and compliment – it’s very much appreciated!
I’ll have to think about this one for a minute – I’m on vacation, so I do not have any of my gear with me. So what I’d do is create an array of colors, matching the number of LEDs, and change the setPixel() call to basically toggle a LED on or off based what’s in the array. Having said that: it will take a minute to figure something out code-wise to show this. I’ll give it a try later tonight.
I’d start with an array defining the colors. The size of the array will depend on the number of LEDs you have. We could define a color for each LED or for several “ranges”. I’d start with individual LEDs, since that’s easier to deal with and the most flexible. So an untested example for 10 LEDs could be:
byte LEDColors [10][3] = { {0xff,0,0}, // LED 0 red {0xff,0,0}, // LED 1 red
{0xff,0,0}, // LED 2 red
{0,0,0xff}, // LED 3 blue
{0,0,0xff}, // LED 4 blue
{0,0,0xff}, // LED 5 blue
{0,0,0xff}, // LED 6 blue
{0,0xff,0}, // LED 7 green
{0,0xff,0}, // LED 8 green
{0,0xff,0} }; // LED 9 green
void loop() { CylonBounce(0xff, 0, 0, 4, 10, 50); }
void CylonBounce(byte red, byte green, byte blue, int EyeSize, int SpeedDelay, int ReturnDelay){ for(int i = 0; i < NUM_LEDS-EyeSize-2; i++) { setAll(0,0,0); setPixel(i, LEDColors[i][0]/10, LEDColors[i][1]/10, LEDColors[i][2]/10); for(int j = 1; j <= EyeSize; j++) { setPixel(i+j, LEDColors[i][0], LEDColors[i][1], LEDColors[i][2]); } setPixel(i+EyeSize+1, LEDColors[i][0]/10, LEDColors[i][1]/10, LEDColors[i][2]/10); showStrip(); delay(SpeedDelay); }
delay(ReturnDelay);
for(int i = NUM_LEDS-EyeSize-2; i > 0; i--) { setAll(0,0,0); setPixel(i, LEDColors[i][0]/10, LEDColors[i][1]/10, LEDColors[i][2]/10); for(int j = 1; j <= EyeSize; j++) { setPixel(i+j, LEDColors[i][0], LEDColors[i][1], LEDColors[i][2]); } setPixel(i+EyeSize+1, LEDColors[i][0]/10, LEDColors[i][1]/10, LEDColors[i][2]/10); showStrip(); delay(SpeedDelay); }
delay(ReturnDelay); }
Note that I replaced “red” with LEDColors[i][0], “green” with LEDColors[i][1], and “blue” with LEDColors[i][2].
Keep in mind that counting LEDs (and arrays) start with “0” for the first item. To use more LEDs, you simply do this for example for 20 LEDs:
byte LEDColors [20][3] = { {0xff,0,0}, // LED 0 red {0xff,0,0}, // LED 1 red {0xff,0,0}, // LED 2 red {0,0,0xff}, // LED 3 blue {0,0,0xff}, // LED 4 blue
... etc {0,0,0xff}, // LED 15 blue {0,0,0xff}, // LED 16 blue {0,0xff,0}, // LED 17 green {0,0xff,0}, // LED 18 green {0,0xff,0} }; // LED 19 green
Each color (LEDColors[x]) has 3 values ([3]) to represent a color (as you have seen with other effects).
Like I said: I have not tested this, I’m typing this while waiting for my plane ride to Europe, so I hope I didn’t make any typos.
Hey Hans. I got it to work almost perfectly, with a few glitches.
First, my string of LED’s needs to be about 42 lights (it needs to fit into a slot and I don’t know the exact width, but let’s say 42 LEDs for now). I cut my strand of lights to 44, giving space for a light in front and light at the end to bleed over just in case.
I included a new line and color definition so there are now 42 lines of code. Here’s where the problem comes in.
In your code, you had it set up for 4 EyeSize as such “CylonBounce(0, 0, 0, 4, 10, 50);”
I like it better with either 5 or 6 EyeSize (5 here), and a little slower (20 SpeedDelay) CylonBounce(0, 0, 0, 5, 20, 50);
The problem is, if I make the EyeSize larger, then the last color begins to disappear.
I see that the array is changing colors at a certain time interval, but I can’t seem to figure out how to speed that up slightly or slow it down, depending on the EyeSize. Even if I slow down the SpeedDelay, it still doesn’t make a difference.
if you want to test it out yourself, set the EyeSize to 6 or higher and the last color won’t be there at all.
Also, as mentioned, there are an extra 2 LEDs in the string that I want to be null, but for some reason, those last 2 are illuminated constantly – 43 is Blue, and 44 is Green.
Other than that, this is awesome and it’s fun to tweek!!!!
Just got back to Europe – I will have to dig up my gear and make a setup to do some tests (I’ll have to do that anyway, for another request), nut that may not happen today.
I’d first make sure it works well without the fixed colors – just to rule out issues with the experimental code. Looking at the original code: Try a larger number for the speed delay, for example CylonBounce(0, 0, 0, 5, 200, 50).
I’ll try to write some code for that. Shouldn’t be to hard. Just bear with me for a bit – I just returned from vacation, so I may not get to it right away.
My sincere apologies; I have to say that I have not made any progress with this. Sometimes things spin a little out of control here and the heatwave of the past weeks (we have no AC!) most certainly didn’t help.
Just for my understanding: The Matrix Rain would probably use multiple strands – this would of course not fit the strands we use in these effects, unless you want it just for one strand. If that would be the case, wouldn’t it be very similar to Meteor Rain?
Usually this happens because of a typo (assuming the function meteorRain() can be found in your code) – either a typo or you forgot an accolade or semi-colon somewhere. I’m assuming your code is placed in “loop()” ?
Thank you so much for putting together this outstanding resource! I’m working with a group of teens who are creating an installation and lighted costumes with Arduino and WS2812 strips, and your site has been invaluable. Unfortunately we’re short on time before these have to be displayed, so we’ve only been able to teach the kids the basics of working with Arduino and playing with the parameters for the desired effect. I’m also coming from the costume design side, so have been learning pretty much at the same time! We have a few questions for you, if you have the time to give them some thought. Thank you!
1) One of the students wants to combine Meteor Rain and Rainbow Cycle, or at least achieve a simiultaneous rainbow effect with Meteor Rain rather than one color at a time. We’ve tried playing with the two codes but with no luck—any suggestions?
2) We are trying to coordinate the code with a song, and have each effect run for a certain amount of time then change when it reaches the next verse. I think that without the time requirements the code would be pretty similar to your sketch with all the effects compiled, running one after the other. have timestamps for the song, and I’ve been trying to figure out millis(), but am struggling with how to use it. Is there a relatively simple way to do this?
3) We are trying to control multiple LED strips with one Arduino unit; all would be running the same code at the same time. Is there a way to define multiple pins using the NeoPixel library?
Thank you very much; hope this isn’t too much of a question dump!
apologies for the late response – I just returned from a trip, and you do have quite a few questions haha …. Thanks you very much for the compliments, I very much appreciate it!
As for your questions:
1) Meteor Rain + Rainbow Cycle.
I did get another request recently, asking for something similar. This would involve modifying the showPixel() call, so it uses a fixed color. This will require some time for me to build. Ideally you’d have either an array with predefined colors, or a function that calculates the color.
2) Sync with a song based on time stamps.
Well, that is indeed an interesting one … it would be quite complicated to have it sync with music without timestamps – but timestamps only works of course when you have predefined the song (and time stamps). For this we’d probably need timed interrupts – a seemingly complicated topic (see also this link). I may want to write an article about that in the future … haven’t done anything with this yet. Maybe the provided link will help (even though this might be a little too much for your students). In essence you set a “timer” that triggers an event (function call) when that time arrives.
3) To run multiple LED strips simultaneous you can apply a simple trick: connect a LED strip as usual and place the other LED strips in parallel, meaning: connect +5V, GND and Din pins of the strips all to the same point (like the first strip).
Hey, I found this article extremely helpful with using multiple strips, effects, and timing with the Arduino. You can basically use the code in the article and swap out the effects for any of Hans’ ones. https://learn.adafruit.com/multi-tasking-the-arduino-part-3/overview
thanks for this great article. It gave me a lot of inspiration. While playing with the different effects, I had the idea to create some c++ classes for each effect. Then, I noticed that there are common lines of code in each class, so a base class for effects came into being. Reading this forum I saw questions about running effects in an other direction etc, each resulting in new code for an effect. My idea was, to develop a virtual strip that can be arranged on a physical one, to change direction or offsets or whatever with a few parameters.
For example, this peace of code runs two meteor effects starting from the mddle of a strip runnig simutaniously to the ends:
I am happy to share my work with everyone who is interested. I guarantee that it is not perfect but hopefully you find it useful. Please see https://github.com/ArminiusM/Neopixel .
Hello. Let me start with the fact that I’m weak when it comes to arduino and these things. He tries to create the code from these animations which will change them after pressing the button. I have never succeeded. I was looking on the internet but there was nothing there, only ugly animations and which I could not change for yours. I am sending this code maybe you can do something. My English is not good. I am waiting for a response. Thanks … very long source code removed and place in this forum post …
I have one problem because I’m trying to do it using a digispark board that does not support eeprom. I’ve removed all eeprom things from the code, but another error is showing, could you rewrite this program so that you do not use eeprom.h? Thanks.
I’m not familiar with the DigiSpark board, but for the trick that I use here, you will need the EEPROM support. After selecting a new pattern, a reset is done, and the value of a given variable will be lost. So without EEPROM you’d be stuck at the first effect.
Since you are powering up the LED strip with a 5V wall-wart is there any reason to be concerned with the current draw from a long strip of 5 Meters? Or a 1M strip with 144 LED’s?
Is it possible to wire this up with a ULN2803A darlington DIP ?
as a rule of thumb I calculate 20mA per LED (where LED is actually a white little block on the strip, containing 3 actual LEDS, one for red, green and blue). So for 144 LEDs, I’d look for a power supply that can provide 3A (a little more than 2880 mA). Assuming that you use 144 LEDs total.
Note: In most LED strips, as far as I know, each LED pulls 20mA max. If you consider that there are 3 actual LEDs (red, green, blue) in each “LED block”, then with 144 LEDs, you’d actually have 432 LEDs. Or in other words: each LED block pulls max 60mA. So if you would have the entire 144 LED strip lit up at max strength, it would pull 8640 ma (a little less than 9A, which typically results in a 10A power supply).
Now keeping in mind that most effects just use a fraction of the LEDs, and/or a fraction of it’s max brightness, and the fact that most power supplies can very briefly pull a little more than their specs; I found that the 20mA per LED block rules works pretty well. I have tested this with 300 LEDs as a backlight for my TV, and the power-supply didn’t even get warm – it is a good idea to monitor if the power brick gets hot or not for a bit. If you want to be 100% save, then assume worse case scenario: 60mA per LED block.
Forgot about the Darlington question; Since I never had a use for one of these, I looked at the specs: The ULN2803A device is a 50 V, 500 mA Darlington transistor array. So if you want to control the full load with this, then I’d say 500 mA isn’t going to cut it. But then again; I have not had a use for any of these (yet), so I’m not sure when and how you’d want to apply this.
I have been working on a virtual pinball machine over the past 6 months. it’s run by a PC with a added microcontroller to handle all cabinet button pushes and game feedback (contacters, LEDs, …) it seams that the most difficult part is to interface the pinball software to run addressable rgb strips. I am using a KL25Z as my microcontroller but interested in bringing a Arduino into the mix for the strips. most use a Teensy. The trick is to trigger the RGB strips in responseto in-game events.
Sounds like an interesting project! Sending data from a PC to a microcontroller can be challenging at times – you’ll need to talk to the “serial” port presented over USB to your Microcontroller. The Arduino supports this out of the box, you’ll need to do some programming on the PC though. You would be able to send whatever code you have in mind to trigger an effect.
Having said that, and depending on the OS you’re using to develop your virtual pinball machine, maybe the Raspberry Pi may be a good alternative as well? The RPI3 is reasonably powerful, very affordable and … it has plenty I/O pins to work with (controller, LED strip, etc).
Firstly thank you for posting these up. They are incredible (especially the meteor!).
I have a very simple error I can’t resolve.
I am trying to run your code along side some other code on a single arduino, with your code going first or last. However I’m getting a expected unqualified-id before ‘{‘ token.
Your code and my code work perfectly separately, but do not work when I run them simultaneously. Can you offer any advice please??
sounds like you’re looking at a typo. Maybe you can post the code in the Arduino Forum? Or if you do not like the code to be public; email me the code (webmaster at tweaking4all dot com). I’d prefer the forum so others can learn from it as well, but I’d understand if you’d want the code to remain private. Just looked at your website; nice projects!
you’d probably see more of blue. You’ll have to play a little with the values, just keep in mind how setPixel() works;
setPixel(Pixel, Red, Green, Blue)
The “heatramp” is the changing variable, if a color = 0 (eg. Red=0) then this color is off. If a color = 255 (eg. Red=255) then this color is set to mac.
thanks for posting and great to see that it works! Code looks fine to me, you could of course consider using the switch-case command, which looks nice but is probably not that much better anyway
Sep 26, 2018 - 8:36 AM - Christian Galipeau Comment Link
Is there a way to merge two of these codes to show on 2 different pins? I’m trying to merge codes Sparkle and Fire to run on PIN 6 and 9 respectively. I’m trying to merge the two codes but fail for now. Maybe someone else would want to do that as well don’t you think? Thanks!
If you want both effects to run at the same time, then the code would have to be adapted significantly – since the Arduino doesn’t do multitasking or task switching. I suspect this is not impossible though, maybe by using interrupts, or mixing the codes. But it won’t be pretty (the code). FastLED for example can control more than 1 strip at a time. timing will be a pain though since the Fire effect requires some work.
If they do not have to run in parallel, then it’s relatively easy. You’d have to define the second LED strand and call that one with one of the 2 effects.Something like (see also the GitHub page);
Sep 27, 2018 - 7:04 AM - Christian Galipeau Comment Link
Thank you so much for your answer. Yeah, that’s what I tried and can’t have it to work. What I’ll do is get a second arduino… will be much easier and since they’re cheap, not big budget problem!
I’d probably go that route as well – unless you have a lot of time on your hands to play with the code. Considering the price of an Arduino; I’d probably go the easier route as well.
Hello, I’m planning to do a project with SK6812 based RGBW stripes being installed in the curbstones on both sides and for a length of some 20m. I was reading a lot in the last few days but it looks like that no library is actually prepared to drive the W part of the stripes. Besides that I’m very interested to find out if the affect library will work with the SK6812 on one of the two base libraries as most of the usages in here focus on other controller it looks like. Is there a good place to read of the basics for the SK6812 and RGBW. Sorry for the potential stupid questions of a beginner in this field. Have a great evening and many thanks for any tip / reply.
seems this is a known issues. I have never worked with these RGBW LEDs, but did find this guy’s article that shows how this can be done with FastLED. Seems latest FastLED has included it (see this bug report) as well.
Hope this helps. And keep in mind; The only “stupid” question is the one unasked
First of all congratulations for your work…and also for the support (when I see that the 1st message dates from 2015 ;-))
I have a strip with 84 LEDs chained it into 3 chunks of 24 LEDs.
I’d like the Meteor effects to be on all 3 chunks at the same time and not as a serpentine.
I tried to create three array:
CRGBArray<NUM_LEDS> leds; // Define the array of leds CRGBSet partA(leds(0,23)); // Define custom pixel range with a name. CRGBSet partB(leds(24,47)); // Define custom pixel range with a name. CRGBSet partC(leds(48,71)); // Define custom pixel range with a name.
but then I don’t really understand how to integrate it into the code…. can you help me
Now I’m not sure who Gerald was responding to (comment below) but this would work for your trick as well. You have to wire the 3 strips in parallel – this way all 3 will generate the exact same pattern.
So connect +5v, GND and Din (which normally would connect to the beginning of the strand) to the beginning of all 3 strands.
Step 1) define the break points by setting the length of each “piece”, and modify the strip length, something like this. The effect functions utilize NUM_LEDS and since this is the “max” length of each segment, we’ll bring it down to 24. We do however need the full length to initialize, so we create a new define for that;
and of course keep the old setPixel as well, as it was before.
Step 3) in the meteorRain() function we need to replace setPixel with our new set3Pixels function and we need to make sure the FadeToBlack functions addresses ALL the LEDs by replacing NUM_LEDS with REAL_NUM_LEDS.
Now the effect should appear on all 3 segments. Since I don’t have my gear nearby to test, I haven’t tested this, but I’m confident it will work, or at least get very close that what you’re looking for.
Note: running 3 led strips in parallel will possibly be faster, but I haven’t tested that.
I played with this using the classes I wrote based on this website and the Adafruit_NeoPixel classes. It is posted at https://github.com/ArminiusM/Neopixel (just copy the AGNeoPatterns folder to your library folder) . Serpentines can be handled. The code is very short, may be it helps:
The NeoPin definition must fit your arrangement. Also, the keepBackground parameter is not yet implemented (just ignore it). The effects repeats when finished. Change random parameter to true for different results.
Oct 4, 2018 - 11:30 PM - Aaron Schlottman Comment Link
Hello Hans! Let me say I love all of your articles, and I am really enjoying the learning process of Arduino. I had a request that should be really simple for an advanced coder such as yourself, and I have scoured the internet looking for an option that works to no avail. What I am looking for is 2 things really. I am trying to make a crowd noise meter (VU Meter) that can run on a nano utilizing WS2812B neopixel strips. I have found codes that get me close, but nothing seems to get me to 100%. My only requirements are to have it with variable neopixel count with mic input on A5 and output on pin 6. I would love it to have standard VU colors (green, yellow, red) and to have a peak input hang that is adjustable in both hang time and rebound speed.
Project 2 is probably just as easy. I need to set up a nano with a length of up to 2500 pixels. I want some simple color wash / effects that run on a loop.
If there is ANY chance you can help out with this, I would greatly appreciate it!
as the questions are not directly related to this article, I’d recommend starting a forum topic.
To get you started;
VU Meter – I’ve been playing with this as well, just never finished it. If you use a microphone, then you’d need a small pre-amplifier something like this example. Just a Mic is too “rough” when the Arduino converts analog signal to digital.
2500 LEDs – This is very well possible, you’ll need some serious power supply though (sounds like an awesome project!). With that many LEDs, you’ll need to make some additional +5V and GND connections between LED strip(s) and power supply. Just connecting it at the beginning of the strand will degrade power (and possibly overload the leads of the LED strip) and LEDs at the end will either not light up or be very dim.
If someone could help me with the question I posted there, I would be very grateful!
PS: When I paste and edit code here, I cannot insert empty lines, the code breaks up into smaller boxes/elements. What should I do to avoid that so that code becomes more readable?
good idea to post here as well. The forum is not (yet) very active at the moment, and is mostly used to post large sources etc. I’ll take a look at it as well.
Hello Hans, I’m using most of the code above for a set of sequences, I’m kind of new to this and was wondering if it was entirely possible to set sequences to be played through different pins?
so perhaps having SnowSparkle on pin 5 while having theaterChase on pin 6?
it’s probably not impossible, but the Arduino is not designed to multitask. This means that the effects have to be rewritten so that they can do their tasks at the [almost] same time mixed, or a task switching mechanism needs to be designed (if that is even possible).
Considering the pricing of Arduino’s, using a second Arduino is probably a lot easier.
A little while back I asked about controlling multiple strips to create a wide fire effect. With some help from this forum I came up with the following:
#include "FastLED.h" #define NUM_STRIPS 6 // The number of strips #define NUM_LEDS 10 // The number of LEDs per strip const int TOTAL_LEDS = NUM_LEDS*NUM_STRIPS; CRGB leds[TOTAL_LEDS]; #define PIN 6 // Fire Base Color // RED = 0, GREEN = 1, BLUE = 2, PURPLE = 3 #define FIRE_BASE_COLOR 0
setAll(0,0,0); } // *** REPLACE FROM HERE *** void loop() { // Flame characteristics - Original values 55, 120, 15, 7 int COOLING = 55; int SPARKING = 60; // 255 max int SPARK_DELAY = 7; int SPARKING_LEDS = 3; //number of led which can start a new spark Fire(COOLING, SPARKING, SPARK_DELAY, SPARKING_LEDS); delay(10); } void Fire(int Cooling, int Sparking, int SpeedDelay, int SparkingLeds) { static byte heat[TOTAL_LEDS]; int cooldown;
// Step 1. Cool down every cell a little for( int i = 0; i < TOTAL_LEDS; i++) { cooldown = random(0, ((Cooling * 10) / NUM_LEDS) + 2);
As for your question; you could play with the values in setPixelHeatColor(). It would take some work, but as you can see there are 3 “setPixel” lines in this function, where the base colors are defined for “hot”, “middle” and “cool”. This is where you could make some modifications to accomplish a rainbow effect or use different [possibly changing] base colors.
You’ll have to play a little with it, hope this helps.
void setPixelHeatColor (int Pixel, byte temperature) { // Scale 'heat' down from 0-255 to 0-191 byte t192 = round((temperature/255.0)*191);
// calculate ramp up from byte heatramp = t192 & 0x3F; // 0..63 heatramp <<= 2; // scale up to 0..252
// figure out which third of the spectrum we're in: if( t192 > 0x80) { // hottest setPixel(Pixel, 255, 255, heatramp); // <--- "hot" here } else if( t192 > 0x40 ) { // middle setPixel(Pixel, 255, heatramp, 0); // <--- "middle" here } else { // coolest setPixel(Pixel, heatramp, 0, 0); // <--- "cool" here } }
I am simply amazed with all these effects. However I am a neophyte to Python, Linux and the Raspberry. It seem the Arduino uses a different language to the Raspberry and I am having trouble converting. I have Tony Dicola’s code running but looking for more effects. Alas most of what I have found is for the Arduino?
unfortunately, I have not doen anything with the Raspberry PI and it’s I/O port. I haven’t done anything with Python either (considered playing with it a while back, but never got the taste for it). Arduino uses C++ as a standard programming language. In comparison, Python is a language which’s syntax is definitely different than that of C or C++.
So in short; converting will be challenging, not to mention the possibly missing libraries used in the Arduino applications. The basic routines could be converted by someone with experience in C and Python, but unfortunately, that would not be me .
Maybe one of the other visitors here does, and is willing to chime in.
Thanks Hans. Kind of what I thought. I haven’t done any coding for over 20 years and that was on mainframes and mid-range computers so I guess the learning begins again. I’m going to have to study up on C++ as well as Python.
As you say maybe some of the other visitors may have some thoughts.
No Problem Nigel, wish I could have been more helpful. If you’re familiar with C, Java or JavaScript, then using C++ should not be a too big a transition. You could take a peek at a small course I’ve written, it will give you an idea of the syntax. The Object Oriented part of C++ is rarely used or visible to the developer, so it may not be as hard as you’d think. I am however curious how well the Raspberry Pi will do with timing, as it’s running a full fledge OS. A few related links that may be helpful are:
As an alternative, you could hookup the Arduino to a Raspberry Pi (haven’t done this myself) or just run it on a Arduino straight (they are not that expensive anymore).
If you find anything useful, or would like to share your experiences; feel free to post it here – I’m sure others would love to read about is as well.
added link to this article to the README.mdI have finished converting all of the examples listed here to python. might take a look at the PiLED project next
if you use FastLED, brightness can be controller for all LEDs right from the beginning. I guess my best way to explain this function is that it sets the maximum brightness the LEDs can be set to. It’s easy to implement.
Something like this (note: this works for FastLED only!):
Hope this is what you’re looking for. As far as I understand, you can call this function (setBrightness()) anywhere in your code. If you set it right away at the beginning (in setup()), then it dictate brightness for all effects.
First of all, amazing post and pieces of code for Arduino and LED strips, which is currently usefull as I’m working on this kind of a project now.
I’m just getting stuck for 2 days and have no clue what can be the root cause or how I can debug this.
Situation:
Using an Ardiuno Uno r3 / Arduino Mega and a LED WS2812 strip with 560 RGB LEDS.
Testedboth all in one code packages (Neopixel and FastLED)
Currently using only one 5V supply to power everything (second supply is ordered to feed the second half of the strip seperate).
Problem:
For certain patterns (like rainbow, color wipe, …) the Arduine get stuck somehow (both Uno and Mega Tested).
For the rainbow efect, I then get something like this when frozen https://ibb.co/MfGwLd4
Also when uploading a change, I first need to unplug the arduino and be quick to upload again before the pattern start again. (I’ll later post the error messages)
If I test this for 60 LED, then it works.
Question
Can I somehow debug step by step, the running project what goes wrong?
Can it be because of the single power supply ? Strange enough if I only program Running lights they are all working fine for the whole project.
Even with the Arduino Mega, I have more memory available it gives me the same effect, so can I exclude the no memory part ?
Since you gave the impression that some other effects do work correctly, I would not expect this to be a hardware (LED strip) issue.
My initial guess;
Yes – Your power supply is not keeping up. Easiest test: set ALL leds to white and see what happens with something like this:
// *** REPLACE FROM HERE *** void loop() { setAll(255,255,255); } // ---> here we define the effect function <--- // *** REPLACE TO HERE ***
If this fails then your power supply may not be adequate. The fact that the Arduino “crashes” may indicate insufficient power as well.
560 LEDs = 560 x 60mA = 33.6 A (worse case). If ALL the LEDs are not white and at max brightness for a longer time, then somewhere between 11 A and 33A may be sufficient.
I’m not aware of a debug option – it would be great to have that, but since your Arduino freezes, you’d probably get nothing useful out of that even if it would be available. The freeze would prevent the Arduino from sending data back. You could use the serial monitor to output some messages that may help debugging. But again; in this case this may not be useful.
Many thanks for putting together such a brilliant piece of code. You have saved me many countless nightless night of sleep!
I downloaded your LEDs in one sketch and have successfully managed to upload and run your code.
However, my LEDs Nexpixel strips are configured in a 7 row x 22 column wide setup (i made a visor).
Anyway – when using your code untouched it works but I noticed say with the cylon it displayed oddly. I figured out why. It was because your configuration is for a single row LED strip. So I attempted to frankenstein your code with one that I had been using successfully. Here’s your original part of the code:
#include <Adafruit_NeoPixel.h> #define PIN 6 #define NUM_LEDS 154 // Parameter 1 = number of pixels in strip // Parameter 2 = pin number (most are valid) // Parameter 3 = pixel type flags, add together as needed: // NEO_KHZ800 800 KHz bitstream (most NeoPixel products w/WS2812 LEDs) // NEO_KHZ400 400 KHz (classic ‘v1’ (not v2) FLORA pixels, WS2811 drivers) // NEO_GRB Pixels are wired for GRB bitstream (most NeoPixel products) // NEO_RGB Pixels are wired for RGB bitstream (v1 FLORA pixels, not v2) Adafruit_NeoPixel strip = Adafruit_NeoPixel(NUM_LEDS, PIN, NEO_GRB + NEO_KHZ800);
Thanks for the compliment – love the “Frankenstein” part haha!
Since I have never worked with “Adafruit_NeoMatrix“, I can only guess that this replaces the “Adafruit_NeoPixel” as shown in the code below, which is defined as “strip“;
Adafruit_NeoPixel strip = Adafruit_NeoPixel(NUM_LEDS, PIN, NEO_GRB + NEO_KHZ800); void setup() { strip.begin(); strip.show(); // Initialize all pixels to 'off' }
Your code probably doesn’t have “strip” defined anywhere any more. Instead you have “matrix” defined. I do not know how “drop-in compatible” Adafruit_NeoMatrix is with Adafruit_NeoPixel – so I don’t even know if replacing the faulty line with:
Thanks for your tips. I think I’ve got my head around most of it! (this is the first time I’ve played with Arduino code)
I’ve managed to compile the code and no errors appears now! It says:
Sketch uses 15884 bytes (55%) of program storage space. Maximum is 28672 bytes.
Global variables use 485 bytes of dynamic memory.
But nothing is happening on the neopixels! Could I send you the source code for you to see if there’s anything obvious I’m missing please? (i’m respecting the rules here not to post large code) The source code will consist of my basic code for scrolling text and also your entire code directly beneath that. My scrolling code works by itself but as soon as I add yours I get nothing appearing on the neopixels. I’ve got a gut feeling it may have something to do with the NUM_LEDS from your code that is not playing nicely.
Very much appreciated if you could spare the time to look into this.
Thanks for keeping an eye on the rules – it’s much appreciated!
You can go 2 routes;
1) Start a topic in the Arduino forum – which is good so others can read the fix as well, or 2) Send me the code by email (webmaster at tweaking4all dot com).
Please keep in mind that I do not have any Arduino hardware available at the moment – so I will not be able to test anything. Also; I will not be able to respond in the next 2 or 3 days.
Thanks for getting back to me. I had a eureka moment and decided to start afresh but this time using FastLEDs – and guess what…it works!
One question that you may know the answer and it’s probably obvious from the source code you provided above – I want to combine (or Frankenstein!) my basic scrolling text code with the now working FastLED code of yours. Can I do that this?
Once again – sincerely grateful for your prompt response (p.s. I’m not one to give up on goals I have set myself!)
Awesome that it now works. Yeah, that doesn’t surprise me. FastLED has become much more mature than NeoPixel. Or maybe I should say: I like it better than NeoPixel since it is a more advanced and reliable library for controlling LED strips.
Mixing text and effects … I you mean really mixing them / laying an effect over a text; then that may be tricky. If you want to in sequence; for example show text, remove text and show effect, remove effect and show text, etc. then this should be very do-able. Simply call you text functions first, when done with showing the text call an effect, etc.
The scrolling text code I have is written using the NeoPixel, GFX and NeoMatrix libraries. What I’d like to do is add this scrolling text code in addition to your FastLED code in the same sketch
The goal here is to have say the scrolling text code and say five of your FastLED examples so that they work one after another
So not laying my text over your code – it’s to have my text run before or after your code
You can indeed do the codes in sequence. Normally I’d be worried about is mixing libraries (eg. FastLED versus NeoPixel) – since it may cause unexpected results, incompatibility issues, etc. Now the good news, is that the creator of NeoMatrix seems to have made it FastLED compatible (see this issue, and their Github page states the same).
Haha, thanks! Even though I wouldn’t give myself that much credit, and I’m sure you’ll run into a few challenges anyway. But I hope those will be minor If you get your project going, maybe you can show off what you made. I always like to be inspired!
So I’ve uploaded the entire code as FastLED and 100% success!
With regards to: HalloweenEyes(0xff, 0x00, 0x00, 1,7, true, 10, 80, 3000); (please note that the second number – ‘7’ was originally 4 from your code. I just changed it for my purposes)
I have my grid setup as follows: #include “FastLED.h” #define NUM_LEDS 154 CRGB leds[NUM_LEDS]; #define PIN 6
I’ve been trying figure out how to make the eyes blink in the same position. I thought it was this part: //int StartPoint = random( 0, NUM_LEDS – (2*EyeWidth) – EyeSpace );
Basically I’ve made the daft punk helmet and I would like the eyes to blink in the same position every time. This is basically the last part. The helmet is fully constructed from 3d printed parts.
So imagine my grid as 22across x 7high. How do I set the first eye position to be at 7across x 3high and the second eye position to be 15across x 3high?
With regards to Cylon I’d like it to work in a similar fashion but only scrolling across the middle row only. I haven’t got to that part yet but thought I’d give you a heads up as to what I’ll be playing with next.
Once again Hans – its been excellent having you assist me. Please do feel free to ask me to go away or to keep my requests to a minimum. My plan was never to hijack this thread!
And sincere apologies to any other subscribers to this thread.
Awesome to hear things now work! As Daniel already stated; feel free to post this as a topic in the Arduino Forum. This way code, pictures and/or videos, and plenty of questions can be shared there as well. I understand if you’d rather not share your code (I’m a little code shy myself).
hans
Dec 2, 2018 - 2:24 PM - Daniel Fernandes Comment Link
Greetings orangoo! What is the real effect of your sketch? try to show some animation here or on youtube to see; make your code available too, please!
Does anyone know how to add the ‘juggle’ effect from FastLEDs demo reel to this (awesome) bundle of sketches.
I’ve tried adding it to the ‘All LED Effects in One Sketch’ sketch.. but I doesn’t seem to work.
Many thanks,
OM.
void juggle() {
// eight colored dots, weaving in and out of sync with each other
fadeToBlackBy( leds, NUM_LEDS_PER_STRIP, 20);
byte dothue = 0;
for( int i = 0; i < 8; i++) {
leds[beatsin16( i+7, 0, NUM_LEDS_PER_STRIP-1 )] |= CHSV(dothue, 200, 255);
dothue += 32;
}
}
Since this is using FastLED functions, I assume you’re not using NeoPixel. What kind of error are you getting? How did you try to incorporate this function?
(if you want to post you code; please use the Arduino forum to avoid that the comments here become super long – you’re fine with short source codes like you just did)
I’m actually not getting any errors at all.. the sketch compiles properly. The issue is that if I call juggle in the void loop along with one of the sketches written from tweaking4all, the juggle sketch is ignored. I’ve tested this by running ‘juggle’ on its own (which works), and then adding something after juggle like ‘theaterChaseRainbow’. theaterChaseRainbow will be the only function that loops in this case.
And yes, all of the functions are FastLED. I have a feeling the problem has something to do with how the tweaking4all functions calls other sub functions, ‘set pixel’ for example. Here is how I setup the loop:
void juggle() { // eight colored dots, weaving in and out of sync with each other fadeToBlackBy( leds, NUM_LEDS_PER_STRIP, 20); byte dothue = 0; for( int i = 0; i < 8; i++) { leds[beatsin16( i+7, 0, NUM_LEDS_PER_STRIP-1 )] |= CHSV(dothue, 200, 255); FastLED.show(); // <-- add this either here dothue += 32; } FastLED.show(); // <-- or add this here }
I assume this would not be impossible. I’d probably start with the All LED Effects in One Sketch, and replace the switch with some sorts of setup that mimics a switch based on an IR Remote. This will most likely not be a simple drop-in solution though (because of the interrupt that is needed). Maybe one or the other visitor here has worked with IR remotes and are willing to chime in.
Here is the skeleton sketch I use for Ir remotes, you will need to change the remote codes to ones that work with your own remote but there should be a sketch in the examples to get them.
I have used it for a strip of lights to change colours and I used one effect for my grand-children so I’m sure you could incorporate it with the “all LED in One Sketch” but I haven’t tested that yet.
#include <IRremote.h>
int RECV_PIN = 11; IRrecv irrecv(RECV_PIN); decode_results results;
i have the same code for my remote control i tried to change the code in the sketch, but i have not knowledge of programing and i’m stuck, i could get until my arduino is receiving the signal from the remote control as shown in the code below.
The challenge you’re looking at is that in my code I use an interrupt which gets triggered when the button is pressed. However, using IR instead will not trigger the interrupt so you’re stuck in “loop()” which will prevent you to interrupt a running loop.
Since I don’t have my gear with me, I cannot even begin to test an alternative.
You might find something useful here regarding interrupts, I hope to have a go at this soon as it could be very useful in some settings. I also have a couple of wemos d1 boards (using esp8266 [wifi]) and that will be another one to post, but I would guess it might be a bigger sketch so will likely post that in the forum.
i was just trying to get this workin in another sketch, but as i told you before, im not good at all in programing and i’m stuck in this part.
i can read the remote key and get the option to run when the key is pressed, but i cant get out the function.
in my first try i could get the cyclon function to run half of the way, so i use the while to get it run complete, but dont get out there to accept other key.
can anyone give me a push to get there?
#include <FastLED.h> #include <IRremote.h> unsigned long key_value = 0; const int RECV_PIN = 7; IRrecv irrecv(RECV_PIN); decode_results results; // How many leds in your strip? #define NUM_LEDS 11 //549
// For led chips like Neopixels, which have a data line, ground, and power, you just // need to define DATA_PIN. For led chipsets that are SPI based (four wires - data, clock, // ground, and power), like the LPD8806, define both DATA_PIN and CLOCK_PIN #define DATA_PIN 3 //#define CLOCK_PIN 13
// Define the array of leds CRGB leds[NUM_LEDS]; void setup() { Serial.begin(9600); Serial.println("resetting"); LEDS.addLeds<WS2812,DATA_PIN,RGB>(leds,NUM_LEDS); LEDS.setBrightness(16); irrecv.enableIRIn(); irrecv.blink13(true);
}
void fadeall() { for(int i = 0; i < NUM_LEDS; i++) { leds[i].nscale8(150); } }
void loop() { // if (results.value == 0XFFFFFFFF){ //results.value = key_value; if (irrecv.decode(&results)){ switch(results.value){ case 0xFF30CF: //Keypad button "1" while(results.value == 0xFF30CF) OneLed(); break;
case 0xFF18E7: //Keypad button "2" while(results.value == 0xFF18E7) MovingLed(); break;
case 0xFF38C7: //Keypad button "5" while(results.value == 0xFF38C7) Cyclon(); break;
void MovingLed(){ for(int dot = 0; dot < NUM_LEDS; dot++) { Serial.println(dot); leds[dot] = CRGB::Blue; FastLED.show(); // clear this led for the next time around the loop leds[dot] = CRGB::Black; delay(1000); } }
void Cyclon() { static uint8_t hue = 0; // First slide the led in one direction Serial.println("ida"); for(int i = 0; i < NUM_LEDS; i++) { // Set the i'th led to red leds[i] = CHSV(hue++, 255, 255); // Show the leds FastLED.show(); // now that we've shown the leds, reset the i'th led to black // leds[i] = CRGB::Black; fadeall(); // Wait a little bit before we loop around and do it again delay(100); } // Now go in the other direction. Serial.println("vuelta"); for(int i = (NUM_LEDS)-1; i >= 0; i--) { // Set the i'th led to red leds[i] = CHSV(hue++, 255, 255); // Show the leds FastLED.show(); // now that we've shown the leds, reset the i'th led to black // leds[i] = CRGB::Black; fadeall(); // Wait a little bit before we loop around and do it again delay(100); } }
I’d recommend continuing this topic in the forum and post the link to the forum topic here. It’s getting a little off topic and posting code each time takes up a lot of space.
Note: I haven’t done anything with IR remotes (yet). I hope some else can chime in.
void meteorRain(byte red, byte green, byte blue, byte meteorSize, byte meteorTrailDecay, boolean meteorRandomDecay, int SpeedDelay) { setAll(0,0,0) // here is the problem
I think you may have forgotten the last of of the basic framework (see NeoPixel Framework above).
Seeing an error like this usually means that you’ve not defined a function (SetAll in this case, which is at the end of the framework), or you’ve made a typo (for example one missing “}”).
Yes there is a way to adjust brightness. The easiest is when using the FastLED library, for example by adding the setBrightness() statement in the loop() (or where ever in the code you’d want to change brightness);
Hello, thank you so much for the answer,I’ve already solved the problem, but now I have another question, I’m going to control 4 LED strips at the end, each of them presents different effects one after another, so here is the question : how do I adjust the code, for example the Meteor rain effect, to have a delay and wait for other strips running other effects, I’ve tried to put a delay(5000); at the end but it didn’t fade to black but the light just stayed there. Is there any solution for this?
Obviously, this will fade instantly, changing the value “255” to a lower number, and repeating the loop a few times, may make this go a little smoother.
This would fade in 4 steps, by 64 each step (alter if needed):
Hello Hans, thanks for the answer, now I’m trying to control multiple strips, and want them to run Meteorrain effect one after another, but no matter how I change the code, they either don’t work or run at the same time, could you please tell me how can I can the code? thanks for the help Jeff
#include <Adafruit_NeoPixel.h>
#define NUM_LEDS 28 #define PIN 12 #define PIN1 11 #define PIN2 10 #define PIN3 9 #define BRIGHTNESS 40 // Parameter 1 = number of pixels in strip // Parameter 2 = pin number (most are valid) // Parameter 3 = pixel type flags, add together as needed: // NEO_KHZ800 800 KHz bitstream (most NeoPixel products w/WS2812 LEDs) // NEO_KHZ400 400 KHz (classic 'v1' (not v2) FLORA pixels, WS2811 drivers) // NEO_GRB Pixels are wired for GRB bitstream (most NeoPixel products) // NEO_RGB Pixels are wired for RGB bitstream (v1 FLORA pixels, not v2) Adafruit_NeoPixel strip = Adafruit_NeoPixel(NUM_LEDS, PIN, NEO_GRB + NEO_KHZ800); Adafruit_NeoPixel strip1 = Adafruit_NeoPixel(NUM_LEDS, PIN1, NEO_GRB + NEO_KHZ800); Adafruit_NeoPixel strip2 = Adafruit_NeoPixel(NUM_LEDS, PIN2, NEO_GRB + NEO_KHZ800); Adafruit_NeoPixel strip3 = Adafruit_NeoPixel(NUM_LEDS, PIN3, NEO_GRB + NEO_KHZ800);
I do not see anything wrong with the code (please consider using the forum for posting code) – but I also do not have the hardware near me to test. I would however consider using the FastLED library for more complex setups like yours.
Hey, Thanks For your codes. Great efforts by you, it helped me alot. I was trying 5 colored bouncing balls as you have shown but its not working by me. i am making mistake somewhere but i don’t know where. i am leaving code that i am using here.
#include <Adafruit_NeoPixel.h> #define PIN 0 #define NUM_LEDS 100 // Parameter 1 = number of pixels in strip // Parameter 2 = pin number (most are valid) // Parameter 3 = pixel type flags, add together as needed: // NEO_KHZ800 800 KHz bitstream (most NeoPixel products w/WS2812 LEDs) // NEO_KHZ400 400 KHz (classic 'v1' (not v2) FLORA pixels, WS2811 drivers) // NEO_GRB Pixels are wired for GRB bitstream (most NeoPixel products) // NEO_RGB Pixels are wired for RGB bitstream (v1 FLORA pixels, not v2) Adafruit_NeoPixel strip = Adafruit_NeoPixel(NUM_LEDS, PIN, NEO_GRB + NEO_KHZ800);
void setup() { strip.begin(); strip.show(); // Initialize all pixels to 'off' }
void loop() { byte colors[5][3] = { {0xff, 0,0}, // red {0, 0xff, 0}, // green {0, 0, 0xff}, // blue {0xff, 0xff, 0xff},// white {0xff, 0xff, 0} }; // yellow BouncingColoredBalls(5, colors); }
I do not have LED strips & Arduino handy, so I cannot test anything. However I see that you’ve set you PIN to “0” (zero) – this should probably be a different number (eg. typically using pin 6). Since you do not have a good description of what is “not” working, I can only guess that this is the problem.
I appreciate your effort. Despite of very little knowledge of programming i want to make certain effect in my LED. Can you help me to have Fourth animation in this video link. https://youtu.be/578hrnxruuI?t=39
Check out Frederick’s website, where he posted the code – I believe this is the function he used (modified to fit my code):
// gradually fill up the strip with random colors void randomColorFill(uint8_t wait) { setAll(0,0,0); // was: clearStrip();
for(uint16_t i=0; i<dstrip.numPixels(); i++) { // iterate over every LED of the strip int r = random(0,255); // generate a random color int g = random(0,255); int b = random(0,255);
for(uint16_t j=0; j<dstrip.numPixels()-i; j++) { // iterate over every LED of the strip, that hasn't lit up yet
setPixel(j-1, 0, 0, 0); // was: dstrip.setPixelColor(j-1, dstrip.Color(0, 0, 0)); // turn previous LED off setPixel(j, r, g, b); // was: strip.setPixelColor(j, dstrip.Color(r, g, b)); // turn current LED on showStrip();; // was: dstrip.show(); // apply the colors delay(wait); } } }
I have not been able to test this (not having my gear near me), but it should work.
Call the function like so in the loop():
randomColorFill(100); // where "100" is the delay for each "LED" being added
Thanks Hans, I have tried that code and solved some errors but it shows ‘Error compiling for board’. here is the code that i used.
#include <Adafruit_NeoPixel.h>
// gradually fill up the strip with random colors
#define PIN 5 // Parameter 1 = number of pixels in strip // Parameter 2 = pin number (most are valid) // Parameter 3 = pixel type flags, add together as needed: // NEO_KHZ800 800 KHz bitstream (most NeoPixel products w/WS2812 LEDs) // NEO_KHZ400 400 KHz (classic 'v1' (not v2) FLORA pixels, WS2811 drivers) // NEO_GRB Pixels are wired for GRB bitstream (most NeoPixel products) // NEO_RGB Pixels are wired for RGB bitstream (v1 FLORA pixels, not v2) Adafruit_NeoPixel strip = Adafruit_NeoPixel(10, PIN, NEO_GRB + NEO_KHZ800); void setup() { strip.begin(); strip.show(); // Initialize all pixels to 'off' } void randomColorFill(uint8_t wait) { for(uint16_t i=0; i<strip.numPixels(); i++) { // iterate over every LED of the strip int r = random(0,255); // generate a random color int g = random(0,255); int b = random(0,255); for(uint16_t j=0; j<strip.numPixels()- i; j++) { // iterate over every LED of the strip, that hasn't lit up yet strip.setPixelColor(j-i, 0, 0, 0); // was: dstrip.setPixelColor(j-1, dstrip.Color(0, 0, 0)); // turn previous LED off strip.setPixelColor(j, r, g, b); // was: strip.setPixelColor(j, dstrip.Color(r, g, b)); // turn current LED on strip.show(); // was: dstrip.show(); // apply the colors delay(wait); } } }
Just wanted to thank you for this. I was able to merge your fire effect into a project where I had to simulate coals and embers in an interactive museum display.
My setup uses twenty 24 LED neopixel rings (total of 480 neopixels) running the fire effect on an Arduino nano. The twenty neopixels rings are split into two separate data runs of 240 LEDs because the animation was too slow when trying to incorporate a single chain of 480 neopixels. I randomized the order and placement of the rings to try to make the effect seem more random.
The only problem I’ve run into is trying to incorporate more yellow into the fire effect. I’ve played around with the spectrum and heatramp sections without a lot of luck. I’m able to introduce more yellow but at the cost of adding in bright white when the sparks occur. Any suggestions?
hello all. i done whole things and work very well but i address 405 LEDs but after 135 leds not work properly according to given data maybe it’s due to less current, so can anyone please help me with that problem ?
First thing I’d do, is do a simple test to see if all LEDs work properly. If (in your example) LED 136 is defective, everything after that LED will not work or not work properly.
Second thing to pay attention to is your Poser Supply – make sure it’s powerful enough – between (405x20ma) 8A and 24A. Since your strand is long, I’d connect +5V and GND from the power supply, at the end of the strand as well.
Last step; “not working properly” doesn’t tell us much about what is going on. Do the LEDs after LED 135 not work at all (defective LED 136)? Are effects acting weird (possible problem in the sketch code)? Are the LEDs dimming (Power Supply problem)?
Mar 12, 2019 - 8:57 PM - Eduardo Filipe Comment Link
Hello!I’m looking to make a simple code for something similar to the blue and red police lights, like a wigwag effect.Can you please help me with this?Thanks!Eduardo
Even though I think Italian sounds great, I unfortunately do not speak the language. So Google Translate made this out of your post:
hi, you are very strong, beautiful play of light !!!
I wanted to copy all the examples and place them on a single sketch, I succeeded
for almost everyone, there is only one that does not want, and the one with the LEDs that they skip, I don’t know what to modify to make them all stay together
can you please help me ??
and if I don’t ask too much?
maybe giving them some time has to do at least 2 times the same thing, doing so we extend the time to enjoy the games.
Thank you so much.
Thank you for your kind words. They even sound better in Italian
Brilliant effect, I found this very interesting. as this is for Arduino’s code, it there possible to convert from this code into Python for my raspberry pi?
I’m not a Python coder, but one of the users here (Hootie) has started a project just for this purpose. Look at his Github page for more info.
p.s. I wouldn’t mind getting started with Python. However, I’m so used to an IDE as seen with Delphi and Lazarus Pascal, true RAD (Rapid Application Development) IDE’s where one can design the UI directly in the IDE, and write code very rapidly. I have found it very hard to find anything like that for Python (suggestions are welcome).
Thanks so much for this code. I’ve been playing with it a bit. I’m really trying though to figure out how I can get different patterns running in different sections of the strip. The reason for this is that I’m using the LED strip for my electric skateboard and I want part of the strip (40 LEDs) to be under the board and then some of the strip (10 LEDs) to be at the front of the board to be used as a headlight. I can’t figure out how to modify your code to allow for this. Any help would be appreciated.
I suppose there are a few ways we can accomplish this. I’d use the last 10 LEDs of the strip for the headlight and modify the code something like this.
Set NUM_LEDS to the number of leds (40) you’d like to use for effects, and HEADLIGHT_LEDS to the number of LEDs you’d like to use for a headlight (10). Next in the setup() we set the headlights to white (or whichever color you prefer).
Since the total led count = NUM_LEDS+HEADLIGHT_LED, we will have to use this when initializing the LEDs. After that, all effect functions work with NUM_LEDS, so they (theoretically) should only use LEDs zero to NUM_LEDS. I just had my first coffee for the day, so I hope I didn’t goof up the counting …
For FastLED:
#include "FastLED.h" #define NUM_LEDS 40 #define HEADLIGHT_LEDS 10 CRGB leds[NUM_LEDS]; #define PIN 6 void setup() { FastLED.addLeds<WS2811, PIN, GRB>(leds, NUM_LEDS+HEADLIGHT_LEDS).setCorrection( TypicalLEDStrip );
// Set the "HeadLight LEDs to white
for(int i=0;i<HEADLIGHT_LEDS;i++) {
setPixel(i+NUM_LIGHTS,255,25,255);
} }
...
For NeoPixel:
#include <Adafruit_NeoPixel.h> #define PIN 6 #define NUM_LEDS 60 #define HEADLIGHT_LEDS 10 // Parameter 1 = number of pixels in strip // Parameter 2 = pin number (most are valid) // Parameter 3 = pixel type flags, add together as needed: // NEO_KHZ800 800 KHz bitstream (most NeoPixel products w/WS2812 LEDs) // NEO_KHZ400 400 KHz (classic 'v1' (not v2) FLORA pixels, WS2811 drivers) // NEO_GRB Pixels are wired for GRB bitstream (most NeoPixel products) // NEO_RGB Pixels are wired for RGB bitstream (v1 FLORA pixels, not v2) Adafruit_NeoPixel strip = Adafruit_NeoPixel(NUM_LEDS+HEADLIGHT_LEDS, PIN, NEO_GRB + NEO_KHZ800); void setup() { strip.begin(); strip.show(); // Initialize all pixels to 'off' // Set the "HeadLight LEDs to white for(int i=0;i<HEADLIGHT_LEDS; i++) { setPixel(NUM_LIGHTS+i,255,25,255); }
Hopefully this will get you started
Oh and pretty please post your end product – I’m curious what this will look like – it sounds awesome!
I been trying to replace parts of the reciever code to include this fire code however I have not been successful, I am relatively new to arduino however I have used it for various projects in the past, any help/advice or a point in the right direction would be much appreciated,
You may want to take a look at this: Effects with Remote control – it may help you get started. I apologize for the short answer, but I’m running out of time with the current projects and I’m not familiar with the item you’re wanting to use. A quick glance makes me thing the IR Remote code (structure) will work for your application as well.
I have a few questions. Just to make sure, if I connect two same strands of LED’S in parallel, they will work identically?
I’m trying to install LED lighting to my car and want to add some effects. Leds will be controlled with Bluetooth.
I’ve tried to change colors with setAll command, but some why it does not work for me, because setting commands to change color of each led would make a very long code.
Other question is how to make leds fade between two or three colors as one effect?
Any help would be appreciated.
p.s don’t know why, but pressing button changes just between 3 effects, fadeInOut, strobe and some other.. each effect separately works fine.
Two strands in parallel should work indeed, and they would show identical effects. (assuming WS2812 like models, but other models may work as well)
I suspect there is something not going right on your Arduino setup if setAll() doesn’t work and effects only switch between 3 effects. A few things to check; – Verify the sketch (I assume you’ve done this already) – Are you using FastLED of NeoPixel (I prefer FastLED) – What model Arduino are you using? (I’ve had poor experience with clones)
Well, I’ve copied your code, so it should be okay. I mean on your effect code setAll works, but if I use it on a separate code just for simple color changing it does not, maybe I have placed it in a wrong position, I’m not a programmer, so I’m just trying different cases. And Im using original Arduino uno r3 with FastLED
Usually, when I get lost in the code, I’ll start over and start with the bare minimum. Just to test and see how things work. It also helps getting a better overview what we’re doing
Don’t know what I did wrong before, but setAll is now working ant everything is fine. I just have one issue and hope you could help me.
As I said before, I’m using Bluetooth app to control the lighting, for now no effects, just simple color changing. There’s one slider, which should control the brightness and it is set from 10 to 100. For example, the arduino gets signal of 110-1100 (index of 1 and slider possition 10 to 100) that should change brightness, but some why it’s very inconsistent. Sliding it upwards at one spot it gets a little brighter, on other a little dimmer, somewhere at the middle it even shuts off completely.
If I recall correctly, the FastLED brightness function uses a scale 0 – 255, where 0 = off, 128 = 50% brightness and 255 = max brightness. Since you’re using an app, I would assume you can tell it to use that scale. If this cannot be done, and you’re stuck with a scale 110 – 1100, then converting that to a 0 – 255 range may indeed come with some dead spots, since 1100 -> 255 = 255* 1100/1100. So in that case you’ll need to divide the value by 1100 and multiply by 255. Keep in mind that brightness has to be a byte, otherwise (int for example can be 2 bytes) could potentially mean that only one of the bytes is being read (and the result may be completely wrong). It may be a good idea to (temporary for debugging), dump the value of “brightness” to the serial monitor – just to see what the converted string looks like after conversion? I see you’re looking for the position of “1” in your received string – maybe there is a better way to determine the value?
Well yes, I can set the scale up to 255. And for the index, I can set it whatever I want, so maybe some letter would be better, as I’m using letters for the colors.
Oh that would be so nice if I knew how to dump the value to the serial monitor… :D That must be the sign for me to learn coding :) Anyway, I can set the value 0-255 in the app and index with a letter, but then how the arduino should read that? How the code line should look like?
Interesting that you’re using letters for the values – aren’t there characters that may not be readable? Then again; I don’t know how the Bluetooth app works, so if a character works; great. I would prefer numbers though – it may make debugging easier. Maybe comma separated or something like that. I guess this also brings me to you last question; how to read it; again, I do not know how the app sends data, and what the options are.
As for doing serial output; that’s actually pretty easy. Leave the Arduino hooked to your PC, and the Arduino IDE has the means to monitor this. See also this description I’ve made.
Started a new thread here to further discuss my questions. Thanks again for getting back to me.
Here’s my set-up. I have a nano controlling a WS2812 RGB LED string with your sketch that I’ve modified (added variations of the theater chase and a couple others). I can power the arduino from a wall outlet that can be controlled through Z-wave. When I activate power to the outlet the arduino will power on, boot and start the first light sequence. What I’m trying to figure out is how after the arduino gets power it can send a signal to a TV via a separate IR LED. I’ve seen 2 methods of capturing and sending IR signals but no real method on how to combine different types of sketches and no idea how to add a delay to sending the IR signal as my thought is to also have the TV connected to the same switched power source. That way when the power is turned off the TV turns off as well as the arduino. When first getting power back the TV will likely need a slight delay to internally boot up.
The second aspect is that I currently use your guide for adding a single SPST switch to cycle through the light sequences. I would like to be able to use a matrix keypad to control more functions, like changing sequences both forward and backward, maybe selecting a specific sequence with a number code, and sending a few more IR signals to the TV for volume, power and input control.
If you have any ideas on any of this I’m very appreciative of your advice. At the very least I currently have the lights working and can use a simple switch to change the sequence and can resolve the TV on/off issue in other ways. Thanks for everything!
If I’d had experience with IR for remotes, I’d say: start a thread in the forum But unfortunately, I have not played with IR (yet). Once you know what code to send, I assume you could call that in the setup(), which would then fire at startup and fire only once. UNLESS you use the one button to cycle through effects of course; since that would reset the Arduino and run setup() again.
Combined with a keyboard matrix, I’d think a different approach would be needed to detect the button to change effects and read the keyboard. This may become a challenge since the arduino is not a multitask device. You may have to do some reading up to do on multitasking. I haven’t played with it (yet).
Here’s a WIP of the project I’ve been pestering you about. The frame has now been painted but still needs final trim work installed. I do need to re-hang the TV and then the frame though to make it all nice and level.
Anyways, I was trying to massage on of the sequences you helped my create but ran into an issue and my knowledge of this code just isn’t that strong. I have the lights running on a every 4th light chaser sequence with all other lights on at a dim level. I tried the change the color of the lights but while the “chase” lights did change color the static lights stayed the same dim white. I was trying to make them all an amber color. Any ideas?
Ehm, every 4th LED dimmed,… you could try this (I don’t have your code, so I’m taking Theatre chase as an example):
void theaterChase(byte red, byte green, byte blue, int SpeedDelay) { for (int j=0; j<10; j++) { //do 10 cycles of chasing for (int q=0; q < 3; q++) { for (int i=0; i < NUM_LEDS; i=i+3) { setPixel(i+q, red, green, blue); //turn every third pixel on } showStrip();
delay(SpeedDelay);
for (int i=0; i < NUM_LEDS; i=i+3) { setPixel(i+q, 0xBB,0x00,0xBB); //turn every third pixel off <--- change this color } } } }
See the part where we turn off the LEDs, here we set the LEDs to black. If you change that to a different color (your choice of dimmed color) then I assume it should give you the desired effect? (I picked the color with the Color Picker above).
I should have posted my code before and used a better description. In the second video linked I have the theater chase mode with every 4th light illuminated (rather than every 3rd like your main code) and then you showed me how to have all the “off” lights actually on but dimmed. So this is the code for that.
case 0 : {
// theaterChaseWhite4FastOnClockwise - Color (red, green, blue), speed delay
theaterChaseO4(255, 255, 255, 100);
break;
}
void theaterChaseO4(byte red, byte green, byte blue, int SpeedDelay) {
for (int j = 0; j < 10; j++) { //do 10 cycles of chasing
for (int q = 0; q < 4; q++) {
for (int i = 0; i < NUM_LEDS; i = i + 4) {
setPixel(i + q, red, green, blue); //turn every fourth pixel on
}
showStrip();
delay(SpeedDelay);
for (int i = 0; i < NUM_LEDS; i = i + 4) { // 2nd loop!!
setPixel(i + q, ChaseBaseBrigthness, ChaseBaseBrigthness, ChaseBaseBrigthness); //turn every fourth pixel off
}
}
}
}
So now I’m trying to change the color of the lights from White to Amber. If I change the color in the top section the “chase” lights do turn Amber. However the “dim” lights are still white, not amber. I thought that the color information in the first section would be used for both the chase and dim lights but that doesn’t seem to be the case, so I am confused.
Here is a mini build log for the digital frame I built using your help for the LED string coding. The diffusers are pingpong balls hot glued over the lights coming through the holes in the frame. The lights are set to “white” but the camera picks them up as very purple. I am still trying to figure out if I can change them to a shade of amber with the ‘dim’ lights also being dimmed amber. I posted the code above in this thread that you helped create to get the white dimmed lights but for some reason I can’t change their color, only the ‘on’ light color will change.
I will try to get another video soon of what I mean. Currently waiting on a momentary switch to arrive so I can install it into the frame to change light sequences with an easy button press.
Ultimately I’d love to be able to send a signal from a separate pin through an IR LED to turn the TV on when the Arduino gets power. Waiting on my IR LED shipment as well.
This video shows what I’ve been trying to work out with the color of the ‘dim’ lights on the theater chase. I posted the code in a reply above that you helped work out for the white lights but changing the color value only seems to affect the ‘on’ lights and not the ‘dim’ lights. Any ideas?
Oh sorry for missing the question haha (I’m on vacation, so I think I must have left my brain at home hahah). Looking at your AVSForum post: very nice and very well though through. Looks stunning!
At a quick glance I noticed I made a booboo in the code;
void theaterChase(byte red, byte green, byte blue, int SpeedDelay) { for (int j=0; j<10; j++) { //do 10 cycles of chasing for (int q=0; q < 3; q++) { for (int i=0; i < NUM_LEDS; i=i+3) { setPixel(i+q, red, green, blue); //turn every third pixel on } showStrip();
delay(SpeedDelay);
for (int i=0; i < NUM_LEDS; i=i+3) { setPixel(i+q, 0xBB,0x00,0xBB); //turn every third pixel off <--- change this color } showStrip(); // <-- forgot this! } } }
When I get home (a week from now), I’ll pull out my gear and will try to build the effect so I can better work on the issue.
Thanks for looking into this on your vacation. I thought you were home now otherwise I’d not have bugged you! I tried the changes to the code you noted but it only blinked each LED once and then stayed on a solid color. Enjoy the rest of your vacation as I’m not in a huge rush for any answers.
It may be an idea to start a forum topic on this project. I have limited time (unfortunately, I cannot live from my website), and the forum allows others to chime in as well, without making the discussions here too lengthy …
When I arrive at my home I’m going to show the complete code here. Anyway I want when a “if” turns true the rainbow runs: If ( a == true)rainbow () And when another if turns true the rainbow stops to run: If ( b == true)Rainbow () stops The variable b can be a button or something like that. How can I do it?
I tryed to use the function strip.clear() but it didn’t work. I also tryed to force the colors turns in black strip.fill((0,0,0),0,30) but it also didn’t work.
Well, I can imagine you have something like a cord in mind that catches fire and starts burning. Again, I wouldn’t know what that would look like. I looked on YouTube if I could find something, with no result (so far).
As far as I can see in the code; the pattern is predetermined by making a “bitmap” of a particular song. So before playing the song you’d need to define a pattern which (in your example) is loaded in the program. It would not be impossible to make this for the Arduino, however … you’d need to make those patterns first, for each song.
I’ve been trying to make a shtech to do what I need to. My setup is:
– 39 neopixel strip (WS 2012);
– attiny 85 – with 1000uf capacitor (between ground and VCC) and 450 ohm resistor on pin 1 (data pin);
– all is programed with a Sparkfun USBTiny programmer;
– using Adafruit Neopixel library.
I spliced my led strip in 3 strips 13 each.
What I am trying to do :
– 1 strip red;
– 1 strip green;
– 1 strip blue.
All is OK, but I need to have the red strip using color fill (colorWipe). How can I do that?
#include <Adafruit_NeoPixel.h>
#define PIN 1
// Parameter 1 = number of pixels in strip // Parameter 2 = pin number (most are valid) // Parameter 3 = pixel type flags, add together as needed: // NEO_KHZ800 800 KHz bitstream (most NeoPixel products w/WS2812 LEDs) // NEO_KHZ400 400 KHz (classic 'v1' (not v2) FLORA pixels, WS2811 drivers) // NEO_GRB Pixels are wired for GRB bitstream (most NeoPixel products) // NEO_RGB Pixels are wired for RGB bitstream (v1 FLORA pixels, not v2) Adafruit_NeoPixel strip = Adafruit_NeoPixel(38, PIN, NEO_GRB + NEO_KHZ800); uint32_t red = strip.Color(255, 0, 0); uint32_t green = strip.Color(0, 255, 0); uint32_t blue = strip.Color(0, 0, 255); int led = 0; void setup() { strip.begin(); strip.show(); // Initialize all pixels to 'off' }
void loop() { strip.fill(red, 0, 12); strip.fill(green, 12, 25); strip.fill(blue, 25, 38); colorWipe(strip.Color(255, 0, 0),50); } // Fill the dots one after the other with a color void colorWipe(uint32_t color, uint8_t wait){ int i; strip.fill(green, 12, 25); strip.fill(blue, 25, 38); { for(int i=0; i<strip.numPixels(); i++) { // For each pixel in strip... strip.setPixelColor(i, color); // Set pixel's color (in RAM) strip.show(); // Update strip to match delay(wait);// Pause for a moment
Thank you taking time to get back to me. After I “clean” up your code for Adafruit library, I try it many times, but I cant make it work. First 13 led lit up red, but there is no color fill. All of them stay lit and that’s about it. Can you have a look whats going on?
Another thing is the last led (39th) stays lit like a yellowish color all the time after power up. Why?
Thank you
Gabi
colorWipe(255,0,0,50,0,12); // Colorwipe for LEDs 0-12
void colorWipe(byte red, byte green, byte blue, int SpeedDelay, int StartLED, int StopLED) { for(uint_16 i=StartLED; i<=StopLED; i++) { strip.setPixelColor(i, red, green, blue); strip.show(); delay(SpeedDelay); }
Sorry, Hans. Just tried and does the same thing. First group of leds (0 to 12) lit up red and static. The rest of the groups (13 to 26 and 27 to 39) are off. If I bracket (//) the entire colorWipe function and put on the main void loop:
I’ve never used the fill function of NeoPixel as I prefer to use the FastLED library (both are good libraries though).
From what I read here, the fill function works as such:
strip.fill(color, first, count);
Where “count” is the number of pixels to fill. From what I see in your code, you’re using it maybe not as intended; instead of “first” and “count”, you seem to be using “first” and “last”. So the fill functions should probably work better if you do this:
I doubt it will make a difference, but using a uint_16 is maybe more correct (it was a little sloppy of me to use . just an “int”). I assume the two closing accolades ( } ) at the end, were in your code as well.
Hans, I was able to make it work. The colorwipe code helped me and I was able to modify the Rainbow Cycle code as per my need. Now I need help with another issue. The colors are moving from left to right. Can we move it from right to left? Keeping a flag somewhere and changing the code based on it. Also I am calling it from another function and i want the wave in an infinite loop unless say i switch off the power source. I cannot put in inside loop() as its a continuation of a big project. i need to do something with the for loop (j = 0; j <256*5; j++);
The next 2 days will be tricky to help out as I’m traveling, but I’ll try to help where I can.
So having that function outside of loop() is (IMO) the clean way to do it, but it does come with a few questions – which we can address once we have the infinite loop going.
Do I understand correctly that you want Color Wipe to run indefinitely? And then of course the question; what should that look like?
I want the rainbow cycle to run infinitely say atleast for 30mins or 1hour. what I have done is changed the code in the wheel() function like this. Rest code is same as the Rainbow cycle. Now I want this cycle to run infinitely instead of the (i=0; i < 5*256; i++) // 5 times
I want the rainbow cycle to run infinitely say atleast for 30mins or 1hour. what I have done is changed the code in the wheel() function like this. Rest code is same as the Rainbow cycle. Now I want this cycle to run infinitely instead of the (i=0; i < 5*256; i++) // 5 times
I try to put a touch button like this on the all effects sketch, but I don’t know where exactly should I put that piece of code. Can you help? I also found this code (see below), but again I am stuck … I put a push button and is working. When I replace the push button with the touch one, the selection is working till the strobe part. I need to touch quite a few times till the make it to move to next animation. I don’t know if the touch button should be coded with the above code or my power supply (5V 2A) is playing
Thank you for your time
#define touchpin 4 // sets the capactitive touch sensor @pin 4 int ledPin = 2; // sets the LED @pin 2 void setup() { pinMode(touchpin, INPUT); //sets the touch sensor as input pinMode(ledPin, OUTPUT); //sets the led as output } void loop() { int touchValue = digitalRead(touchpin); //reads the touch sensor signal if (touchValue == HIGH){ //if sensor is HIGH digitalWrite(ledPin, HIGH); //LED will turn ON } else{ //otherwise digitalWrite(ledPin,LOW); //LED is turned OFF } delay(300); //delay of 300milliseconds }
With the current code, this will be as fast as it goes.
You may be able to optimize the code by leaving out the setAll() line, and adding to the 2 loops a setPixel(x,0,0,0). This would take out setting all LEDs to black and applying it. I have not tested this, but this could be a way to make it go a little faster.
i was wondering if you could tell me which values adjust the speed of the fade animation. i have created a dual animation using new kitt and fade for a project, i seem to have lost the fade completely. it goes from an ON state with a 30 sec delay to a OFF state with no fade.
posting long code here is getting a little out of control, hence the message “Friendly request to not post large files here (like source codes, log files or config files).” in the editor and my request to start a forum topic.
In your code, I see no evidence of any fading. So I’m not sure what your question is.
First of all, thank you very much for all of these awesome effects! This saves me a lot of time and energy and I feel like I have a decent grasp of the code. I do not know very much about code myself however and have a question.
Would it be possible to set effects only to a certain section of the strand? Say I have a 60 LED strand, and I want LED’s 1-22 to display cylon, LED’s 23-38 to display Strobe, and 39-60 to display say cylon again. Would this be fairly easy to learn how to do, or is it even possible at all?
I rave alot and recently had the idea of creating a helmet decked out with LED’s, I have attached the LED’s to the helmet and run the Adafruit strandtest code to test it and now am trying learn more interesting effects to add. So far it looks pretty cool, if you want to see it I could send a picture haha!
Mixing effects is not impossible, but comes with it’s challenges. When looking at the code, each effect has its own “loop”, which means that if you’d like to use multiple effects, we’d need to combine those – which can be a challenge. The challenge will not just be that each step of each effect needs to be done, but timing will become more critical as well.
I guess the best approach would to try to understand each effect (you’d like to use), and from that create your own effect.
Hope your summer has been going well. I’ve been tinkering a bit with the code you’ve helped put together for my project and I think I’ve found the issue I was asking about before but I am uncertain of a solution. Perhaps you have another idea on how to achieve this.
Take a 4 LED segment. A set colour at full brightness “chases” through the segment at a set speed. When not the “chase ” light the other lights are on to the set colour at a defined lower brightness level. Almost a “head” and “tail” chase of the same colour but only changing the brightness level with main colour and speed delay variable.
If this makes sense and you have and ideas or any idea where I might find some more info on something like this your help is always appreciated. You’ve gotten me way further than other places I’ve asked for guidance!
If not all LEDs should have the same brightness then you could apply a (sloppy) trick. Say you set the bright LEDs as such:
setPixel(lednumber, red, green, blue);
Then making other LEDs less bright could be done like this:
setPixel(lednumber, red/10, green/10, blue/10);
So basically (you’ll have to experiment with this) take the same color values for red/green/blue, but divide them for example by 10.
If I understand you correctly; all LEDs are ON and dimmed, only the chase is brighter? In that case, first call setAll with with the divided colors, instead of black;
setAll(red/10, green/10, blue/10); // set all LEDs dimmed
And then for the LEDs that need to be brighter:
setPixel(lednumber, red, green, blue); // set individual LED to brighter
(of course you’ll need to incorporate that in the effect you’d like to use)
Changing this code – setPixel(i+q, 0, 0, 0) to – setPixel(i+q, red/90, green/90, blue/90) works! To explain, taking the theater chase code you’ve helped teak and in the second parameter instead of using a chase dim ariable you use the colour/ variable. If that makes sense.
I’ll post more when I’ve got it better worked out.
If you plan to post the code (which we’d love to see!), then please post it in the Arduino Forum (to avoid that the comments here become a collection of huge code listings), and maybe post a link to the forum post here instead.
Just looking for a little help as I’m a total newbie at this LED stuff. I am building an LED strip light for under my electric scooter using the following.
-Neon Pixel LED Strip
– Adafruit Feather board
– All effects in one sketch
Now, I have this working on the bench and I can toggle through the different effects using a button just fine. Next step is I would like to use my iPhone (android if easier) to turn on/off and toggle the effects over BLE. Any pointers on how to go about doing this?
Well, I’ll admit that I haven’t tried something like that yet. You’d probably need a Bluetooth or Ethernet/Wifi shield for your Arduino, and get an app that supports this.
Hans that was it! I now have two lights “running”!
Thank you so much. I guess this is why I went into networking instead of coding
One more thought about lengthening each color.
Is the “i+Position” part of the code the sine wave frequency? If so would I then change “Position++” to “Position = Position + 2” in order to make each color “wider” on the strip.
Haha, well, I think programming is a matter of training the brain to think in certain ways. It is all logic and recalling your “steps” when you want to do something. When starting a complicated project or function, I usually (in my head) recap the exact steps I’d take if I (as a human) were to solve the issue at hand. Writing it down the first few times will help as well. The trick obviously being to not forget a step – but that is a matter of “training” .
As far as your “wave” question goes; I’d always recommend making a copy of the sketch that works, and just experiment with it. This will be the best way to learn and get a better feeling how things work (or not work). I sometimes have to do this myself to determine the effect of what I changed.
I’m afraid the libraries cannot be run directly on a Raspberry Pi. The code and hardware is simply very different. Having said that … here a few resources that may be helpful to run Arduino code on a Raspberry Pi anyway …
But to keep a long story short; It will take a lot of reading up and experimenting to get only a part of the effects/libraries to work. If you’re new to this topic, then I’d highly recommend starting with an Arduino anyway – they can be had at a pretty affordable prince (at Amazon for example). Not a requirement, however for your first Arduino, I do recommend getting “the original” – it’s a few bucks extra, but it may save you some misery (little incompatibilities with the USB chip) and you’d show support for the original developers. You’d get familiar with the ins- and outs- and at a later time, once you have a little more experience, you can try one of the cheaper clones.
HI Lucian if you are still working on xmas tree and need help message me. I am currently adding new effects for ws2811 and/or ws2812 not sure how the “WS2818B” work, as there are 4 connections instead of the 3 that i have on mine.
As far as I know, the WS2811 is controlled slightly different than the WS2812 and WS2812B. Both WS2812 models are controlled the same way, but the “B” model has an improved controller (see also this document on the differences between WS2812 and WS2812B).
So the WS2812B is a drop-in replacement for the WS2812.
As for library support; I’m not sure what is available on the Raspberry Pi, but on the Arduino, both libraries (FastLED and NeoPixel) support all these models,
For those interested; the light_ws2812 library can be found at GitHub). I haven’t played with it, so I’m not sure how much of the code needs to be adapted. As far as I can see the strip initialization is done differently and the showLeds is done with ws2812_setleds(). I’m sure there is more to it, but it’s awesome to be able to run the fire effect on the Tiny. Great find!
Nov 14, 2019 - 12:28 AM - George Samson Comment Link
Hi ,
I have this project for using leds in a flow chart diagram, my coding of FastLeds is too bulky and exhausting the memory size, please assist on how I can be able to reduce that but achieve the same result. I laso want to accompany the chasing with sound and lcd display as I progress.
One rule I kind-a live by is this one: If you see a lot of repetitive code in your sketch, then you should probably look into using loops, and in this case this can be done!
Let’s go through the code in steps;
All the “#define xyz abc” lines you can leave as they are, since they do not take up memory at all. They are just telling the compiler: before you compile this code, replace all occurrences of xyz with value abc.
The “FastLED.addLeds” lines, we cannot optimize at the moment, since enumerating these will take some changes in your code that we’d like to skip for now.
which would replace that entire section. To accommodate the down count from 19 to 10, you’ll see that I use “19 – Counter’. So if Counter=0 then this gets executed:
So all combined, your entire “loop()” can be written as (I realize your loop() has more code to it, but you now see how you can reduce the amount of code for repetitive tasks):
I have tested your idea and works perfectly on a section of the code with actual customization of my requirement. This has given me a heads up on other sections that operate in the same way.
Am confident with your assistance I will manage the project as per expected timelines.
My other section has the leds in a matrix of 4×4, which starts with two colors ( yellow& blue) that change gradually to a different color as they keep blinking to red( imagine molecules reacting to form a new product)
An idea oh how this can be achieved will be most welcome.
first off; I’ve moved your sources to this forum post. Unfortunately, this pages becomes too long with all the sources that are being placed here, hence the request to place longer codes in the forum. The forum is also the more suitable place to discuss this, as it’s a little off-topic.
Great question … but this would mean that you’d have to customize the meteorRain() function, and the modification would be very specific for your LED setup. In the meteorRain() function you’d have to add a loop to handle each “section” of your strip (assuming all strips are connected sequential), or each stip (if you have separate strips, each on their own pin on the Arduino). I’m not sure how many strips you have, and at the moment I do not have the ability to test (hardware not at hand).
I thought to use a single long led strip, cut into several sections, put side by side, but all connected in series (I think it’s the simplest at first)
For the moment, during my tests, I manage to execute the function meteorRain (), but I can not launch several “meteor” in a row with a small delay.
Each time it is necessary that the meteor arrived at the end of led strips (and therefore of the function) to have a following. Thank you
I think the easiest is indeed like you described. This way you’d also not have less limitations on how many sections you’d want to use (since the number of pins on the Arduino could be a limitation).
I personally start by adding a parameter to the meteorRain() function, something like “byte SectionCount“;
And then use “SectionCount” in the for-loops to make sure effects stay in each range. It’s a little difficult for me right now to play with this and provide you with a full code .
You’d probably want to set a variable to determine how many leds are in a section, say “LedsInSection“;
void meteorRain(byte red, byte green, byte blue, byte meteorSize, byte meteorTrailDecay, boolean meteorRandomDecay, int SpeedDelay, byte SectionCount) { byte LedsInSection = NUM_LEDS / SectionCount; // this result in an integer (byte) value ...
And some of the occurrences of NUM_LEDS should be replaced with this new “LedsInSection” variable.
Next you’ll have to tinker with the for-loops to make sure every section is handled in parallel with the other sections. I know this is far from complete, but as I said: I do not have the means right now to test and play with the code
I can imagine it is a little much hahah … Unfortunately, I do not have an Arduino, or LED strips available right now, so testing code is not an option at the moment
I’ll try to see what I can do, hopefully later today …
Oh you’re not annoying – I’d be happy to help. The only challenge for me is that I have to go find some hardware (power supply, Arduino, and a LED strip)
If I have 4 strips (or a multiple there of), of 10 addressable LED’s each being fed by a data stream (Arduino #1 – 30 LED COUNT) into a 4 relay board (controlled by Arduino #2) with data stream going to all 4 common relay connections), and the 4 strips wired as follows: when relay 1 is closed the data flows into strip 1, out of 1 and into 2 and out of 2 and into 3, with a data connection going from the top of 3 into the bottom of 4 (to complete relay 3 & 4 circuit later), only the first 30 LED’s are energized, even though power goes to all 40 LED’s. Then when relay 2 closes (1 opens) the data stream goes into strips 2 – 3 – 4 and back to the bottom of 1, only the LED’s 11 thru 40 are energized by the 30 LED count, relay 3 closes LED’s 21 thru 40 and 1 thru 10 are energized and when relay 4 closes LED’s 31 thru 40 and 1 thru 20 are energized. Each of the 4 LED strips have 3 data input lines (input from relay # ‘X’ and 2 data exit lines going to the next 2 LED strips. Are my assumptions correct that the LED display will walk from one string to the next, with 3 of the 4 string being energized at any one point in time? Think of a 12 or 16 strand Christmas Tree, wired as described. Thanks for reviewing my assumption.
I’ll honestly will admit that I have a hard time grasping what you’re trying to do – maybe I need more coffee to wake up
From what I understand you’re using relays to determine the data flow of a segmented LED strip? And you’re using the Din and Dout pins of the strips to switch? (all strips should share +5V and GND)
Then I’d think you’d be right, even though I’m not fully grasping the idea (a schematic overview would be helpful – you can post that in the forum if you’d like). I’m not sure if you’d have to initialize the strips though, especially when the number of LEDs that are “active” keep changing. If the number of LEDs stay always the same, then reinitializing may not be needed.
i just found your project, it’s awesome :) I’m using the WS2812B with 144 Leds and I’m experiencing bugs with some sketches (wild flickering, eg. with the fire sketch), I found out that when reducing the LEDs to 50 it works .. any idea why? I’d love an extra effect for xmas: some random sparkling, where a row of eg 3 leds will turn white (the middle should be the lightest) and then slowly fade out :D Thanks and greets, Tom
The first thing I’d try is testing if all 144 LEDs are OK. You can checkout this article and test the code listed there to see if all LEDs are working properly. Maybe one of these days I’ll dedicate an article specifically to testing the LEDs (to reduce the hunt for code hahah).
Another reason why you may run into flickering is when the power supply can’t keep up. The test above should show flickering then as well. 114 LEDs requires 144x3x20mA = 8.6 A at maximum brightness if all LEDs are on. In my experience a little less will work as well, since most effects do not have all LEDs on for a prolonged time. But your mileage may vary.
Then the 3rd reason could be that the Arduino can’t keep up with this many LEDs for these particular effects. I haven’t tested any of the effects with that many LEDs
Dec 11, 2019 - 6:09 AM - Richard Stevens Comment Link
Hi – I’m using 600 LEDs and all is well up to 300 but after that I’m getting random LEDs and changes when the rest of the LEDs transition. I was wondering if there was a timing issue for so may LEDs ie. the data not getting to the end of the chain? I have tried both fastled and neopixel.
I have modified the rainbow theatre chase to run 600 LEDs with the delay at 5000 – 5seconds to slow the effect down.
It would be great for a starfield ceiling I am doing. I tried to copy/paste it into my ardunio. It won’t run the program. I have no clue what I am doing LOL
Can someone tell me how to use that program with a arduino uno and a WS2812B 144 LED strip.
Since I’m not sure what is going wrong,so I’ll do a brief description of the steps:
1. Install the Library you’d like to use (I recommend FastLED) in the Arduino Application. (“Tools” – “Manage Library” – type “fastled” in the search box, press ENTER, and click the “install” button in the FastLED section).
2. Copy the code listed for FastLED (in this paragraph). Note: – modify the line “#define NUM_LEDS 60” and replace “60” with the number of LEDs your strip has – modify the line “#define PIN 6” and replace “6” with the pin you’re using on the Arduino (I’d recommend using pin 6)
3. Copy the code listed for MeteorRain (in this paragraph), replacing the highlighted code in step 2.
4. Click in the Arduino Application “Sketch” – “Upload“.
The code was created for an original Arduino Uno R3 but may work on other models as well.
I have replicated this tutorial. Putted in as much effects in to code and as a remote button I have used an simple RF remote relay. It can be configured as push button (press and keep pressed button on remote keeps relay on). After release button on remote releases and relay.
My problem is that effect changes once I press remote button and once again when releasing that remote button.
pinMode(2,INPUT_PULLUP); // internal pull-up resistor is enabled
What you think – is this behavior related to pull-up resistor? Is it enough internal or should i use an additional one?
This is from my code:
void changeEffect() {
if (digitalRead (BUTTON) == HIGH) {
selectedEffect++;
EEPROM.put(0, selectedEffect);
asm volatile (” jmp 0″);
}
I am not codemaker and I do not know how this works I just wanted to ask is this OK?
I have really tried getting some result, but it seams that anything I do I break the code and Arduino will run it… So, please any hint would be greatly appreciated!
I’m sorry I overlooked this forum post. There are sometimes just too many questions and every morning I try to go through them. Somehow I overlooked this one.
I’ll take a look and see what I can do – since it’s not my own code, I’ll have to dig a little and see how it works (always a pain). On top of that, I do not have an Arduino + LED strip handy at the moment, so it may take a little more work. I’ll respond in the forum.
Hello Hans, first of all…what a great job. I´m so happy to have found your article. With your examples its much easier to have some fun with Neopixels.
I really love the Meteor-effect. I have never seen a better one. Especially the tail decay.
Is it possible to have a solid color along the strip in lets say green and having the meteor running down the strip with another color? And the decay is not fading to black but fading to the solid color.
Great to hear you like this! Thanks for the compliment!
As for a run down to another color (instead a black / off), we’d have to rewrite the “fadeToBlack” function. I haven’t tested this, but I did find an example on Github, assuming you’re using the NeoPixel library (FastLED is in my opinion a more mature library).
I’ve “slapped” this together and have not tested the code, but you could try something like this:
Update the fadeToBlack() function to:
void fadeToBlack(int ledNo, byte fadeValue, byte targetRed, byte targetGreen, byte targetBlue) { // For NeoPixel only byte startR, startG, startB; int value; uint32_t startColor = strip.getPixelColor(ledNo); // get the current colour
startB = startColor & 0xFF; startG = (startColor >> 8) & 0xFF; startR = (startColor >> 16) & 0xFF; // separate into RGB components
if ( (startR != targetRed) || (startG != green) || (startB != blue) )
{ // while the current color is not yet the target color if (startR < targetRed) startR++; else if (startR > targetRed) startR--; // increment or decrement the old color values if (startG < targetGreen) startG++; else if (startG > targetGreen) startG--; if (startB < targetBlue) startB++; else if (startB > targetBlue) startB--;
}
strip.setPixelColor(ledNo, startR, startG, startB); // set the color }
Now we’ve added a target color to the fadeToBlack function, so we’d need to update a line in the “meteorRain()” function as well.
I prefer Fast.LED. Just wrote Neopixel without meaning I want to use this library.
Thanks for your fast response. Your code works (just some typo). But not exactly what I have in mind :D I want the strip light up with a steady color, lets say red. And the meteor just shoots through with, lets say orange (want to add a button function to trigger the meteor). To still have the decay effect, the decay will then blend to the steady color (which works great with your code). Just like one color is always on and then it will look like a pulse goes through it.
The github code was a bit hard do change for the Arduino IDE and doesn´t work correctly. Cause the code is meant for Spark Web UI. With the github code I thought there must be an easier way to blend two colors while running down the strip. But that´s just another thing to think about for me.
Glad to hear the code works, and sorry it isn’t doing exactly the effect you were looking for. That would be the downside of translating somebody’s idea to code without being able to test it (I do not have my Arduino + LED strips handy). Maybe this week I’ll get to it to dig up the needed stuff and try a better code. It’s a busy week with the holidays and such.
I hope to get back to you with a better code, now that I have a better idea of what you’re looking for … Feel free to remind me – like I said: it’s a busy week
No need to say sorry. You are doing a really great job and you are doing it for free. And the goal for me and everyone else here is to learn. So there are no codes without desired effect. There are only codes to learn from. Compared with other forums, you are pure gold ;)
I was reading through all the comments here to find exactly the same effect Trace is after. Did you guys figured it out? CHeers! And before I forget… Merry Christmas! :D
I don’t think we got any further on this – with all the questions I answer daily, this somehow went on the back burner. Sincere apologies to Trace, I hope you can forgive me
I’ve posted the code in the forum, since I’d like to avoid large pieces of code here in the comments. Look at this forum post for the code.
Hi Hans, no need for apologies. I knew you were busy and so was I. Didn´t dare to ask for progress on those codes. Nice to see the custom meteor code works now. Do you remember about the Star Trek Warp jump effect?
Hello everyone and the author of the forum! I mistakenly bought a 12V RGB LED Strip instead of 5V and would like to know if I can use it with this “AllEffects_FastLED” sketch, which I found very beautiful and interesting (I’m using with a 5V LED Strip ). The link is this: https://www.ebay.com/itm/252371081346 and the LED Strip is as shown below on the page: 4Pin RGB and if you can use it with this sketch, I would like to know how to connect it because it is with 4 wires (White, Green, Red and Blue). Thank you all
I honestly have no experience with the 12V models. I have seen some users use it though, so it appears that it is possible to use those. You may (and I’m just guessing here) have to connect your power supply differently though. I’m again just guessing that you’d have these 4 pins:
– +12V –> to 12V Power Supply + – 12V GND –> to 12V Power Supply GND (may have to be connected to Arduino GND as well, first try without doing that) – Data In (+5V) –> to Arduino PIN – Data In GND . –> to Arduino GND
Note: which pin is what, is something you’d have to find out yourself, maybe Google it, ask the seller, or it may be printed on the strip.
Coming back to the 4 pins: – the +12V and 12V Gnd is used to power the LEDs, and – the Data In and the Data In GND are used for the controller that is embedded with each of the (3) LEDs in LED blok (each one of those white little blocks).
So if you use one power supply for the 12V pins, and the “Data In” pins to your Arduino, then this may work. This also would imply that you’d need a 5V power supply (not nearly as potent as the 12V) to just power the Arduino. Also: I suspect that they may need to share GND (so the GND of the 12V power supply, connect to the GND of the Arduino).
Again: I have never played with the 12V models, maybe others that do have experience with these can chime in and confirm or deny what I’m writing here.
Jun 11, 2020 - 7:27 PM - Daniel Fernandes Comment Link
Forgive me Hans and Gunnar for being so late in answering them. I mistakenly bought the Led strip from eBay and, in order not to be lost or to not have so much work, later, I also bought the Remote Control from eBay together with the 3A Power Supply for this Strip; Thank you for your help.
Now, a second question: I am using Hans’ wonderful sketch, “AllEffects_FastLED”, which is working perfectly but, I would prefer to use, preferably, the Blynk app or any Bluetooth, to turn my Led strip on and off , which is attached to the top of a wardrobe and plugged into an outlet, also at the top of the wall, and every time I need to turn the strap on / off, I have to climb up on a chair to plug / unplug it.
I already created the button icon in Blynk to turn the Led strip on and off, including, naming D2 as the #define PIN 2, which is defined in the sketch (I don’t know if I’m right!) And, I also got the “char auth” “(authentication), therefore, I would like your help to complete the sketch to work with any Blynk or Bluetooth;
Unfortunately, I have no experience with Blynk, but you could check out the forum, since the Bluetooth topic has been discussed there by others. See for example this topic, but I think there may be more than one topic covering this. This link may be helpful as well with some of the hardware setup.
Sorry, didn´t read the comment rules thoroughly about posting large codes. Please delete the comment, I will post it in the Forum as soon as I got the registration mail.
In case you did; email me at webmaster at tweaking4all dot com, with your loginname/email address, then I can look and see why this may have gone wrong. If not then you’d still have to do that.
I found your name/email in the user accounts … maybe the email went into your spam, or you used the wrong email address? Just send me an email and I’ll fix it 😊
running 2 effects at the same time (on 2 different LED strips) is possible, but can be quite a challenge, especially when the effect needs a loop. I’ve written a follow up on this article: All Effects In One. You could experiment with that one.
You’d need to initialize both strips, and in each effect you’d need to call a specific strip. But it will come with challenges and the effects will be slower. I’d probably use 2 Arduino’s instead.
You can only control the LEDs through a device like the Arduino, ESP8266, Raspberry Pi, etc. The WS2812 LEDs require a signal (data) so it know what color to use.
Since I’m not sure what you have in mind when you say ON/OFF, I’ll assume you’ll use one Arduino and you have a LED strip of 3 LEDs.
Note if the LEDs should not be sitting next to each other, you can cut them loose by cutting on the line (see this article, figure 3) between the markings “DO – Din, +5V-+5V, GND-GND) and you can use regular wires to reconnect them. This way you can position them anywhere you’d like.
To switch a LED ON and OFF (assuming you’re using the FastLED library – for FastLED-library and NeoPixel-library examples, please read this article), you could create a function to make it easier to call in your code, for example (untested):
void SwitchLED(int LedNr, bool SwitchON) {
// Numbering of LEDs starts with zero (0),
// so the first LED = 0, seconde = 1, and the third LED = 2
if(!SwitchON) { // if NOT SwitchON = Switch OFF = color black
leds[LedNr] = CRGB(0,0,0);
}
else // Switch LED ON
{
switch (LedNr) {
0: leds[LedNr] = CRGB(255,0,0); break; // First LED -> red (= red 255, green 0, blue 0)
1: leds[LedNr] = CRGB(0,255,0); break; // Second LED -> green (= red 0, green 255, blue 0)
2: leds[LedNr] = CRGB(0,0,255); break; // Thrid LED -> blue (= red 0, green 0, blue 255)
}
}
FastLED.show(); // Show changes
}
You can call the function now in your code like this, for example turn the first LED ON, second LED OFF:
SwitchLED(0,true); // switch the first LED ON SwitchLED(1,false); // switch the second LED OFF
Note that in the “void setup()” function, you’d want to set all LEDs to black first (so they are all OFF), so for example:
[…] to the Arduino for the output of text strings. Next, I consulted a site by Hans Lujiten called tweaking4all.com that described how to program different animation effects for NeoPixel strands. The only part that […]
I am looking at the Cylone effect. when I try in exceed a LED number of 71, none of the LEDs light up. with only one at the end of the strip flickering on and off. my desired LED count is 75. Im wondering if you can help me out as to why this might be happening. I am using the ESP8266 board. I have no issue with these LEDS when using other effects.
It is not impossible that my code may have a flaw of course, but when I looked at it just now, it seems to be OK. Did you try other odd values? Eg. 65, 67,69 LEDs?
Power shouldn’t be an issues, since not all LEDs will be on at the same time – just the same amount of LEDs will be bouncing, even if you’d use 71+ LEDs. As for ESP limitations; I do not see a reason why it would limit at 71 … just an odd number.
ok apon further testing i have found that when I had the LED strip (ES2812B) at a larger amount (150 for example), and i set the NUM_LED value to say 100. i noticed it started performing the code down towards the bottom end of the strip rather then the top. secondly I tried it with a different type of strip (WS2813) and had a similar problem where it was starting from the bottom. this time it was once the NUM_LED was set to 68 and above that thisd occard and it was now starting from the bottom end. when using another effect like say the rainbow cycle one. it has no trouble with colouring all the LEDs correctly.
its had me stumped. and im unsure if maybe there is something to do with the esp board changing polarity of the integer after a certain value or something like that. cheers
Hmm, interesting. Well, there could be a problem with the code of course.
Unfortunately, I’m stuck in two other project that I’d like to finish first. Could you try an eye size of “1” ?
It almosts sounds like the pixel, when it is being set in the code, is going below zero and/or beyond NUM_LEDS.
You could do a quick test by changing the setPixel() calls, which you could do in the setPixel() function. Something by replacing the setPixel() function (at the bottom of the code) with:
This should avoid negative pixels and pixels beyond the strip length.
Ideally one would like to see some sorts of output in the debug window as well of course. But like I said: I’m stuck in 2 projects which I’d like to finish first. Once done, I’d be happy to do some testing as well.
I’ve moved your post to this forum topic to minimize the amount of code posted here in the comments. Let’s please continue this topic there – my apologies for the inconvenience.
Thanks so much for this comprehensive LED tutorial! It’s the best i’ve found. I had a few questions, sorry if this is easy, I’ve only started with Arduino and LED strips today so am struggling a lot to understand the coding parts. I’m using your approach to fade in and out of the for the LED strip, I’ve adapted bits of the code you posted and the working code I’m using is pasted below. Can you please give a bit more information about the points mentioned below.
thank you for the very nice complements and right away my apologies for moving the code to the forum. Unfortunately (as you can see), code is taking up a lot of space in the comments, so I try to move as much as possible to the forum.
well, to be very honest: both works if you have more than one LED (in my opinion anyway).
The resistor is just there to protect a single LED from burning out. The theory being that it is to limit the current going through the LED, without resistor LED would eat current until it melts (source).
This points more towards the use of one single LED though, and it is recommended by most. In practical use (I always have more than 10 LEDs for sure) this doesn’t seem to be an issue. It is however totally possible that your strand will have only one single LED on, so it may be a good idea to place the resistor.
Commonly seen values are 470 Ohm (12V circuits) and 330 Ohm (5V). With the circuit here, the 330 Ohm may result in a slightly brighter LED. But in all honesty; I have not noticed the difference (without resistor, with 330 Ohm resistor or with 470 Ohm resistor).
Also notice that this article was published about a year after the Boblight article, I’ve learned a few things in that year in between.
Firstly this is by far the best tutorial in terms of range of options for these strip LEDs so thank you!
I was just wondering if there was a way of changing the colours in the rainbow cycle effect? I love this effect but I just only want to use a few select colours rather than the whole rainbow!
Thank you very much for the compliment, it is much appreciated!
I suppose this depends a little on what you had in mind? Just doing a rainbow with one color? (eg. a blue wave for example)
In the meanwhile: I’m not sure if this is of any help, but maybe give this a try LED strip effect generator. I haven’t tried it, but it seems to allow for a selection of color(s).
Well, I’ve been tinkering with some code and wasn’t able to “quickly” create some code for you. My apologies for that. I’d recommend playing with the settings in the code generator (the link in my previous comments).
As for your question; looking at the FadeInOut() function, you’ll see twice a for-loop. One from 0 to 256 (Fade in) and 256 to 0 (Fade Out). This is where we’d want to set the 75% and 25% cut-off.
For example change
for(int k = 0; k < 256; k=k+1) {
to
for(int k = 50; k < 256; k=k+1) {
(assuming “50” approaches “25%”), and
for(int k = 255; k >= 0; k=k-2) {
to
for(int k = 255; k >= 50; k=k-2) {
If I recall correctly, the challenge will be this:
The “brightness curve” is not linear. With that I mean: 25% of 256 does not result in 25% brightness. So you’ll have to determine what the right values are to get close to 25% and 75% – you could try using the serial monitor for that – have it output a number, wait a little so you can read the number, etc. A good read on this topic (and LED colors in general) would be the FastLED LED reference article.
On that note: if you decide to use FastLED, tinkering with the FastLED.setBrightness() function maybe a good alternative as well.
Well, I do have a YouTube channel, but it’s hardly used, more for small demo’s or examples. The main reason is probably because I usually get very annoyed when trying to follow steps in a video (I have to press pause and rewind too often) .
As for your countdown process. If I’d have to write code for this, then I’d first create a function that dims one individual LED. Let’s call that function “DimLED(x)“, where x = the LED we’d like to dim. In that function you’d have a line that does a setPixel(x,colors).
So if we count from 0 to 7 ( = (NUMLEDS/2) – 1), then we could call this function to dim the LEDS 0, 1, 2, 3, 4, 5, 6, 7.
Keep in mind that the LEDs around counted from 0 to NUM_LEDS-1 (arrays start with 0 and the LED colors are store in an array).
To do this in parallel with the LED on the other end, we can add a line that calls setPixel again, just with the opposite number.
So where you’d have setPixel(x ,red,green,blue) in the DimLED() function, we add setPixel(NUM_LEDS – x – 1 ,red,green,blue). This way the LEDs on both ends will dim at the same time.
Finally, in the main loop() we make a little for-loop to have it count from 0 – 7. Something like this:
for(x=0; x<(NUM_LEDS/2); x++) { DimLED(x); }
So this way we only have to count to half the length of the strip.
Note: “x < (NUM_LEDS/2)” will stop before it hit NUM_LEDS/2. So in our example, it will stop after x = 7 (NUM_LEDS/2 = 8, and we tell the for-loop to only loop while x<8).
i have the APA102 3 inch (77mm) 60 RGB LED ring (available from sparkfun) i want to use for a clock. i know the code works, and works correctly with a 6 3/4 inch (172mm) 60 RGB LED ring that uses WS2811 LEDs. the issue i am having is that the 3 inch ring is manufactured in a counter clockwise direction apposed to the 6 3/4 inch ring manufactured in the clockwise direction. i have tried using for (int i = 59; i >= 0 ; i–) and/or for (int i = 0; i < numLEDs; i++) to try and reverse the direction of data flow. neither one has any effect and i am guessing it is because in the code, it is the time (hour, minute, seconds) that tell which LED is to be lit up, and when.
i have also tried playing with ARRAY, CRGBSet, and a few other possible tricks to tell the ring which way to run. all i run into are errors or having no effect as well…. any ideas?
i can post the code if you like. i tried registering for the FORUM but have not received any emails about password in order to sign in. so i thought i would try and start here
sorry to hear you’re running into issue registering for the forum. Did you use the “Register” link on the Forum Page? (the one provided by the LOGIN button on the regular pages seems to be having issues – I’m looking into that)
Posting the code (not here – thank you for not doing that, the forum is where it should go) would be helpful to get an idea what may be going wrong (it sounds like you did already tried some of the obvious ones).
many thanks Hans, you ROCK!!! that worked……… however, now when it goes from 59 to 0 (at the 30 second mark because of the offset), the whole ring dims just slightly for that one second. i could live with that, but if you might think of something about it would be awesome. again many thanks.
Hi guys, is there any way to make the running light in 2 color but in group of leds? I mean not 2 different light one led after the other but make like 5 leds red and 5 blu? Also if is not too diffuclt, make the led in the center of the gtoup brighter than the other led
this would require some reworking of the RunningLights() function. I’ll try to take a look at this in the next few days – feel free to give me a nudge if you’re wondering where I’m at with that (it is going to be a very busy week here).
I did find a little time to quickly tinker and try to make the effect you’re looking for (hopefully I understood you correctly). I simplified the code, and I’m sure it can be done in a smarter way, but give it a try.
This is the entire sketch, based on FastLED and a strand of 60 LEDs connected to pin 6:
With the upcoming 4th of July (US national holiday), I’ve modified the code to support 3 colors (3 blocks of 5), so red-white-and-blue can be used easily. Naturally you can use the colors of your own country, sports team, etc.
To minimize the amount of code posted in Comments, I’ve moved your code to the forum. This is to keep the list of comments to a minimum, as noted above (Do not post large files here (like source codes, log files or config files)).
Is there a way to tell the cylon/KITT lights to use a specific set of the string? I have a box outlined, and for certain effects I want the cylon sketch to run on either the top or bottom of the box.
Yes, you can modify both functions to fit only a selected range of LEDs.
You’d have to introduce a start (StartLed) and stop (StopLed) LED position. Next replace, only in the functions related to the effect, NUM_LEDS with the stop LED position (StopLed) and 0 (zero) with the start LED position (StartLED).
Change these only inside of the “// *** REPLACE FROM HERE ***” and “// *** REPLACE TO HERE ***” section.
Here an example how this can be done for the Cylon effect:
p.s. if everything needs to be mirrored then you could also consider keeping the function original and changing the “setPixel” function. This function is called to set a LED color for a specific LED with this code:
Amazing work on these sketches! I managed to get the all effects one working as well. But I was wondering; without knowing how to code, is it possible for me to alter the rainbow sketch so that it can be say, 2 colours like orange to green slowly changing? I would love to be able to toggle them too with a switch. Thanks again!
Altering the rainbow cycle to work with 2 colors may require quite a bit of change – it will probably be easier to write a new function to accommodate that. the current function cycles through values for red, green and blue – the native RGB colors. If we’d want to use only 2 specific colors the wheel function will not work as designed.
Having said that: I’m working ona little project using an ESP8266, which offers more speed and memory than an Arduino Uno, offers WiFi so we can run a webserver, and … is typically only $5. It may take a bit before I migrated all effects to that project, but I’ve made note of your request, so I may be able to add this effect as well (and with some luck I should be able to convert it for use in this project as well).
No problem, we all appreciate your awesome efforts. Hm, OK so I think I should practice my python then and see what I can do. I’m guessing I can’t simply paste someone else’s code into your all effects sketch like a void loop? I want to be able to toggle with my tactile switch, and I think you were saying it was complicated to get them to work with it?
Another issue I noticed was that the transition between effects in the all effects in one sketch was kind of unpredictable. Like I would toggle from say, strobe to the next effect and it would bring me back to the beginning. Is that likely an issue with bounce or should I have used a resistor with the switch?
Also, thanks for using my suggestion for your new ESP8266 project! It sounds interesting.
If you’re working with an Arduino, I’m afraid Python will not do much good. You’ll need C(++).
Effects can be pasted (if written in C), but you may have to modify it a little bit to accommodate the “universal” calls I have created. Unless you decide on using a specific library (I’d recommend FastLED, as it is more mature than AdaFruit’s NeoPixel).
The issue you run into is most likely caused by the debounce effect: “Pushbuttons often generate spurious open/close transitions when pressed, due to mechanical and physical issues”. I haven’t experienced it myself, so it can be switch specific. In the link you’ll see some schematics (simple) and some minor code changes. It has been discussed in the comments of my follow up project as well (all effects in one – comment1, comment2) .
This is good to know! I didn’t realize switches could vary in this problem and that Fastled is in c++. Thanks for the links. I’ve added the code you provided;
Instead of “strip” you’d probably need to use “leds”.
Having said that, “strip.begin();” and “strip.show();” are AdaFruit NeoPixel specific – and is not used for FastLED. So just remove those 2 lines.
I originally wrote the code to work for either AdaFruit Neopixel and FastLED, however both libraries work slightly different, and each user has his or her own preference.
Did you add the pull-up resistor as mentioned in the comment here? Otherwise this would indeed not work.
Suppressing effects is most certainly possible. You could remove the involved “case” section, but it would be cleaner to just remove the effect from the code all together. But … this would be related to the other project (All effects in one) and not the project on this page.
Say this is your void loop() code:
// *** REPLACE FROM HERE *** void loop() { EEPROM.get(0,selectedEffect);
case 0 : { // RGBLoop - no parameters RGBLoop(); break; } case 1 : { // FadeInOut - Color (red, green. blue) FadeInOut(0xff, 0x00, 0x00); // red ... } case 2 : { // HalloweenEyes - Color (red, green, blue), Size of eye, space between eyes, fade (true/false), steps, fade delay, end pause ... break; }
Note:
– You will need to decrease the “18” -> “17” in the line “if(selectedEffect>18) {“ – You will need to remove the case block “case 2 : { // Strobe … }“ – You will need to renumber each “case” line after where “Strobe” used to be, and reduce it by one (so “case 3 : {” becomes “case 2 : {” etc.)
As for adding the mentioned effect: yes, I’m sure you can add this, but it will take some work to make it work for the All-in-One approach. As mentioned with the All-in-one project: we need to prevent that endless running effects get interrupted every now and then, and the code you provided does not support that. So some tinkering is needed there. Having said that: I’m working on a new project, with all effects in one, by using a cheap ($5) ESP8266 which is much more potent than an Arduino. I’ll look and see if I can incorporate the mentioned effect there, as I’m using a different way to interrupt an effect (and control over WiFi so far works great).
Great! The method you described for suppressing effects worked! I only needed about 9 for my project and they seem to toggle a lot better now. And yes, next time if I have an issue with the alleffects sketch, I’ll post in the correct forum.
If by the pull up resistor, was it the code that was included in the void setup? If so, then yes it was added. The only issue left (which is not a huge deal) is that sometimes if I switch too quickly, it pauses the effect (again, not a big bother for me) but also sometimes the effect pauses itself and restarts (not sure why). I should mention too that for some reason whenever I add the
EEPROM.put(0,0); // <-- add this
it doesn’t work at all. Anyway, this is the changed code in the setup and renumbered case blocks.
As we are both posting more and more code: this topic would probably have been better in the forum
For the pull-up resistor:
You’ll need to add a resistor (10 KOhm) between the GND pin and the Datapin on your Arduino. The datapin needs to be the pin used for the switch. (see also the picture in this comment)
Since I haven’t done much with debouncing (just running short on time), you may have to add a little test to see that between 2 button pushes at least a certain time has passed. Since a full reset takes place in the code you’re using, you may be able to get away with this approach:
void setup() { FastLED.addLeds<WS2811, PIN, GRB>(leds, NUM_LEDS).setCorrection( TypicalLEDStrip ); pinMode(2,INPUT_PULLUP); // internal pull-up resistor
delay(100); // little 100ms delay before attaching the interrupt for the button attachInterrupt (digitalPinToInterrupt (BUTTON), changeEffect, CHANGE); // pressed digitalWrite(2, HIGH); // turn on pull-up resistor }
p.s. on your code:
1) you will have to renumber the case statements as well. You right now have 1-2-4-5-6-7-8-9, which should probably better be 1-2-3-4-5-6-7-8.
2) I’m not seeing the “changeEffect()” function in your code (please do not post a full code here again until we have everything running – or even better: start a topic in the forum).
Hi Hans, sorry for the delay. Good point about pasting too much code and also on the wrong page. I’ve moved this to the forum as per your suggestion. Thanks for the info on the pull up resistor. It seems to work find now, not sure if that’s due to the internal resistor on my Arduino Uno? I’ve also renumbered the case blocks; good catch! And finally, I attached a link in the forum to my sketch from pastebin. Thanks again for all your help!
Hey, can someone help me out, i have tried to get the snow sparkle to work but im to noob to understand it. i have 2812B with 144 leds per strip and i have 2 strips. using pin 7
I’d be happy to help. Could you provide more info? Did you use the FastLED or the NeoPixel “framework”? Could you post you full code in the Arduino forum? (do not post the code here!) I’d be happy to take a look
I was wondering if yall had any idea how to save the pattern on EEPROM. For example, if i flip through the patterns and I land on any pattern, then shut it off, when turned back on I want the pattern to stay on the pattern it was on prior to the shut down. In short, I want to change to a certain pattern then turn it off and when it turn it back on I want it to be on that same pattern. I know EEPROM can accomplish this but I cannot figure it out.
Upon looking at the forum I’ve tried your way and I peered through the comments and tried other peoples way with no avail… I have a power off button as well as a switch button. The common problem is when the Arduino is cut from all power it seems to just reset the code. I know you mentioned something like that in one of the comments replies. Any fixes so far? If not ill probably just accept the fact and move on. Thanks again!
Would you mind posting it in the Arduino forum here? (if you’d rather not sign up: emailing me would be an option as well, I can post it for you, unless of course your helper is super small)
well, technically the EEPROM should hold the last value(s) written to it, even after powering the Arduino down. I did notice however that it’s not always as reliable as one would expect, especially when power is removed. The values do however always seem to survive a reset.
So unfortunately, I do no (yet) have a good and reliable fix for this (assuming you save the value as soon as you change to a different effect).
Forgive me for not understanding your question entirely; The rainbowcycle with just one color wouldn’t do much? Or are you thinking of a color “block” (dark to bright and back to dark) sliding over the LED strip?
Note: if you’d want to play with the colors, you’ll have to change the “Wheel()” function. Since you’re looking at a more simple color pattern, this function may even become redundant, especially when using the FastLED library.
You could try something like this (again: not quite understanding what you’re looking for):
Hi! This page was a lifesaver and it’s so cool/useful! I know I’m writing a comment quite a while after this was made but I have a simple (hopefully) question! I want to add a switch to turn the lights on and off. I have the neopixel, Arduino, and switch connected to a small breadboard, and the base code works, but I just cant seem to get the switch to turn on and off the code! I’m not sure if anyone will respond but it’s worth a shot :)
No worries – years later people still respond to this article. It is nice to hear that you liked it, so thank you for the compliment.
What did you have in mind with switch the LEDs ON/OFF? Something like completely switching the entire thing OFF and the option to have it ON with an effect running? Or where you thinking of an effect that turns all LEDs OFF?
If you want a complete ON/OFF, then I’d recommend a switch on your power supply. I assume that you’re running the Arduino off the same power supply that powers the LEDs. The Arduino boots uop fast enough to get it going when you need it.
As for the Teensy; I have seen folks use a Teensy, but I have never tried it myself (I don’t have a Teensy available).
Hello, i love all of the effects but I am having trouble working them. I am new to all of this and Love the meteor rain effect. I got the set up working and I have different led shows going right now. When I copy and paste meteor rain in the code just does not do anything. I have all of the libraries downloaded and I have tried using them. If anybody can tell me what I am doing wrong I would be very grateful. Thank you.
My coding knowledge only goes so far. I am trying to combine certain effects to play in a sequence after a button is pressed. (Strobe to twinkle to cylon, etc)
I would want it to strobe for X amount of time, then go into the next effect for X amount of time, and so forth. What do I alter to accomplish this? Thanks for the great resource! Glad it’s still here after these years.
Then you could combine those to something like this, where the first effect in essence is a combo of effects:
case 0 : { // do 3 times RGB loop RGBLoop(); RGBLoop(); RGBLoop(); // do 3 times a FadeInOut FadeInOut(0xff, 0x00, 0x00); // red FadeInOut(0xff, 0xff, 0xff); // white FadeInOut(0x00, 0x00, 0xff); // blue // do 1 time a Strobe effect Strobe(0xff, 0xff, 0xff, 10, 50, 1000); break; }
You’d need to change the case count, but you should be able to find more on that in the comments (where folks want to add or remove effects by changing the number of effects).
Hey there! I just recently got an Arduino Mega and a copuld of led strips and these examples have been very helpful, even more when I have no experience in coding. The first part certainly has helped in being able to tinker with the code, as I had trouble setting up the void setup properly, so thanks for that.
My idea is to manually code the lights as I wish so they go with the beats of the song, so I would be telling the arduino the effect and colors and how long it should last. So far I feel better using Neopixel rather than FastLED, would you advise I change the library or do you think both should work well for me?
both libraries work fine, however I feel that FastLED is much more mature. Especially when you start tinkering more with LED strips, you will find that NeoPixel becomes very limiting. FastLED on the other hand offers advanced functions to help you accomplish certain LED related tasks much easier without having to worry about the complexity behind it. Besides that: I have the feeling that FastLED is faster and that FastLED development is MUCH more active than the development of NeoPixel.
So, I’d recommend FastLED (so you get used to the FastLED functions and notations), but in the end NeoPixel will be OK as well.
Hey! Great work on the lights! I have some questions regarding the Meteor lights(and also in general). I’m using just a Normal Arduino UNO, and i’m trying to run your code. But is replying with the “Could not be Defined” on the setAll(0,0,0);. I commented out to try to trouble shoot more, and replied with the same message on the for loop.
I have not seen the “Could not be Defined” error before, but what I have seen happen is that users make a little goof up (happens to the best of us) when pasting the code. For example for the FastLED variant (link) – the yellow marked text needs to be replaced keeping everything before and after the yellow marked text in tact. If you this right, then please consider starting a forum topic so I can look at you code and see what may be going wrong
Hey, can someone help me, to run this code from right to left
void randomColorFill(uint8_t wait) { clearStrip(); for(uint16_t i=0; i<strip.numPixels(); i++) { // iterate over every LED of the strip int r = random(0,255); // generate a random color int g = random(0,255); int b = random(0,255); for(uint16_t j=0; j<strip.numPixels()-i; j++) { // iterate over every LED of the strip, that hasn't lit up yet strip.setPixelColor(j-1, strip.Color(0, 0, 0)); // turn previous LED off strip.setPixelColor(j, strip.Color(r, g, b)); // turn current LED on strip.show(); // apply the colors delay(1); } }
void randomColorFill(uint8_t wait) { clearStrip(); for(uint16_t i=strip.numPixels()-1; i>=0; i--) { // iterate over every LED of the strip int r = random(0,255); // generate a random color int g = random(0,255); int b = random(0,255); for(uint16_t j=strip.numPixels()-i-1; j>=0; j--) { // iterate over every LED of the strip, that hasn't lit up yet strip.setPixelColor(j-1, strip.Color(0, 0, 0)); // turn previous LED off strip.setPixelColor(j, strip.Color(r, g, b)); // turn current LED on strip.show(); // apply the colors delay(1); } }
Here the bold lines are the changes I’d start with. Not know exactly what this effect should look like and untested.
p.s. if you’d like to discuss the code more, then please use the forum, so we do not see a ton of code in the comments, especially with code that is not part of the effects in the article
Sorry to hear that. You can also try this (keep the loop the same, just correct the LED position to the opposite position):
void randomColorFill(uint8_t wait) { clearStrip(); for(uint16_t i=0; i<strip.numPixels(); i++) { // iterate over every LED of the strip int r = random(0,255); // generate a random color int g = random(0,255); int b = random(0,255); for(uint16_t j=0; j<strip.numPixels()-i; j++) { // iterate over every LED of the strip, that hasn't lit up yet strip.setPixelColor(NUM_LEDS-j+1, strip.Color(0, 0, 0)); // turn previous LED off strip.setPixelColor(NUM_LEDS-j, strip.Color(r, g, b)); // turn current LED on strip.show(); // apply the colors delay(1); } }
for(int i; i<(NUM_LEDS/2) i++) { strip.setPixelColor(i, strip.Color(0, 0, 0)); strip.setPixelColor(NUM_LEDS - i, strip.Color(0, 0, 0)); strip.show(); // apply the colors delay(100); // define a time to slow down the effect }
Hi, I’m a bit confused in the begging paragraph explaining how to set up lights if you’re using the FastLED with an Arduino, any way you can paste and explain?
I’d be more than happy to assist and thank you for the compliment. Are you referring to this paragraph (#5 FastLED Framework)?
If so: then the steps are:
1) Copy the sketch into the Arduino IDE (48 lines). 2) Determine the effect you’d like and select and copy the code for that – do not yet paste it in the sketch. 2) Look in the code from step 1, and look for the yellow marked lines (lines 11 to 17) – select these lines in your Arduino IDE and now paste the code of the effect you copied in step 2, effectively replacing those yellow lines.
Let me know if this answers your question. If you need more help, then please let me know. If you want to look at code more, then please consider starting a forum topic as we’d like to avoid code being posted here in the comments (you can see the comments have already become huge because of previously posted code parts).
Thank you very much for this excellent article. I used your explanations to illuminate my Christmas tree last year. I mostly used the rainbow cycle with sparkle effect.
This year I removed the button to have a chaining of some effects. And I would like to stop the meteor rain just when the last led of the led strip is lighting to start directly the (reversed) color wipe effect.
Could you say me how I have to modify the code of the meteor rain to do this. I’m not able to modify this code, it is too complex for me.
Thank you for the very nice compliment, and awesome to hear you’ve used my project to illuminate your Christmas tree
So if I understand you correctly, when the “head” of the meteor hits the last LED, you’d like it to stop completely so the rainbow effect can kick in. Right?
In that case you need to tweak the meteor effect a little (this may take some experimenting). In the first for-loop, you’d want to have the loop to stop when it is reaching NUM_LEDS. Again: you may have to tinker a little with this, as I have not been able to test this.
Here is a task for coders who likes to help newbies because I came to a conclusion that I’ll never be able to write it myself after spending hours trying to figure it out.
I need a code for meteor rain effect followed by color wipe effect, activated with PIR sensor 1, stays on untill PIR sensor 2 is activated.
Not sure what the setup will be like, but I found PIR sensors to not be the most accurate/reliable for work where a little more precision is needed. Having said that; since this is off-topic, please create a topic in the Arduino Forum where folks may be able to assist.
I just tried to add a fade in and a fade out on the rainbow effect. For the fade in this is OK. It works. For the fade out, I have a problem. All the led decrease to become black but just after the led light up again and the color of each led seems to change randomly but gradually. (Sorry for the not very clear explanations)
Could you help me please ?
Hereafter the code of fadeInRainbow and fadeOutRainbow I tested. for the both I used a speed delay of 20ms.
p.s. when posting code (this one is OK), then please consider using the forum. Just to avoid that too much code is placed in the comments .
For fading in and out, when using the FastLED library, you could experiment with FastLED.setBrightnes(). Where the passed value is 0-255. I haven’t really used it myself, but idea is that this function sets the overall brightness of all LEDs.
Thank you for our answer. Unfortunately I can’t seem to apply it. I use the Adafruit NeoPixel library so I installed the FastLED library and include it in the code. I tested it only on the fade out version. But when the led strip has to fade out, it freezes. I tried to replace showStrip(); by FastLED.show(); The result was the same. So I tried to use the Adafruit version of this function strip.setBrightness(j); Always the same result. I don’t know why. I’m continuing to search. If I find I will tell you.
I’d start with just using one library, and since it is the most mature library, I’d choose FastLED. It also comes with the most functions.
I wasn’t aware AdaFruit had a setBrightness-like function. Hmm, good to know
The hardest part is fading from black to a color, since one would need to know the target color. Fading the other way around is relatively easy, since we know a color starting point.
Is there any way you can start a forum topic so you can post a small video?
I used meteor effect and works great, starts form beginning of the ledstrip to the end. But I also want it reversed, which starts at the end of the strip and basicly to come back. I think I should modify this code but I could not make it work. Can you please help me with this. Thank you.
Ideally this would be better asked in the Arduino Forum (to avoid tons of code being posted here). If I understand you correctly, you’re looking for the meteor rain to bounce back and forth. The code below would do that. Not that I removed “setAll(0,0,0)” – you may want to add that at the end of the “void setup()” function to make sure the LEDs are black when the effect starts.
I did keep it relatively simple, so this function can be optimized. The rest of the meteor rain functions (like fadeToBlack) remains the same as with the original meteor rain.
First of all, this guide is amazing, thanks for it.
Now, what I’d love to do is to have group of 4 leds of two different color (so we’ll have 4 red leds, 4green led, 4 red leds, 4 green led, 4 red leds, 4 green led……)running through the led stripe.
I tried to change the Running leds code example but it seems like the leds are kind of blinking instead to actually change position (or better say, change color).
Thank you for the compliment, it is much appreciated!
You could try to modify the running lights effect, but that would come with some challenges due to the way this function works. So it took me a little bit to get this to work right.
In the code below, make sure you update PIN and NUM_LEDS.
This new function (RunningLightBlocks) takes 2 colors, the width of each color block, the dim value (0-255; higher = darker), and the speed delay.
For each block, the first and last LED are dimmed, so a block should at least be 2 or 3 LEDs (2 would mean: you only have 2 dimmed LEDs).
Note: This is the full sketch, based on the FastLED library. It first draws all the color blocks, and for each block it dims the first and the last LED. After that it (endless loop) it keeps shifting all LED colors one position over, and adds a new LED color at the beginning. Since we know that we have 2 blocks of a given size, we can simply copy the color from 2*Block size.
while(Christmas) // endless loop { // shift all leds one position memmove( &leds[1], &leds[0], NUM_LEDS * sizeof( CRGB) );
// set first led leds[0]=leds[ BlockWidth*2 ];
FastLED.show(); delay(WaveDelay); } }
It took me most of the afternoon to get a seemingly simple effect to run well, in short and efficient code. So I really hope this is what you were looking for
First of all I want to let you know that I think you are a great person,
your guide is amazing, you keep answering to everyone and helping everyone after all this time (which is really rare those times, usually people drop a post or guide to show how good they are and they just disappear or reply to google the answer…), you not only answer to me but you gave me straight away the code and all what I needed with great explanation using your free time,
man, again, you are great!
Second, I spent a week, an year ago, trying to figure that out but I couldn’t XD
So Yes! that’s exactly what I needed thank you so much!!!
Now I’ll try to reverse and slow down a bit the light flow, so I’ll learn something as I can learn only whem I try to do something.
Thanks Luke – you’re making me blush You’re most welcome, I actually really enjoy helping people with their projects. Putting a smile on someone’s face just makes my day.
Let me know if you run into issues or questions. Don’t feel bad it didn’t work when you tried yourself – it took me a bit of time as well. I started with the RunningLights function to eventually realized that I just had to write something from scratch.
I assume this is the code for sharing the effects and the bouncing balls? Anyhoo – to keep the comment section readable, I’ve moved the code to this forum post.
dude your a verygood person, im using your code the new kitt and trying to experiment it. now im having trouble with my code when im adding switch to it, evrytime i upload my sketch it says error, im a total newbee bro and when i saw your articles and design , its a life changing bro, hope you give me refence code for switching new kitt. God bless boss hans
To help you out, I’d recommend making a post in the Arduino Forum here. This way we can look at code, error messages etc. without filling the comment section here with large pieces of text
The code was written so it works for the FastLED and Adafruit Neopixel library. I prefer the FastLED library myself, and the code is already assuming you’re using a WS2812 LED strip.
1. Install the FastLED Library (in the Arduino Application, go to the Sketch menu -> Include Library -> Manage Libraries, type “fastled” in the filter box, locate “FastLED” by Daniel Garcia and click “Install”). 2. Copy the framework code (which is basically a template), for the FastLED library into your Arduino application. You find the code here. 3. Scroll (on this page) to the effect you’d like to use, and select and copy the code for that effect. 4. In the Arduino application, replace the code below with the code you just copied in step 3.
// *** REPLACE FROM HERE *** void loop() { // ---> here we call the effect function <--- } // ---> here we define the effect function <--- // *** REPLACE TO HERE ***
look, I did it like this and it’s not working, send me an example of what to do, because I’m new to this, thanks for the help
#include "FastLED.h" #define NUM_LEDS 60 CRGB leds[NUM_LEDS]; #define PIN 6 void setup() { FastLED.addLeds<WS2811, PIN, GRB>(leds, NUM_LEDS).setCorrection( TypicalLEDStrip ); } // *** REPLACE FROM HERE *** void loop() { // ---> here we call the effect function <--- } // ---> here we define the effect function <--- // *** REPLACE TO HERE *** void loop() { theaterChaseRainbow(50); } void theaterChaseRainbow(int SpeedDelay) { byte *c;
for (int j=0; j < 256; j++) { // cycle all 256 colors in the wheel for (int q=0; q < 3; q++) { for (int i=0; i < NUM_LEDS; i=i+3) { c = Wheel( (i+j) % 255); setPixel(i+q, *c, *(c+1), *(c+2)); //turn every third pixel on } showStrip();
delay(SpeedDelay);
for (int i=0; i < NUM_LEDS; i=i+3) { setPixel(i+q, 0,0,0); //turn every third pixel off } } } } byte * Wheel(byte WheelPos) { static byte c[3];
You have two “void loop()” sections so your Arduino will not like this.
You have to remove this part:
// *** REPLACE FROM HERE *** void loop() { // ---> here we call the effect function <--- } // ---> here we define the effect function <--- // *** REPLACE TO HERE ***
I overlooked something; it seems you removed the functions at the end as well. Also note: just saying it is still not working is OK, but it would be more helpful if you’d post the error message or report what you’re actually seeing.
So, from scratch:
1) Copy the framework code for FastLED you can find above (here) 2) Next copy the code for theaterChaseRainbow. 3) Paste it in the framework code (step 1) replacing the code between “// *** REPLACE FROM HERE ***” and “// *** REPLACE TO HERE ***”
Now you should have the full working code.
To verify your code:
– Before “// *** REPLACE FROM HERE ***” you’ll find some definitions and the void setup function. – Between “// *** REPLACE FROM HERE ***” and “// *** REPLACE TO HERE ***” you’ll find the code for the LED effect. – After “// *** REPLACE TO HERE ***” you’ll find the functions “showStrip”, “setPixel”, and setAll.
p.s. I hope this helps, if not, then please consider starting a topic in our Arduino Forum, so we can post more code without disrupting the comment section here
Hi… Great examples…In your fire example (which works great) how would I reverse the order so for example if it starts on led 1 and goes to 60, instead having it start from 60 down to 1?
If you’re wondering about the “-1”; If we have 60 LEDs, then NUM_LEDS = 60, and LEDs are counted 0-59. So the opposite LED of LED #0 (first one) would be 59.
One last question..Do you have a good example of how you would wire up a WS2801 strip to a Arduino? And how you would change the Fire code for this new strip? Alot to ask I know!! lol.
1. WS2801 is supported by FastLED, however it seems slower and prone to glitching on longer strands. (source)
2. The WS2801 has 4 pins, compared to the 3 of the WS2812.
You will have two data pins (D0 = Data and C0 = Clock) on the WS2801, where the WS2812 has only one Data pin.
So you have to connect the 2 data wires, for example to pin 3 and 4 and define these as such. (instead of Pin 6 in the example above) +5V and GND are connected just like the WS2812.
I am writing you from the Netherlands. Your name could very well be from this side of Europe any links?
I was asked by my sister to help her out with an art exhibition. She wishes flame like effect (to be exact: she wishes a moving fire effect that pops up randomly and moves around the strip) I had no experience but Arduino but internet helped me discovering that this might be the way to go, combined with a SK6812 RGBW led strip.
Youre explanation and code examples are far beyond others i found on the web. Im (safely) fooling around with programming, but still i cannot seem te get the colours in the desired colour. I want to use your FIRE effect and TWINKLE effect and give her a option to choose from these 2. They both work on the RGBW indi. addressable led strips, but i failed to get the colour to fire like orange (somewhere around FF8000). The Fire effect is more white/purple in the hottest area and the others sections are red. The Twinkle effect is randomly giving colours.
Maybe you want to help me with further explaining how to arrange this color changing. Im already thinking that the fact that my strip is RGB +W might af influence.
I have not yet played with RGBW strips, so I’m not sure how the white element affects things. To make the color of the fire more orange, you’ll probably need to play a little with setPixelHeatColor() function.
I haven’t tested this, but I think you need to change things a little in last if-then-else part (bold below). You may have to tinker a little to get the best colors in case this works:
void setPixelHeatColor (int Pixel, byte temperature) { // Scale 'heat' down from 0-255 to 0-191 byte t192 = round((temperature/255.0)*191);
// calculate ramp up from byte heatramp = t192 & 0x3F; // 0..63 heatramp <<= 2; // scale up to 0..252
// figure out which third of the spectrum we're in: if( t192 > 0x80) { // hottest setPixel(Pixel, 255, 128, heatramp); // changed 255 to 128 } else if( t192 > 0x40 ) { // middle setPixel(Pixel, 255, min(128,heatramp), 0); // choose the lowest value, but do not exceed 128) } else { // coolest setPixel(Pixel, heatramp, 0, 0); } }
Hope this helps
(ps. there is a Dutch version of this article as well – if this is more convenient for you, and I did write a little Arduino C for beginners course in Dutch and English if you’re interested)
To make things less complicate i orderd a RGB strip instead of a RGB+W. No it works like a charm. This evening i will try youre suggestion/instruction to change up the colours a bit more.
My sister is very happy with the progress so far! So thanks once more.
I on the other hand am still struggeling with one issue. Because she desires more spreading and moving of the light, we are adding an dc motor (with reflective material). I can get the motor to work with a simple code i found on this website https://www.tutorialspoint.com/arduino/arduino_dc_motor.htm (not posting the code for ‘forum reader friendly’ reasons)
Can someone help me with adding a simple 5 volt dc motor (spinning) motor code to youre fire code? If the speed would be managneble this would be an extra. Bassicaly i want the fire code and the motor to run and be powered on 1 arduino plus 5 volt powersupply.
Great to hear you’re making good progress! the motor question would indeed be better in the forum (if you run into signup problems: just let me know, so I can activate an account for you, or try it with this form – the forum is having issues with sending confirmation emails).
Hi, first I love the Meteor Rain library. Actually all of them. I am not a programmer. Not yet at least. I am learning C and I am at the basic level. I wanted to asked how I can change the meteor rain time between events? What I mean is once the script is uploaded, it just runs continuously. How can I change it where the meteor runs every 30 seconds or so?
If the format of my question is incorrect or in the wrong place, then my apologies. This is my first comment and not sure what i’m doing yet.
To run the meteorrain say every 30 seconds, you could do something like this: (we use millis to determine if the effect ran 30 seconds ago – you can change the value next to waitTime if you want a different time)
...
unsigned long previousMillis = 0; // to store the last time the effect ran
#define waitTime 30000 // wait time: 30 seconds (=30,000 milliseconds)
...
void loop() {
if(millis() - previousMillis > waitTime) { // if it has been more than 30 seconds, then run the effect
previousMillis = millis(); // set previousMillis to the current time meteorRain(0xff,0xff,0xff,10, 64, true, 30);
} }
If you’d like to make it more random then you could use the random function: (you can change minWaitTime and maxWaitTime to your preferred range)
... unsigned long previousMillis = 0; // to store the last time the effect ran
unsigned long waitTime = 30000; // assume a wait time of 30 seconds to start with #define minWaitTime 10000 // wait at least 10 seconds
#define maxWaitTime 30000 // wait no more than 30 seconds
...
void setup() {
...
randomSeed(analogRead(0)); // needed to make the random function more random
waitTime = random(minWaitTime, maxWaitTime); // set initial random wait time
...
}
void loop() { if(millis() - previousMillis > waitTime) { // pick a random number between 10 and 30 seconds previousMillis = millis();
waitTime = random(minWaitTime, maxWaitTime); // set a new random wait time meteorRain(0xff,0xff,0xff,10, 64, true, 30); } }
I have not tested any of this code, but I am confident this will do the trick. (I just had my first coffee for the day, so I hope I didn’t screw up haha)
p.s. If you’d like to get a little more familiar with programing for the Arduino: Arduino C for beginners may be helpful or a good reference.
Thank you so much for taking the time to respond. I will give these a try. This is going to sound funny or silly, but I kind of cheated to make it work, but I rather do it the correct way. I have a 90 LED strip, so what I did was change NUM_LEDS from 90 to 250. By the time it started again was about 30 seconds. I know, very bad, but I was desperate! lol.
I will give your suggestions a shot and will let you know how it goes. I should get back to you in about 7 months :)
I just bought beginner C for dummies.
Seriously, thank you so much. This is an absolutely amazing site and I have learned a lot from you already.
Hans, YOU DA MAN!!! Thank you so much. It worked exactly how I wanted it to work. At first I fumbled by placing some of the code in the wrong place, but realized it pretty quickly so the pain was minimal :) Below is the entire sketch. Thank you again, Ron
#include "FastLED.h" #define NUM_LEDS 90 CRGB leds[NUM_LEDS]; #define PIN 6 unsigned long previousMillis = 0; // to store the last time the effect ran #define waitTime 30000 // wait time: 30 seconds (=30,000 milliseconds) void setup() { FastLED.addLeds<WS2811, PIN, GRB>(leds, NUM_LEDS).setCorrection( TypicalLEDStrip ); } // *** REPLACE FROM HERE *** //default-meteorRain(0xff,0xff,0xff,10, 64, true, 30) void loop() { if(millis() - previousMillis > waitTime) { // if it has been more than 30 seconds, then run the effect previousMillis = millis(); // set previousMillis to the current time meteorRain(0xFF, 0xD7, 0x0,10, 64, true, 50); } } void meteorRain(byte red, byte green, byte blue, byte meteorSize, byte meteorTrailDecay, boolean meteorRandomDecay, int SpeedDelay) { setAll(0,0,0);
for(int i = 0; i < NUM_LEDS+NUM_LEDS; i++) { // fade brightness all LEDs one step for(int j=0; j<NUM_LEDS; j++) { if( (!meteorRandomDecay) || (random(10)>5) ) { fadeToBlack(j, meteorTrailDecay ); } }
Hi Hans…First off, everything you’ve posted has worked great! I do have a question about using 2 pins running Neopixels doing different things..I found that to add another pin I would use the command,
So if I took you to examples Strobe Effect and Snow Effect and I wanted to run the first on on pin 5 and the second on pin 6…What would I have to add to the source code below to make that happen? Thank you!!!
using two strands can be done indeed, however running two effects at the same time will be challenging. You see, the Arduino does not multi-task (like a PC or Raspberry Pi can).
So for both effects to work, you’d need to switch back and forth between the two effects. This is not only challenging (timing) but will slow down both effects as well.
I think we can get something to work, but the generic approach I used in the code does not foresee the use of more than one strip of LEDs. On that note: I’d recommend using FastLED instead of NeoPixel as it is faster and more mature.
If you’d like to pursue this idea, then pleas make a forum topic, so we have more space to post code and such. Otherwise the comments here become very large.
Hi Hans…If this is the wrong place to post this please let me know. I did sign up for a forum id but have not gotten anything back…I bought a little SD micro card reader (teamed up with an Arduino Uno)…with a couple of tiny speakers. Would I be able to run a .wav file followed by LED Theater Chase code? My goal is that when power is turned on, the .wav file plays and then the lights come on about 15 seconds later…Is this possible do you think? Here is the code for the audio..
apologies for the forum issues – I’m waiting for the guys from the forum to get back to me with a fix. I wasn’t able to find your email address in the user list, so I wasn’t able to manually assist you with this.
As for your Arduino question; yep, this would have been better in the forum (as you were already trying to do). Again my apologies for the inconvenience.
You can basically add everything to the LED effect code, let’s say you’re using the FastLED variant, then change this:
#include "FastLED.h" #define NUM_LEDS 60 CRGB leds[NUM_LEDS]; #define PIN 6
void setup() { FastLED.addLeds<WS2811, PIN, GRB>(leds, NUM_LEDS).setCorrection( TypicalLEDStrip ); }
// *** REPLACE FROM HERE *** void loop() { // ---> here we call the effect function <--- } // ---> here we define the effect function <--- // *** REPLACE TO HERE ***
...
To this (I added the bold text):
#include "FastLED.h" #define NUM_LEDS 60 CRGB leds[NUM_LEDS]; #define PIN 6
#include "SD.h" #define SD_ChipSelectPin 4 #include "TMRpcm.h" #include "SPI.h" TMRpcm tmrpcm;
void setup() { FastLED.addLeds<WS2811, PIN, GRB>(leds, NUM_LEDS).setCorrection( TypicalLEDStrip ); tmrpcm.speakerPin = 9; Serial.begin(9600); if (!SD.begin(SD_ChipSelectPin)) { Serial.println("SD fail"); return; } tmrpcm.setVolume(5); tmrpcm.play("Voyage .wav"); // plays audio async
delay(15000); // 15000 = 15 seconds }
// *** REPLACE FROM HERE *** void loop() { // ---> here we call the effect function <--- } // ---> here we define the effect function <--- // *** REPLACE TO HERE ***
,,,
Now keep in mind that I have not been able to test this, since I do not have that particular device. As I understand from the TMRpcm library documentation, the playback is asynchronous, so this could/should mean that calling “tmrpcm.play(“Voyage .wav”);” will return right away and your device will keep playing the audio file. So we need to add a delay of 15 seconds after starting the WAV playback.
Hope this works Again, apologies for the inconvenience – if you’d like; contact me with the email address you’ve used for the forum and I’ll make sure you get access.
I’m hoping you can give me a steer on how to approach modifying the ‘fire’ sketch for a stage prop I’m putting together.
Put simply, I have two 150 LED strips laid end to end with the arduino in-between the two strips. Each strip is connected to a different data output on the arduino.
I need to make the fire start at the far left of the first strip (i.e. LED 150), move to the right (to LED 1) then continue on to the second strip (LED 1) finishing at the far right of this strip (LED 150).
I understand how most of the code in your sketch works, but I am struggling to see how I can get the ‘fire’ to pass to a separate instance of FastLED for the second strip.
This sounds like an interesting project. Maybe something we should discus in the forum ?
I’ve fixed the forum registration bug – would you mind trying to register again? I’ve removed you previous attempt so that you can use the same email address at registration again.
Thank you very much for all the work you have done here!
The fire effect has kept me busy for quite a while now. As I´m into marble-runs, I had the funny idea to combine runs with all kind of electronic gismos like led meteor showers and motors and…
When I came across the Fire-effect, I desperatelywanted to include it in the marble-run I´m working on. Here is the idea:
A marble runs through a lightbeam with an LDR.
My Arduino sketch recognises the break of the beam (Sketch works so far :0)
Then it activates the Fire function (Works, too :o)
But: Fire just runs once and then returns to the main code!
(I have opened a post in the forum with the code)
But I need Fire to run for about 10 sec or a number of times until it returns to the main code and the LDR can be triggered by another marble.
In a different post you recommended to use a variable. But that was for Sparkle and I have no idea, where to “int” a variable which counts up and keeps Fire running before returning to the main code.
thanks for the heads up! I wasn’t aware these (PIN1-PIN7) were predefined, even though I’m not sure what the context was, but good to mention this here. Makes though, since other pins are predefined as well – and some depending on the device you’re developing for (eg. the ESP boards have a few of their own as well it seems).
Personally I’d prefer to use different names anyway, for example just “PIN” or even better “LEDSTRIP_PIN” or something like that.
Thank you very much for sharing your code. I’m making my first project right now – I have 3 strips of led lights (15 meters of 60 leds/m which in total gives 900 leds). I want to put them on my ceiling to illuminate my room and make it look cooler.
When I connected the 1st strip to my Arduino Uno everything was going fine, but then I connected the other 2 strips to the first one and encountered some problems. I ran Adafruit strandtest to check how do they look. I found out that the maximum number of leds I can use in that particular program was 622, any number higher than that would make the lights ‘freeze”. The console showed that the program was using only 2% of max D RAM.
Then I tried to run FastLED Cyclon example. Unfortunately, when I put in my number of leds it turned out that my Arduino doesn’t have enough D RAM to run this program for 900 lights. I figured out that I can unplug the strips from each other and connect them individually to the Arduino pin. I changed the value in the program to 300 and it worked!!
Now my only problem is that the strips are working individually (obviously) and not as one. I’d want them to work together, since then the effects like your Cylon, look way better.
Is there any way to solve this problem? Should I invest in an Arduino/chip with a higher D RAM amount?
P.S I’m not a native English speaker, so please let me know If you have any trouble with understanding what I wrote.
Well, you may want to drop NeoPixel and use the FastLED library instead, as can easily got to 1000 or even more.
HOWEVER … this very much depends on the microcontroller you’re using. Key here is first of all the amount of memory needed. This post on Github is a good read on this topic.
Rule of thumb (from that post) due to memory limitations (also keep in mind the size of your sketch!):
Uno/Leonardo/micro/nano : don’t go above 512 LEDs (1.5kByte of SRAM reserved for LEDs),
Mega : 1000 LEDs works when not doing too many other things in code (3 kByte of SRAM reserved for LEDs),
A cheap ESP8266 can do even better (36 kByte RAM available).
Another thing to keep in mind is speed (ESP8266 or ESP32 are much faster, but the speed of the strip will have an impact as well). The more LEDs you use, the lower the refresh speed will be – only relevant if you want to do certain effects of course.
And finally, watch your power supply! 900 LEDs at max brightness white, would pull 60 mA * 900 = 54000 mA = 54 A (yikes!). This comes with some serious challenges when operating at 5V – you’d need a beefy power supply and you’d have to make +5V and GND connections in between the strips to “refresh” the 5V feed.
For this many LEDs, folks recommend using 12V (or higher) strands – but I have never had one of these, so I never connected one of these to an Arduino.
Maybe someone here has done a project like that and can chime in.
Hi guys . I just start using arduino and Ws2811 and ws 2812b. And try to make some animation but I have bit of problem with it. I’ve made 10 × 10 board . And I would like to outside leds (like a frame let’s say) light still which I did in void setup( but I don’t know if I did it correctly) and the rest of leds inside the frame do the meteor effect. But I’m bit struggling with it. Anybody knows how could I do it please??
I’d be happy to help if I can. Since this is a little off-topic, and we’d like to avoid folks from posting code here: Please start a topic in our Arduino forum and describe in detail:
I have managed to complete the stair lighting project with a slight problem.
When PIR sensor activates first meteor rain climbs, and colorwipe follows it when done. The problem is meteor rain performs very slow on long strips even tough I set the setting fastest. It works fine for 2m led, but when I connect 7 meters it really slows down. Also the delay time between meteor rain and colorwipe increases when 7m led stip is connected, while it is acceptable with 2 meters.
Is there a way to make the meteor rain really fast with 7m led strip and reduce the delay between two effects?
Bonus question: Is it possible to combine colorwipe effect to be leaded by meteor rain effect? I mean 2nd effect kicks in before the 1st one is finished. So the beginning of the colorwipe looks like meteor rain.
7 meters is quite a lot of LEDs … I you have 60 LEDs per meter then we’re talking 420 LEDs, or 210 LEDs if it is 30 LEDs per meter.
There are a few things to help speedup things;
1) Use the FastLED library 2) I wrote a few translation functions so the effects work for NeoPixel and FastLed, like for example setPixel and showStrip. Replacing these with the real function could speed things up as well.
Example:
Replace showStrip() with FastLED.show() .
Replace setPixel(pixel,red,green,blue) with leds[pixel]=CRGB(red,gree,blue) .
Replace setAll(red,green,blue) with fill_solid(leds,NUM_LEDS,CRGB(red,green,blue)) followed by FastLED.show.
Replace fadeToBlack(pixel, fadeValue) with leds[ledNo].fadeToBlackBy( fadeValue );.
The function definitions can then be removed (void showStrip, void setPixel, void setAll, void fadeToBlack).
3) You could experiment with the end value fo this for-loop:
for(int i = 0; i < NUM_LEDS+NUM_LEDS; i++) {
I picked NUM_LEDS+NUM_LEDS to make sure the fade goes all the way. You could try a starting with NUM_LEDS and then increasing this more and more until the meteor behaves correctly for such a long strip. A initial guess would be NUM_LEDS+meteorSize so something like this;
for(int i = 0; i < NUM_LEDS+meteorSize; i++) {
There may be more options to optimize, but may this is better discussed in a forum topic (the Arduino Forum).
As for your bonus question: this most certainly would be a forum topic haha. This will take more code and more testing to see what we can do.
Omg, I have been trying to make the corrections that you suggested for few days but couldn’t make it work :( I attached the code I use, if you have time can you please edit it?
I had to move your code, since posting code is something we like to avoid (see also the red warning just above the editor). As suggested before, I moved this to the Arduino Forum, see this post.
How do you re-order the initial array or string of led’s before it is passed to rest of program?
Typical program asks number of leds and then labels initial string ordered range
Led array => 1,2,3,4,5,6…49,50
But what if I want a different led order because it’s a 3D non linear shape, and want my string ordered
Led array => 5,37,2,34…21,1
What’s the syntax or coding that allows me to put the led strip in any order I like before passing to automated programs? I feel like I should be able to use some sort of cross list or cross mapping?
Thank you for the awesome information! I downloaded the files for the Neopixel links but a lot of them will not open on Arduino IDE. I’m really wanting the Running Lights sketch but it won’t load. Any thoughts?
Did you follow the steps for the framework needed? (link) Basically all effects are written in such a way that they can be used for either NeoPixel of FastLED. However, the effect code need to be pasted into the framework sketch, effectively replacing this part of the code:
// *** REPLACE FROM HERE *** void loop() { // ---> here we call the effect function <--- } // ---> here we define the effect function <--- // *** REPLACE TO HERE ***
I did. And I found the zip file you have on the thread and neither worked. I couldn’t get the zip file to load in Arduino ide and I couldn’t get the code from the section of the thread itself to work in the simulator I’ve found. Keeps telling me bad build.
Would you mind opening a topic in our Arduino forum? This way you can post the code so I can see what may be going wrong … (please do not post code here!)
Unfortunately, your question is a little vague. Considering this project, I would say you pasted the wrong code in the sketch.
If you’d like me to look at the code: please post a topic in the Arduino forum, where you can post your code, so I can look at it. !! Please do NOT post code here in the comments !!
Jul 28, 2021 - 8:18 AM - Gerald Bonsack Comment Link
I do this by telling the system I have (14 in your case) and having the last 15 wired as 3 – 5 LED branches. That is LED number 9 (10) is actually 10A/10B/10C, creating the branch/cross
Thanks a lot for the awesome work, I used the rainbow cycle on a 3D printed christmas tree I’m building using 18 WS2812b leds, and it looks awesome, I managed to use an ATTiny85 (mini 8pin 3v-5v chip that supports arduino, has 8mhz clock and 16kb mem) and power it with USB, you dont even need a full size arduino to use these code samples, Thanks, I sent you a small donation
Hi Hans. Thanks for this tutorial and I’ve already modified it to a point of adding capacitive touch to toggle between light effects using a Trinket MO controller
I modified your code to use on an adafruit Trinket MO microcontroller where I use capacitive touch to toggle between the different effects (code below).
One key point to note is the value used for the internal resister setting. (RESISTOR_20K). Set too low and ambient light can toggle the switch. Set too high and it struggles to detect your touch.
Hope this compliments your awesome work in some way.
Thank you for such useful sketches. I’m new to this but have found your examples clear to use. How do I make the meteor sketch run the LEDs in the opposite direction?
1) Rewrite the setPixel function, by subtracting the pixel position from NUM_LEDS. So led 1 becomes NUM_LEDS-1. Led 2 becomes NUM_LEDS-2 etc. This is probably the easiest method, but it will reverse the other effects as well (unless you creates a second setPixel function, say “setPixelReverse”, and you use that function only in the meteor effect).
2) Rewrite the meteor effect where every function call to “setPixel” and “fadeToBlack” is passed the “NUM_LEDS-pixel” value instead of the “pixel” value. For example:
Hey thanks for all this hard work. I just found this. I’ve been studying Fast LED’s for a few days and someone referred me to this site. Wow, lots of great effects here. I will be back.
I’m trying to do a fire effect on two pins of a single board so I can have different parameters for each leg. I’m finding it a tough nut to crack.
Any tips or code you can point me to? I’m away for my coding laptop so i can share the code i am using but it looks pretty much like everyone else’s fire code.
That would indeed be a tough nut to crack with existing Fire effects. Your issue would be that you’d need to switch pins while doing each step of the Fire effect – something the Fire effect code is not suitable for. A problem that I described in this article as well. Now in that article, I have modified the Fire effect a little, check it out and maybe this gets you going in the right direction. You will need to either modify the function, or for testing purposes make one function for each pin and call them like so, repeatedly;
Fire1(55,120,15); // for the first pin Fire2(55,120,15); // for the second pin
Now keep in mind; this is not something I have tested, you may need to do some tweaking, and this may not work as great as one would hope. Worth a shot though.
Another idea, also untested, would be using an ESP32, since that puppy has 2 CPU cores and you could maybe run each effect on it’s own core.
If you’d like to go deeper into this project, then please consider starting a topic in our Arduino Forum, so posting code won’t bother others.
Hello and have a good timeI used your codes for a home decor and thank you very much And I used a potentiometer and a rotary encoder to change the light intensity, but I couldn’t.Of course, it was not done with the potentiometer at all, but with the rotary encoder, this was done, but with a long delay …If you know a way to change the intensity of light, can you help me?have a nice day. Babak
There is a setBrightness option (e.g. strip.setBrightness(64);) you can include in your code but this isn’t intended to be used as part of standard effects.
holy smokies! this is the best break down and most user friendly explanation of programming for beginners. i finally found a fire effect for a cosplay piece that i could easily manipulate based on your examples. thank you!
Messages like these just make my day – and thanks for the coffee
p.s. if you’d like to share your cosplay project(s): Please feel free to post them in the Arduino forum or by email (webmaster at tweaking4all dot com) – only if you like to share of course.
this is the second time I’ve been trying to write this message, the previous one was marked as spam so I apologize if I’m a little brief.
I’d like to begin just by thanking you for all this work that you put into these effects I really appreciate it and it has been very helpful in helping me learn to code using the fast LED library.
I am currently working on a modified version of the FLORA Umbrella project.
essentially it is using the flora controller, the fast LED library, and the one button library. I am trying to create a sketch that can toggle through various effects using auxiliary button. I have been successful in using your code to create other projects, in successful in this project with adding other effects. However when attempting to add the theater chase rainbow effect to the pattern toggling sketch I encounter several problems. First it often takes several coggles to reach the theater effect, meaning that I have to cycle through all the other effects multiple times before I see the theater effect. Once I do reach the theater effect it will no longer allow me to toggle through effects. Another problem I have encountered is that sometimes it won’t even reach the theater chase effect it will actually just freeze end require a restart to continue usage. Not sure where I’m going wrong in the code I’ve tried to trim it down and figure out what it is the essentials but can’t seem to figure out what is stopping this from working and also causing this to freeze.
Without seeing what you may or may not have done to the code, I cannot see or determine what may be wrong. And if you did follow the instructions here, which I’m sure you did, then you did change the code.
second thing i have to modified this line also, because the animation is too fast i don't know why (i am newbie in programming) i have an aruino nano china version
from this float Gravity = -9.81;
to this float Gravity = -1;
When declaring a function is C+ how would you modify your code so the pixel strip that the effects is applied to, can be added as a variable to the function.
Your current code applies the effect to a single strip and if I add multiple strips, I have to duplicate the functions. Not that familiar with c+
This can be confusing indeed – I have to stop and think for a minute as well to do this
Passing the led-strip is like passing an array, since the “leds” variable is an array of LED colors (CRGB).
CRGB leds[NUM_LEDS];
To use this as a function parameter you’d probably want to do something like this:
SomeFunction(CRGB ThisLedstrip[]);
If all strips are the same length, then this should be OK. However, to do it more correct, you’d want to make sure you are using the right number of LEDs.
One option is to pass the size of the array as a variable as well, either by passing the constant NUM_LEDS or by using the “SizeOfArray()” function. Something like this:
I’ve been doing some digging and found my issue is wanting to run your specific effects on multiple strips.
The trouble is with the use of the delay() method that freezes the processor so it cant be used to run multiple effects on different strips or check for change in button states or other inputs during the delay.
Using Adafruit’s sample code as a base, the answer is using millis() to check current time, previous update time and delay period or “interval” to evaluate againts an interval between updating effects
Code below that runs 2 different effects at the same time on different strips as follows:
1. Set the effect to run on either strip
2. Use an update function that checks period since last updated and updates the relevant effect by incrementing the index – the index is used to determine which pixel to update next,
3. Instead of creating the same set of functions for each strip, use a class constructor to build an object for each PIN / strip of pixels
Unfortunately; I had to move it to the forum due to its size, as requested in form used to post comments here.
The solution looks interesting, and you’re right: for multiple effects “delay” isn’t the best the use. Another alternative is using an ESP32 (cheaper, faster, more options) which has 2 cores. This way work can be split over both cores allowing for faster effects. Of course, this does take some thinking about what core does what
I do not think any one combined the two. What do you have in mind? Should the theaterChase runs and goes ON/OFF in between? Or should it flash white in between?
Oh and good to know: are you using FastLED (preferred) or NeoPixel?
Note: considering that working on this project will become off-topic, please consider starting a topic in the Arduino forum. (placing your question here is totally legit – just want to avoid that we start posting several messages and source codes here in the comments)
Thanks for your answer, ok for the new topic, I’ll create it.
For answered at your questions :
I use FastLed, I read that is better than NeoLed.
for the combine effect, I would loke to make the theaterchase with 2 colors in the same time for exemple 5 pixels in red, 5 in white and it move to pixel 1 to 300 (I have 300 pixel WS2811), and alls the led must blink off/on/off/on like a stroboscope but the effect “theaterchase” must to continue.
FYI: I just removed your post with the Dropbox link (did watch the video!) – just not sure how safe it is to publicly post a Dropbox share 😉
Unfortunately, today is a busy day for me, so apologies for not replying right away – I’ll await your forum post (feel free to post the link to the forum post here as well, in case others want to follow the conversation).
The code is still a work in process, but if requested, I’ll post what I have on the Forum. Also, along with these “Icicles” I am making 20 Christmas “Candy Canes” following the same style coding.
I’ve also completed a 3X3X3, 5X5X5 and a 9X9X9 matrix, using the same style wiring, (with not so clean code), but they create a multiple minute three-dimensional lighting show, again using a continuous string of addressable.
Very nice work. A meteor effect running down might have a bit more of an organic effect with the tail randomly decaying. To level up, I would have each strand randomly starting and running at different speeds but you’ll need to use timed functions instead to f using the delay to multitask
I just used the Fadein Fadeout your color to make the ignition of a truster with a 16 led ring and I was looking a way to slow down the effect because is very fast with the Ring and I want to make the FadeinFadeout Effect go for around 45seconds and after stay Fixed on for 30seconds then restart the loop.
Do you think it is possible and wich code can I use ?
thank you if you can help.
p.s. I just started with Arduino and I am trying to learn more possible.
Both Fadein Fadeout functions work in a similar way, and you can slow it down by adding a “delay()” function call just before (or after) the showStrip() functions.
for(int k = 0; k < 256; k=k+1) { r = (k/256.0)*red; g = (k/256.0)*green; b = (k/256.0)*blue; setAll(r,g,b);
delay(100); // <-- added this showStrip(); }
for(int k = 255; k >= 0; k=k-2) { r = (k/256.0)*red; g = (k/256.0)*green; b = (k/256.0)*blue; setAll(r,g,b);
delay(100); // <--- added this showStrip(); } }
Hope this gives the desired delay. You may want tinker with the value (100). Higher numbers = more delay, and 1000 = 1 second.
Great, I will give a try with different delay times to find the better one.
If I want to add a second effect you think it is possible ? I tryied but no results, maybe I made something wrong because I am am new to arduino programming.
Thank for your tip that are very usefull with neopixels
I am looking to make the the LedRing use first for 20/30sec. this effect code (added here under) and after the FadeinFadeout 1 time and after 5 sec of black start again.
With the two effect in sequence I will have the ignition and full throttle of the Thruster.
It’s a big thing for me but I need to make for the engines of the Razor Crest model fo Mandalorian Series (P.S: I am a Sci-Fi Scale model builder)
// SPDX-FileCopyrightText: 2017 Tony Sherwood for Adafruit Industries // SPDX-License-Identifier: MIT //Superhero Power Plant //fades all pixels subtly //code by Tony Sherwood for Adafruit Industries #include <Adafruit_NeoPixel.h> #define PIN 6 // Parameter 1 = number of pixels in strip // Parameter 2 = pin number (most are valid) // Parameter 3 = pixel type flags, add together as needed: // NEO_KHZ800 800 KHz bitstream (most NeoPixel products w/WS2812 LEDs) // NEO_KHZ400 400 KHz (classic 'v1' (not v2) FLORA pixels, WS2811 drivers) // NEO_GRB Pixels are wired for GRB bitstream (most NeoPixel products) // NEO_RGB Pixels are wired for RGB bitstream (v1 FLORA pixels, not v2) Adafruit_NeoPixel strip = Adafruit_NeoPixel(16, PIN, NEO_GRB + NEO_KHZ800); int alpha; // Current value of the pixels int dir = 1; // Direction of the pixels... 1 = getting brighter, 0 = getting dimmer int flip; // Randomly flip the direction every once in a while int minAlpha = 25; // Min value of brightness int maxAlpha = 100; // Max value of brightness int alphaDelta = 5; // Delta of brightness between times through the loop void setup() { strip.begin(); strip.show(); // Initialize all pixels to 'off' } void loop() { flip = random(32); if(flip > 20) { dir = 1 - dir; } // Some example procedures showing how to display to the pixels: if (dir == 1) { alpha += alphaDelta; } if (dir == 0) { alpha -= alphaDelta; } if (alpha < minAlpha) { alpha = minAlpha; dir = 1; } if (alpha > maxAlpha) { alpha = maxAlpha; dir = 0; } // Change the line below to alter the color of the lights // The numbers represent the Red, Green, and Blue values // of the lights, as a value between 0(off) and 1(max brightness) // // EX: // colorWipe(strip.Color(alpha, 0, alpha/2)); // Pink colorWipe(strip.Color(0, 0, alpha)); // Blue } // Fill the dots one after the other with a color void colorWipe(uint32_t c) { for(uint16_t i=0; i<strip.numPixels(); i++) { strip.setPixelColor(i, c); strip.show(); } }
Not sure if it’s needed, but you could consider starting a topic in the Arduino forum, especially when more code needs to be shared (to not bother those not interested). And … there are more Sci-Fi builders there
The pics of your builds: Super cool and impressive! Very nicely done!
Anyhoo … I’m not quite sure what you have in mind. You have a colorwipe and a fadein/out function, and you want to run those in sequence, followed by 5 seconds black?
Then yes, you could do something like this:
void loop() { colorWipe(0xff, 0xff, 0x00, 50); // pick whatever color you need of course FadeInOut(0xFF, 0xFF, 0x00); delay(5000); }
void powerplanteffect() { flip = random(32); if(flip > 20) { dir = 1 - dir; } // Some example procedures showing how to display to the pixels: if (dir == 1) { alpha += alphaDelta; } if (dir == 0) { alpha -= alphaDelta; } if (alpha < minAlpha) { alpha = minAlpha; dir = 1; } if (alpha > maxAlpha) { alpha = maxAlpha; dir = 0; } // Change the line below to alter the color of the lights // The numbers represent the Red, Green, and Blue values // of the lights, as a value between 0(off) and 1(max brightness) // // EX: // colorWipe(strip.Color(alpha, 0, alpha/2)); // Pink colorWipe(strip.Color(0, 0, alpha)); // Blue }
Wow, great Idea and so I learned also the function use, but with the new parts I have 30 sec of black and after only the fadeinfadeout effect.
I think is because I must tell how much time the PowerPlant Function must work but I don’t know how to declare it.
Here the code that gives no error.
#include <Adafruit_NeoPixel.h> #define PIN 6 #define NUM_LEDS 16 #include <Adafruit_NeoPixel.h> // Parameter 1 = number of pixels in strip // Parameter 2 = pin number (most are valid) // Parameter 3 = pixel type flags, add together as needed: // NEO_KHZ800 800 KHz bitstream (most NeoPixel products w/WS2812 LEDs) // NEO_KHZ400 400 KHz (classic 'v1' (not v2) FLORA pixels, WS2811 drivers) // NEO_GRB Pixels are wired for GRB bitstream (most NeoPixel products) // NEO_RGB Pixels are wired for RGB bitstream (v1 FLORA pixels, not v2) Adafruit_NeoPixel strip = Adafruit_NeoPixel(16, PIN, NEO_GRB + NEO_KHZ800); int alpha; // Current value of the pixels int dir = 1; // Direction of the pixels... 1 = getting brighter, 0 = getting dimmer int flip; // Randomly flip the direction every once in a while int minAlpha = 25; // Min value of brightness int maxAlpha = 100; // Max value of brightness int alphaDelta = 5; // Delta of brightness between times through the loop void setup() { strip.begin(); strip.show(); // Initialize all pixels to 'off' } // *** REPLACE FROM HERE *** void loop() { delay(5000); powerplanteffect(); FadeInOut(0xFF, 0xFF, 0x00); } void powerplanteffect() { flip = random(32); if(flip > 20) { dir = 1 - dir; } // Some example procedures showing how to display to the pixels: if (dir == 1) { alpha += alphaDelta; } if (dir == 0) { alpha -= alphaDelta; } if (alpha < minAlpha) { alpha = minAlpha; dir = 1; } if (alpha > maxAlpha) { alpha = maxAlpha; dir = 0; } // Change the line below to alter the color of the lights // The numbers represent the Red, Green, and Blue values // of the lights, as a value between 0(off) and 1(max brightness) // // EX: // colorWipe(strip.Color(alpha, 0, alpha/2)); // Pink colorWipe(strip.Color(0, 0, alpha)); // Blue } // Fill the dots one after the other with a color void colorWipe(uint32_t c) { for(uint16_t i=0; i<strip.numPixels(); i++) { strip.setPixelColor(i, c); strip.show(); } } void FadeInOut(byte red, byte green, byte blue){ float r, g, b;
for(int k = 0; k < 256; k=k+1) { r = (k/256.0)*red; g = (k/256.0)*green; b = (k/256.0)*blue; setAll(r,g,b); delay(5); showStrip(); }
Hi there Hans, here is another request on your nice Meteor effect. Probably the most noticed effect here. Would it be possible to have the meteor effect goes round and round? In the original code, the Meteor itself stops at the end of the strip, then the tail decays and after that the Meteor starts again. My approach would be to have the Meteor start again as soon as the Meteor hits the end. In this case you would have a never “hitting” or “endless” Meteor falling, which would look great when using a LED-Ring.
Changing this line:
for(int i = 0; i < NUM_LEDS+NUM_LEDS; i++)
to this line:
for(int i = 0; i < NUM_LEDS; i++)
Makes the Meteor start again immediately, but also stops the old Meteor tail of course. So not very pretty.
Making the Meteor effect infinite is a cool idea (kind- like traveling through space right? ).
First thing would be to make sure the effect keeps going for at least as long as the meteor trail. Having said that I’d probably rewrite the entire code and use a method to shift the LED colors endlessly. So basically keep shifting LEDs and at random rebuild a meteor, with a fading trail. There is a good function to very fast shift the LED array, but I’d have to experiment a little to see what works the most elegant (and I’d need to dig-up my Arduino+LED strip).
I doubt we can find an elect way by just adapting a for loop
Hi Hans, sounds like a plan. Using FastLed of course.
My thoughts about it:
What about beat8 or sin8 function? Also, what about using a gradient color palette? This way we can specify the tip color (a white-ish Meteor) and the color of the tail, which could be a fading from yellow to red. The last color could be black (which replaces FadeToBlack) or red, purple, green etc. (which replaces FadeTowardColor). So that the last color would be the background color. So we could define many gradient palettes and just activate which one we want to use in the function right?
1 2 3 4 5
DEFINE_GRADIENT_PALETTE( meteor_gp ) {
0, 0, 0, 0, //black - tail fading to black (or any color)
128, 255, 0, 0, //red - tail
224, 255,255, 0, //bright yellow - tail
255, 255,255,255 }; //full white - for the tip of the meteor
And instead of the random tail decay (which would need FadeToBlack or FadeTowardColor), can we just put a sparkle effect on top, moving along the tip of the meteor (so the first few leds after the tip are sparkling)? <– just some ideas
To bad the Power Rangers topic does not work, we could use it to further discuss this effect. Cause I think it will fill this comment section more and more.
Hi hans ! this is such a great work. I am a beginner to Arduino and coding. From the downloaded files i got individual code for each effect. Explain me how to add the required effects. Can you Plzzzzzzzzzzzz tell me with an example
I want 1. Multicolour bouncingballs 2. Fire 3. Strobe 4. cylon 5. KITT 6. Meteor rain 7. Theater chase Rainbow
can you Plzzzzzzzzzzzzzzzzzzzzzzzzzzzzz Explain mee !!!
can you plz make me a code that runs the multi coloured bouncing bal effect first and followed by fire effect. After that it will be easy for me to understand.
can you plzzzzzzzzzzzzzzzzzzz help me without hesitation
You’ll have to copy the code for both effects to your Arduino sketch. Just replace (in both cases) the “void loop()” section of the examples with only this:
well, first off all, I do like the idea! Just not owning a 32×32 LED panel, and never really built anything like that.
I do recall AdaFruit having a few projects that may look like what you’re looking for. Could not resist and quickly looked an found two Adafruit libraries: the older RGB-matrix-Panel library, and the newer Protomatter library.
Unfortunately, I’m unfamiliar with the TL866 II plus programmer … sounds like you’re trying to work with the microcontroller chip straight (not an Arduino-like board). To find the data pin you may have to consult the Atmega datasheet (you can find those here: link).
Hope this helps find the right pin.
p.s. please post questions in English or have Google Translate it for you – this saves me from having to do that and others can read your question as well
Finding quality resources for niche programming projects can be a challenge. Sure, a quick search might yield a code snippet with the right keywords, but clear explanations are often lacking. Breaking this mold, [JaneCoder] delivers an exceptional guide to custom sensor integration in her detailed post titled “Mastering IoT Projects with Arduino.
Hi Hans. I still use so many of your effects but branched off to python and was working on my own variation of using a class that includes the effects as various methods. The key difference was using time.monotonic instead of time.sleep which pauses the machine.
This way, I can have multiple effects running on different strips if I like.
Arduino is still so much faster on slower micro processors or running effects over long strands.
Is there an update to this? I made several of these with the All Led sketch years ago but now I want to revisit and build a few more of these, so wondering about updates or improvements?
I haven’t done much with this in the last few years – everything should still work and way back when I did start playing more with ESP32’s. Due to family circumstance I just kept running out of time and never got to really making any publishable changes.
MySolutions.Tech Best DVD/Blu-ray/Video Solutions-Help You to Digitize Your Colorful Life
Lazarus / FPC Lazarus / Free Pascal Compiler - A cross platform software development environment that show similarities with the good old Delphi.
Put.io Online disk ruimte met Torrent mogelijkheden!
XKPassword Super practical website for those who need to generate one or a list of passwords based on words (more secure).
Osceola, WI My other home-town ... love living there! Osceola rocks!
VLC - VideoLAN Media Player One of the most flexible media players around and available on multiple computer platforms. Handles pretty much any audio and video type available and plays DVD as well.
Links Page These and more of our favorite links can be found on the Links Page.
New Downloads
ConnectMeNow4-v4.0.26-beta-macOS-Universal.dmgDate: 2026-07-27 - Size: 5.8 MBVersion 4 of ConnectMeNow Beta Releasse - A tool for more convenient mounting of network shares under macOS. This is the Apple Silicon version (not suitable for Intel).
squirclenomore-v1.0.3-macos.dmgDate: 2026-01-20 - Size: 5.5 MBmacOS Tahoe applies a very ugly Squircle jail to application icons - SquircleNoMore removes these and resets the normal application icon.
RenameMyTVSeries-2.3.15-Windows-x64-setup.exeDate: 2025-12-14 - Size: 49.1 MBRename My TV Series, for Windows (Intel 64 bit), a tool to assist in renaming TV Show episode files. Static builds of ffmpeg and ffprobe are included.
RenameMyTVSeries-2.3.12-GTK-Linux-x64-static-ffmpeg.tar.xzDate: 2025-10-06 - Size: 78.3 MBRename My TV Series, for Linux (64 bit GTK), a tool to assist in renaming TV Show episode files. This bundle comes with (large) static builds of ffmpeg and ffprobe.
RenameMyTVSeries-2.3.12-QT5-Linux-x64-static-ffmpeg.tar.xzDate: 2025-09-28 - Size: 78.3 MBRename My TV Series, for Linux (64 bit QT5), a tool to assist in renaming TV Show episode files. This bundle comews with rather large static builds of ffmpeg and ffprobe.
Downloads Page Find these and more Downloads on the Downloads Page, where you will also find articles references, operating system requirements and categories.
Amazon Ads
Support us by doing your shopping at Amazon.com, either click the link, or click one of the links below …
You can also sponsor us through these Amazon offerings:
Please consider disabling your ad blocker for our website.We rely on these ads to be able to run our website.You can of course support us in other ways (see Support Us on the left).

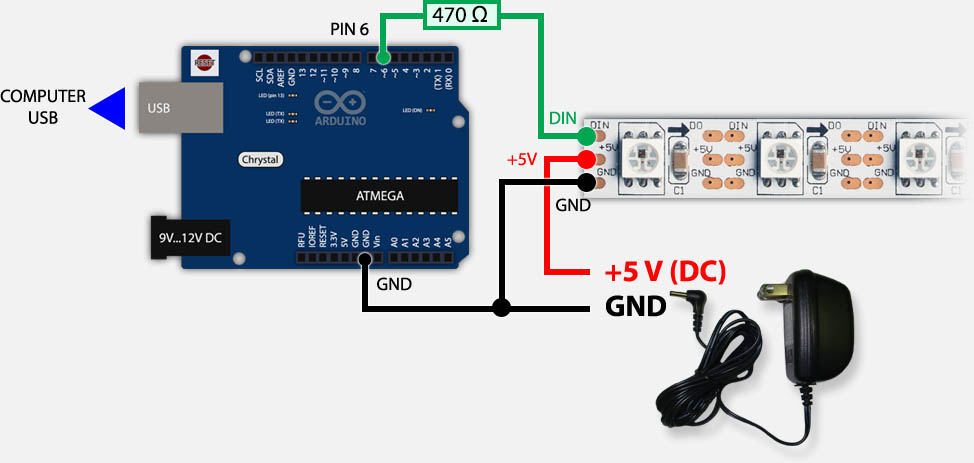
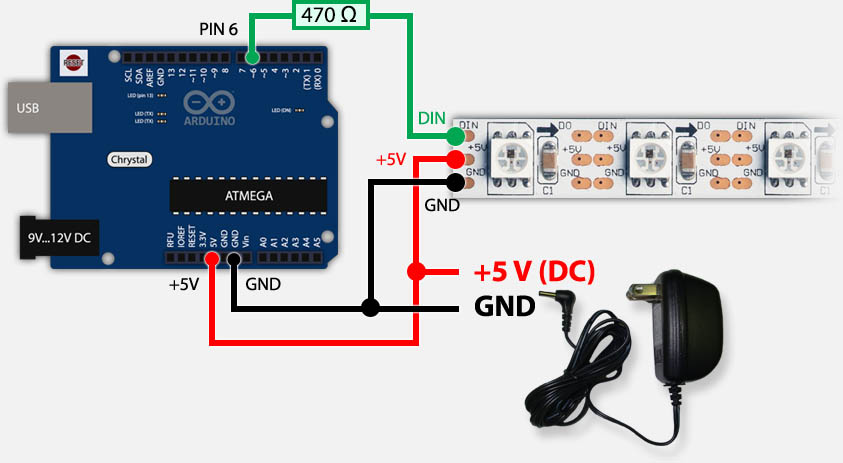

Comments
There are 1086 comments. You can read them below.
You can post your own comments by using the form below, or reply to existing comments by using the "Reply" button.
Great tutorial! Thanks so much for sharing the examples and creating the videos!
Michael
Thanks Michael for taking the time to post a “Thank you” note! It’s very much appreciated!
hans
It’s nice and saved lots of time writing colour routines, thanks. Ported to ARM and wrote my own library to lit each pixel and set RGB colour.
seaworld
Hi.
Very good tutorial, but I think there is an error on the picture 2 “Arduino & WS2812 – Only running on external power supply”. I guess when you connect Arduino to external power supply in this case external +5V (DC) should be connected to Vin pin of the Arduino, but on your chart it is connected to +5V (that i theory should be used to supply detectors connected to Arduino).
Regards
Evghenii
Evghenii
Hi Evghenii,
I guess you’re right that usually Vin is being used, instead of +5V.
And even though the displayed setup works just fine (I’ve been using this setup for almost 2 years now on a daily basis), I should probably look into changing the picture to be really 100% correct.
The problem is that I’m traveling until next month, so I won’t be near my stuff in the next weeks to make the modifications …
hans
Actually the VIN pin is connected to the voltage regulator, which at least on the UNO is supposed to be fed with 7-16V. When using a (regulated?) 5V source the 5V terminal can be properly used as an input.
Kevin Z
Thank you for sharing your work !
bogdan
You’re welcome Bogdan, and thanks for taking the time to post a “Thank you”
hans
[…] códigos para programar los Leds fueron sacados de Tweaking4all.com para los que quieran practicar y aplicar otros diseños de Leds para reemplazar ornamenta […]
Hans,
Fantastic site! I just got a Arduino Uno starter kit from Amazon and waiting for a 1m strip of WS2812 lights to arrive as I have a project I am working on for a holistic friend of mine. I’m 50 and new to all of this, but from my research, using the Arduino and the light strip is my best way to go here, so I am learning as I go now.
I have to create a 7 led light strip that goes in the following order LED1 always red, number 2 always orange, 3=yellow, 4=green, 5=blue, 6=indigo and 7=violet.
What I need the sketch to do is run for about 10 minutes in a random format where 1 of the 7 led lights will light up for a second or two and other lights remain off and then the next random led lights up. Then after 10 minutes, I need the strip to then run a continuous simple chase format where LED1 lights up for a second or two (all other lights off), then goes off. Then LED 2 goes on (all others off) , then the pattern continues #3 thru #7 then start over again at #1.
I’ll be reading more of your posts, but any advice on how to proceed would be greatly appreciated!
Chuck
Hi Chuck,
Maybe (considering the potential code we’d be posting) it’s better to start a topic in our Arduino Forum. Any post in the forum, I read …
It does not sound like this would be a very complicated project, so I most certainly am willing to help you with this.
hans
Thanks Hans, I appreciate the help! I will start a topic in the Arduino Forum, thank you for pointing me the way! :-)
Chuck
I’ll be looking forward to your post
hans
Hello Hans,
I have been following this thread with interest.
I am a complete novice but have made some limited progress with some modifications as you will see from the attached code. I would be extremely grateful if you could point the way with the next stage as a variation on your Strobe code. I have so far modified it to produce the following: –
1. A second strobe function including and an additional integer that I have called BlackDelay which needs to have a different integer value to the FlashDelay.
2. Corresponding duplicate function and statement blocks for the second strobe function.
What I would like to do is make each Pixel individually addressable with a predetermined fixed colour/colour combination and strobe sequence. At the moment I am using 5 PL9823 addressable RGB LEDS for testing but will eventually require >100.
Not every one of the intended 100 or so Pixels will be unique, as in some Pixels may share the same colour/colour combination and strobe sequenceI and I am assuming that if there are say 80 variants, that these could be configured in setup and then called from a loop function for each Pixel?
My modified code is as follows:
If you could give me some idea as to the methodology for this more complicated variant of your original code I would be extremely grateful.
David
Hi David,
I’d recommend taking this to the forum.

On top of that: I’m traveling so I won’t be able to give you anything good until I get back home, which will be in a few days.
If you decide to move this to the forum;
– Post a link to the Forum post here would be great for others that might be interested
– I do see every post in the forum, so I won’t forget or miss it
Sorry for the delay …
hans
Hello Hans,
Thanks for your reply. Despite being logged on as dp34067 I am unable to create a new topic in the forum.
Am I barking up the wrong tree and should I just be replying to one of the existing topics?
dp34067
Hmm, you should be able to create a new topic. – I just checked your user profile and it’s set to “participant”, so you should be able to create a new topic.
Can you try reloading the page and try again (if you haven’t done that already)?
If not then that would be a problem
I did notice however that the login dialog doesn’t always seem refresh the page as it should, after loggin in.
Please let me know if this issue persists. I’ll do some investigating on my end as well.
hans
Hello i have a question, first off thank you for all the code and great job, second I try to put the code into Arduino and compile it, it keeps saying ‘meteorrain’ was not declared in this scope any idea of how i could fix that?
Richard Amador
Hi Richard,
it’s a little hard to determine why you get this message without seeing the code.
Please do not post the full code here though, rather use the forum for that to avoid that the comment sections gets too long.
The most common reasons why you’d see that message:
1) You copied the code from this website and are one of the very unlucky users where the Arduino IDE is doing something goofy with it.
fix: Copy and Paste the sketch from the website into Notepad, Copy again from there and paste it in the Arduino IDE – this typically filters invisible characters causing issues.
2) You’ve typed the code and made a typo somewhere.
fix: Look around the “void meteorRain(…)” function definition. You may have missed a “}” or a “;” (quite common).
hans
Hello Hans,
I switched browsers from Firefox to Google Chrome and all seems well, but that may be a coincidence!
dp34067
I tested it here with a fake username in Chrome and Safari – it worked just fine unfortunately. So I’m guessing it was a caching issue.
I’ll keep an eye on it and take a better look once I get back home. Maybe one or the other thing is caching where it shouldn’t.
hans
Hello;
nice effects and thanks for writing such a informative tutorial.
But i am here with a stupid question :D
how to display a static color using arduino?
i want to make led strip (ws2812b) to show a static color lets say only red. So that when i start arduino my led strip would only display red color and continue to display it.
Adnan
Hi Adan,
There are no stupid question ….
Setting the entire strip in one color can be done (in this framework) with:
So for example for setting all LEDs to blue:
hans
thank you so much!
askfriends
You’re welcome.
p.s. I also posted some code in your forum topic.
hans
Just wanna thank you for this great tutorial with flexible codes and videos! Awesome!
Hadj
Thank you for taking the time to post a “Thank you” Hadj! …
…
It’s much appreciated
hans
Running Arduino 1.6.3 with FastLED 3.0, Arduino Nano 3, 328 atmega, WS2812B leds. LEDs, when setup with RGB ordering, output green for red, and red for green. Blue is fine.Switching to GRB ordering, all the LEDs in my strip turn green, with hints of other colors (ie a flashing “red” LED will be a slightly pulsing fully lit green LED.The coloring of the strip does not occur in the RGB ordering – but obviously, the colors are backwards.Any thoughts?
matt.h
Hi Matt,
there are several ways of ordering the LED colors, not sure why some (often Chinese) manufacturers choose a different order. You’ve already tried RGB and GRB, if I understand you comment correctly. As far as I can see, these combinaties should be valid, and you’d have to test which one works for your strip:
RGB, RBG, GRB, GBR, BRG, and BGR.
Since I haven’t ran into this issue, I would not be able to predict which one would work for you.
Note: When you set all LEDs to WHITE then the color scheme should not matter, since all values (R, G and B) should be FF.
However ,… if you strip does not light up white, then there might be another problem.
hans
I am “newbie” with Ardunio and my English is not sooooo good (I read better than I write). So I have to use Google translator to help me to write to you.
But I hope you can help me.
I visited this site: //www.tweaking4all.com/hardware/arduino/adruino-led-strip-effects/. I liked what I saw and tried out all the sketch on this site.
So my question is: Can I find a sketch/Framework that contains all the effect-sketch in the Framework?
I want to teach me the use of functions (I would think that I have to use functions to “connect” sketch together?), but still has a lot before I understand their use. Unless there is a sketch which shows that use of all smal sketch in the Framework.
I would be very grateful if you could write me the sketch to show me all the effect-sketch in use in Framework.
You can also post it on your site so that other people can use it. :)
I want to study how you put together all the sketch and run them together, and use off function to be beeter to write code. I want to make myself a great Christmas stuff! :)
I use Adafruit_NeoPixel library. I would be very happy for your help.
Nils-Johnny Friis
Hi Nils-Johnny,
you’re English is actually pretty good – with or without help from Google
I suppose theoretically, you could put all effects into one sketch. It might be however, that you run out of memory (depending on the Arduino model you’re using).
First you’d have to copy all the functions I have mentioned here into the same sketch – just keep adding them at the end each time.
Next you’ll have to look at the “loop()” function where we call these functions – this is where you have to be creative and see how you’d like to call them (what order etc).
Posting the entire code here would be a bit large, so I did post it in the forum … You’ll find the FastLED and NeoPixel versions in this post.
hans
OMG…you know how cool it is when you find EXACTLY what you are looking for on the magical interwebs? Thanks so much for sharing your knowledge on this…just got my first set of pixels to make a marquee sign, and have been trying to explore both of the libraries you use here on my own…this write-up pulled it all together for me! Now I have them doing exactly what I want, and have come up with some different ideas that I never would have thought of…
Thanks for sharing your knowledge!
Greg Wren
Thanks Greg!
It’s equally awesome to see a “Thank you” note like this one – it’s so much appreciated! Thanks!
(and yes; playing with these LED strips is awesome! )
)
hans
Hi,
These LED routines are all great. I’m trying to combine a few of them into one program and have a variable chose which one to display. I’ve only tested a few so far, but I found that the Bouncing colored balls gets stuck and does not return to the loop. I added a line after showstrip; to break if the variable is not set to the value for that routine. I thought I’d mention this in case someone else is attempting to do the same thing.
mikewolf
Thanks Mikewolf
Glad you’re having fun with LED strips haha (so do I!).
I have not run into this issue before, but it makes sense since we keep the balls bouncing using “while(true)”.
You could of course add a timer or something and then modify the while to something that checks if it has been bouncing for a certain time.
A few other users have been toying with combining the effects, see this forum post and this one.
Not sure how helpful they will be of course for your project, just thought I should mention it …
If you have created a cool project, feel free to post it in the forum!
I’m sure others might enjoy it as well – but it’s totally optional of course …
hans
Hi ,
I added the Cylon and New Kitt to my Program and noticed every time these routine starts over, most of the leds briefly flash white. I cant see anything in the code that could be causing this. Any ideas?
mikewolf
I had the same issue with my 300 led strip.
It turns out that the control voltage needs to be in close match with the supply voltage.
I used a transistor, with the arduino connected to the base (with a 100k pulldown resistor) and the supply voltage on the collector, then connected the strip to the emitter and all the glitches went away.
Maybe you could just use a pulldown resistor on its own, thinking about it. The glitches do seem to be data rate associated.
flow in
I figured it out. I forgot to put a break in between one of my “switch case” statements. It was briefly going to a function that just called up all white leds.
mikewolf
Hi MikeWolf!
See; that’s what I like to see haha … I sleep, while the user finds a problem and resolves it. Awesome!
Glad to hear it works now!
hans
Once I get the NewKitt routine to change colors everytime the eyes hit the sides or each other, my life will be complete
mikewolf
Hi MikeWolf,
You could change color in the bounces in the NewKITT function. Just a dirty hack, but say you’d want to use only 2 colors (red and white):
void NewKITT(byte red, byte green, byte blue, int EyeSize, int SpeedDelay, int ReturnDelay){RightToLeft(0xff, 0, 0, EyeSize, SpeedDelay, ReturnDelay); // red
LeftToRight(0xff, 0xff, 0xff, EyeSize, SpeedDelay, ReturnDelay); // white
OutsideToCenter(0xff, 0, 0, EyeSize, SpeedDelay, ReturnDelay); // red
CenterToOutside(0xff, 0xff, 0xff, EyeSize, SpeedDelay, ReturnDelay); // white
LeftToRight(0xff, 0, 0, EyeSize, SpeedDelay, ReturnDelay);
RightToLeft(0xff, 0xff, 0xff, EyeSize, SpeedDelay, ReturnDelay);
OutsideToCenter(0xff, 0, 0, EyeSize, SpeedDelay, ReturnDelay);
CenterToOutside(0xff, 0xff, 0xff, EyeSize, SpeedDelay, ReturnDelay);
}
Obviously, this can be done nicer, and I don’t know if only 2 colors would be OK for your purposes.
hans
Hi Hans,
I got it to do exactly what I wanted. I was already using the bouncing color ball routine, so I used the array to call up the different colors as it switches from left to right, outside to center, etc. I’m just started learning this arduino stuff. I’ve been programming pic micros in assembly language for the past 25 years. Using these addressable LEDs is a great way to learn a new language. FYI, I’m using a Teensy 3.2 as my processor.
mikewolf
Hi MikeWolf!
Glad to hear that!
Hey, for me, a lot of this stuff is new as well. I used to play with the BASICStamp (far from as advanced as using assembly) for a while, but the Arduino made things a lot easier. Also good to know that Teensy pulls this off!
hans
Does anyone know how to program these effects so that you can select a button for each or one button to scroll thru each with a random selector as well?
I built a crosley type jukebox with digital screen and Kodi with 4 pairs of WS2811 LED’s. 10 LED’s on 2 strings vertical and 9 LED’s on 2 strings horizontal.
I have tried piecing together Fastled Multiple string code with Fastled DEMO100 code but only the first effect lights up.
(Apologies: due to the length of the code, I had to move it to the forum: see this post)
imdr5534
Hi Imdr5534 ….
….
I had to move the lengthy code to the forum. Apologies for that.
I’ll post an answer there.
hans
Utterly fantastic. Thank you so much for taking the time to create, write up, and share all of these fantastic light displays with us! You have a true gift and a generous heart.
Since your code has saved me at least a day’s worth of work, I would happily donate to your site for your time and effort, but I’d rather all of the funds go directly to you (instead of 90% through Flattr). Are there alternatives (like PayPal) or something similar? I’m US-based, if that makes a difference.
Thanks again! I really appreciate your work!
KTTJ
Hi KITJ!
Thank you for your kind compliments – that is always a motivator to keep going .
.
You can donate through PayPal, although it’s not required yet very much appreciated.
Unfortunately, PayPal did not allow me to have a donate button but I do have a PayPal account. I’ll email you the details.
hans
Absolutely Amazing! You truly are the keymaster of NeoPixels. I absolutely love WS2812’s and have been playing with them for about 6 months now. This is by far the best use of them I have found. I was hoping you could point me to an example that uses your examples with a switch. I have been trying for a few days now to get your code with “all effects” to operate through a switch case instead of time delays. I have had no luck getting a switch to control even two shows. I must be missing something very simple like checking my switch at the wrong times. Hopefully there is something out there for me? Otherwise you have made a wonderful contribution to NeoPixels.
(int thanks, thanks++);
abarrelofmonkeys
Hi ABarrelOfMonkeys!
Thank you very much for the compliment.
As for using a switch, I recall another user asking for something like this as well (see this comment, this forum topic might get you started as well).
Unfortunately, I’m traveling for work, so I have little chance and time to help you on your way.
I should be back in about 2 weeks, which would clear my schedule a little more …
hans
For those interested in effects for Christmas, look at Spike’s project in this forum post.
hans
Hi Hans,
Thank you, I hope others find it useful.
As KITJ! asked above, would you also send me the details so that I can buy you a drink please?
Your preferred currency too if you would be so kind.
I’m still working on more stuff for Christmas, although the wife doesn’t think I should go overboard with the amount of LEDs. As if I would
spike
Thanks Spike,
I could use a drink right now haha (it’s super hot here right now). ….
….
You can donate through PayPal (email: hans at luijten dot net) … pick a subject like “drink” or “LEDs”. PayPal doesn’t allow me to place a Donate Now button on my website
Hahaha once you get the hang of it … you WILL go overboard with the LED strips … don’t forget to send pictures!!!!
It’s awesome stuff to play with …
hans
Hi Hans,
Indeed, it’s very hot here at the moment too.
Yes, I read your post about PP saying that you couldn’t use a link, it’s a real shame.
You’re quite right, LEDs are seriously addictive, I have been playing with them for a couple of years. This is one of my creations https://youtu.be/oiXbXCQdf8c
But thanks to you, I am getting better at the coding side of it.
Is there a list of the NeoPixel or FastLED commands anywhere?
A drink should be in your inbox Enjoy!
spike
You’re the best Spike!!!
Perfect timing for sending me a few drinks!
Oh wow! Love the YouTube video you posted – that’s so cool! I better start looking into an effect like that as well …
As for lists of available commands, I found this keyword list for NeoPixel, and this FastLED reference. The one for FastLED actually had a good explanation with it. Hope that helps …
hans
Hi, I’m new to all of this LED and Audrino stuff, I was wondering if it is at all possible to create a “Chase” effect or any of the effects posted here for that matter, using a single color LED strip with UV LED’s?
Anthony
Hi Anthony,
I would assume this is very well possible,… if you can find a LED strip with UV LED’s.
Then the next question would be finding a library that supports that particular LED strip.
Unfortunately, I have not yet seen a LED strip with just UV LEDs.
hans
First off, thank you Hans for writing back so quickly. I really do appreciate it and your your time. So yes to, there are lots of strip out there with UV LED’s but to my understanding they are all analog. I can’t seem to find a single color digital strip anywhere let alone one that is UV. This is basically for a computer build that I’m putting together. The other question I came up with is permanent placement of the arduino in side the computer. Is it possible/ok to, substitute the external 5v power supply you in your diagram with a molex connection to the 5v 30a DC rail on a ATX computer psu?
Again I really do appreciate your help!!!!!
Anthony
Hi Anthony,
you’re most welcome.
I think the problem with Analog strips is that you cannot address the LEDs individually, so making that work with an Arduino might not be possible. I did find this Arduino Forum Topic, which might be of interest.
As for powering the Arduino+LEDs with your computers PSU; that should work (5V 30A is definitely enough). Just make sure that you get a PSU with some extra watts available to power your PC (mainboard, disks, videocard, etc) and the LEDs. Placing the Arduino itself in the case would not be a problem though.
hans
And So Again, I’m calling on your expertise……..
So I went and got an Arduino UNO Starter kit, ordered a whole mess of led strips (waiting for them to be delivered). Downloaded the Arduino Software and the Fast LED Library. No matter what i do whether its open a file from the fast led library or just copy and past it from here. All I get are error messages. I have to say beyond the simple downloading and uploading of files or copying and pasting the code. I truly have no clue as to what I’m doing or looking at, or even what I’m doing wrong. Whatever help you can give would be greatly appreciated.
Anthony
Hi Anthony,
Could you post the exact steps and error message?
hans
Ok, so ill start from the beginning.
I downloaded the arduino ide, installed the drivers. All apears properly
In the arduino software I went to TOOLS>BOARD and made sure my UNO was selected, Same thing for the COM
All seems to be working properly, I even ran through the blink project in getting started everything functioned as it should.
I tried several ways to use the FASTLED library, Ill go over each one:
#1) Sketch>Include Library>Add .ZIP Library, When the window opens, Downloads> LEDEeffects_Sources.zip> Open
Then I get:
Arduino: 1.6.7 (Windows 10), Board: “Arduino/Genuino Uno”
Specified folder/zip file does not contain a valid library
This report would have more information with
“Show verbose output during compilation”
enabled in File > Preferences.
#2)Manuallly extrating the files to the arduino library: I followed the Instructions from here: https://www.arduino.cc/en/Guide/Libraries#toc5
After restarting the IDE I get a window:
ignoring bad library name
The library “FastLED Examples” cannot be used.
Library Names can only contain basic letters and numbers.(ASCII only and no spaces, and it cannot start with a number)
GRRRRRRRRRRR You can See My fustration, and oviously just copy and pasting the code doesnt work.
Really Hans, thank you.
Anthony
Hi Anthony,
I can totally understand the frustration … it’s too bad that the Arduino IDE doesn’t handle GitHub ZIP’s all that well (see also here). You could try that older FastLED library and the Arduino IDE could automatically update it to the latest version.
So I quickly started up a Windows virtual machine to describe it for you., and installed the latest Arduino IDE (1.6.9).
After the application started, I went to the menu: Sketch -> Include Library -> Manage Libraries. This will open a window, which takes a bit to load everything it can find. But once it’s done, you can type “fastled” in the “Filter your search…” box.
FastLED should appear here. Click it and the button “install” will appear. Installation takes seconds. Once done, click “Close” and the FastLED library should be available.
hans
p.s. you’ll find the examples in File->Examples->FastLED
hans
Ok, so I was able to find the library and install it through the IDE like you said. Much to my delight, the effects that I want to use are not included…… sigh……The effects that I’m looking for are:
Newkitt, Strobe, RunningLights, Bouncing balls multi color
Also saw this one on you tube https://www.youtube.com/watch?v=_wkTtAk2V_k
My Project: I’m building a new High End Gaming Computer, with a custom liquid cooling system, of which the main focal point of the system will be the a custom built reservoir tank. Everything inside the case will be visible through large side panel windows. I plan on cutting the led strip down to length, to fit inside a sealed tube, inside the center of the reservoir and have the LED’s running the desired effects while the coolant is swirling around the reservoir.
So obviously I will have to change the led count from 60 to whatever it is that’s on the strip after I cut it. Correct? Hopefully……..
I ordered 2 strips of Waterproof WS2812 LEDS one with a 60 LED count, One with a 144 LED count. Again in theory either should work as long as I change the LED count in the sketch accordingly?
I also “get” the part in the code, on how to tweak the colors.
So simply put, where can I get the the code, for the examples I gave from beginning to end, simply copy and paste into a sketch, save it, use it, and works?
Anthony
Hi Anthony … good to hear you’ve got the library running now
Looks like you’re starting an interesting project (send pictures when you’re done!!).
Yes you’d have to reduce the LED count to make it fit the strip/LED count you’re actually using.
The examples can be found in the code here as well. There is pretty much no overhead in my code – I just made it so it can be used with both libraries.
As for combining effects, take a look in the Tweaking4All Arduino Forum (goor place to ask questions too). It’s not super extensive, but this topic for example discusses how to put multiple effects together. For most effects, it’s a matter of copy and paste, for a few others it takes a little bit more work … but it can be done!
hans
I don’t think I’m going as far as combining effects. Just switching them around as the mood suits me. I’ll definitely be posting up some pics soon as I get things up and running. Might even do a you tube videos on the build too.
Anthony
Awesome!
Feel free to post links here, or send me pictures (I can place pictures in the comments for you).
hans
For those interested:
Spike posted the code and such for how to make an awesome Christmas star with effects in this forum post.
A YouTube video demo can be found here.
hans
Hans, Can you please take a look at this and tell me what exactly is wrong with it?
When I try to verify I get “setAll” was not declared in this scope…..
#include “FastLED.h”
#define DATA_PIN 6
#define LED_TYPE WS2812B
#define COLOR_ORDER GRB
#define NUM_LEDS 144
CRGB leds[NUM_LEDS];
void loop() {
// Slower:
// Strobe(0xff, 0x77, 0x00, 10, 100, 1000);
// Fast:
Strobe(0xff, 0xff, 0xff, 10, 50, 1000);
}
void Strobe(byte red, byte green, byte blue, int StrobeCount, int FlashDelay, int EndPause){
for(int j = 0; j < StrobeCount; j++) {
setAll(red,green,blue);
showStrip();
delay(FlashDelay);
setAll(0,0,0);
showStrip();
delay(FlashDelay);
}
delay(EndPause);
}
Anthony
P.S.
It seems as though the set all error message comes up on every sketch I copy from here. So I’m sure it’s just me, missing something.
Anthony
Hi Anthony,
you forgot to copy the “framework” (link = see above).
In the framework code (depending which library you choose, in your case FastLED), you’ll need to replace the following code with the code for the effect:
hans
Thank You, Thank You, Thank You, Thank You…………. Finally its working just as it should.
Anthony
Awesome! Good to hear that!
hans
Hi Guys
Looking for major help, I have made an intinity mirror which is using 205 ws2812B what I would like to do is use the fire sketch (which i can of course) but what i cannot do or maybe its not possiable is to have 2 starting point with the flames using 100 leds.
starting point (1) leds 1 to 100
starting point (2) leds 205 to 105
The idea is that it looks like the flames are starting at the same point and lapping round the mirror
I really enjoy working with the arduino and leds but sometimes its so bloody frustating :)
If you think its not possiable let me know as i will then give up on that idea, on a postive note if it is any help would be much appreciated
Fantastic page by the way
Steve
Hi Steve,
thanks for the compliment
I wouldn’t think of it as impossible, would it be OK if both sets behave the same with the fire effect? Or should they be different?
p.s. it’s better to discuss this in our Arduino Forum, otherwise the comments in this topic become too much – I took the liberty to start this topic for you question.
hans
Hi Hans
Thank you for your reply, if they were the same for a start then I dont think that would matter if I like the effect , I was trying a sort of New Kitt with the flames instead of the chasing lights but you guessed I could get it to work
Steve
Hi Steve,
you’re most welcome!
I posted a code suggestion in this forum topic.
Give it a try – it should mimic what you’d like to see – but I’m unable to test this, since I don’t have my hardware with me.
hans
I couldnt get it to work (typo)
Steve
Im back on here as im unable to login on the forum username ap0ll0 password as been sent but unable to get logon
do you know i have been trying on and off for 3 weeks to do what you have just put on the forum yes its working the only problem is the start point for 0 to 99 is starting at 99
man i wish i could do what you have just done
ap0ll0
Hi Ap0ll0!
I just emailed you a new password – I have no idea why the forum acts up every now and then. Time to start looking for a new forum for WordPress I suppose.
I’ll add a comment to the forum topic again …
ap0ll0
As for being able to do this your self; practice … and believe me, I’m not a great coder either … it just takes a lot of playing with code to get a feel for it.
hans
Interested in cool effects and uses of effects, checkout App0ll0’s work in the forum … it looks awesome!
hans
hi how to do that was to be turned on and off by pressing button
chemix
Awesome guide and resource, many thanks and praise for all of the useful info, demos, and code! Can’t wait to fiddle with these-
Kent Caldwell
Hi Hans!
Could you help me, please?
I want to combine different effects in 1 sketch, but Bouncing Balls effect (that I rly like) is endless. What shall I change in code to limit number of Bouncing Balls cycles?
tidehunter
Hi TideHunter,
I’d start with playing with the while loop in line 26 (while (true) {), maybe change that to some like this:
Just a crude example of how we make the infinite look (while(true)) a finite loop.
ps. If you’d like to discuss the code, please consider starting a forum topic in the Arduino Forum. Just to avoid that the comments here become very long.
hans
Hello!
I’ve been trying to utilize your hint about random numbers in order to run different functions every time I switch on the arduino, but I keep getting error messages. I try to tie if and if else statements to different functions and numbers but I’ve been unsuccessful. Can you please let me know a better way to think about calling random functions?
jacchavez
Hi Jacchavez!
Please start a topic in the forum, so we can exchange code examples without making the comments here too lengthy – I’ll see what I can do to help
hans
That’s exactly what I’m looking for, for my Hot Tub Led light project… I can’t find the topic in the forum… has it been done?
kylegap
Hi Kylegap!
I found the forum topic you started (excellent! ) – for you and other, please continue discussion in this forum topic.
For reference, I’ll post the short fix for this here as well:
When using the code of the Led Effects All in one project, you could modify it to actually do this.Modify this part:
void loop() {
  EEPROM.get(0,selectedEffect);

  if(selectedEffect>18) {
    selectedEffect=0;
    EEPROM.put(0,0);
  }

  switch(selectedEffect) {
to this:
void loop() {selectedEffect=random(18); // assuming there are 18 effects
switch(selectedEffect) {
The entire EEPROM part has been removed and has been replaced by a random selection (0 to 18).
To improve the randomness, you can add the following line to the void setup() function;
Hope this helps
hans
Hi Hans! Just joining in the chorus of voices expressing gratitude for your tutorial and examples. Thank you for your time and energy. It certainly helps to add light to my day! Keep it up!
-j
Jesse
Hi Jesse!
Thank you so much for the compliments and taking the time to post it here. It’s so much appreciated and definitely a motivator to keep going!
Thanks
hans
HI,
A while back I posted about using an RS-422 ic to extend the wiring between and arduino and a strip of addressable LEDs to 1000 feet.
Since then I’ve added remote control using a Sony IR codes, a music interface, and made a high power LED pixel using a WS2811 IC and power Mosfets. I was thinking of making an arduino shield that would contain these features as well as a circuit board to make the high power pixel. I put a video on youtube that shows the music interface in action and the high power pixel thats made up of 3 watt red, green and blue LEDs.
IR remote LEDs
mikewolf
Hi there!
i appreciate you taking the time to upload this, alot of it looks cool, but… i am very much a beginner to this and it looks very unfriendly to me, i have tried with both NeoPixel and FastLED library, and get the same errors no matter what, yet, virtually no explanation on how to fix it :( i get either, NUM_LED not defined or SetAll not defined, and it is frustrating me :(
i have a strong of 50 WS2811 12mm LEDs i want to make use of for christmas :(
can you please help me ? D:
mikeb1479
Hi Mikeb1479,
I can understand that this might be challenging for beginners, but no worries – I’ll try to help get you started.
First of all, the general idea was to have a few functions available which are defined in this part (FastLED as an example).
Paste this in the Arduino IDE editor.
Now select this section in this code:
and replace it with the function you found with the effect you’d like to use, for example for the FadeInOut effect:
void loop() {
  FadeInOut(0xff, 0x77, 0x00);
}
void FadeInOut(byte red, byte green, byte blue){
  float r, g, b;

  for(int k = 0; k < 256; k=k+1) {
    r = (k/256.0)*red;
    g = (k/256.0)*green;
    b = (k/256.0)*blue;
    setAll(r,g,b);
    showStrip();
  }

  for(int k = 255; k >= 0; k=k-2) {
    r = (k/256.0)*red;
    g = (k/256.0)*green;
    b = (k/256.0)*blue;
    setAll(r,g,b);
    showStrip();
  }
}
I hope this makes more sense now … please feel free to ask though!
hans
wow!
thanks so much friend :D
it worked very well and much easier that you explained it simply to me :), i now have a few cool effects to choose from for christmas tree lighting :D
i made sure to save them also!
thanks so very much for your time and your help, it is much appreciated! :D
mikeb1479
Awesome Mike!
Glad I could help … have fun with the LED strips (I know I do!).
hans
i have been, theyre now being used as xmas lights :D
mikeb1479
hey,
sorry to bother you again, but, other night i had a thought, that maybe you would like
i was thinking of, sound activated WS2811 lighting, using an UNO, microphone and my WS2811 led’s, but, cannot find a decent sketch anyway :|
was surprised you didnt have one also :o or did it not interest you ? :)
many htnaks :D
mikeb1479
Here is a link, which shows driving 7 LED’s, but one could change the solid LED’s to WS2811/12 and define a color or color mix.
https://www.baldengineer.com/msgeq7-simple-spectrum-analyzer.html
gbonsack
Nice!
hans
Hi Mike,
yes, ginormous LED VU meters is something on my to-do list … unfortunately, all the little projects I’m working on plus and my fulltime job do conflict constantly. I actually prefer working on projects here over my actual job, but … my actual job pays the bills
hans
Hey,
I’ve been playing around with the Fire code, i’ve been running into problems getting it to start and end within a pixel range.
Any idea what I need to change to achieve this?
Thanks for all of this has been really helpful!!
xena2000
Hi Xena2000,
sorry for the late reply.
In essence you’d need to change the “for” loops in fire() function. For example (untested):
void Fire(int Cooling, int Sparking, int SpeedDelay, int FirstLED, int LastLED) {
  static byte heat[NUM_LEDS];
  int cooldown;

  // Step 1.  Cool down every cell a little
  for( int i = FirstLED; i < LastLED; i++) {               // <-- Changed
    cooldown = random(0, ((Cooling * 10) / NUM_LEDS) + 2);

    if(cooldown>heat[i]) {
      heat[i]=0;
    } else {
      heat[i]=heat[i]-cooldown;
    }
  }

  // Step 2.  Heat from each cell drifts 'up' and diffuses a little
  for( int k= LastLED - 1; k >= FirstLED+2; k--) {         // <-- changed
    heat[k] = (heat[k - 1] + heat[k - 2] + heat[k - 2]) / 3;
  }

  // Step 3.  Randomly ignite new 'sparks' near the bottom
  if( random(255) < Sparking ) {
    int y = random(7);
    heat[y] = heat[y] + random(160,255);
    //heat[y] = random(160,255);
  }
  // Step 4.  Convert heat to LED colors
  for( int j = FirstLED; j < LastLED; j++) {
    setPixelHeatColor(j, heat[j] );
  }
  showStrip();
  delay(SpeedDelay);
}
You can call Fire() the same way as usual, I just added 2 additional parameters (First and Last LED).
I have not tested this, since I do not have my gear near me. But give it a try (I hope I didn’t overlook anything).
hans
I created an Android application to control it via Bluetooth:
https://github.com/thiagolr/lightita
Thiago
Hi Thiago,
very nice!!! Thanks for sharing!
hans
Hi Thiango, Thanks for sharing, I would love to try this out and incorporate it into my Christmas lights next year.
Can you give me more info on how it is implemented please;
What BT modules does it support? Assuming it would connect to an Arduino etc
I guess I’m really asking for an idiots guide, including how to install your app to an Android device as there doesn’t appear to be an APK.
Spike
I’m using an HC-05 Bluetooth Module connected on an Arduino Uno, but the Android application should work with any Bluetooth module.
The Android APK can be found here:
https://github.com/thiagolr/lightita/releases
Thiago
Thats awesome, thank you.
Which sketch should be uploaded to the Arduino? I’m assuming it should be ‘lightita.ino’ ?
What is the ‘effects.ino’ sketch for?
Sorry for all the questions but I appreciate your support.
Thank you
spike
You should open the lightita.ino on the Arduino IDE and the effects.ino should be opened automatically on another tab inside the IDE. The effects.ino file contains all the effects, I separated on two different files to keep things organized.
Thiago
Thanks a lot!!!!
have a nice days!!
Aldo
Thanks! You too Aldo!
hans
Although a very cool and fantastically laid out article, I find a lot of the code needlessly complex. To me, the big no no’s in an animation that may have button or other controls include:
My other big issue is counting pixels up and down and I’ll use the cylon as an example. Why have all that code to count up and down, when you could just use some basic high school math and use sine waves instead? You could use it to go back and forth, you could use phase shifting and have waves, you could clip it and so on. In addition, with FastLED’s beatsin8() function, you don’t even need delays at all.
Andrew
Hi Andrew,
thank you very much for your input, and you’re right about the ability to optimize this much more. If I’d be writing this just for me, things would look very different. However … the intend is that everybody (as far as possible) can follow all this just fine, or at least with minimal effort. And yes, there is always room for improvements, and I’m very open to that, so please feel free to post modified sources that have been optimized. I’m confident that certain users will definitely be interested.
Also keep in mind; I’m trying to target everybody and I have found that explaining a sinus to my 11 year old nephew proved challenging, not to mention that quite a few users have no programming background.
I would like to invite you though to post optimized alternatives here – It would be welcome for sure.
hans
Marvelous amount of information – thanks. I’ve bookmarked your site for additional reading.
I am into light painting photography, using tri-color LEDs for years, with a bank of logic switches to control color. Just read a magazine article about Arduino’s and have gone crazy looking for new light patterns and codes. I have a two part question:
First, I want to build several light painting props, where I can turn on a “GO” switch and then select one of the switch positions of a 4 or 5 position switch. Should I go with the “HIGH/LOW” logic or put resistors between the 5 positions and push 0, 1.25, 2.5, 3.75 or 5 volts to the input and do voltage logic?
In either case, what would the: if, then else logic look like, directing the Arduino to run program1 … program5?
I went to the forum and read imdr5534 logic, but that was for a system generated number and not a selected input.
Thank you in advance.
gbonsack
Hello Gbonsack!
Thank you for the compliment, and … Wow, I had never heard about light painting photography – that looks great!
I’d probably go for using several pins and maybe a rotary switch. You’ll need a wire from GND with a resistor to a pin or several pins (see basic diagram here – you’ll find some basic code there as well on how to read a switch/button state), then a wire for each pin to a switch which shorts to +5V. I’d probably consider using a rotary switch so we do not switch multiple switches at the same time.
Then in code it could look something like this:
if (firstswitch==high) {starteffect1(); }
else if (secondswitch==high) {
starteffect2(); }
... etc
It could be done more elegant of course, but this would probably be an easy start.
hans
Thanks, That’s the way I was leaning, but with only a few weeks of coding, my first test loop was only working for switch position 1 and 2 and not 3, 4 and 5. It may have been a bread board or jumper wire issue too, now that I think of it. Adafruit has an article on using pixel strips, to paint with, search for: Jabberwock.
gbonsack
I’d go with what feels right for you, especially when you’re just starting with the Arduino.
You can always try to find more elegant solutions once you get more experienced with Arduino coding – at least that’s how it works for me. This way I get a better feel for what I’m doing as well …
I’ll take a looksy and see what Jabberwock stuff I can find (some links I found so far: Overview, and this one).
So far I like it
hans
That’s it. Happy Holiday’s
gbonsack
Merry Christmas and a Happy New Year to you too
hans
Hi Hans! Could you help me please?
I want to combine 10 effects in one sketch, but Effect Bouncing Balls is infinite … ..i don’t know how limit the number of cycles Bouncing Balls?
merry chirstmas and
happy new year!!!!!!!!
Aldo
Hi Aldo,
several users have been working on combining the effects in one sketch (see also our Arduino Forum).
The trick for the bouncing balls is found in modifying like #26;
while (true) {This keeps going forever of course. You could modify this to a loop, or a time count.
Hope this helps
hans
thanks a lot!!! bye.. Hans!!!
rompipelotas
Hi, Hans,
You helped me a few years ago with a sketch and now I’m back for more. . I’m making a cloud lamp and I’d like to have a lightning effect inside. I have an Arduino Mega and a short strip of WS2812B NeoPixels. I want the effect to be random, like real lightning. For example, three quick flashes, dark for several seconds, then a slower flash fading up; that kind of thing. I thought I could edit the strobe sketch or the Halloween eyes, but I don’t understand how to use the random function. Would love some help!
Thanks,
Claire
Claire Tompkins
Hi Claire!
Welcome back …
…
Maybe this will be helpful;
The function is called as such:
Where the first 3 parameters define the color (0xff),
The 4th parameter sets the number of flashes (10 flashes),
The 5th parameter sets the delay between flashes (50 ms),
and finally the 6th parameter determines how long we’d like to wait after the flashes have been done (1000 ms).
So this function is responsible for a one time effect.
In the example: 10 white flashes with 50ms pause between each flash, and once done a 1 second delay (1,000 ms = 1 second).
Now, since it’s placed in the “void loop() { … }” this function will be called over and over again, with the same parameters. So just a rinse and repeat of the same effect. To add randomness to this we could modify the function call and use the Arduino “random()” function.
An illustration how we we could use this (can be done much more compact – but this way it’s easier to read and understand):
In the beginning of the sketch, just before the “void setup {” line, define the following variables:
… and change the “void loop() {” to something like this:
void loop() {numberOfFlashes=random(10); // random number between 0 and 10
delayBetweenFlashes=random(100); // random number between 0 and 100
pauseAfterEffect=random(1000); // random number between 0 and 1000
Strobe(red, green, blue, numberOfFlashes, delayBetweenFlashes, pauseAfterEffect);
}
Note: the Arduino doesn’t really do random numbers very well, since it always starts with the same “seed”. We can however change the seed by a more random number whenever the sketch starts by adding the “randomSeed()” function to the “void setup() { … }”.
void setup(){// if analog input pin 0 is unconnected, random analog noise will cause the call to randomSeed() to generate
// different seed numbers each time the sketch runs. randomSeed() will then shuffle the random function.
randomSeed(analogRead(0));
}
Just an idea to add more randomness to the whole thing: make the color brightness intensity random as well:
void loop() {numberOfFlashes=random(10); // random number between 0 and 10
delayBetweenFlashes=random(100); // random number between 0 and 100
pauseAfterEffect=random(1000); // random number between 0 and 1000
red = random(30, 255); // random number between 30 and 255
Strobe(red, red, red, numberOfFlashes, delayBetweenFlashes, pauseAfterEffect);
}
You might notice that I introduced two things here. First of all “random(x);” produces a random number between zero and x. “random(x,y);” generates a random number between x and y. You might want to use that in the other variables as well, to make sure that a minimum delay is observed.
The other thing I did is set the color to “red, red, red” – I’m packing a random number between 30 and 255 for the variable red. Since you might want to keep a “white” like color, we would need to have red, green and blue to be the same number. So I’m just recycling the variable for green and blue as well – I hope that doesn’t make it too confusing.
Hope this helps
hans
Thanks! But I need some more hand holding, I’m afraid. Are you suggesting editing the Strobe sketch? I added the six suggested lines to the top of the sketch and replaced the void loop section as you wrote. But I don’t know what to do with the other two sections of code, void setup and void loop.
Claire
Claire Tompkins
Hi Claire,
maybe it’s better to start a forum topic – so we can post full size code and such without disrupting the comment section here.
I already started a topic here …
hans
FYI, I pulled the code from the Forum page and pasted into the Arduino editing program, made a the changes for NUM_LEDS and PIN and tried to compile it – got a couple of error messages (240 and 300?). Did a re-type of code and still the same error messages and then I stated to look at the “error lines” and found several referenced lines as blank lines, more online searches and found copy/paste can add hidden code. So if the error referenced line 15, I did a control L and enter 15, moved the cursor to the stated of line 16 and hit back space until the cursor was at the last character in line 14, then “enter”, “enter” and that error line disappeared. After doing this several times, the Forum code worked beautifully, so I started to tweak the code for my “Light Painting” sticks.
Could find a place to comment on the Forum page, so I’m doing it here.
Thanks
gbonsack
Hi Gbonsack,
You’ll have to register (free) to be able to post comments in the forum.
It’s a little inconvenient, I know, but unfortunately a fully open forum invites spammer and script-kiddies to come pollute the forum with none-sense, trolling, advertising, misleading information, etc. — my sincere apologies that I made it that users need to sign up …
Anyhoo; you did indeed catch the issue with the error codes.
As mentioned below; copy the code, paste it into Notepad, copy all from Notepad, paste it into your Arduino IDE – this should strip all excessive characters.
Under what operating system did you see this happen and with which browser?
(can’t reproduce it with Google Chrome on MacOS)
hans
Hello, i am a beginner with WS2812B LED strips with an Arduino nano and I would like to use the KITT effect. I try to use it but I get an error. Are you able to help me please, thank you. The error message is:Arduino: 1.8.1 (Windows 10), Board: “Arduino Nano, ATmega328”
sketch_jan14c:8: error: stray ‘\302’ in program
 FastLED.addLeds<WS2811, PIN, GRB>(leds, NUM_LEDS).setCorrection( TypicalLEDStrip );
^
sketch_jan14c:8: error: stray ‘\240’ in program
sketch_jan14c:12: error: stray ‘\302’ in program
 TwinkleRandom(20, 100, false);
^
— LINES DELETED —
Peter Bohus
Hi Peter,
first off the friendly request to post large source codes, logs, or other lengthy outputs in the forum
Coming back to your issue:
I suspect you might have copied and pasted the code into the Arduino IDE?
The “stray ‘\240′” and “stray ‘302’” refer to characters in your code that may not be visible, but do interfere with the code.
I tried finding some reference for you: this is one at Stack Exchange.
Now, what I usually do (I assume you’re working under Windows) is copy code, then paste it into Notepad, select everything in Notepad and copy it again. Now excessive characters are gone … now paste it into your code editor and try again …
Hope this helps.
hans
Thanks, it all works now!
Thanks again!:)
Peter Bohus
Awesome!
hans
Hello,
I would like to ask you if it is possible (how) to change the colour of the moving strip from red to another colour on the cyclon effect. Also how can I do it so the strips start moving from both sides and bounce like this one but from both sides not just one. So it would look like this:
——–> <——–
<——————>
——–> <——–
Explained:
From both ends the leds will move towards the other side passing each other in the centre (not bouncing apart) then at the ends they bounce back and pas each other again etc.
Thanks, I hope you can help me as that would be amazing (I’m only a beginner so need to learn these codes)
:)
Thanks Peter
Peter Bohus
Hi Peter,
Changing the color of the running LED is easy. You can pass it to the function in the “void()” section.
For example:
Red:
Green:
Blue:
The first 3 parameters are hex RGB (red green blue) colors (see also the color picker in this article).
As for your second question; this is kind-a what the New KITT effect does, just a little more elaborate.
You’d have to modify this a little bit for the NewKITT() function (so copy the NEW Kitt code and replace the “void NewKITT(…)” function with thsi):
void NewKITT(byte red, byte green, byte blue, int EyeSize, int SpeedDelay, int ReturnDelay){OutsideToCenter(red, green, blue, EyeSize, SpeedDelay, ReturnDelay);
CenterToOutside(red, green, blue, EyeSize, SpeedDelay, ReturnDelay);
}
I have not tested any of these, but I’m confident this will do the trick …
hans
That is kind of what I wanted, but I wanted it to not bounce apart in the middle. Like the Cylon but from both sides so it will start on left and right and go to the opposite sides and then bounce at the end of the strip and bounce back again to the opposite sides instead of bouncing in the middle.
Thanks Peter
Peter Bohus
Hi Peter!
I think I know what you might mean haha … so we have 2 “runners”, one starts on the left and bounce on the right, back the to left where it bounces again to the right etc. In the meanwhile the other one does the exact opposite?
We could tweak one or the other function together for that;
void BounceBothWays(byte red, byte green, byte blue, int EyeSize, int SpeedDelay, int ReturnDelay) {for(int i = 0; i < NUM_LEDS-EyeSize-2; i++) {
setAll(0,0,0);
setPixel(i, red/10, green/10, blue/10); setPixel(NUM_LEDS-i, red/10, green/10, blue/10); // opposite side
for(int j = 1; j <= EyeSize; j++) {
setPixel(i+j, red, green, blue); setPixel(NUM_LEDS-(i+j), red, green, blue); // opposite side
}
setPixel(i+EyeSize+1, red/10, green/10, blue/10); setPixel(NUM_LEDS-(i+EyeSize+1), red/10, green/10, blue/10); // opposite side
showStrip();
delay(SpeedDelay);
}
delay(ReturnDelay);
}
I have not been able to test this though … but it might get you started.
You’d call it in the void loop.
void loop() {BounceBothWays(0xff, 0x00, 0x00, 8, 10, 50);
}
Hope this helps …
hans
Hi, i need some help. I’m clueless when it comes to programming so I’m kinda lost. I have an issue, whatever is meant to fade out and then in to change, is blinking and changing instead. Is my strip faulty, or am i doing something wrong. Using arduino nano clone and ws2812b 5050 led tape (60 led),
Arduino nano, ATmega328
Drax
Hi Drax,
I’d first see if the LED strand test works, just to make sure Arduino, LEDs and powersupply play nice.
I have only played with the Uno, and I tend to stay away from clones since they can create all kinds of issues.
hans
Made a video showing what is wrong here. I that an LED tape issue, arduino issue or power supply issue ?
Drax
Hi Drax,
ehm, the link to the video is somehow pointing to this page again … could you repost the link please?
Sorry for the inconvenience …
hans
Hans, Windows 10 and Microsoft Edge gave me the 302 and 240 error messages. As for the Forum, I thought I was logged in, as it showed my IP address, login name.
gbonsack
Oh boy, yeah … I really cannot recommend Microsoft browsers for any purpose. Rather use something like Google Chrome, Apple Safar, FireFox or Opera.
Thanks for posting this though, since others might run into the same issue!
As for the forum; maybe this is browser related as well – I have not tested Microsoft Edge with my website yet.
Would you mind checking again? When logged in, you should see (at the bottom of a topic) a text editor to post replies.
hans
Hello Hans, ).
).
First, thank you very much for this superb page. (The best on the web
Difficult to find information on the implementation of “NeoPixel” (Adafruit).
I am a beginner in programming (Arduino IDE) and I realized an e-textile project (ATtiny85 + 1x LED RGB WS2812B) with one of your script (NeoPixel) that works well.
The base comes from: “Blinking Halloween Eyes”. (My script not posted as requested).
But I would like to work with 2-3 colors like: “Fade In and Fade Out Your own Color(s)”.
Since “Blinking Halloween Eyes”, so I would like to add 2-3 colors and a Fade-in. (Existing Fade-out).
Currently I come back with another color with function: [setAll(0,0,0);].
I want to keep the random side for the whole !
I tried to mix these two scripts unsuccessfully. Can you help me ? Thank you in advance – I would be so happy.
(If it’s simpler with the “FastLED” Framework. I can also try).
Greetings from Switzerland
PS: My current project uses only one LED RGB, but in the future why not 2-3 LEDs – which would have a different sequence.
Guy-Laurent
Hello Guy-Laurent!
First off: thank you for the very nice compliment – that’s always appreciated and definitely a motivator!
Thank you so much for observing the code posting request, if you’d like, you can post the code in our Arduino forum.
I’m not sure I understand what you’d like to accomplish though (sorry – it’s early in the morning here so I probably need more coffee) …
…
I guess I’m getting a little confused; do you want a each “eyes” to appear in different colors?
Or a different color to fade in/out? And you’re using only one LED? or one LED Strip?
Since I’m sure I can help, I did start this forum topic so we can chat about code and how to implement it. (you’d have to register, but it’s free)
hans
Hello Hans,
Thank you for the message – and your link.
I am now registered on the forum – but I can not log in !
Tested with Chrome (clear cache) & I.E.11 – Win7Ux64
Do you have to validate my registration ?
If there is no more coffee, I will go to sleep
See you soon,
Guy-Laurent
BravoZulu
Hi Guy-Laurent,
I registered yesterday and had the same issue you have. Seems that admins must approve your account before you can post on the forum.
I could not create a topic right after registering but this morning it was ok.
Try again a bit later
cam
Hi Cam,
I’m sorry to hear you’re running into issues with the forum (I’m getting pretty fed up with the forum software ).
).
Admins do not need to approve your account, but I did notice that on rare occasions a page needs to be reloaded for the text box to appear so you can add or reply to a post.
Please let me know if you run into more issues with the forum – I’m already looking for a replacement forum.
hans
Hi Guy
Yes, coffee is always good …
…
I noticed that sometimes the forum is acting up, so I’m already looking into replacing it with another forum.
Occasionally the user has to reload the page to be able to post a new topic or reply to a topic. It’s quite aggravating since I can’t seem to find a fix for it.
Would you mind trying to login again?
hans
Hello Hans,
After many tests yesterday – I’m now logged
(Yesterday by selecting a link in the history of the browser, I was logged – but only on this page of course – Then by clicking on the link of the other subject I was losing the log-in).
The problem: when you do the log-in, the Menu at the top right is always as if you were not logged in. (You do not see the user – [User Menu]).
It seems that at this moment, by making a refresh of page one becomes logged !
Then I repeatedly got the message (Top of Chrome): “WebGL encountered a problem” – [Ignore] [Refresh].
(Never seen this message before with other sites).
To be continued…
So, I will continue on the page: blinking-halloween-eyes-with-different-colors
Guy-Laurent
BravoZulu
« Houston, we have a problem »
After log-in according to the trick: refresh the page, I have posted 3 times without success !
The image I wanted to attach was too big !? (Max 4MB).
I went from 3.6MB to 1.5MB then 960KB – Every time with the error message (Chrome):
I attempted to send the image alone (960KB) with the same error.
My Post is now Online – but no picture
To be continued…
Guy-Laurent
BravoZulu
Bingo !
With an image (alone) of 86KB.
BravoZulu
Hi Guy!
Oh wow, I better check my settings then … I did set it to 4Mb max, so the images should have worked, and I have never seen this error message before.
Just verified the settings, both PHP and bbPress are set to 4Mb per file max, and max 4 files per post. I’ll try uploading something myself and see what that does …
Again apologies for the problems you’re running into and thanks for sticking around
hans
OK, tested it as admin and as a participant (forum roles) and both were able to upload a 2Mb picture.
I’m running Google Chrome on macOS Sierra.
I did change some settings in bbPress, maybe this helps. Would you mind trying again?
(I’ll continue this conversation there haha)
hans
Hello Hans,
I think you saw, I was able to download 2 images (2.7MB and 450KB) without problems. (Chrome Win7Ux64).
Your changes seem to be conclusive
PS: I can now read: “Your account has the ability to upload any attachment regardless of size and type.”
BravoZulu
I got the comment window this AM??? System re-booted over night??? Flip-A-Coin
gbonsack
Hi Gbonsack …
ehm, you mean your system rebooted? Not sure what you’re referring to
 )
)
(I need more coffee – that’s for sure
hans
Hi,
I wanted to thank you for all these examples, it made me want to have fun with those LEDs. I actually had a DAC project ongoing and I’m using these ideas (and the way they’re coded since I’m in uncharted territory here).
I actually have a problem but since I modified the code to fit my plans I’m going post my code on the forum so anyone can help me understand what’s wrong :D
Thanks again for the ideas and the very well explained code there is on this page, it is very educational.
cam
I registered but couldn’t create topic so I’ll explain my problem here, code is there.
It seems that dutch people inspired me on this project since my DAC board is based on Doede Douma DDDAC with differences on components (all SMD to gain size). an output buffer has been added as well as a FIFO buffer followed by a reclock board.
First, context. I’m making myself a DAC and I was looking into VHDL and PWM for a little while but as I expected, last time I used VHDL was in school more than 10 years ago and I suck a lot at it! I have a bit better knowledge of C.
Back to subject of interest. I found this article which made me hopeful (almost a better man!). My idea of the result goes through phases (I used switch/case ).
).
1st phase: Start-up lighting to actually signify to user it started. I used fade in/out code, I only modified the brightness increasing with sine wave instead of linear. ).
).
2nd phase: RaspberryPi starts and look for a connection to my NAS. I used twinkle effect.
3rd phase: When NAS is found, the RaspberryPi updates its output and my arduino goes back to almost the same fade in/out as in phase 1 except it doesn’t go back to LEDs off but stays to 50% (I don’t want too much light and I like how it looks to go high and a little back down
4th phase: Steady lighting at defined brightness. If connection to NAS is lost, it goes back to phase 2.
Seems nice but it only half works. phase 1 and 2 works perfectly fine but when I connect my wire to simulate the input from the RaspberryPi it goes crazy. It’s like the switch/case is broken and I have all code executed at the same time and it looks bad I could make a video to clear things up if required. I’ve got to mention I don’t arduino but a smaller Adafruit Pro Trinket with 10 LEDs.
cam
I actually could open a new topic on the forum. Follow up there.
cam
You have saved me so much time….Tons of love.
Warren Richardson
Hi Warren!
Thanks for taking the time to post a “Thank you” … glad to hear you’ve enjoyed this article!
hans
I just uploaded, to the Forum, my modified Button Cycle .ino, where every time I press a normally open switch, the sketch jumps to the next loop (case) segment and does a different light pattern sequence. The problem is if I am doing a photography workshop and the people want loop #5 repeated, I have to power down and restart at loop #1, pressing the button time and again until I get to loop #5 (each loop creates a 35 second light show). I have tried to modify that sketch to take a keypad input of 5 to jump to that case (Keypad_Test), but I have two (2) lines that keep giving me error messages. I have re-typed those lines and many other lines above and below the error lines, plus lines in the define section and have cleared many other error messages (I’m using Windows 10) and from previous posts see where I should have possibly saved the code to Notepad and then copied it into IDE. If that is the answer, then so be it, but if I am doing something stupid, then tell me – thanks.
gbonsack
I just replied with a suggestion the forum.
Others; please feel free to join the conversation with better and/or smarted solutions!
hans
I solved the issue, with the 2 lines of code that were giving me error messages, it seems that “Fat Fingers” had creeped in and I had an extra character in the define line. I now have a working 3 X 4 matrix keypad., where I can press any one of the 12 keys and that case/loop runs. A sample video has been posted on YouTube https://youtu.be/t14OyY58YNY and I’ll post the full code on the Forum page https://www.tweaking4all.com/forums/topic/lightning-effect/
Hans, thanks for the comments, to get me thinking correctly.
gbonsack
Awesome! Very nice effects! Love the stills as well!
hans
Sorry. I now to coding and i am zero. Of course i have a long road to go and for now i m just trying to het the logic. I just want to ask this ; i see j and k and i integers. I didnt get what are these because i dont see that we define these letters as integer names in void setup. Are they predefined in library or what? Thanks. Sorry for my english. I m not native talker. So i guess u also understand why its hard to understand that kind of articles for me.
Stan
Hi Stan,
these variables are defined on the fly. For example:
for(int k = 0; k < 256; k++) { ...This says: start a loop where we count 0-256, by using the integer variable k. See the “int” in front of it? Here we define “k” as an integer (see also the for-loop section of my mine course).
The definition of variables is done based their scope.
So for example, a variable that needs to be available everywhere, is defined way at the beginning of your code.
If the variable is only needed in for example the “setup()” function, then we define it only there, ideally in the beginning of the code.
If however, the variable is only need briefly, for example for counting in a loop, then we can choose to define it right there (as seen in the example).
hans
Yes Hans i see int goes for integer but i disnt know we Define k in here. I was thinking we Want k to do something in ur code. So its a Define code, not a Do code. Umm okay. Thanks for ur very fast reply that was so nice of u. I will dig on that in my mind. I m a newbee. Thanks again. I guess i need another article that teachea Coding from zero and the logics of it.
Stan
No worries, we all had to start at some point in time …
This might be helpful to get started: Arduino Programming for Beginners.
I wrote it for those with no programming experience, so maybe it’s helpful for you as well.
Enjoy! And feel free to ask question if you have any (either under the related article or in the forum).
hans
Wow. This cant be real. I email and wrote so messages on some websites and i wait for days long but was no reply. And you show me road to start and tell me to feel free to ask if i have some to. My friend i would like to give a handshake to u. I m so happy to hear this friensly sentences from u. I do thank you. Now i have more energy to sit and learn this. (I am web&graphic designer and in love with electronics from childhood times and i want to combine them in my interior design lighting projects). Peace..
Stan
Hi Stan,
I got my Arduino unit mid-November and beat my head against the wall too. My best advise is think of coding as a good book – Introduction, Table of Content and the individual chapter or chapters.
What I wanted to do was create a “Light Painting Stick” for photography, where I could press one of the keys, on a 3 X 4 keypad and have that sub-loop/sketch run. With a few comments from Hans, it all came together for me and if you read the above Feb. 5 post, there is a link to the finished code – enjoy this site.
gbonsack
Thanks Gronsack. . I ve seen a lot on light paintings and its a realy awesome type of usage of leds. I will definitely check that post and the code
Stan
You’re most welcome – I try to answer as fast as I can … sometimes that’s right away, sometimes it’s a day later (timezone difference and of course sometimes my daytime job interferes ).
).
I’m always happy to help!
hans
hello,
i want to make a rainbow code of the color wipe. i mean that the color stable to show out like a rainbow in 16 LED lights. i dont want to make a rainbow run. can u suggest for me? thank you very much.
candy
candy
Sorry i dont understand what is color wipe
Stan
candy,
If I understand correctly, you want LED ‘0’ (first LED) to be red and the last LED to be violet? If so consider defining each of the 16 LED’s like this (you need to enter color code as desired). This is copied from another program, so verbiage may have to be changed to suit. Have to run for an appointment, but will check later today.
// Put color values in arrays
long invader1a[] =
{
0x008000, 0x000000, 0x000000,0x000000,0x000000,0x000000,0x000000, 0x008000,
0x008000, 0xFFFF00, 0x0000FF, 0xFFFF00, 0xFFFF00, 0x0000FF, 0xFFFF00, 0x008000,
0x008000, 0x000000, 0xFFFF00, 0x800080, 0x800080, 0xFFFF00, 0x000000, 0x008000,
0x000000, 0x000000, 0x000000, 0xFF0000, 0xFF0000, 0x000000, 0x000000, 0x000000
};
long invader1b[] =
{
0x000000, 0x000000, 0x0000FF, 0xFFFF00, 0xFFFF00, 0x0000FF, 0x000000, 0x000000,
0x000000, 0x008000, 0xFFFF00, 0x800080, 0x800080, 0xFFFF00, 0x008000, 0x000000,
0x008000, 0x000000, 0x000000, 0xFFFF00, 0xFFFF00, 0x000000, 0x000000, 0x008000,
0x000000, 0x008000, 0x000000, 0xFF0000, 0xFF0000, 0x000000, 0x008000, 0x000000
};
gbonsack
Awesome guys – thanks for chiming in!
If we indeed mean a static rainbow, then that code would work, and I’m sure there would be a smart calculation for it as well but using array like that is easier to understand.
hans
thank you very much
yes, i want LED ‘0’ (first LED) to be red and the last LED to be violet which show out at the same time in 16 LED’s. But the colors are not run in the 16 LED
But the above code, where can i put it?
Otherwise, i want to adjust the code. when i load the program to my arduino, my other function I2C display can not show out out and detect sensor must delay to read the data, can you give me some suggest?
candy
I just wrote this:
#include <Adafruit_NeoPixel.h>
#define PIN 6
Adafruit_NeoPixel strip = Adafruit_NeoPixel(8, PIN, NEO_GRB + NEO_KHZ800);
// I wrote this using just an 8 LED strip, so change 8 above to 16 and double the lines below
void setup() {
strip.begin();
strip.show();
// Initialize all pixels to ‘off’
}
void loop ()
{
strip.setPixelColor(0,125, 0, 0);
strip.setPixelColor(1, 80, 45, 0);
strip.setPixelColor(2, 64, 64, 0);
strip.setPixelColor(3, 0, 125, 0);
strip.setPixelColor(4, 0, 64, 64);
strip.setPixelColor(5, 0, 0, 125);
strip.setPixelColor(6, 50, 0, 75);
strip.setPixelColor(7, 40, 40, 40);
// (led position, amount red, green, blue) I use lower numbers to reduce brightness
strip.show();
}
gbonsack
thank you very much, Gbonsack
candy
i try it that is good result for me. thank you for your time. thank you very much….
candy
That would work very well of course! Thanks Gbonsack!
Candy; you’ll just have to expand this to 16 LEDs – you can use the color picker and split the hexadecimal number into 3 sections. For example B5FF8A would become (the first parameter – 1 – is the LED number):
So B5FF8A becomes: B5, FF, and 8A. to let the Arduino know this is not a normal number, but a hexadecimal number, add “0x” (zero-X) in front of each of the numbers (this would save you from having to think too much about hexadecimal number and convert them).
hans
thank you Hans
BUt i have another problem to come out.. plz help.
candy
Hi Candy,
I’m sorry that I had to remove all the code you posted, but this became a little too much for the comment section.
Could you place your question in our Arduino forum please?
I’d be happy to take a look and see where I can help. But with long codes being posted here, other users would have to scrolls for days to find something.
hans
Hi Candy,
I do not have my Arduino stuff nearby, but you could try this modified code:
void loop() {
  rainbowCycle();
}

void rainbowCycle() {
  byte *c;
  uint16_t i, j;

  for(i=0; i< NUM_LEDS; i++) {
    c=Wheel(((i * 256 / NUM_LEDS)) & 255);
      setPixel(i, *c, *(c+1), *(c+2));
    }
  showStrip();
}

byte * Wheel(byte WheelPos) {
  static byte c[3];

  if(WheelPos < 85) {
   c[0]=WheelPos * 3;
   c[1]=255 - WheelPos * 3;
   c[2]=0;
  } else if(WheelPos < 170) {
   WheelPos -= 85;
   c[0]=255 - WheelPos * 3;
   c[1]=0;
   c[2]=WheelPos * 3;
  } else {
   WheelPos -= 170;
   c[0]=0;
   c[1]=WheelPos * 3;
   c[2]=255 - WheelPos * 3;
  }
  return c;
}
Not sure if the colors will appears as desired …
The code would replace this section:
Your next question is to combine the code with controlling a display and reading sensors. This makes things a little bit more complicated and we’d need to see the code for those peripherals.
Since this might become a rather longer topic, I recommend starting a topic in our Arduino Forum.
hans
thank you very much, Hans.
candy
Hello Hans
I tried myself at the rainbowcycle code.
In the video it looks great.
But I don’t get it….
I’m receiving always the error message:
21: error: ‘setPixel’ was not declared in this scope
setPixel(i, *c, *(c+1), *(c+2));
^
23: error: ‘showStrip’ was not declared in this scope
showStrip();
^
exit status 1
‘setPixel’ was not declared in this scope
This report would have more information with
“Show verbose output during compilation”
option enabled in File -> Preferences.
I’m an apprentince and I tried to do an LED Matrix as a project with the arduino Nano.
I’m trying to get a few programms on my arduino and switch between those with some switches.
I really like the rainbow effect so I decided to do the rainbowcycle too
as I said and mentioned I’m getting the same error message again and again…
Do u have some extra files where u declared respective defined these functions?
Thanks already
Trollo_meo
Hi Trollo_meo,
since I do not see the entire sketch you’re using (and pretty please do not post it here – the forum is the place to post large pieces of code), I can only guess that you didn’t copy the framework.
See this section: FastLED Framework.
The idea was to have a framework depending on the library you’d like to use – FastLED (recommended) or NeoPixel.
The “framework” is the base for all sketches, and where indicated you have to paste the effect code into this framework code.
Hope this helps,
Hans
hans
Here is a link to my latest Arduino driven Light Stick video:
https://youtu.be/nA8IT59nD00
I find cutting the output of the LED’s to 25 to 50% gives me better color saturation and doesn’t burn out the video colors.
I now have the 121 keypad code working, as well as the multiple position and pushbutton advance switch code. Thanks again to you Hans, for your direction and tips.
gbonsack
That’s just awesome! I probably should dig into this topic as well – looks really great!
Thanks for sharing!
hans
Hi there, I’m very new to all of this. I have completed the strand test and uploaded a couple effects. My question is: if I want to make a standalone strip that cycles through effects with the push of a button, where would I begin? As in, I want to give the whole assembly a power cord, and just use a button to cycle through effects, how would I do so?
Ben Linsenmeyer
Hi Ben,
cycling through effects has been requested a few times (which makes me want to write an article about it, but simple do not seem to get to actually finding time to do it). A few users have been working on the same question in the Arduino Forum – that would be a great starting point.
Feel free to join a conversation there or post your own question.
hans
Ben, thanks to a few comments from Hans, I have created several different light painting sticks, using the Arduino Uno Board and either a 12 button keypad, a 5 position switch or a normally open push button (9 sub-sketches). Sample video’s can be seem on my YouTube page “Gerald Bonsack”. I have found that as the 9V battery gets weak, the Arduino wants to do it own thing and not follow my written code. I have posted one or two of the .ino files, on the Forum page and will post others, if requested. For the 5 position switch, I have the 10k resistor between the ground and the common connection between the 5V supply and the switch – output from the switch goes to INPUT PINS, on the board. Since I started playing with the Arduino only a couple of months ago, my code my not be pretty, but it works.
gbonsack
Hello! I am trying out these sketches using an Adafruit Trinket as my microcontroller. For some reason, no matter if I try the Neopixel library, or the Fast LED library, all I am getting when I upload any sketch, say the Fire sketch, is just all white LEDs. The Neopixel sketches from Adafruit work fine. Any ideas?
Marc Johnston
Hi Marc,
ehm, I’m not familiar with the AdaFruit Trinket. As far as I can read from the specs, there is a 3V and a 5V version – so it might be related to that, since the LEDs might expect 5V for their data, then again, you said that the NeoPixel examples do work.
The next thing might be in the initialization – verify that with the ones used in the NeoPixel examples:
Also make sure you use the same NeoPixel library (but you probably already do this).
Since NeoPixel is the only one you want to use (for testing), you could narrow down the code to:
hans
Hans,
Thanks for the reply. I will say upfront, that I am a Arduino newbie. However, using the code you posted gave me the white LEDs again. I compared that code to a working Neo Pixel sketch, and noticed some differences that pertain to the Trinket. I modified the code with those bits, and now when I run it, all the LEDs go black. Here is the modified code:
Marc Johnston
Hi Marc,
no worries, we all had to start at some point right?

Hey! You caught the same difference I did!
This code would indeed not do much since you didn’t include an effect, but I think you’re getting closer!
Replace this code with the effect you’d like to use (unless you already did that):
For example with:
void loop() {
  rainbowCycle(20);
}
void rainbowCycle(int SpeedDelay) {
  byte *c;
  uint16_t i, j;
  for(j=0; j<256*5; j++) { // 5 cycles of all colors on wheel
    for(i=0; i< NUM_LEDS; i++) {
      c=Wheel(((i * 256 / NUM_LEDS) + j) & 255);
      setPixel(i, *c, *(c+1), *(c+2));
    }
    showStrip();
    delay(SpeedDelay);
  }
}
byte * Wheel(byte WheelPos) {
  static byte c[3];

  if(WheelPos < 85) {
   c[0]=WheelPos * 3;
   c[1]=255 - WheelPos * 3;
   c[2]=0;
  } else if(WheelPos < 170) {
   WheelPos -= 85;
   c[0]=255 - WheelPos * 3;
   c[1]=0;
   c[2]=WheelPos * 3;
  } else {
   WheelPos -= 170;
   c[0]=0;
   c[1]=WheelPos * 3;
   c[2]=255 - WheelPos * 3;
  }
  return c;
}
hans
And also, here is a working sketch from Adafruit:
Marc Johnston
Hi Marc,
the only exceptional things I see in this working code is:
I’d assume you have to bring that over to the demo code from this article as well, which would make it like so (note: your code says PIN 0!):
(I hope I got all the differences, and this would be the “base” code of course – just didn’t want to post very lengthy code, that would be better in the forum, if we want to continue the topic)
Hope this helps
hans
Thanks for all the help Hans. I’ll look back into it once I get another Trinket in.
My original intent was to use the Neopixels to fix the lighting in a friends jukebox. Most of the lighting effects on it were made by using fluorescent tubes, and color wheels. The color wheels have long since quit working, and are expensive to replace. I like the fire effect example here, but as I wasn’t able to get it working (yet), so we went with another fire effect I found @ Adafruit. Anyways, the end result looks much better than I anticipated. We ended up using two of the Neopixel rings for the “ends” of the top of the jukeboxe, a strip behind the “compact disc” area, and two strips going verticle up the leg areas (that’s where the fire is). I still think the fire example here will look better, and once I figure it out, I can easily upload it.
Here is a short video we made:
https://www.youtube.com/watch?v=bqiyCwOSPgQ
Marc Johnston
Very nice results mate, the Jukebox looks great.
I usually use the nano for my small lighting projects, though I also relied on a lot of great help from Hans.
Here’s Christmas decoration I 3D printed and lit up with a nano and some ws2812’s
https://youtu.be/Z6lp8Dd5w5w
Spike
Awesome Spike!
What brand/model 3D printer do you use?
hans
That is very nice! I think I may order me a Nano instead of a Trinket. It seems to be a bit more powerful, and not much bigger.
Marc Johnston
Hi Marc!
Thanks for the video – that looks awesome!
The fire effect would indeed be very cool for this purpose!
hans
Hi Hans, Thank you, but it’s all down to your help, it wouldn’t be so good without it.
That was printed on a version of the i3 that I built myself. I now have an Original Prusa i3 MK2.
Spike
Hi Marc, Thank you, I got mine from a UK ebay seller who was very quick to dispatch and with comms.
The nano has served me well for a lot of LED projects, including a 30×15 matrix https://youtu.be/oiXbXCQdf8c
Spike
Oh Wow! I like the matrix! Very cool!
Yeah I dabbled for a bit with 3D printers, and have to say that I’m probably not patient/accurate enough to work with 3D printers (LeapFrog) just yet haha … Maybe one of these days I’ll pick it up again.
hans
Well, I ordered a bunch of Nanos, and have been playing around with them. All the sketches work fine in them, so I think I’ll use the Trinket for something else. I appreciate everyone’s help!
Marc Johnston
You’re very welcome mate. Glad they are working well for you.
Spike
I just wanted to thank you for the code examples!
Bret
Thanks Bret for taking the time and effort to post a Thank-You — it’s much appreciated!
hans
Thank you for sharing the code and beautiful videos with clear details!!!
Prasanna K
Hi Prasanna!
Thank you very much for the compliment and for taking the time to post a “Thank you” – it’s very much appreciated!
hans
Trying to figure out how to reverse the direction of the running lights code. Any help is appreciated!
Steve Doll
If you like to have the LEDs run into the opposite direction, just:
void loop() {
  RunningLights(0xff,0xff,0x00, 50);
}
void RunningLights(byte red, byte green, byte blue, int WaveDelay) {
  int Position=0;

  for(int i=(NUM_LEDS*2)-1; i>=0; i--)  // <-- opposite direction
  {
      Position++; // = 0; //Position + Rate;
      for(int i=0; i<NUM_LEDS; i++) {
        setPixel(i,((sin(i+Position) * 127 + 128)/255)*red,
                   ((sin(i+Position) * 127 + 128)/255)*green,
                   ((sin(i+Position) * 127 + 128)/255)*blue);
      }

      showStrip();
      delay(WaveDelay);
  }
}
Is this what you’re looking for?
hans
Doesnt seem to change the direction
Steve Doll
Doh, I modified the wrong for-loop … I should drink more coffee before replying hahah …
void RunningLights(byte red, byte green, byte blue, int WaveDelay) {
  int Position=0;

  for(int i=0; i<NUM_LEDS*2; i++)
  {
      Position++; // = 0; //Position + Rate;
      for(int i=NUM_LEDS-1; i<=0; i--) {         // <-- changed this
        setPixel(i,((sin(i+Position) * 127 + 128)/255)*red,
                   ((sin(i+Position) * 127 + 128)/255)*green,
                   ((sin(i+Position) * 127 + 128)/255)*blue);
      }

      showStrip();
      delay(WaveDelay);
  }
}
I’m sorry – I do not have my Arduino and LEDs anywhere near me, so I cannot test …
hans
Appreciate the help, unfortunately that makes the LEDs not work at all
Steve Doll
I guess I’ll have to find an Arduino + LED strip to do some testing …
hans
One last tweak needed to get the lights to run in reverse, setting the Position to the end and decreasing it:
 void RunningLights(byte red, byte green, byte blue, int WaveDelay) {
  int Position=NUM_LEDS;  // this also needs to start high and decrease

  for(int j=(NUM_LEDS*2)-1; j>=0; j--) // this may work
  {
      Position--; // = 0; //Position + Rate;  // use -- to decrease the position instead of increase
      for(int i=NUM_LEDS-1; i>=0; i--) { // and here
        setPixel(i,((sin(i+Position) * 127 + 128)/255)*red,
                   ((sin(i+Position) * 127 + 128)/255)*green,
                   ((sin(i+Position) * 127 + 128)/255)*blue);
      }

      showStrip();
      delay(WaveDelay);
  }
}
Gizmo Props
Thanks for chiming in Gizmo Props! Awesome!
Hans
Hi! The “Compile” didn´t pass because the “SIN” function doesn´t exist on my project.
Supposed this SIN function is included in the NEOPIXEL Library?
Thanks for your support!!
void loop() {
  RunningLights(0xff,0xff,0x00, 50);
}
void RunningLights(byte red, byte green, byte blue, int WaveDelay) {
  int Position=0;

  for(int i=(NUM_LEDS*2)-1; i>=0; i--)  // <-- opposite direction
  {
      Position++; // = 0; //Position + Rate;
      for(int i=0; i<NUM_LEDS; i++) {
        setPixel(i,((sin(i+Position) * 127 + 128)/255)*red,
                   ((sin(i+Position) * 127 + 128)/255)*green,
                   ((sin(i+Position) * 127 + 128)/255)*blue);
      }

      showStrip();
      delay(WaveDelay);
  }
}
Sebastian Krupnik
Hi Sebastian,
the sin() function is a standard function that comes with the Arduino IDE (link).
Since the code looks OK, my first guess would be to update your Arduino IDE to the latest version (link).
hans
Hi Hans, mi interface is for coding is https://build.particle.io/ (using a PHOTON). Not sure how to upgrade this interface. Have you know what to do?
Thank you!!
Sebastian Krupnik
Hi Sebastian,
I have never worked with that tool, and unfortunately it seems required that one has to signs up.
Maybe other users/visitors are familiar with this tool and can assist?
hans
hi im new to coding on Arduino but iv been trying to do the KITT effect (Cylon) for ages and just found this site yesterday iv managed to get it working but not liking the look of the KITT effect when i slow it down, iv set the speed to about “70” as i want it to look like the real KITT car but i can see the LED’s are not fading into the red as its going along.. it looks as if its just turning the led’s on from 0% brightness to 100% also the faded sides of the eye that I’m guessing jumps from 0% to 50% brightness.. so my question is can i make the effect better by fading the LED’s in as they go along.. for example each LED will not jump straight to 100 instead 10% 20% 30% 40% 50% 60% 70% 80% 90% 100% brightness.. any help il be much appreciated.
chris
Hi Chris,
that would most certainly be possible, maybe we should try to find a video that displays the 100% correct effect.
I did play a little with fading (happened to be for a bouncing ball project), and selecting 10, 20,…,90, 100% is a little tricky since brightness does not behave in a linear way with LEDs.
We can start a forum topic if you’d like.
hans
Sure anything that would help me would be great also this is helping me learn to code
Chris
Hello there Hans, and thank you very very much for this guide!
I just started learning how to use the arduino, my idea was to have custom led configs on my pc case for fun, and I found out learning arduino with 2812b leds is a much better way to do this than lets say buying a retail product like NZXT Hue+.
I have a question, I got it all working, but I need a way to either update the arduino data to change effects.
Is there a way to have many effects on the memory and by an USB command change between it? Or perhaps a way to double click a shortcut and it will directly upload a sketch to it?
I used this program (https://github.com/CalcProgrammer1/KeyboardVisualizer) and got it to control the lighting via the COM port in real time, works great based on the music, is there a way to do it to change effects??
Once again, thank you very much for the hard work!!
Moreno Antunes
Hi Moreno,
glad to hear you’re having fun with these LEDs as well.
In our Arduino forum, you’ll find a few topics covering the combining of all effects in one sketch.
I’m planning on writing a dedicated article for that, but just simply haven’t gotten to it yet.
So, it’s very well possible, just might take some work to get it going …
hans
candy
This page is awesome. I’m trying to combine your fade code, with another “code” i found.
– https://github.com/zatamite/Neopixel-heartbeat
I basically want my Neopixel strip to beat like the program attached throughout the whole strip but with your fading script.
Any thoughts???
Jeffrey T Pruitt
Hi Jeffrey,
thanks for the compliment!
As for the heartbeat code you found, this can be modified to:
void loop() {
  // original uses 3 leds, in that case use:
  // heartbeat(3, random(255), random(255), random(255));

  // The next line uses all LEDs:
  heartbeat(NUM_LEDS, random(255), random(255), random(255));
}

void heartbeat(int ledCount, byte red, byte green, byte blue) {
  byte brightnessStep = 3;

  for(int i = 0; i<ledCount; i++) {
    setPixel(i, red, green, blue);
  }
  showStrip();

  delay (20);

  for (int brightnessValue = 1 ; brightnessValue <252 ; brightnessValue = brightnessValue + brightnessStep){
    setBrightness(brightnessValue);
    showStrip();
    delay(5);
  }

  for (int brightnessValue = 252 ; brightnessValue > 3 ; brightnessValue = brightnessValue - brightnessStep){
    setBrightness(brightnessValue);
    showStrip();
    delay(3);
  }

  delay(10);

  brightnessStep = 6;

  for (int brightnessValue = 1 ; brightnessValue <255 ; brightnessValue = brightnessValue + brightnessStep){
    setBrightness(brightnessValue);
    showStrip();
    delay(2);
  }

  for (int brightnessValue = 255 ; brightnessValue > 1 ; brightnessValue = brightnessValue - brightnessStep){
    setBrightness(brightnessValue);
    showStrip();
    delay(3);
  }

  delay (50);
}

// I have never used the brightness function of either NeoPixel or FastLED, so I hope this works.
void setBrightness(byte value) {
  #ifdef ADAFRUIT_NEOPIXEL_H
    // NeoPixel
   strip.setBrightness(value);
  #endif
  #ifndef ADAFRUIT_NEOPIXEL_H
   // FastLED
   FastLED.setBrightness(value);
  #endif
}
This code should replace the following lines in the base code of this article:
Please note that I did not have the opportunity to test this code, please let us know how well this does (or does not) work.
Also note that I changed the variable names to make it more readable, and … keep in mind that I might have made typos …
Also keep in mind that the original code only uses 3 LEDs (see comments in the loop() section).
hans
Thank you thank you thank you!!!!This did exactly what I was looking for, I’m just starting with Arduino, neopixel etc, so I’m still trying to figure out coding things so this is a HUGE help.
Thanks again!
Jeffrey T Pruitt
You’re most welcome …
…
Did it work as expected?
hans
[…] Arduino – LEDStrip effects for NeoPixel and FastLED […]
hi there is anyone can tell me that these codes will work on RGB led strip as well thx
lucky kang
Hi Lucky,
it depends on what RGB strips you’re using. The WS2811 and WS2812 are RGB LED strips running on 5V (typically). There are some cheap knock offs that use a different color order (GRB for example), but in essence that works just the same.
Do you have any specifications?
hans
is these code on these RGB strips thx
http://www.ebay.com/itm/2x-5M-SMD-Remote-RGB-LED-Strip-light-5050Waterproof-300-44-Key-12V-Supply-Power-/272375557890?hash=item3f6ad92f02:g:ZbMAAOSwmfhX2LgF
lucky kang
Hi Lucky,
I can’t guarantee that. It states it’s RGB, but since sellers post whatever they like, there is no guarantee – one thing I noticed is that these LEDs are 12V, so I would not recommend using them.
hans
can u recommend and good RGB led strips thx
lucky kang
I just ordered some strips from AliExpress – I had ordered from this seller before and they work very well.
They are also very affordable. See this link.
I always pick the 5 Meter strand with 60 LEDs per meter, with black PCB and IP65 (5M 60 IP65).
The LEDs are waterproof and casted in some kind of solid transparent silicone, which makes it very well protected against dust, water, bugs etc etc. It also makes it look really nice with the black “PCB”. It’s $22.73 for a 5 meter strand – different sizes are available – at the time of this writing.
hans
hi i order ws2811 from ebay and the all three colour work except white why is that anyone help thx
jony
Hi Jony,
if each color works, then white would be when all colors are ON.
this should work for all types of LED strands. Now if the strand is not really a WS2811, it might become tricky to control the LED colors. Quite a lot of sellers advertise wrong or misleading information. Did you try some test code from the “Controlling LEDs with Arduino” article?
hans
ok
lucky kang
so can you tell me how can i do that please thx
jony
Hi Jony,
did you run the test sketches?
Normally, to get white, one would set the color to 0xff, 0xff, 0xff (all 3 colors to max).
hans
Hi tweaking4all.com. My English translator level is Google, I apologize for the mistakes.
– I googled a lot about LED on WS2812b, and came across your magic site, which helped me a lot in mastering. But I have a few questions, tell or send me to the desired section of your forum.
I
downloaded “AllLEDEffects-FastLED” unlocked ALL effects, but in the
case of “Bouncing Balls Multi Color” and just Bouncing Balls it stays on
this effect and that’s it. In the case of “Fire” if something is unlocked in addition to this effect, then “Fire” simply does not play.
Questions:
1. How to remove these shortcomings?
2. How to make a random effect switching time, or every 10 minutes?
3. In the “Bouncing Balls Multi Color” effect, do random colors?
prof
Hi Prof,
well, I’d start with making those 2 effects work properly.
You can create the code from scratch by copying the initial framework, for the library you want to use, and then paste in the effect code.
As for multiple effects in one sketch, consult our Arduino Forum, there are a few topics on this, for example this one, that should help get you started.
hans
hi guys is anyone can help me i jst wanna add two pir sensor with these codes top and bottom im bit confuse with wiring and coding is anyone knows how to do it thx
lucky kang
Hi Lucky,
It is best to start a forum topic in our Arduino forum for this. I monitor this daily, and it would keep off-topic and long source codes away from these comment sections.
Do however feel free to post the link to the forum topic here to grab the attention of others.
hans
anyone knows how to add pir sensor click the link for the topic forum thx https://www.tweaking4all.com/forums/topic/how-to-add-two-pir-sensor-stair-project/
luckykang
The project i m working on is stair project one PIR sensor bottom stair and one top so when bottom sensor activate the light start from bottom to top when top sensor activate the light start top to bottom and also how to do the wiring also thx
Similar to this video
https://www.youtube.com/watch?v=lNxgYWHewzg
John
None of the videos are working. I’d love to see the examples though, is it easy enough to fix them?
Or are they working for other people?
Wrybread
Hi Wrybread,
Could you let me know which Operating System and which browser versions you’re using?
I have seen the videos causing issues with old Android devices, but with Windows and Mac I have not seen any issues yet.
If you have an older OS, consider trying Google Chrome.
hans
Hello friends! I
have very little knowledge on the subject but, I would like to join
several of these codes mentioned in several strips of Led, say, 8; Therefore, how can the code be assembled in this way?
Thank you all
Daniel
Hi Daniel!
Welcome!
I’m not sure what you mean? Are you thinking of running 8 strips in parallel?
hans
Hi,
I’m a complete novice with Arduino and Neopixels, and by novice I mean I’ve never coded anything before! I’ve picked up some bits and pieces but I’ve found that most tutorials jump through stages without actually explaining the basics, pretty much just copy and paste code which isn’t great for learning! I’ve been attempting the Rainbow Cycle sketch but I get an error message saying the the number of LEDs has not been declared, where do I put this value in the code?
I’m also hoping to loop 5 rainbow cycles and then run a colour wipe through every colour on my RGBW Neopixels before returning to the rainbow cycle, is this possible to run on the Arduino as one sketch?
Thanks in advance!
Dan
Hi Dan,
you’re probably right about the lack of detailed info, since most assume some basic knowledge.
Maybe this little intro course is useful, in case you want to dig a little deeper.
As for the number of defined LEDs, the line
defines the number of LEDs in your strand. You’ll see it in both examples (NeoPixel and FastLED).
Doing 5x rainbow, and then a colour wipe for several colors is most certainly possible.
You’d need something like this
void loop() {
  for(i=0;i<5;i++) {
    rainbowCycle(20);
  }
  colorWipe(0xff,0x00,0x00, 50);
  colorWipe(0x00,0xff,0x00, 50);
  colorWipe(0x00,0x00,0xff, 50);
}

void rainbowCycle(int SpeedDelay) {
  byte *c;
  uint16_t i, j;
  for(j=0; j<256*5; j++) { // 5 cycles of all colors on wheel
    for(i=0; i< NUM_LEDS; i++) {
      c=Wheel(((i * 256 / NUM_LEDS) + j) & 255);
      setPixel(i, *c, *(c+1), *(c+2));
    }
    showStrip();
    delay(SpeedDelay);
  }
}

byte * Wheel(byte WheelPos) {
  static byte c[3];

  if(WheelPos < 85) {
   c[0]=WheelPos * 3;
   c[1]=255 - WheelPos * 3;
   c[2]=0;
  } else if(WheelPos < 170) {
   WheelPos -= 85;
   c[0]=255 - WheelPos * 3;
   c[1]=0;
   c[2]=WheelPos * 3;
  } else {
   WheelPos -= 170;
   c[0]=0;
   c[1]=WheelPos * 3;
   c[2]=255 - WheelPos * 3;
  }
  return c;
}

void colorWipe(byte red, byte green, byte blue, int SpeedDelay) {
  for(uint16_t i=0; i<NUM_LEDS; i++) {
      setPixel(i, red, green, blue);
      showStrip();
      delay(SpeedDelay);
  }
}
As you might see; I combined the code of both effects, and call them in the loop().
It does the 5xrainbow, wipe for Red, wipe for Green, wipe for Blue.
After it completed that, it will do the loop again, so effectively do 5xRainbow, and 3x wipe.
Keep in mind that the code needs to be pasted in the framework, replacing the text between the lines (maybe you forgot that earlier):
and
If you want to add more colors, you can add a line like this for each color you’d want:
If you want a ton of colors for the colour wipe, then consider using for-loops (see also the little course).
For example:
This example would go through all colors (16 million), so you might want to narrow that down haha.
Hope this is helpful.
hans
Thanks Hans, this is great! I’ll get stuck into all of that, plenty of material to get me started!
Thanks again
Dan
Cool! Well, feel free to ask if you run into issue or have questions …
hans
I’ve been messing about with all of this and I seem to be getting a warning message saying that I have created a compound expression list after dealing with a declaration problem, will this cause any problems with the neopixels? See below;
Users/Daniel/Documents/Arduino/RainbowCycle/RainbowCycle.ino: In function ‘void rainbowCycle(int)’:
/Users/Daniel/Documents/Arduino/RainbowCycle/RainbowCycle.ino:35:40: warning: expression list treated as compound expression in initializer [-fpermissive]
int setPixel(i, *c, *(c+1), *(c+2));
^
/Users/Daniel/Documents/Arduino/RainbowCycle/RainbowCycle.ino: In function ‘void colorWipe(byte, byte, byte, int)’:
/Users/Daniel/Documents/Arduino/RainbowCycle/RainbowCycle.ino:65:38: warning: expression list treated as compound expression in initializer [-fpermissive]
int setPixel(i, red, green, blue);
^
Dan
Hi Dan,
it is a warning which most likely will not stop your program from running. It does point to something not being 100% perfect though.
I haven’t ran into this problem before so, just a guess here; look for this line in your code (defining the function SetPixel):
void setPixel(int Pixel, byte red, byte green, byte blue) {and replace that line with:
void setPixel(int Pixel, int red, int green, int blue) {But there could be other reasons – Maybe you can post your code in our Arduino Forum so I can look at it (without making this treat super long) …
hans
[…] Tweaking4All’s also really nice Fire neopixel sketch. Same comments as with John’s work. THANK YOU. […]
First off, thank you so much for this resource!! So great!
Question: Using the “Fire” code to create a flame inside an outdoor lamp post w/diffuser to simulate a flame. I’d like to change the flame colors to have more orange and less red. Also would like less white and more yellow? Could you recommend changes to the Fire code to modify the output as such?
Thanks in advance.
Tony
Hi Tony,
I have not tested this, but in the last procedure used by the fire code (setPixelHeatColor()), you could play a little with the “Red” value when the pixel colors are calculated, worse thing that can happen is that the colors will be off
void setPixelHeatColor (int Pixel, byte temperature) {
  // Scale 'heat' down from 0-255 to 0-191
  byte t192 = round((temperature/255.0)*191);

  // calculate ramp up from
  byte heatramp = t192 & 0x3F; // 0..63
  heatramp <<= 2; // scale up to 0..252

  // figure out which third of the spectrum we're in:
  if( t192 > 0x80) {                     // hottest
    // original: setPixel(Pixel, 255, 255, heatramp);
    setPixel(Pixel, 200, 255, heatramp); // changed res 255 to red 200
  } else if( t192 > 0x40 ) {             // middle
    // original: setPixel(Pixel, 255, heatramp, 0);
    setPixel(Pixel, 200, heatramp, 0);   // changed red 255 to red 200
  } else {                               // coolest
    setPixel(Pixel, heatramp, 0, 0);
  }
}
hans
Thank you for the reply. I actually modified the code on my own in a similar manner.
Tony
[…] https://www.tweaking4all.com/hardware/arduino/adruino-led-strip-effects/ […]
Dear All,
I am new to this project.I don’t have any idea about coding but i want to run all this code on a neopixel stripe. How to combine all these codes to run in one single sketch.
Dhiraj Kumar
Ha!
JaquesHaas
I would like to repeat the Dhiraj Kumar’s question!
Daniel Fernandes
Hi Daniel (and Dhiraj),
there have been a few requests for this and some of the users have worked on it in the forum – however, it will take some work and reading to get this done, which might not be the easiest for a beginner.
If users could tell me how they would like to see then, then I’ll try to create code to include all effects.
Do we prefer toggling effects with a push button? Or based on a predefined pattern?
hans
It is really refreshing to find someone such as yourself who has the knowledge, and is willing to share it – without a demeaning / snarky attitude.
Thank you!
John
John
Hi John,
thank you for the very nice compliment. It’s very much appreciated and definitely a motivator to keep working on more articles.

And the relaxed attitude is what I’m going for. I like to show folks how things can be done, in a fun way. The more folks that participate with the same mindset, the more fun it will be for all of us …
hans
Thanks, great stuff.
For the Particle.io I needed to add one line after including the FastLED library:
#include <FastLED.h>
FASTLED_USING_NAMESPACE
Unlike Arduino, the Particle.io uses namespace and so requires this single line to compile correctly. More about it here.
Brian
Awesome!
Thanks for the info Brian!
hans
[…] ici est LEDStrip Effect – Snow Sparkle, mais a cette adresse on peux trouver plein d’autres […]
Thank you for sharing your fantastic work. I arrived here after searching or neopixel fire. I wanted to bring a big picture of a rocket to life on my sons wall. I plan on using a shorter strip, so I think with a few little tweaks your code will be work great for me.
I love the other effects too, so I’m going to have to think of where I can use them.
Ian
Hi Ian,
Thank you for taking the time to post a thank-you – it’s very much appreciated. Glad to hear you’re having fun!
I guess I should have placed a warning, the darn LED strips can be very addicting!
hans
Thank you very much for this great site and nice examples
Henrik Lauridsen
Hi Hendrik!
Thank you so much for taking the time to post a thank-you note. It’s very much appreciated.
Glad to hear that you enjoy the website!
hans
Hi, and thank you for your examples they really have made it easier for me to get some good effects as I start getting my christmas led displays ready (it’s my first year doing my own). And in response to Daniel and Dhiraj’s question, I have created a single sketch that includes all your examples as their own functions and then call them in the order I prefer in the loop section, I now have my pro-mini running my first example string with hours of different effects before they get repeated. These have saved me a huge amount of time and I can’t praise you enough. Thank You. :)
Dai
Hi Dai!
That’s awesome and thanks for sharing!
Feel free to post the sketch if you’re comfortable doing that – once I get the time to play with that, I’ll try to write an article on how to do that and your input would be very welcome.
hans
Here is my sketch that I have been using to get the timings sorted out (Sorry if it is too long), I have had to make a few adjustments to your demos to prevent infinite loop in BouncingBalls and BouncingColoredBalls , which is now simply a for loop which runs the amount of times specified in the extra parameter “timesToRun”. Also there are some short routines that would need a for loop in the main loop to make them run a certain amount of times (like I have done for the Fire function). I also added a colorWipeReverse function which as the name suggests simply goes the other way.
You will notice I have a couple of Serial.print(millis());, one at the beginning of the main loop and one at the end, this is to tell me the timing of each loop as I change settings. I am doing that so that I can set each effect to last X amount of time.
There are a couple of other changes you may find from your examples although I did not make note of what I was changing but I’m sure you will spot them.
I hope this is of some use to others as it is just the beginning of setting my own strings, so not perfect, but usable.
And just a note about hardware, I am using Arduino Uno for testing (as it is easer) and then a pro-mini in the actual project. The led string I am using with these have 3 leds from each ws2811 IC so the 14 pixels listed are actually 42 on the test string, this may make the timings I have used a little more understandable.
Dai
Hi Dai,
thank you so much for taking the time to post the code – I’m sure others will love it (as do I).
Well done!
hans
Hi Dai,
I would like to add my appreciation too. You have done an awesome job and I plan to give it a try, as soon as I can get the time.
Thank you for sharing your code.
Spike
Thank you Spike, I’m glad you like it, but the thanks should go to Hans as it is 99% his code, I just copy/pasted it all into one sketch ( with a couple of very minor tweaks. )
)
Dai
It’s all about team work! And LED strips are fun to play with hahah
hans
Thanks for your examples! These were a great inspiration to me.
So now, I want to show a rainbow, but not cycling from right to left or left to right. All 150 LEDs should show the same color value and change the rainbow colors.
How can I do this?
astro0302
Hi Astro0302!
The modification for that shouldn’t be too hard.
Try something like this:
void rainbowCycle(int SpeedDelay) {byte *c;
uint16_t i, j;
for(j=0; j<256*5; j++) { // 5 cycles of all colors on wheel
c=Wheel(((i * 256 / NUM_LEDS) + j) & 255); // color selection used to be in the "i" loop
for(i=0; i< NUM_LEDS; i++) {
setPixel(i, *c, *(c+1), *(c+2));
}
showStrip();
delay(SpeedDelay);
}
}
You see the two for loops? The first one cycles colors (j), and the second one addresses each LED (i).
Instead of doing a color change for each LED, I moved the color selection out of that loop (i).
So it selects a color and then applies it to all LEDs.
Now, I did not test this (I’m traveling) so it might need a little tweaking, but it will get you started.
If you have a working sketch, then please feel free to post it here.
hans
Hi Hans! Thanks for your fast reply. Works great!
Now my ledstripe has the right WAF.
Andreas
astro0302
Awesome!
hans
I have this sketch that is part of a sequence I am testing at the moment, not a finished one but might be useful to you. Obviously you will need to change the settings for your own pixel type and quantity but it works on my test strip. You can change the colour sequence in the sketch in each “colorStep” using RGB values.
Dai
Sorry, posted around the same time as Hans, and his solution is far more elegant than mine.
Dai
Nice work, Dai.
I see you have used the ws2811 in your sketch, and I’m fairly new at this, so please bear with me.
I’ve been running various test sketches using WS2812 and a 144 pixel strip. Fascinating what can be done with one data wire!
If you have a couple of minutes, could you comment on my question, below?
If I were to change “#define NUM_LEDS 14” to “#define NUM_LEDS 144”, and “LEDS.addLeds<WS2811,DATA_PIN,BRG>(leds,NUM_LEDS);” to the specification line for the WS2812, could I expect the sketch to work?
Thanks.
John
John
Hi John,
It will work just fine with the 2812 as well.
You are right though that some of the settings need to be modified to match the 2812 and the LED count you’d like to use.
The “addLeds” line might not need to be changed, since i seem to have used that as well even though I have a 2812 strip hahah …
hans
Yes, and one thing you might need to change would be the “BRG” in the “addLeds” line, some are GRB and some RGB, I had to adjust it to suit my pixels.
Dai
Got the sketch working just fine. Now comes the fun of tweaking it!
A question on the lines below:
Why do some lines use Hex color designation, and some use the RGB color names? Are they interchangeable, or are there coding reasons why one or the other is used?
Thanks.John
circuitdriver
Hi John,
Very good question … I guess that is my sloppiness ie. not always working consistently, especially when a project takes several days and effects have been written on different days.
Anyhoo … Decimal numbers and hex numbers are indeed interchangeable.
hans
Just to add that if you copied my sketch there would be some that I have changed as I have got used to using decimals for the brightness level and have changed some of them to make it easier for me to understand.
Dai
That’s a good plan!
I like hex numbers because they look more consistent (always 0x plus 2 characters), but I agree that decimal numbers are easier to read for us humans
hans
Multi Color Bouncing Balls
Hi !Could show me in the code of “Multi Color Bouncing Balls” how to invert the show. For easy wiring of my strip led , I want that the first led is the number 15 ” Starting led is 15 instead of 0″
Please explain me !
thank a lot !fred
fred49
Hi
Inverting the order should not be too hard.
Try the following code (I have not had a chance to test this, but I’m confident that it will work OK):
void loop() {
  BouncingBalls(0xff,0,0, 3);
}

void BouncingBalls(byte red, byte green, byte blue, int BallCount) {
  float Gravity = -9.81;
  int StartHeight = 1;

  float Height[BallCount];
  float ImpactVelocityStart = sqrt( -2 * Gravity * StartHeight );
  float ImpactVelocity[BallCount];
  float TimeSinceLastBounce[BallCount];
  int   Position[BallCount];
  long  ClockTimeSinceLastBounce[BallCount];
  float Dampening[BallCount];

  for (int i = 0 ; i < BallCount ; i++) {
    ClockTimeSinceLastBounce[i] = millis();
    Height[i] = StartHeight;
    Position[i] = 0;
    ImpactVelocity[i] = ImpactVelocityStart;
    TimeSinceLastBounce[i] = 0;
    Dampening[i] = 0.90 - float(i)/pow(BallCount,2);
  }

  while (true) {
    for (int i = 0 ; i < BallCount ; i++) {
      TimeSinceLastBounce[i] =  millis() - ClockTimeSinceLastBounce[i];
      Height[i] = 0.5 * Gravity * pow( TimeSinceLastBounce[i]/1000 , 2.0 ) + ImpactVelocity[i] * TimeSinceLastBounce[i]/1000;

      if ( Height[i] < 0 ) {
        Height[i] = 0;
        ImpactVelocity[i] = Dampening[i] * ImpactVelocity[i];
        ClockTimeSinceLastBounce[i] = millis();

        if ( ImpactVelocity[i] < 0.01 ) {
          ImpactVelocity[i] = ImpactVelocityStart;
        }
      }
      Position[i] = round( Height[i] * (NUM_LEDS - 1) / StartHeight);
    }

    for (int i = 0 ; i < BallCount ; i++) {
      setPixel((NUM_LEDS - 1) - Position[i],red,green,blue); // <-- changed this line
    }

    showStrip();
    setAll(0,0,0);
  }
}
Only one line did get changed, where we simply flip the LED order by subtracting the original position from the total number of LEDs.
So position 0 becomes 15-0=15, position 1 becomes 15-1=14, position 2 becomes 15-2=13, etc.
The “-1” is added since we count 15 LEDs, but we humans start counting with “1” where as the LED array starts counting with “0”.
So the 15th LED actually is position 14 in the LED array in the code.
Hope this helps!
hans
Hi Hans
You are too strong in programming, it works perfectly with my 3 colors. Thanks again and again.
You facilitate the wiring of my garland.
I am ready for chrismast
thank you
fred49
Thanks Fred49!
Glad to hear it worked out for you. Just in case you post a YouTube video or something like that; then please feel free to share the link here as well. Always cool to see what other people do!
A little early, but Merry Christmas for you guys!
hans
Hi !
This is my video of my project :
https://youtu.be/edxAOdJKeIg
Is it possible to desynchronize my three ramps relative to each other ?
thanks
Have a good day
FRED49
Wow that looks cool!
I’m not sure about the code you’ve used, but per strand you could change one of these variables;
I’d play with them and see what the effect is.
I’m not quite sure what you mean with desynchronize but I assume you mean: so they don’t look too much alike.
You could modify the calculation for “Dampening[i]” … say change 0.90 to 0.50 or 1.0.
Either way I have not tested, but you should be able to mimic or trigger different behavior.
Of course the values have to be different per strand, so I’d probably start with testing which gives you the desired effect and the use the value used for that as a parameter to pass to the function.
hans
Hi !
Thanks for all
in fact , this is my program i use :
I have 3 exit for my annimation.
And I would like it to have a start shifting in time.
To not see the balls all go up at the same time.
No worries if you can not look at this for me, I’m doing tests for the moment to add annimation.
thanks again
have a good day
fred
fred49
What you could do is make the gravity value a random value – not too much different from the original of course:
to
This way the “gravity” will be slightly different each time the function will be called.
I have not tested this, but this is what I’d play with – maybe the notation of the random float can be done better. It basically adds 9 + “a random number between 0…99 divided by 100” (so we get a fraction of “1”) and after that make it a negative number, so that -9.81 is a possible outcome. Or better set -9 … -9.99 is a possible outcome.
See also the Arduino random function and the randomSeed function.
hans
I am new to Arduino. I want to add multiple sketch in one . How can I do this. As a Arduino can run only one sketch at a time. If I want to run multiple led function in one sketch then what is the solution for it?
Dhiraj Kumar
Hi Dhiraj,
apologies for the late reply.
You can only run one sketch on your Arduino at a time.
To get the multiple sketches to work, you’ll have to rewrite the code so all of it is in one single sketch.
In this case (LED effects) you’ll have to combine them, like for example in this post.
hans
First off, thanks for the really well written and highly nutritive tutorial. I’m using the FadeInOut code broken up into two chunks like below. Curious as to how I can change the speed the leds fade up and down. Very new to Arduino and coding so my attempts experimenting with different values have resulted in undesired results. –E
void FadeIn(byte red, byte green, byte blue){ float r, g, b; for(int k = 0; k < 256; k=k+1) { r = (k/256.0)*red; g = (k/256.0)*green; b = (k/256.0)*blue; setAll(r,g,b); showStrip(); }}
void FadeOut(byte red, byte green, byte blue){ float r, g, b; for(int k = 255; k >= 0; k=k-2) { r = (k/256.0)*red; g = (k/256.0)*green; b = (k/256.0)*blue; setAll(r,g,b); showStrip(); }}
Eric
Hi Eric,
first off: thank you very much for the compliment, it’s much appreciated!
As for changing speed, the procedure you use is pretty much at the max of it’s speed.
We can delay it though by adding delays in the loops, for example by using the delay() function. Of course it would be nice to be able to pass the “delay” value in the function, so I modified the functions a little bit to accommodate that. The delayvalue is expressed in milliseconds (1 second = 1,000 milliseconds).
void FadeIn(byte red, byte green, byte blue, int delayvalue) // added the delayvalue parameter { float r, g, b; for(int k = 0; k < 256; k=k+1) { r = (k/256.0)*red; g = (k/256.0)*green; b = (k/256.0)*blue; setAll(r,g,b); showStrip(); delay(delayvalue); // <-- here we add the delay } }void FadeOut(byte red, byte green, byte blue, int delayvalue) // added the delayvalue parameter { float r, g, b; for(int k = 255; k >= 0; k=k-2) { r = (k/256.0)*red; g = (k/256.0)*green; b = (k/256.0)*blue; setAll(r,g,b); showStrip(); delay(delayvalue); // <-- and here again } }
So basically when a color changes, we apply (setAll) and show (ShowStrip) it, and right after that we wait an x number of milliseconds.
Is this what you’re looking for?
hans
If I’m understanding correctly that would add a delay between the fade up and fade down. What I would like to do is slow down the time it takes for the Led to go from black to the desired brightness level and correspondingly light to dark. I’m using the code in a motion activated light sensing night light. So, fading on and off slowly is what I’m after.
Cheers!
eric
Hi Eric,
No this would add a delay between each color “step”, effectively making the transition slower. So FadeIn and FadeOut would be slower, depending on the value you pass for “delayvalue”. Give it a try. DelayValue-0 is the same as the original speed. DelayValue=1000 will make it that the fade will take about 255 seconds (dee the “for” loop).
hans
Tried adding DelayValue=x and got errors. Mind showing how you would use it and why it causes the speed change. Thanks Hans!!
void FadeIn(byte red, byte green, byte blue){float r, g, b;
for(int k = 0; k < 256; k=k+1) {
r = (k/256.0)*red;
g = (k/256.0)*green;
b = (k/256.0)*blue;
setAll(r,g,b);
showStrip();
}
}
Code below where I’m calling FadeIn
void loop() {
  if (analogRead(lightPin) < threshold && (digitalRead(pirPin) == HIGH)) {
    if (lockLow) {

      //makes sure we wait for a transition to LOW before any further output is made:
      lockLow = false;
      Serial.println("---");
      Serial.print("motion detected at ");
      Serial.print(millis() / 1000);
      Serial.println(" sec");
      Serial.println(analogRead(lightPin));
      FadeIn(0xff, 0x00, 0x00); //Wait until Serial print work is done before activating strip
      delay(50);
    }
    takeLowTime = true;
  }
eric
Hi Eric,
what error messages did you get? Did you use the code I gave?
if so, calling FadeIn or FadeOut would be something like this:
or
hans
Thanks Hans, that led me to the solution after a little experimenting which is better than being given the answer! Now it fades as slowly as I like.
What I ended up changing:(in Bold)
1) adding a delay value to the RGB values where I’m calling FadeIn and FadeOut
2) adding “uint8_t wait” to method header
3) and finally “delay(wait);” after strip.show() which finally pushes the change to the strip
void FadeIn(byte red, byte green, byte blue, uint8_t wait) {float r, g, b;
for (int k = 0; k < 256; k = k + 1) {
r = (k / 256.0) * red;
g = (k / 256.0) * green;
b = (k / 256.0) * blue;
setAll(r, g, b);
strip.show();
delay(wait);
}
}
eric
Well done Eric! Thanks for posting it here!
And yes; the best way to learn is to play with it yourself, but sometimes a nudge in the right direction helps right?
hans
Thanks for your easy to follow no-nonsense explanations, very straightforward to follow.
I want to build some hanging outdoor Christmas decoration with my children (to get them interested in electronics and coding), using either Adafruit DotStar LED strip APA102 144LEDs/m or Adafruit NeoPixel RGBW 144LEDs/m and a 5V DC Trinket Pro (small size, easy to waterproof). I want to drive three two-metre strips independently (same effect, but different velocity/randomness). Does this mean I need three 5V DC PSUs and three Adafruit Trinkets? Or is there an alternative solution to drive three strips independently but from a single larger/more capable microcontroller?
On another note – what is the limit of the length of cable if one wants to keep the microcontroller and the LED strips at a distance, say, four metres?
Thanks in advance for some hints!
Systembolaget
Hi Systembolaget,
Thanks for the compliment – it’s much appreciated.
Well, the easiest would indeed be with 3 Trinkets yet.
Two major challenges might be, when using just one, are:
1) Addressing the LEDs in 3 blocks, but with some coding tricks that might not be the hardest part.
2) Having the effects on the 3 “strips” behave indecently. Arduino’s are usually not use in a multi-task setup, so they usually do things in sequence. Again, with so code skills you could consider using interrupts, but I’m sure that would make it difficult and possible undermine the enthusiasm of your kids.
As for the length, I assume you mean the wires between Arduino and strip; 4 meters might work just fine. It will be a matter of testing, but I wouldn’t expect any issues.
Hope this helps!
hans
Ok, thanks for your input! I bought:
The PSU and Trinket will go in the enclosure to withstand the winter weather. We can’t wait for the parts to arrive. With the help of your forum here, we hope to get the coding just right.
Systembolaget
Looking at the latest FastLED git, it seems that one can drive multiple strips doing different things https://github.com/FastLED/FastLED/wiki/Multiple-Controller-Examples
However, I will stick to three independent setups to not overload the kids.
Systembolaget
Sounds like you’re ready for a cool project – your kids will love it!
And you’re right, don’t want to make it too complicated, otherwise they’ll loose interest and that would be a shame.
Keep us posted on the progress!
hans
Hi again,
I found this page while googling other led animation stuff led animations and thought it would be useful to others to know a way to have their arduino’s use a non-blocking method to display animations. I am using this to allow a button press to change animations (in progress) and so far it looks very promising. I haven’t had time to convert any of your animations yet (but I’m sure to try soon) but I do think it would work with a little tweaking.
Here is a code snippet example showing both ways to code the same display, I’m not sure if either are the best way to do this but it’s code I am trying at the moment.
NON-BLOCKING METHOD
NORMAL METHOD (using delay)
Both of these move a trail of pixels from outside edge to the middle, but the non-blocking method allows the arduino to do other stuff in between (like checking sensors, reading button presses etc).
Anyway I hope it is useful to someone else and thanks again for the inspiration gained from this site.
Dai
Thanks Dia!
Your info is much appreciated – great tip! – and I’m sure users will have benefit from it! Awesome, thanks!
hans
Hi,
thanks for your great examples.
I went a different route in my project by using the strip as receiver and define the content on a different machine.
The controller opens an UDP port and accepts commands in a json format as input.
https://wiki.d.evba.se/doku.php?id=projects:neopixel-bandwidth-room-light
Your effects should be fairly easy to be added to this structure so you can trigger them over Wifi.
I hope you enjoy it and I helps others to come up with some ideas.
Cheers
Trinitor
That’s a pretty cool project, I’ve bookmarked it for when I get my ESP8266! I’m currently using arduino pro minis for my strings as they are cheap and can control around 600 (ish) pixels depending on the code, but I think the ESP8266 has more possibilities. I might try adjusting your code to see if I can get an Arduino Mega with ethernet board working with it. I like to code in python and think if I get this working it would mean I could use some scripting to get all the effects I could possibly need (for now anyway :) ) Thanks for posting this.
Dai
Thanks – I’ve listed this for my ESP8266 future projects as well
hans
Be advised that the fastPixel library has problems with the 8266, but the neo seems fine.
Mike Garber
Thanks Mike for the heads up!
Others will most definitely benefit from it!
I still have to get started with the ESP8266, hopefully by then FastLED will be updated
hans
I’ve been playing around with some different effects for a few strings of NEOPIXELS running on an Arduino Pro Mini and have found that theatreChaseRainbow function will prevent any further effects being displayed. I have adjusted my effects to put this one last and it works for now but I must put it last in the list and have also noticed that the millis() count is reset to Zero after this effect finishes. I don’t know if this is possibly a memory limit reached causing a reset or something like that but thought I would post in case somebody had noticed (and maybe fixed) it.
The code I am using for this strip is :-
And the Serial output I get is :-
If I comment out the theatreChaseRainbow effect then the millis() count is normal (keeps adding after each cycle). Any body have any ideas?
Also what I haven’t shown here is if you put the theatreChaseRainbow in the middle of the list it will display the effects before it but then resets after it and the following effects do not show (it starts from the beginning again without completing the main loop)
Dai
Hi Dai,
I couldn’t find anything weird that might trigger these issues.
millis() will not reset until it has run for about 50 days (according to the documentation).
Resetting the clock used by millis() isn’t even that easy (see this post).
So now I’m left guess, and what might do the trick is where you use “NUM_LEDS”, and use “NUM_LEDS-1” instead, so try the theaterChaseRainbow with this code (I changed 2 lines):
void theaterChaseRainbow(int SpeedDelay) {
  byte *c;

  for (int j=0; j < 256; j++) {     // cycle all 256 colors in the wheel
    for (int q=0; q < 3; q++) {
        for (int i=0; i < NUM_LEDS-1; i=i+3) {   // <-- change here
          c = Wheel( (i+j) % 255);
          setPixel(i+q, *c, *(c+1), *(c+2));    //turn every third pixel on
        }
        showStrip();

        delay(SpeedDelay);

        for (int i=0; i < NUM_LEDS-1; i=i+3) {   // <-- change here
          setPixel(i+q, 0,0,0);        //turn every third pixel off
        }
    }
  }
}
Maybe not exactly the correct programmers way to do this, but worth a test.
hans
Thank you Hans, that has worked on a small test with only three effects, but when i put the full script in place it seems to go back to previous behaviour (resetting the millis count and starting from the beginning…) I am guessing at this point that there would be a memory full error which might cause a reset because it is not happening when I use less effects, but thank you for trying and I might have to reduce the number of effects for these strings or I might use another method to get similar effect.
Dai
Erratic behavior could indeed be caused by out-of-memory (see this document).
This still happens when you change the order of the effect (ie. start with theaterChaseRainbow() and run the other effects after that)?
hans
Yes, I think it is a simple out of memory error, and thanks to your link I may be able to fix it using PROGMEM for some fixed variables, although I will have to come back to it when I’ve finished a few other bits .
I did try with theaterChase Rainbow at the beginning and the results are the same, that is, if I only have one (or maybe two) other effects it works as expected, but if I have more effects (and the associated Serial.print statements that I’m using for tests) then theaterChaseRainbow will trigger a restart (not directly but because of the memory issue). So I’m sure that it can be overcome with a little coding change on my part.
Thanks for the great help and advice, it is much appreciated
Dai
I thought I had better post the solution to my particular problem in case it might be of use to others with a similar issue, I decided to try and “shorten” or “shrinkify” the theaterChaseRainbow sketch and this is what I ended up with :-
void theaterChaseRainbow(int SpeedDelay) {
  for (int j=0; j<256; j++) {
    for (int q=0; q<3; q++) {
      for (int i=2; i<NUM_LEDS-2; i=i+3) {
        c = Wheel(j);
        setPixel(i+q, *c, *(c+1), *(c+2));
      }
      showStrip();
      fadeall(15);
      delay(SpeedDelay);
    }
  }
}
This makes use of the fadeall function I am using in another sketch to turn off the lights after they have been displayed, it can be set differently to have the lights go off almost immediately to make the pattern more like the original one you (Hans) posted.
Anyway, everything is working as it should and I am again a happy bunny
Thanks again for your advise/inspiration.
Dai
Hi Dai!
Great to hear you’re happy with the result and thanks for posting your function!
hans
We got our setup (Pro Trinket 5V and APA102C 144 LEDs/m strip) working and are now wondering how we could achieve something along the monochromatic/polychromatic “twinkle” or “sparkle” effects shown above, but more subtle and continuous, also taking into account that the brightness of LEDs should fade in/out sinusoidal or, rather, logarithmic (human brightness perception)?
Here’s one code-less example of “random twinkling” that shows what we’re after… do you have some ideas how that could be done?
Thanks for some hints!
Systembolaget
Hi Systembolaget,
that’s good news!
As for the desired effect; I like the idea, but I have not code readily available to do this.
i’d have to sit down and set everything up to do some testing to see what works best.
Unfortunately, I do not have my gear readily available so it would take quite some time before I’d have code available …
hans
Hi Systembolaget,
You could try this sketch I think it goes some way towards what you want, it uses the TwinkleRandom sketch with some minor modifications, you can enter the fade speed using the extra parameter I added. You will probably need a longer fade value for longer strings as I have only been using this on a 14 pixel string at the moment. Also this doesn’t fade pixels in but does fade them out. Hope this helps towards finding something useful.
Dai
Hej Hans,
after going through the FastLED 3.1 codebase on Github, I found a good solution, which is nicely twinkling, glittering or sparkling; maybe useful for others, too.
Systembolaget
Awesome! Thanks Systembolaget for posting this!!
hans
This subtle change allows for hue, saturation and brightness control. Randomised or clamped to a range. Enjoy!
Systembolaget
Nice! You’re having fun with the LED strips, aren’t you? (me too!)
Thanks again for posting your code!
hans
Hello, and thank you very much for this very impressive Effects!
Never found a site with this much of exaples!
I want to use all effects by calling them in the main loop(), all is working ok but the effect:
“Bouncing Balls” is running and never ends :-(
In that effect there is this codepart:
while WHAT is true ?
So please can someone tell me how i can stopp the effect after one time running?
I want to change the Ballcolor after each run, so i want to call the function this way:
Daniel
Hi Daniel,
thank you for the compliment!
As for the “while(true)” – this keeps the loop going until the end of time (unless power gets disrupted of course.
I did this to avoid having to look for an elegant exit.
To change that you’d have to change the while-loop.
  while (true) {
    for (int i = 0 ; i < BallCount ; i++) {
      TimeSinceLastBounce[i] =  millis() - ClockTimeSinceLastBounce[i];
      Height[i] = 0.5 * Gravity * pow( TimeSinceLastBounce[i]/1000 , 2.0 ) + ImpactVelocity[i] * TimeSinceLastBounce[i]/1000;

      if ( Height[i] < 0 ) {
        Height[i] = 0;
        ImpactVelocity[i] = Dampening[i] * ImpactVelocity[i];
        ClockTimeSinceLastBounce[i] = millis();

        if ( ImpactVelocity[i] < 0.01 ) {
          ImpactVelocity[i] = ImpactVelocityStart;
        }
      }
      Position[i] = round( Height[i] * (NUM_LEDS - 1) / StartHeight);
    }

    for (int i = 0 ; i < BallCount ; i++) {
      setPixel(Position[i],red,green,blue);
    }

    showStrip();
    setAll(0,0,0);
  }
to (for example – i don’t think this is very elegant):
  for(int count=0; count<100; count++) {
    for (int i = 0 ; i < BallCount ; i++) {
      TimeSinceLastBounce[i] =  millis() - ClockTimeSinceLastBounce[i];
      Height[i] = 0.5 * Gravity * pow( TimeSinceLastBounce[i]/1000 , 2.0 ) + ImpactVelocity[i] * TimeSinceLastBounce[i]/1000;

      if ( Height[i] < 0 ) {
        Height[i] = 0;
        ImpactVelocity[i] = Dampening[i] * ImpactVelocity[i];
        ClockTimeSinceLastBounce[i] = millis();

        if ( ImpactVelocity[i] < 0.01 ) {
          ImpactVelocity[i] = ImpactVelocityStart;
        }
      }
      Position[i] = round( Height[i] * (NUM_LEDS - 1) / StartHeight);
    }

    for (int i = 0 ; i < BallCount ; i++) {
      setPixel(Position[i],red,green,blue);
    }

    showStrip();
    setAll(0,0,0);
  }
This will make the balls do 100 “steps”.
To make it more elegant, untested though, you could try to make the balls stop once they do not bounce beyond a certain height;
  boolean started=false; // to avoid that we stop too early
  boolean canstop=false; // once this is true, and started=true, we can stop and exit the loop

  while (!canstop) {  // while not canstop
    for (int i = 0 ; i < BallCount ; i++) {
      TimeSinceLastBounce[i] =  millis() - ClockTimeSinceLastBounce[i];
      Height[i] = 0.5 * Gravity * pow( TimeSinceLastBounce[i]/1000 , 2.0 ) + ImpactVelocity[i] * TimeSinceLastBounce[i]/1000;

      if ( Height[i] < 0 ) {
        Height[i] = 0;
        ImpactVelocity[i] = Dampening[i] * ImpactVelocity[i];
        ClockTimeSinceLastBounce[i] = millis();

        if ( ImpactVelocity[i] < 0.01 ) {
          ImpactVelocity[i] = ImpactVelocityStart;
        }
      }
      Position[i] = round( Height[i] * (NUM_LEDS - 1) / StartHeight);
    }

    for (int i = 0 ; i < BallCount ; i++) {
      setPixel(Position[i],red,green,blue);
      started = started || Position[i]>4; // arbitrary number (4) - depends a little on the length of your LED strip
      canstop = (Position[i]<3) && started; // did we start? and did a ball go below 2? Then we exit the loop
    }

    showStrip();
    setAll(0,0,0);
  }
The idea being; if one of the balls has passed a position higher than LED #4 then we set “started” to true (meaning; we can now start looking for when a ball goes below LED #3). “canstop” will become true when “started” is true AND we found a ball below LED #3.
Again the numbers 3 and 4 are arbitrary chosen, you’ll have to play with that to see what value works for you.
Hope this will get you started – feel free to ask questions and/or share your findings.
hans
Hello Hans and first of all Vrolijk Kerstfeest to you and your family!
I really try your second implementation but it is not working here with my 60 led strip.
It stars with red ball, red i flying to top, after red goes to 0, green starts to top and after
reaching 0, the blue ball stops – so there is only one jumping per ball!
I have a idee: when the Ball is about to die, he stays a longer time on StripLED 0 for around 1 second, so i try
to stop the function at this position, but i’m really not good in programming inside a arduino loop().
Daniel
Hi Daniel,
sorry that it didn’t work as hoped – I’m a little limited since I cannot test as my hardware is nowhere near me.
Your timer approach could work, but I do tend to write if statements with more brackets to make sure it does what is expected. So you line
I’d write as:
Another thing we could do is use a counter that increase with each bounce and when a certain number has been reached; we exit.
Something in the line of:
Hope this helps … and Merry Christmas
hans
Hello Hans, i try all the ideas but nothing works really good.
But then i checked again your code “BouncingBalls” and i found a 100% perfect
solution :-)
if(ImpactVelocity[i]<0.1) {canstop=true;} //Stop script
//if(ImpactVelocity[i]<0.01) {ImpactVelocity[i]=ImpactVelocityStart;}
//Serial.println(ImpactVelocity[i]);
I replace only one code line from the script with this one!
It works perfekt and stopps wenn Balljumping in lower then 0.1
But this woes not work with the multi bouncing balls “BouncingColoredBalls”
because in this line
if(ImpactVelocity[i]<0.1) {canstop=true;} //Stop scriptyou can not check witch of the 3 balls in in the stopping-phase….and also it looks like
the balls are touching each other and amplify or break the jumping Gravity formula :-(
But for now its ok with one Ball bouncing…..
By the way your idee:
is working but the >6 must be in my case around >210 for one ball because on each jump
and fall the ball is passing 2 times the Index 0.
But i will try to use this code for the 3 ball bouncing, by increesing the value >600.
I will post here for others if i got success.
Have a nice eavening Hans, great site.!
Daniel
Awesome fix Daniel – can’t believe I totally overlooked that one.
Yeah with multiple balls you’ll have a challenge.
Maybe it would be good (with 3 balls) that a ball stops bouncing once it’s done with it’s bounce(s), until all balls are done.
  boolean canstop = false;

  while (!canstop) {
    for (int i = 0 ; i < BallCount ; i++) {
      if(ImpactVelocity[i]>0) {
         TimeSinceLastBounce[i] =  millis() - ClockTimeSinceLastBounce[i];
         Height[i] = 0.5 * Gravity * pow( TimeSinceLastBounce[i]/1000 , 2.0 ) + ImpactVelocity[i] * TimeSinceLastBounce[i]/1000;

         if ( Height[i] < 0 ) {
           Height[i] = 0;
           ImpactVelocity[i] = Dampening[i] * ImpactVelocity[i];
           ClockTimeSinceLastBounce[i] = millis();

           if ( ImpactVelocity[i] < 0.01 ) { // changes here
             ImpactVelocity[i] = -1;
           }
         }
         Position[i] = round( Height[i] * (NUM_LEDS - 1) / StartHeight);
      }
    }

    for (int i = 0 ; i < BallCount ; i++) {
      canstop = true; // start with assuming none of the balls are bouncing
      if(ImpactVelocity[i] > 0) { // changes here
         setPixel(Position[i],colors[i][0],colors[i][1],colors[i][2]);
         canstop = false; // still ate least one ball bouncing, so do not stop
      }
    }

    showStrip();
    setAll(0,0,0);
  }
Since ImpactVelocity will never be below 0, we could abuse that – set it to -1 when the bounce is done.
Not sure what the impact will be of not setting the ball … but I figured it may remain “at the bottom”?
Again; untested, but maybe it’s helpful …
hans
Good morning! Thanks a lot for this awesome and helpful site. The toilet paper hack is my favourite
I used your code for my attiny85 with a WS2812 strip. A motion sensor turns the effect on and off after a short delay. Now here comes my question and it would be great if you could help me, because I want to use this for an infinity mirror as a christmas present!
Question: Do you have an idea how to go through all effects instead of repeating only one? So, whenever the sensor detects a new motion, he does not show the previous effect but a new one. Do you think this is possible?
Best regards from Germany
Maike
Hi Maike!
Thanks for the compliment and I have to agree that the toilet paper hack looks great and is kind-a funny at the same time .
.
In the forum, and some posts here, show some examples on how to use multiple effects in one sketch. See for example this comment or this forum topic.
I hope to find time soon to work on questions like this – unfortunately at this time regular work leaves me very little time to do fun projects.
hans
Thank you very much for your answer! It worked out and my parents-in-law were very happy about their present. I used it for an infinity mirror with a motion sensor and two magnetic key holders. It was fun doing the project, so thanks for your help and sharing for knowledge
Enjoy Christmas!
maike
Hi Maike!
Merry Christmas to you too!
Glad to hear your project worked out … actually sounds like an interesting project!
hans
If you want to take a look at it: https://photos.app.goo.gl/CCFstrtUiKsaf4M33
The next one will be better, but this was very good to learn all the differents tasks from cutting ikea mirrors to coding the neopixels! Thanks to your great descriptions, videos and explanations
maike
Oh wow! that looks nice! Well done!
I’ll have to look into that some more as well … I like it!
hans
Hi Hans,
Could you show an meteor rain example. Thank you in advance,
Henrik
Henrik Lauridsen
Hi Hendrik,
well, ehm … that depends on what a meteor shower looks like.
Do you have an example? For example a YouTube video that shows this effect?
Merry Christmas and a happy New Year to you too
hans
Hi Hans,
Thank you for your reply and wishes.
Something like :
Meteor rain
https://www.youtube.com/watch?v=pCrMn_240Ms
Meteor rain 2
https://www.youtube.com/watch?v=i_ld7vK2tAs
I would like to be able to change color and speed of the meteor rain.
By the way I always comes back to this site. Great site. Thank you,
Henrik
Henrik Lauridsen
Hi Henrik!
Thanks for the YouTube links,… and thanks for keeping traffic on my website going, it’s very much appreciated.
As for the code for the meteor rain; I’ll have to do some tinkering – mostly finding my Arduino and LED strips.
It doesn’t look like this would be super complicated though.
I’ll try to make some time this week to write some code for this, and maybe combine that with some extras to cycle through all the effects mentioned in this post.
Might take a little though,…
hans
Hi Hans,
Thank you for your time.
I am looking forward to your solution with excitement.
Henrik Lauridsen
Hi Hendrik,
I hope you like this one; it’s currently only for one strip though.
The function meteorRain takes 6 parameters:
For the color of the meteor: red, green, blue
– meteorSize: size of the meteor (including trail)
– meteorIntensity: intensity of the trail, or how fast the trail fades (1=fast fade, 10=slow fade)
– speedDelay: how fast the meteor moves by setting a delay value (so higher value = slower)
I have the meteor fade all the way, so even if the meteor is out of sight (past the end of the strip) then the trail will keep going until it’s totally gone.
Give it a shot an see what you think. I’m sure there is room for improvement (for example; dividing colors to mimic a fade is OK but can be done better).
I did try this with a 60 LED strip and looked pretty good. Then again; I never payed much attention to the meteor rain effect in the past.
Let me know what you think, and if it’s worthy I’ll add it to the list above – if not, then we’ll do some tweaking …
hans
Hi Hans,
Thank you very much for your time and solution. Its looking good and in my opinion absolutely worthy to join the list above.
Of course it would be great with an option to support more strip syncron or asyncron and a wait state before the meteor started all over.
Again thank you and please keep up the good work,
Henrik
Henrik Lauridsen
Hej,
here’s one with a sparkling and adjustable length trail. Colour can be fixed or change, too. Happy Easter!
Systembolaget
Thanks Hendrik!
Glad you liked it. As for your suggestion; Hey, it wouldn’t be fun if we couldn’t improve this right?
The option to add more strips would of course be great, but that would no longer fit this “generic” approach I’m afraid.
hans
Since I love playing with LED strips, a variant that might be better;
This one only works with FastLED since NeoPixel has no function to fade LEDs (by my knowledge).
I’ve added a few options like the size of the meteor (excl. tail), how fast the tail decays, if the tail LEDs should decay at random (leaving little pieces that decay less fast). Play a little with the values and to add randomness – play with random values as well.
As for a random start when using multiple Arduino’s and/or strands;
you could do a “delay(random(12345));” before the meteorRain() call. You’d probably need to set randomSeed() in the setup function, for example:
void setup(){...
randomSeed(analogRead(0));
}
If anyone knows of a trick to make LEDs fade in NeoPixel, then I’d love to hear that so we can add this to the list.
Happy New Year!
hans
Got it to work for NeoPixel as well … so I’ll add it to the article;
hans
Thanks to you Systembolaget!
Very clean and compact – I like it. I’ll have to test it and see if we can squeeze it in this article as well!
hans
Looks really good! Just had a chance to test it.
Unfortunately, it would not fit in the “generic” approach of this article, but for those who are looking for this effect: highly recommend trying this one!
Happy New Year!
hans
Happy New Year to you guys!
hans
Thank you and a happy New Year to you.
Henrik Lauridsen
Hi again,
I forgot to wish you a merry Christmas and a happy new year
Henrik Lauridsen
Thanks a lot.
Really great job !
See you !
Lephilelec
Thanks Lephilelec for taking the time to post a Thank-You note!
It’s very much appreciated!
Happy New Year!
hans
UPDATE:
Added a new Effect (thanks Hendrik for pointing me to a cool new effect): Meteor Rain.
hans
HI THERE
I want to integrate the meteor rain effect with a ultrasonic sensor .Could you point me in the direction of how exactly to go about it.
p.s- I am a newbie at arduino :)
arav kumar
Hi Arav,
I have yet to play with an ultrasonic sensor. Not sure if it passes a value or an on/off state.
Either way, you could setup a loop that checks the sensor. Once the sensor “triggers”, call the meteor effect?
hans
UPDATE:
Finally found the time to combine all sketches into one single sketch.
I’ve created it such a way that you can toggle effect (fast!) with a single button.
See: Arduino – All LEDStrip effects in one (NeoPixel and FastLED)
hans
Hi Hans. I am incredibly grateful for the code and help you’ve added with this post. So very much appreciated. Is there any way to learn the language you’ve used to program these sketches?
Gary Kester
Thanks Gary!
I very much appreciate your post!
To get started, at some point I wrote a course for my nephews. Maybe this is a good starting point to get familiar with the language.
Here is the link of the overview page: Arduino Programming for Beginners.
Don’t be afraid to ask if you have questions … we are all beginners at some point, and I’m 100% sure there are better programmers than me out there that can teach me a few things as well.
hans
We can always do what we do better ;). I’m learning from the bottom up and your tutorial is gold for that. I’m also trying to implement the lighting effects into some of my projects at the same time. e.g. https://youtu.be/R-_Mn9t1OoE
Have you ever done a sketch that results in 2 different effects to two different sets of neopixels (of different lengths) at the same time?
I’d like to have the core pulse randomly separate to the circle that I want a superfast spinning effect on.
Gary Kester
Hi Gary!
That’s a cool project, which initially (since I forgot to read the “Iron man” text) made me think of a LED ring around a speaker responding to music. Anyhoo – both fun projects!
I have not played with multiple strips yet – I’ve always used math to set the LEDs so it looks like 2 strands. FastLED however does support multiple strands, but I can imagine it to be challenging to have 2 or more effects to run in parallel. I’m thinking about timing issues and such.
I guess I would start using 2 Arduino’s for that – to get max speed as well.
Then again, if you’d make one procedure handling the spinning – just 1 step, and another one doing just one step of the other effect, and then call them in a certain sequence in loop(); might work.
hans
Hi Hans,
I have a question regarding powering more LED strips.
I need to power 300 WS2812b LEDs or more, but my PSU can’t handle that much (300 x 60 mA)
Can I do the following?
5 LED strips and 5 PSU’s
Every PSU with common ground including Arduino ground.
Every strip + connected to VCC on its own PSU
All strips data pin connected to Arduino data pin 6
Thank you.
Henrik
Henrik Lauridsen
Hi Hendrik,
in my practical experience, 300 x 20mA would work or is at least worth a test. This works since not all LEDs are on and at max brightness all the time for a long period of time. Which would suggest a 6A power supply could pull this off.
If you’d like to use individual PSU’s, then your approach looks good; common GND, Vcc for each strip.
However if all strips have a common data pin 6, then they most likely all will display the exact same effect. Not sure if that’s what you had in mind.
If this is NOT what you had in mind then connect the Din of the first strip to Pin 6 of the Arduino. At the end of the first strip you’ll find a Dout pin (follow the arrows) which can be connected to Din of the second strip, and so on, daisy chaining the strips. Power still can still be done per individual LED strip.
hans
Hi Hans,
Thank you for your reply.
If this is NOT what you had in mind then connect the Din of the first strip to Pin 6 of the Arduino. At the end of the first strip you’ll find a Dout pin (follow the arrows) which can be connected to Din of the second strip, and so on, daisy chaining the strips. Power still can still be done per individual LED strip.
This was what I meant, but formulated it wrong.
Thank you again,
Henrik
Henrik Lauridsen
I guess we are talking about the same approach then
hans
Hi Guys,
Just adding my contribution. The enclosed sketch is based on the Hero Powerplant sketch done my Tony Sherwood for Adafruit Industries.
I modified it to allow for 2 sets of Neopixels (1 for the circle – RGBW and another for the core RGB) with different colors running off different pins.
Video of the effect on Youtube https://www.youtube.com/embed/QStYTdPPeQ4
//fades all pixels subtly
//code by Tony Sherwood for Adafruit Industries
//modified by Gary Kester for Make It Real (Australia)
#include <Adafruit_NeoPixel.h>
#define PIN1 1
#define PIN2 2
// Parameter 1 = number of pixels in circle
// Parameter 2 = pin number (most are valid)
// Parameter 3 = pixel type flags, add together as needed:
// NEO_KHZ800 800 KHz bitstream (most NeoPixel products w/WS2812 LEDs)
// NEO_KHZ400 400 KHz (classic ‘v1’ (not v2) FLORA pixels, WS2811 drivers)
// NEO_GRB Pixels are wired for GRB bitstream (most NeoPixel products)
// NEO_RGB Pixels are wired for RGB bitstream (v1 FLORA pixels, not v2)
Adafruit_NeoPixel circle = Adafruit_NeoPixel(10, PIN1, NEO_GRBW + NEO_KHZ800);
Adafruit_NeoPixel core = Adafruit_NeoPixel(6, PIN2, NEO_GRB + NEO_KHZ800);
int alpha; // Current value of the pixels
int dir = 1; // Direction of the pixels… 1 = getting brighter, 0 = getting dimmer
int flip; // Randomly flip the direction every once in a while
int minAlpha = 25; // Min value of brightness
int maxAlpha = 100; // Max value of brightness
int alphaDelta = 5; // Delta of brightness between times through the loop
void setup() {
circle.begin();
core.begin();
circle.show(); // Initialize all pixels to ‘off’
core.show(); // Initialize all pixels to ‘off’
}
void loop() {
flip = random(32);
if(flip > 20) {
dir = 1 – dir;
}
// Some example procedures showing how to display to the pixels:
if (dir == 1) {
alpha += alphaDelta;
}
if (dir == 0) {
alpha -= alphaDelta;
}
if (alpha < minAlpha) {
alpha = minAlpha;
dir = 1;
}
if (alpha > maxAlpha) {
alpha = maxAlpha;
dir = 0;
}
// Change the line below to alter the color of the lights
// The numbers represent the Red, Green, and Blue values
// of the lights, as a value between 0(off) and 1(max brightness)
//
// EX:
colorWipe(circle.Color(alpha, 0, alpha/2)); // Pink
// colorWipe(circle.Color(0, 0, alpha)); // Blue
colorWipe2(core.Color(alpha, alpha, alpha)); // Blue
}
// Fill the dots one after the other with a color
void colorWipe(uint32_t c) {
for(uint16_t i=0; i<circle.numPixels(); i++) {
circle.setPixelColor(i, c);
circle.show();
;
}
}
// Fill the dots one after the other with a color
void colorWipe2(uint32_t c) {
for(uint16_t i=0; i<core.numPixels(); i++) {
core.setPixelColor(i, c);
core.show();
;
}
}
Gary Kester
With a link this time https://youtu.be/QStYTdPPeQ4
Gary Kester
Hi Gary,
Thats fantastic, thanks for sharing your work.
I’m planning to build some more Christmas lights and I’ve been pondering on a way to use more than one strip/string on individual pins.
This will help a lot.
Spike
Thanks Gary! Awesome!
hans
Thank you for this fast and cool library!
Umberto Giacobbi
Hi Umberto!
Thanks you very much for the compliment! Glad you’re having fun with it as well!
hans
Hello! You have a great website, very fascinating stuff on here! I am an art student looking to do a sculpture project involving light, and I am stuck because I am using Adadfruit’s drum sound sensor code. Of course, all it is is a sound reactive digital 30 Neopixel light using GEMMA MO and Electret Microphone amplifier. I am using varying pixels because they will be wrapped around trees like belts, and whenever someone speaks, it should light up. Problem is I do not want simple bars and rainbow lighting as the code is given, I want something like your last demo the Meteor light or something simpler like a trail of light across the strip. Could you help me customize this code? The project is due next Wednesday (Valentine’s day).
you can read their code from this link
https://learn.adafruit.com/gemma-powered-neopixel-led-sound-reactive-drums/circuit-diagram
or
Here is the code:
* LED “Color Organ” for Adafruit Trinket and NeoPixel LEDs.
Hardware requirements:
– Adafruit Trinket or Gemma mini microcontroller (ATTiny85).
– Adafruit Electret Microphone Amplifier (ID: 1063)
– Several Neopixels, you can mix and match
o Adafruit Flora RGB Smart Pixels (ID: 1260)
o Adafruit NeoPixel Digital LED strip (ID: 1138)
o Adafruit Neopixel Ring (ID: 1463)
Software requirements:
– Adafruit NeoPixel library
Connections:
– 5 V to mic amp +
– GND to mic amp –
– Analog pinto microphone output (configurable below)
– Digital pin to LED data input (configurable below)
Written by Adafruit Industries. Distributed under the BSD license.
This paragraph must be included in any redistribution.
*/
#include <Adafruit_NeoPixel.h>
#define N_PIXELS 27 // Number of pixels you are using
#define MIC_PIN A1 // Microphone is attached to Trinket GPIO #2/Gemma D2 (A1)
#define LED_PIN 0 // NeoPixel LED strand is connected to GPIO #0 / D0
#define DC_OFFSET 0 // DC offset in mic signal – if unusure, leave 0
#define NOISE 100 // Noise/hum/interference in mic signal
#define SAMPLES 60 // Length of buffer for dynamic level adjustment
#define TOP (N_PIXELS +1) // Allow dot to go slightly off scale
// Comment out the next line if you do not want brightness control or have a Gemma
//#define POT_PIN 3 // if defined, a potentiometer is on GPIO #3 (A3, Trinket only)
byte
peak = 0, // Used for falling dot
dotCount = 0, // Frame counter for delaying dot-falling speed
volCount = 0; // Frame counter for storing past volume data
int
vol[SAMPLES], // Collection of prior volume samples
lvl = 10, // Current “dampened” audio level
minLvlAvg = 0, // For dynamic adjustment of graph low & high
maxLvlAvg = 512;
Adafruit_NeoPixel strip = Adafruit_NeoPixel(N_PIXELS, LED_PIN, NEO_GRB + NEO_KHZ800);
void setup() {
//memset(vol, 0, sizeof(vol));
memset(vol,0,sizeof(int)*SAMPLES);//Thanks Neil!
strip.begin();
}
void loop() {
uint8_t i;
uint16_t minLvl, maxLvl;
int n, height;
n = analogRead(MIC_PIN); // Raw reading from mic
n = abs(n – 512 – DC_OFFSET); // Center on zero
n = (n <= NOISE) ? 0 : (n – NOISE); // Remove noise/hum
lvl = ((lvl * 7) + n) >> 3; // “Dampened” reading (else looks twitchy)
// Calculate bar height based on dynamic min/max levels (fixed point):
height = TOP * (lvl – minLvlAvg) / (long)(maxLvlAvg – minLvlAvg);
if(height < 0L) height = 0; // Clip output
else if(height > TOP) height = TOP;
if(height > peak) peak = height; // Keep ‘peak’ dot at top
// if POT_PIN is defined, we have a potentiometer on GPIO #3 on a Trinket
// (Gemma doesn’t have this pin)
uint8_t bright = 255;
#ifdef POT_PIN
bright = analogRead(POT_PIN); // Read pin (0-255) (adjust potentiometer
// to give 0 to Vcc volts
#endif
strip.setBrightness(bright); // Set LED brightness (if POT_PIN at top
// define commented out, will be full)
// Color pixels based on rainbow gradient
for(i=0; i<N_PIXELS; i++) {
if(i >= height)
strip.setPixelColor(i, 0, 0, 0);
else
strip.setPixelColor(i,Wheel(map(i,0,strip.numPixels()-1,30,150)));
}
strip.show(); // Update strip
vol[volCount] = n; // Save sample for dynamic leveling
if(++volCount >= SAMPLES) volCount = 0; // Advance/rollover sample counter
// Get volume range of prior frames
minLvl = maxLvl = vol[0];
for(i=1; i<SAMPLES; i++) {
if(vol[i] < minLvl) minLvl = vol[i];
else if(vol[i] > maxLvl) maxLvl = vol[i];
}
// minLvl and maxLvl indicate the volume range over prior frames, used
// for vertically scaling the output graph (so it looks interesting
// regardless of volume level). If they’re too close together though
// (e.g. at very low volume levels) the graph becomes super coarse
// and ‘jumpy’…so keep some minimum distance between them (this
// also lets the graph go to zero when no sound is playing):
if((maxLvl – minLvl) < TOP) maxLvl = minLvl + TOP;
minLvlAvg = (minLvlAvg * 63 + minLvl) >> 6; // Dampen min/max levels
maxLvlAvg = (maxLvlAvg * 63 + maxLvl) >> 6; // (fake rolling average)
}
// Input a value 0 to 255 to get a color value.
// The colors are a transition r – g – b – back to r.
uint32_t Wheel(byte WheelPos) {
if(WheelPos < 85) {
return strip.Color(WheelPos * 3, 255 – WheelPos * 3, 0);
} else if(WheelPos < 170) {
WheelPos -= 85;
return strip.Color(255 – WheelPos * 3, 0, WheelPos * 3);
} else {
WheelPos -= 170;
return strip.Color(0, WheelPos * 3, 255 – WheelPos * 3);
}
}
Sharon Noordermeer
Thank you so much for putting this lot together an incredible resource. I am trying to work out how to run three of these effects from three different pins. I am building a brain storming hat for a party that has a Cloud which i would like to have the Multi colour sparkle. Then two Tubes with LEDs in that will run the Meteor sequence down to two 16 pixel rings that will Cycle up in colour showing the “charge” in the helmet. I was hoping to add sound and some Other lights in the cloud to strobe to signify Lightning ( but time is not on my side)
. Any help or directions to Previous topics that might help would be greatly appreciated thank you all very much.
Dan Rutter
Hi Dan,
I’d recommend using 3 Arduino’s instead of trying to run 3 different effects on one Arduino.
The code would become quite challenging.
Since you’d want to use something small; check out the Arduino Nano, and if you’re more experienced the ESP8266.
hans
I’m learning about arduino for pixels in trying to build a home theater marquee. I’ve used your code example and got a basic marquee chase working but I’m confused one a couple things. I’m not understanding how to set the speed delay. My brain just isn’t processing the code for it.
I’m also trying to figure out how to use multiple pixels as one, like 2 or 3 pixels count as 1 unit with the units chasing.
Lastly, I’ve seen a video on YouTube with someone doing a similar project and he was able to run 4 or 5 different versions of a chase off 1 board, all switched with a simple button press. Any idea how that might work?
Thanks for any advice you can offer!
Tim
Hi Tim,
apologies for the late response … (I’m in the middle of a move from the US to Europe)
The speed delay basically is the time “consumed” between each step.
See it as: LED1 on, wait x milliseconds, LED1 off, LED2 on, wait x milliseconds, LED2 off, LED3 on, wait x milliseconds, etc.
The higher the number, the slower the chase will be.
I don’t have my equipment near me (it’s in a big container somewhere on the ocean hahah), but I’d look in this part of the code:
void theaterChaseRainbow(int SpeedDelay) {
  byte *c;

  for (int j=0; j < 256; j++) {     // cycle all 256 colors in the wheel
    for (int q=0; q < 3; q++) {  // <--- look in this for loop
        for (int i=0; i < NUM_LEDS; i=i+3) {
          c = Wheel( (i+j) % 255);
          setPixel(i+q, *c, *(c+1), *(c+2));    //turn every third pixel on
        }
        showStrip();

        delay(SpeedDelay);

        for (int i=0; i < NUM_LEDS; i=i+3) {
          setPixel(i+q, 0,0,0);        //turn every third pixel off
        }
    }
  }
}
I’ve marked the 5th line, in this for-loop you will have to do some coding to make a single LED become “bigger”.
While thinking about this, there maybe a more elegant way to do this … I’d probably make a virtual LED array, populate it as done in this code (so instead of “setPixel”). Then call my own procedure that “translates” the virtual LED to a set of 3 LEDs. This does require some extra work of course.
I have yet to experiment with multiple strands on one board. Libraries like FastLED so support this though, but your loop will become a little more complex since you want to effects to work independently. If they do not need to run independently and you’re OK with all strips doing exactly the same thing, then things become more simple: you can connect all LED strips in parallel (so the Din wire of all strips tied together and connected to the same pin on the Arduino).
hans
I appreciate the response.
I may not have been clear in my first post. I understand what a delay is, just not how to read it within this code. The language is very Greek to me. Not trying to become an expert either but tinkering a bit for a couple projects.
I think what I’m trying to achieve is one block of code with 3-5 different chase-style patterns/colors that can easily be changed with the press of an auxiliary button. I do have some chasing EL wire that I need to control as well and if 1 arduino nano can handle both that would be perfect but if I have to use a second controller it’s not a huge deal.
I will tinker some more and ask if I have anymore questions.
Thank you and safe travels!
Tim
Hi Tim!
Thanks for the safe travels wish! I’ve made it to Europe – now wait another month before my belongings get here. Yikes!
Which of the two theatre chase examples were you looking at?
I don’t mind helping to “un-Greek” the code
hans
Wow! You’re moving to Europe eh Hans … UK by any chance?
Spike
Yeah … I’m moving to The Netherlands … sorry, not the UK. I’d stop by for a beer otherwise
hans
Hello Hans,
Just digging into the project again after having to shelf it for a bit.
I’ve found your posting on combining multiple effects into one string that can then be changed with a SPST switch. Got that working but now Im tweeking the theater chase modes. I’m doing different light timings but still not sure how to adjust the speed delay.
Is it also possible to reverse the direction?
lastly, and maybe this requires all new coding but can the chase be set so all lights are on at a “dim” level and the chase lights are just turned up brighter”.
Any help is appreciated. I unfortunately don’t have the time to invest in learning as much code as possible right now but would like to put some cool lights to good use!
Cheers!
Tim
Hi Tim,
you’ve got quite a few questions there …
…
To reverse the TheatreChase, you’ll have to reverse the for-loop, for example, like so:
void theaterChase(byte red, byte green, byte blue, int SpeedDelay) {
  for (int j=0; j<10; j++) {  //do 10 cycles of chasing
    for (int q=0; q < 3; q++) {
      for (int i=0; i < NUM_LEDS; i=i+3) {
        setPixel(NUM_LEDS-i+q, red, green, blue);    //turn every third pixel on
      }
      showStrip();

      delay(SpeedDelay);

      for (int i=0; i < NUM_LEDS; i=i+3) {
        setPixel(NUM_LEDS-i+q, 0,0,0);        //turn every third pixel off
      }
    }
  }
}
(I have not tested this, but it seemed the easiest fix)
To have the strand have dimmed lights instead of OFF, you could do this:
#define ChaseBaseBrigthness 10
...
void theaterChase(byte red, byte green, byte blue, int SpeedDelay) {
  for (int j=0; j<10; j++) {  //do 10 cycles of chasing
    for (int q=0; q < 3; q++) {
      for (int i=0; i < NUM_LEDS; i=i+3) {
        setPixel(NUM_LEDS-i+q, red, green, blue);    //turn every third pixel on
      }
      showStrip();

      delay(SpeedDelay);

      for (int i=0; i < NUM_LEDS; i=i+3) { // 2nd loop!!
        setPixel(NUM_LEDS-i+q, ChaseBaseBrigthness,ChaseBaseBrigthness,ChaseBaseBrigthness);        //turn every third pixel off
      }
    }
  }
}
I have not tested this one either (play with the value of ChaseBaseBrightness, and you may have to so a “setAll(ChaseBaseBrigthness,ChaseBaseBrigthness,ChaseBaseBrigthness)” before calling the function.
In the second for-loop you could define a color instead as well (instead of 2xChaseBaseBrigthness). If the dimmed color has to match the red,green,blue, then you may have to do a calculation to determine the dimmer value for red, green and blue.
Hope this is what you’re looking for.
hans
Hello again Hans,
About ready to put your awesome code into action and your below help got the “always” on function for the theater chase working.
However I’ve not been able to figure out how to possibly reverse the direction of the theater chase. I compared the code you posted to what I had but didn’t see any differences that changed the actions.
I’m actually working with your full sketch of all functions and picking out the ones that work best for my set-up. I have the button working to change functions but I’m curious if a second button can be added to go backwards through the list?
And I am also hoping to be able to reverse the direction of the RunningLights as until my project is fully built I’m not sure what will look best and currently the Theater Chase runs one direction and the Running Lights go the other!
Thanks for any help as always!
Cheers!
Tim
Hi Tim,
Sorry for the late reply; it took me a little bit to catch up again
Basically what you’d want to do, is have the for-loop count in the opposite direction.
Either by reversing the loop, or by calculating the LED pixel at ShowPixel().
Maybe I’m not awake enough yet … let me try again – I do not have any hardware near by to test.
void theaterChase(byte red, byte green, byte blue, int SpeedDelay) {
  for (int j=0; j<10; j++) {  //do 10 cycles of chasing
    for (int q=2; q >= 0; q--) { // I think this may give the reverse look
      for (int i=0; i < NUM_LEDS; i=i+3) {
        setPixel(i+q, red, green, blue);    //turn every third pixel on
      }
      showStrip();

      delay(SpeedDelay);

      for (int i=0; i < NUM_LEDS; i=i+3) {
        setPixel(i+q, 0,0,0);        //turn every third pixel off
      }
    }
  }
}
For RunningLights you could try this;
void RunningLights(byte red, byte green, byte blue, int WaveDelay) {
  int Position=0;

  for(int j=(NUM_LEDS*2)-1; j>=0; j--) // this may work
  {
      Position++; // = 0; //Position + Rate;
      for(int i=NUM_LEDS-1; i>=0; i--) { // and here
        setPixel(i,((sin(i+Position) * 127 + 128)/255)*red,
                   ((sin(i+Position) * 127 + 128)/255)*green,
                   ((sin(i+Position) * 127 + 128)/255)*blue);
      }

      showStrip();
      delay(WaveDelay);
  }
}
Apologies if this doesn’t work out right away – after doing so much work on ApplePi-Baker (one of my projects) I’m experiencing a little brain-fog
hans
Hello Hans,
As always, thanks for taking the time to look into this. I will give your code examples a shot.
I was hoping to be able to program the Arduino with a few functions, firstly controlling the LEDs but secondly to control an IR LED performing a few functions of a TV remote. Basically upon powering on, having the Arduino send a Power On signal to the TV and possibly upon main losing power having enough charge built up in a capacitor to fire off a Power Off signal to the TV. I wanted to integrate a 3×4 Matrix keypad in to be able to select the lighting sequences and use a few other commands for the TV like volume and input. I’ve tried asking for some help elsewhere but it seems there’s a lot of expectation for people to learn full programming languages when they only want to figure out a few small things so I very much appreciate that you took the time to write your code and tutorials and continue to provide support to us who keep asking for help.
Keep being awesome!
Tim
Thanks Tim!
Sounds like an interesting project you’re working on!
Sending IR to your TV at startup should not be a big problem (I’ve never done it though). Sending a signal on power loss could be a little more challenging, since the Arduino would need to somehow detect the power loss. I can come up with a few solutions to consider, but I would need to know more about the setup. For example, you could add a relay to the power source of whichever power source you want to monitor. If powered, the relay switches ON, and on power loss it would switch OFF. Your Arduino would be able to detect that. But that’s running ahead of what you’re working with I suppose
hans
Thanks for the great tutorial. Helps a lot when you get started with led stuff.
I would like to run a NeoPixel LED matrix (8×64 pixel) and NeoPixel LED strip (144 LEDs) at the same time off one Arduino.
I can upload the program for running either one just fine. What the best way (code wise) to run both in parallel in a loop? Or do I need a second Arduino?
Cheers,
Rolf
Rolf
Hi Rolf,
thank you for the nice compliment and thank-you note – it’s much appreciated!
As for running two strips at the same time; I know the FastLED library (works with NeoPixel strips/matrix as well) can handle more than one strip at a time. The problem however is to program things in such a way that both are handled in parallel (or very fast in sequence). This may become a little tricky – but it’s not impossible.
I guess it also depends on the complexity of what you’re trying to do and how fast it needs to “move”.
Since Arduino’s get cheaper and cheaper, you may want to consider using 2 instead.
hans
[…] Quality software development examples can be hard to come by. Sure, it’s easy to pop over to Google and find a <code> block with all the right keywords, but having everything correctly explained can be hit or miss. And the more niche the subject, the thinner the forum posts get. Bucking the downward trend [HansLuijten] provides an astoundingly thorough set of LED strip patterns in his comprehensive post titled Arduino LED strip effects. […]
[…] Quality software development examples can be hard to come by. Sure, it’s easy to pop over to Google and find a <code> block with all the right keywords, but having everything correctly explained can be hit or miss. And the more niche the subject, the thinner the forum posts get. Bucking the downward trend [HansLuijten] provides an astoundingly thorough set of LED strip patterns in his comprehensive post titled Arduino LED strip effects. […]
[…] Quality software development examples can be hard to come by. Sure, it’s easy to pop over to Google and find a <code> block with all the right keywords, but having everything correctly explained can be hit or miss. And the more niche the subject, the thinner the forum posts get. Bucking the downward trend [HansLuijten] provides an astoundingly thorough set of LED strip patterns in his comprehensive post titled Arduino LED strip effects. […]
[…] Quality software development examples can be hard to come by. Sure, it’s easy to pop over to Google and find a <code> block with all the right keywords, but having everything correctly explained can be hit or miss. And the more niche the subject, the thinner the forum posts get. Bucking the downward trend [HansLuijten] provides an astoundingly thorough set of LED strip patterns in his comprehensive post titled Arduino LED strip effects. […]
[…] Quality software development examples can be hard to come by. Sure, it’s easy to pop over to Google and find a <code> block with all the right keywords, but having everything correctly explained can be hit or miss. And the more niche the subject, the thinner the forum posts get. Bucking the downward trend [HansLuijten] provides an astoundingly thorough set of LED strip patterns in his comprehensive post titled Arduino LED strip effects. […]
[…] Quality software development examples can be hard to come by. Sure, it’s easy to pop over to Google and find a <code> block with all the right keywords, but having everything correctly explained can be hit or miss. And the more niche the subject, the thinner the forum posts get. Bucking the downward trend [HansLuijten] provides an astoundingly thorough set of LED strip patterns in his comprehensive post titled Arduino LED strip effects. […]
[…] for everything from simple single color fades and classic Cylon eyes to effects that look like meteors falling from the sky. Seriously! Check out the video after the break. Those chasing lights you see around theater signs? […]
[…] Quality software development examples can be hard to come by. Sure, it’s easy to pop over to Google and find a <code> block with all the right keywords, but having everything correctly explained can be hit or miss. And the more niche the subject, the thinner the forum posts get. Bucking the downward trend [HansLuijten] provides an astoundingly thorough set of LED strip patterns in his comprehensive post titled Arduino LED strip effects. […]
[…] Quality software development examples can be hard to come by. Sure, it’s easy to pop over to Google and find a <code> block with all the right keywords, but having everything correctly explained can be hit or miss. And the more niche the subject, the thinner the forum posts get. Bucking the downward trend [HansLuijten] provides an astoundingly thorough set of LED strip patterns in his comprehensive post titled Arduino LED strip effects. […]
Thanks so much for this article! I have used it to get started with 2812 LEDs. So much good information.
I have tried to modify the Fire sketch to split a strip in half and make it look like the fire starts in the center and flows out to the ends. My programming skills are not up to the task. Any help would be appreciated!
Thanks!
Barn
Barn Blanken
Hi Barn,
thank you very much for the compliment!
In your case, you could connect the strands in parallel.
For example if each strand is 30 LEDs, then set the LED count to 30.
Connect the 3 wires of both strands together to the Arduino.
Both strands should now give the exact same effect.
Hope this helps.
hans
Thanks for the quick reply!
Yes I considered using two strings but I want to use this as one setting on a string of lights that will be on my Hexacopter. I build a lot of multirotors and airplanes for night flying and I want to add 2812 LEDs to my tool box. Woodie Copter Thread
The plan is for the LED strip to wrap around the craft with the center of the strip on the nose of the craft and the two ends at the back. This will allow for different color patterns and I think the fire would look good coming from the center and down each side. I could even pass it a speed parameter so the flames grew longer as the airspeed increased.
Barn
Barn Blanken
Hi Barn,
That looks like an awesome project!
A hexacopter – Nice!! I just sold my DJO Vision (only quad copter, I know) since I wasn’t using it for a few years now. But; it’s awesome gear to play with (if you’re allowed to use it in your area haha).
Did you want the “2” flames to behave differently? Or is it OK that they behave identical. If identical is OK, then you could place 2 strands (or more) in parallel. If they should behave differently, then coding may become a challenge and using 2 ESP’s or Arduino’s maybe much easier (although I’m aware that it will add unwanted weight).
Keep us posted, I love these kind of projects!
hans
Bonjour Hans
Je suis nouveau dans la programmation de l’arduino ,je trouve génial de faire partager ton savoir sur la programation
J’ai un problème sur un modèle que j’ai copie du 18 novembre 2016 – 07:52 j’ai fait un copier /coller et quand je le compile, IDE m’a
renvoyé comme erreur ‘ Led ‘ does not name a type
#include “FastLED.h”
#define NUM_LEDS 60
Leds CRGB [NUM_LEDS]; ici j’ai remplace par GRB IDE me met toujours erreur
#define PIN 6
void setup ()
{
FastLED.addLeds <WS2811, code PIN, GRB> (leds, NUM_LEDS) .setCorrection (TypicalLEDStrip);
}
merci beaucoup si tu me trouve une explication
Marc
marc monneron
Hi Marc,
apologies, my French is really bad, but from what I can understand, you have a typo. In your code:
should be:
Two problems: you swapped “leds” and “CRGB” and you typed “Leds” instead of “leds”.
Hope this fixes the issue
hans
Saut Hans
Merci de m’avoir répondu aussi rapidement.
J’ai corrigé en mettant leds avec minuscule toujours pareil message d’erreur ( leds does not name a type )
#include "FastLED.h";
#define NUM_LEDS 60
leds CRGB [NUM_LEDS];
#define PIN 6

void setup () {
  FastLED.addLeds  (leds, NUM_LEDS) .setCorrection (TypicalLEDStrip);
Merci
Marc
marc monneron
Hi Marc,
you still have to change the line
to
First indicate type (CRGB) and then provide the variable name (leds) and the array size ([NUM_LEDS].
hans
bonjour
toujours des problemes
#include <FastLED.h>
#define NUM_LEDS 60
#define LED_TYPE WS2811
CRGB leds [NUM_LEDS]; si j’ecris CRGB leds [NUM_LEDS] en compile il me met (variable ou champ “FadeInOut” déclaré vide)
#define PIN 6
void setup ()
FastLED.addLeds <WS2811, code PIN, GRB> (leds, NUM_LEDS) .setCorrection (TypicalLEDStrip);
je ne suis pas doué
Marc
marc monneron
At the beginning of your code, you should see this:
Your error message however seems related to another issue.
Can you post the fadeout function you have in your code?
hans
[…] a really captivating article on Tweaking4All illustrating the various effects (firelight, bouncing-balls, chasers, etc) that can be easily […]
Very good learning tool. Thank you.
I am having issue with The New KITT. I split the program to just use the outside to inside and inside to outsideI also split the lights using 2 – 8×5050 adafruit LED. I have set the LEDS to //0xff, F175FF, 0xff, 1, 50, 10
it all works, but my problem is that the number 8 LED blinks on and off going to and returning from the number 9 LED.any ideas how to remedy this? If i make the eye bigger am sure it might work but using such a small amount of LEDS will take away the effect
Daron
Hi Daron,
Thanks for the compliment – it’s much appreciated!
So you have 2 strips of 8 LEDs – did you connect the end of one strip to the beginning of the other strip (Dout->Din, GND->GND, +5V=>+5V)?
If looking at this part of the code (as an example):
You may want play with the values in the for loop.
hans
Hey
Thanks for this awesome tutorial.
I use a Teensy 3.2 with the OCTOWS2811 adaptor for my Christmas light and wanted to use some of these effects for it. I came up with this bit of a modification for anyone wanting to use the OCTOWS2811 Library for the Teensy. I’m still new to the coding side but this works a treat for my display.
Oh and the 5 Colour Bouncing balls looks great on the house !
#define USE_OCTOWS2811
#include <OctoWS2811.h>
#include <FastLED.h>
#define NUM_LEDS_PER_STRIP 50 // Led’s per strip
#define NUM_STRIPS 2 // Number of strips …..Max 8 per Board
int NUM_LEDS = (NUM_LEDS_PER_STRIP * NUM_STRIPS);
CRGB leds[NUM_STRIPS * NUM_LEDS_PER_STRIP];
// Pin layouts on the teensy 3:
// OctoWS2811: 2,14,7,8,6,20,21,5
void setup() {
LEDS.addLeds<OCTOWS2811>(leds, NUM_LEDS_PER_STRIP);
LEDS.setBrightness(30);
LEDS.show();
}
// *** REPLACE FROM HERE ***
// *** REPLACE TO HERE ***
void showStrip() {
#ifdef ADAFRUIT_NEOPIXEL_H
// NeoPixel
strip.show();
#endif
#ifndef ADAFRUIT_NEOPIXEL_H
// octows2811
LEDS.show();
#endif
}
void setPixel(int Pixel, byte red, byte green, byte blue) {
#ifdef ADAFRUIT_NEOPIXEL_H
// NeoPixel
strip.setPixelColor(Pixel, strip.Color(red, green, blue));
#endif
#ifndef ADAFRUIT_NEOPIXEL_H
// FastLED
leds[Pixel].r = green;
leds[Pixel].g = red;
leds[Pixel].b = blue;
}
#endif
void setAll(byte red, byte green, byte blue) {
for(int i = 0; i < NUM_LEDS_PER_STRIP*NUM_STRIPS; i++ ) {
setPixel(i, red, green, blue);
}
showStrip();
}
Joel
Hi Joel,
thanks for the compliment and awesome that you’re posting your modification for the Teensy/OCTOWS2811 combination as well! Well done and I’m sure others will benefit from this!
And as for the bouncing balls on the house; one user here used it on the side of his house, running along the roofline – it looks absolutely awesome!
hans
[…] played around with some code I found online. I combined some different code from Tweaking4all and came up with four different LED light modes. One calm, one semi calm, one a bit hectic and one […]
Hey,
Im trying to use the running lights effect with an arduino uno and a ws2812B led strip, but the leds are only flickering. I’ve copied the base code and the code for running lights but it doesnt seem to work for me. What could i possibly have done wrong?
AlfredK
Hi Alfred,
I haven’t seen any flickering in any of my projects. So a few things I’d check;
1) Make sure power is setup adequately – if the power source is not sufficient, things may become unreliable.
2) I read something here about interrupt issues, but that pertains more to ESP like setups; one comment that may help:
A couple things to try is either:
Or
But I doubt it will make a difference for your setup.
3) I read in some posts the comment to verify ground (GDN) connections as well.
4) Did you use the right kind of resistor? I did read about a guy that used 470 KiloOhms instead of 470 Ohms.
5) Are you adding any other code that may interfere?
hans
Thanks for your reply.
It seems to be something wrong with the running lights code, because all the other effects are working fine. I´ve gone through the five suggestions u gave me, but it doesnt seem to help.
Anyone else having problem with the running light effect?
AlfredK
Amazing list!.
One question.
Is there a way to set up a button or something to where you can cycle through two or more of these?
I am still pretty new at this and could use the help.
Thanks
DaveTheGeek
Hi Dave!
You may want to check out this article where I combined all in one sketch and a button to toggle effects.
hans
Thanks. I’ll take a second look.
David Stalvey
Perfect.
Thanks for all the hard work!
DaveTheGeek
Awesome!
hans
[…] We had found two different codes for the two light behaviors, one called ‘colorwipe’ and one called ‘meteor rain’, both found in this list of effects: https://www.tweaking4all.com/hardware/arduino/adruino-led-strip-effects/ […]
Hi Hans
And as everybody here I am very happy for your thorough tutorials here!
I as a newbie have a question that I am struggling with, have tried different ideas here in this thread but none works…
I have a neopixel strip that I would have the whole strip showing a rainbow transition with the FadeinOut function but the “pause” between the color shifts are very fast! cant think of any more ways to try this…
Any help would be great!
perolalars
Hi Petrolalars,
Not 100% sure what you mean. You want a delay between each of the FadeInOut line? Something like this:
void loop() {FadeInOut(0xff, 0x77, 0x00);
delay(1000); // <--- delay a second
FadeInOut(0xff, 0x00, 0x00);
delay(1000); // <--- delay a second
FadeInOut(0x00, 0x1a, 0xff);
delay(1000); // <--- delay a second
...
Or do you mean the fading is too fast?
Then change the 2 delay lines (see below):
void FadeInOut(byte red, byte green, byte blue){
  float r, g, b;

  for(int k = 0; k < 256; k=k+1) {
    r = (k/256.0)*red;
    g = (k/256.0)*green;
    b = (k/256.0)*blue;
    setAll(r,g,b);
    showStrip();
    delay(5);  // <--- change this number: Higher = slower
  }

  for(int k = 255; k >= 0; k=k-2) {
    r = (k/256.0)*red;
    g = (k/256.0)*green;
    b = (k/256.0)*blue;
    setAll(r,g,b);
    showStrip();
    delay(5);  // <--- change this number as well: Higher = slower
  }
}
Hope this helps
hans
Hi Hans
And thanks for reply!
Right now I am not with my led strip so cant try your suggestions but I know how to slow down the fadin/out speed, so it is going nice and soft but when the motion changes color it changes it fast, like a hickup.. so I will try your first tip, did not know that one could place a delay in between the colors.
Is there a third way of making the transition from one color to another smoother and still have control over the overall length?
I imagine the motion like breathing in and out slowly…. like a sinus curve and not a bouncing ball. Hope you understand what I mean?!
Best regards
Per
perolalars
Hi Per,
when using FastLED, you could try the build-in functions of FastLED to FadeIn and FadeOut – which will probably be smoother.
I do not have my gear near me either, but I can provide a link to the FastLED documentation on Dimming and Brightening Colors.
Hope this helps.
Note: FastLED in general seems better than NeoPixel when it comes to these kind of things.
hans
Hi Hans
Will check it out!
When using FastLED is it just to put in the led-type (ws2812) or do I have to specify something more than that?
And a second question: Is there a way to make FastLED to loop all through a rainbow spectrum (not specify every specific color) and fade out/in on every color-change? Because now it seams that neopixel goes more fast past the yellow and red color then the blues and greens…
perolalars
Hi Perolalars,
I have posted the changes in this article for FastLED – it should work right away if you copied the code here (just make sure to include FastLED of course). Pretty straight forward.
FastLED can work with a long list of other LED strips, not just the WS2812.
When I worked on the Meteorrain, I noticed that FastLED performs MUCH better. Experiment with it and you’ll see
hans
[…] Last Tuesday we went down to talk to Halfdan in the intermedia lab, and he gave use a Ledstrip which we could use. It meant that I needed to figure out how we could control the led strip. I figured that three states would be fitting for the light, to create the interaction we want. A stage where no light is turned on, a stage that turns the LEDs on, one at a time (to give a time aspect), and a pulsating stage that creates a puls between the users. Here I went to find some inspiration on the internet. I found a great site, which had a code, and a lot of LEStrip effects, I could use to find an effect that fits our need. https://www.tweaking4all.com/hardware/arduino/adruino-led-strip-effects/ […]
[…] https://www.tweaking4all.com/hardware/arduino/adruino-led-strip-effects/ […]
Hi,
This is all incredible, thanks so much for putting it up!
I was looking at the fade in / fade out function… I wanted to adjust how quickly the fade happens but as I’m not much of a coder I couldn’t really figure out what part of the code controlled how quickly the transition happened?
Any advice would be greatly appreciated!
David
David
Hi David!
Hans will probably answer this but since I also had this query check out my posting at: https://www.tweaking4all.com/hardware/arduino/adruino-led-strip-effects/#comment-246411
Hope it will answer some of your questions!
Regards
Per
perolalars
Thanks so much! adding the delay was just what I needed! Much appreciated!
Still need to figure out how it works though…, is ‘FadeInOut’ a function, called into this script? Would it be possible to get the fade out to only go half way? ie. LEDS stay lit, just get brighter and dimmer?
Apologies for my basic code knowledge, hopefully that vaguely makes sense?
David
David
Hi David,
thank you very much for the compliment and the thank-you note!
The function FadeInOut() is indeed a function called from the main loop(). However, the FadeOut part is based on what the FadeIn is doing. So if you’d take out just the FadeOut part, then you may not get the desired effect. In other words, lets say that you do a FadeInOut for the color red, then the FadeOut part is based on that you start with the color red.
You could stop it half way though, for example:
void FadeInOutHalfWay(byte red, byte green, byte blue){
  float r, g, b;
  float maxBrightness = 255;  // <-- add
  float minBrightness = 128;  // <-- add

  for(int k = 0; k < 256; k=k+1) {
    r = (k/256.0)*red;
    g = (k/256.0)*green;
    b = (k/256.0)*blue;
    setAll(r,g,b);
    showStrip();
  }

  for(int k = maxBrightness; k >= minBrightness; k=k-2) {  // <-- change
    r = (k/256.0)*red;
    g = (k/256.0)*green;
    b = (k/256.0)*blue;
    setAll(r,g,b);
    showStrip();
  }
}
I have not tested this, but I’m pretty confident this works. The function is called the same way as FadeInOut().
p.s. if you change “k=k-2” to “k=k-1” the fade will go slower and “k=k-3” will make it go faster.
Hope this helps
hans
Amazing Hans,
Thank you again, I will give it a go!
Kind Regards
David
David
Sorry wrong link, a little higher up! https://www.tweaking4all.com/hardware/arduino/adruino-led-strip-effects/#comment-246360
perolalars
And I finally used the FastLED script! Much smoother then Neopixel!
perolalars
Thanks for chiming in Per!
hans
Hi Hans.
I must say what a great tutorial.I am a total beginner and also 60 so please try to bear with me.I would very much like to get the Running Light program running.When I try to compile it I am getting several error messages including one saying something like “can not be compiled for Arduino Uno.What I am after is your running light effect but with a gap of say 8 led’s in between each moving bank.I do have a small sketch that will run one bank of 4 led’s but I can not work out how to have multiple banks running at the same time i.e chasing.Sorry if that doesn’t make sense.
Thank you for your time.
bbkhawk
Hi Bbkhawk!
Welcome to Tweaking4all and thank you so much for the compliment!
Compiler errors:
Some older Arduino IDE’s show some bugs/issue that may cause this, so I’d start with downloading the latest version. You can find the latest version of the Arduino IDE here. If that doesn’t resolve the issue, the please feel free to post the error message here. If it’s a very long list, then please consider posting it in the forum (just to avoid that the comments do not become too lengthy here).
Running strands in parallel:
The easiest way to do this is by connecting the strands in parallel. So connect GND to GND of both strands, +5V to +5V (or Vcc) or both strands, and Di (Data input) to both strands. They should run identical after that. In the sketch you only have to enter the length of one strand. For example, you have to strands of 8 LEDS (16 total), det the number of LEDs to 8.
Hope this helps,…
hans
Just wanted to say thank you very much. I bought a set of strip LEDs based on sk6812 RGBW and I had problems finding sketches that would work with them properly. Thanks to you and the neopixel side of things these work great. If you own these sk6812 RGBW LED strip just change the pixel type to:
mysticforce
Hi Mysticforce!
Thank you very much for the thank-you note! It’s very much appreciated.
Posting your code for the sk6812 is also very much appreciated as others will benefit from this for sure!
Thanks!!!
hans
Count me in as an “other” who benefited. I tried to get FastLED to work with my SK6812 RGBW, including one of the published tweaks to wedge in the extra byte, but was unsuccessful. Was quite frustrated, until I found this posting.
Mysticforce’s ‘type’ line worked on the first try! (using NeoPixel’s strandtest sample code)
Many thanks!
JohnGo
Awesome!
Thanks for confirming!
hans
Hi Hans,
Thank you and you are very welcome.I bought my Arduino 2 weeks ago and the IDE is 2 weeks old too.Also I have only one strand of 150 leds.
bbkhawk
Hi Bbkhawk!
You’re welcome!
Well, I guess it’s not the IDE, you are up to date – reading back I think I may have misinterpreted your question.
So the effect you’re looking for is basically a small group of LEDs running?
What is your code and what errors do you get?
hans
Hi Hans,
It was your code for the running light on here. Running Lights I will have to re run the code to get the errors again.I am using an Arduino Uno by the way.
bbkhawk
Hi Bbkhawk,
can you post the error messages here? (unless it’s really long, then please consider using the forum, or email me at webmaster at tweaking4all dot com)
hans
Hi Hans,
Sorry for the late reply.I compiled the sketch again and I do not know why but it compiled fine no error messages (strange).Though it compiled all leds were off.
bbkhawk
If the LEDs remain off: verify the GND, +5V (Vcc) and Din connections from Arduino to LED strip. Make sure Din is connect at the correct end of the strip. If there are arrows, then the arrows should point away from the pin.
hans
Hi there. Thank you SO much for these tutorials and codes, and I see that you are extremely helpful in answering questions.
I’m new at this and just barely bought my arduino and lights, haven’t even started learning to code yet, but I think I’ll catch on quickly.
I want to do the Cylon with a twist. I want to have each individual LED to have a dedicated color. For example, Maybe LED’s 1-4 be Blue, 5-10 be Red, 11-24 be Pink, etc. And the light then bounces but those LED’s don’t change colors at all – each LED stays the same color at all times when illuminated.
I assume that’s an easy fix for someone who knows what they’re doing?
Thanks, Jim!!!
Jim Jepson
Hi Jim,
thank you very much for the “Thank you” note and compliment – it’s very much appreciated!
I’ll have to think about this one for a minute – I’m on vacation, so I do not have any of my gear with me.
So what I’d do is create an array of colors, matching the number of LEDs, and change the setPixel() call to basically toggle a LED on or off based what’s in the array. Having said that: it will take a minute to figure something out code-wise to show this. I’ll give it a try later tonight.
hans
Awesome. Thank you, Hans!!
jjepson
I’ll be flying back to Europe this Monday – so hopefully I get some time when I get back.
hans
First attempt, without having my gear near me;
I’d start with an array defining the colors. The size of the array will depend on the number of LEDs you have.
We could define a color for each LED or for several “ranges”. I’d start with individual LEDs, since that’s easier to deal with and the most flexible. So an untested example for 10 LEDs could be:
byte LEDColors [10][3] = { {0xff,0,0}, // LED 0 red
                           {0xff,0,0}, // LED 1 red
                           {0xff,0,0}, // LED 2 red
                           {0,0,0xff}, // LED 3 blue
                           {0,0,0xff}, // LED 4 blue
                           {0,0,0xff}, // LED 5 blue
                           {0,0,0xff}, // LED 6 blue
                           {0,0xff,0}, // LED 7 green
                           {0,0xff,0}, // LED 8 green
                           {0,0xff,0} }; // LED 9 green

void loop() {
  CylonBounce(0xff, 0, 0, 4, 10, 50);
}

void CylonBounce(byte red, byte green, byte blue, int EyeSize, int SpeedDelay, int ReturnDelay){
  for(int i = 0; i < NUM_LEDS-EyeSize-2; i++) {
    setAll(0,0,0);
    setPixel(i, LEDColors[i][0]/10, LEDColors[i][1]/10, LEDColors[i][2]/10);
    for(int j = 1; j <= EyeSize; j++) {
      setPixel(i+j, LEDColors[i][0], LEDColors[i][1], LEDColors[i][2]);
    }
    setPixel(i+EyeSize+1, LEDColors[i][0]/10, LEDColors[i][1]/10, LEDColors[i][2]/10);
    showStrip();
    delay(SpeedDelay);
  }

  delay(ReturnDelay);

  for(int i = NUM_LEDS-EyeSize-2; i > 0; i--) {
    setAll(0,0,0);
    setPixel(i, LEDColors[i][0]/10, LEDColors[i][1]/10, LEDColors[i][2]/10);
    for(int j = 1; j <= EyeSize; j++) {
      setPixel(i+j, LEDColors[i][0], LEDColors[i][1], LEDColors[i][2]);
    }
    setPixel(i+EyeSize+1, LEDColors[i][0]/10, LEDColors[i][1]/10, LEDColors[i][2]/10);
    showStrip();
    delay(SpeedDelay);
  }

  delay(ReturnDelay);
}
Note that I replaced “red” with LEDColors[i][0], “green” with LEDColors[i][1], and “blue” with LEDColors[i][2].
Keep in mind that counting LEDs (and arrays) start with “0” for the first item.
To use more LEDs, you simply do this for example for 20 LEDs:
byte LEDColors [20][3] = { {0xff,0,0}, // LED 0 red{0xff,0,0}, // LED 1 red
{0xff,0,0}, // LED 2 red
{0,0,0xff}, // LED 3 blue
{0,0,0xff}, // LED 4 blue ... etc
{0,0,0xff}, // LED 15 blue
{0,0,0xff}, // LED 16 blue
{0,0xff,0}, // LED 17 green
{0,0xff,0}, // LED 18 green
{0,0xff,0} }; // LED 19 green
Each color (LEDColors[x]) has 3 values ([3]) to represent a color (as you have seen with other effects).
Like I said: I have not tested this, I’m typing this while waiting for my plane ride to Europe, so I hope I didn’t make any typos.
hans
p.s. if you want to read up on arrays, check this out: Arduino Programming for beginners – Arrays.
hans
Hey Hans. I got it to work almost perfectly, with a few glitches.
First, my string of LED’s needs to be about 42 lights (it needs to fit into a slot and I don’t know the exact width, but let’s say 42 LEDs for now). I cut my strand of lights to 44, giving space for a light in front and light at the end to bleed over just in case.
I included a new line and color definition so there are now 42 lines of code. Here’s where the problem comes in.
In your code, you had it set up for 4 EyeSize as such “CylonBounce(0, 0, 0, 4, 10, 50);”
I like it better with either 5 or 6 EyeSize (5 here), and a little slower (20 SpeedDelay) CylonBounce(0, 0, 0, 5, 20, 50);
The problem is, if I make the EyeSize larger, then the last color begins to disappear.
I see that the array is changing colors at a certain time interval, but I can’t seem to figure out how to speed that up slightly or slow it down, depending on the EyeSize. Even if I slow down the SpeedDelay, it still doesn’t make a difference.
if you want to test it out yourself, set the EyeSize to 6 or higher and the last color won’t be there at all.
Also, as mentioned, there are an extra 2 LEDs in the string that I want to be null, but for some reason, those last 2 are illuminated constantly – 43 is Blue, and 44 is Green.
Other than that, this is awesome and it’s fun to tweek!!!!
jjepson
Hey there
Just got back to Europe – I will have to dig up my gear and make a setup to do some tests (I’ll have to do that anyway, for another request), nut that may not happen today.
I’d first make sure it works well without the fixed colors – just to rule out issues with the experimental code.
Looking at the original code: Try a larger number for the speed delay, for example CylonBounce(0, 0, 0, 5, 200, 50).
LED strips are fun to play with right?
hans
Hi.
The know of some code to perform matrix digital rain .
Thanks
Jon
Hi Jon,
I’ll try to write some code for that. Shouldn’t be to hard. Just bear with me for a bit – I just returned from vacation, so I may not get to it right away.
hans
Hi.
OK, there’s no hurry…
Thanks
Jon
Hi, Is there any new news?
Thanks
Jun
Hi Jon,
My sincere apologies; I have to say that I have not made any progress with this.
Sometimes things spin a little out of control here and the heatwave of the past weeks (we have no AC!) most certainly didn’t help.
Just for my understanding: The Matrix Rain would probably use multiple strands – this would of course not fit the strands we use in these effects, unless you want it just for one strand. If that would be the case, wouldn’t it be very similar to Meteor Rain?
hans
Hi
Thanks for the sharing. I have one question on it.
I’m trying to add a button to this project, when press a button, it will activate the effect, when release it stop.
I add some coding as below:
—————————————————————————————————————–
if (buttonState == HIGH) { meteor effect coding
} else { setAll(0,0,0);
}
——————————————————————————————————————
However, it show ‘meteorRain’ was not declared in this scope
What should I do to fix the error?
Thanks
joe
Hi Joe,
Usually this happens because of a typo (assuming the function meteorRain() can be found in your code) – either a typo or you forgot an accolade or semi-colon somewhere.
I’m assuming your code is placed in “loop()” ?
hans
Hi Hans,
Thank you so much for putting together this outstanding resource! I’m working with a group of teens who are creating an installation and lighted costumes with Arduino and WS2812 strips, and your site has been invaluable. Unfortunately we’re short on time before these have to be displayed, so we’ve only been able to teach the kids the basics of working with Arduino and playing with the parameters for the desired effect. I’m also coming from the costume design side, so have been learning pretty much at the same time! We have a few questions for you, if you have the time to give them some thought. Thank you!
1) One of the students wants to combine Meteor Rain and Rainbow Cycle, or at least achieve a simiultaneous rainbow effect with Meteor Rain rather than one color at a time. We’ve tried playing with the two codes but with no luck—any suggestions?
2) We are trying to coordinate the code with a song, and have each effect run for a certain amount of time then change when it reaches the next verse. I think that without the time requirements the code would be pretty similar to your sketch with all the effects compiled, running one after the other. have timestamps for the song, and I’ve been trying to figure out millis(), but am struggling with how to use it. Is there a relatively simple way to do this?
3) We are trying to control multiple LED strips with one Arduino unit; all would be running the same code at the same time. Is there a way to define multiple pins using the NeoPixel library?
Thank you very much; hope this isn’t too much of a question dump!
—Ali
Ali
Hi Ali,
apologies for the late response – I just returned from a trip, and you do have quite a few questions haha ….
Thanks you very much for the compliments, I very much appreciate it!
As for your questions:
1) Meteor Rain + Rainbow Cycle.
I did get another request recently, asking for something similar. This would involve modifying the showPixel() call, so it uses a fixed color. This will require some time for me to build. Ideally you’d have either an array with predefined colors, or a function that calculates the color.
2) Sync with a song based on time stamps.
Well, that is indeed an interesting one … it would be quite complicated to have it sync with music without timestamps – but timestamps only works of course when you have predefined the song (and time stamps). For this we’d probably need timed interrupts – a seemingly complicated topic (see also this link). I may want to write an article about that in the future … haven’t done anything with this yet. Maybe the provided link will help (even though this might be a little too much for your students). In essence you set a “timer” that triggers an event (function call) when that time arrives.
3) To run multiple LED strips simultaneous you can apply a simple trick: connect a LED strip as usual and place the other LED strips in parallel, meaning: connect +5V, GND and Din pins of the strips all to the same point (like the first strip).
Hope this helps a little bit …
hans
Hey,
I found this article extremely helpful with using multiple strips, effects, and timing with the Arduino.
You can basically use the code in the article and swap out the effects for any of Hans’ ones.
https://learn.adafruit.com/multi-tasking-the-arduino-part-3/overview
Adam V
Thanks Adam! Great find!
hans
Hello:
In the RunningLights function, both the inner loop and outer loop use i as the for counter. Shouldn’t one of the loops use a different variable?
Thanks,
Greg
Greg
Hi Greg,
Awesome and great catch!
Not sure why it actually works hahah … I do not have my gear nearby to test, but I’d change the code to:
void RunningLights(byte red, byte green, byte blue, int WaveDelay) {
  int Position=0;

  for(int j=0; j<NUM_LEDS*2; j++)  //                <-- only in this line, changed "i" to "j"
  {
      Position++; // = 0; //Position + Rate;
      for(int i=0; i<NUM_LEDS; i++) {
        // sine wave, 3 offset waves make a rainbow!
        //float level = sin(i+Position) * 127 + 128;
        //setPixel(i,level,0,0);
        //float level = sin(i+Position) * 127 + 128;
        setPixel(i,((sin(i+Position) * 127 + 128)/255)*red,
                   ((sin(i+Position) * 127 + 128)/255)*green,
                   ((sin(i+Position) * 127 + 128)/255)*blue);
      }

      showStrip();
      delay(WaveDelay);
  }
}
Can you confirm this works?
hans
Thanks for the confirmation Greg,
I’ve updated the code to reflect this change …
hans
[…] https://www.tweaking4all.com/hardware/arduino/adruino-led-strip-effects/ […]
Hello Hans,
thanks for this great article. It gave me a lot of inspiration. While playing with the different effects, I had the idea to create some c++ classes for each effect. Then, I noticed that there are common lines of code in each class, so a base class for effects came into being. Reading this forum I saw questions about running effects in an other direction etc, each resulting in new code for an effect. My idea was, to develop a virtual strip that can be arranged on a physical one, to change direction or offsets or whatever with a few parameters.
For example, this peace of code runs two meteor effects starting from the mddle of a strip runnig simutaniously to the ends:
I am happy to share my work with everyone who is interested. I guarantee that it is not perfect but hopefully you find it useful. Please see https://github.com/ArminiusM/Neopixel .
Armin
Hi Armin,
thank you for sharing! That looks pretty good if you ask me!
I like the additional effects like “flag”. Well done!!
For those interested; visit the github link mentioned!
hans
Hello,
Still appears to be something wrong with the running lights code.
AlfredK
Hi AlfredK,
can you be more specific?
hans
Hello. Let me start with the fact that I’m weak when it comes to arduino and these things. He tries to create the code from these animations which will change them after pressing the button. I have never succeeded. I was looking on the internet but there was nothing there, only ugly animations and which I could not change for yours. I am sending this code maybe you can do something. My English is not good. I am waiting for a response. Thanks
… very long source code removed and place in this forum post …
Mateusz
Hi Mateusz,
apologies that I moved your code to the forum – it was just way too long to keep it here in the comments.
Please proceed to this post in the forum.
hans
If you’re looking for all effects in one sketch, and toggle the effects with a button press, the consider reading this article: All Effects in One.
hans
Hello,
I have one problem because I’m trying to do it using a digispark board that does not support eeprom. I’ve removed all eeprom things from the code, but another error is showing, could you rewrite this program so that you do not use eeprom.h? Thanks.
mateusz
Hi Mateusz,
I’m not familiar with the DigiSpark board, but for the trick that I use here, you will need the EEPROM support. After selecting a new pattern, a reset is done, and the value of a given variable will be lost. So without EEPROM you’d be stuck at the first effect.
hans
Hello!
Thank you so much for your excellent work coding and documenting and sharing!
My projects will get a Great benefit from your efforts and I Sincerely appreciate it!!!
Ryzilla
Thank you Ryzilla!
It’s very much appreciated that you took the time to send a thank-you note!
When your project is done, feel free to share it here!
hans
Since you are powering up the LED strip with a 5V wall-wart is there any reason to be concerned with the current draw from a long strip of 5 Meters? Or a 1M strip with 144 LED’s?
Is it possible to wire this up with a ULN2803A darlington DIP ?
Barney Rubble
Hi Barney,
as a rule of thumb I calculate 20mA per LED (where LED is actually a white little block on the strip, containing 3 actual LEDS, one for red, green and blue).
So for 144 LEDs, I’d look for a power supply that can provide 3A (a little more than 2880 mA). Assuming that you use 144 LEDs total.
Note:
In most LED strips, as far as I know, each LED pulls 20mA max. If you consider that there are 3 actual LEDs (red, green, blue) in each “LED block”, then with 144 LEDs, you’d actually have 432 LEDs. Or in other words: each LED block pulls max 60mA.
So if you would have the entire 144 LED strip lit up at max strength, it would pull 8640 ma (a little less than 9A, which typically results in a 10A power supply).
Now keeping in mind that most effects just use a fraction of the LEDs, and/or a fraction of it’s max brightness, and the fact that most power supplies can very briefly pull a little more than their specs; I found that the 20mA per LED block rules works pretty well. I have tested this with 300 LEDs as a backlight for my TV, and the power-supply didn’t even get warm – it is a good idea to monitor if the power brick gets hot or not for a bit. If you want to be 100% save, then assume worse case scenario: 60mA per LED block.
I hope this helps.
hans
Forgot about the Darlington question;
Since I never had a use for one of these, I looked at the specs: The ULN2803A device is a 50 V, 500 mA Darlington transistor array. So if you want to control the full load with this, then I’d say 500 mA isn’t going to cut it. But then again; I have not had a use for any of these (yet), so I’m not sure when and how you’d want to apply this.
hans
I have been working on a virtual pinball machine over the past 6 months. it’s run by a PC with a added microcontroller to handle all cabinet button pushes and game feedback (contacters, LEDs, …) it seams that the most difficult part is to interface the pinball software to run addressable rgb strips. I am using a KL25Z as my microcontroller but interested in bringing a Arduino into the mix for the strips. most use a Teensy. The trick is to trigger the RGB strips in responseto in-game events.
Barney Rubble
Hey Barney Rubble
Sounds like an interesting project! Sending data from a PC to a microcontroller can be challenging at times – you’ll need to talk to the “serial” port presented over USB to your Microcontroller. The Arduino supports this out of the box, you’ll need to do some programming on the PC though. You would be able to send whatever code you have in mind to trigger an effect.
Having said that, and depending on the OS you’re using to develop your virtual pinball machine, maybe the Raspberry Pi may be a good alternative as well? The RPI3 is reasonably powerful, very affordable and … it has plenty I/O pins to work with (controller, LED strip, etc).
hans
Hi . im trying to change strobe color to red . Changing numbers dont making all leds to be red .
jama
Hi Jama,
I assume you’ve tried this?
I’m looking into the code and cannot see why this wouldn’t work.
Doesn’t it have any effect? Or just not the correct colors?
hans
Hi Hans,
Firstly thank you for posting these up. They are incredible (especially the meteor!).
I have a very simple error I can’t resolve.
I am trying to run your code along side some other code on a single arduino, with your code going first or last. However I’m getting a expected unqualified-id before ‘{‘ token.
Your code and my code work perfectly separately, but do not work when I run them simultaneously. Can you offer any advice please??
Thank you,
Jake
Jake
Hi Jake,
sounds like you’re looking at a typo.
Maybe you can post the code in the Arduino Forum? Or if you do not like the code to be public; email me the code (webmaster at tweaking4all dot com).
I’d prefer the forum so others can learn from it as well, but I’d understand if you’d want the code to remain private.
Just looked at your website; nice projects!
hans
wow these effects are great.
can you tell me how to change the base color of the fire effect from orange/red to blue/green?
Thanks!
CRAIG
Hi Craig,
thanks for the compliment
You can look in the function setPixelHeatColor();
void setPixelHeatColor (int Pixel, byte temperature) {
  // Scale 'heat' down from 0-255 to 0-191
  byte t192 = round((temperature/255.0)*191);

  // calculate ramp up from
  byte heatramp = t192 & 0x3F; // 0..63
  heatramp <<= 2; // scale up to 0..252

  // figure out which third of the spectrum we're in:
  if( t192 > 0x80) {                     // hottest
    setPixel(Pixel, 255, 255, heatramp);
  } else if( t192 > 0x40 ) {             // middle
    setPixel(Pixel, 255, heatramp, 0);
  } else {                               // coolest
    setPixel(Pixel, heatramp, 0, 0);
  }
}
In the if-section, we determine colors.
I do not have my gear nearby, but you can play with these values:
if( t192 > 0x80) { // hottestsetPixel(Pixel, 255, 255, heatramp);
} else if( t192 > 0x40 ) { // middle
setPixel(Pixel, 255, heatramp, 0);
} else { // coolest
setPixel(Pixel, heatramp, 0, 0);
}
For example to something like this:
if( t192 > 0x80) { // hottestsetPixel(Pixel, 255, 255, heatramp);
} else if( t192 > 0x40 ) { // middle
setPixel(Pixel, 0, heatramp, 255);
} else { // coolest
setPixel(Pixel, 0, 0, heatramp);
}
you’d probably see more of blue. You’ll have to play a little with the values, just keep in mind how setPixel() works;
The “heatramp” is the changing variable, if a color = 0 (eg. Red=0) then this color is off. If a color = 255 (eg. Red=255) then this color is set to mac.
Hope this helps
hans
here is what I did ….
Added a FIRE_BASE_COLOR constant to set the fire color
Just set this to the color you want (note: everything not 1,2 or 3 will result in red flames)
then updated the logic you pointed out with this.
if (FIRE_BASE_COLOR == 1) { // GREEN
// figure out which third of the spectrum we're in:
if( t192 > 0x80) { // hottest
setPixel(Pixel, heatramp, heatramp, 255);
} else if( t192 > 0x40 ) { // middle
setPixel(Pixel, 128, 128, heatramp);
} else { // coolest
setPixel(Pixel, 0, heatramp, 0);
}
} else if (FIRE_BASE_COLOR == 2) { // BLUE
// figure out which third of the spectrum we're in:
if( t192 > 0x80) { // hottest
setPixel(Pixel, heatramp, 255, heatramp);
} else if( t192 > 0x40 ) { // middle
setPixel(Pixel, 128, heatramp, 128 );
} else { // coolest
setPixel(Pixel, 0, 0, heatramp);
}
} else if (FIRE_BASE_COLOR == 3) { // PURPLE
// figure out which third of the spectrum we're in:
if( t192 > 0x80) { // hottest
setPixel(Pixel, heatramp, 255, heatramp);
} else if( t192 > 0x40 ) { // middle
setPixel(Pixel, 128, heatramp, 128 );
} else { // coolest
setPixel(Pixel, heatramp, 0, heatramp);
}
} else { // RED
// figure out which third of the spectrum we're in:
if( t192 > 0x80) {                     // hottest
  setPixel(Pixel, 255, 255, heatramp);
} else if( t192 > 0x40 ) {             // middle
  setPixel(Pixel, 255, heatramp, 0);
} else {                               // coolest
  setPixel(Pixel, heatramp, 0, 0);
}
}
There is probably a slicker way to code this without all the nested if’s
….but hey, it works and I am a lazy coder :/
CRAIG
Hi Craig,
thanks for posting and great to see that it works!

Code looks fine to me, you could of course consider using the switch-case command, which looks nice but is probably not that much better anyway
hans
Is there a way to merge two of these codes to show on 2 different pins? I’m trying to merge codes Sparkle and Fire to run on PIN 6 and 9 respectively. I’m trying to merge the two codes but fail for now. Maybe someone else would want to do that as well don’t you think? Thanks!
Christian Galipeau
Hi Christian!
If you want both effects to run at the same time, then the code would have to be adapted significantly – since the Arduino doesn’t do multitasking or task switching. I suspect this is not impossible though, maybe by using interrupts, or mixing the codes. But it won’t be pretty (the code).
FastLED for example can control more than 1 strip at a time. timing will be a pain though since the Fire effect requires some work.
If they do not have to run in parallel, then it’s relatively easy. You’d have to define the second LED strand and call that one with one of the 2 effects.Something like (see also the GitHub page);
hans
Thank you so much for your answer. Yeah, that’s what I tried and can’t have it to work. What I’ll do is get a second arduino… will be much easier and since they’re cheap, not big budget problem!
Thanks again, wonderful work, keep up! :)
Christian Galipeau
I’d probably go that route as well – unless you have a lot of time on your hands to play with the code. Considering the price of an Arduino; I’d probably go the easier route as well.
Thanks
hans
Thanks man, much appreciated! :)
Christian Galipeau
Hello, I’m planning to do a project with SK6812 based RGBW stripes being installed in the curbstones on both sides and for a length of some 20m. I was reading a lot in the last few days but it looks like that no library is actually prepared to drive the W part of the stripes. Besides that I’m very interested to find out if the affect library will work with the SK6812 on one of the two base libraries as most of the usages in here focus on other controller it looks like. Is there a good place to read of the basics for the SK6812 and RGBW. Sorry for the potential stupid questions of a beginner in this field. Have a great evening and many thanks for any tip / reply.
Hauke
Hi Hauke,
seems this is a known issues. I have never worked with these RGBW LEDs, but did find this guy’s article that shows how this can be done with FastLED. Seems latest FastLED has included it (see this bug report) as well.
Hope this helps.
And keep in mind; The only “stupid” question is the one unasked
hans
Hello,
First of all congratulations for your work…and also for the support (when I see that the 1st message dates from 2015 ;-))
I have a strip with 84 LEDs chained it into 3 chunks of 24 LEDs.
I’d like the Meteor effects to be on all 3 chunks at the same time and not as a serpentine.
I tried to create three array:
but then I don’t really understand how to integrate it into the code…. can you help me
Thank you in advance and have a good day
lololo
Hi Lololo,
thank you for the compliment!
Now I’m not sure who Gerald was responding to (comment below) but this would work for your trick as well.
You have to wire the 3 strips in parallel – this way all 3 will generate the exact same pattern.
So connect +5v, GND and Din (which normally would connect to the beginning of the strand) to the beginning of all 3 strands.
hans
thank you for your reply
The problem is that the 3 strips are not connected parralelle (I have only one strip in serpentine style).
I thought I could do it with this function, but I have a little trouble.
https://plus.google.com/102282558639672545743/posts/a3VeZVhRnqG
I will continue to search
Thank you
lololo
You could do it like this:
Step 1) define the break points by setting the length of each “piece”, and modify the strip length, something like this.
The effect functions utilize NUM_LEDS and since this is the “max” length of each segment, we’ll bring it down to 24.
We do however need the full length to initialize, so we create a new define for that;
#define NUM_LEDS 24
#define REAL_NUM_LEDS 72
#include "FastLED.h"
CRGB leds[REAL_NUM_LEDS];
#define PIN 6

void setup()
{
  FastLED.addLeds<WS2811, PIN, GRB>(leds, REAL_NUM_LEDS).setCorrection( TypicalLEDStrip );
}
Step 2) Create an additional the setPixel function which will call the original setPixel function 3 times. Once for each segment.
void set3Pixels(int Pixel, byte red, byte green, byte blue) {setPixel(Pixel,red,green,blue);
setPixel(Pixel+NUM_LEDS,red,green,blue);
setPixel(Pixel+NUM_LEDS+NUM_LEDS,red,green,blue);
}
and of course keep the old setPixel as well, as it was before.
Step 3) in the meteorRain() function we need to replace setPixel with our new set3Pixels function and we need to make sure the FadeToBlack functions addresses ALL the LEDs by replacing NUM_LEDS with REAL_NUM_LEDS.
void meteorRain(byte red, byte green, byte blue, byte meteorSize, byte meteorTrailDecay, boolean meteorRandomDecay, int SpeedDelay) {
  setAll(0,0,0);

  for(int i = 0; i < NUM_LEDS+NUM_LEDS; i++) {


    // fade brightness all LEDs one step
    for(int j=0; j<REAL_NUM_LEDS; j++) { // <-- change her
      if( (!meteorRandomDecay) || (random(10)>5) ) {
        fadeToBlack(j, meteorTrailDecay );
      }
    }

    // draw meteor
    for(int j = 0; j < meteorSize; j++) {
      if( ( i-j <NUM_LEDS) && (i-j>=0) ) {
        set3Pixels(i-j, red, green, blue); // <-- change here!
      }
    }

    showStrip();
    delay(SpeedDelay);
  }
}
Now the effect should appear on all 3 segments. Since I don’t have my gear nearby to test, I haven’t tested this, but I’m confident it will work, or at least get very close that what you’re looking for.
Note: running 3 led strips in parallel will possibly be faster, but I haven’t tested that.
Hope this helps.
hans
Thank you so much for your help.
It works almost, the row of led in the center is not going in the right direction.
I will try to find for myself ;-)
Have a good day
lololo
Hello,
I played with this using the classes I wrote based on this website and the Adafruit_NeoPixel classes. It is posted at https://github.com/ArminiusM/Neopixel (just copy the AGNeoPatterns folder to your library folder) . Serpentines can be handled. The code is very short, may be it helps:
The NeoPin definition must fit your arrangement. Also, the keepBackground parameter is not yet implemented (just ignore it). The effects repeats when finished. Change random parameter to true for different results.
Armin
does anyone have an example of code to use the FLAME effect as a matrix?
I have a 30 LED strip and I have the flame effect working on it.
I would like to cut the strip into 3 strips of 10 leds that I can put side by side to make a wider flame effect.
Craig
Geralds approach would work just fine!
But I’m guessing you don’t want the 3 strips to be identical?
hans
I run 3 Christmas tree LED strings of 50 each, with one Arduino and a 1 to 3 splitter (3 strings are in parallel),
Gerald Bonsack
Was this a response to Craig (flame) or Lololo (meteor) ? Haha … well, it could work for both!
hans
Hello Hans! Let me say I love all of your articles, and I am really enjoying the learning process of Arduino. I had a request that should be really simple for an advanced coder such as yourself, and I have scoured the internet looking for an option that works to no avail. What I am looking for is 2 things really. I am trying to make a crowd noise meter (VU Meter) that can run on a nano utilizing WS2812B neopixel strips. I have found codes that get me close, but nothing seems to get me to 100%. My only requirements are to have it with variable neopixel count with mic input on A5 and output on pin 6. I would love it to have standard VU colors (green, yellow, red) and to have a peak input hang that is adjustable in both hang time and rebound speed.
Project 2 is probably just as easy. I need to set up a nano with a length of up to 2500 pixels. I want some simple color wash / effects that run on a loop.
If there is ANY chance you can help out with this, I would greatly appreciate it!
Aaron Schlottman
Hi Aaron,
as the questions are not directly related to this article, I’d recommend starting a forum topic.
To get you started;
VU Meter – I’ve been playing with this as well, just never finished it.
If you use a microphone, then you’d need a small pre-amplifier something like this example.
Just a Mic is too “rough” when the Arduino converts analog signal to digital.
2500 LEDs – This is very well possible, you’ll need some serious power supply though (sounds like an awesome project!).
With that many LEDs, you’ll need to make some additional +5V and GND connections between LED strip(s) and power supply. Just connecting it at the beginning of the strand will degrade power (and possibly overload the leads of the LED strip) and LEDs at the end will either not light up or be very dim.
hans
There seems not so much traffic on the Arduino forum here, so I would like the opportunity to link to a question regarding lighting effects and FastLED usage https://www.tweaking4all.com/forums/topic/very-slow-fastled-palette-with-random-shimmer/#post-10926
If someone could help me with the question I posted there, I would be very grateful!
PS: When I paste and edit code here, I cannot insert empty lines, the code breaks up into smaller boxes/elements. What should I do to avoid that so that code becomes more readable?
1234abcd
hans
Hello Hans, I’m using most of the code above for a set of sequences, I’m kind of new to this and was wondering if it was entirely possible to set sequences to be played through different pins?
so perhaps having SnowSparkle on pin 5 while having theaterChase on pin 6?
harry benham
Hi Harry,
it’s probably not impossible, but the Arduino is not designed to multitask. This means that the effects have to be rewritten so that they can do their tasks at the [almost] same time mixed, or a task switching mechanism needs to be designed (if that is even possible).
Considering the pricing of Arduino’s, using a second Arduino is probably a lot easier.
hans
A little while back I asked about controlling multiple strips to create a wide fire effect. With some help from this forum I came up with the following:
CRAIG
Awesome! Thanks for sharing Craig!
hans
Thank you for this amazing insight, really helped me a lot with my DIY project.
Is there any way to use the Fire effect color scheme and loop it like a Rainbow cycle effect? (With colors just subtly cycling along the strip).
Thanks!
Marko
Thanks Marko, awesome to hear you enjoyed it!
As for your question;
you could play with the values in setPixelHeatColor().
It would take some work, but as you can see there are 3 “setPixel” lines in this function, where the base colors are defined for “hot”, “middle” and “cool”. This is where you could make some modifications to accomplish a rainbow effect or use different [possibly changing] base colors.
You’ll have to play a little with it, hope this helps.
void setPixelHeatColor (int Pixel, byte temperature) {
  // Scale 'heat' down from 0-255 to 0-191
  byte t192 = round((temperature/255.0)*191);

  // calculate ramp up from
  byte heatramp = t192 & 0x3F; // 0..63
  heatramp <<= 2; // scale up to 0..252

  // figure out which third of the spectrum we're in:
  if( t192 > 0x80) {                     // hottest
    setPixel(Pixel, 255, 255, heatramp); // <--- "hot" here
  } else if( t192 > 0x40 ) {             // middle
    setPixel(Pixel, 255, heatramp, 0);   // <--- "middle" here
  } else {                               // coolest
    setPixel(Pixel, heatramp, 0, 0);     // <--- "cool" here
  }
}
hans
Ah, wasn’t expecting such a quick answer :)
Thanks a lot Hans, this should do it!
Marko
Cool! Glad I could help!
hans
I am simply amazed with all these effects. However I am a neophyte to Python, Linux and the Raspberry. It seem the Arduino uses a different language to the Raspberry and I am having trouble converting. I have Tony Dicola’s code running but looking for more effects. Alas most of what I have found is for the Arduino?
Any guidance would be appreciated.
Nigel Boubert
Nigel
Hi Nigel,
unfortunately, I have not doen anything with the Raspberry PI and it’s I/O port.
I haven’t done anything with Python either (considered playing with it a while back, but never got the taste for it).
Arduino uses C++ as a standard programming language. In comparison, Python is a language which’s syntax is definitely different than that of C or C++.
So in short; converting will be challenging, not to mention the possibly missing libraries used in the Arduino applications. .
.
The basic routines could be converted by someone with experience in C and Python, but unfortunately, that would not be me
Maybe one of the other visitors here does, and is willing to chime in.
hans
Thanks Hans. Kind of what I thought. I haven’t done any coding for over 20 years and that was on mainframes and mid-range computers so I guess the learning begins again. I’m going to have to study up on C++ as well as Python.
As you say maybe some of the other visitors may have some thoughts.
NIgel
Nigel
No Problem Nigel, wish I could have been more helpful.
If you’re familiar with C, Java or JavaScript, then using C++ should not be a too big a transition.
You could take a peek at a small course I’ve written, it will give you an idea of the syntax. The Object Oriented part of C++ is rarely used or visible to the developer, so it may not be as hard as you’d think.
I am however curious how well the Raspberry Pi will do with timing, as it’s running a full fledge OS.
A few related links that may be helpful are:
hans
I have started porting this code over to Python (so it will work on my RaspberryPie 3 using WS21811).
Code can be found here: https://github.com/DanStach/rpi-ws2811
If you have questions, please post here
hootie
Very Cool!
I see you have done quite some work already on some of the used functions (ws2811-all.py). Keep up the good work!
For those interested in RPI and WS2811/WS2812, this article may be useful as well:
Connect and Control WS2812 RGB LED Strips via Raspberry Pi.
Since I like FastLED better than NeoPixel (library), this may be a promising GitHub project as well:
PiLED (not sure how active development is).
p.s. would be cool if you’d mentioned at GitHub that you derived it from this article.
Maybe mention the link: https://www.tweaking4all.com/hardware/arduino/adruino-led-strip-effects ?
hans
hootie
Awesome! Thanks Hootie!
hans
I have started adding videos of these effects on a christmas tree
youtube playlist can be found here
hootie
Awesome Hootie!
That actually looks very good, and I very much appreciate that you’ve added the link to this page as well!
hans
Nice work Hottie!
Have you tried to make a Python version of Hans’s Fire effect?
I’d like to try it on my itsybitsy ;) but I’m new to all this ^^
thanks
PA
P.A
I have :)
Video: https://youtu.be/fhLvsKJlhH8
Code:
https://github.com/DanStach/rpi-ws2811/blob/03ef8cb4344e075f4762a35d732b6e63f2705492/neopixel-part1.py
line 449: def FireCustom(CoolingRangeStart, CoolingRangeEnd, Sparking, SparkingRangeStart, SparkingRangeEnd, SpeedDelay, FireColor, FireEffect, LoopCount):
example use: FireCustom(0, 2, 90, 0, int(num_pixels/3), 0.02, 0, 2, 300) # red fire
hootie
Awesome Hootie!
Thanks for the great looking video and the link to the source code!
Happy New Year!
hans
[…] I switched to NeoPixel. https://www.tweaking4all.com/hardware/arduino/adruino-led-strip-effects/ and selected Fade in and Out, Meteor Rain and Fire as the […]
can anyone help me how to define brightness in the codeing thx
lucky kang
Hi Lucky Kang,
if you use FastLED, brightness can be controller for all LEDs right from the beginning. I guess my best way to explain this function is that it sets the maximum brightness the LEDs can be set to.
It’s easy to implement.
Something like this (note: this works for FastLED only!):
Hope this is what you’re looking for. As far as I understand, you can call this function (setBrightness()) anywhere in your code.
If you set it right away at the beginning (in setup()), then it dictate brightness for all effects.
hans
[…] FireEffect […]
Hi All,
First of all, amazing post and pieces of code for Arduino and LED strips, which is currently usefull as I’m working on this kind of a project now.
I’m just getting stuck for 2 days and have no clue what can be the root cause or how I can debug this.
Situation:
Using an Ardiuno Uno r3 / Arduino Mega and a LED WS2812 strip with 560 RGB LEDS.
Testedboth all in one code packages (Neopixel and FastLED)
Currently using only one 5V supply to power everything (second supply is ordered to feed the second half of the strip seperate).
Problem:
For certain patterns (like rainbow, color wipe, …) the Arduine get stuck somehow (both Uno and Mega Tested).
For the rainbow efect, I then get something like this when frozen https://ibb.co/MfGwLd4
Also when uploading a change, I first need to unplug the arduino and be quick to upload again before the pattern start again. (I’ll later post the error messages)
If I test this for 60 LED, then it works.
Question
Regards,Ltmini
Ltmini
Since you gave the impression that some other effects do work correctly, I would not expect this to be a hardware (LED strip) issue.
My initial guess;
Yes – Your power supply is not keeping up. Easiest test: set ALL leds to white and see what happens with something like this:
If this fails then your power supply may not be adequate. The fact that the Arduino “crashes” may indicate insufficient power as well.
560 LEDs = 560 x 60mA = 33.6 A (worse case). If ALL the LEDs are not white and at max brightness for a longer time, then somewhere between 11 A and 33A may be sufficient.
I’m not aware of a debug option – it would be great to have that, but since your Arduino freezes, you’d probably get nothing useful out of that even if it would be available. The freeze would prevent the Arduino from sending data back. You could use the serial monitor to output some messages that may help debugging. But again; in this case this may not be useful.
hans
Hello
Many thanks for putting together such a brilliant piece of code. You have saved me many countless nightless night of sleep!
I downloaded your LEDs in one sketch and have successfully managed to upload and run your code.
However, my LEDs Nexpixel strips are configured in a 7 row x 22 column wide setup (i made a visor).
Anyway – when using your code untouched it works but I noticed say with the cylon it displayed oddly. I figured out why. It was because your configuration is for a single row LED strip. So I attempted to frankenstein your code with one that I had been using successfully. Here’s your original part of the code:
#include <Adafruit_NeoPixel.h>
#define PIN 6
#define NUM_LEDS 154
// Parameter 1 = number of pixels in strip
// Parameter 2 = pin number (most are valid)
// Parameter 3 = pixel type flags, add together as needed:
// NEO_KHZ800 800 KHz bitstream (most NeoPixel products w/WS2812 LEDs)
// NEO_KHZ400 400 KHz (classic ‘v1’ (not v2) FLORA pixels, WS2811 drivers)
// NEO_GRB Pixels are wired for GRB bitstream (most NeoPixel products)
// NEO_RGB Pixels are wired for RGB bitstream (v1 FLORA pixels, not v2)
Adafruit_NeoPixel strip = Adafruit_NeoPixel(NUM_LEDS, PIN, NEO_GRB + NEO_KHZ800);
And here’s what I replaced it with:
#include <Adafruit_NeoPixel.h>
#include <Adafruit_GFX.h>
#include <Adafruit_NeoMatrix.h>
#define PIN 6
Adafruit_NeoMatrix matrix = Adafruit_NeoMatrix(22, 7, PIN,
NEO_MATRIX_TOP + NEO_MATRIX_LEFT + NEO_MATRIX_ROWS + NEO_MATRIX_ZIGZAG);
I receive an error when attempting to compile and upload:
(affected part of code below)
void setPixel(int Pixel, byte red, byte green, byte blue) {
#ifdef ADAFRUIT_NEOPIXEL_H
// NeoPixel
strip.setPixelColor(Pixel, strip.Color(red, green, blue));
#endif
And here’s the error:
exit status 1
‘strip’ was not declared in this scope
Any help would be greatly appreciated
kindest regards
thanks
Kayee
orangoo
Hi Kayee!
Thanks for the compliment – love the “Frankenstein” part haha!
Since I have never worked with “Adafruit_NeoMatrix“, I can only guess that this replaces the “Adafruit_NeoPixel” as shown in the code below, which is defined as “strip“;
Your code probably doesn’t have “strip” defined anywhere any more. Instead you have “matrix” defined.
I do not know how “drop-in compatible” Adafruit_NeoMatrix is with Adafruit_NeoPixel – so I don’t even know if replacing the faulty line with:
would work.
hans
Hello again
Thanks for your tips. I think I’ve got my head around most of it! (this is the first time I’ve played with Arduino code)
I’ve managed to compile the code and no errors appears now! It says:
Sketch uses 15884 bytes (55%) of program storage space. Maximum is 28672 bytes.
Global variables use 485 bytes of dynamic memory.
But nothing is happening on the neopixels!
Could I send you the source code for you to see if there’s anything obvious I’m missing please? (i’m respecting the rules here not to post large code)
The source code will consist of my basic code for scrolling text and also your entire code directly beneath that. My scrolling code works by itself but as soon as I add yours I get nothing appearing on the neopixels.
I’ve got a gut feeling it may have something to do with the NUM_LEDS from your code that is not playing nicely.
Very much appreciated if you could spare the time to look into this.
Kindest regards
Kayee
Kayee Tang
Hi Kayee!
Thanks for keeping an eye on the rules – it’s much appreciated!
You can go 2 routes;
1) Start a topic in the Arduino forum – which is good so others can read the fix as well, or
2) Send me the code by email (webmaster at tweaking4all dot com).
Please keep in mind that I do not have any Arduino hardware available at the moment – so I will not be able to test anything.
Also; I will not be able to respond in the next 2 or 3 days.
hans
Hi Hans
Thanks for getting back to me.
I had a eureka moment and decided to start afresh but this time using FastLEDs – and guess what…it works!
One question that you may know the answer and it’s probably obvious from the source code you provided above – I want to combine (or Frankenstein!) my basic scrolling text code with the now working FastLED code of yours. Can I do that this?
Once again – sincerely grateful for your prompt response
(p.s. I’m not one to give up on goals I have set myself!)
kindest regards
Kayee
orangoo
You’re welcome!
Awesome that it now works.
Yeah, that doesn’t surprise me. FastLED has become much more mature than NeoPixel. Or maybe I should say: I like it better than NeoPixel since it is a more advanced and reliable library for controlling LED strips.
Mixing text and effects … I you mean really mixing them / laying an effect over a text; then that may be tricky.
If you want to in sequence; for example show text, remove text and show effect, remove effect and show text, etc. then this should be very do-able.
Simply call you text functions first, when done with showing the text call an effect, etc.
hans
Sorry Hans – I should have been more clearer.
The scrolling text code I have is written using the NeoPixel, GFX and NeoMatrix libraries.
What I’d like to do is add this scrolling text code in addition to your FastLED code in the same sketch
The goal here is to have say the scrolling text code and say five of your FastLED examples so that they work one after another
So not laying my text over your code – it’s to have my text run before or after your code
cheers
Kayee
orangoo
No problem
You can indeed do the codes in sequence. Normally I’d be worried about is mixing libraries (eg. FastLED versus NeoPixel) – since it may cause unexpected results, incompatibility issues, etc.
Now the good news, is that the creator of NeoMatrix seems to have made it FastLED compatible (see this issue, and their Github page states the same).
So you should be good to go.
hans
You are a legend!
I will give this a whirl and see what happens! Pretty excited about this – fingers crossed. I’ll let you know how I get on.
many thanks again for your time
kindest regards
Kayee
orangoo
Haha, thanks! Even though I wouldn’t give myself that much credit, and I’m sure you’ll run into a few challenges anyway. But I hope those will be minor

If you get your project going, maybe you can show off what you made. I always like to be inspired!
hans
Hi Hans
So I’ve uploaded the entire code as FastLED and 100% success!
With regards to:
HalloweenEyes(0xff, 0x00, 0x00, 1,7, true, 10, 80, 3000); (please note that the second number – ‘7’ was originally 4 from your code. I just changed it for my purposes)
I have my grid setup as follows:
#include “FastLED.h”
#define NUM_LEDS 154
CRGB leds[NUM_LEDS];
#define PIN 6
// Define matrix width and height.
#define mw 22
#define mh 7
I’ve been trying figure out how to make the eyes blink in the same position. I thought it was this part:
//int StartPoint = random( 0, NUM_LEDS – (2*EyeWidth) – EyeSpace );
Basically I’ve made the daft punk helmet and I would like the eyes to blink in the same position every time. This is basically the last part. The helmet is fully constructed from 3d printed parts.
So imagine my grid as 22across x 7high. How do I set the first eye position to be at 7across x 3high and the second eye position to be 15across x 3high?
With regards to Cylon I’d like it to work in a similar fashion but only scrolling across the middle row only. I haven’t got to that part yet but thought I’d give you a heads up as to what I’ll be playing with next.
Once again Hans – its been excellent having you assist me. Please do feel free to ask me to go away or to keep my requests to a minimum. My plan was never to hijack this thread!
And sincere apologies to any other subscribers to this thread.
kindest regards
Kayee
orangoo
Hi Kayee!
Awesome to hear things now work!
As Daniel already stated; feel free to post this as a topic in the Arduino Forum. This way code, pictures and/or videos, and plenty of questions can be shared there as well. I understand if you’d rather not share your code (I’m a little code shy myself).
hans
Greetings orangoo!
What is the real effect of your sketch? try to show some animation here or on youtube to see; make your code available too, please!
Daniel Fernandes
Awesome Job guy!
Great Effects… my daughter was amazed, when I added some stripes with these effect under her bed.
mcwinston
Hi McWinston!
Awesome! Haha – glad you and your daughter have fun with this!

My nephew loved it as well.
hans
[…] https://www.tweaking4all.com/hardware/arduino/adruino-led-strip-effects/ […]
Hi all,
Does anyone know how to add the ‘juggle’ effect from FastLEDs demo reel to this (awesome) bundle of sketches.
I’ve tried adding it to the ‘All LED Effects in One Sketch’ sketch.. but I doesn’t seem to work.
Many thanks,
OM.
void juggle() { // eight colored dots, weaving in and out of sync with each other fadeToBlackBy( leds, NUM_LEDS_PER_STRIP, 20); byte dothue = 0; for( int i = 0; i < 8; i++) { leds[beatsin16( i+7, 0, NUM_LEDS_PER_STRIP-1 )] |= CHSV(dothue, 200, 255); dothue += 32; } }oscarmiike
Hi OscarMike,
Since this is using FastLED functions, I assume you’re not using NeoPixel.
What kind of error are you getting?
How did you try to incorporate this function?
(if you want to post you code; please use the Arduino forum to avoid that the comments here become super long – you’re fine with short source codes like you just did)
hans
Hi Hans,
Thanks for the tips :)
I’m actually not getting any errors at all.. the sketch compiles properly. The issue is that if I call juggle in the void loop along with one of the sketches written from tweaking4all, the juggle sketch is ignored. I’ve tested this by running ‘juggle’ on its own (which works), and then adding something after juggle like ‘theaterChaseRainbow’. theaterChaseRainbow will be the only function that loops in this case.
And yes, all of the functions are FastLED. I have a feeling the problem has something to do with how the tweaking4all functions calls other sub functions, ‘set pixel’ for example. Here is how I setup the loop:
void loop() { FastLED.show(); juggle(); theaterChaseRainbow(); }oscarmiike
I do not have my Arduino and LEDs nearby, but maybe this is related to this line:
Just for testing try this:
void juggle() {// eight colored dots, weaving in and out of sync with each other
fadeToBlackBy( leds, NUM_LEDS_PER_STRIP, 20);
byte dothue = 0;
for( int i = 0; i < 8; i++) {
leds[beatsin16( i+7, 0, NUM_LEDS_PER_STRIP-1 )] |= CHSV(dothue, 200, 255);
FastLED.show(); // <-- add this either here
dothue += 32;
}
FastLED.show(); // <-- or add this here
}
Hope this helps.
hans
[…] I also worked on the Rain effect this week. I took a snowing LED effect that I found on this website: https://www.tweaking4all.com/hardware/arduino/adruino-led-strip-effects/#LEDStripEffectSnowSparkle […]
[…] https://www.tweaking4all.com/hardware/arduino/adruino-led-strip-effects/#LEDStripEffectMeteorRain […]
new library ws2812fx
https://github.com/kitesurfer1404/WS2812FX
rompipelotas
hi there,
im just wondering if it possible to change effects and speed with an ir remote control intead of the button.
thanks
johndlcg
Hi John,
I assume this would not be impossible. I’d probably start with the All LED Effects in One Sketch, and replace the switch with some sorts of setup that mimics a switch based on an IR Remote. This will most likely not be a simple drop-in solution though (because of the interrupt that is needed). Maybe one or the other visitor here has worked with IR remotes and are willing to chime in.
hans
Here is the skeleton sketch I use for Ir remotes, you will need to change the remote codes to ones that work with your own remote but there should be a sketch in the examples to get them.
I have used it for a strip of lights to change colours and I used one effect for my grand-children so I’m sure you could incorporate it with the “all LED in One Sketch” but I haven’t tested that yet.
Dai Trying
Awesome! Thanks for chiming in with the code Dai!
hans
Hi Hans/Dai Trying
i have the same code for my remote control i tried to change the code in the sketch, but i have not knowledge of programing and i’m stuck, i could get until my arduino is receiving the signal from the remote control as shown in the code below.
**************** working part *****************
#include “FastLED.h”
#include <EEPROM.h>
#include <IRremote.h>
#define NUM_LEDS 274
CRGB leds[NUM_LEDS];
#define PIN 3
#define BUTTON 2
byte selectedEffect=0;
const int RECV_PIN = 7;
IRrecv irrecv(RECV_PIN);
decode_results results;
unsigned long key_value = 0;
void setup()
{
FastLED.addLeds<WS2812, PIN, GRB>(leds, NUM_LEDS).setCorrection( TypicalLEDStrip );
Serial.begin(9600);
irrecv.enableIRIn();
irrecv.blink13(true); every time i press a key from the remote the led on the arduino turns on
************* Until here i could see the signal on the arduino **************
*** the problem starts here, i dont know how to make the ir signal to change the effect in the underline lines***
digitalWrite (BUTTON, HIGH); // internal pull-up resistor
// attachInterrupt (digitalPinToInterrupt (BUTTON), changeEffect, CHANGE); // pressed
attachInterrupt (digitalPinToInterrupt(RECV_PIN), changeEffect, CHANGE); // pressed
}
// *** REPLACE FROM HERE ***
void loop() {
if (irrecv.decode(&results)){
if (results.value == 0xFF6897) // if (results.value == 0XFFFFFFFF)
Serial.println(“0”);
results.value = key_value;
}
EEPROM.get(0,selectedEffect);
if(selectedEffect>18) {
selectedEffect=0;
EEPROM.put(0,0);
}
switch(selectedEffect) {
case 0 : {
// rainbowCycle – speed delay
rainbowCycle(20);
break;
johndlcg
sorry for the code in that way, but i tried the code button in the bar and it just make a line for each line, not like in the dai post.
johndlcg
No worries John!
The challenge you’re looking at is that in my code I use an interrupt which gets triggered when the button is pressed. However, using IR instead will not trigger the interrupt so you’re stuck in “loop()” which will prevent you to interrupt a running loop.
Since I don’t have my gear with me, I cannot even begin to test an alternative.
hans
You might find something useful here regarding interrupts, I hope to have a go at this soon as it could be very useful in some settings. I also have a couple of wemos d1 boards (using esp8266 [wifi]) and that will be another one to post, but I would guess it might be a bigger sketch so will likely post that in the forum.
Dai Trying
Thanks for chiming in Dai!
hans
Hi there again,
i was just trying to get this workin in another sketch, but as i told you before, im not good at all in programing and i’m stuck in this part.
i can read the remote key and get the option to run when the key is pressed, but i cant get out the function.
in my first try i could get the cyclon function to run half of the way, so i use the while to get it run complete, but dont get out there to accept other key.
can anyone give me a push to get there?
johndlcg
Hi Johndlcg,
I’d recommend continuing this topic in the forum and post the link to the forum topic here.
It’s getting a little off topic and posting code each time takes up a lot of space.
Note: I haven’t done anything with IR remotes (yet). I hope some else can chime in.
hans
ok, and sorry for the code posting.
johndlcg
No worries
hans
Hello, thank you very much for this tutorial, it’s really helpful especially for beginner like me, here i have a question,
i tried to copy the meteor rain effect, but the program kept showing “setAll” was not declared in this scope,
could you please tell me what did I do wrong?
thanks
Jeff
Hi Jeff,
I think you may have forgotten the last of of the basic framework (see NeoPixel Framework above).
Seeing an error like this usually means that you’ve not defined a function (SetAll in this case, which is at the end of the framework), or you’ve made a typo (for example one missing “}”).
hans
Hi.
Very good work! It is possible to adjust the brightness of the effect?
Carles
Hi Carles,
Thank you for the compliment!
Yes there is a way to adjust brightness.
The easiest is when using the FastLED library, for example by adding the setBrightness() statement in the loop() (or where ever in the code you’d want to change brightness);
The brightness will be set to ALL LED effects and can be called in other places in your code. For example to dim one effect and brighten for the next:
(I picked random values for the setBrightness() function call – you may want to test a few values to determine what works best for you)
hans
Hello, thank you so much for the answer,I’ve already solved the problem, but now I have another question, I’m going to control 4 LED strips at the end, each of them presents different effects one after another, so here is the question : how do I adjust the code, for example the Meteor rain effect, to have a delay and wait for other strips running other effects, I’ve tried to put a delay(5000); at the end but it didn’t fade to black but the light just stayed there. Is there any solution for this?
thank you very much for the answer
Jeff
Jeff
Hi Jeff,
To fade LEDs to black, you could try adding a “fadeToBlack(int ledNo, byte fadeValue)” function call at the end (before your delay).
Try something like:
for(int j=0; j<NUM_LEDS; j++) {fadeToBlack(j, 255);
}
Obviously, this will fade instantly, changing the value “255” to a lower number, and repeating the loop a few times, may make this go a little smoother.
This would fade in 4 steps, by 64 each step (alter if needed):
for(int=1; i<4; i++) {for(int j=0; j<NUM_LEDS; j++) {
fadeToBlack(j, 64);
}
}
You’ll have to play a little with the numbers.
hans
Hello Hans,
thanks for the answer, now I’m trying to control multiple strips, and want them to run Meteorrain effect one after another, but no matter how I change the code, they either don’t work or run at the same time, could you please tell me how can I can the code?
thanks for the help
Jeff
Jeff
Hi Jeff,
I do not see anything wrong with the code (please consider using the forum for posting code) – but I also do not have the hardware near me to test.
I would however consider using the FastLED library for more complex setups like yours.
hans
Hey,
Thanks For your codes. Great efforts by you, it helped me alot.
I was trying 5 colored bouncing balls as you have shown but its not working by me.
i am making mistake somewhere but i don’t know where.
i am leaving code that i am using here.
ronak dalwadi
Hi Ronak,
I do not have LED strips & Arduino handy, so I cannot test anything.
However I see that you’ve set you PIN to “0” (zero) – this should probably be a different number (eg. typically using pin 6).
Since you do not have a good description of what is “not” working, I can only guess that this is the problem.
Hope this helps
hans
Hi Hans,
I appreciate your effort. Despite of very little knowledge of programming i want to make certain effect in my LED. Can you help me to have Fourth animation in this video link. https://youtu.be/578hrnxruuI?t=39
I hope you can Help me out over here.
Thanks,
ronak dalwadi
Hi Ronak,
Check out Frederick’s website, where he posted the code – I believe this is the function he used (modified to fit my code):
I have not been able to test this (not having my gear near me), but it should work.
Call the function like so in the loop():
Hope this is what you’re looking for …
hans
Thanks Hans,
I have tried that code and solved some errors but it shows ‘Error compiling for board’.
here is the code that i used.
ronak dalwadi
You’re missing a lot of code it seems …
a) There is no “loop()”,
b) There is code from the framework missing.
Did you post only a part of the code?
p.s. when posting code, please consider using the forum. This thread is becoming very long because of folks posting long pieces of code.
hans
Hi, Hans
Sorry, for commenting code over here.
I have added loop and solved some errors it’s finally working in my ATTiny 85 board.
Thanks for helping me out.
link for the code is here.
https://www.tweaking4all.com/forums/topic/arduino-all-led-effects-in-one-sketch/page/5/#post-11443
ronac
Hi Ronac,
no worries!!
Thanks for posting the working code in the forum – it’s much appreciated!
hans
Just wanted to thank you for this. I was able to merge your fire effect into a project where I had to simulate coals and embers in an interactive museum display.
https://www.youtube.com/watch?v=OHNywhf0LaM
My setup uses twenty 24 LED neopixel rings (total of 480 neopixels) running the fire effect on an Arduino nano. The twenty neopixels rings are split into two separate data runs of 240 LEDs because the animation was too slow when trying to incorporate a single chain of 480 neopixels. I randomized the order and placement of the rings to try to make the effect seem more random.
The only problem I’ve run into is trying to incorporate more yellow into the fire effect. I’ve played around with the spectrum and heatramp sections without a lot of luck. I’m able to introduce more yellow but at the cost of adding in bright white when the sparks occur. Any suggestions?
Thanks and great work.
Keith S
Hi Keith!
Wow, nice project!
And, thank you for the Thank-You note – it’s much appreciated.
I do not have my gear nearby to test this but you could try playing with this section:
You’d probably want to change the values 0x80 and 0x40.
Since yellow is the hottest, I’d swap 0x80 for another number, say 0x50.
Then swap 0x40 for 0x20 or something like that.
Hope this works
hans
hello all. i done whole things and work very well but i address 405 LEDs but after 135 leds not work properly according to given data maybe it’s due to less current, so can anyone please help me with that problem ?
sapan
Hi Sapan,
First thing I’d do, is do a simple test to see if all LEDs work properly. If (in your example) LED 136 is defective, everything after that LED will not work or not work properly.
Second thing to pay attention to is your Poser Supply – make sure it’s powerful enough – between (405x20ma) 8A and 24A.
Since your strand is long, I’d connect +5V and GND from the power supply, at the end of the strand as well.
Last step; “not working properly” doesn’t tell us much about what is going on.
Do the LEDs after LED 135 not work at all (defective LED 136)?
Are effects acting weird (possible problem in the sketch code)?
Are the LEDs dimming (Power Supply problem)?
Hope this helps
hans
Hello!I’m looking to make a simple code for something similar to the blue and red police lights, like a wigwag effect.Can you please help me with this?Thanks!Eduardo
Eduardo Filipe
salve, siete fortissimi,bellissimi giochi di luce!!!
ho voluto di copiare tutti esempi posizionarli su un solo sketch ,sono riuscito
per quasi tutti ,ce solo uno che non vuole, e quello con il led che saltano,non so cosa modificarli per farli stare tutti insieme
possiate ad aiutarmi per favore ??
e se non chiedo troppo ?
magari darli un puo di tempo ha fare almeno 2 volte la stessa cosa,cosi facendo allunghiamo il tempo per goderci i’ giochi.
GRAZIE mille.
michele
Hi Michelle,
Even though I think Italian sounds great, I unfortunately do not speak the language. So Google Translate made this out of your post:
Thank you for your kind words. They even sound better in Italian
To maybe answer your question, please check out this follow up article I wrote: Arduino – All LEDStrip effects in one (NeoPixel and FastLED)
hans
Hello,
Brilliant effect, I found this very interesting. as this is for Arduino’s code, it there possible to convert from this code into Python for my raspberry pi?
please let me know. many thanks
David
David
Hi David,
thanks for the compliment
I’m not a Python coder, but one of the users here (Hootie) has started a project just for this purpose.
Look at his Github page for more info.
p.s. I wouldn’t mind getting started with Python.
However, I’m so used to an IDE as seen with Delphi and Lazarus Pascal, true RAD (Rapid Application Development) IDE’s where one can design the UI directly in the IDE, and write code very rapidly. I have found it very hard to find anything like that for Python (suggestions are welcome).
hans
HI…if i want use a button to cycle between code how i do that.. please need help.
Julio E
Hi Julio,
I’ve written an article just for that; Arduino – All ledstrip effects in one.
Take a look, it shows you how to do this
hans
thank you Hans
Julio e
You’re welcome!
hans
Hi
Thanks so much for this code. I’ve been playing with it a bit. I’m really trying though to figure out how I can get different patterns running in different sections of the strip. The reason for this is that I’m using the LED strip for my electric skateboard and I want part of the strip (40 LEDs) to be under the board and then some of the strip (10 LEDs) to be at the front of the board to be used as a headlight. I can’t figure out how to modify your code to allow for this. Any help would be appreciated.
Zayne
Hi Zayne,
I suppose there are a few ways we can accomplish this.
I’d use the last 10 LEDs of the strip for the headlight and modify the code something like this.
Set NUM_LEDS to the number of leds (40) you’d like to use for effects, and HEADLIGHT_LEDS to the number of LEDs you’d like to use for a headlight (10). Next in the setup() we set the headlights to white (or whichever color you prefer).
Since the total led count = NUM_LEDS+HEADLIGHT_LED, we will have to use this when initializing the LEDs. …
…
After that, all effect functions work with NUM_LEDS, so they (theoretically) should only use LEDs zero to NUM_LEDS.
I just had my first coffee for the day, so I hope I didn’t goof up the counting
For FastLED:
For NeoPixel:
Hopefully this will get you started
Oh and pretty please post your end product – I’m curious what this will look like – it sounds awesome!
hans
HI There,
What would be the best way to alter this code: https://learn.adafruit.com/neotrellis-neopixel-controller/receiver-code to replace the rainbow fade with a Fire effect? my aim is to replace each of the rainbow effects with variations of this code https://github.com/FastLED/FastLED/blob/master/examples/Fire2012/Fire2012.ino
I been trying to replace parts of the reciever code to include this fire code however I have not been successful, I am relatively new to arduino however I have used it for various projects in the past, any help/advice or a point in the right direction would be much appreciated,
Thanks in advance!
beau
Hi Beau!
You may want to take a look at this: Effects with Remote control – it may help you get started.
I apologize for the short answer, but I’m running out of time with the current projects and I’m not familiar with the item you’re wanting to use.
A quick glance makes me thing the IR Remote code (structure) will work for your application as well.
hans
Hallo Hans,
I have a few questions. Just to make sure, if I connect two same strands of LED’S in parallel, they will work identically?
I’m trying to install LED lighting to my car and want to add some effects. Leds will be controlled with Bluetooth.
I’ve tried to change colors with setAll command, but some why it does not work for me, because setting commands to change color of each led would make a very long code.
Other question is how to make leds fade between two or three colors as one effect?
Any help would be appreciated.
p.s don’t know why, but pressing button changes just between 3 effects, fadeInOut, strobe and some other.. each effect separately works fine.
m4relis
Hi M4relis!
Two strands in parallel should work indeed, and they would show identical effects. (assuming WS2812 like models, but other models may work as well)
I suspect there is something not going right on your Arduino setup if setAll() doesn’t work and effects only switch between 3 effects.
A few things to check;
– Verify the sketch (I assume you’ve done this already)
– Are you using FastLED of NeoPixel (I prefer FastLED)
– What model Arduino are you using? (I’ve had poor experience with clones)
hans
Well, I’ve copied your code, so it should be okay. I mean on your effect code setAll works, but if I use it on a separate code just for simple color changing it does not, maybe I have placed it in a wrong position, I’m not a programmer, so I’m just trying different cases. And Im using original Arduino uno r3 with FastLED
m4relis
FastLED is a good choice!
Usually, when I get lost in the code, I’ll start over and start with the bare minimum. Just to test and see how things work. It also helps getting a better overview what we’re doing
hans
Hallo again!
Don’t know what I did wrong before, but setAll is now working ant everything is fine. I just have one issue and hope you could help me.
As I said before, I’m using Bluetooth app to control the lighting, for now no effects, just simple color changing. There’s one slider, which should control the brightness and it is set from 10 to 100. For example, the arduino gets signal of 110-1100 (index of 1 and slider possition 10 to 100) that should change brightness, but some why it’s very inconsistent. Sliding it upwards at one spot it gets a little brighter, on other a little dimmer, somewhere at the middle it even shuts off completely.
This is the example code:
if (dataIn.startsWith(“1”)) {
String stringBrightness = dataIn.substring(dataIn.indexOf(“1”) + 1, dataIn.length());
brightness = stringBrightness.toInt();
FastLED.setBrightness(brightness);
Is there some more simple way to control it?
m4relis
Hi Myrelis,
If I recall correctly, the FastLED brightness function uses a scale 0 – 255, where 0 = off, 128 = 50% brightness and 255 = max brightness.
Since you’re using an app, I would assume you can tell it to use that scale.
If this cannot be done, and you’re stuck with a scale 110 – 1100, then converting that to a 0 – 255 range may indeed come with some dead spots, since 1100 -> 255 = 255* 1100/1100. So in that case you’ll need to divide the value by 1100 and multiply by 255.
Keep in mind that brightness has to be a byte, otherwise (int for example can be 2 bytes) could potentially mean that only one of the bytes is being read (and the result may be completely wrong). It may be a good idea to (temporary for debugging), dump the value of “brightness” to the serial monitor – just to see what the converted string looks like after conversion?
I see you’re looking for the position of “1” in your received string – maybe there is a better way to determine the value?
hans
Well yes, I can set the scale up to 255. And for the index, I can set it whatever I want, so maybe some letter would be better, as I’m using letters for the colors.
Oh that would be so nice if I knew how to dump the value to the serial monitor… :D That must be the sign for me to learn coding :) Anyway, I can set the value 0-255 in the app and index with a letter, but then how the arduino should read that? How the code line should look like?
m4relis
Interesting that you’re using letters for the values – aren’t there characters that may not be readable?
Then again; I don’t know how the Bluetooth app works, so if a character works; great.
I would prefer numbers though – it may make debugging easier. Maybe comma separated or something like that.
I guess this also brings me to you last question; how to read it; again, I do not know how the app sends data, and what the options are.
As for doing serial output; that’s actually pretty easy.
Leave the Arduino hooked to your PC, and the Arduino IDE has the means to monitor this.
See also this description I’ve made.
hans
Hello Hans,
Started a new thread here to further discuss my questions. Thanks again for getting back to me.
Here’s my set-up. I have a nano controlling a WS2812 RGB LED string with your sketch that I’ve modified (added variations of the theater chase and a couple others). I can power the arduino from a wall outlet that can be controlled through Z-wave. When I activate power to the outlet the arduino will power on, boot and start the first light sequence. What I’m trying to figure out is how after the arduino gets power it can send a signal to a TV via a separate IR LED. I’ve seen 2 methods of capturing and sending IR signals but no real method on how to combine different types of sketches and no idea how to add a delay to sending the IR signal as my thought is to also have the TV connected to the same switched power source. That way when the power is turned off the TV turns off as well as the arduino. When first getting power back the TV will likely need a slight delay to internally boot up.
The second aspect is that I currently use your guide for adding a single SPST switch to cycle through the light sequences. I would like to be able to use a matrix keypad to control more functions, like changing sequences both forward and backward, maybe selecting a specific sequence with a number code, and sending a few more IR signals to the TV for volume, power and input control.
If you have any ideas on any of this I’m very appreciative of your advice. At the very least I currently have the lights working and can use a simple switch to change the sequence and can resolve the TV on/off issue in other ways. Thanks for everything!
Tim
Hi Tim,
If I’d had experience with IR for remotes, I’d say: start a thread in the forum
But unfortunately, I have not played with IR (yet).
Once you know what code to send, I assume you could call that in the setup(), which would then fire at startup and fire only once. UNLESS you use the one button to cycle through effects of course; since that would reset the Arduino and run setup() again.
Combined with a keyboard matrix, I’d think a different approach would be needed to detect the button to change effects and read the keyboard.
This may become a challenge since the arduino is not a multitask device. You may have to do some reading up to do on multitasking. I haven’t played with it (yet).
hans
Hi Hans,
Here’s a WIP of the project I’ve been pestering you about. The frame has now been painted but still needs final trim work installed. I do need to re-hang the TV and then the frame though to make it all nice and level.
https://youtu.be/2lYNUhvk0w8
https://youtu.be/PS5XswikwbU
Anyways, I was trying to massage on of the sequences you helped my create but ran into an issue and my knowledge of this code just isn’t that strong. I have the lights running on a every 4th light chaser sequence with all other lights on at a dim level. I tried the change the color of the lights but while the “chase” lights did change color the static lights stayed the same dim white. I was trying to make them all an amber color. Any ideas?
Tim
Hi Tim,
that looks really nice!
Ehm, every 4th LED dimmed,… you could try this (I don’t have your code, so I’m taking Theatre chase as an example):
void theaterChase(byte red, byte green, byte blue, int SpeedDelay) {
  for (int j=0; j<10; j++) {  //do 10 cycles of chasing
    for (int q=0; q < 3; q++) {
      for (int i=0; i < NUM_LEDS; i=i+3) {
        setPixel(i+q, red, green, blue);    //turn every third pixel on
      }
      showStrip();

      delay(SpeedDelay);

      for (int i=0; i < NUM_LEDS; i=i+3) {
        setPixel(i+q, 0xBB,0x00,0xBB);        //turn every third pixel off <--- change this color
      }
    }
  }
}
See the part where we turn off the LEDs, here we set the LEDs to black. If you change that to a different color (your choice of dimmed color) then I assume it should give you the desired effect?
(I picked the color with the Color Picker above).
hans
Hello Hans,
I should have posted my code before and used a better description. In the second video linked I have the theater chase mode with every 4th light illuminated (rather than every 3rd like your main code) and then you showed me how to have all the “off” lights actually on but dimmed. So this is the code for that.
case 0 : {void theaterChaseO4(byte red, byte green, byte blue, int SpeedDelay) {for (int j = 0; j < 10; j++) { //do 10 cycles of chasingfor (int q = 0; q < 4; q++) {for (int i = 0; i < NUM_LEDS; i = i + 4) {for (int i = 0; i < NUM_LEDS; i = i + 4) { // 2nd loop!!So now I’m trying to change the color of the lights from White to Amber. If I change the color in the top section the “chase” lights do turn Amber. However the “dim” lights are still white, not amber. I thought that the color information in the first section would be used for both the chase and dim lights but that doesn’t seem to be the case, so I am confused.
Tim
Hey Hans,
Not sure if you saw my previous question just above here about trying to change the dimmed lights color from white to anything else.
Here’s another updated video of the project I’ve been working on!
https://youtu.be/kHrGskXgicE
Tim
Hey Tim!
That looks awesome!

Nicely done with the light bulb look light diffusers. How did you create those?
hans
Hans,
Here is a mini build log for the digital frame I built using your help for the LED string coding. The diffusers are pingpong balls hot glued over the lights coming through the holes in the frame. The lights are set to “white” but the camera picks them up as very purple. I am still trying to figure out if I can change them to a shade of amber with the ‘dim’ lights also being dimmed amber. I posted the code above in this thread that you helped create to get the white dimmed lights but for some reason I can’t change their color, only the ‘on’ light color will change.
I will try to get another video soon of what I mean. Currently waiting on a momentary switch to arrive so I can install it into the frame to change light sequences with an easy button press.
Ultimately I’d love to be able to send a signal from a separate pin through an IR LED to turn the TV on when the Arduino gets power. Waiting on my IR LED shipment as well.
https://www.avsforum.com/forum/19-dedicated-theater-design-construction/3072030-clanhold-cinema.html#post58155512
Tim
Hans,
This video shows what I’ve been trying to work out with the color of the ‘dim’ lights on the theater chase. I posted the code in a reply above that you helped work out for the white lights but changing the color value only seems to affect the ‘on’ lights and not the ‘dim’ lights. Any ideas?
https://youtu.be/mw9YCDjEyWs
Yes the purple looking lights are actually white to the eye. Camera tricks.
Tim
Oh sorry for missing the question haha (I’m on vacation, so I think I must have left my brain at home hahah).
Looking at your AVSForum post: very nice and very well though through. Looks stunning!
At a quick glance I noticed I made a booboo in the code;
void theaterChase(byte red, byte green, byte blue, int SpeedDelay) {
  for (int j=0; j<10; j++) {  //do 10 cycles of chasing
    for (int q=0; q < 3; q++) {
      for (int i=0; i < NUM_LEDS; i=i+3) {
        setPixel(i+q, red, green, blue);    //turn every third pixel on
      }
      showStrip();

      delay(SpeedDelay);

      for (int i=0; i < NUM_LEDS; i=i+3) {
        setPixel(i+q, 0xBB,0x00,0xBB);        //turn every third pixel off <--- change this color
      }
      showStrip(); // <-- forgot this!
    }
  }
}
When I get home (a week from now), I’ll pull out my gear and will try to build the effect so I can better work on the issue.
hans
Hey Hans,
Thanks for looking into this on your vacation. I thought you were home now otherwise I’d not have bugged you! I tried the changes to the code you noted but it only blinked each LED once and then stayed on a solid color. Enjoy the rest of your vacation as I’m not in a huge rush for any answers.
Cheers!
Tim
Thanks Tim and now worries – I don’t expect everybody to know when I’m on vacation.
But … even on vacation I like to keep an eye on Tweaking4All
I’ll take a looksy when I get home!
hans
Hey Hans,
If you are back from your vacation just curious if you’ve had a chance to take a look at my above inquiry.
I’m also curious if it’s possible to control the brightness of the “on” LEDs.
And any suggestions you might have for finding some info on using a 12-key keypad to control/select different sequences.
I know, I ask for a lot! :)
Tim
It may be an idea to start a forum topic on this project.
I have limited time (unfortunately, I cannot live from my website), and the forum allows others to chime in as well, without making the discussions here too lengthy …
hans
Hello!
Could someone help me how I can stop the execution while the run (Rainbow Cicle? I don’t have idea as I can do it.
thank you!
Ramon
Hi Ramon,
I’m not sure what you’re asking?
You mean how to interrupt the Rainbow Cycle, like with a button or something?
hans
When I arrive at my home I’m going to show the complete code here.
Anyway I want when a “if” turns true the rainbow runs:
If ( a == true)rainbow ()
And when another if turns true the rainbow stops to run:
If ( b == true)Rainbow () stops
The variable b can be a button or something like that.
How can I do it?
Ramon
I tryed to use the function strip.clear() but it didn’t work. I also tryed to force the colors turns in black strip.fill((0,0,0),0,30) but it also didn’t work.
Ramon
Hello, I am writing from Argentina. I would like to ask you a question.
in the fire effect how can I get the fire to spread out in the whole strip?
as if the strip were burning …
Best regards
gabriel
Hi Gabriel,
I’m afraid that would take rewriting the entire effect.
I’m not even sure what it would look like
hans
and do you know any program to simulate the effects?
gabriel
Well, I can imagine you have something like a cord in mind that catches fire and starts burning.
Again, I wouldn’t know what that would look like.
I looked on YouTube if I could find something, with no result (so far).
hans
exactly .. that it would be interesting to be able to achieve something like that.
gabriel
It could be indeed. I just wouldn’t know what it would look like, considering that the “cord” is only on LED thick.
hans
https://www.youtube.com/watch?v=H8Cmht5duso&t=60s
and how can I do this? because I do not understand the explanation in the description of the video
gabriel
As far as I can see in the code; the pattern is predetermined by making a “bitmap” of a particular song.
So before playing the song you’d need to define a pattern which (in your example) is loaded in the program.
It would not be impossible to make this for the Arduino, however … you’d need to make those patterns first, for each song.
hans
Hi Hans and all,
I’ve been trying to make a shtech to do what I need to. My setup is:
– 39 neopixel strip (WS 2012);
– attiny 85 – with 1000uf capacitor (between ground and VCC) and 450 ohm resistor on pin 1 (data pin);
– all is programed with a Sparkfun USBTiny programmer;
– using Adafruit Neopixel library.
I spliced my led strip in 3 strips 13 each.
What I am trying to do :
– 1 strip red;
– 1 strip green;
– 1 strip blue.
All is OK, but I need to have the red strip using color fill (colorWipe). How can I do that?
Gabi
Hi Gabi,
you can modify the colorWipe function by adding a start and stop parameter. Something like this:
void colorWipe(byte red, byte green, byte blue, int SpeedDelay, int StartLED, int StopLED) {for(uint16_t i=StartLED; i<=StopLED; i++) {
setPixel(i, red, green, blue);
showStrip();
delay(SpeedDelay);
}
}
Calling this function for your Red LEDs could be something like this:
Hope this helps
hans
Hi Hans,
Thank you taking time to get back to me. After I “clean” up your code for Adafruit library, I try it many times, but I cant make it work. First 13 led lit up red, but there is no color fill. All of them stay lit and that’s about it. Can you have a look whats going on?
Another thing is the last led (39th) stays lit like a yellowish color all the time after power up. Why?
Thank you
Gabi
Gabi
You’ll still have to add the color fill you had before
void colorWipe(byte red, byte green, byte blue, int SpeedDelay, int StartLED, int StopLED) {strip.fill(green, 12, 25);
strip.fill(blue, 25, 38);
for(uint_16 i=StartLED; i<=StopLED; i++) {
strip.setPixelColor(i, red, green, blue);
strip.show();
delay(SpeedDelay);
}
I’d normally do this with calculations, so it remains flexible when the number of LEDs change, but for now this should work.
hans
Sorry, Hans. Just tried and does the same thing. First group of leds (0 to 12) lit up red and static. The rest of the groups (13 to 26 and 27 to 39) are off. If I bracket (//) the entire colorWipe function and put on the main void loop:
strip.fill(red, 0, 11);
strip.fill(green, 12, 24);
strip.fill(blue, 25, 37);
strip.show()
all is showing OK.
What else should I try?
Gabi
I’ve never used the fill function of NeoPixel as I prefer to use the FastLED library (both are good libraries though).
From what I read here, the fill function works as such:
Where “count” is the number of pixels to fill.
From what I see in your code, you’re using it maybe not as intended; instead of “first” and “count”, you seem to be using “first” and “last”. So the fill functions should probably work better if you do this:
So I’m not sure if this is related to the issue or not, but considering the values you used, there may be some sorts of overflow.
The ColoWipe function is very simple, so I’m not sure what else could go wrong there. Does the function work without the color fills?
You can change the integers to unsigned integers in the function call;
void colorWipe(byte red, byte green, byte blue, int SpeedDelay, uint_16 StartLED, uint_16 StopLED) {for(uint_16 i=StartLED; i<=StopLED; i++) {
strip.setPixelColor(i, red, green, blue);
strip.show();
delay(SpeedDelay);
}
}
I doubt it will make a difference, but using a uint_16 is maybe more correct (it was a little sloppy of me to use . just an “int”).
I assume the two closing accolades ( } ) at the end, were in your code as well.
hans
Hi
I was trying to do a 3 or 4 color wave cycle like the rainbow cycle but instead of the rainbow colors i want to use say red, white, violet only.
Can you please help me?
foogle
Hi Foogle,
if you want them in sequence, then you can call the function ColorWipe with different colors.
For example:
But I assume this is not what you mean?
hans
I want a continuous circular wave just like the rainbow cycle but with 3 colors.
I will try with the colorwipe today to see if it servers the purpose.
foogle
Hans, I was able to make it work. The colorwipe code helped me and I was able to modify the Rainbow Cycle code as per my need.
Now I need help with another issue. The colors are moving from left to right. Can we move it from right to left? Keeping a flag somewhere and changing the code based on it.
Also I am calling it from another function and i want the wave in an infinite loop unless say i switch off the power source. I cannot put in inside loop() as its a continuation of a big project. i need to do something with the for loop (j = 0; j <256*5; j++);
foogle
Hi Foogle!
Awesome! That’s good to hear!
Well, I do not have any equipment nearby to test, and I’m a little stuck in work right now, but you could try to just reverse the pixels;
void colorWipe(byte red, byte green, byte blue, int SpeedDelay) {for(uint16_t i=0; i<NUM_LEDS; i++) {
setPixel(NUM_LEDS-i, red, green, blue); // <= reverse here
showStrip();
delay(SpeedDelay);
}
}
hans
Thanks Hans. I will try that out.
Can you help me out with running the color wave infinitely?
foogle
The next 2 days will be tricky to help out as I’m traveling, but I’ll try to help where I can.
So having that function outside of loop() is (IMO) the clean way to do it, but it does come with a few questions – which we can address once we have the infinite loop going.
Do I understand correctly that you want Color Wipe to run indefinitely? And then of course the question; what should that look like?
hans
I want the rainbow cycle to run infinitely say atleast for 30mins or 1hour.
what I have done is changed the code in the wheel() function like this. Rest code is same as the Rainbow cycle. Now I want this cycle to run infinitely instead of the (i=0; i < 5*256; i++) // 5 times
if(WheelPos < 85) {c[0]=0xff;
c[1]=0x8b;
c[2]=0x00;
} else if(WheelPos < 170) {
WheelPos -= 85;
c[0]=0xff;
c[1]=0xff;
c[2]=0xff;
} else {
WheelPos -= 170;
c[0]=0x00;
c[1]=0x80;
c[2]=0x00;
}
foogle
Solved it…now it goes on infinitely
foogle
Awesome! Sorry for the late response, I’m traveling at the moment
But great to hear you’ve got it working!
hans
I want the rainbow cycle to run infinitely say atleast for 30mins or 1hour.
what I have done is changed the code in the wheel() function like this. Rest code is same as the Rainbow cycle. Now I want this cycle to run infinitely instead of the (i=0; i < 5*256; i++) // 5 times
foogle
please ignore…accidentally posted it
foogle
Hi Hans,
I try to put a touch button like this on the all effects sketch, but I don’t know where exactly should I put that piece of code. Can you help? I also found this code (see below), but again I am stuck … I put a push button and is working. When I replace the push button with the touch one, the selection is working till the strobe part. I need to touch quite a few times till the make it to move to next animation. I don’t know if the touch button should be coded with the above code or my power supply (5V 2A) is playing
Thank you for your time
Gabi
Hello,
How could I reverse the direction of MeteorRain?
Sam
Hi Sam,
I do not have any equipment near me to test this (I’m on vacation), but you could try to change the for-loop below the “// draw meteor” comment.
Instead of:
try:
Like I said; I’m on vacation and have to do this without being able to test, so I may have overlooked one or the other thing.
hans
Thanks, I’ll try your code and if anything is wrong I will try my best to fix it myself
Sam
Thanks, I’ll try your code
Sam
It works perfectly, thanks!
Sam
Awesome!
hans
hello
i was looking at the Meteor Rain sketch, really like that pattern, i was wondering if there is a way to speed it it up.
meteorRain(0xff,0xff,0xff,10, 64, true, 30);
the last parameter is the speed and it states 0 is the fastest it can go.
i am trying to control with a potentiometer the speed where it the effect goes from slow to really fast and at max be on solid.
thx
markus
Apologies for the late response.
With the current code, this will be as fast as it goes.
You may be able to optimize the code by leaving out the setAll() line, and adding to the 2 loops a setPixel(x,0,0,0).
This would take out setting all LEDs to black and applying it.
I have not tested this, but this could be a way to make it go a little faster.
void meteorRain(byte red, byte green, byte blue, byte meteorSize, byte meteorTrailDecay, boolean meteorRandomDecay, int SpeedDelay) {
// setAll(0,0,0); / remove this
for(int i = 0; i < NUM_LEDS+NUM_LEDS; i++) {
// fade brightness all LEDs one step
for(int j=0; j<NUM_LEDS; j++) {
if( (!meteorRandomDecay) || (random(10)>5) ) {
fadeToBlack(j, meteorTrailDecay );
} else {
setPixel(j,0,0,0); // add this
}
}
// draw meteor
for(int j = 0; j < meteorSize; j++) {
if( ( i-j <NUM_LEDS) && (i-j>=0) ) {
setPixel(i-j, red, green, blue);
} else {
setPixel(j,0,0,0); // add this
}
}
showStrip();
delay(SpeedDelay);
}
}
I’m not sure what the speed gain will be though.
hans
Hi There,
i was wondering if you could tell me which values adjust the speed of the fade animation. i have created a dual animation using new kitt and fade for a project, i seem to have lost the fade completely. it goes from an ON state with a 30 sec delay to a OFF state with no fade.
Abi
Hi Abi,
Maybe you’d like to start a forum topic, so you can post the code that you’re using right now?
I’m not sure what you mean with “dual animation”.
hans
CODE REMOVED
Abi
Hi Abi,
posting long code here is getting a little out of control, hence the message
“Friendly request to not post large files here (like source codes, log files or config files).” in the editor and my request to start a forum topic.
In your code, I see no evidence of any fading. So I’m not sure what your question is.
hans
Hello!
First of all, thank you very much for all of these awesome effects! This saves me a lot of time and energy and I feel like I have a decent grasp of the code. I do not know very much about code myself however and have a question.
Would it be possible to set effects only to a certain section of the strand? Say I have a 60 LED strand, and I want LED’s 1-22 to display cylon, LED’s 23-38 to display Strobe, and 39-60 to display say cylon again. Would this be fairly easy to learn how to do, or is it even possible at all?
I rave alot and recently had the idea of creating a helmet decked out with LED’s, I have attached the LED’s to the helmet and run the Adafruit strandtest code to test it and now am trying learn more interesting effects to add. So far it looks pretty cool, if you want to see it I could send a picture haha!
Jeremy
Hi Jeremy,
Thank you for your enthusiasm!

Mixing effects is not impossible, but comes with it’s challenges.
When looking at the code, each effect has its own “loop”, which means that if you’d like to use multiple effects, we’d need to combine those – which can be a challenge. The challenge will not just be that each step of each effect needs to be done, but timing will become more critical as well.
I guess the best approach would to try to understand each effect (you’d like to use), and from that create your own effect.
A picture would be awesome! Or a video!
hans
Hey Hans,
Hope your summer has been going well. I’ve been tinkering a bit with the code you’ve helped put together for my project and I think I’ve found the issue I was asking about before but I am uncertain of a solution. Perhaps you have another idea on how to achieve this.
Take a 4 LED segment. A set colour at full brightness “chases” through the segment at a set speed. When not the “chase ” light the other lights are on to the set colour at a defined lower brightness level. Almost a “head” and “tail” chase of the same colour but only changing the brightness level with main colour and speed delay variable.
If this makes sense and you have and ideas or any idea where I might find some more info on something like this your help is always appreciated. You’ve gotten me way further than other places I’ve asked for guidance!
Cheers!
Tim
If not all LEDs should have the same brightness then you could apply a (sloppy) trick.
Say you set the bright LEDs as such:
Then making other LEDs less bright could be done like this:
So basically (you’ll have to experiment with this) take the same color values for red/green/blue, but divide them for example by 10.
If I understand you correctly; all LEDs are ON and dimmed, only the chase is brighter?
In that case, first call setAll with with the divided colors, instead of black;
And then for the LEDs that need to be brighter:
(of course you’ll need to incorporate that in the effect you’d like to use)
hans
Eureka!
Changing this code – setPixel(i+q, 0, 0, 0) to – setPixel(i+q, red/90, green/90, blue/90) works! To explain, taking the theater chase code you’ve helped teak and in the second parameter instead of using a chase dim ariable you use the colour/ variable. If that makes sense.
I’ll post more when I’ve got it better worked out.
As always thanks for all the help!!!
Tim
Awesome!
If you plan to post the code (which we’d love to see!), then please post it in the Arduino Forum
(to avoid that the comments here become a collection of huge code listings), and maybe post a link to the forum post here instead.
hans
Hi There,
Just looking for a little help as I’m a total newbie at this LED stuff. I am building an LED strip light for under my electric scooter using the following.
-Neon Pixel LED Strip
– Adafruit Feather board
– All effects in one sketch
Now, I have this working on the bench and I can toggle through the different effects using a button just fine. Next step is I would like to use my iPhone (android if easier) to turn on/off and toggle the effects over BLE. Any pointers on how to go about doing this?
Thanks
Douganator
Hi Douganator!
Well, I’ll admit that I haven’t tried something like that yet.
You’d probably need a Bluetooth or Ethernet/Wifi shield for your Arduino, and get an app that supports this.
Maybe this article can get you started:
Instructables – Control Arduino Board Wirelessly With IPhone, IPad or IPod Using IArduino App and Ethernet Shield (uses your network).
Another (long and maybe not so clear) article: Sparkfun – Controlling an Arduino with an iPhone.
In the forum you’ll also find a topic on using Infrared, which you may have to modify to accommodate Bluetooth or network.
Maybe one of the visitors here can assist as well.
hans
Hi Hans,
Love this page BTW! Great help in getting me going.
I have one question with the Running Lights.
I’m wanting to have the lights alternate between two colors instead of being all one color. Specifically orange and purple for Halloween.
Would I need to add a second “setPixel” function and offset the “i” ?
Hope that makes sense. I’m just learning this.
Thanks.
Jon
Hi Jon!
Thank you for the compliment – it is much appreciated!
If I understand what you’re asking correctly, you could try something like this:
void loop() {
RunningLights2Colors( 0xff,0x00,0x00, 0x00,0x00,0xff, 50);
}
void RunningLights2Colors(byte red1, byte green1, byte blue1, byte red2, byte green2 byte blue2, int WaveDelay) {
int Position=0;
for(int j=0; j<NUM_LEDS*2; j=j+2)
{
Position++; // = 0; //Position + Rate;
for(int i=0; i<NUM_LEDS; i++) {
setPixel(i,((sin(i+Position) * 127 + 128)/255)*red1,
((sin(i+Position) * 127 + 128)/255)*green1,
((sin(i+Position) * 127 + 128)/255)*blue1);
setPixel(i+1,((sin(i+Position) * 127 + 128)/255)*red2,
((sin(i+Position) * 127 + 128)/255)*green2,
((sin(i+Position) * 127 + 128)/255)*blue2);
}
showStrip();
delay(WaveDelay);
}
}
(bold are the changes)
I have not tested this, just my first stab at it (I don’t have an Arduino + LEDs handy at the moment).
hans
Did this work for a two-color Running Light?
MedPixMan
Thanks Hans for taking a stab at it. I was finally able to test it.
Unfortunately it still only shows one of the colors.
The only way to get the 2nd color to show is to comment out one of the setPixel functions. So I know each one will correctly set a color.
I’m just wondering if the first is overwriting the 2nd with its color??
I will take some time to see if I can get my brain to figure this one out.
Jon
Woops, I see I made a little boo-boo in the code.
Try this:
void loop() {
RunningLights2Colors( 0xff,0x00,0x00, 0x00,0x00,0xff, 50);
}
void RunningLights2Colors(byte red1, byte green1, byte blue1, byte red2, byte green2 byte blue2, int WaveDelay) {
int Position=0;
for(int j=0; j<NUM_LEDS*2; j=j+2)
{
Position++; // = 0; //Position + Rate;
for(int i=0; i<NUM_LEDS; i=i+2) { // changed i++ to i=i+2
setPixel(i,((sin(i+Position) * 127 + 128)/255)*red1,
((sin(i+Position) * 127 + 128)/255)*green1,
((sin(i+Position) * 127 + 128)/255)*blue1);
setPixel(i+1,((sin(i+Position) * 127 + 128)/255)*red2,
((sin(i+Position) * 127 + 128)/255)*green2,
((sin(i+Position) * 127 + 128)/255)*blue2);
}
showStrip();
delay(WaveDelay);
}
}
In the for-loop, I forgot to change the i++ to i=i+2 – so yes, it would keep overwriting
hans
Hans that was it! I now have two lights “running”!
Thank you so much. I guess this is why I went into networking instead of coding
One more thought about lengthening each color.
Is the “i+Position” part of the code the sine wave frequency? If so would I then change “Position++” to “Position = Position + 2” in order to make each color “wider” on the strip.
Or am I just way off on this one.
Thanks again!
Jon
Hi Jon!
Haha, well, I think programming is a matter of training the brain to think in certain ways. It is all logic and recalling your “steps” when you want to do something. When starting a complicated project or function, I usually (in my head) recap the exact steps I’d take if I (as a human) were to solve the issue at hand. Writing it down the first few times will help as well. .
.
The trick obviously being to not forget a step – but that is a matter of “training”
As far as your “wave” question goes;
I’d always recommend making a copy of the sketch that works, and just experiment with it.
This will be the best way to learn and get a better feeling how things work (or not work).
I sometimes have to do this myself to determine the effect of what I changed.
hans
Hello everyone,
please, I start now from zero, and I need some help.
So, I intend, with 3 strips WS2818B, each 5m/150pixels, to build a spiral Christmas tree.
Before reading your article/tutorial I already bought a Raspberry Pi 4
My questions :
can I run NeoPixel and FastLED on Raspberry Pi?
can I program the effects to run in a sequence? For example 10 seconds Rainbow Cycle, after Sparkle for 5 seconds… for 4-5 hours?
Thanks, a lot!
Lucian
Lucian
Hi Lucian,
I’m afraid the libraries cannot be run directly on a Raspberry Pi. The code and hardware is simply very different.
Having said that … here a few resources that may be helpful to run Arduino code on a Raspberry Pi anyway …
– How to run Arduino code on a Raspberry Pi (you may or may not run into hardware limitations, do the libraries may or may not work)
– Connect and Control WS2812 RGB LED Strips via Raspberry Pi (this does not include the libraries we use here)
– Dan’s project at Github is definitely worth mentioning here as well
But to keep a long story short; It will take a lot of reading up and experimenting to get only a part of the effects/libraries to work.
If you’re new to this topic, then I’d highly recommend starting with an Arduino anyway – they can be had at a pretty affordable prince (at Amazon for example).
Not a requirement, however for your first Arduino, I do recommend getting “the original” – it’s a few bucks extra, but it may save you some misery (little incompatibilities with the USB chip) and you’d show support for the original developers. You’d get familiar with the ins- and outs- and at a later time, once you have a little more experience, you can try one of the cheaper clones.
hans
Hi Hans,
first of all RESPECT for your quick answer. Obviously you like what you do. Thanks!
Today I found this tutorial: https://www.youtube.com/watch?v=Pxt9sGTsvFk&t=141s. I made the same and for now everything fine.
I bother you with the question: is it possible to add in the program a command/code/script to run it for 4-5 hours and after that, itself shut down?
Thanks again!
Lucian
Hi Lucian!
Thanks for the tip and absolutely no disrespect taken

In the end, the goal is that we can all play with this kind of stuff, so thanks for sharing
For those who prefer reading over YouTube, here the quick start article on how to run LEDs on your Raspberry Pi: WS2812 / NeoPixel Addressable LEDs: Raspberry Pi Quickstart Guide
hans
HI Lucian
if you are still working on xmas tree and need help message me. I am currently adding new effects for ws2811 and/or ws2812
not sure how the “WS2818B” work, as there are 4 connections instead of the 3 that i have on mine.
– Hootie
hootie
Thanks Hootie for chiming in!
As far as I know, the WS2811 is controlled slightly different than the WS2812 and WS2812B. Both WS2812 models are controlled the same way, but the “B” model has an improved controller (see also this document on the differences between WS2812 and WS2812B).
So the WS2812B is a drop-in replacement for the WS2812.
As for library support; I’m not sure what is available on the Raspberry Pi, but on the Arduino, both libraries (FastLED and NeoPixel) support all these models,
hans
Fire effect fits the Attiny13A after minimal tuning (with light_ws2812 library) :)
Oleksandr
Nice!
For those interested; the light_ws2812 library can be found at GitHub).
I haven’t played with it, so I’m not sure how much of the code needs to be adapted.
As far as I can see the strip initialization is done differently and the showLeds is done with ws2812_setleds().
I’m sure there is more to it, but it’s awesome to be able to run the fire effect on the Tiny. Great find!
hans
Hi ,
I have this project for using leds in a flow chart diagram, my coding of FastLeds is too bulky and exhausting the memory size, please assist on how I can be able to reduce that but achieve the same result. I laso want to accompany the chasing with sound and lcd display as I progress.
Here is a section of my code.
#include “FastLED.h”
#define NUM_LEDS_PART_A 20 //pin 2
#define NUM_LEDS_PART_B 16 // pin 3
#define NUM_LEDS_PART_C 20 // pin 4
#define NUM_LEDS_PART_D 16 //pin 5
#define NUM_LEDS_PART_E 20 //pin 6
#define NUM_LEDS_PART_F 16 // pin 7
#define NUM_LEDS_PART_G 20 // pin 8
#define NUM_LEDS_PART_H 16 // pin 9
#define NUM_LEDS_PART_J 20 // pin 10
#define BRIGHTNESS 0
#define UPDATES_PER_SECOND 100
CRGB ledsA[NUM_LEDS_PART_A];
CRGB ledsB[NUM_LEDS_PART_B];
CRGB ledsC[NUM_LEDS_PART_C];
CRGB ledsD[NUM_LEDS_PART_D];
CRGB ledsE[NUM_LEDS_PART_E];
CRGB ledsF[NUM_LEDS_PART_F];
CRGB ledsG[NUM_LEDS_PART_G];
CRGB ledsH[NUM_LEDS_PART_H];
CRGB ledsJ[NUM_LEDS_PART_J];
long step1[] =
{
0xFFF71C, 0xFFF71C, 0xFFF71C, 0xFFF71C,0xFFF71C,
0xFFF71C, 0xFFF71C, 0xFFF71C, 0xFFF71C,0xFFF71C,
0x0800FF, 0x0800FF, 0x0800FF, 0x0800FF,0x0800FF,
0x0800FF, 0x0800FF, 0x0800FF, 0x0800FF,0x0800FF
};
long step2[] =
{
0xFFF71C, 0x0800FF, 0xFFF71C, 0x0800FF,0xFFF71C,
0x0800FF, 0xFFF71C, 0x0800FF, 0xFFF71C,0x0800FF,
0xFFF71C, 0x0800FF, 0xFFF71C, 0x0800FF,0xFFF71C,
0x0800FF, 0xFFF71C, 0x0800FF, 0xFFF71C,0x0800FF
};
void setup() {
FastLED.addLeds<NEOPIXEL, 2>(ledsA, NUM_LEDS_PART_A);// sulphur, oxygen
// FastLED.addLeds<NEOPIXEL,DATA_PIN>(leds, NUM_LEDS);
FastLED.addLeds<NEOPIXEL, 3>(ledsB, NUM_LEDS_PART_B);//Furnace
FastLED.addLeds<NEOPIXEL, 4>(ledsC, NUM_LEDS_PART_C);//Sulphur dioxide, oxygen
FastLED.addLeds<NEOPIXEL, 5>(ledsD, NUM_LEDS_PART_D);//reactor
FastLED.addLeds<NEOPIXEL, 6>(ledsE, NUM_LEDS_PART_E);//sulphur trioxide,conc sulphuric acid
FastLED.addLeds<NEOPIXEL, 7>(ledsF, NUM_LEDS_PART_F);//contact
FastLED.addLeds<NEOPIXEL, 8>(ledsG, NUM_LEDS_PART_G);//oleum, water
FastLED.addLeds<NEOPIXEL, 9>(ledsH, NUM_LEDS_PART_H);//dilution of oleum
FastLED.addLeds<NEOPIXEL, 10>(ledsJ, NUM_LEDS_PART_J);// final product, sulphuric acid
}
void loop() {
ledsA[0] = CRGB::Blue; ledsA[19] = CRGB::Yellow;
FastLED.show();
ledsA[0] = CRGB::Black; ledsA[19] = CRGB::Black;
delay(500);
ledsA[1] = CRGB::Blue; ledsA[18] = CRGB::Yellow;
FastLED.show();
ledsA[1] = CRGB::Black; ledsA[18] = CRGB::Black;
delay(500);
ledsA[2] = CRGB::Blue; ledsA[17] = CRGB::Yellow;
FastLED.show();
ledsA[2] = CRGB::Black; ledsA[17] = CRGB::Black;
delay(500);
ledsA[3] = CRGB::Blue; ledsA[16] = CRGB::Yellow;
FastLED.show();
ledsA[3] = CRGB::Black; ledsA[16] = CRGB::Black;
delay(500);
ledsA[4] = CRGB::Blue; ledsA[15] = CRGB::Yellow;
FastLED.show();
ledsA[4] = CRGB::Black; ledsA[15] = CRGB::Black;
delay(500);
ledsA[5] = CRGB::Blue; ledsA[14] = CRGB::Yellow;
FastLED.show();
ledsA[5] = CRGB::Black; ledsA[14] = CRGB::Black;
delay(500);
ledsA[6] = CRGB::Blue; ledsA[13] = CRGB::Yellow;
FastLED.show();
ledsA[6] = CRGB::Black; ledsA[13] = CRGB::Black;
delay(500);
ledsA[7] = CRGB::Blue; ledsA[12] = CRGB::Yellow;
FastLED.show();
ledsA[7] = CRGB::Black; ledsA[12] = CRGB::Black;
delay(500);
ledsA[8] = CRGB::Blue; ledsA[11] = CRGB::Yellow;
FastLED.show();
ledsA[8] = CRGB::Black; ledsA[11] = CRGB::Black;
delay(500);
ledsA[9] = CRGB::Blue; ledsA[10] = CRGB::Yellow;
FastLED.show();
ledsA[9] = CRGB::Black; ledsA[10] = CRGB::Black;
delay(500);
for(int i = 0; i < NUM_LEDS_PART_B; i++) {
ledsB[i] = step1[i];
}
FastLED.setBrightness(50);
FastLED.show();
delay(1000);
for(int i = 0; i < NUM_LEDS_PART_B; i++) {
ledsB[i] = step2[i];
}
FastLED.setBrightness(50);
FastLED.show();
delay(1000);
FastLED.clear();
ledsC[0] = CRGB::Blue; ledsC[10] = CRGB::Green;
FastLED.show();
ledsC[0] = CRGB::Black; ledsC[10] = CRGB::Black;
delay(500);
ledsC[1] = CRGB::Blue; ledsC[11] = CRGB::Green;
FastLED.show();
ledsC[1] = CRGB::Black; ledsC[11] = CRGB::Black;
delay(500);
ledsC[2] = CRGB::Blue; ledsC[12] = CRGB::Green;
FastLED.show();
ledsC[2] = CRGB::Black; ledsC[12] = CRGB::Black;
delay(500);
ledsC[3] = CRGB::Blue; ledsC[13] = CRGB::Green;
FastLED.show();
ledsC[3] = CRGB::Black; ledsC[13] = CRGB::Black;
delay(500);
ledsC[4] = CRGB::Blue; ledsC[14] = CRGB::Green;
FastLED.show();
ledsC[4] = CRGB::Black; ledsC[14] = CRGB::Black;
delay(500);
ledsC[5] = CRGB::Blue; ledsC[15] = CRGB::Green;
FastLED.show();
ledsC[5] = CRGB::Black; ledsC[15] = CRGB::Black;
delay(500);
ledsC[6] = CRGB::Blue; ledsC[16] = CRGB::Green;
FastLED.show();
ledsC[6] = CRGB::Black; ledsC[16] = CRGB::Black;
delay(500);
ledsC[7] = CRGB::Blue; ledsC[17] = CRGB::Green;
FastLED.show();
ledsC[7] = CRGB::Black; ledsC[17] = CRGB::Black;
delay(500);
ledsC[8] = CRGB::Blue; ledsC[18] = CRGB::Green;
FastLED.show();
ledsC[8] = CRGB::Black; ledsC[18] = CRGB::Black;
delay(500);
ledsC[9] = CRGB::Blue; ledsC[19] = CRGB::Green;
FastLED.show();
ledsC[9] = CRGB::Black; ledsC[19] = CRGB::Black;
delay(500);
George Samson
Hi George,
Let’s see if I can help
One rule I kind-a live by is this one: If you see a lot of repetitive code in your sketch, then you should probably look into using loops, and in this case this can be done!
Let’s go through the code in steps;
All the “#define xyz abc” lines you can leave as they are, since they do not take up memory at all. They are just telling the compiler: before you compile this code, replace all occurrences of xyz with value abc.
The “FastLED.addLeds” lines, we cannot optimize at the moment, since enumerating these will take some changes in your code that we’d like to skip for now.
This part of the code, we can optimize:
We see ledsA[x] counting from 0 – 9, and down from 19 to 10.
Since we basically do the same in each block, you could try doing this:
for(int Counter=0; Counter<=9; Counter++) {ledsA[Counter] = CRGB::Blue; ledsA[19-Counter] = CRGB::Yellow;
FastLED.show();
ledsA[Counter] = CRGB::Black; ledsA[19-Counter] = CRGB::Black;
delay(500); }
which would replace that entire section. To accommodate the down count from 19 to 10, you’ll see that I use “19 – Counter’.
So if Counter=0 then this gets executed:
etc, and finally when Counter=9: (19-9 = 10)
Your second repetitive section can be fixed in that way as well:
Can become (counting 0-9 and 10-19):
So all combined, your entire “loop()” can be written as (I realize your loop() has more code to it, but you now see how you can reduce the amount of code for repetitive tasks):
void loop() {for(int Counter=0; Counter<=9; Counter++)
{
ledsA[Counter] = CRGB::Blue; ledsA[19-Counter] = CRGB::Yellow;
FastLED.show();
ledsA[Counter] = CRGB::Black; ledsA[19-Counter] = CRGB::Black;
delay(500);
}
for(int i = 0; i < NUM_LEDS_PART_B; i++) {
ledsB[i] = step1[i];
}
FastLED.setBrightness(50);
FastLED.show();
delay(1000);
for(int i = 0; i < NUM_LEDS_PART_B; i++) {
ledsB[i] = step2[i];
}
FastLED.setBrightness(50);
FastLED.show();
delay(1000);
FastLED.clear();
for(int Counter=0; Counter<=9; Counter++)
{
ledsA[Counter] = CRGB::Blue; ledsA[10+Counter] = CRGB::Green;
FastLED.show();
ledsA[Counter] = CRGB::Black; ledsA[10+Counter] = CRGB::Black;
delay(500);
}
...
Hope this helps – if you have more questions with more code, then please consider using the forum instead
hans
Forgot to post the forum link:
https://www.tweaking4all.com/forums/forum/hardware/arduino/
hans
Hi Hans
I have tested your idea and works perfectly on a section of the code with actual customization of my requirement. This has given me a heads up on other sections that operate in the same way.
Am confident with your assistance I will manage the project as per expected timelines.
My other section has the leds in a matrix of 4×4, which starts with two colors ( yellow& blue) that change gradually to a different color as they keep blinking to red( imagine molecules reacting to form a new product)
An idea oh how this can be achieved will be most welcome.
Thank you so much.
geowai
Hi George!
Glad to hear this helped you get started
As for your 4×4 matrix; please consider starting a Forum topic.
I may need some more info to understand what you’re trying to achieve
hans
Hello
I’m having a problem with my project I’ve made with your projects…
I would like to do an LED-matrix with WS2812b LED-stripes.
So I picked 6 different project’s from this website and I put them into my sketch.
Now I’m having a problem…
I wanted to work with an HIGH respective LOW pegel.
Everything is good and at the right pin I’m having HIGH if I close the switch.
But the programm doesn’t start my function where the LED’s will start to work…
I’m sorry for my bad english I’m native german speaker…
It’s a pretty big project sorry
Thank u very much
[SOURCES MOVED TO THE FORUM]
Trollo_meo
my mistake…I had my comments in german I’ve translated itsorry if it’s not good as I said english is my second language
[SOURCES MOVED TO THE FORUM]
Trollo_meo
Hi Trollo_Meo,
first off; I’ve moved your sources to this forum post.
Unfortunately, this pages becomes too long with all the sources that are being placed here, hence the request to place longer codes in the forum.
The forum is also the more suitable place to discuss this, as it’s a little off-topic.
Apologies for the inconvenience.
hans
I’ve added a reply in that particular forum post.
hans
This is a superbe resource, thank-you.
I used the fire code to create a bicycle powered art piece:
https://www.instagram.com/p/B4DLxKfn4-J/
Colin
Hi Colin!
Thanks for sharing that – that is awesome!
And thanks for the complement and the thank-you not of course as well – it is much appreciated.
hans
hey mate, how would i run multiple of this one after the other.
i want to run bounce multi then rainbow theatre chase
ive googled but cant find much
cheers
dane
danelord
Hi Dane!
Let’s see if I can be helpful here
First I’d start with the code I’ve using in this article: Arduino – All LEDStrip effects in one (NeoPixel and FastLED)
That version allows you to toggle effects with a button.
Now to accommodate for what you’re asking, you can do a few modifications: replace setup() and loop() with this to get started;
void loop() {byte colors[3][3] = { {0xff, 0x00, 0x00}, {0xff, 0xff, 0xff} {0x00, 0x00, 0xff} };
BouncingColoredBalls(3, colors, false);
// theaterChaseRainbow - Speed delay
theaterChaseRainbow(50);
}
There is a lot more cleaning up that can be done, and you can of course selected/add/remove other effects as well — I hope this gets you started
hans
Hello, excuse me for my english.
I am a beginner in the arduino world and I would like to create a “rain effect”.
I would like to put several led strips side by side, and see several led “fall” as the effect “meteor rain”.
I can not change the code of the “meteor rain” effect to have several meteors in a row, of different size, and with a different time between each.
Can you help me please?
I hope i was clear.
Thank you in advance.
AdictiK
Hi AdictiK!
Great question … but this would mean that you’d have to customize the meteorRain() function, and the modification would be very specific for your LED setup.
In the meteorRain() function you’d have to add a loop to handle each “section” of your strip (assuming all strips are connected sequential), or each stip (if you have separate strips, each on their own pin on the Arduino). I’m not sure how many strips you have, and at the moment I do not have the ability to test (hardware not at hand).
hans
Hello,
Thank you for your answer.
I thought to use a single long led strip, cut into several sections, put side by side, but all connected in series (I think it’s the simplest at first)
For the moment, during my tests, I manage to execute the function meteorRain (), but I can not launch several “meteor” in a row with a small delay.
Each time it is necessary that the meteor arrived at the end of led strips (and therefore of the function) to have a following. Thank you
AdictiK
You’re welcome!
I think the easiest is indeed like you described. This way you’d also not have less limitations on how many sections you’d want to use (since the number of pins on the Arduino could be a limitation).
I personally start by adding a parameter to the meteorRain() function, something like “byte SectionCount“;
And then use “SectionCount” in the for-loops to make sure effects stay in each range. .
.
It’s a little difficult for me right now to play with this and provide you with a full code
You’d probably want to set a variable to determine how many leds are in a section, say “LedsInSection“;
void meteorRain(byte red, byte green, byte blue, byte meteorSize, byte meteorTrailDecay, boolean meteorRandomDecay, int SpeedDelay, byte SectionCount) {byte LedsInSection = NUM_LEDS / SectionCount; // this result in an integer (byte) value
...
And some of the occurrences of NUM_LEDS should be replaced with this new “LedsInSection” variable.
Next you’ll have to tinker with the for-loops to make sure every section is handled in parallel with the other sections.
I know this is far from complete, but as I said: I do not have the means right now to test and play with the code
hans
Thank you again for your help.
I’m going to be honest, and I think my brain is overheating when I read your comment.
I think that everything is beyond me.
I know it’s a lot to ask you, but if you happen to have a little time to give me the code changes it would be great.
In the meantime I will try to fiddle with what you gave me.
Again again thank you
AdictiK
I can imagine it is a little much hahah …
Unfortunately, I do not have an Arduino, or LED strips available right now, so testing code is not an option at the moment
I’ll try to see what I can do, hopefully later today …
hans
I do not want to annoy you but it is true that if you have time it would help me a lot.
You saved my life
AdictiK
Oh you’re not annoying – I’d be happy to help.

The only challenge for me is that I have to go find some hardware (power supply, Arduino, and a LED strip)
hans
Hello
I come back with good news,
I found this code (https://pastebin.com/pRbS6Vfy) while searching the internet.
Several effects, by changing a little code that corresponds to what I was looking for.
Thank you
AdictiK
Awesome and thank for sharing the link!
Phew, now I no longer have to worry about finding the hardware to do some tests
hans
If I have 4 strips (or a multiple there of), of 10 addressable LED’s each being fed by a data stream (Arduino #1 – 30 LED COUNT) into a 4 relay board (controlled by Arduino #2) with data stream going to all 4 common relay connections), and the 4 strips wired as follows: when relay 1 is closed the data flows into strip 1, out of 1 and into 2 and out of 2 and into 3, with a data connection going from the top of 3 into the bottom of 4 (to complete relay 3 & 4 circuit later), only the first 30 LED’s are energized, even though power goes to all 40 LED’s. Then when relay 2 closes (1 opens) the data stream goes into strips 2 – 3 – 4 and back to the bottom of 1, only the LED’s 11 thru 40 are energized by the 30 LED count, relay 3 closes LED’s 21 thru 40 and 1 thru 10 are energized and when relay 4 closes LED’s 31 thru 40 and 1 thru 20 are energized. Each of the 4 LED strips have 3 data input lines (input from relay # ‘X’ and 2 data exit lines going to the next 2 LED strips. Are my assumptions correct that the LED display will walk from one string to the next, with 3 of the 4 string being energized at any one point in time? Think of a 12 or 16 strand Christmas Tree, wired as described. Thanks for reviewing my assumption.
gbonsack
Hi Gbonsack,
I’ll honestly will admit that I have a hard time grasping what you’re trying to do – maybe I need more coffee to wake up
From what I understand you’re using relays to determine the data flow of a segmented LED strip?
And you’re using the Din and Dout pins of the strips to switch? (all strips should share +5V and GND)
Then I’d think you’d be right, even though I’m not fully grasping the idea (a schematic overview would be helpful – you can post that in the forum if you’d like).
I’m not sure if you’d have to initialize the strips though, especially when the number of LEDs that are “active” keep changing.
If the number of LEDs stay always the same, then reinitializing may not be needed.
hans
Hi,
i just found your project, it’s awesome :)
I’m using the WS2812B with 144 Leds and I’m experiencing bugs with some sketches (wild flickering, eg. with the fire sketch), I found out that when reducing the LEDs to 50 it works .. any idea why?
I’d love an extra effect for xmas: some random sparkling, where a row of eg 3 leds will turn white (the middle should be the lightest) and then slowly fade out :D
Thanks and greets,
Tom
Tom
Hi Tom!
Thanks for liking the project
The first thing I’d try is testing if all 144 LEDs are OK. You can checkout this article and test the code listed there to see if all LEDs are working properly.
Maybe one of these days I’ll dedicate an article specifically to testing the LEDs (to reduce the hunt for code hahah).
Another reason why you may run into flickering is when the power supply can’t keep up. The test above should show flickering then as well.
114 LEDs requires 144x3x20mA = 8.6 A at maximum brightness if all LEDs are on.
In my experience a little less will work as well, since most effects do not have all LEDs on for a prolonged time. But your mileage may vary.
Then the 3rd reason could be that the Arduino can’t keep up with this many LEDs for these particular effects.
I haven’t tested any of the effects with that many LEDs
hans
Hi – I’m using 600 LEDs and all is well up to 300 but after that I’m getting random LEDs and changes when the rest of the LEDs transition. I was wondering if there was a timing issue for so may LEDs ie. the data not getting to the end of the chain? I have tried both fastled and neopixel.
I have modified the rainbow theatre chase to run 600 LEDs with the delay at 5000 – 5seconds to slow the effect down.
Cheer.
Richard Stevens
Seen the “meteor rain” at the top.
It would be great for a starfield ceiling I am doing. I tried to copy/paste it into my ardunio. It won’t run the program. I have no clue what I am doing LOL
Can someone tell me how to use that program with a arduino uno and a WS2812B 144 LED strip.
Martin
Hi Martin,
Since I’m not sure what is going wrong,so I’ll do a brief description of the steps:
1. Install the Library you’d like to use (I recommend FastLED) in the Arduino Application.
(“Tools” – “Manage Library” – type “fastled” in the search box, press ENTER, and click the “install” button in the FastLED section).
2. Copy the code listed for FastLED (in this paragraph).
Note:
– modify the line “#define NUM_LEDS 60” and replace “60” with the number of LEDs your strip has
– modify the line “#define PIN 6” and replace “6” with the pin you’re using on the Arduino (I’d recommend using pin 6)
3. Copy the code listed for MeteorRain (in this paragraph), replacing the highlighted code in step 2.
4. Click in the Arduino Application “Sketch” – “Upload“.
The code was created for an original Arduino Uno R3 but may work on other models as well.
hans
Hi everyone,
I have replicated this tutorial. Putted in as much effects in to code and as a remote button I have used an simple RF remote relay. It can be configured as push button (press and keep pressed button on remote keeps relay on). After release button on remote releases and relay.
My problem is that effect changes once I press remote button and once again when releasing that remote button.
pinMode(2,INPUT_PULLUP); // internal pull-up resistor is enabled
What you think – is this behavior related to pull-up resistor? Is it enough internal or should i use an additional one?
This is from my code:
void changeEffect() {
if (digitalRead (BUTTON) == HIGH) {
selectedEffect++;
EEPROM.put(0, selectedEffect);
asm volatile (” jmp 0″);
}
I am not codemaker and I do not know how this works I just wanted to ask is this OK?
Barcors
Hi Barcors,
I think you meant to post this comment here.
For more detail on using PULLUP, read David’s excellent explanation in this comment under said article.
For pullup, you will have to add a pullup resistor, something like this:
(source)
hans
Hi all!
I wish (still!) that somebody would care to take a look at my questions at the forum, at https://www.tweaking4all.com/forums/topic/fastled-noisepluspalette-help-needed/
I have really tried getting some result, but it seams that anything I do I break the code and Arduino will run it…
So, please any hint would be greatly appreciated!
perolalars
Sorry got the wrong link here is the right one: https://www.tweaking4all.com/forums/topic/fastled-noisepluspalette-help-needed/#post-13091
perolalars
Hi Perolalars,
I’m sorry I overlooked this forum post. There are sometimes just too many questions and every morning I try to go through them. Somehow I overlooked this one.
I’ll take a look and see what I can do – since it’s not my own code, I’ll have to dig a little and see how it works (always a pain). On top of that, I do not have an Arduino + LED strip handy at the moment, so it may take a little more work. I’ll respond in the forum.
hans
Hello Hans,
first of all…what a great job. I´m so happy to have found your article. With your examples its much easier to have some fun with Neopixels.
I really love the Meteor-effect. I have never seen a better one. Especially the tail decay.
Is it possible to have a solid color along the strip in lets say green and having the meteor running down the strip with another color? And the decay is not fading to black but fading to the solid color.
Thanks for help
Trace
Trace
Hi Trace!
Great to hear you like this! Thanks for the compliment!
As for a run down to another color (instead a black / off), we’d have to rewrite the “fadeToBlack” function.
I haven’t tested this, but I did find an example on Github, assuming you’re using the NeoPixel library (FastLED is in my opinion a more mature library).
I’ve “slapped” this together and have not tested the code, but you could try something like this:
Update the fadeToBlack() function to:
void fadeToBlack(int ledNo, byte fadeValue, byte targetRed, byte targetGreen, byte targetBlue) {
// For NeoPixel only
byte startR, startG, startB;
int value;
uint32_t startColor = strip.getPixelColor(ledNo); // get the current colour
startB = startColor & 0xFF;
startG = (startColor >> 8) & 0xFF;
startR = (startColor >> 16) & 0xFF; // separate into RGB components
if ( (startR != targetRed) || (startG != green) || (startB != blue) ) { // while the current color is not yet the target color
if (startR < targetRed) startR++; else if (startR > targetRed) startR--; // increment or decrement the old color values
if (startG < targetGreen) startG++; else if (startG > targetGreen) startG--;
if (startB < targetBlue) startB++; else if (startB > targetBlue) startB--; }
strip.setPixelColor(ledNo, startR, startG, startB); // set the color
}
Now we’ve added a target color to the fadeToBlack function, so we’d need to update a line in the “meteorRain()” function as well.
Ideally I’d change it to something like this:
void meteorRain(byte red, byte green, byte blue, byte targetRed, byte targetGreen, byte targetBlue, byte meteorSize, byte meteorTrailDecay, boolean meteorRandomDecay, int SpeedDelay) {
setAll(0,0,0);
for(int i = 0; i < NUM_LEDS+NUM_LEDS; i++) {
// fade brightness all LEDs one step
for(int j=0; j<NUM_LEDS; j++) {
if( (!meteorRandomDecay) || (random(10)>5) ) {
fadeToBlack(j, meteorTrailDecay, targetRed, targetGreen, targetBlue, );
}
}
// draw meteor
for(int j = 0; j < meteorSize; j++) {
  if( ( i-j <NUM_LEDS) && (i-j>=0) ) {
    setPixel(i-j, red, green, blue);
  }
}
showStrip();
delay(SpeedDelay);
}
}
This also means that calling the function would change, so instead of
we now add the target RGB color numbers (where 0x00,0x00,0x20 represents the target color):
Now, as said before: this is untested code, and I’d still have to add the fade speed (fadeValue).
But I hope this will get you started.
hans
Almost forgot: Merry Christmas!
hans
Sorry I forgot…..Merry Christmas!!!
I prefer Fast.LED. Just wrote Neopixel without meaning I want to use this library.
Thanks for your fast response. Your code works (just some typo). But not exactly what I have in mind :D
I want the strip light up with a steady color, lets say red. And the meteor just shoots through with, lets say orange (want to add a button function to trigger the meteor). To still have the decay effect, the decay will then blend to the steady color (which works great with your code).
Just like one color is always on and then it will look like a pulse goes through it.
The github code was a bit hard do change for the Arduino IDE and doesn´t work correctly. Cause the code is meant for Spark Web UI.
With the github code I thought there must be an easier way to blend two colors while running down the strip. But that´s just another thing to think about for me.
Trace
Haha, no worries; I almost forgot as well …
…
Glad to hear the code works, and sorry it isn’t doing exactly the effect you were looking for.
That would be the downside of translating somebody’s idea to code without being able to test it (I do not have my Arduino + LED strips handy).
Maybe this week I’ll get to it to dig up the needed stuff and try a better code. It’s a busy week with the holidays and such.
I hope to get back to you with a better code, now that I have a better idea of what you’re looking for …
Feel free to remind me – like I said: it’s a busy week
hans
No need to say sorry. You are doing a really great job and you are doing it for free. And the goal for me and everyone else here is to learn. So there are no codes without desired effect. There are only codes to learn from. Compared with other forums, you are pure gold ;)
Take your time, no need to hurry.
Trace
Thanks Trace!
I very much appreciate hearing that – makes me almost blush
hans
I was reading through all the comments here to find exactly the same effect Trace is after. Did you guys figured it out? CHeers! And before I forget… Merry Christmas! :D
Christian
Merry Christmas for you as well haha
I don’t think we got any further on this – with all the questions I answer daily, this somehow went on the back burner.
Sincere apologies to Trace, I hope you can forgive me
I’ve posted the code in the forum, since I’d like to avoid large pieces of code here in the comments.
Look at this forum post for the code.
Hans
Hi Hans, no need for apologies. I knew you were busy and so was I. Didn´t dare to ask for progress on those codes. Nice to see the custom meteor code works now. Do you remember about the Star Trek Warp jump effect?
Trace
Thanks Trace
Well, it’s been what? a year now? That’s a long time to post a solution
That’s why I jumped on it right away to find a working solution.
As for the Star Trek Warp jump effect – I’ll have to look at the forum topic again and read up where we left off (found it)
Hans
Hi Trace,
please check this forum post – I may have gone a little overboard with the Warp effect, and it is highly configurable towards your preferences.
Enjoy!
Hans
Can you post a complete example of a code using one of the animations? I can’t figure it out;(
Rudy
Hi Rudy,
To avoid too much code here, I’ve posted an example in our Arduino Forum: this is the link to that example.
Hope this helps!
Merry Christmas!
hans
[…] Introduction to LEDs (with Arduino, FastLed, NeoPixel) • Tips on getting the current right • Soldering Tips [1] , [2] • Arduino Basics (download […]
Hello everyone and the author of the forum!
I mistakenly bought a 12V RGB LED Strip instead of 5V and would like to know if I can use it with this “AllEffects_FastLED” sketch, which I found very beautiful and interesting (I’m using with a 5V LED Strip ).
The link is this: https://www.ebay.com/itm/252371081346 and the LED Strip is as shown below on the page: 4Pin RGB and if you can use it with this sketch, I would like to know how to connect it because it is with 4 wires (White, Green, Red and Blue).
Thank you all
dancopy
Hi Dancopy!
I honestly have no experience with the 12V models. I have seen some users use it though, so it appears that it is possible to use those.
You may (and I’m just guessing here) have to connect your power supply differently though. I’m again just guessing that you’d have these 4 pins:
– +12V –> to 12V Power Supply +
– 12V GND –> to 12V Power Supply GND (may have to be connected to Arduino GND as well, first try without doing that)
– Data In (+5V) –> to Arduino PIN
– Data In GND . –> to Arduino GND
Note: which pin is what, is something you’d have to find out yourself, maybe Google it, ask the seller, or it may be printed on the strip.
Coming back to the 4 pins:
– the +12V and 12V Gnd is used to power the LEDs, and
– the Data In and the Data In GND are used for the controller that is embedded with each of the (3) LEDs in LED blok (each one of those white little blocks).
So if you use one power supply for the 12V pins, and the “Data In” pins to your Arduino, then this may work.
This also would imply that you’d need a 5V power supply (not nearly as potent as the 12V) to just power the Arduino.
Also: I suspect that they may need to share GND (so the GND of the 12V power supply, connect to the GND of the Arduino).
Again: I have never played with the 12V models, maybe others that do have experience with these can chime in and confirm or deny what I’m writing here.
hans
Forgive me Hans and Gunnar for being so late in answering them. I mistakenly bought the Led strip from eBay and, in order not to be lost or to not have so much work, later, I also bought the Remote Control from eBay together with the 3A Power Supply for this Strip; Thank you for your help.
Now, a second question: I am using Hans’ wonderful sketch, “AllEffects_FastLED”, which is working perfectly but, I would prefer to use, preferably, the Blynk app or any Bluetooth, to turn my Led strip on and off , which is attached to the top of a wardrobe and plugged into an outlet, also at the top of the wall, and every time I need to turn the strap on / off, I have to climb up on a chair to plug / unplug it.
I already created the button icon in Blynk to turn the Led strip on and off, including, naming D2 as the #define PIN 2, which is defined in the sketch (I don’t know if I’m right!) And, I also got the “char auth” “(authentication), therefore, I would like your help to complete the sketch to work with any Blynk or Bluetooth;
My advance thanks
Daniel Fernandes
No worries
Unfortunately, I have no experience with Blynk, but you could check out the forum, since the Bluetooth topic has been discussed there by others.
See for example this topic, but I think there may be more than one topic covering this.
This link may be helpful as well with some of the hardware setup.
Hans
I don’t know anything about your strip but find this and hope it can help you.
https://github.com/FastLED/FastLED/blob/master/examples/Blink/Blink.ino
Regards Gunnar
Gunnar
Thanks Gunnar!
hans
Thank you Gunnar! forgive me for the delay! I also wrote to Hans.
Daniel Fernandes
(code moved to forum)
Trace
Sorry, didn´t read the comment rules thoroughly about posting large codes. Please delete the comment, I will post it in the Forum as soon as I got the registration mail.
Trace
No worries: I’ve moved it to the forum – this post.
hans
Thanks Hans. Didn´t get a registration mail (did the registration a few days ago). Shall i register again with another name?
Trace
Did you register yourself?
In case you did; email me at webmaster at tweaking4all dot com, with your loginname/email address, then I can look and see why this may have gone wrong.
If not then you’d still have to do that.
hans
I found your name/email in the user accounts … maybe the email went into your spam, or you used the wrong email address?
Just send me an email and I’ll fix it 😊
hans
Hello :
Just asking, how to use these effects for 2 neopixel rings into 1 arduino board ?
For example, Ring1 for Sparkle and Ring2 for Rainbow cycle
Denny
Hi Denny,
running 2 effects at the same time (on 2 different LED strips) is possible, but can be quite a challenge, especially when the effect needs a loop.
I’ve written a follow up on this article: All Effects In One. You could experiment with that one.
You’d need to initialize both strips, and in each effect you’d need to call a specific strip. But it will come with challenges and the effects will be slower.
I’d probably use 2 Arduino’s instead.
hans
hello Hans :
OK, I will try.
Many thanks for the reply.
Will post it here later.
Denny
[…] Идеей лампы вдохновился здесьОсновные эффекты брал тут […]
[…] https://www.tweaking4all.com/hardware/arduino/adruino-led-strip-effects/ […]
[…] The main effects took here […]
Hello
I need to command 3 leds, ws2812b,
The first one is red, the second green, the third blue, and I would like to control them as if they were normal LEDs.
Example: red on, red / off.
How can I do?
thank you
usul
Hi Usul!
You can only control the LEDs through a device like the Arduino, ESP8266, Raspberry Pi, etc.
The WS2812 LEDs require a signal (data) so it know what color to use.
Since I’m not sure what you have in mind when you say ON/OFF, I’ll assume you’ll use one Arduino and you have a LED strip of 3 LEDs.
Note if the LEDs should not be sitting next to each other, you can cut them loose by cutting on the line (see this article, figure 3) between the markings “DO – Din, +5V-+5V, GND-GND) and you can use regular wires to reconnect them. This way you can position them anywhere you’d like.
To switch a LED ON and OFF (assuming you’re using the FastLED library – for FastLED-library and NeoPixel-library examples, please read this article), you could create a function to make it easier to call in your code, for example (untested):
void SwitchLED(int LedNr, bool SwitchON) { // Numbering of LEDs starts with zero (0), // so the first LED = 0, seconde = 1, and the third LED = 2if(!SwitchON) { // if NOT SwitchON = Switch OFF = color black leds[LedNr] = CRGB(0,0,0); } else // Switch LED ON { switch (LedNr) { 0: leds[LedNr] = CRGB(255,0,0); break; // First LED -> red (= red 255, green 0, blue 0) 1: leds[LedNr] = CRGB(0,255,0); break; // Second LED -> green (= red 0, green 255, blue 0) 2: leds[LedNr] = CRGB(0,0,255); break; // Thrid LED -> blue (= red 0, green 0, blue 255) } } FastLED.show(); // Show changes }
You can call the function now in your code like this, for example turn the first LED ON, second LED OFF:
Note that in the “void setup()” function, you’d want to set all LEDs to black first (so they are all OFF), so for example:
void setup() {...
fill_solid( leds, NUM_LEDS, CRGB(0,0,0));
FastLED.show();
}
Hope this helps …
Hans
this is a part of what I was looking for, thank you, but would there also be the possibility of identifying them with a name?
Example: red led; green led; etc?
thank you
usul
Yes, you can use the predefined colors from FastLED.
You can assign colors manually per color:
or all at once
or direct with the predefined colors:
Hans
[…] to the Arduino for the output of text strings. Next, I consulted a site by Hans Lujiten called tweaking4all.com that described how to program different animation effects for NeoPixel strands. The only part that […]
hello,
I am looking at the Cylone effect. when I try in exceed a LED number of 71, none of the LEDs light up. with only one at the end of the strip flickering on and off.
my desired LED count is 75. Im wondering if you can help me out as to why this might be happening.
I am using the ESP8266 board. I have no issue with these LEDS when using other effects.
thanks
kevin
Hi Kevin,
It is not impossible that my code may have a flaw of course, but when I looked at it just now, it seems to be OK.
Did you try other odd values? Eg. 65, 67,69 LEDs?
Power shouldn’t be an issues, since not all LEDs will be on at the same time – just the same amount of LEDs will be bouncing, even if you’d use 71+ LEDs.
As for ESP limitations; I do not see a reason why it would limit at 71 … just an odd number.
Did you test another strip of 71 LEDs?
Hans
ok apon further testing i have found that when I had the LED strip (ES2812B) at a larger amount (150 for example), and i set the NUM_LED value to say 100. i noticed it started performing the code down towards the bottom end of the strip rather then the top. secondly I tried it with a different type of strip (WS2813) and had a similar problem where it was starting from the bottom. this time it was once the NUM_LED was set to 68 and above that thisd occard and it was now starting from the bottom end.
when using another effect like say the rainbow cycle one. it has no trouble with colouring all the LEDs correctly.
its had me stumped. and im unsure if maybe there is something to do with the esp board changing polarity of the integer after a certain value or something like that.
cheers
kevinm
Hmm, interesting. Well, there could be a problem with the code of course.
Unfortunately, I’m stuck in two other project that I’d like to finish first.
Could you try an eye size of “1” ?
It almosts sounds like the pixel, when it is being set in the code, is going below zero and/or beyond NUM_LEDS.
You could do a quick test by changing the setPixel() calls, which you could do in the setPixel() function. Something by replacing the setPixel() function (at the bottom of the code) with:
void setPixel(int Pixel, byte red, byte green, byte blue) {if ( (Pixel>=0) && (Pixel<NUM_LEDS) )
{
#ifdef ADAFRUIT_NEOPIXEL_H
// NeoPixel
strip.setPixelColor(Pixel, strip.Color(red, green, blue));
#endif
#ifndef ADAFRUIT_NEOPIXEL_H
// FastLED
leds[Pixel].r = red;
leds[Pixel].g = green;
leds[Pixel].b = blue;
#endif
}
}
This should avoid negative pixels and pixels beyond the strip length.
Ideally one would like to see some sorts of output in the debug window as well of course.
But like I said: I’m stuck in 2 projects which I’d like to finish first. Once done, I’d be happy to do some testing as well.
Hans
Hey it’s me again
I’m struggeling once again with my LED-Matrix….
Code moved to this forum post
Trollo_meo
Hi Trollo_Meo,
I’ve moved your post to this forum topic to minimize the amount of code posted here in the comments.
Let’s please continue this topic there – my apologies for the inconvenience.
Hans
Thanks so much for this comprehensive LED tutorial! It’s the best i’ve found. I had a few questions, sorry if this is easy, I’ve only started with Arduino and LED strips today so am struggling a lot to understand the coding parts. I’m using your approach to fade in and out of the for the LED strip, I’ve adapted bits of the code you posted and the working code I’m using is pasted below. Can you please give a bit more information about the points mentioned below.
Thanks again for such an amazing tutorial!
Code moved to the forum, see this forum post
Asa
Hi Asa,
thank you for the very nice complements and right away my apologies for moving the code to the forum.
Unfortunately (as you can see), code is taking up a lot of space in the comments, so I try to move as much as possible to the forum.
I’ll try to answer your questions there
Hans
Hi All,
I’d like to ask you, why there is a 470R resistor in your circuit and there is no resistor on schema for BOBLIGHT?
https://www.tweaking4all.com/home-theatre/xbmc/xbmc-boblight-openelec-ws2811-ws2812/
Should I add 470R resistor to BOBLIGHT configuration?
if so? why?
Thanks
Marc
Marcin
Hi Marc,
well, to be very honest: both works if you have more than one LED (in my opinion anyway).
The resistor is just there to protect a single LED from burning out.
The theory being that it is to limit the current going through the LED, without resistor LED would eat current until it melts (source).
This points more towards the use of one single LED though, and it is recommended by most.
In practical use (I always have more than 10 LEDs for sure) this doesn’t seem to be an issue.
It is however totally possible that your strand will have only one single LED on, so it may be a good idea to place the resistor.
Commonly seen values are 470 Ohm (12V circuits) and 330 Ohm (5V).
With the circuit here, the 330 Ohm may result in a slightly brighter LED.
But in all honesty; I have not noticed the difference (without resistor, with 330 Ohm resistor or with 470 Ohm resistor).
Also notice that this article was published about a year after the Boblight article, I’ve learned a few things in that year in between.
Hans
Hi,
Firstly this is by far the best tutorial in terms of range of options for these strip LEDs so thank you!
I was just wondering if there was a way of changing the colours in the rainbow cycle effect? I love this effect but I just only want to use a few select colours rather than the whole rainbow!
Thanks again!
Sarah
Sarah
Hi Sarah!
Thank you very much for the compliment, it is much appreciated!
I suppose this depends a little on what you had in mind?
Just doing a rainbow with one color? (eg. a blue wave for example)
In the meanwhile:
I’m not sure if this is of any help, but maybe give this a try LED strip effect generator.
I haven’t tried it, but it seems to allow for a selection of color(s).
Hans
Thanks so much that website is great! Yes, just one colour (shades of one colour I suppose).
Sarah
Sarah
Hi Sarah!
Well, I’ve been tinkering with some code and wasn’t able to “quickly” create some code for you.
My apologies for that. I’d recommend playing with the settings in the code generator (the link in my previous comments).
Stay healthy!
Hans
Ah thank you so much for your time anyway! I really appreciate it!
That website is super helpful anyway so thanks so much!
Sarah
Sarah
You’re most welcome Sarah!
Stay Healthy!
Hans
Hello
I love the way you layed out this sample code, makes it so easy to use.
With the fade in and out Im fading from 75% to off and back up again without a problem.
But how do I fade from 75% to 25% to 75% repeating, I cant work out how to stop the fade at 25%
Thanks
Steve
Steve
Hi Steve,
Thanks for the compliments
As for your question; looking at the FadeInOut() function, you’ll see twice a for-loop.
One from 0 to 256 (Fade in) and 256 to 0 (Fade Out). This is where we’d want to set the 75% and 25% cut-off.
For example change
for(int k = 0; k < 256; k=k+1) {to
for(int k = 50; k < 256; k=k+1) {(assuming “50” approaches “25%”), and
for(int k = 255; k >= 0; k=k-2) {to
for(int k = 255; k >= 50; k=k-2) {If I recall correctly, the challenge will be this:
The “brightness curve” is not linear. With that I mean: 25% of 256 does not result in 25% brightness.
So you’ll have to determine what the right values are to get close to 25% and 75% – you could try using the serial monitor for that – have it output a number, wait a little so you can read the number, etc. A good read on this topic (and LED colors in general) would be the FastLED LED reference article.
On that note: if you decide to use FastLED, tinkering with the FastLED.setBrightness() function maybe a good alternative as well.
Hans
Hi Hans
Thanks so much for the quick reply :-))
Praise should be given when deserved.
Do you have a youtube channel by chance, I do most of my browsing on a phone, videos make quick searches easier.
I actually worked out the fading to a dim glow (not off) by guessing the 0 ment off (its so obvious now, right lol )
but my next question Im sure I wont fluke the answer.
I have 16 2812 leds, I want all leds to light up and count down, but outside to inside
All leds on, then leds 1 & 16 to dim to off (or just turn off), then 2 & 15, 3 & 14 etc
Is there an easy way to do this?
Cheers mate
Steve
Steve
Thanks for the compliment
Hans
Hi Steve,
Well, I do have a YouTube channel, but it’s hardly used, more for small demo’s or examples. .
.
The main reason is probably because I usually get very annoyed when trying to follow steps in a video (I have to press pause and rewind too often)
As for your countdown process.
If I’d have to write code for this, then I’d first create a function that dims one individual LED.
Let’s call that function “DimLED(x)“, where x = the LED we’d like to dim.
In that function you’d have a line that does a setPixel(x,colors).
So if we count from 0 to 7 ( = (NUMLEDS/2) – 1), then we could call this function to dim the LEDS 0, 1, 2, 3, 4, 5, 6, 7.
Keep in mind that the LEDs around counted from 0 to NUM_LEDS-1 (arrays start with 0 and the LED colors are store in an array).
To do this in parallel with the LED on the other end, we can add a line that calls setPixel again, just with the opposite number.
So where you’d have setPixel(x ,red,green,blue) in the DimLED() function, we add setPixel(NUM_LEDS – x – 1 ,red,green,blue).
This way the LEDs on both ends will dim at the same time.
Finally, in the main loop() we make a little for-loop to have it count from 0 – 7. Something like this:
for(x=0; x<(NUM_LEDS/2); x++) {DimLED(x);
}
So this way we only have to count to half the length of the strip.
Note: “x < (NUM_LEDS/2)” will stop before it hit NUM_LEDS/2.
So in our example, it will stop after x = 7 (NUM_LEDS/2 = 8, and we tell the for-loop to only loop while x<8).
I hope that makes sense
Hans
Hi Hans
I think I got the gist of it.
Ill find out on the weekend :-)
Thanks again mate
Steve
You’re welcome!
If you need help: open a forum topic and I’ll see where I can help
Hans
hi
can you explane how can i use different couple of pattern in one Arduino programme.
thilina
Hi Thilina,
You may want to check this article to combine effects.
It includes all effects and allows you to toggle effects. This could be a good starting point.
Hans
Thanks for your help😀😀😀
thilina
You’re welcome!
Hans
i have the APA102 3 inch (77mm) 60 RGB LED ring (available from sparkfun) i want to use for a clock. i know the code works, and works correctly with a 6 3/4 inch (172mm) 60 RGB LED ring that uses WS2811 LEDs. the issue i am having is that the 3 inch ring is manufactured in a counter clockwise direction apposed to the 6 3/4 inch ring manufactured in the clockwise direction. i have tried using for (int i = 59; i >= 0 ; i–) and/or for (int i = 0; i < numLEDs; i++) to try and reverse the direction of data flow. neither one has any effect and i am guessing it is because in the code, it is the time (hour, minute, seconds) that tell which LED is to be lit up, and when.
i have also tried playing with ARRAY, CRGBSet, and a few other possible tricks to tell the ring which way to run. all i run into are errors or having no effect as well…. any ideas?
i can post the code if you like. i tried registering for the FORUM but have not received any emails about password in order to sign in. so i thought i would try and start here
Dwight
Hi Dwight,
sorry to hear you’re running into issue registering for the forum.
Did you use the “Register” link on the Forum Page?
(the one provided by the LOGIN button on the regular pages seems to be having issues – I’m looking into that)
Posting the code (not here – thank you for not doing that, the forum is where it should go) would be helpful to get an idea what may be going wrong (it sounds like you did already tried some of the obvious ones).
Hans
i was finally able to get logged into the forum (ppgflyer68) and reply to a thread (In need of assistance with a sketch -Addressable LED)
with my situation. i hope i did things correctly…. total newb to the forum thing aside from reading them.
ppgflyer68
No worries – this worked
For anyone interested: this is the link to the forum topic.
Hans
Thanks so very much Hans, I look forward to suggestions
Dwight
You’re welcome Dwight!
I’ve just posted a potential fix in the forum.
Hans
‘NUM_LEDS’ was not declared in this scope
this is the error that popped up when compiled
ppgflyer68
I just noticed that your code uses “numLEDs” instead of “NUM_LEDS”. See forum post
Hans
many thanks Hans, you ROCK!!! that worked……… however, now when it goes from 59 to 0 (at the 30 second mark because of the offset), the whole ring dims just slightly for that one second. i could live with that, but if you might think of something about it would be awesome. again many thanks.
ppgflyer68
just discovered another weird action, when it hits 59 – 0, the mode changes back to 0 no matter which mode you set it.
ppgflyer68
Awesome!
Maybe it is an idea to start a new and separate forum topic in the Arduino Forum for this and continue the conversation there.
Hans
Hi guys, is there any way to make the running light in 2 color but in group of leds? I mean not 2 different light one led after the other but make like 5 leds red and 5 blu? Also if is not too diffuclt, make the led in the center of the gtoup brighter than the other led
thanks you guys!
Sid
Hi Sid,
this would require some reworking of the RunningLights() function.
I’ll try to take a look at this in the next few days – feel free to give me a nudge if you’re wondering where I’m at with that (it is going to be a very busy week here).
Hans
I did find a little time to quickly tinker and try to make the effect you’re looking for (hopefully I understood you correctly).
I simplified the code, and I’m sure it can be done in a smarter way, but give it a try.
This is the entire sketch, based on FastLED and a strand of 60 LEDs connected to pin 6:
Hans
With the upcoming 4th of July (US national holiday), I’ve modified the code to support 3 colors (3 blocks of 5), so red-white-and-blue can be used easily.
Naturally you can use the colors of your own country, sports team, etc.
I’ve posted the code in the forum as well.
Hans
Hello
I really appreciate the amount of work you put into creating this site. it has lots of useful information.
could you please kindly look at my sketch and tell me if you find any issue with it.
it is for running leds from side to center with white color.
I have been told the left side is moving faster than right.I appreciate if you could take a look and tell me how to fix it?
here is my code:
Code removed – placed in forum
sid
Hi Sid,
To minimize the amount of code posted in Comments, I’ve moved your code to the forum.
This is to keep the list of comments to a minimum, as noted above (Do not post large files here (like source codes, log files or config files)).
Please proceed there.
Hans
p.s. I’ve added an optimized code, and a solution in case the optimized code still isn’t quite cutting it for your purposes.
Hans
Is there a way to tell the cylon/KITT lights to use a specific set of the string? I have a box outlined, and for certain effects I want the cylon sketch to run on either the top or bottom of the box.
John S
Hi John,
Yes, you can modify both functions to fit only a selected range of LEDs.
You’d have to introduce a start (StartLed) and stop (StopLed) LED position.
Next replace, only in the functions related to the effect, NUM_LEDS with the stop LED position (StopLed) and 0 (zero) with the start LED position (StartLED).
Change these only inside of the “// *** REPLACE FROM HERE ***” and “// *** REPLACE TO HERE ***” section.
Here an example how this can be done for the Cylon effect:
void loop() {
  CylonBounce2(0xff, 0, 0, 4, 10, 50, 30, 50);
}

void CylonBounce2(byte red, byte green, byte blue,
                  int EyeSize, int SpeedDelay, int ReturnDelay,
                  int StartLED, int StopLED){

  for(int i = StartLED; i < StopLED-EyeSize-2; i++) {
    setAll(0,0,0);
    setPixel(i, red/10, green/10, blue/10);
    for(int j = 1; j <= EyeSize; j++) {
      setPixel(i+j, red, green, blue);
    }
    setPixel(i+EyeSize+1, red/10, green/10, blue/10);
    showStrip();
    delay(SpeedDelay);
  }

  delay(ReturnDelay);

  for(int i = StopLED-EyeSize-2; i > StartLED; i--) {
    setAll(0,0,0);
    setPixel(i, red/10, green/10, blue/10);
    for(int j = 1; j <= EyeSize; j++) {
      setPixel(i+j, red, green, blue);
    }
    setPixel(i+EyeSize+1, red/10, green/10, blue/10);
    showStrip();
    delay(SpeedDelay);
  }

  delay(ReturnDelay);
}
You can apply the same trick to KITT, but I did find the effect to be less “great”.
Hope this helps
Hans
Hello Hope you can help how do you make something go from left to right… I.e the meteor shower?
David
Hi David,
flipping around an effect is quite often relatively easy by flipping the counting.
So for example in the Meteor Rain:
void meteorRain(byte red, byte green, byte blue, byte meteorSize, byte meteorTrailDecay, boolean meteorRandomDecay, int SpeedDelay) {
  setAll(0,0,0);

  // OLD: for(int i = 0; i < NUM_LEDS+NUM_LEDS; i++) {
  for(int i = NUM_LEDS+NUM_LEDS; i >= 0; i--) {

    // fade brightness all LEDs one step
    for(int j=0; j<NUM_LEDS; j++) {
      if( (!meteorRandomDecay) || (random(10)>5) ) {
        fadeToBlack(j, meteorTrailDecay );
      }
    }

    // draw meteor
    for(int j = 0; j < meteorSize; j++) {
      if( ( i-j <NUM_LEDS) && (i-j>=0) ) {
        setPixel(i-j, red, green, blue);
      }
    }

    showStrip();
    delay(SpeedDelay);
  }
}
Note: I have not tested this code change.
Hope this helps.
Hans
So I have
void meteorRain(byte red, byte green, byte blue, byte meteorSize, byte meteorTrailDecay, boolean meteorRandomDecay, int SpeedDelay) {
Please can you advise what you have changed?
David
So sorry I have clicked on now I want it to go left to right not just one way can you advise me please?
David
However, I’m sure I overlooked something.
As you can see I flipped the order around from the for-loop – for more info on how the for-loop works: see this paragraph of “Arduino Programming for Beginners – Part 5: Going in Loops“.
This could be a starting point (sorry – running out of time to actually test the code).
Hans
p.s. if everything needs to be mirrored then you could also consider keeping the function original and changing the “setPixel” function. This function is called to set a LED color for a specific LED with this code:
void setPixel(int Pixel, byte red, byte green, byte blue) {#ifdef ADAFRUIT_NEOPIXEL_H
// NeoPixel
strip.setPixelColor(Pixel, strip.Color(red, green, blue));
#endif
#ifndef ADAFRUIT_NEOPIXEL_H
// FastLED
leds[Pixel].r = red;
leds[Pixel].g = green;
leds[Pixel].b = blue;
#endif
}
If you’d want everything to be flipped, you could do this by just flipping that function, like so (also untested):
Hope this helps
p.s. it’s early and I may not have had enough coffee yet.
Hans
Amazing work on these sketches! I managed to get the all effects one working as well. But I was wondering; without knowing how to code, is it possible for me to alter the rainbow sketch so that it can be say, 2 colours like orange to green slowly changing? I would love to be able to toggle them too with a switch. Thanks again!
Justin
Thanks Justin for the complements
Altering the rainbow cycle to work with 2 colors may require quite a bit of change – it will probably be easier to write a new function to accommodate that.
the current function cycles through values for red, green and blue – the native RGB colors.
If we’d want to use only 2 specific colors the wheel function will not work as designed.
Having said that: I’m working ona little project using an ESP8266, which offers more speed and memory than an Arduino Uno, offers WiFi so we can run a webserver, and … is typically only $5. It may take a bit before I migrated all effects to that project, but I’ve made note of your request, so I may be able to add this effect as well (and with some luck I should be able to convert it for use in this project as well).
Hans
Looking forward to the ESP8266 project Hans.
Will you be posting it here so I get a notification?
Spike
I’ll most certainly will try to do that
Hans
Hi Hans,
No problem, we all appreciate your awesome efforts. Hm, OK so I think I should practice my python then and see what I can do. I’m guessing I can’t simply paste someone else’s code into your all effects sketch like a void loop? I want to be able to toggle with my tactile switch, and I think you were saying it was complicated to get them to work with it?
Another issue I noticed was that the transition between effects in the all effects in one sketch was kind of unpredictable. Like I would toggle from say, strobe to the next effect and it would bring me back to the beginning. Is that likely an issue with bounce or should I have used a resistor with the switch?
Also, thanks for using my suggestion for your new ESP8266 project! It sounds interesting.
Justin
Justin
Hi Justin,
If you’re working with an Arduino, I’m afraid Python will not do much good. You’ll need C(++).
Effects can be pasted (if written in C), but you may have to modify it a little bit to accommodate the “universal” calls I have created.
Unless you decide on using a specific library (I’d recommend FastLED, as it is more mature than AdaFruit’s NeoPixel).
The issue you run into is most likely caused by the debounce effect: “Pushbuttons often generate spurious open/close transitions when pressed, due to mechanical and physical issues”. I haven’t experienced it myself, so it can be switch specific. In the link you’ll see some schematics (simple) and some minor code changes. It has been discussed in the comments of my follow up project as well (all effects in one – comment1, comment2) .
Hope this helps
Hans
This is good to know! I didn’t realize switches could vary in this problem and that Fastled is in c++. Thanks for the links. I’ve added the code you provided;
However, when I include it in the setup, I get an error that says ‘strip’ was not declared in this scope. Am I pasting in the wrong place?
Justin
Instead of “strip” you’d probably need to use “leds”.
Having said that, “strip.begin();” and “strip.show();” are AdaFruit NeoPixel specific – and is not used for FastLED.
So just remove those 2 lines.
I originally wrote the code to work for either AdaFruit Neopixel and FastLED, however both libraries work slightly different, and each user has his or her own preference.
Hans
Hm the code runs, but didn’t seem to fix the button issue:
However, I was able to switch effects if I let each one run for a while.
Last 2 questions (and thanks again for your help throughout all of this):
1. Is it possible to suppress some of the effects in the all-effects-in-one sketch? Like if I want to not use strobe?
2. Is it possible for me to add this sketch to the all-effects-in-one sketch? https://gist.github.com/kriegsman/8281905786e8b2632aeb#file-colorwaveswithpalettes-ino
Justin
Justin
Did you add the pull-up resistor as mentioned in the comment here?
Otherwise this would indeed not work.
Suppressing effects is most certainly possible.
You could remove the involved “case” section, but it would be cleaner to just remove the effect from the code all together.
But … this would be related to the other project (All effects in one) and not the project on this page.
Say this is your void loop() code:
Then it would like this after removing the Strobe effect:
Note:
– You will need to decrease the “18” -> “17” in the line “if(selectedEffect>18) {“
– You will need to remove the case block “case 2 : { // Strobe … }“
– You will need to renumber each “case” line after where “Strobe” used to be, and reduce it by one (so “case 3 : {” becomes “case 2 : {” etc.)
As for adding the mentioned effect: yes, I’m sure you can add this, but it will take some work to make it work for the All-in-One approach.
As mentioned with the All-in-one project: we need to prevent that endless running effects get interrupted every now and then, and the code you provided does not support that. So some tinkering is needed there. Having said that: I’m working on a new project, with all effects in one, by using a cheap ($5) ESP8266 which is much more potent than an Arduino. I’ll look and see if I can incorporate the mentioned effect there, as I’m using a different way to interrupt an effect (and control over WiFi so far works great).
Hans
Great! The method you described for suppressing effects worked! I only needed about 9 for my project and they seem to toggle a lot better now. And yes, next time if I have an issue with the alleffects sketch, I’ll post in the correct forum.
If by the pull up resistor, was it the code that was included in the void setup? If so, then yes it was added. The only issue left (which is not a huge deal) is that sometimes if I switch too quickly, it pauses the effect (again, not a big bother for me) but also sometimes the effect pauses itself and restarts (not sure why). I should mention too that for some reason whenever I add the
it doesn’t work at all.
Anyway, this is the changed code in the setup and renumbered case blocks.
Justin
Hi Justin,
As we are both posting more and more code: this topic would probably have been better in the forum
For the pull-up resistor:
You’ll need to add a resistor (10 KOhm) between the GND pin and the Datapin on your Arduino. The datapin needs to be the pin used for the switch. (see also the picture in this comment)
Since I haven’t done much with debouncing (just running short on time), you may have to add a little test to see that between 2 button pushes at least a certain time has passed. Since a full reset takes place in the code you’re using, you may be able to get away with this approach:
p.s. on your code:
1) you will have to renumber the case statements as well. You right now have 1-2-4-5-6-7-8-9, which should probably better be 1-2-3-4-5-6-7-8.
2) I’m not seeing the “changeEffect()” function in your code (please do not post a full code here again until we have everything running – or even better: start a topic in the forum).
Hans
Hi Hans, sorry for the delay. Good point about pasting too much code and also on the wrong page. I’ve moved this to the forum as per your suggestion. Thanks for the info on the pull up resistor. It seems to work find now, not sure if that’s due to the internal resistor on my Arduino Uno? I’ve also renumbered the case blocks; good catch! And finally, I attached a link in the forum to my sketch from pastebin. Thanks again for all your help!
lakerice
No worries, no harm done
Thanks for posting the working code in the forum – it is very much appreciated
Hans
Hey, can someone help me out, i have tried to get the snow sparkle to work but im to noob to understand it. i have 2812B with 144 leds per strip and i have 2 strips. using pin 7
void loop() {
SnowSparkle(0x10, 0x10, 0x10, 20, 100);
}
void SnowSparkle(byte red, byte green, byte blue, int SparkleDelay, int SpeedDelay) {
setAll(red,green,blue);
int Pixel = random(144);
setPixel(Pixel,0xff,0xff,0xff);
showStrip();
delay(SparkleDelay);
setPixel(Pixel,red,green,blue);
showStrip();
delay(SpeedDelay);
}
Kjell
Hi Kjell,
I’d be happy to help. Could you provide more info?
Did you use the FastLED or the NeoPixel “framework”?
Could you post you full code in the Arduino forum? (do not post the code here!)
I’d be happy to take a look
Hans
Hello anybody that can help!
I was wondering if yall had any idea how to save the pattern on EEPROM. For example, if i flip through the patterns and I land on any pattern, then shut it off, when turned back on I want the pattern to stay on the pattern it was on prior to the shut down. In short, I want to change to a certain pattern then turn it off and when it turn it back on I want it to be on that same pattern. I know EEPROM can accomplish this but I cannot figure it out.
Any help would be appreciated!
JT
Hi JT,
apologies for the late response.
The successor of this article (link) is supposed to be doing exactly that.
Hans
Thanks for the reply Hans!
Upon looking at the forum I’ve tried your way and I peered through the comments and tried other peoples way with no avail…
I have a power off button as well as a switch button. The common problem is when the Arduino is cut from all power it seems to just reset the code. I know you mentioned something like that in one of the comments replies. Any fixes so far? If not ill probably just accept the fact and move on. Thanks again!
JT
i have written a little helper – storing values in flash-blocks (protected by crc) – if you are interested, i would post it here….
Normen
Please!
JT
Awesome!
Would you mind posting it in the Arduino forum here?
(if you’d rather not sign up: emailing me would be an option as well, I can post it for you, unless of course your helper is super small)
Hans
Hi JT,
well, technically the EEPROM should hold the last value(s) written to it, even after powering the Arduino down.
I did notice however that it’s not always as reliable as one would expect, especially when power is removed.
The values do however always seem to survive a reset.
So unfortunately, I do no (yet) have a good and reliable fix for this (assuming you save the value as soon as you change to a different effect).
Hans
Hello Hans :
Thank you for your article here. I like very much for your tutorial here.
I see the effect ( LEDStrip Effect – Rainbow Cycle ), and I want to know how to make the same effect like this, but for 1 colour only.
Which part should be changed ?
Thank you and have a nice day.
Maier
Maier
Hi Maier,
Forgive me for not understanding your question entirely; The rainbowcycle with just one color wouldn’t do much?
Or are you thinking of a color “block” (dark to bright and back to dark) sliding over the LED strip?
Note: if you’d want to play with the colors, you’ll have to change the “Wheel()” function.
Since you’re looking at a more simple color pattern, this function may even become redundant, especially when using the FastLED library.
You could try something like this (again: not quite understanding what you’re looking for):
void rainbowCycle(int SpeedDelay, byte red, byte green, byte blue) {byte *c;
uint16_t i, j;
for(j=0; j<256*5; j++) { // 5 cycles of all colors on wheel
for(i=0; i< NUM_LEDS; i++) {
// c=Wheel(((i * 256 / NUM_LEDS) + j) & 255);
// setPixel(i, *c, *(c+1), *(c+2));
setLED(i, CRGB( ((sin(i+Position) * 127 + 128)/255)*red,
((sin(i+Position) * 127 + 128)/255)*green,
((sin(i+Position) * 127 + 128)/255)*blue) );
}
showStrip();
delay(SpeedDelay);
}
}
Note: I have not tested this code, I just grabbed it from another project I’m toying with.
Hans
Hi! This page was a lifesaver and it’s so cool/useful! I know I’m writing a comment quite a while after this was made but I have a simple (hopefully) question! I want to add a switch to turn the lights on and off. I have the neopixel, Arduino, and switch connected to a small breadboard, and the base code works, but I just cant seem to get the switch to turn on and off the code! I’m not sure if anyone will respond but it’s worth a shot :)
Marie
Also, I’m going to try and put this on a Teensy-duino. Would there be anything I need to make sure of when doing that?
Marie
Hi Marie,
No worries – years later people still respond to this article.
It is nice to hear that you liked it, so thank you for the compliment.
What did you have in mind with switch the LEDs ON/OFF?
Something like completely switching the entire thing OFF and the option to have it ON with an effect running?
Or where you thinking of an effect that turns all LEDs OFF?
If you want a complete ON/OFF, then I’d recommend a switch on your power supply.
I assume that you’re running the Arduino off the same power supply that powers the LEDs.
The Arduino boots uop fast enough to get it going when you need it.
As for the Teensy; I have seen folks use a Teensy, but I have never tried it myself (I don’t have a Teensy available).
Hans
thank you for the quick response! My original comment was very non-descriptive, my bad but I actually was able to figure out a small workaround!
Marie
Awesome!
Feel free to ask (here or in our Arduino forum) if you have more questions.
Hans
Hello, i love all of the effects but I am having trouble working them. I am new to all of this and Love the meteor rain effect. I got the set up working and I have different led shows going right now. When I copy and paste meteor rain in the code just does not do anything. I have all of the libraries downloaded and I have tried using them. If anybody can tell me what I am doing wrong I would be very grateful. Thank you.
Lex
Hi Lex,
great to hear you like the effect and I’m sorry to hear you’re running into an issue with the meteor effect.
Would you mind opening a topic in our Arduino forum?
This way you can post your code and I can take a look at what may be going wrong.
Hans
Greetings,
My coding knowledge only goes so far. I am trying to combine certain effects to play in a sequence after a button is pressed. (Strobe to twinkle to cylon, etc)
I would want it to strobe for X amount of time, then go into the next effect for X amount of time, and so forth. What do I alter to accomplish this? Thanks for the great resource! Glad it’s still here after these years.
Bizzaro
Hi Bizzaro,
You’d probably want to look into my follow up project (here).
In each “case” statement (in that follow up project), you could do something like this:
Say these are the original case statements:
case 0 : {
RGBLoop();
break;
}
case 1 : {
FadeInOut(0xff, 0x00, 0x00); // red
FadeInOut(0xff, 0xff, 0xff); // white
FadeInOut(0x00, 0x00, 0xff); // blue
break;
}
case 2 : {
Strobe(0xff, 0xff, 0xff, 10, 50, 1000);
break;
}
Then you could combine those to something like this, where the first effect in essence is a combo of effects:
case 0 : {// do 3 times RGB loop
RGBLoop();
RGBLoop();
RGBLoop();
// do 3 times a FadeInOut
FadeInOut(0xff, 0x00, 0x00); // red
FadeInOut(0xff, 0xff, 0xff); // white
FadeInOut(0x00, 0x00, 0xff); // blue
// do 1 time a Strobe effect
Strobe(0xff, 0xff, 0xff, 10, 50, 1000);
break;
}
You’d need to change the case count, but you should be able to find more on that in the comments (where folks want to add or remove effects by changing the number of effects).
Hans
This is a LEGENDARY resource for running addressable LED strips. THANK YOU HANS! I hope you are well!
Will
Hi Will!
Thank you for the compliment – I didn’t know this was a legendary resource, but I’m sure pleased to see it
Hope you’re well as well! Stay healthy!
Hans
Hello,
Many thanks for this very useful tutorial, great job
THIERRY
Hi Thierry!
Thank you very much for taking the time to post a thank-you! It is very much appreciated!
Hans
what is matter with this cod
I want to do the strip show wen I push the Butten an then end the strip show
who can help me:(((
[CODE REMOVED – SEE THIS FORUM TOPIC]
mehdiiii
Hi Mehdiiii,
I’ve moved your code to the forum – please continue the conversation there as this is a little off topic for this article.
Hans
Hey there! I just recently got an Arduino Mega and a copuld of led strips and these examples have been very helpful, even more when I have no experience in coding. The first part certainly has helped in being able to tinker with the code, as I had trouble setting up the void setup properly, so thanks for that.
My idea is to manually code the lights as I wish so they go with the beats of the song, so I would be telling the arduino the effect and colors and how long it should last. So far I feel better using Neopixel rather than FastLED, would you advise I change the library or do you think both should work well for me?
Thanks!
Jon Ander
Hi Jon,
both libraries work fine, however I feel that FastLED is much more mature.
Especially when you start tinkering more with LED strips, you will find that NeoPixel becomes very limiting.
FastLED on the other hand offers advanced functions to help you accomplish certain LED related tasks much easier without having to worry about the complexity behind it.
Besides that: I have the feeling that FastLED is faster and that FastLED development is MUCH more active than the development of NeoPixel.
So, I’d recommend FastLED (so you get used to the FastLED functions and notations), but in the end NeoPixel will be OK as well.
Hans
Hey! Great work on the lights! I have some questions regarding the Meteor lights(and also in general). I’m using just a Normal Arduino UNO, and i’m trying to run your code. But is replying with the “Could not be Defined” on the setAll(0,0,0);. I commented out to try to trouble shoot more, and replied with the same message on the for loop.
Any Suggestions?
Thanks!
Nicholas
Hi Nicholas!
Thank you for the compliment
I have not seen the “Could not be Defined” error before, but what I have seen happen is that users make a little goof up (happens to the best of us) when pasting the code.
For example for the FastLED variant (link) – the yellow marked text needs to be replaced keeping everything before and after the yellow marked text in tact.
If you this right, then please consider starting a forum topic so I can look at you code and see what may be going wrong
Hans
Hey, can someone help me, to run this code from right to left
void randomColorFill(uint8_t wait) {clearStrip();
for(uint16_t i=0; i<strip.numPixels(); i++) { // iterate over every LED of the strip
int r = random(0,255); // generate a random color
int g = random(0,255);
int b = random(0,255);
for(uint16_t j=0; j<strip.numPixels()-i; j++) { // iterate over every LED of the strip, that hasn't lit up yet
strip.setPixelColor(j-1, strip.Color(0, 0, 0)); // turn previous LED off
strip.setPixelColor(j, strip.Color(r, g, b)); // turn current LED on
strip.show(); // apply the colors
delay(1);
}
}
aan
Hi Aan,
You’ll have to flip the for-loops.
void randomColorFill(uint8_t wait) {clearStrip();
for(uint16_t i=strip.numPixels()-1; i>=0; i--) { // iterate over every LED of the strip
int r = random(0,255); // generate a random color
int g = random(0,255);
int b = random(0,255);
for(uint16_t j=strip.numPixels()-i-1; j>=0; j--) { // iterate over every LED of the strip, that hasn't lit up yet
strip.setPixelColor(j-1, strip.Color(0, 0, 0)); // turn previous LED off
strip.setPixelColor(j, strip.Color(r, g, b)); // turn current LED on
strip.show(); // apply the colors
delay(1);
}
}
Here the bold lines are the changes I’d start with. Not know exactly what this effect should look like and untested.
p.s. if you’d like to discuss the code more, then please use the forum, so we do not see a ton of code in the comments, especially with code that is not part of the effects in the article
Hans
ok thanks for the response, sorry but it’s not working
aan
Sorry to hear that. You can also try this (keep the loop the same, just correct the LED position to the opposite position):
void randomColorFill(uint8_t wait) {clearStrip();
for(uint16_t i=0; i<strip.numPixels(); i++) { // iterate over every LED of the strip
int r = random(0,255); // generate a random color
int g = random(0,255);
int b = random(0,255);
for(uint16_t j=0; j<strip.numPixels()-i; j++) { // iterate over every LED of the strip, that hasn't lit up yet
strip.setPixelColor(NUM_LEDS-j+1, strip.Color(0, 0, 0)); // turn previous LED off
strip.setPixelColor(NUM_LEDS-j, strip.Color(r, g, b)); // turn current LED on
strip.show(); // apply the colors
delay(1);
}
}
Hans
Thank you very much
aan
You’re most welcome.
Hans
I’m sorry, if to make it light from the right and left edge and meet the middle, can you?
aan
That shouldn’t be too hard.
I like to remind you to use the forum for requests.
Short version, do something like this:
for(int i; i<(NUM_LEDS/2) i++) {strip.setPixelColor(i, strip.Color(0, 0, 0));
strip.setPixelColor(NUM_LEDS - i, strip.Color(0, 0, 0));
strip.show(); // apply the colors
delay(100); // define a time to slow down the effect
}
Hans
Hi, I’m a bit confused in the begging paragraph explaining how to set up lights if you’re using the FastLED with an Arduino, any way you can paste and explain?
Thankss!(Great work btw)
Nicholas
Hi Nicholas,
I’d be more than happy to assist and thank you for the compliment.
Are you referring to this paragraph (#5 FastLED Framework)?
If so: then the steps are:
1) Copy the sketch into the Arduino IDE (48 lines).
2) Determine the effect you’d like and select and copy the code for that – do not yet paste it in the sketch.
2) Look in the code from step 1, and look for the yellow marked lines (lines 11 to 17) – select these lines in your Arduino IDE and now paste the code of the effect you copied in step 2, effectively replacing those yellow lines.
Let me know if this answers your question.
If you need more help, then please let me know.
If you want to look at code more, then please consider starting a forum topic as we’d like to avoid code being posted here in the comments (you can see the comments have already become huge because of previously posted code parts).
Hans
Hello Hans,
Thank you very much for this excellent article.
I used your explanations to illuminate my Christmas tree last year. I mostly used the rainbow cycle with sparkle effect.
This year I removed the button to have a chaining of some effects.
And I would like to stop the meteor rain just when the last led of the led strip is lighting to start directly the (reversed) color wipe effect.
Could you say me how I have to modify the code of the meteor rain to do this. I’m not able to modify this code, it is too complex for me.
Thank you.
Hereafter my void loop version.
void loop() {
int i;
int j;
int k;
for(i=0; i<random (5,15); i++) {
rainbowCycleWithSparkle(50,20);
}
for(j=0; j<1; j++) {
meteorRain(0xff,0xff,0xff,10, 64, true, 30);
}
{
colorWipeReversed(0xff,0xff,0xff, 20);
colorWipeReversed(0x00,0x00,0x00, 20);
}
for(k=0; k<random (3000,20000); k++) {
Sparkle(0xff, 0xff, 0xff, 0);
}
}
Arnaud
Hi Arnaud!
Thank you for the very nice compliment, and awesome to hear you’ve used my project to illuminate your Christmas tree
So if I understand you correctly, when the “head” of the meteor hits the last LED, you’d like it to stop completely so the rainbow effect can kick in. Right?
In that case you need to tweak the meteor effect a little (this may take some experimenting).
In the first for-loop, you’d want to have the loop to stop when it is reaching NUM_LEDS.
Again: you may have to tinker a little with this, as I have not been able to test this.
Hope this helps
void meteorRain(byte red, byte green, byte blue, byte meteorSize, byte meteorTrailDecay, boolean meteorRandomDecay, int SpeedDelay) {
setAll(0,0,0);
// old: // for(int i = 0; i < NUM_LEDS+NUM_LEDS; i++) { // new: for(int i = 0; i < NUM_LEDS; i++) {
// fade brightness all LEDs one step
for(int j=0; j<NUM_LEDS; j++) {
if( (!meteorRandomDecay) || (random(10)>5) ) {
fadeToBlack(j, meteorTrailDecay );
}
}
// draw meteor
for(int j = 0; j < meteorSize; j++) {
if( ( i-j <NUM_LEDS) && (i-j>=0) ) {
setPixel(i-j, red, green, blue);
}
}
showStrip();
delay(SpeedDelay);
}
}
Hans
Here is a task for coders who likes to help newbies because I came to a conclusion that I’ll never be able to write it myself after spending hours trying to figure it out.
I need a code for meteor rain effect followed by color wipe effect, activated with PIR sensor 1, stays on untill PIR sensor 2 is activated.
Any help will be appriciated, thanks guys.
isiloon
Hi Isiloon,
Not sure what the setup will be like, but I found PIR sensors to not be the most accurate/reliable for work where a little more precision is needed.
Having said that; since this is off-topic, please create a topic in the Arduino Forum where folks may be able to assist.
Hans
Hi Hans,
It’s perfect ! Thank you very much.
This is exactly what I wished.
You light up my family’s Christmas.
Arnaud
Hi Ardnaud!
Glad to hear that worked and glad to hear your Christmas tree is lit up again by my LED effects
Hans
Hi Hans,
It’s Arnaud again.
I have another problem.
I just tried to add a fade in and a fade out on the rainbow effect.
For the fade in this is OK. It works.
For the fade out, I have a problem. All the led decrease to become black but just after the led light up again and the color of each led seems to change randomly but gradually. (Sorry for the not very clear explanations)
Could you help me please ?
Hereafter the code of fadeInRainbow and fadeOutRainbow I tested.
for the both I used a speed delay of 20ms.
Arnaud
Hi Arnaud!
p.s. when posting code (this one is OK), then please consider using the forum. Just to avoid that too much code is placed in the comments .
.
For fading in and out, when using the FastLED library, you could experiment with FastLED.setBrightnes(). Where the passed value is 0-255.
I haven’t really used it myself, but idea is that this function sets the overall brightness of all LEDs.
So you could try something like this:
void fadeInRainbow(int SpeedDelay) {byte *c;
uint16_t i, j;
for(j = 0; j < 256; j=j+1) {
FastLED.setBrightness(j);
showStrip();
delay(SpeedDelay);
}
}
void fadeOutRainbow(int SpeedDelay) {
byte *c;
uint16_t i, j;
for(j = 255; j >= 0; j=j-2) {
FastLED.setBrightness(j);
showStrip();
delay(SpeedDelay);
}
}
Note: I have not tested this,
Hans
Hi Hans,
Thank you for our answer.
Unfortunately I can’t seem to apply it.
I use the Adafruit NeoPixel library so I installed the FastLED library and include it in the code.
I tested it only on the fade out version. But when the led strip has to fade out, it freezes.
I tried to replace showStrip(); by FastLED.show(); The result was the same.
So I tried to use the Adafruit version of this function strip.setBrightness(j); Always the same result.
I don’t know why. I’m continuing to search. If I find I will tell you.
Arnaud
My apologies. Not “our answer” but “your answer” in the previous message.
I’m not very good at English.
Arnaud
Hi Ardnaud!
I’d start with just using one library, and since it is the most mature library, I’d choose FastLED. It also comes with the most functions.
I wasn’t aware AdaFruit had a setBrightness-like function. Hmm, good to know
The hardest part is fading from black to a color, since one would need to know the target color.
Fading the other way around is relatively easy, since we know a color starting point.
Is there any way you can start a forum topic so you can post a small video?
Hans
Hi Hans,
It was not simple for me but it’s done. Here.
arnaud
Hello Hans,
Great content, thanks for sharing.
I used meteor effect and works great, starts form beginning of the ledstrip to the end. But I also want it reversed, which starts at the end of the strip and basicly to come back. I think I should modify this code but I could not make it work. Can you please help me with this. Thank you.
(code removed)
isiloon
Hi Isiloon!
Thank you for the compliment.
Ideally this would be better asked in the Arduino Forum (to avoid tons of code being posted here).
If I understand you correctly, you’re looking for the meteor rain to bounce back and forth.
The code below would do that. Not that I removed “setAll(0,0,0)” – you may want to add that at the end of the “void setup()” function to make sure the LEDs are black when the effect starts.
I did keep it relatively simple, so this function can be optimized.
The rest of the meteor rain functions (like fadeToBlack) remains the same as with the original meteor rain.
void loop() {
meteorRain(0xff,0xff,0xff,10, 64, true, 30);
}
void meteorRain(byte red, byte green, byte blue, byte meteorSize, byte meteorTrailDecay, boolean meteorRandomDecay, int SpeedDelay) {
for(int i = 0; i < NUM_LEDS; i++) {
// fade brightness all LEDs one step
for(int j=0; j<NUM_LEDS; j++) {
if( (!meteorRandomDecay) || (random(10)>5) ) {
fadeToBlack(j, meteorTrailDecay );
}
}
// draw meteor
for(int j = 0; j < meteorSize; j++) {
if(i-j>0) {
setPixel(i-j, red, green, blue);
}
}
showStrip();
delay(SpeedDelay);
}
for(int i = NUM_LEDS-1; i>=meteorSize; i--) {
// fade brightness all LEDs one step
for(int j=0; j<NUM_LEDS; j++) {
if( (!meteorRandomDecay) || (random(10)>5) ) {
fadeToBlack(j, meteorTrailDecay );
}
}
// draw meteor
for(int j = 0; j < meteorSize; j++) {
if(i-j>0) {
setPixel(i-j, red, green, blue);
}
}
showStrip();
delay(SpeedDelay);
}
}
Hope this helps.
If you have more questions or are looking for a little change: please use the Arduino forum.
Hans
Hi there, I hope you are all well.
First of all, this guide is amazing, thanks for it.
Now, what I’d love to do is to have group of 4 leds of two different color (so we’ll have 4 red leds, 4green led, 4 red leds, 4 green led, 4 red leds, 4 green led……)running through the led stripe.
I tried to change the Running leds code example but it seems like the leds are kind of blinking instead to actually change position (or better say, change color).
Any help?
thank you
Luke
Hi Luke!
Thank you for the compliment, it is much appreciated!
You could try to modify the running lights effect, but that would come with some challenges due to the way this function works.
So it took me a little bit to get this to work right.
In the code below, make sure you update PIN and NUM_LEDS.
This new function (RunningLightBlocks) takes 2 colors, the width of each color block, the dim value (0-255; higher = darker), and the speed delay.
For each block, the first and last LED are dimmed, so a block should at least be 2 or 3 LEDs (2 would mean: you only have 2 dimmed LEDs).
Note: This is the full sketch, based on the FastLED library.
It first draws all the color blocks, and for each block it dims the first and the last LED.
After that it (endless loop) it keeps shifting all LED colors one position over, and adds a new LED color at the beginning.
Since we know that we have 2 blocks of a given size, we can simply copy the color from 2*Block size.
It took me most of the afternoon to get a seemingly simple effect to run well, in short and efficient code.
So I really hope this is what you were looking for
Hans
Hi Hans,
First of all I want to let you know that I think you are a great person,
your guide is amazing, you keep answering to everyone and helping everyone after all this time (which is really rare those times, usually people drop a post or guide to show how good they are and they just disappear or reply to google the answer…), you not only answer to me but you gave me straight away the code and all what I needed with great explanation using your free time,
man, again, you are great!
Second, I spent a week, an year ago, trying to figure that out but I couldn’t XD
So Yes! that’s exactly what I needed thank you so much!!!
Now I’ll try to reverse and slow down a bit the light flow, so I’ll learn something as I can learn only whem I try to do something.
Again,
Thank you so much Hans for your super fast reply!
Luke
Thanks Luke – you’re making me blush
You’re most welcome, I actually really enjoy helping people with their projects.
Putting a smile on someone’s face just makes my day.
Let me know if you run into issues or questions.
Don’t feel bad it didn’t work when you tried yourself – it took me a bit of time as well. I started with the RunningLights function to eventually realized that I just had to write something from scratch.
Have fun and have a good week!
Hans
Hi Hans,
sorry for the late answer but somehow I din’t received the notification.
I did some changes but still can’t figure out how to change the direction of the effect, I’m still learning….
I also tried to incorporate the code in another one in order to turn on and of the leds via webserver, but of course I’m getting to many errors.
I’ll probalby be back soon asking for your help.
Thank you again!
Luke
No worries Luke!
these little projects remain a hobby 😉
If you have questions, then please consider using the forum to avoid we fill up the comment section with code 😊
Hans
Hello all,
Luke, I totally agree with you about Hans. He is a great and generous person.
Good luck to reverse your effect. It is a good exercice.
Arnaud
You guys are awesome! Thanks Arnaud for the very nice compliment
Hans
if you want you can remove the remmed lines to enable 128×64 display with name of the effects ………..
rompipelotas
Hi Rompipelotas!
Thank you for sharing your code
I assume this is the code for sharing the effects and the bouncing balls?
Anyhoo – to keep the comment section readable, I’ve moved the code to this forum post.
Hans
dude your a verygood person, im using your code the new kitt and trying to experiment it. now im having trouble with my code when im adding switch to it, evrytime i upload my sketch it says error, im a total newbee bro and when i saw your articles and design , its a life changing bro, hope you give me refence code for switching new kitt. God bless boss hans
sam
Hi Sam,
thank you very much for the very nice compliments
To help you out, I’d recommend making a post in the Arduino Forum here. This way we can look at code, error messages etc. without filling the comment section here with large pieces of text
Hans
hello guys, how do i use the source codes of the led strip effects ws2812
clevison
Hi Clevison,
The code was written so it works for the FastLED and Adafruit Neopixel library.
I prefer the FastLED library myself, and the code is already assuming you’re using a WS2812 LED strip.
1. Install the FastLED Library (in the Arduino Application, go to the Sketch menu -> Include Library -> Manage Libraries, type “fastled” in the filter box, locate “FastLED” by Daniel Garcia and click “Install”).
2. Copy the framework code (which is basically a template), for the FastLED library into your Arduino application. You find the code here.
3. Scroll (on this page) to the effect you’d like to use, and select and copy the code for that effect.
4. In the Arduino application, replace the code below with the code you just copied in step 3.
Hope this helps 😊
Hans
look, I did it like this and it’s not working, send me an example of what to do, because I’m new to this, thanks for the help
clevison
You have two “void loop()” sections so your Arduino will not like this.
You have to remove this part:
Hans
I took it out, but it’s still not working, I’ve tried a lot of things, but it’s still not working, thanks for your help
clevison
I overlooked something; it seems you removed the functions at the end as well.
Also note: just saying it is still not working is OK, but it would be more helpful if you’d post the error message or report what you’re actually seeing.
So, from scratch:
1) Copy the framework code for FastLED you can find above (here)
2) Next copy the code for theaterChaseRainbow.
3) Paste it in the framework code (step 1) replacing the code between “// *** REPLACE FROM HERE ***” and “// *** REPLACE TO HERE ***”
Now you should have the full working code.
To verify your code:
– Before “// *** REPLACE FROM HERE ***” you’ll find some definitions and the void setup function.
– Between “// *** REPLACE FROM HERE ***” and “// *** REPLACE TO HERE ***” you’ll find the code for the LED effect.
– After “// *** REPLACE TO HERE ***” you’ll find the functions “showStrip”, “setPixel”, and setAll.
Hans
p.s. I hope this helps, if not, then please consider starting a topic in our Arduino Forum, so we can post more code without disrupting the comment section here
Merry Christmas!
Hans
hello Hans .. can you help me run the cylon effect running cascades from slow to fast
Ismt
Hi Ismt,
I haven’t tested this, but you could try modifying the “void loop()” to something like this:
void loop() {for(int 1=10; i>=0; i--) // count down speeddelay: 10,9,8,..,2,1
{
CylonBounce(0xff, 0, 0, 4, 10*i, 50); // multiply "i" by 10, so we get 100, 90, 80, ... ,20, 10
}
}
Hans
Hi… Great examples…In your fire example (which works great) how would I reverse the order so for example if it starts on led 1 and goes to 60, instead having it start from 60 down to 1?
Thank you!!!
Christopher
Hi Christopher,
thank you for the compliment
As for reversing the fire effect, you could try this (untested):
In the function setPixelHeatColor(), simply set select the opposite LED:
void setPixelHeatColor (int Pixel, byte temperature) {
// Scale 'heat' down from 0-255 to 0-191
byte t192 = round((temperature/255.0)*191);
// calculate ramp up from
byte heatramp = t192 & 0x3F; // 0..63
heatramp <<= 2; // scale up to 0..252
// figure out which third of the spectrum we're in:
if( t192 > 0x80) { // hottest
// was: setPixel(Pixel, 255, 255, heatramp); setPixel(NUM_LEDS - Pixel -1, 255, 255, heatramp);
} else if( t192 > 0x40 ) { // middle
// was: setPixel(Pixel, 255, heatramp, 0); setPixel(NUM_LEDS - Pixel -1, 255, heatramp, 0);
} else { // coolest
// was: setPixel(Pixel, heatramp, 0, 0); setPixel(NUM_LEDS - Pixel -1, heatramp, 0, 0);
}
}
If you’re wondering about the “-1”;
If we have 60 LEDs, then NUM_LEDS = 60, and LEDs are counted 0-59.
So the opposite LED of LED #0 (first one) would be 59.
Again: untested, but I think it will work.
Hans
That worked GREAT! You’re a genius! Thanks!
Christopher
Hi Christopher!
Awesome!
Hans
One last question..Do you have a good example of how you would wire up a WS2801 strip to a Arduino? And how you would change the Fire code for this new strip? Alot to ask I know!! lol.
Christopher
From what I could find with the FastLED library;
1. WS2801 is supported by FastLED, however it seems slower and prone to glitching on longer strands. (source)
2. The WS2801 has 4 pins, compared to the 3 of the WS2812.
You will have two data pins (D0 = Data and C0 = Clock) on the WS2801, where the WS2812 has only one Data pin.
So you have to connect the 2 data wires, for example to pin 3 and 4 and define these as such. (instead of Pin 6 in the example above)
+5V and GND are connected just like the WS2812.
(versus just one pin on the WS2812)
Hope this helps
Hans
Hello Hans,
I am writing you from the Netherlands. Your name could very well be from this side of Europe any links?
I was asked by my sister to help her out with an art exhibition. She wishes flame like effect (to be exact: she wishes a moving fire effect that pops up randomly and moves around the strip) I had no experience but Arduino but internet helped me discovering that this might be the way to go, combined with a SK6812 RGBW led strip.
Youre explanation and code examples are far beyond others i found on the web. Im (safely) fooling around with programming, but still i cannot seem te get the colours in the desired colour. I want to use your FIRE effect and TWINKLE effect and give her a option to choose from these 2. They both work on the RGBW indi. addressable led strips, but i failed to get the colour to fire like orange (somewhere around FF8000). The Fire effect is more white/purple in the hottest area and the others sections are red. The Twinkle effect is randomly giving colours.
Maybe you want to help me with further explaining how to arrange this color changing. Im already thinking that the fact that my strip is RGB +W might af influence.
Many thanks in advance
Jorus Habers
Hi Jorus!
I am originally from the Netherlands as well
I have not yet played with RGBW strips, so I’m not sure how the white element affects things.
To make the color of the fire more orange, you’ll probably need to play a little with setPixelHeatColor() function.
I haven’t tested this, but I think you need to change things a little in last if-then-else part (bold below).
You may have to tinker a little to get the best colors in case this works:
void setPixelHeatColor (int Pixel, byte temperature) {
// Scale 'heat' down from 0-255 to 0-191
byte t192 = round((temperature/255.0)*191);
// calculate ramp up from
byte heatramp = t192 & 0x3F; // 0..63
heatramp <<= 2; // scale up to 0..252
// figure out which third of the spectrum we're in:
if( t192 > 0x80) { // hottest
setPixel(Pixel, 255, 128, heatramp); // changed 255 to 128
} else if( t192 > 0x40 ) { // middle
setPixel(Pixel, 255, min(128,heatramp), 0); // choose the lowest value, but do not exceed 128)
} else { // coolest
setPixel(Pixel, heatramp, 0, 0);
}
}
Hope this helps
(ps. there is a Dutch version of this article as well – if this is more convenient for you, and I did write a little Arduino C for beginners course in Dutch and English if you’re interested)
Hans
Hello Hans,
Thanks for youre reply.
To make things less complicate i orderd a RGB strip instead of a RGB+W. No it works like a charm. This evening i will try youre suggestion/instruction to change up the colours a bit more.
Thank you!
Jorus
Awesome!
Maybe one of these days I’ll get an RGBW strip to do some tests with.
Hans
Hello Hans,
My sister is very happy with the progress so far! So thanks once more.
I on the other hand am still struggeling with one issue. Because she desires more spreading and moving of the light, we are adding an dc motor (with reflective material). I can get the motor to work with a simple code i found on this website https://www.tutorialspoint.com/arduino/arduino_dc_motor.htm (not posting the code for ‘forum reader friendly’ reasons)
Can someone help me with adding a simple 5 volt dc motor (spinning) motor code to youre fire code? If the speed would be managneble this would be an extra. Bassicaly i want the fire code and the motor to run and be powered on 1 arduino plus 5 volt powersupply.
Any help would be very appreciated.
jory habers
Hi Jory!
Great to hear you’re making good progress!
the motor question would indeed be better in the forum (if you run into signup problems: just let me know, so I can activate an account for you, or try it with this form – the forum is having issues with sending confirmation emails).
On that note, AdaFruit has a good guide as well – which looks kinda similar.
From what I could find (I haven’t played with motors yet);
1. Add this to the beginning of the code
2. Add this to setup()
3. Start the motor like so
4. Stop the motor like so
So with all this, your loop could look like this:
void loop() {analogWrite(motorPin, 123); // set motor speed to 123
Fire(55,120,15);
analogWrite(motorPin, 0); // stop motor (speed=0)
}
Note: untested code … let me know if this works
Hans
Hi, first I love the Meteor Rain library. Actually all of them. I am not a programmer. Not yet at least. I am learning C and I am at the basic level. I wanted to asked how I can change the meteor rain time between events? What I mean is once the script is uploaded, it just runs continuously. How can I change it where the meteor runs every 30 seconds or so?
If the format of my question is incorrect or in the wrong place, then my apologies. This is my first comment and not sure what i’m doing yet.
Thanks in advance,
Ron
Ronald Mason
Hi Ron,
To run the meteorrain say every 30 seconds, you could do something like this:
(we use millis to determine if the effect ran 30 seconds ago – you can change the value next to waitTime if you want a different time)
... unsigned long previousMillis = 0; // to store the last time the effect ran #define waitTime 30000 // wait time: 30 seconds (=30,000 milliseconds) ... void loop() { if(millis() - previousMillis > waitTime) { // if it has been more than 30 seconds, then run the effect previousMillis = millis(); // set previousMillis to the current timemeteorRain(0xff,0xff,0xff,10, 64, true, 30); }
}
If you’d like to make it more random then you could use the random function:
(you can change minWaitTime and maxWaitTime to your preferred range)
I have not tested any of this code, but I am confident this will do the trick. (I just had my first coffee for the day, so I hope I didn’t screw up haha)
p.s. If you’d like to get a little more familiar with programing for the Arduino: Arduino C for beginners may be helpful or a good reference.
Hans
Hi Hans!
Thank you so much for taking the time to respond. I will give these a try. This is going to sound funny or silly, but I kind of cheated to make it work, but I rather do it the correct way. I have a 90 LED strip, so what I did was change NUM_LEDS from 90 to 250. By the time it started again was about 30 seconds. I know, very bad, but I was desperate! lol.
I will give your suggestions a shot and will let you know how it goes. I should get back to you in about 7 months :)
I just bought beginner C for dummies.
Seriously, thank you so much. This is an absolutely amazing site and I have learned a lot from you already.
Cheers,
Ron
Ron
Hi Hans,
I didn’t realize that was a link to a course. I will definitely check it out. Thanks again!
Ron
Ron
Hi Ron,
You’re welcome!
Haha, keep in mind; we all fumble a little in our code at some point
Feel free to ask if you run in any questions, and don’t forget we have an Arduino forum section for projects and/or questions as well
Hans
Hans, YOU DA MAN!!! Thank you so much. It worked exactly how I wanted it to work. At first I fumbled by placing some of the code in the wrong place, but realized it pretty quickly so the pain was minimal :) Below is the entire sketch. Thank you again, Ron
Ron
Awesome Ron!
Glad to hear that worked and thanks for posting the code.
Hans
My pleasure Hans, but really Thank You!!! I truly appreciate your help.
Have a great day!
Ron
Ron Mason
Hi Hans…First off, everything you’ve posted has worked great! I do have a question about using 2 pins running Neopixels doing different things..I found that to add another pin I would use the command,
Adafruit_NeoPixel strip_a = Adafruit_NeoPixel(16, 5);
Adafruit_NeoPixel strip_b = Adafruit_NeoPixel(16, 6);
So if I took you to examples Strobe Effect and Snow Effect and I wanted to run the first on on pin 5 and the second on pin 6…What would I have to add to the source code below to make that happen? Thank you!!!
(Code removed to save space)
Chris
Hi Chris,
using two strands can be done indeed, however running two effects at the same time will be challenging.
You see, the Arduino does not multi-task (like a PC or Raspberry Pi can).
So for both effects to work, you’d need to switch back and forth between the two effects.
This is not only challenging (timing) but will slow down both effects as well.
I think we can get something to work, but the generic approach I used in the code does not foresee the use of more than one strip of LEDs.
On that note: I’d recommend using FastLED instead of NeoPixel as it is faster and more mature.
If you’d like to pursue this idea, then pleas make a forum topic, so we have more space to post code and such. Otherwise the comments here become very large.
Hans
Just seeing this now … this article has been mentioned a few years ago on Hack-a-Day. Awesome!
Hans
Hi Hans…If this is the wrong place to post this please let me know. I did sign up for a forum id but have not gotten anything back…I bought a little SD micro card reader (teamed up with an Arduino Uno)…with a couple of tiny speakers. Would I be able to run a .wav file followed by LED Theater Chase code? My goal is that when power is turned on, the .wav file plays and then the lights come on about 15 seconds later…Is this possible do you think? Here is the code for the audio..
#include "SD.h" #define SD_ChipSelectPin 4#include "TMRpcm.h" #include "SPI.h" TMRpcm tmrpcm; void setup() { tmrpcm.speakerPin = 9; Serial.begin(9600); if (!SD.begin(SD_ChipSelectPin)) { Serial.println("SD fail"); return; } tmrpcm.setVolume(5); tmrpcm.play("Voyage .wav"); } void loop() {}Chris
Hi Chris,
apologies for the forum issues – I’m waiting for the guys from the forum to get back to me with a fix.
I wasn’t able to find your email address in the user list, so I wasn’t able to manually assist you with this.
As for your Arduino question; yep, this would have been better in the forum (as you were already trying to do).
Again my apologies for the inconvenience.
Assuming the code you provided already works, then yes, you could try to incorporate that in the LED Effects code.
Others have done it as well (see for example this very long thread on LED Effects combined with sound).
You can basically add everything to the LED effect code, let’s say you’re using the FastLED variant, then change this:
To this (I added the bold text):
Now keep in mind that I have not been able to test this, since I do not have that particular device.
As I understand from the TMRpcm library documentation, the playback is asynchronous, so this could/should mean that calling “tmrpcm.play(“Voyage .wav”);” will return right away and your device will keep playing the audio file.
So we need to add a delay of 15 seconds after starting the WAV playback.
Hope this works
Again, apologies for the inconvenience – if you’d like; contact me with the email address you’ve used for the forum and I’ll make sure you get access.
Hans
Hans – Awesome stuff….
I’m hoping you can give me a steer on how to approach modifying the ‘fire’ sketch for a stage prop I’m putting together.
Put simply, I have two 150 LED strips laid end to end with the arduino in-between the two strips. Each strip is connected to a different data output on the arduino.
I need to make the fire start at the far left of the first strip (i.e. LED 150), move to the right (to LED 1) then continue on to the second strip (LED 1) finishing at the far right of this strip (LED 150).
I understand how most of the code in your sketch works, but I am struggling to see how I can get the ‘fire’ to pass to a separate instance of FastLED for the second strip.
Any suggestions would be much appreciated!
Thanks
mark
Hi Mark!
This sounds like an interesting project.
Maybe something we should discus in the forum ?
I’ve fixed the forum registration bug – would you mind trying to register again?
I’ve removed you previous attempt so that you can use the same email address at registration again.
Hans
Hi Hans!
These effects are incredible!!!
Thank you very much for all the work you have done here!
The fire effect has kept me busy for quite a while now. As I´m into marble-runs, I had the funny idea to combine runs with all kind of electronic gismos like led meteor showers and motors and…
When I came across the Fire-effect, I desperatelywanted to include it in the marble-run I´m working on. Here is the idea:
A marble runs through a lightbeam with an LDR.
My Arduino sketch recognises the break of the beam (Sketch works so far :0)
Then it activates the Fire function (Works, too :o)
But: Fire just runs once and then returns to the main code!
(I have opened a post in the forum with the code)
But I need Fire to run for about 10 sec or a number of times until it returns to the main code and the LDR can be triggered by another marble.
In a different post you recommended to use a variable. But that was for Sparkle and I have no idea, where to “int” a variable which counts up and keeps Fire running before returning to the main code.
I would appreciate your help so much!
ledmeup
Hi LedMeUp
I’ll take a look at your forum post
Hans
The PIN0 up to PIN7 are already in use by the AVR-GCC for the I/O pins. They are defined in “portpins.h”.
https://www.nongnu.org/avr-libc/user-manual/portpins_8h_source.html
Turn on all the compiler warnings and you get: “warning: “PIN1″ redefined”.
Koepel
Hi Koepel,
thanks for the heads up!
I wasn’t aware these (PIN1-PIN7) were predefined, even though I’m not sure what the context was, but good to mention this here.
Makes though, since other pins are predefined as well – and some depending on the device you’re developing for (eg. the ESP boards have a few of their own as well it seems).
Personally I’d prefer to use different names anyway, for example just “PIN” or even better “LEDSTRIP_PIN” or something like that.
Thanks again, it is appreciated!
Hans
Thank you very much!
Lesto
Thank you Lesto for taking the time to post a Thank-You note – it is much appreciated
Hans
Hi!!
Thank you very much for sharing your code. I’m making my first project right now – I have 3 strips of led lights (15 meters of 60 leds/m which in total gives 900 leds). I want to put them on my ceiling to illuminate my room and make it look cooler.
When I connected the 1st strip to my Arduino Uno everything was going fine, but then I connected the other 2 strips to the first one and encountered some problems. I ran Adafruit strandtest to check how do they look. I found out that the maximum number of leds I can use in that particular program was 622, any number higher than that would make the lights ‘freeze”. The console showed that the program was using only 2% of max D RAM.
Then I tried to run FastLED Cyclon example. Unfortunately, when I put in my number of leds it turned out that my Arduino doesn’t have enough D RAM to run this program for 900 lights. I figured out that I can unplug the strips from each other and connect them individually to the Arduino pin. I changed the value in the program to 300 and it worked!!
Now my only problem is that the strips are working individually (obviously) and not as one. I’d want them to work together, since then the effects like your Cylon, look way better.
Is there any way to solve this problem? Should I invest in an Arduino/chip with a higher D RAM amount?
P.S I’m not a native English speaker, so please let me know If you have any trouble with understanding what I wrote.
Kuba
Hi Kuba,
that is a lot of LEDs wow!
Well, you may want to drop NeoPixel and use the FastLED library instead, as can easily got to 1000 or even more.
HOWEVER … this very much depends on the microcontroller you’re using.
Key here is first of all the amount of memory needed.
This post on Github is a good read on this topic.
Rule of thumb (from that post) due to memory limitations (also keep in mind the size of your sketch!):
Another thing to keep in mind is speed (ESP8266 or ESP32 are much faster, but the speed of the strip will have an impact as well). The more LEDs you use, the lower the refresh speed will be – only relevant if you want to do certain effects of course.
And finally, watch your power supply!
900 LEDs at max brightness white, would pull 60 mA * 900 = 54000 mA = 54 A (yikes!).
This comes with some serious challenges when operating at 5V – you’d need a beefy power supply and you’d have to make +5V and GND connections in between the strips to “refresh” the 5V feed.
For this many LEDs, folks recommend using 12V (or higher) strands – but I have never had one of these, so I never connected one of these to an Arduino.
Maybe someone here has done a project like that and can chime in.
Hans
This is the best guide ever made. So comprehensive and concise. Loved every piece of it :)
Aryan Mahindra
Thanks Aryan!
Thank you for taking the time to post a compliment, it is very much appreciated, and great to hear you like the article
Hans
Hi guys . I just start using arduino and Ws2811 and ws 2812b. And try to make some animation but I have bit of problem with it. I’ve made 10 × 10 board . And I would like to outside leds (like a frame let’s say) light still which I did in void setup( but I don’t know if I did it correctly) and the rest of leds inside the frame do the meteor effect. But I’m bit struggling with it. Anybody knows how could I do it please??
Darek
Hi Darek,
I’d be happy to help if I can.
Since this is a little off-topic, and we’d like to avoid folks from posting code here:
Please start a topic in our Arduino forum and describe in detail:
Hans
Hello, thanks for sharing great content.
I have managed to complete the stair lighting project with a slight problem.
When PIR sensor activates first meteor rain climbs, and colorwipe follows it when done. The problem is meteor rain performs very slow on long strips even tough I set the setting fastest. It works fine for 2m led, but when I connect 7 meters it really slows down. Also the delay time between meteor rain and colorwipe increases when 7m led stip is connected, while it is acceptable with 2 meters.
Is there a way to make the meteor rain really fast with 7m led strip and reduce the delay between two effects?
Bonus question: Is it possible to combine colorwipe effect to be leaded by meteor rain effect? I mean 2nd effect kicks in before the 1st one is finished. So the beginning of the colorwipe looks like meteor rain.
Thanks in advance.
isiloon
Hi Isiloon!
7 meters is quite a lot of LEDs …
I you have 60 LEDs per meter then we’re talking 420 LEDs, or 210 LEDs if it is 30 LEDs per meter.
There are a few things to help speedup things;
1) Use the FastLED library
2) I wrote a few translation functions so the effects work for NeoPixel and FastLed, like for example setPixel and showStrip. Replacing these with the real function could speed things up as well.
Example:
Replace showStrip() with FastLED.show() .
Replace setPixel(pixel,red,green,blue) with leds[pixel]=CRGB(red,gree,blue) .
Replace setAll(red,green,blue) with fill_solid(leds,NUM_LEDS,CRGB(red,green,blue)) followed by FastLED.show.
Replace fadeToBlack(pixel, fadeValue) with leds[ledNo].fadeToBlackBy( fadeValue );.
The function definitions can then be removed (void showStrip, void setPixel, void setAll, void fadeToBlack).
3) You could experiment with the end value fo this for-loop:
for(int i = 0; i < NUM_LEDS+NUM_LEDS; i++) {I picked NUM_LEDS+NUM_LEDS to make sure the fade goes all the way. You could try a starting with NUM_LEDS and then increasing this more and more until the meteor behaves correctly for such a long strip. A initial guess would be NUM_LEDS+meteorSize so something like this;
for(int i = 0; i < NUM_LEDS+meteorSize; i++) {There may be more options to optimize, but may this is better discussed in a forum topic (the Arduino Forum).
As for your bonus question: this most certainly would be a forum topic haha.
This will take more code and more testing to see what we can do.
Hans
Omg, I have been trying to make the corrections that you suggested for few days but couldn’t make it work :( I attached the code I use, if you have time can you please edit it?
Code moved to this Arduino Forum post
isiloon
I had to move your code, since posting code is something we like to avoid (see also the red warning just above the editor).
As suggested before, I moved this to the Arduino Forum, see this post.
Hans
How do you re-order the initial array or string of led’s before it is passed to rest of program?
Typical program asks number of leds and then labels initial string ordered range
Led array => 1,2,3,4,5,6…49,50
But what if I want a different led order because it’s a 3D non linear shape, and want my string ordered
Led array => 5,37,2,34…21,1
What’s the syntax or coding that allows me to put the led strip in any order I like before passing to automated programs? I feel like I should be able to use some sort of cross list or cross mapping?
Using FastLED, or WS2812fx library
Khammel
Hi Khammel,
Since this question is a little off-topic, I created this Arduino forum post with an answer
Hans
Thank you for the awesome information! I downloaded the files for the Neopixel links but a lot of them will not open on Arduino IDE. I’m really wanting the Running Lights sketch but it won’t load. Any thoughts?
Nikkole
Hi Nikkole,
Did you follow the steps for the framework needed? (link)
Basically all effects are written in such a way that they can be used for either NeoPixel of FastLED.
However, the effect code need to be pasted into the framework sketch, effectively replacing this part of the code:
Hope this helps
Hans
I did. And I found the zip file you have on the thread and neither worked. I couldn’t get the zip file to load in Arduino ide and I couldn’t get the code from the section of the thread itself to work in the simulator I’ve found. Keeps telling me bad build.
nikkole
Would you mind opening a topic in our Arduino forum?
This way you can post the code so I can see what may be going wrong …
(please do not post code here!)
Hans
Posted (link). Thank you so much!
niksim86
Hi,
I really like your effects. But I refer to your Theatre Chase effect on my LED strip, my LED strip became strobe effect.
Could you please guide me how to solve it? Thanks.
Kevin
Hi Kevin!
Unfortunately, your question is a little vague.

Considering this project, I would say you pasted the wrong code in the sketch.
If you’d like me to look at the code: please post a topic in the Arduino forum, where you can post your code, so I can look at it.
!! Please do NOT post code here in the comments !!
Hans
Hi
Posted in https://www.tweaking4all.com/forum/arduino/about-theatre-chase-effect-on-led-strip-with-ws2812b/
Thanks
kevinfang
Excellent – I’ll take a look …
Hans
Can you add VU METER EFFECT in your code…..Or can you give me that part of code 😊…..If you gives its fulfilled for me 👍
Mathew shaw
I do not have code for VU meters.
Folks have played with it though and in the comments this article has been mentioned: Simple spectrum analyzer
Hans
I just ask about Effects 😊….Not an Real Spectrum Analyser Anyway Thank you sir!!
Mathew shaw
But there is no VU meter effect here?
So I’m not sure what you’re referring to?
Hans
hey I really liek your examples.
maybe you can help me to achieve
this look ??
somehow I stuck.
Thank you
Stanislav Fedorenko
Hi Stanislav,
I’ve started this forum topic for this since this is a little off topic.
Hans
I do this by telling the system I have (14 in your case) and having the last 15 wired as 3 – 5 LED branches. That is LED number 9 (10) is actually 10A/10B/10C, creating the branch/cross
Gerald Bonsack
How to remove the outer 2 faded leds in the Cylon effect?Please some help I need it in a project that is due soon.
Hamza
You could try the code below.
I modified 4 lines where the colors used to be divided by 10 … (indicated with the // <————– )
void CylonBounce(byte red, byte green, byte blue, int EyeSize, int SpeedDelay, int ReturnDelay){
for(int i = 0; i < NUM_LEDS-EyeSize-2; i++) {
setAll(0,0,0);
setPixel(i, red, green, blue); // <--------------
// was: setPixel(i, red/10, green/10, blue/10); for(int j = 1; j <= EyeSize; j++) {
setPixel(i+j, red, green, blue);
} setPixel(i+EyeSize+1, red, green, blue); // <--------------
// was: setPixel(i+EyeSize+1, red/10, green/10, blue/10);
showStrip(); delay(SpeedDelay); }
delay(ReturnDelay);
for(int i = NUM_LEDS-EyeSize-2; i > 0; i--) {
setAll(0,0,0);
setPixel(i, red, green, blue); // <-------------- // was: setPixel(i, red/10, green/10, blue/10);
for(int j = 1; j <= EyeSize; j++) {
setPixel(i+j, red, green, blue);
}
setPixel(i+EyeSize+1, red, green, blue); // <-------------- // was: setPixel(i+EyeSize+1, red/10, green/10, blue/10);
showStrip();
delay(SpeedDelay);
}
delay(ReturnDelay);
}
Hans
Thanks a lot for the awesome work, I used the rainbow cycle on a 3D printed christmas tree I’m building using 18 WS2812b leds, and it looks awesome, I managed to use an ATTiny85 (mini 8pin 3v-5v chip that supports arduino, has 8mhz clock and 16kb mem) and power it with USB, you dont even need a full size arduino to use these code samples, Thanks, I sent you a small donation
Thanks!
Mario
Mario H
Hi Mario!
Awesome to hear this and thanks for the coffee (any token of appreciation is very much appreciated!)
Happy holidays!!
Hans
Hi Hans. Thanks for this tutorial and I’ve already modified it to a point of adding capacitive touch to toggle between light effects using a Trinket MO controller
https://www.youtube.com/watch?v=0WxDgiRM9g8
Happy to share my mod of your code where you see fit if you like.
Gary
Hi Gary!
Oh wow that looks cool! Please share if you can
(maybe post it in the Arduino forum, or just reply to the notification email and I’ll post it for you)
Hans
Hi Hans,
I modified your code to use on an adafruit Trinket MO microcontroller where I use capacitive touch to toggle between the different effects (code below).
One key point to note is the value used for the internal resister setting. (RESISTOR_20K). Set too low and ambient light can toggle the switch. Set too high and it struggles to detect your touch.
Hope this compliments your awesome work in some way.
End result here:
https://www.youtube.com/watch?v=0WxDgiRM9g8
(full code moved to the forum – see this post)
Gary Kester
Awesome Gary!
Thank you for sharing! I hope you don’t mind that I moved the full code to the forum (just to keep things a little cleaner here in the comments).
Once again: thank you for sharing!
Hans
Thank you for such useful sketches. I’m new to this but have found your examples clear to use. How do I make the meteor sketch run the LEDs in the opposite direction?
Simon
Simon
Hi Simon,
Awesome and thank you for posting a thank-you
You have two options to reverse the meteor rain.
1) Rewrite the setPixel function, by subtracting the pixel position from NUM_LEDS. So led 1 becomes NUM_LEDS-1. Led 2 becomes NUM_LEDS-2 etc.
This is probably the easiest method, but it will reverse the other effects as well (unless you creates a second setPixel function, say “setPixelReverse”, and you use that function only in the meteor effect).
void setPixel(int Pixel, byte red, byte green, byte blue) {#ifdef ADAFRUIT_NEOPIXEL_H
// NeoPixel
strip.setPixelColor(NUM_LEDS - Pixel, strip.Color(red, green, blue));
#endif
#ifndef ADAFRUIT_NEOPIXEL_H
// FastLED
leds[NUM_LEDS - Pixel].r = red;
leds[NUM_LEDS - Pixel].g = green;
leds[NUM_LEDS - Pixel].b = blue;
#endif
}
2) Rewrite the meteor effect where every function call to “setPixel” and “fadeToBlack” is passed the “NUM_LEDS-pixel” value instead of the “pixel” value.
For example:
becomes
and
becomes
(may need some experimenting)
Hope this helps
Hans
Your speedy response is much appreciated.
Coffee’s on its way.
Thanks, Simon.
Simon
Thanks Simon!
Your generous coffee is very much appreciated

Hans
Hello, I want to thank you for this presentation, here I found some useful information for me.
I wish you a Happy New Year and many achievements.
Bursucel
Thank you Bursucel for taking the time to post a thank you! It is much appreciated!
Happy New Year to you as well!
Hans
Hey thanks for all this hard work. I just found this. I’ve been studying Fast LED’s for a few days and someone referred me to this site. Wow, lots of great effects here. I will be back.
Jim
Hi Jim!
Thank you for the compliments – it is much appreciated!
Enjoy the effect when you get to it
Hans
I’m trying to do a fire effect on two pins of a single board so I can have different parameters for each leg. I’m finding it a tough nut to crack.
Any tips or code you can point me to? I’m away for my coding laptop so i can share the code i am using but it looks pretty much like everyone else’s fire code.
mrpurplepaul
Hi MrPurplePaul,
That would indeed be a tough nut to crack with existing Fire effects.
Your issue would be that you’d need to switch pins while doing each step of the Fire effect – something the Fire effect code is not suitable for.
A problem that I described in this article as well. Now in that article, I have modified the Fire effect a little, check it out and maybe this gets you going in the right direction.
You will need to either modify the function, or for testing purposes make one function for each pin and call them like so, repeatedly;
Now keep in mind; this is not something I have tested, you may need to do some tweaking, and this may not work as great as one would hope. Worth a shot though.
Another idea, also untested, would be using an ESP32, since that puppy has 2 CPU cores and you could maybe run each effect on it’s own core.
If you’d like to go deeper into this project, then please consider starting a topic in our Arduino Forum, so posting code won’t bother others.
Hans
Hello and have a good timeI used your codes for a home decor and thank you very much And I used a potentiometer and a rotary encoder to change the light intensity, but I couldn’t.Of course, it was not done with the potentiometer at all, but with the rotary encoder, this was done, but with a long delay …If you know a way to change the intensity of light, can you help me?have a nice day.
Babak
Babak
My approach:
There is a setBrightness option (e.g. strip.setBrightness(64);) you can include in your code but this isn’t intended to be used as part of standard effects.
See this article – https://learn.adafruit.com/adafruit-neopixel-uberguide/arduino-library-use
Instead, consider adding logic to modify the colours such as (255/n,0,0) where you change the value of n.
an “n” of 1 will be full brightness and 2 half brightness.
Gary
Hello friends
Thank you very much for your cooperation
I did it with a potentiometer and it worked well. I have not tested with Rotary Encoder yet, but I will write the result later.
have a nice day
Babak
Hi Babak – awesome!
Have a good weekend.
Hans
Thanks for chiming in Gary – that’s what I’d look into as well!
On that note: FastLED supports setBrightness() as well.
Hans
holy smokies! this is the best break down and most user friendly explanation of programming for beginners. i finally found a fire effect for a cosplay piece that i could easily manipulate based on your examples. thank you!
Roberta P
Hi Roberta!
Messages like these just make my day – and thanks for the coffee
p.s. if you’d like to share your cosplay project(s):
Please feel free to post them in the Arduino forum or by email (webmaster at tweaking4all dot com) – only if you like to share of course.
Hans
Hey there
this is the second time I’ve been trying to write this message, the previous one was marked as spam so I apologize if I’m a little brief.
I’d like to begin just by thanking you for all this work that you put into these effects I really appreciate it and it has been very helpful in helping me learn to code using the fast LED library.
I am currently working on a modified version of the FLORA Umbrella project.
essentially it is using the flora controller, the fast LED library, and the one button library. I am trying to create a sketch that can toggle through various effects using auxiliary button. I have been successful in using your code to create other projects, in successful in this project with adding other effects. However when attempting to add the theater chase rainbow effect to the pattern toggling sketch I encounter several problems. First it often takes several coggles to reach the theater effect, meaning that I have to cycle through all the other effects multiple times before I see the theater effect. Once I do reach the theater effect it will no longer allow me to toggle through effects. Another problem I have encountered is that sometimes it won’t even reach the theater chase effect it will actually just freeze end require a restart to continue usage. Not sure where I’m going wrong in the code I’ve tried to trim it down and figure out what it is the essentials but can’t seem to figure out what is stopping this from working and also causing this to freeze.
Here is my code,
Code removed, please find it here in the forum.
Thank you in advanced for any help!
p.s Trying to finish this for an even next week so hoping to get this fixed by then <3 I’ll def post photos/vids when I finish it!
Jack
Hi Jack,
apologies for being booted as a spammer. Sometime the spam filter becomes a little too enthusiastic I suppose.
I also had to move your post to the forum, since we’d like to avoid code to be posted here.
I’ve posted it here: https://www.tweaking4all.com/forum/arduino/question-modified-version-of-the-flora-umbrella-project/
Hans
Hi first of all thank you very much
i have tried the bouncing balls multicolor, but i don’t have green color.
i have modified this, and i got the green color
Gyula84
Hi Gyula84,
Did you include the proper count when calling BouncingColoredBalls?
Like so:
For example (with your colors):
void loop() {byte colors[3][3] = { {0xff, 0, 0},
{0, 0xff, 0},
{0, 0, 0xff} };
BouncingColoredBalls(3, colors);
}
Hans
Hi Hans
code look like this, i am newbie
Gyula84
Assuming you have an “}” after that code, then the code looks correct.
Would you mind opening a topic in our Arduino forum so I can look at the full code?
(please: do not post your sketch in these comments)
Hans
I have downloaded the code from here this website, all LED effets are in a zip file LEDEeffects-Sources.zip
Gyula84
Without seeing what you may or may not have done to the code, I cannot see or determine what may be wrong.
And if you did follow the instructions here, which I’m sure you did, then you did change the code.
Hans
Here is the link for code codeshare
Gyula84
Not sure why you didn’t post this in the forum as requested …
Oh well, … the code looks correct.
Check your wiring.
Also: Did you try another LED strip? Maybe the strip is faulty?
Hans
I noticed the strip is set to “GRB” perhaps it needs to be “RGB” instead?
Dai Trying
Depends on your strip, but you can most certainly give it a try – worse case you get unexpected colors.
Hans
I have tired the RGB and now i have green and blue but i don't have red color
the second line of this is not good
byte colors[3][3] = { {0xff, 0,0}, {0xff, 0xff, 0xff}, {0 , 0 , 0xff} };if i have changed them to this and right now i have red, blue and green color also
byte colors[3][3] = { {0xff, 0,0}, {0, 0xff, 0}, {0 , 0 , 0xff} };second thing i have to modified this line also, because the animation is too fast i don't know why (i am newbie in programming) i have an aruino nano china version
from this float Gravity = -9.81;
to this float Gravity = -1;
Gyula84
Awesome, looks like you’ve got it to work to your liking!
Hans
I added a heartbeat effect I thought you might want to include.
I added it as an effect on this video
https://www.instagram.com/reel/CnHbSDnj1ia/?utm_source=ig_web_copy_link
=-=-=-==-=
HeartBeat(153, 76, 0, 150, 2000, 0, 0);
=-=-=-==-=
void HeartBeat (byte red, byte green, byte blue, int HeartRate, int Pause, int PixelStart, int PixelEnd) {
for(int i = PixelStart; i < (PixelEnd+1); i++) {
strip.setPixelColor(i, (red/2*3), (green/2*3), (blue/2*3));
}
showStrip();
delay(HeartRate/3*2);
for(int i = PixelStart; i < (PixelEnd+1); i++) {
strip.setPixelColor(i, 0, 0, 0);
}
showStrip();
delay(HeartRate);
for(int i = PixelStart; i < (PixelEnd+1); i++) {
strip.setPixelColor(i,red, green, blue);
}
showStrip();
delay(HeartRate);
for(int i = PixelStart; i < (PixelEnd+1); i++) {
strip.setPixelColor(i, 0, 0, 0);
}
showStrip();
delay(Pause);
}
=-=-=-==-=
Gary Kester
Hi Gary!
Thanks for sharing – and apologies for somehow completely forgetting to reply to your post.
Thanks again – its much appreciated!
Hans
Hi Hans,
When declaring a function is C+ how would you modify your code so the pixel strip that the effects is applied to, can be added as a variable to the function.
Your current code applies the effect to a single strip and if I add multiple strips, I have to duplicate the functions. Not that familiar with c+
Regards,
Gary
Gary
Hi Gary,
This can be confusing indeed – I have to stop and think for a minute as well to do this
Passing the led-strip is like passing an array, since the “leds” variable is an array of LED colors (CRGB).
To use this as a function parameter you’d probably want to do something like this:
If all strips are the same length, then this should be OK.
However, to do it more correct, you’d want to make sure you are using the right number of LEDs.
One option is to pass the size of the array as a variable as well, either by passing the constant NUM_LEDS or by using the “SizeOfArray()” function.
Something like this:
Now in the effect function you’d obviously replace “leds” with “TheLedstrip” and “NUM_LEDS” with “NumberOfLEDs“.
Hope this helps.
Hans
Hi Hans,
I’ve been doing some digging and found my issue is wanting to run your specific effects on multiple strips.
The trouble is with the use of the delay() method that freezes the processor so it cant be used to run multiple effects on different strips or check for change in button states or other inputs during the delay.
Using Adafruit’s sample code as a base, the answer is using millis() to check current time, previous update time and delay period or “interval” to evaluate againts an interval between updating effects
Code below that runs 2 different effects at the same time on different strips as follows:
1. Set the effect to run on either strip
2. Use an update function that checks period since last updated and updates the relevant effect by incrementing the index – the index is used to determine which pixel to update next,
3. Instead of creating the same set of functions for each strip, use a class constructor to build an object for each PIN / strip of pixels
Code removed and moved to this forum post.
Gary
Hi Gary,
Thank you for sharing your code.
Unfortunately; I had to move it to the forum due to its size, as requested in form used to post comments here.
The solution looks interesting, and you’re right: for multiple effects “delay” isn’t the best the use. Another alternative is using an ESP32 (cheaper, faster, more options) which has 2 cores. This way work can be split over both cores allowing for faster effects. Of course, this does take some thinking about what core does what
Hans
Hi, I’m french, so sorry if my english is not very undersantable.
I’l already seen this post in the past for create a little project.
I have a new project and for this I need to combine the TheaterChase with Strobe, the theaterChase need to “blink”.
Currently I d’ont find the solution, one of you alraedy make this ?
I’m not an expert in C langage.
Thanks all ;)
Bryan
Bryan
Hi Bryan,
I do not think any one combined the two.
What do you have in mind?
Should the theaterChase runs and goes ON/OFF in between? Or should it flash white in between?
Oh and good to know: are you using FastLED (preferred) or NeoPixel?
Note: considering that working on this project will become off-topic, please consider starting a topic in the Arduino forum.
(placing your question here is totally legit – just want to avoid that we start posting several messages and source codes here in the comments)
Hans
Hi Hans,
Thanks for your answer, ok for the new topic, I’ll create it.
For answered at your questions :
I use FastLed, I read that is better than NeoLed.
for the combine effect, I would loke to make the theaterchase with 2 colors in the same time for exemple 5 pixels in red, 5 in white and it move to pixel 1 to 300 (I have 300 pixel WS2811), and alls the led must blink off/on/off/on like a stroboscope but the effect “theaterchase” must to continue.
You understand what I want or is not clear ?
thanks,
Bryan
Hi Bryan!
FYI: I just removed your post with the Dropbox link (did watch the video!) – just not sure how safe it is to publicly post a Dropbox share 😉
Unfortunately, today is a busy day for me, so apologies for not replying right away – I’ll await your forum post (feel free to post the link to the forum post here as well, in case others want to follow the conversation).
Hans
Hi Hans,
thanks, not problem for the Dropbox link and your reply, I made a Youtube link, it’s more “secure” ;)
I make a new topic too : Leds effects – Combine theater chase and Strobe
Thanks 😁
ptitbry
Hans
Just completed a grouping of 24 Christmas “Icicle” and have posted them on YouTube: https://youtu.be/I8HOdbV_AR8.
The code is still a work in process, but if requested, I’ll post what I have on the Forum. Also, along with these “Icicles” I am making 20 Christmas “Candy Canes” following the same style coding.
I’ve also completed a 3X3X3, 5X5X5 and a 9X9X9 matrix, using the same style wiring, (with not so clean code), but they create a multiple minute three-dimensional lighting show, again using a continuous string of addressable.
gbonsack
Very nice work. A meteor effect running down might have a bit more of an organic effect with the tail randomly decaying. To level up, I would have each strand randomly starting and running at different speeds but you’ll need to use timed functions instead to f using the delay to multitask
Gary Kester
Thanks, I was thinking of the same thing, and I’ll see if I can include an increasing variable (t), to reduce the brightness over time.
gbonsack
CORRECTION, accidentally inserted while cut and paste.
https://www.youtube.com/watch?v=I8HOdbV_AR8
gbonsack
Hi, your work on neopixels code is great.
I just used the Fadein Fadeout your color to make the ignition of a truster with a 16 led ring and I was looking a way to slow down the effect because is very fast with the Ring and I want to make the FadeinFadeout Effect go for around 45seconds and after stay Fixed on for 30seconds then restart the loop.
Do you think it is possible and wich code can I use ?
thank you if you can help.
p.s. I just started with Arduino and I am trying to learn more possible.
Stephen
Hi Stephen,
I’m sure we can that to work
Both Fadein Fadeout functions work in a similar way, and you can slow it down by adding a “delay()” function call just before (or after) the showStrip() functions.
So for example, like so:
void FadeInOut(byte red, byte green, byte blue){
float r, g, b;
for(int k = 0; k < 256; k=k+1) {
r = (k/256.0)*red;
g = (k/256.0)*green;
b = (k/256.0)*blue;
setAll(r,g,b); delay(100); // <-- added this
showStrip();
}
for(int k = 255; k >= 0; k=k-2) {
r = (k/256.0)*red;
g = (k/256.0)*green;
b = (k/256.0)*blue;
setAll(r,g,b); delay(100); // <--- added this
showStrip();
}
}
Hope this gives the desired delay. You may want tinker with the value (100). Higher numbers = more delay, and 1000 = 1 second.
Hans
Great, I will give a try with different delay times to find the better one.
If I want to add a second effect you think it is possible ? I tryied but no results, maybe I made something wrong because I am am new to arduino programming.
Thank for your tip that are very usefull with neopixels
Stephen
Stephen
Enjoy
What do you mean with adding a second effect?
p.s. de FastLED library works with NeoPixels as well and is much more mature and faster than the NeoPixel library (IMO).
Hans
Good I will give a try.
I am looking to make the the LedRing use first for 20/30sec. this effect code (added here under) and after the FadeinFadeout 1 time and after 5 sec of black start again.
With the two effect in sequence I will have the ignition and full throttle of the Thruster.
It’s a big thing for me but I need to make for the engines of the Razor Crest model fo Mandalorian Series (P.S: I am a Sci-Fi Scale model builder)
Thanks
Stephen
p.s.s. here you can see my last works Tantive 4 spaceship and Medical Frigate
Stephen
Not sure if it’s needed, but you could consider starting a topic in the Arduino forum, especially when more code needs to be shared (to not bother those not interested). And … there are more Sci-Fi builders there
The pics of your builds: Super cool and impressive! Very nicely done!
Anyhoo … I’m not quite sure what you have in mind.
You have a colorwipe and a fadein/out function, and you want to run those in sequence, followed by 5 seconds black?
Then yes, you could do something like this:
void loop() {colorWipe(0xff, 0xff, 0x00, 50); // pick whatever color you need of course
FadeInOut(0xFF, 0xFF, 0x00);
delay(5000);
}
Is that what you had in mind?
Hans
If you thnik it’s better a new topic it’s ok
the sequance I try to make is:
1) All off (for 5/10 sec)
2)the superhero powerplant effect I posted before (for 30 sec)
3)FadeInFadeout (without fadeout if possible) for other 30 sec)
4)return to 1
I hope I explained well.
Thanks
Stephen
Stephen
Yep, then I’d go for the suggested approach.
1) Glue your effect in a function.
void powerplanteffect() {flip = random(32);
if(flip > 20) {
dir = 1 - dir;
}
// Some example procedures showing how to display to the pixels:
if (dir == 1) {
alpha += alphaDelta;
}
if (dir == 0) {
alpha -= alphaDelta;
}
if (alpha < minAlpha) {
alpha = minAlpha;
dir = 1;
}
if (alpha > maxAlpha) {
alpha = maxAlpha;
dir = 0;
}
// Change the line below to alter the color of the lights
// The numbers represent the Red, Green, and Blue values
// of the lights, as a value between 0(off) and 1(max brightness)
//
// EX:
// colorWipe(strip.Color(alpha, 0, alpha/2)); // Pink
colorWipe(strip.Color(0, 0, alpha)); // Blue
}
2) make the calls …
void loop() {delay(5000);
powerplanteffect();
FadeInOut(0xFF, 0xFF, 0x00);
}
Hans
Wow, great Idea and so I learned also the function use, but with the new parts I have 30 sec of black and after only the fadeinfadeout effect.
I think is because I must tell how much time the PowerPlant Function must work but I don’t know how to declare it.
Here the code that gives no error.
Stephen
Hi there Hans, here is another request on your nice Meteor effect. Probably the most noticed effect here.
Would it be possible to have the meteor effect goes round and round? In the original code, the Meteor itself stops at the end of the strip, then the tail decays and after that the Meteor starts again.
My approach would be to have the Meteor start again as soon as the Meteor hits the end. In this case you would have a never “hitting” or “endless” Meteor falling, which would look great when using a LED-Ring.
Changing this line:
to this line:
Makes the Meteor start again immediately, but also stops the old Meteor tail of course. So not very pretty.
Trace
Hi Trace
Making the Meteor effect infinite is a cool idea (kind- like traveling through space right? ).
).
First thing would be to make sure the effect keeps going for at least as long as the meteor trail. Having said that I’d probably rewrite the entire code and use a method to shift the LED colors endlessly. So basically keep shifting LEDs and at random rebuild a meteor, with a fading trail. There is a good function to very fast shift the LED array, but I’d have to experiment a little to see what works the most elegant (and I’d need to dig-up my Arduino+LED strip).
I doubt we can find an elect way by just adapting a for loop
Hans
Hi Hans, sounds like a plan. Using FastLed of course.
My thoughts about it:
What about beat8 or sin8 function? Also, what about using a gradient color palette? This way we can specify the tip color (a white-ish Meteor) and the color of the tail, which could be a fading from yellow to red. The last color could be black (which replaces FadeToBlack) or red, purple, green etc. (which replaces FadeTowardColor). So that the last color would be the background color. So we could define many gradient palettes and just activate which one we want to use in the function right?
And instead of the random tail decay (which would need FadeToBlack or FadeTowardColor), can we just put a sparkle effect on top, moving along the tip of the meteor (so the first few leds after the tip are sparkling)? <– just some ideas
To bad the Power Rangers topic does not work, we could use it to further discuss this effect. Cause I think it will fill this comment section more and more.
Trace
I think the forum works … at least I seem to be able to communicate with other.
Hans
Hi hans !
this is such a great work. I am a beginner to Arduino and coding. From the downloaded files i got individual code for each effect. Explain me how to add the required effects. Can you Plzzzzzzzzzzzz tell me with an example
I want
1. Multicolour bouncingballs
2. Fire
3. Strobe
4. cylon
5. KITT
6. Meteor rain
7. Theater chase Rainbow
can you Plzzzzzzzzzzzzzzzzzzzzzzzzzzzzz Explain mee !!!
shyamk
can you plz make me a code that runs the multi coloured bouncing bal effect first and followed by fire effect.
After that it will be easy for me to understand.
can you plzzzzzzzzzzzzzzzzzzz help me without hesitation
shyamk
You’ll have to copy the code for both effects to your Arduino sketch.
Just replace (in both cases) the “void loop()” section of the examples with only this:
void loop() {BouncingBalls(0xff,0,0, 3);
Fire(55,120,15);
}
(so do not forget to copy both effect functions in the sketch! 😉)
Hans
Where should i paste this loop…. And where should paste the code of the effect
Can you plz tell me
Shyam
By any chance can you make a favour for me by giving me the complete code with two effects. After that i can manage.
Shyam
Im looking for some matrix scripts like 32×32 something with a lot of 60s groovy action moving color balls .i had one but deem to have lost it
thanks
fred
fred
Hi Fred,
well, first off all, I do like the idea!
Just not owning a 32×32 LED panel, and never really built anything like that.
I do recall AdaFruit having a few projects that may look like what you’re looking for.
Could not resist and quickly looked an found two Adafruit libraries: the older RGB-matrix-Panel library, and the newer Protomatter library.
Hope this helps
Hans
Je veux savoir comment programmé un Atmega 328 pour le circuit pixel led avec un programateur TL866 II plus.
quelle est la broche du circuit Atmega 328 qui devienne DATA .
Nabil
Unfortunately, I’m unfamiliar with the TL866 II plus programmer … sounds like you’re trying to work with the microcontroller chip straight (not an Arduino-like board).
To find the data pin you may have to consult the Atmega datasheet (you can find those here: link).
Hope this helps find the right pin.
p.s. please post questions in English or have Google Translate it for you – this saves me from having to do that and others can read your question as well
Hans
Finding quality resources for niche programming projects can be a challenge. Sure, a quick search might yield a code snippet with the right keywords, but clear explanations are often lacking. Breaking this mold, [JaneCoder] delivers an exceptional guide to custom sensor integration in her detailed post titled “Mastering IoT Projects with Arduino.
Anjali Arora
Hi Anjau, thank you for the compliments
Hans
Hi Hans. I still use so many of your effects but branched off to python and was working on my own variation of using a class that includes the effects as various methods. The key difference was using time.monotonic instead of time.sleep which pauses the machine.
This way, I can have multiple effects running on different strips if I like.
Arduino is still so much faster on slower micro processors or running effects over long strands.
e.g. here – https://github.com/neowashumanizedcode/appleofeden/blob/main/code.py
Gary Kester
Hi Gary!
I’m not a big Python fan myself, but I’m sure others may benefit from your efforts.
Thank you for sharing!
Hans
Great collection and great inspiration. I’m also in Micropython and take this as a great starting point.
Stefan
Is there an update to this? I made several of these with the All Led sketch years ago but now I want to revisit and build a few more of these, so wondering about updates or improvements?
jlpicard
Hi jlpicard!
I haven’t done much with this in the last few years – everything should still work and way back when I did start playing more with ESP32’s.
Due to family circumstance I just kept running out of time and never got to really making any publishable changes.
Sorry
Hans