Before you start …
Verify your local laws!
This article is not intended to promote pirating Copyrighted Materials!
Laws, when it comes to copying Copyrighted materials, differ from country to country. It is your responsibility to be aware of these laws and comply to them. See also our Disclaimer!
The movie industry in general does not want you to copy a DVD for any reason. Fair use proponents however claim that the law leaves room for making a private backup (in the US: DMCA or Digital Millenium Copyright Act). But it’s all a matter of interpretation – so think for yourself before you act!
Other countries, like The Netherlands, are more liberal when it comes to this – Consumers pay a few cents extra for empty media, and for personal use you are allowed to make a copy (see Stichting Thuiskopie).
Why DVD to MP4 or MKV?
So you might wonder what MP4 (or M4V) and MKV stand for?
Both are file types; in this case they are so called containers that can contain multiple parts which can be video, audio, subtitles, etc. These particular file types can hold multiple video, audio, and subtitle parts or so called streams.
For example videos in different angles, audio in different languages and qualities (Dolby Surround, Dolby AC3, regular stereo, etc), or subtitles in different languages or types (Closed Caption versus regular subtitles).
The purpose of the files we are about to make will be mainly playback on your computer or other device capable of playback of these kind of files. For example: XBMC box, Tablet PC, iPod/iPad, smartphone, media player in your car, or other media playback capable device.
Here MP4 is the most commonly used format (together with AVI).
MKV on the other hand, although seemingly superior, is not (yet) as popular, but HandBrake supports MKV as well.
MP4 vs M4V
For certain Apple devices, when a AC3 Dolby Surround track and/or Chapters are added, the file extension of an MP4 will become M4V. An M4V file is almost the same as a MP4 file, but it seems that an AC3 audio track and chapters are not considered “valid” in an MP4 file, but perfectly valid in an M4V.
XBMC, VLC and the likes care less if it’s called MP4 or M4V.
Transcoding Other Video sources …
HandBrake also accepts other video sources than just a DVD – including other video files!
It can convert most common video files to MP4 or MKV with ease.
Note : Copying a DVD is commonly referred to as “ripping” a DVD.
For the impatient: the short version …
For those that are impatient and more experienced, you can follow the following steps quickly.
For beginners I recommend to continue reading the following paragraphs which explain a little bit more about what’s happening.
- Install HandBrake.
- Install codecs and libdvdcss (see below).
- Start HandBrake.
- Insert DVD.
- Open the “Source” in HandBrake (the DVD).
- Select “Title“.
- Click preferred “Preset” – possibly fine tune settings
- Click “Start“.
- Drink a cup of coffee and eat a cookie – a.k.a. wait and pretend to be patient.
- Done.
Tools we need to Rip a DVD
When using HandBrake, we have all we need in one application, for proper working though we need a few extras, libdvdcss being one of them (to decrypt a DVD).
Downloads
Most Linux distributions, like Ubuntu, come with some sorts of package management tool, where APT is probably one of the most popular ones. To install HandBrake for Ubuntu (11+) open a shell and type:
1
2
3
4
5
| sudo add-apt-repository ppa:stebbins/handbrake-releases
sudo apt-get update
sudo apt-get install handbrake-gtk
sudo apt-get install ubuntu-restricted-extras
sudo /usr/share/doc/libdvdread4/install-css.sh |
This will:
- Line 1: Add the HandBrake repository to APT
- Line 2: Update the APT package list
- Line 3: Install HandBrake
- Line 4: Get additional tools and codecs (libdvdcss included)
- Line 5: Install additional tools and codecs
Other Linux distributions might work in a similar fashion – I’ll be the first one to admit that I’m not a Linux expert.
Ripping a DVD to MP4 (or MKV)
Alright! Now that we have that done, we can get started with the actual ripping of a DVD.
Region Code
Before proceeding, make sure the DVD can be played on your computer with your regular DVD playback program for example “VLC” – just to make sure that the Region Code is set correctly.
Step 1: Start HandBrake
In Ubuntu you can click the “Dash Home” icon and start typing “handbrake” – when you see the icon: double click it.
Step 2: Select your video source (the DVD)
Normally HandBrake starts right away with a file dialog asking what to rip or convert.
If that didn’t happen: Click the “Source” button (1) to have the file dialog appear.
In the file dialog, select your DVD on the left hand side (2) and click “OK” (3).
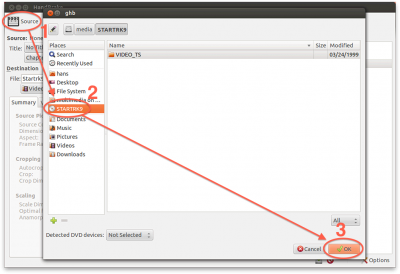
HandBrake – Select your DVD
After clicking “OK” (3), HandBrake will start scanning the DVD.
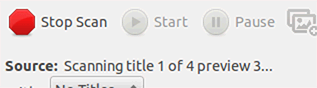
HandBrake is scanning your DVD
Step 3: Select the Movie
Once the scan completed, HandBrake will pick what it thinks is the main movie. You can of course override this and select the specific part of the DVD you’re like to rip. Typically, the title with the longest playback time is your main movie, but that is not a guarantee!
Too many titles to choose from?
If you find yourself in the situation where it becomes difficult to decide what title to pick, for example when certain copy protection mechanisms tamper with the table of content, and it appears that you DVD has a truck load of movies on it (the so called “99 title problem”): read this article on how to detect which movie to rip or copy.

HandBrake – Select the movie to rip
Step 4: DVD Conversion settings – Video
First we can set the destination of the result file. Typically HandBrake will take a default location, like your desktop, and name the file based on what it found on the DVD (which can be a random guess). You can change the location and filename as you see fit. Keep in mind that the resulting file size for a normal movie is in the 1 -2 Gb size – make sure the destination drive has enough space available!
When ripping a DVD we basically convert (transcode) the DVD movie to a different file format and for this we will need to do a few settings. For your first DVD, you’d want to try the default settings as they are already pretty good, but you can fine tune the settings if you’d like. In this article you’ll find more details on how to fine-tune/tweak the settings.
First, since we want to create an MP4 or MKV: Select the desired “Format“. For most purposes choose “MP4“.
One of the nice things of HandBrake is the ability to work with presets, you will see them on the right.

HandBrake – Presets for particular target devices
If you have a particular target device in mind, try to pick the one that closest matches one of the presets.
If you’re unsure or you have multiple devices in mind, then pick “Universal” – a preset I usually start out with.
Note : All settings after this point are optional! So you could jump right away to step 7 and click the “Start” button, but it might not be a bad idea to keep reading anyway …
Basic setting I use (that I’d start out with – which are slightly different than “Universal” – more optional fine tuning in this article):
Starters HandBrake Settings
| Field |
Setting |
| Video Codec |
H.264 (x264) |
| Framerate |
Same as source / Variable Framerate |
| Constant Quality |
RF: 20 |
| x264 Preset |
Placebo (slow but very good) or veryfast (fast and reasonable quality) |
| x264 Tune |
film (for regular movies) or animation (for classic animations or Manga) |
| H.264 profile |
3.0 or auto |
If you have multiple target devices in mind, check the option “iPod 5G Support” as well.
With these settings most DVD movies end up in the 1.2 – 1.5 Gb file size range. You can tweak this down if you’d like but then you’d have to play with an average bitrate instead of constant quality.
Note :
For Android devices, I’ve found that setting the “Video Codec” to “MPEG-4 (ffmpeg)” results in the most compatible format.
Note :
After tweaking and modifying all kinds of settings, in the now following paragraphs, you can save them as a new preset using the “harddisk with green arrow” button at the bottom.
Step 5: DVD Conversion settings – Audio
Next click the “Audio” tab, where we can play with the audio settings.
Under normal circumstances I would choose the highest audio quality “Track” the DVD has to offer, which is typically (if available) AC3 Dolby Surround, in the language of your preference.
You now have 2 options to choose from:
1) Add only one Audio Track
In that case you will have to decide if you want the original sound track, unmodified (codec: auto passthru), or if you’d like, use a format like AAC (I prefer AAC coreAudio for Macs) or MP3 – as the cheaper playback devices are not always capable of AC3 playback!
2) Add multiple Audio Tracks
You can also choose, and this is what I do, to add the sound track in 2 (or more) formats. For example the fancy AC3, for the good video playback devices, and AAC (CoreAduio for MacOS X) or MP3 for the less capable playback devices. At the same token, you can also choose to add multiple languages as well (if available on the DVD).
Repeat these steps as often as you need to:
High Quality Audio Track
I always choose the first audio track using the codec “Auto Pasthru” (unmodified), which means that you will get the best audio quality when watching the movie … this is often the “AC3 Dolby Surround” audio track, if provided by the DVD. Click “+” to add the track.
Lower Quality Audio Track
I also always add a secondary audio track where I set the audio codec to a simpler format like MP3 or AAC. I would always choose one of the AAC variants, with a “Dolby Surround” or “Stereo” “mixdown” at a “Bitrate” of “160“. Click “+” to add the track.
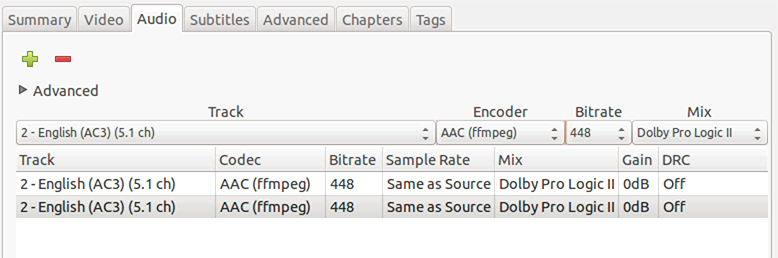
HandBrake example Audio settings
Step 6: DVD Conversion settings – Subtitles (optional)
Now that we have covered Audio and Video: Subtitles.
Of course subtitles is fully optional and you can leave them out if you’d like.
I usually add at least one subtitle: English Closed Caption. You can however enable as many as you’d like.
You will have to pay attention here though!
Some subtitles HandBrake wants to have “Burned In” – which is a bad idea all together.
It means that subtitles will always be visible and cannot be turned off!
So we really want to make sure that “Burned In” is NOT CHECKED!
More details about subtitles variations can be found on the HandBrake Wiki page.
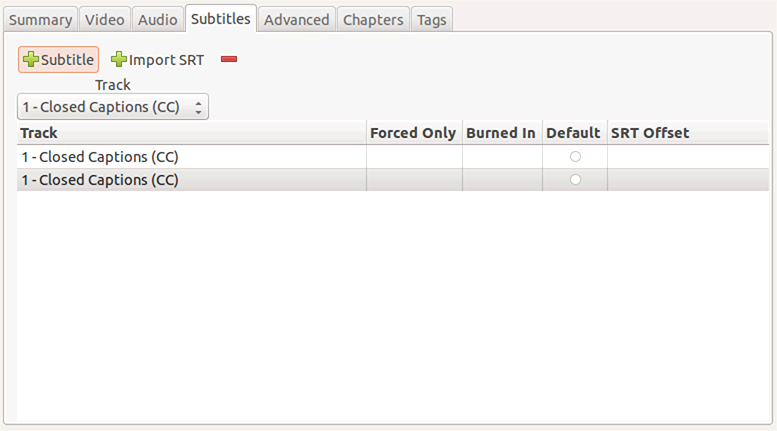
HandBrake Subtitles example
Step 7: Start Ripping!
This would be the time to click the “Start” button to start the ripping/copying/converting process.
Ripping will take a little bit and it mostly depends on the speed of your computer and the encoder settings you used.
Additional Tips
Advanced Tweaking of the Encoder
I wrote an additional article for those interested in additional optimzing and tweaking of the HandBrake encoder settings for h264.
I can highly recommend, even for beginners, to read thought this article. It’s not just about “better” settings but also about some of the basic principles of encoding video.
Using a Queue for sequential ripping of multiple DVD’s or video conversions
You do have the option – if you have multiple DVD Rom players connected to your computer, or want to convert multiple video files – to add everything you just did to the Queue (click “Add to queue”) and start the entire process you just went through again to then add that one to the queue as well. You can however NOT remove the DVD form the drive it’s in right now!
Once you filled the Queue, click “Start” and HandBrake will process the entire Queue in sequence.
Put the computer to sleep when done
One of the features I really appreciate is that you can have HandBrake put the computer to bed when done converting. Specially with conversion job that take a while, this proves very handy. If you’d like to enable this option, because you’re going to walk away from the computer and let HandBrake do it’s thing:
Click the menu (top of your screen) “HandBrake” “Preferences” “General” “When All Encodes are Complete” and choose “Put Computer To Sleep“. You can even do this while HandBrake is in the middle of converting your DVD!
You can of course also choose for one of the other options …

Handbrake – Go to sleep when done!
HandBrake not Ripping the entire movie
It can happen, for example due to particular copy protection, or a damaged disc, that HandBrake will not rip the movie correctly. I’ve found that MakeMKV, although often used for BluRay discs, does a great job recovering from those situations for DVD as well.
It is slower than HandBrake though and MakeMKV is a little tougher to install under Linux.
Read: MakeMKV – Copy a Blu-Ray movie to MP4 or MKV.


Comments
There are 27 comments. You can read them below.
You can post your own comments by using the form below, or reply to existing comments by using the "Reply" button.
Just wanted to say THANK YOU for a well written, easy to understand tutorial. I am fairly new to Linux/Ubuntu and spelling things out at the start is always helpful. You explain exactly what lines due in terminal AND most of all everything works great after the install. I have your page bookmarked and have used it many times to refer to when reinstalling Ubuntu or installing on other computer!!Thank you again
Sean
Hi Sean!
Thank you so much for your kind words! It really makes it worthwhile to write articles like this!
hans
The section “Too many titles to choose from” has the wrong link. It takes you to:
//www.tweaking4all.com/video/rip-dvd-blu-ray/windows-handbrake-copy-a-dvd-to-mp4-or-mkv-file/
Instead of:
//www.tweaking4all.com/video/rip-dvd-blu-ray/dvd-what-title-to-rip-99-titles-fix/
Cheers,
ak.
Anthony K
Thank Anthony for finding that one!
Little boo-boo on my end, and I just corrected the link!
Thanks again! Much appreciated!
hans
Note that the ppa has moved to stebbins/handbrake-git-snapshots.
Ron
Thanks Ron for the heads-up!
Do you happen to know the correct statements to get it going?
(I’m traveling at the moment, and do not have a Linux machine with me)
hans
Thank you very much for this wonderful tutorial. It was just what I needed to bet started ripping my huge DVD collection!
However there is one thing that I would like to be able to do. To rip a DVD uncompressed or losslessly compressed. In the same way that an audio CD can be ripped to WAV or FLAC. I want to be able to burn an exact copy of the original DVD, which is identical to the original DVD, with no loss of quality whatsoever! I accept that file sizes will be large, this is OK with me.
Handbrake has a myriad of combinations possibler for various audio and video formats and container formats. I would appreciate if you could recommend a set of settings that will result in lossless ripping.
Kind regards,
Njaal
Njaal Bendixen
Hello Njaal!
Ripping a DVD “lossless” or uncompressed makes very little sense, since DVD video is compressed (MPEG2) already, unlike an Audio CD.
Copying a DVD 100% identical is an option, even though it’s still compressed, by actually copying the entire DVD structure. A tool like DVDShrink (Windows only) is free and should be able to do just that. Most media players (VLC, XBMC/KODI) can play those just fine. You can either grab the directories (you’ll need decryption) or create ISO files.
HandBrake on the other hand will always re-compress the file, and you will therefor always have a little loss (even though you might not even notice it).
Personally, I enjoy h.264 and h.265 versions of my own DVD collection. But if you’d like a “full” copy, then I’d go with a tool like DVDShrink (there are others).
A very good alternative to HandBrake is the commercial application DVDFab (available for Windows and MacOS X), it’s not for free but it’s very good. It does allow you to rip to MPEG4 etc, but it also allows ripping to ISO files, so you keep your full DVD.
Hope this helps
hans
Hi Njaal,
On linux you can get a copy of the DVD original with dvdbackup on the command line. I find it works fine so far. It keeps the structure and a media player like VLC will run the folder as-if it is the original DVD, so you can jump to chapters, see specials, etc
will
Thanks Will!
I did not know that! Excellent tip!
hans
Based on Will’s tip, for those who do not access to dvdbackup on their Linux distro:
The SourceForge page of dvdbackup for downloading and how to compile your own (seemed a bit old).
As far as I could find, it might also be available through apt-get as well:
And I found this guide for the entire process, including how to get a tool to strip CSS if needed.
Hope this helps
hans
Thank you for the great manual. I’ve installed in LMDE 1 directly from repository, without require the ppa. Great job!
Rafael
Hi Rafael!
Thanks for the thank-you post! It’s much appreciated! Glad to hear you’ve got it running!
hans
Great work, hans.
I’d like to add another good Linux DVD ripping freeware I love – AcidRIP ( https://apps.ubuntu.com/cat/applications/precise/acidrip/ ). AcidRIP is small and efficient, and allows me to transcode my DVDs just one button click. The average length of time I can rip a DVD is 15-30 minutes. http://dvd0101.com, by the way, lists four of my favorite DVD rippers for Windows. If you plan on ripping DVDs on Windows, you can give them a try. Note, the four rippers are shareware, not free.
JonesLee
Hi JonesLee,
thank you very much for the compliment and for the additional info!
For Mac and Windows users, if one doesn’t mind a commercial tool, I’ve found DVDFab (does BluRay as well) to work VERY well and can highly recommend it as well. Too bad there is no Linux version available from them.
hans
I did those commands but this was not found:
sudo: /usr/share/doc/libdvdread4/install-css.sh: command not found
I looked in the folder but the .sh doesn’t exist. what gives?
joel
Hi Joel,
“sh”, on most Linux distributions, is a shell. So the command “sh” would open a new shell (for example in Ubuntu).
Per Linux version this might be different. You can try it by open a command line (or: Terminal) window and simply type “sh” (without the quotes) and press enter. A new prompt should appear (you can exit it by typing “exit”).
hans
Hi Hans
I had the same problem. Although the folder exists after installing from step 4 (/usr/share/doc/libdvdread4/) there is no install-css.sh in there. This is on Ubuntu 16.10 64. Any thoughts?
Thanks
mark
Mark
Using Ubuntu 17.04, /usr/share/doc/libdvdread4/install-css.sh does not exist.
Here https://www.lifewire.com/how-to-use-ubuntu-to-convert-dvds-to-mp4-4111375 is a more recent installation that worked for me:
dvo
Thanks DVO!
hans
I guess I missed the point of Joel’s question (sorry Joel).
It looks like the package no longer includes libdvdread.
You could try to install one of the older versions first (see this page for a list: Handbrake release for Ubuntu).
I never had to do this, so you might need to read up on how to do this. I did find this AskUbuntu Post. The answer looks pretty complicated, but when you scroll all the way down to the last response, then you’ll see a comment that seems much easier to work with.
I’m only guessing (!!!) but it’s probably going to be something like this:
But you’ll have to play with that to see what works.
If you find one that had DVDLibRead in it, then pretty please post your solution here.
I did see this post at the Ubuntu forum as well, not sure how helpful it will be though. The short version:
Not sure if this is helpful. Please confirm.
hans
Tried following these steps. but I got the error message about the Sh file not found as well. Also, when I tried to rip one of my DVD’s it gave me a strong of error codes due to region coding or something like that? What am I missing? Just trying to rip all my DVD’s I own so they can be streamed in the home on any of the screens. (And still new to Ubuntu as well so that adds another layer of complexity for me LOL)
HG…
Sean
Hi Sean,
Region codes is something HandBrake won’t “fix”. The problem with modern DVD drives is that they lock into a region when you use them for DVD playback the first time. I’m not sure how Ubuntu handles this, but for example MacOS and Windows will actually popup a message about this so you can select/confirm your region. I did see this Ubuntu tool for reading/setting the DVD Region of your DVD drive, and this article might be very helpful with that as well.
Be aware though that the region code can only be changed a limited number of times! I think it was 3 or 5 times before the drive permanently locks into a region depending on the firmware of your DVD drive.
Alternatively, and depending on your computer, you could look for a region free DVD drive (I did see a few at Amazon) or see if there is region free firmware for your drive (the old RPC1.org website is no longer active, but maybe this article is helpful).
Once that is set HandBrake should be able to rip your DVD’s. Assuming libdvdcss does it’s work properly.
hans
I am trying to rip a dvd using v 1.0.3 on Linux. I see where I can set the destination under File ==> Set Destination however, I have to do this for each title. Is there a method to make this destination setting permanent? Thanks
George
Hey, great tutorial, but at least one part is out-of-date, and I lost an hr on it. Please update this line: `sudo /usr/share/doc/libdvdread4/install-css.sh`. It’s only applicable for Ubuntu 12.04 to 15.04 (i386, amd64), and requires `sudo apt install libdvdread4` before you call it anyway. THE NEW REPLACEMENT FOR THE “install-css.sh” line above is simply `sudo apt install libdvd-pkg`–then follow the instructions that come up. This is applicable to Ubuntu 15.10 and newer. See here, under “Installing libdvdcss”: https://help.ubuntu.com/community/RestrictedFormats/PlayingDVDs.
Gabriel Staples
Thanks for all the info. However, once I follow the instructions for HandBrake, I *still* remain in the dark as to how to get the file to ‘burn’ to a blank dvd so I can play it in a regular home dvd player. Note: I watch .avi, mkv, mp4, etc. on my computer, but my in-laws are non-tech and need to be able to watch on dvd player (hardware). So, what is the next step??
rob
Hi Rob,
The title of this article is “Copy a DVD to MP4 or MKV file” and not “How to copy a DVD to a DVD“. Having said that, no pun intended, you can burn a MP4 or MKV file with most DVD burning applications to a DVD. I just never wrote an article about it. (adding it to the list!)
I assume you’re running Linux, and for Linux Devede seems to be the way to go. I personally have not tested this application, but you can install it through whatever repository your Linux version is using, or thought apt-get:
Devede seems very capable and comes with a graphical interface (see screenshots).
From what I have read: Devede creates an ISO file which can used to burn a DVD that can be played in a DVD player.
Note that not all (older) DVD players seem to like DVD’s that have been burned on DVDRoms or DVD R/W.
Burning an ISO to DVD can be done on most Operating Systems, here a link that may be of use. The article describes how to burn an Ubuntu ISO file to DVD. The steps are just the same for the ISO created with Devede.
hans