Some of you may be familiar with the problem … no sleep button on your keyboard.
You have a really nice Mac, but you’re using a Windows keyboard since there is no MacOS keyboard that you really like.
I’m using a keyboard from Havit (you can find it here).
One of the things I hate about this setup is that I have no key or key-shortcut to put my computer to sleep.
When you look at the Apple reference, you’ll only find keys that cannot be found on your Windows keyboard, like the Eject key, or the Power key.
So in this article, I’ll show you, without the use of special software, how I have created a keyboard shortcut to put my Mac Pro to sleep, using a Windows keyboard.
With every keyboard that comes with a Mac, has the option to put your Mac to sleep with a simple keyboard shortcut.
The most common methods for putting your Mac to sleep are (reference):
- Press the power button for 1.5 seconds
- Option–Command–Power button
- Option–Command–Media Eject button
- Control–Power button (will ask what you want – not for use with a touch bar)
- Control–Media Eject button (will ask what you want)
Just to name a few.
Commonly, you will not find these keys on a Windows keyboard – which is where our problem started.
p.s. I use this Havit Mechanical Keyboard (HV-KB395L) and can highly recommend it if you’re looking for a great and affordable mechanical keyboard. It’s nice and has a very low profile, has great tactical feedback and .. you can set the backlight of the keys to whatever you like. No special software or drivers on your Mac needed. I even stopped using my much more expensive Mac version of “Das Keyboard” (which is a great keyboard as well, just a little to high for my taste).
Creating a “Sleep” shortcut
There are powerful tools out there that can assist in remapping keys and help you do this when using a Windows keyboard with your Mac.
Karabiner (also known as KeyRemap4MacBook) is such a powerful tool, recommended for more advanced purposes, and it is for free.
However, I do not like installing yet another tool, especially for a simple task like this one.
One of the cool thing with MacOS is that you can define your own keyboard shortcuts, per application or system wide. This is what I have used to create my “sleep” shortcut.
1) Define a key combination for your “Sleep” shortcut
One of the things you have to determine is: what key combination do I want to use to put my Mac to sleep?
You’ll have to make sure it’s not used for anything else (system or application wise) – to avoid conflicts and unintended side effects.
I picked this key combination: Shift + Ctrl + Alt + F12
This combination has not caused any conflicts so far (knock on wood) and the F12 key is a rare key for MacOS to begin with.
Before we start defining the keyboard shortcut, we will need to determine what the sleep function is called in the Apple Menu ( ) of your Mac.
For each available language this may be called something else.
Below an example of a Mac running in English.
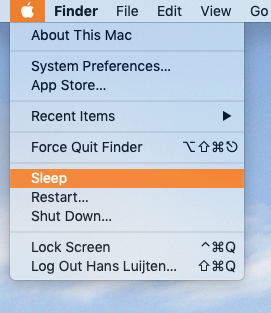
MacOS – Menu item “Sleep”
In the English language (which is what I use), my Mac lists it as “Sleep” (mind the uppercase “S”).
With a Mac running with the Dutch language, this is called “Sluimeren” (who ever came up with these weird translations?).
A Mac running the German language, would call it “Ruhezustand“.
Write down what the “Sleep” option is called on you Mac!
From here on, I assume you’re working in English and the word in the menu is called “Sleep” – don’t forget to use the word seen on your Mac.
If you see keyboard symbols behind the “Sleep” menu option…
Your Mac already has a shortcut defined for your keyboard, and you may not need this tutorial, unless you have a second keyboard attached (for example with a laptop) that does not accommodate this shortcut.
3) Actually creating the “Sleep” keyboard shortcut
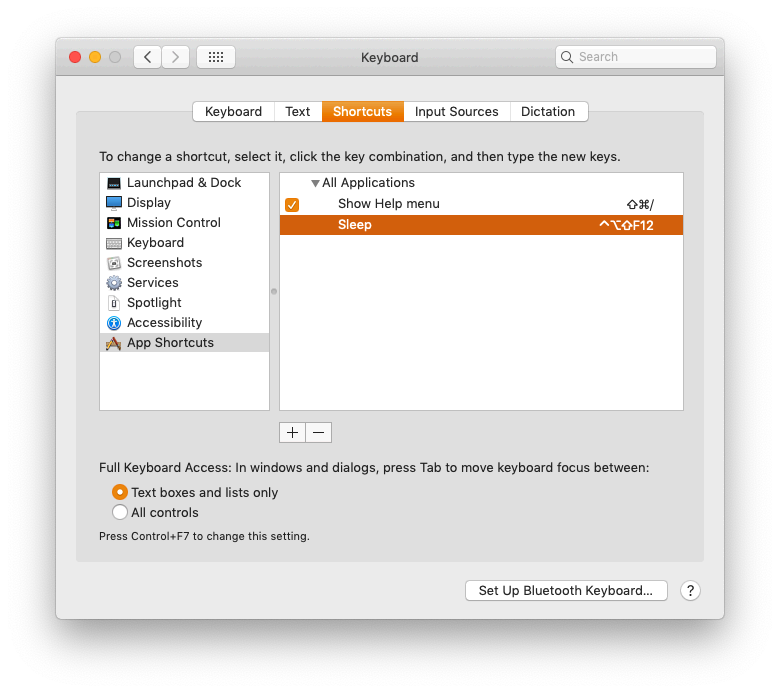
To create a keyboard shortcut, we will have to open System Preferences where we open the Keyboard options: Apple Menu ( ) System Preferences… . A window like this one, will open.
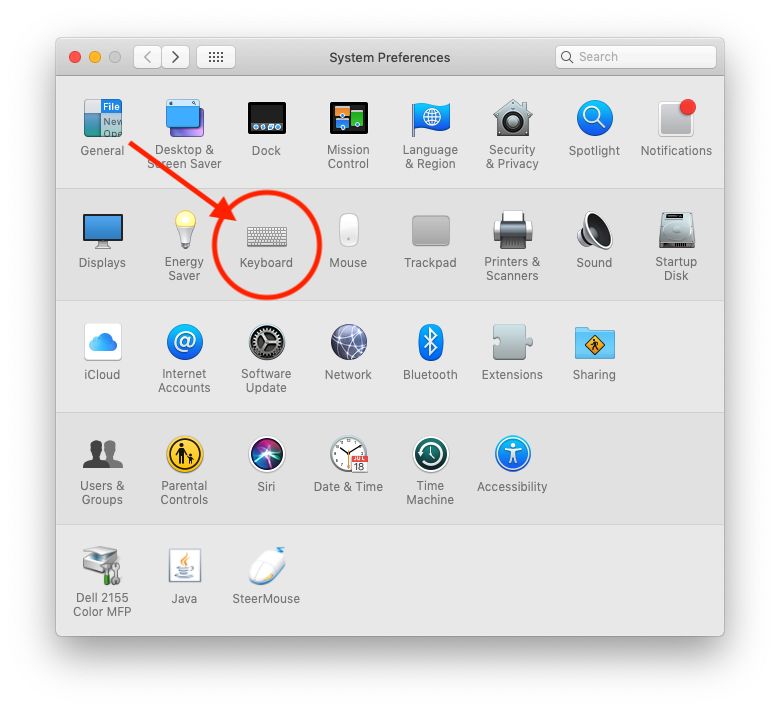
MacOS – System Preferences
In the window show above, select the “Keyboard” option, which will provide access to the keyboard preferences.
In the “Keyboard” window, select the “Shortcuts” tab, followed by clicking the “App Shortcuts” and finally clicking the “+” button.
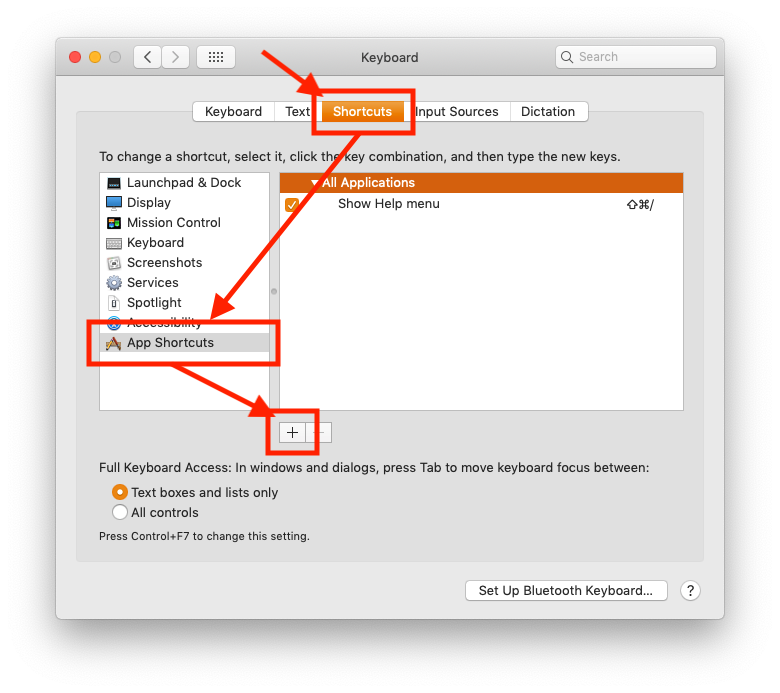
MacOS – Keyboard Shortcut Preferences
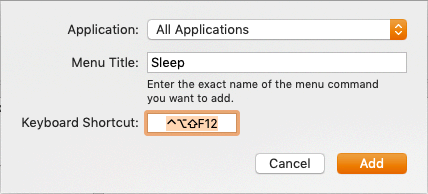
A small window will now open. Here we need to pay attention …
MacOS – Sleep Keyboard Shortcut
First we need to make sure the field “Application” is set to “All Applications” – after all, we’d want the sleep function to kick in, no matter what application we have open.
The field “Menu Title” is the one that is trickier. It should be the name as it appears in any menu.
So in my case I will use the word “Sleep” (English MacOS), which we found in the Apple Menu. You did write that one down if you’re using a different language – right? So in Dutch “Sluimeren” and in German it’s “Ruhezustand”. Double check the word if needed.
Finally we have to enter the desired keyboard shortcut. Click the field next to the text “Keyboard Shortcut:“, and press the key combination you’d like to use. If you mistyped, simply press a new combination again.
Again: I use Shift + Ctrl + Alt + F12 , which has served me very well in the past few months.
Finally click the “Add” button and you list should look something like this (if you made a mistake – simply click the minus “–” button and try again):
MacOS – Sleep Shortcut Added
Ad Blocking Detected Please consider disabling your ad blocker for our website.
We rely on these ads to be able to run our website.
You can of course support us in other ways (see Support Us on the left).
Testing the “Sleep” shortcut
You can now, optionally, close the System Preferences window, and test your new keyboard “Sleep” shortcut.
Waking up you Mac
You can wake up you Mac, from a sleep, by pressing any key or mouse button.
I typically press Shift or the left mouse button.
Powered USB hub
If your keyboard and/or mouse are not plugged straight into your Mac, but into an external USB hub instead, then make sure the hub powered ON and your keyboard and/or mouse are ACTIVE.
My keyboard actually is “active” when the backlight is ON, but you can also see it by pressing Caps Lock, or Num Lock key, and see if the indicator on your keyboard lights up or not.
Monitor with USB hub
If your monitor has a build-in USB hub, and you use it for your keyboard and/or mouse, the same rules apply as for a powered USB hub.
Make sure you monitor is ON and your keyboard and/or mouse are ACTIVE.
Comments
There are 14 comments. You can read them below.
You can post your own comments by using the form below, or reply to existing comments by using the "Reply" button.
Hi,
excellent detailed describtion which works very well.
I got a Logitech K375s keyboard which works for Mac OS/iOS as well as for Window/Android for three different devices (iMac/iPhne/iPad) in one! Easy switch from one device to the other.
Uwe
Thanks Uwe!
I found that there is a much better selection when it keyboards offered for the Windows platform as well
I’m using HAVIT KB395L since I happen to love mechanical keyboards. Used to have “Das Keyboard” (still have one laying around), but this one from Havit has a better balance when it comes to noise, travel distance of the keys, and it’s super flat.
hans
Just got my Corsair K95 XT, thank you!
Ray
Cool! I had to figure this out for one of the nicer Windows keyboards as well
Thanks for the “Thank you” post – it’s much appreciated.
Hans
Saved my life!!! Thanks so much! Instructions were very well laid out, surprisingly rare to come across. Terrific job
Zack
Awesome! Glad to hear this was useful for you!

Thanks Zack for taking the time to posting such a nice compliment – it is very much appreciated.
Hans
Thank you so much this was very helpful
Eric Tao
Hi Eric!
Thank you very much for taking the time to post a Thank-You note!
It is much appreciated. Glad to hear this was useful to you
Hans
02/15/2022
Had a problem with my mac. Googled how to fix it and tried one response that included “Press “Control,” “Shift” and “Eject” at the same time to put the computer to sleep”, which of course didn’t work. Googled how to fix that and Google brought me here. Even when I am grateful at a functioning fix and workable help aid, I am more likely to just move on contentedly. This tweak is different. As others have said above, This one is so well laid out that I needed to say thanks. First off it applies to my OS (monterey). Apple changes bit by bit and some Googled tweaks don’t quite fit letter for letter. I go down the Rabbit Hole wondering WTF. Not here. From start to finish I was able to apply this without having to google something else. More help aides need good sized ORANGE highlight boxes and ORANGE arrows like yours.
Ctrl+Shift —> (left pinky finger) Alt —> (left index finger) F12 —> (right ring finger (have to reach for it))
I am so tickled by this tweak and how it works right out of the box that I’ve gone all wordy and slobbery. I keep pressing these buttons even though I’m not finished with anything.
IT JUST WORKS.
Thank you
rick
rick hackbarth
Hi Rick!
Thank you very much for your kind words and for taking the time to post a thank-you — it is very much appreciated, and makes it worthwhile to continue with my website!
Thank you and have a great week!
Hans
Hans
Great article, thanks!
Dmitrii
Thanks Dmitrii!
It’s very much appreciated that you took the time to post a Thank-you note
Hans
Hi Hans,
Thank you so much for going through the trouble of writing out these detailed instructions that were so easy to follow (and still work perfectly years after your original post; btw: the Dutch term nowadays is “Sluimer” rather than “Sluimeren”). I got myself a Kinesis split keyboard which is fully programmable, but that is no help at all if you do not know how to change the standard shortcut (that does not work on this keyboard)… Now I know, so a big thank you to you!
Hope you keep making these helpful posts.
Cheers, Daniëlle
Danielle
Hi Daniëlle!
Thank you very much for posting a thank-you note! It is much appreciated and its great to hear this was useful to you!
Have a good weekend!
Hans