So you’d like to play a movie on your iPad but you really don’t want to use or an application like iTunes or iTools?
No problem … In this article, I’ll explain how to use an unexpected tool, the Camera Connection Kit, to actually copy a movie to your iPad device without iTunes.
This trick actually works for any operating system, so Linux users are in luck as well, and works for JPEG/JPG images as well.
Getting your video
There are several ways to get a video file – in MP4, M4V or MOV format. Other formats might work as well but it seems that these 3 appear the golden standard.
You can of course download your video(s) or copy a DVD or Blu-Ray that you own.
I’ve written a few tutorials based on HandBrake on how to rip a DVD to MP4 file.
When copying a DVD or Blu-Ray disk, keep the following in mind:
- always use a preset matching your target device best (iPad), and
- don’t forget to use the “iPod 5G Support” option in HandBrake.
Tutorials on how to copy (or: rip) a DVD to an MP4 file:
Once you have completed the ripping process, you should have a copy of your DVD in suitable a MP4 or M4V file for your iPad.
Transferring video without iTunes
Transferring your MP4 (M4V) file to you iPad can be done in several ways (iTunes, iTools, etc) – in this particular article we will “abuse” the camera connection kit to do that. The only downsides I have found so far:
- Metadata (movie info) of the movie file will not be shown,
- Subtitles are not available (unless burned in),
- The movie is stored in your Photo Albums (and not your “Videos”).
Using the Camera Connection Kit to copy a movie to your iPad
The Camera Connection Kit is a hardware plugin suitable for the iPad, allowing you to insert the memory card of your digital camera so that your iPad can and can be considered expensive when bought from Apple (roughly $30 – old connection type ) – but the build quality of the Apple version is very good.
China hasn’t been sleeping with all that and very cheap alternatives are available that even allow more memory card formats and even certain USB sticks (to be had for $12 or less – old connector type with cable , old connector type direct
 , new connector type
 ). The quality is a little less than what Apple provides, but if you don’t use it every day then why pay the extra money?

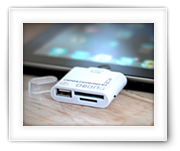
Imitation Camera Connection Kit
Anyhow … what do we need:
First of course you will need one or the other “Camera Connection Kit” – Apple original or Chinese imitation, whatever works for your budget and needs. I used the cheap Chinese version as seen in the picture above.
Next we need a memory card or USB stick. I would start with a regular SD memory card, since certain USB sticks do not seem to work properly, and this way you get familiar with the process before experimenting with USB sticks.
Prepare the memory card and copy the movie(s)
Insert the memory card into your computer or extrenal card reader.
Formatting?
Most memory cards are already formatted in the right format (MS-DOS FAT) when you buy them.If not, or when your iPad is not recognizing the memory card, then the easiest way to prepare a memory card is by simply inserting it in a digital camera and have it formatted. Of course your Mac (instructions in the last paragraph), Windows, or Linux computer can do this as well – make sure it’s (MS-DOS) FAT formatted.
The next step is to open the memory card on your computer with your favorite file browser (i.e. Finder under MacOS X, Windows Explore under Window, etc) and create a new folder on the memory card called “DCIM” (all caps d-c-i-m).
Copy your movie file into the DCIM folder and rename the copy to for example “TEST0001.MP4” or “TEST0001.M4V”.
The name has to be: 8 characters, a dot, and a 3 character extension (MP4, M4V, MOV, etc).
I always use all caps for this and do not use special characters or spaces in the name!
Eject your memory card properly from your computer when all this is done.
Connect the Camera Connection Kit to your iPad and insert the memory card in it.
If everything went well, then (after a few seconds) your iPad will popup a screen that allows you to copy the movie file to your “Photos”.
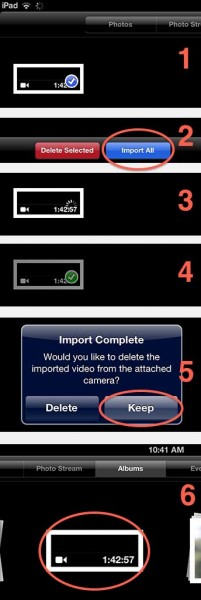
Below you’ll find the import process on your iPad illustrated:
- iPad detects Camera Connection Kit and your memory card – tap the video(s) ( blue appears on video file).
- Tap the “Import” button.
- A spinner on the video file ( ) indicates that the iPad is copying this file.
- A green indicates that the file has been copied.
- The iPad now wants to know if it can remove the file from the memory card (I always tap “Keep”).
- The video can now be found in the “Last Import” album of your Photo albums.

iPad importing video
MacOS X – Formatting the Memory card
Note that this is optional, since most memory cards already come pre-formatted in the right format:
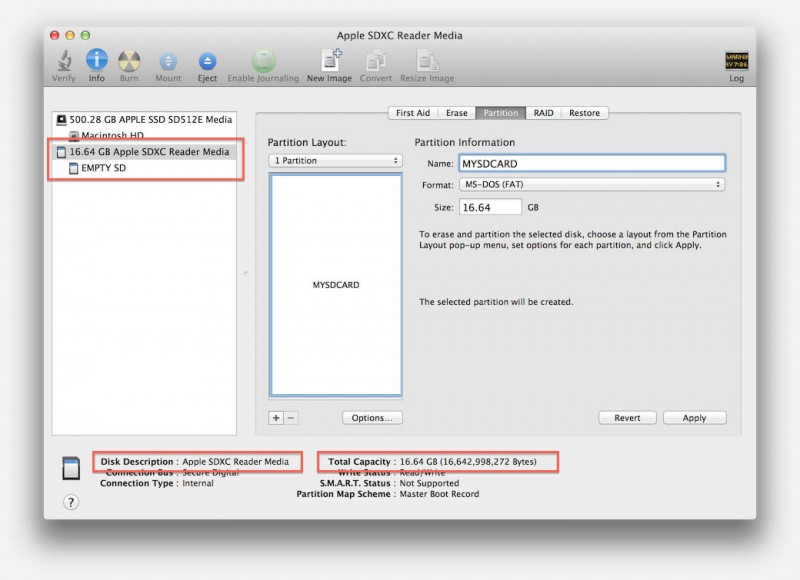
Open “Disk Utility” (which can be found in “Applications” “Utilities”) and select your memory card on the left hand side.
Be careful that you select the right disk (!) – you don’t want to erase anything important.
I typically identify the card type and name on the left (SDXC in the illustration below is the SD card-reader of a MacBook Pro) and the proper size – at the bottom of the window you will see “Total Capacity 16.64 GB …” which matches my SD card which is a 16 Gb card.
Next click the “Partition” tab, set “Partition Layout” to “1 Partition“, enter a “Name“, set “Format” to “MS-DOS (FAT)” and click “Apply“.
After a few seconds your memory card is ready – you can now close “Disk Utility“.

Disk Utility – Preparing your memory card


Comments
There are 4 comments. You can read them below.
You can post your own comments by using the form below, or reply to existing comments by using the "Reply" button.
I was unable to load MP4 files to my iPad Pro with a Camera Connection Kit — even after putting them in a folder named “DCIM”. Like many, I searched far and wide to find out how… Your very simple explanation of the need to rename the video files with 8 Characters saved my life (well, not really – but at least my sanity!) Thanks – 3 years after your post.
Tim Cunningham
Hi Tim!
Thank you for taking the time to post a “Thank You” – it’s much appreciated and I’m happy to hear that this trick worked for you as well …
3 years later, one would expect Apple to have “fixed” this right?
P.s. I have started using a tool, called Waltr – it’s not free unfortunately, but it really works very fast and very well, uses proper naming so you can find the full name in your Videos on your iPad and … it supports subtitles. Highly recommend it.
hans
Most “experienced Apple eaters” says that’s impossible and I finally I found one who understands … Thanks.
hugo
Thanks Hugo!
Thanks for the compliment and for taking the time to post it here! It’s much appreciated and I’m glad this worked for you as well!
hans