Spaces for Virtual Desktops
Spaces was introduced with MacOS X 10.5 (Leopard) and provided virtual desktops to your Mac. As of MacOS X 10.7 (Lion), Spaces became a part of “Mission Control” and finding this functionality, for some awkward reason, became difficult to find, even for seasoned Mac users.
What is a Virtual Desktop?
A virtual desktop can be compared to a computer with multiple monitors, each part of the total “desktop”. So in essence this will give your Mac multiple Desktops.
Your mouse and applications can move from one monitor to the other, which in the end gives you much more working space (the use of multiple monitors this way, on a Mac, has been around for decades). Imagine having Word, Excel and your eMail program all open, and without having to flip windows around, you can see them all at a glance in full size.
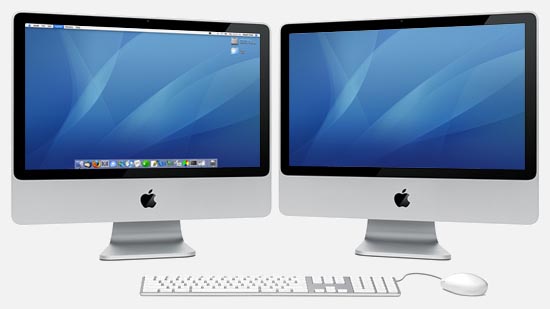
MacOS X – Multiple Monitors
Now working with multiple monitors is really cool and I even dare to say that it increases productivity. It is however far from practical if you’re moving around with your laptop, and this is where Virtual Desktops come in play. Or in other words: Spaces, which offers your Mac Multiple Desktops.
With a virtual desktop, your Mac will seems to have multiple desktops, as if you’re using multiple monitors.
For example, one for working on the code of your website, one for Photoshop, and one for a preview of the website you’re developing. Or if you’re not a developer: One desktop for your Wordprocessor, another one for your spreadsheet application and the third one for your eMail program.
But the beauty of virtual desktops is that we’re not bound to only two or three desktops, I always use 4. Unlike monitors, this function is free and you’re allowed to create up to 18 desktops. And all that with just one screen (works for desktops and laptops).
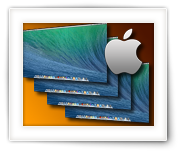
In the image below, an illustration of how you could see “spaces” (virtual desktops).
Say you have 4 virtual desktops, your computer display will only show one of them at the time, but you can rotate through the desktops rapidly to enjoy the content of the next or previous desktop. Each desktop with it’s own set of applications and windows that are opened.

Space – Shuffle through virtual desktops
Virtual Desktops have been around for quite a while already, specially on the Unix/Linux platform. I’ve never found them to be really practical though (and in part I have to blame myself in that). Switching from one desktop to another was in my opinion too cumbersome and not very intuitive.
In this article however, I will show you how to use a key combination, tilting of the wheel of a wheel mouse, or the way I do it myself: by using two side buttons on my mouse. For the last two options, you’ll of course need a mouse that supports this.
Testing Spaces on your computer will not require any additional software (it’s build-in to MacOS X) and you can disable it any time you’d like. Mouse support depends on the driver of your mouse and an application like SteerMouse.
Creating Spaces
To create some spaces, I used 4 but any number will work, is relatively easy – just very well hidden in “Mission Control”.
How to Start Mission Control
You can start Mission Control in 3 ways:
Use the Keyboard
The easiest way to start Mission Control is by pressing the Mission Control key on your keyboard – this is typically the F3 key (or “Expose Key”).
By default, if you haven’t changed the keyboard shortcuts, CTRL + ↑ (CTRL + Arrow Up) will open Mission Control as well.
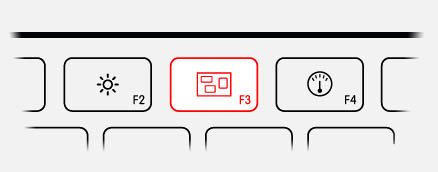
Mission Control – Start by pressing F3 (Expose Key)
Four finger swipe up ..
For laptop users, or for those that have a trackpad, a swipe with four finger moving up will start “Mission Control” as well.
Start Mission Control from “Applications”
You can also start Mission Control by clicking it’s application icon. Go to “Applications” “Mission Control“.

MacOS X – Mission Control icon
Closing Mission Control
You can close Mission Control by pressing the “Esc” key, or the “F3” key, or by a four finger swipe down or by clicking somewhere in the screen.
After Mission Control has been started, you’ll see all your open applications and desktops displayed. The illustration below shows that your screen is basically divided in 2 sections:
– Desktops (A), in this case “Dashboard” and “Desktop” and
– your Open Applications (B), here: TextEdit, Calculator, Safari, System Preferences and Finder.
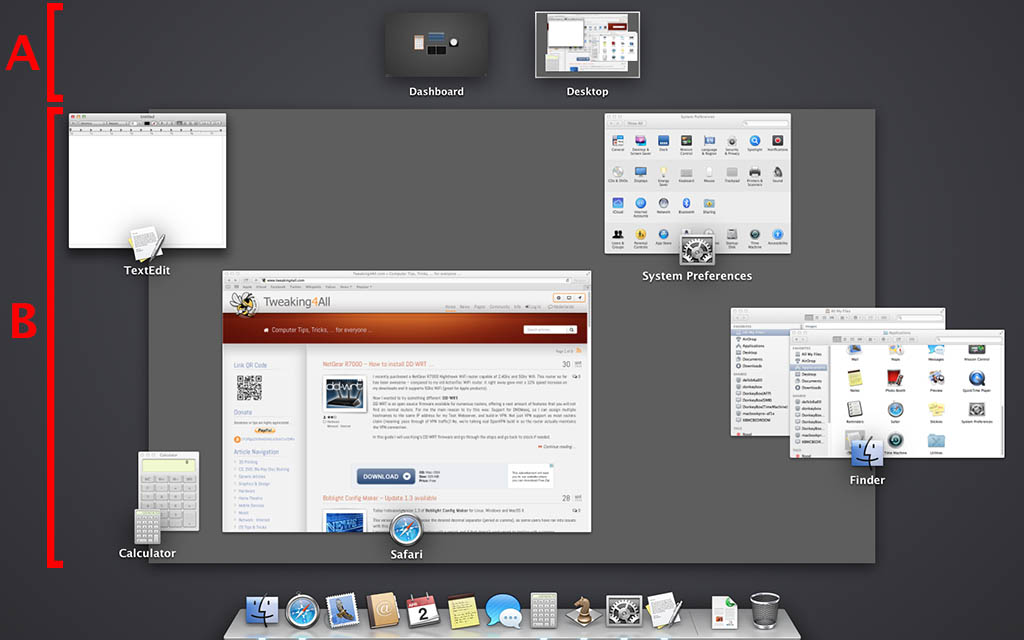
Mission Control Areas – Desktops (A) and Open Applications (B)
How to Remove Dashboard (optional)
It’s a complete mystery to me who would even use Dashboard, but I guess I can’t judge people for using it.
I however removed it immediately after a fresh MacOS X install.
To remove Dashboard. or better said “to hide Dashboard”, simply open “System Preferences” “Mission Control” and remove the checkmark before “Show Dashboard as a Space” and close System Preferences.
Adding Desktops in Mission Control
Adding a (virtual) desktop is easy now that we have Mission Control open.
Move your mouse to the upper right corner until a block appears with a plus symbol in it.
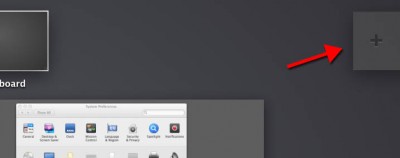
MacOS X Mission Control – Add a Virtual Desktop
For every time you click this plus, a virtual desktop will be added.
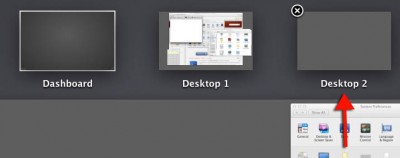
MacOS X Mission Control – Added a Virtual Desktop
You will notice that it’s an empty “desktop” and that when you hover over the thumbnail of that desktop, a remove icon ( ) will appear, which allows you to remove the desktop if desired.
Going Through Virtual Desktops
To switch virtual desktops, specially when this is your first time, is done by clicking the desired desktop in Mission Control. However, I think we can all agree that this is not exactly practical during daily use.
Moving through Desktops
When switching to another Desktop, your Dock and Menubar will move along. Or better said: will be visible on any of the desktops (except when accessing “Dashboard”).
Using the Keyboard to Switch Desktops
The standard method to switch back and forth between desktops is by using the keyboard.
Next Virtual Desktop: CTRL + → (CTRL + Arrow Right)
Previous Virtual Desktop: CTRL + ← (CTRL + Arrow Left)
Using your Trackpad Gestures
By default your Mac is set to use a three finger swipe left (previous desktop) or right (next desktop).
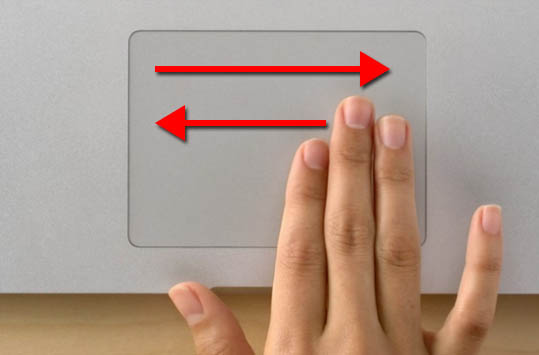
Trackpad – Use 3 finger swipe (left/right) to switch desktops
Using the Mouse to Switch Desktops
I’ve found that using the mouse is much quicker, specially when you have a mouse that has extra buttons or a wheel that can tilt – most Logitech mouses have this option. Other brands like Microsoft and GigaByte offer this on some of there mouse models as well.
Using extra Mouse Buttons
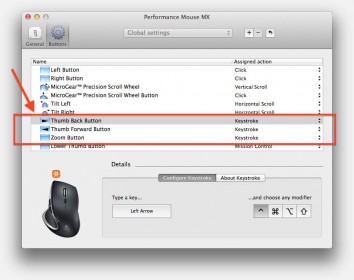
My mouse, a Logitech Performance MX, has three small buttons on the left side, which are easy accessible with my thumb (assuming a mouse for right hand users). These buttons can be assigned in the Logitech software to keystrokes – you only need 2 buttons. Other brands might have similar options.
I have chosen to use the “back” button to go to the previous Desktop, and the “forward” button for the next Desktop. It is of course fully up to you what works intuitively best … any of the mouse buttons can be used, for any key assigment you have in mind.
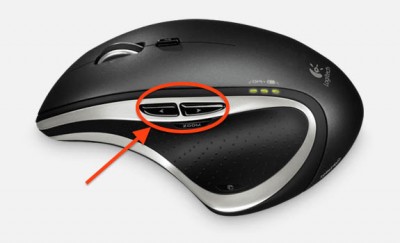
Logitech Performance MX – Extra buttons
Recommended: A much better Mouse Driver … SteerMouse!
If your mouse driver does NOT support the assignment of keystrokes, or if you simply do not like the slow, unreliable and bulky driver provided by the manufacturer (yes Logitech, I’m looking at you!), then consider using SteerMouse which you can try for free for 30 days.
The full version is unfortunately $20, but I’ve found it to be well worth it, specially when you realize how many mouse brand and models it supports (no problems if you decide to switch mice).
SteerMouse does not only support pretty much any mouse on the planet, it’s also light weight, rock solid and offers additional mouse functions that you might not find with other mouse drivers (including profiles for individual applications).
While you’re at it: Assign a button for screenshots …
My mouse has 3 buttons (Forward, Backward, and Zoom). I frequently have to take screenshots for my articles for Tweaking4All, so I decided to assign taking a screenshot to the Zoom button.
I use for that the “Copy picture of selected area to clipboard” screenshot function, which allows me to select an area of the screen and copy this to the clipboard. However; when pressing CTRL + Spacebar after pressing the zoom button, it instead will take a screenshot of the window my mouse hovers over.
To accomplish that, we would use the key combination CTRL + SHIFT + COMMAND + 4, so assign this to the desired mouse button (in the case of my mouse: button 9).
Settings for SteerMouse (recommended)
Since I highly recommend the use of SteerMouse, let’s start with that one.
Keep in mind that SteerMouse needs to be installed, you can download a trial version from the SteerMouse website.
Go to “System Preferences” “SteerMouse“.
A window will open, telling you to click the “SteerMouse” picture, to open the SteerMouse preferences. In the now opening settings window select the tab “Buttons” (it should open with that by default).
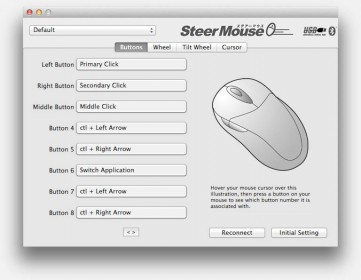
MacOS X – SteerMouse Setitings
Tip : To identify your mouse buttons, I’ve found it to be easiest to move your mouse cursor over the mouse picture in this window, and press the button you’d like to assign a function to. The button you pressed will be highlighted in the list on the left hand side.
The settings for my mouse (a Logitech Performance MX):
Assigned buttons
| Button |
Value |
Purpose |
| Button 4 |
CTRL + Left Arrow |
Previous Desktop |
| Button 5 |
CTRL + Right Arrow |
Next Desktop |
| Button 9 |
CMD + CTRL + SHIFT + 4 |
Screenshot selected area (optional) |
Settings for Logitech Control Center
You can do these settings in the Logitech Control Center as well, but I’ve found that Logitech Control Center is not only bulky, but it occasionally can’t find my mouse and refuses to assign the functions to the buttons. You’ve been warned and your milage may vary ….
Go to “System Preferences” “Logitech Control Center“, select your mouse and click “Configure” (if needed).
Logitech Control Center – Assign keystrokes to buttons
The settings I’ve used:
Assigned Mouse buttons
| Button |
Value |
Purpose |
| Thumb Back Button |
CTRL + Left Arrow |
Previous Desktop |
| Thumb Forward Button |
CTRL + Right Arrow |
Next Desktop |
| Zoom Button |
CMD + CTRL + SHIFT + 4 |
Screenshot selected area (optional) |
Instead of a keystroke for a screenshot, you can also assign the “Screen Capture” “Region” “Clipboard” function in Logitech Control Center.
Using Mouse Tilt
About half the wheel mice I’ve had, did support this function: pushing the wheel of your wheel mouse either left or right.
Depending on your mouse and what you’re used to, this might work just as well as the extra button.

Logitech Performance MX – Wheel tilt
The reason why I don’t use this every day is simple, my finger keeps slipping of the wheel when I try to do that, as extra force is needed on the Logitech Performance MX. My little Bluetooth travel mouse however does not have the extra buttons in in that case I do use this approach.
For SteerMouse, use the same approach as before, and identify the “button” by moving your mouse cursor over the displayed mouse and tap your wheel to the left or right to identify the button (button 7 and 8 on my Logitech Performance MX).
In Logitech Control Center these buttons are called “Tilt Left” and “Tilt Right”.
Working With Virtual Desktops
Now that we have some virtual dekstops and know how to switch with easy from one desktop to another, time for a few tips when actually working with multiple desktops.
Moving an Application Windows from one Desktop to another
When you’d like to move a window from one desktop to another, simply start dragging it to one of the sides of your current desktop. If, for example, you drag the window to the right side, you’ll notice that after a very short time, your Mac will switch to the next desktop. If you want to “drop” the window there, then simple release your left mouse button and stop dragging.
Doing this, will “assign” this application to the destination desktop. Next time when you open that application it will open on this desktop again.
Moving an Application instantly to another Desktop
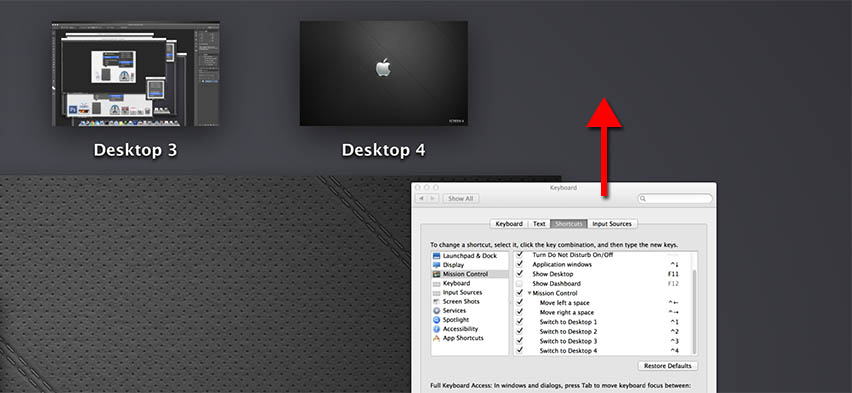
An alternative way of moving an application fast to another desktop is by using keyboard shortcuts. This does not work for an unlimited number of desktops, only for the first four desktops. By default this function is disabled, so you’ll have to go to the “System Preferences” “Keyboard” “Shortcuts” “Mission Control” and set a checkmark before the options “Switch to Desktop 1” … “Switch to Desktop 4” (the number “4” depends on the amount of virtual desktops that you have defined).
After doing this pressing CTRL + 1 will move you quickly to Desktop 1 (dito for Desktop 2, 3 and 4).
To move an application quickly yo (for example) Desktop 1, grab the application window as if you want to drag it and with the other hand press CTRL + 1. Your application window will now instantly be on Desktop 1.
Assigning Destinations for Applications
With the dragging example we just looked at, you might have notice that the application will start on that desktop next time we open it. In fact: You can assign three different kinds of locations to an application:
- “None” or where-ever you open it, so it opens on whatever desktop you’re on and stay there,
- “This Desktop” or predefined desktop, which opens it always on the defined desktop
- “All Desktops” or it will always appear on all desktops.
Dragging a window to a particular desktop is one option to assign a predefined location, but how about the other options?
If you right click the application dock icon, a menu will popup, giving you the option to select (for the given application) what the desktop location “rule” should be. Your Mac will remember your choice, so when you open the application in the future, it will abide to these settings.
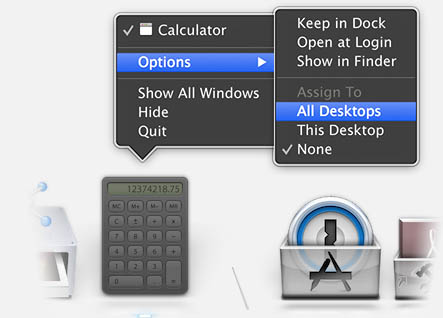
Define the desktop “rule” for this application
What is really great about this option, is that you can “define” your work environment any way you’d like.
As an example, right now I’m writing this article and my webbrowser is fixed to Desktop 1, Path Finder (Finder alternative) is assigned to Desktop 2, Photoshop to Desktop 3 and Dreamweaver to Desktop 4. Whenever I start any of these applications, they will be locked in to those predefined desktops.
Full Screen Applications …
For those running full-screen applications: you can assign them to a specific desktop as well, as seen with normal applications.
As an example, I use VMWare Fusion to run Ubuntu or Windows. I run them in full screen and they are assigned to Desktop 4. So whenever I start for example the Windows Virtual Machine, it will always open in full screen on Desktop 4. Switching desktops will work just fine and with this approach switching between MacOS X and other operating systems becomes a breeze …
Quickly Jumping to an Application
Your Mac will open an application in it’s default location, unless you defined one (see previous paragraph), and will set the involved desktop to the active one (ie. it will go to that Desktop if it is not the current desktop).
Once an application is open and you forgot where it was, just do what you usually would do: Click the icon in the Dock and your Mac will go to the involved desktop right away.
Using different Wallpaper for Desktops
Each desktop can have it’s own Wallpaper. Personally I’d not be happy with a parade of different wallpapers for each desktop, it can however be useful to quickly identify the desktop you’re on.
I used to use only one wallpaper for all my desktop, which of course make every desktop look the same.
Recently I made copies of this particular wallpaper and used a graphics editor (even “Preview” can do this for you!) to add “SCREEN 1” to the picture (I used the lower right corner). I did the same for each wallpaper copy, increasing the number count of course.
So now I have 4 different wallpapers that look identical, with a text in the lower right corner staying “SCREEN 1“, “SCREEN 2” etc.
To assign these wallpapers, simple go to the desktop for which you’d like to set the wallpaper, right click the desktop and select “Change Desktop Background…” and select the wallpaper you’d like to use for this desktop.
Quickly Creating a new Desktop for an open Application
Mission Control (F3) allows you to quickly create a new Desktop for an application that is already open.
To do this, you’ll need to open Mission Control (press F3) and simply drag the application preview to the top part of the screen (where you see the desktop thumbnails) and drop it there between the existing desktops and a new dedicated desktop will be created.
If you drag the application on an existing Desktop, the application will simply move to that desktop.
Mission Control – Add a new Desktop for an Application


Comments
There are 32 comments. You can read them below.
You can post your own comments by using the form below, or reply to existing comments by using the "Reply" button.
I cannot get this:
Assigning Destinations for Applications
With the dragging example we just looked at, you might have notice
that the application will start on that desktop next time we open it. In
fact: You can assign three different kinds of locations to an
application:
to work! If I have Excel open in one space, even though I have designated Excel as “None”, and I am in a different space wanting to open a different spreadsheet, the system zooms me over to the space where I already have a spreadsheet open to open the new one! Is there a bug?
Virginia Stockwell
Hi Virginia!
That sounds like an Excel thing – confusing as it may be.
If I understand you correctly:
Excel is open on for example Desktop 1.
You’d like to open another Excel sheet, but you want this one on Desktop 2.
Which would make sense if you’re working in one and looking up things in the other.
Sounds to me that this is a Excel limitation and I’m sure other programs might suffer from this as well. Even with multiple monitors this then will probably not work either.
I just tried it with Apple’s Numbers (Excel-like app from Apple), and it basically does the same thing. It opens the second worksheet on the same desktop. However, I can drag that worksheet to another desktop and work with 2 desktops.
I’m not sure if Excel supports this though.
hans
I know the answer to this. You need to start a new instance of Excel then open the spreadsheet from there. First go to the space you want to contain the instance of Excel. Then click and hold on the Excel icon in your dock and select “New Window”. (if it isn’t in your dock, find the app in the applications folder and drag it to the dock). From inside that window do the open command and find the spreadsheet you want to open.
This works for all apps. Handy when you want to cut & paste between the windows, etc.
Steve
Thanks Steve!
hans
Thanks for this useful info.
My only problem with spaces is that when I have Word docs open in space 1, but I am on space 2, and then, while on space 2, click the Word dock icon, it returns me to space 1, since that’s where the currently open Word docs are.
The reason that’s annoying is that I might be clicking the dock icon to open a Word doc in space 2. As it is, I have to open it in space 1, then move it to space 2.
Any ideaS?
Thanks
d
David Bain
Hi David,
I suppose this would make perfect (even though annoying) sense.
I just tried the following:
– Open Word and start a new document in Space 1
– Go to Space 2 (or 3, or 4,…)
– Right click the Word icon in the Dock and click “Open Recent” -> “More…“
In my setup it opens the “start” dialog of Word in the currently visible space (space 2) where you can select which document or what template you’d wish to use for a new document … So it does not jump to Space 1 in that case.
I tested this with MS Office 2011 … could you try than and possibly confirm this behavior? ….
….
I rarely use Word … who knows if this is coincidental or not
hans
I have the same logitech mouse,,,
the ZOOM button, I looked and looked and thought I was nutz!
But there it is UNDER the two buttons on the side!!
I set it like you said, and it is great – but you can also leave the control out and it will save to the desktop – But I do get the oaste function
which I did not know !
here are some of the commands
• ⌘ + ⇧ + 3 Capture entire screen + saves to desktop – I do this to read later
• ⌘ + ctrl + ⇧ + 3 Capture entire screen + copy to the clipboard (for pasting no save)
• ⌘ + ⇧ + 4 Capture dragged area + save to desktop
• ⌘ + ctrl + ⇧ + 4 Capture dragged area + c
matt
Hi Matt!
Great that it worked well for you too … and modifying it to your specific needs is definitely what all users should do, excellent!
I often make screenshots for my website, but with a Retina screen the resolution is pretty high for just a website picture. You’d want to take a screenshot and save it for Retina (imagex2.png for example), then resize it to 50% and save it for regular users (image.png).
That’s why I take a screen shot to the clipboard, open “Preview”, press ⌘+N and there is my screenshot to work with.
Thanks for taking the effort to post the other screenshot keyboard shortcuts …
hans
More excellent advice! Thank You!
matt
Thanks Matt!
hans
Hi, very useful article!
I have one annoying issue with these desktops, though. You see, I have three desktops:
1. “Personal” desktop with Safari and stuff
2. “Work” desktop with Google Chrome (primarily)
3. A “fake” desktop, that is virtually an app (Slack) in fullscreen mode.
The issue is that desktops #2 and #3 switch their positions from time to time. E.g., I click a link in Slack and make “To the left desktop” gesture on touch pad, which I expect should bring me to the “Work” space, but I get “Personal” space instead, because “Slack” is somehow in the middle. And so on… Do you, by chance, know how to fix desktop’s position?
Vladimir
I have seen this kind of behavior only in very rare occasions,… (mainly when Google for some reason keeps jumping back to another desktop, or sometimes VMWare Fusion opens it’s fullscreen VM in the wrong desktop).
I’m not familiar with Slack, and I assume you did the right click of it’s dock icon -> Options -> This Desktop.
If Google Chrome (desktop 2) is your primary browser, then I can imagine one or the other gets confused when clicking a link in slack (which should jump from #3 to #2 to open the link). Swiping will then jump to the desktop before that (#1). But that’s just me guessing.
From a developers perspective, it can be tricky to handle how desktops are handled (my own app “ConnectMeNow” will always open it’s preference window, where it was opened the first time, I have yet to find a way to get it to appear in the active desktop).
You could try opening slack when Desktop #3 is visible. See if it stays there.
p.s. I use different wallpaper for every desktop. Basically the same picture, just added 1, 2 or 3 at the bottom, and assign each version to the matching desktop. This way I can always see if the desktops have been shuffled somehow and see what desktop I’m on.
hans
I don’t get the issue anymore. I simply change desktops’ positions by dragging them in the mission control mode (instead of weird “right-clicks”) and positions are remembered!.
Vladimir
Awesome!
Thanks for the tip – I’ll be trying that later on as well, since I run into this occasionally with VMWare Fusion as well.
hans
Thanks I will try that on my Imac when i get home
tony
Hi
I am using google chrome and each time I try and drop an application onto an open desktop 1 or desktop 2 at the top of the screen it bounces back and I get a not allowed symbol – circle with line through it.
Super frustrating…. however in Safari it works perfectly….. help…
tony
Hi Tony,
I have seen that with Google Chrome before as well. It’s SUPER annoying, and can be super persistant in jumping back,but it seems to happen only under very particular situations.
Folks have reported all kinds of reasons (Google Drive installed, only when WiFi connected, in this post they say that it is Google Drive that is crashing and restarting Finder – bit then again, you might not even have Google Drive installed. Temporary disable auto starting Google Drive, reboot, and see if it still happens.
I did find another post which shows how to disable “auto swoosh” by doing this in Terminal:
back to normal:
I have not tested this yet, since the Google effect does not occur at this moment on my Mac, and it might give unexpected results (ie. opening an App and not jumping automatically to the linked desktop). Under El Capitan this “works” but it comes with confusing side effects, and might not address you Google problem.
You could also try Chromium, an Open Source build that is related to Chrome, but I haven’t used it in a while, so I’m not 100%sure about the differences between Chrome and Chromium.
hans
Brill let me try this on my imac when I get home from work…I will get back to you.
Thanks
tony
Hey.
Try cmd+tab
It’s been around since the 90’s…
:|
Simon
Thanks Simon for the tip
CMD+Alt is just task switching, which might work for some and maybe not for others.
Good tip though, even though I rarely use it.
I guess it’s kind-a like using multiple screens (monitors), a certain way of how windows are shown on the screen. Especially with applications that use multiple windows, but when switching task (CMD+Alt) only one of those windows comes to the front.
Either way; to each it’s own. CMD+Alt is definitely useful, and for some a good alternative.
hans
Hi there,
I wonder if anyone knows; if you’ve left a document on your desktop it then appears on every space. Is there a way to put a document only on one space?
Thanks!
Youjia
Youjia
Hi Youjia,
that’s a minor annoyance I have ran into as well – I have yet to find a solution for this
Sorry …
hans
My desktops reset to default every time I restart my computer. Is there anyway to save the desktop preferences?
Theo Schear
Hi Theo,
Ehm, I’m not sure what you mean with “reset to default”? Do you mean your space/multiple desktops are gone?
hans
Exactly, it goes back to a single desktop every time. I’d like for it to maintain multiple desktops with specific background images and apps assigned to each desktop.
Thanks!
Theo
Theo Schear
Hmm, that’s an interesting problem I have yet to encounter
Can you tell me a little more about your setup?
What kind of Mac do you have, do you use more than 1 screen, which macOS version are you running?
Not sure if this will be helpful but these are my settings in System Preferences – Mission control, the following options have been checked:
– Automatically rearrange Spaces based on most recent use
– When switching to an application, switch to a Space …etc
– Displays have separate Space
Oh and I have UNchecked the option “Group windows by application”.
hans
Running a Mac Pro (Late 2013) with 1 Thunderbolt Display.
OSX Yosemite
Processor: 3.5 GHz 6-Core Intel Xeon E5
Memory: 16GB 1866 MHz DDR3 ECC
Thanks for the help!
Theo Schear
Hi Theo,
I was already afraid you’d say that; Yosemite.
When trying to find you an answer, I noticed to happen mostly with Yosemite users.
Have you considered upgrading to a newer version of MacOS?
hans
Just updated to Sierra and that solved the problem! Thanks so much, you’re my hero.
Theo Schear
Awesome – glad to hear that Theo!
hans
Hello! Nice article. I’m just getting my head around this and want to use Chrome in 3 different spaces. one with my work google account and 2 with my personal. I’ll have 3 windows with multiple tabs in each and I might want to open another window of two for some tasks in one space. As its the same app, can you give me tips on generally how this can work the best way?
A particular issue I’m having is when I open a new chrome window the OS puts it in the starting space/desktop and i have to move it to the space i want which is a bit annoying, if i assign it to all spaces I get the same window opening across them all and it gets in the way. How can I make new windows for an app I use in all spaces, only open in the space I am currently working?
billy
Hi Billy,
As far as I know, but I could be wrong of course, one might not be able to have separate windows each for one account. I know you can login with multiple account (link), but I don’t think that’s what you’re looking for. I did find this article, which suggests your idea might work – but I have not been able to test this yet.
You could try to run multiple instances of Chrome – preferable each with different data/preferences directories.
Or: run one set with Google Chrome and one with Chromium (the open source and tuned version of Chrome). I’m not sure if Chromium allows you to login though – I haven’t used it in a long time.
If you would have 2 Chrome “applications” (Chrome and for example Chromium) then you could at least tie each to one specific space/desktop – since it’s applications (versus windows) that are tied to a desktop/space.
Probably easier approach:
There are a few (free and commercial) applications out there that might be helpful, but I have not tested these yet:
Most of these were created having multiple monitors in mind, and as far as I could see, they do support spaces.
Hope this helps a little bit – feel free to post what worked best for you … myself and others most certainly applicatie it.
hans