I just finished an article on how to burn an Audio CD for MacOS X users, and there is already a request for a Windows version of this article – so here it is!
Audio CD’s are still used. Either to protect the original CD you bought when it’s laying in the car, to compile a CD with your own favorites, or to make a CD from MP’3 you bought legit at Amazon.com or the AppStore.
For this article I’ll use “Burnaware Free” – a free version of the commercial Burnaware, yet very capable of creating Audio CD’s (and others) with just a few clicks.
Before we begin …
You’ll need a bunch of MP3 files to compile a disc, and decide what kind of media you’d like to use.
It’s common and recommendable to use CDR (CD Recordable) media.
WARNING
Keep in mind that the GIGO rule (“Garbage In, Garbage Out”) applies.
So if you have really poor quality MP3′s, then the Audio CD version of those MP3′s will sound crappy as well!
TIP
For more information about CD’s I can highly recommend reading this article in which I tell you something about the different media types, how a CD works, how to label, etc.
Ad Blocking Detected Please consider disabling your ad blocker for our website.
We rely on these ads to be able to run our website.
You can of course support us in other ways (see Support Us on the left).
Download and Install Burnaware Free
You will have to get the latest version of Burnaware from their website.
Installation is straight forward:
Double click the executable you just downloaded and follow the step provided by the setup – your typically “Yes” and “OK” clicking process.
Sponsored Offer ..?
Burnaware by default (in version 6.4 anyway) would like to install a sponsored tool (AVG Toolbar) – Personally I’m not crazy about these “options” so I always uncheck the “Sponsored Offer” option.
Preparing your Audio CD
Next step is to start Burnaware.
The following window will open – click the “Audio CD” icon.
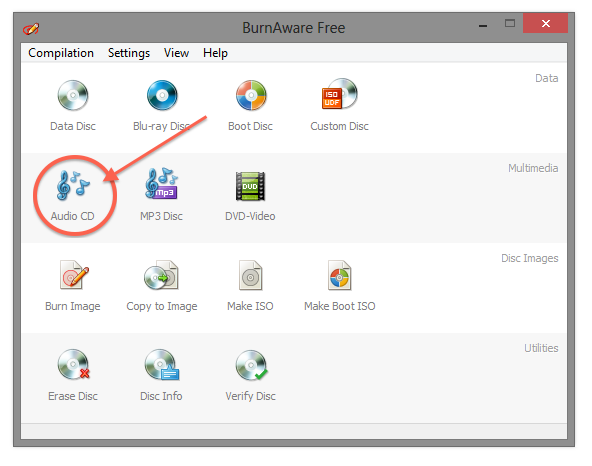
Burnaware – Start Screen
A new window opens and a brief message might fly by (it’s detecting you CD/DVD burner and media capabilities).
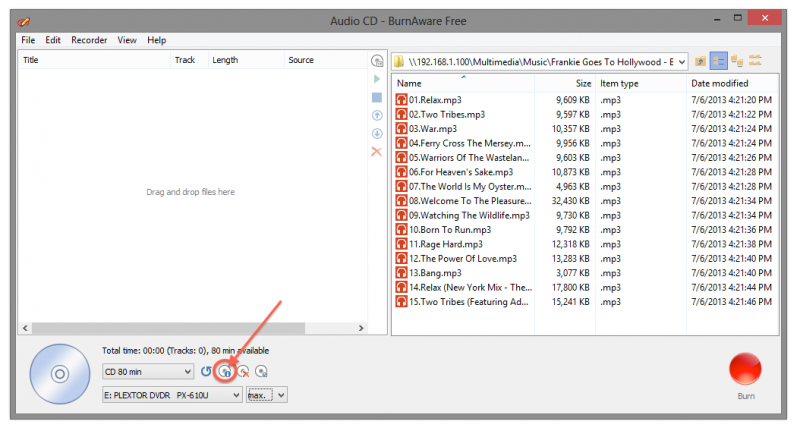
Burnaware – Ready to compile a CD?
In the lower left corner, as indicated in the image above, you will see a CD-icon with a blue printed on top of it (yeah, it’s tiny). This button will open a window with details of the media you inserted in your burner. Close the window if you’re done staring at it … 
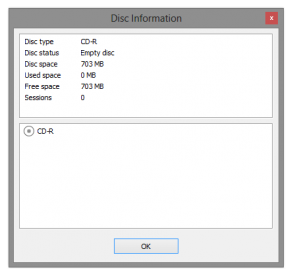
Burnaware – Media details
Ad Blocking Detected Please consider disabling your ad blocker for our website.
We rely on these ads to be able to run our website.
You can of course support us in other ways (see Support Us on the left).
Drag and Drop MP3’s …
Now that we’re ready for building our compilation; start dragging your MP3’s onto the left side of the Burnaware window.
Alternatively, use the right side of the window to navigate to your MP3’s and drag them over to the left from there.
If you do not like the order of the songs:
On the left side you can drag and drop songs up and down within the list to change the order.
Drag and Drop MP3’s to the LEFT side
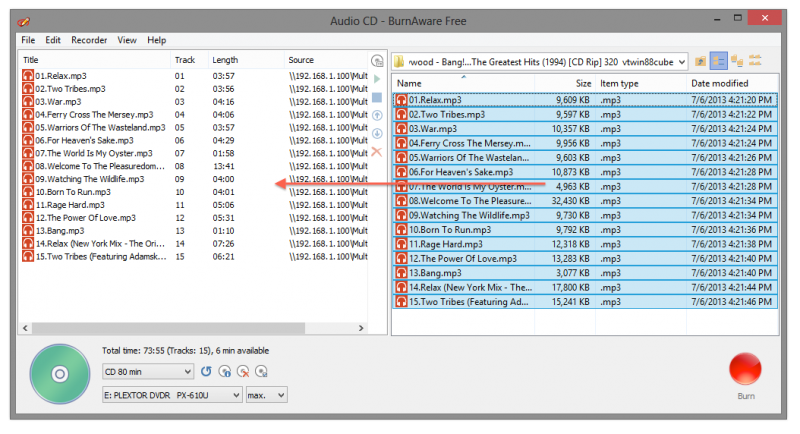
Space available?
As you might have noticed: In the lower left corner you will see a disc:
- blue colored if you haven’t done anything yet,
- green colored if you added at least one MP3,
- or red when you’ve added too any MP3’s and are exceeding the amount your CD can hold.
The image below illustrates this.
The top part: you have still 6 minutes of space left.
The bottom part: woops! You overdid it by 8 minutes.
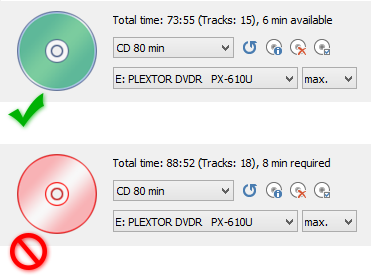
Burnaware – Available disc space?
CD-Text anyone (optional)?
I personally recommend using CD-Text – a method to add information to an Audio CD that can be read by capable players. This information typically includes Album Title, Song Titles, etc. (more details here).
Burnaware supports this, but it’s a little less intuitive than I’d hoped – but it’s most certainly there.
Step 1: Enable CD-TEXT
First we need to make sure CD-Text is enabled (it should be by default).
Click the icon for the burner details (see image below) or press “F10” on your keyboard.
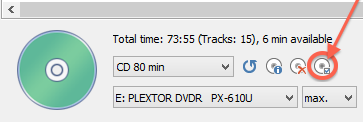
Open the burner options
A new window opens, make sure “Write CD-Text” is checked and that other settings match as well:

Make sure CD-Text (Write CD-Text) is enabled
Click “OK” when you’re done, so this window closes again.
Step 2: Set CD Title and Song Titles
I found this to be easiest done by selecting the song you want to edit (start with the first one?) and pressing the “F2” key on your keyboard.
A windows with both Track and CD details will appear.
The first tab “Track” is specific for the track you selected (you will have to do this exercise for each track) and allows you to enter information. The first one, Name (filename), cannot be changed and serves merely as a reference for yourself so you know what MP3 you’re writing about. The most significant fields are Artist and Title.
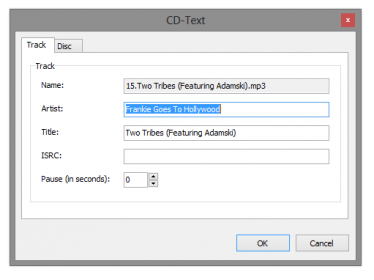
CD-Text – Track details
The second tab “Disc” will show details concerning the entire CD – you’ll have to do these settings only once of course.
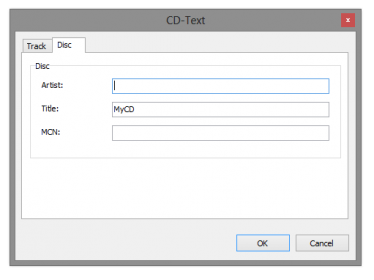
Burnaware – CD details
Click “OK” when done – repeat for the other tracks if you’d like.
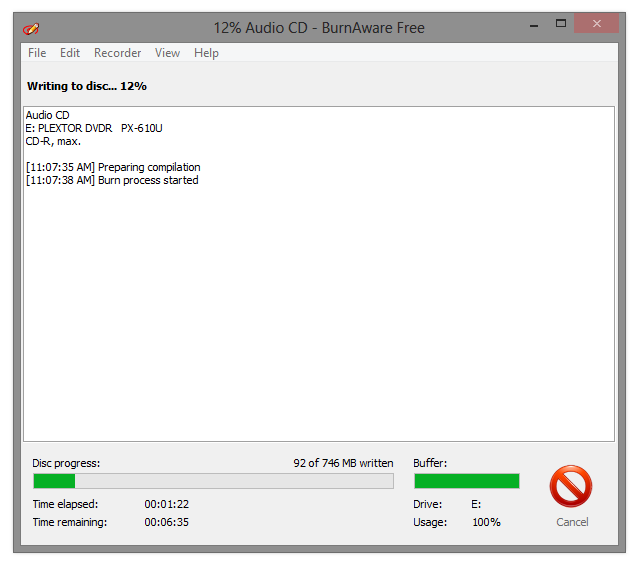
Burning you Audio CD
After you completed your compilation the time has come to burn your disc.
Before you start, make sure the “Write method” is set to “Disc-At-Once” (default setting).
You can verify this by clicking the menu “File” – “Options” (or press “F10“).
When you think you’re ready, click the big red burn button.

Burn!
Burnaware burning an Audio CD
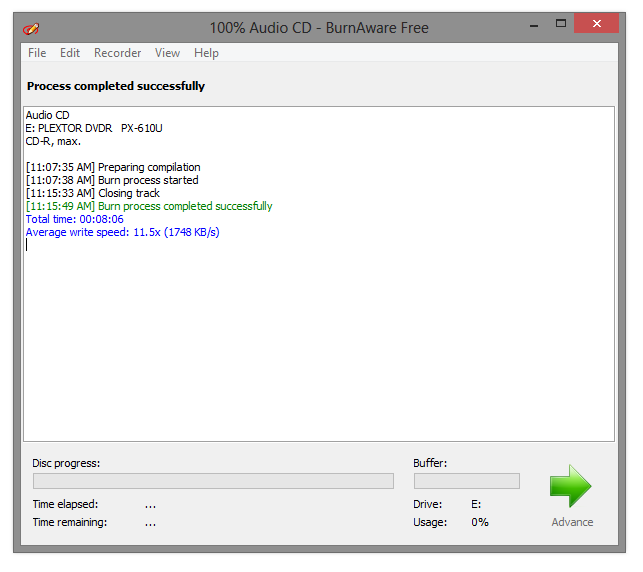
Burnaware – Burning Completed!
Note the green line stating “Burn process completed successfully” – you’re disc is done. 
Click the green arrow to go back to your compilation window.


Comments
There are 7 comments. You can read them below.
You can post your own comments by using the form below, or reply to existing comments by using the "Reply" button.
This DOES NOT WORK. I downloaded via your link, the Free version, and the interface looks NOTHING like what you show, and I CANNOT drag/rearrange the playlist, making it worthless.
ffgds
Hi ffgds,
“does not work” is a rather limited description of what may be the problem you’re running into.
Also: please be aware that this article is already 7 years old. It would have surprised me if Burnaware would have looked like it did 7 years ago.
On that note: I just went through all the steps with the latest (2020) version and the new version does look a little different than the old one, but not by much. Just a little more modernized look.
Burning an Audio CD, rearranging songs (drag and drop within the Burnaware window), worked as well.
So I’m not sure what the issue is that you’re running into, and how I can help out?
p.s. I understand a person can get frustrated when something doesn’t work as hoped for, but please be aware that writing in all caps is considered yelling/screaming in netiquette.
Hans
Thank you for your reply.
This tutorial on burnaware is refreshingly detailed.
When I followed the steps shown, there is no ability to grab a title in the burn list with the mouse, and drag it to another position within the list.
I don’t know how to be more clear than that.
I even deleted my installation of BurnAware, then used the link you provided, to be sure my version was current.
Note that the burnaware website lists three versions. I selected the one furthest to the left, the free version.
Was that the version you tested?
Fewer and fewer online articles bother to name their publishing date, so I’ve given up looking.
If I knew how, I would permanently set Google to restrict results by a time frame.
I just spent around six hours compiling / arranging a playlist in the supposedly “free burner” NCH, only to discover it would not burn
anything until I paid a ransom. Not a nice surprise….but I was desperate to find something that would allow me
to drag and drop titles, and NCH allows it.
evan
somehow my reply isn’t showing up here, so I’m repeating.
I deleted my installation of BurnAware, then clicked on the link shown on this page.
This led to three choices, one free, two paid.
I chose the one furthest to the left, the free one. Is that the version you selected when you tested this out?
I don’t know how to say this any differently. When I try to grip a song in the burn list with the mouse
and drag it to another position, nothing happens. Also, when building the playlist, I am unable to Drag and Drop titles.
I must open a folder, highlight a title, and click Add.
Thank you for your help.
evan
Hi Evan,
Thank you for the compliment
This is what I did: installed the same version you did (the free one, on the far left) – I downloaded it just now to see how outdated the screenshots here are.
After clicking “Audio CD”, I simply dragged some MP3 files on the window that opened after clicking “Audio CD”.
Now in that Window I could rearrange the order by dragging and dropping (I’m sure you figured that out as well).
I was not able to test the actual burning of a CD, since I do not have an empty CD laying around.
But when I clicked “Burn” it did start the procedure, but came back with the message that no disk was present (obvious).
I couldn’t agree more: I hate those apps that let you play with it, but after tons of work to find out that there is a ransom situation …
Note: publishing date is something I always look for myself as well, I hate it when people don’t place a publishing date.
On this website, if you look in the upper right corner, roughly next to the article title, you’ll see the date (July 8th, 2013).
Tip: if you use Google to search, you can actually limit your results to a certain time frame.
-> Open Google and do you initial search query.
When the results appear, look just below the magnifying glass (on the right side of the search box).
There you will find a “Tools” button. Click that and some options appear below the search query box.
One of them is called “Any time” where you can limit the search to “Past hour”, “Past 24 hours”, “Past week”, “Past month”, “Past year” and “Custom range”.
Selecting one of these will limit the results based on desired time frame.
On that note: Reddit notiously pops up there even though the posts are ancient. The other search results seem pretty on the spot though.
Hope this helps
Hans
I forgot to mention another problem.
Although the burnaware box shows light grey words on a white background saying “Drag and Drop Files here”
that isn’t possible. Nothing will drag into it. I have to open a folder, highlight the title, then click Add.
Now, common sense would suggest that I simply add the songs in the order I wish them to burn.
That won’t work for me. I forget things, and change my mind, and want the freedom to rearrange.
evan
That’s odd indeed. I used drag and drop (I was too lazy to find the “Add” button haha) on the white background, below the “Burn”, “Add” etc buttons.
What file format are you trying to add? I used MP3 files.
Hans