In certain scenarios, it can be a timesaver, and avoid mistakes, to have one or more templates for common emails.
Unfortunately, Apple Mail, that comes with macOS, doesn’t have a template mechanism … or does it?
With a simple trick we can use “templates” in Apple Mail under macOS and in this article I’ll show you how …
Overview
The general idea of Email Templates
For me this doesn’t happen often, but I can see a purpose for using email templates.
For example a prewritten email, as a standard response to certain situations.
So what is an email template?
In short: a prewritten and formatted email, which you’d like to use every now and then, to save yourself some time writing the same text (added images etc.) over and over again.
Example:
When a new customer approaches you, you’d like to send them a personal (not automated) welcome message with some instructions on how to use your website.
Typically this will not be a huge text, but wouldn’t it be convenient if you have the standard text pre-populated and just have to customize a few words or lines?
Unfortunately, Apple Mail that comes with macOS doesn’t seem to have an obvious template mechanism.
However, with a simple trick you can make it behave like it does support templates.
In the next steps I’ll show you how you can accomplish this.
Ad Blocking Detected Please consider disabling your ad blocker for our website.
We rely on these ads to be able to run our website.
You can of course support us in other ways (see Support Us on the left).
Creating an Email Template for Apple Mail
Step 1 – Make Folder (mailbox) for your Templates
I prefer to store my email template(s) in a specific folder (Apple calls it a mailbox, which is confusing if you ask me), so I can easily find them and do not get confused with other types of emails.
This is done like so:
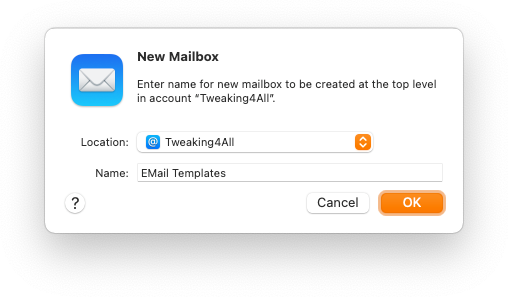
In Apple Mail, go to the menu option “Mailbox” “New Mailbox…“.
This will show a popup asking you where to put your template folder (Location) and what to call it (Name).

Apple Mail – Create a new Mailbox
Since your template most likely is used with one specific email account, set “Location” to that specific email account.
As for the “Name“, I used “EMail Templates“, feel free to enter whatever name you’d prefer. Keep in mind that it should be a name that is recognizable for you, so you can find the folder easily in the future.
Click OK when done.
Step 2 – Create a Draft Email
In this step we will create a new email message and save it as a Draft message.
Start composing a new email just the way you usually do (or press ⌘N, or select from the menu “File” “New Message“).
In the email you can use anything you’d usually would use in an email. So you can add images, videos, different font styles, etc.
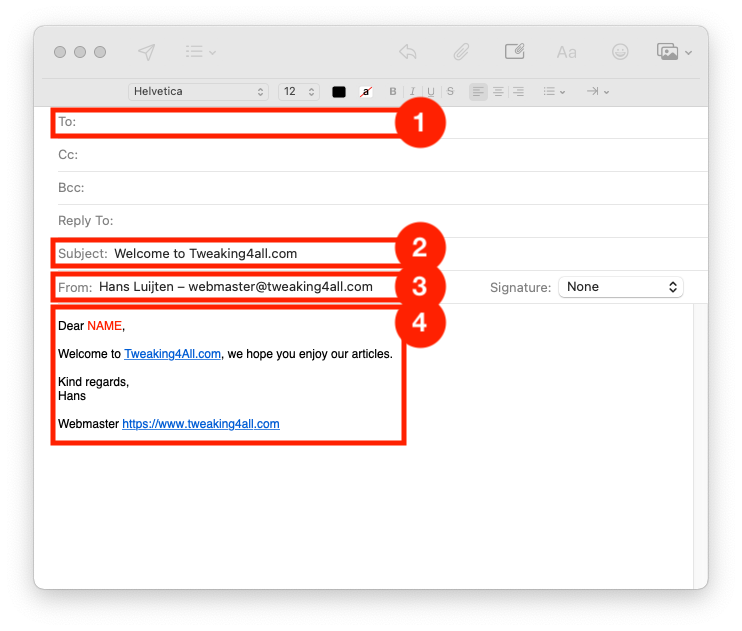
Make sure you pay attention to these items:
- Leave the “To:” field EMPTY.
Later on we’d like to be able to enter the correct email address of the recipient.
- Don’t forget to enter a Subject Line.
- Make sure the “From:” field show the account you’d like to use the template with (may not show if you have only one email account).
Usually a template originates always from the same email account – you can ignore this if this is not the case in your situation.
- Make obvious for yourself where, in the template, you’d need to customize information.
In this example I wrote “NAME” in red, so I can see right away what information I need to change.

Create a new email in Apple Mail
Note : Obviously, you can pre-populate the “Cc:”, “Bcc:” and “Reply To:” fields as well.
Step 3 – Save the New Email as an Email Template
When done editing your email, simply close the new email by clicking the in the upper left corner of the new email window.
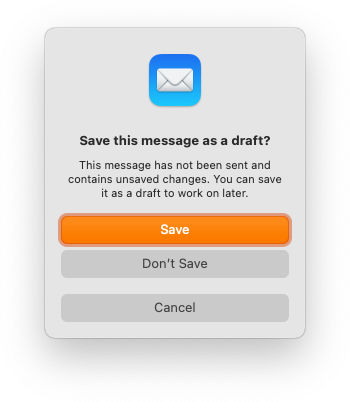
A popup will appear, asking you if you want to save the email as a draft. Click Save.

Save the new email as draft
Step 4 – Move the Email Template to your template folder
If you look in the “Drafts” (or “All Drafts”) folder, you’ll find your new email draft there.
Move it, with drag and drop, to the folder we created in Step 1 (“EMail Templates”).

Your new Template
Using the Email Template in Apple Mail
Using the template is super easy.
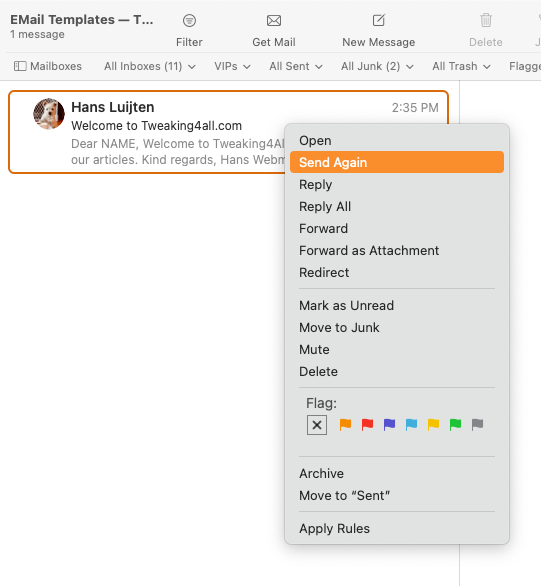
Simply go to the template folder where you stored you template (“EMail Templates” that we created in Step 1).
Next, right click the email template.
A popup will show up, where we select “Send Again“.
A new email will open, with the content of your template.
Fill in the “To:” field, and make sure to modify the information that is recipient specific.
When done, send the email.
Unlike actual drafts, the template remains available in your template folder.

Using the Email Template


Comments
There are 6 comments. You can read them below.
You can post your own comments by using the form below, or reply to existing comments by using the "Reply" button.
Thanks for this – exactly what I needed to finally let go of Outlook.
Angel
Hi Angel!
Glad to hear this was useful for you – and thank you very much for taking the time to post a “Thank you” note, it is very much appreciated.
Hans
A little hidden gem for sure!
Thanks!
John
Thank you very much for posting a thank-you! It is much appreciated!
Hans
When I move the draft to the new folder, it disappears after a few seconds – without a trace. Any idea why??
Micah
Hmm, that’s weird. I have moved mine in a separate folder “Email templates” and moving it there works just fine. Been sitting there for at least 2 years now
I can imagine a few reasons where things may conflict.
My first thought would be that another email client that is accessing this folder as well?
Just a wild stab: is the spam filter removing it? Or any rules you may have setup?
I haven’t tried this with Drafts yet, but usually you can actually drag an email to your desktop.
It will save the email as a .EML file, which can be opened (double click) with Apple Mail.
It then opens like a regular email, and in the window that opened, in the upper right corner, you can place it in a specific folder in Apple Mail.
Just in case you’d like to make a backup while testing…
Hans