Windows users really don’t run into this problem, as it appears (mostly) to already do this for you. But how about Internet shortcuts on your Mac?
The MacOS desktop does not utilize the FavIcons of a particular website to make the icon look more distinguishable … and there appears to be no simple one click step to make this happen either.
Apple: Isn’t it time to add this to MacOS? It’s available under iOS? Why not in MacOS X …?
Anyhow; in the article a quick trick for now that makes this happen anyway.
Intro
I don’t particularly like the default “@ HTTP” Internet shortcut utilized by MacOS. It’s boring, it doesn’t utilize the so called FavIcon and … well it makes it more difficult to distinguish the shortcut on your desktop in case you have multiple … so how are we going to change this icon?
The following trick seems a little cumbersome, but once you get used to it, it’s not that bad. However; I wish Apple would use a FavIcon automatically as seen on for example iOS.
I my example, I want to save a shortcut on my desktop of a website that has my dream car for sale. Just a reminder for me to look at in the next few days after which I might delete it again. This being the main reason why I’m not using the usual bookmark mechanism of my browser.
You’ll notice that the Mac automatically uses a default “@ HTTP” icon. It will use this icon for ALL web/url shortcuts you want to make … making it less obvious and less distinguishable when you have a few on your desktop. As you can see; the name of the shortcut (due to it’s length) is not helping much either.

MacOS X – Default Web Shortcut
To fix this, we can use a beautiful mechanism found in MacOS where you can change the icon of pretty much anything. For this we need an appropriate picture and we are going to use a screenshot for this.
Step 1: Go to the webpage you’d like to bookmark.
Step 2: Create a shortcut to the website
This is easily done by grabbing the icon in the addressbar of your browser and dropping it on your desktop.

Create a Shortcut – Drag the icon to your desktop
Step 3: Take an appropriate screenshot
Taking a region screenshot (only a selected part of the screen) is easy on a Mac, although I have to admit that always forget what the key combination is.
Find a part of the website that you’d like to use, for example the logo of the website, or in my case a picture of the car. Size does not matter – but be aware that the image will be scaled down to your default icon size when displayed on your desktop – so if anything should remain readable; don’t make the picture too big.
Press SHIFT – CONTROL – COMMAND – 4 (don’t worry it takes only one hand for most people). You’ll see the icon change to a cross hair with 2 numbers next to it indicating the location coordinates on the screen.
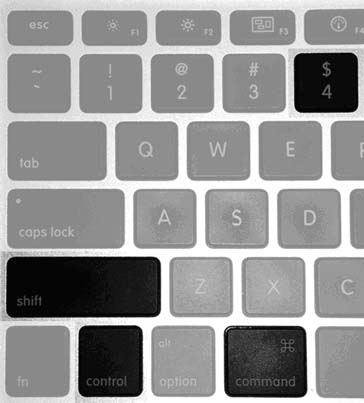
Screenshot keys to grab a region
Go to a corner of the region you’d like to select and press the left mouse button and keep it pressed while dragging – you will notice that the coordinates now change to the dimensions of your selection;

Screenshot – Select the region you’d like
Once you let go of the [left] mouse button a snapshot will be made of the selected region and will be stored on the clipboard …
Step 4: Pasting the new “icon”
Now that we have a proper image on our clipboard, we can use it as an icon. This is relatively simple to do.
- Left click the newly made shortcut once.
- Press “COMMAND + i” (or right click the file and select “Get Info” from the menu).
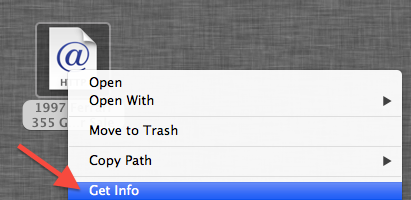
MacOS X – Retrieve file info
A window will open with detailed information of the file. Click the icon in the upper left corner as indicated in the image below and press COMMAND + V (paste) and you will see that the boring old “@ HTTP” icon changes to the image you just captured.
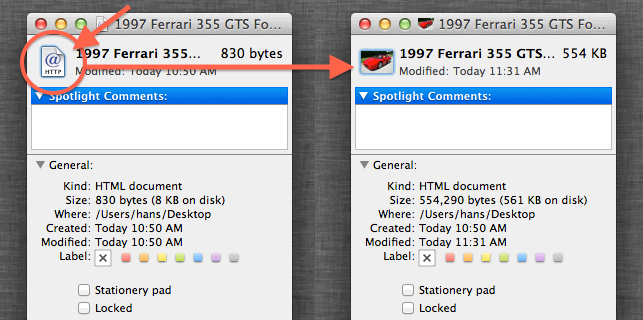
MacOS X – Change the icon of your file
Close the window now and you’ll see the changed icon on your desktop:

New icon for my Internet Shortcut
And that’s all there is to it …


Comments
There are 6 comments. You can read them below.
You can post your own comments by using the form below, or reply to existing comments by using the "Reply" button.
Nice !
matt
Thanks Matt!
If only Apple would this automatically …
hans
Thank you so much! That worked like a charm and I’ve been trying to find the answer to this irritating problem for a very long time now. tweaking4all.com is awesome!
Diane
Diane
Hi Diane!
Thank you for the nice feedback! Glad to hear the article was helpful!
hans
Hi! When I tried this, the icon just changes to say PNG. Any ideas?
Jessica
Hi Jessica,
hmm, that’s interesting (and a little annoying) … since I cannot reproduce this, I’ll have to do a few guessed …
I just tested these exact steps again under Catalina (macOS 10.15.5), and it still works.
1) You probably did, but I have to ask any way: did you follow all the steps to a tee?
Now that we have that out of the way …
2) If the original file is a PNG image, then your Mac appears to be showing generic icons (the “PNG”) text.
In that case a reboot may be helpful to rebuild the icon cache.
3) I did find another option, that seems to work for some users:
Select the file, press COMMAND + i, select the icon, press backspace, close the “Info” window and wait a few seconds.
(in essence: follow the steps of this article, but instead of dragging a file on it, or pasting a screenshot, we use backspace to clear it)
This forces macOS to redetermine the needed icon.
Now repeat the steps of this article and see if it works.
4) Rebuilding the entire icon cache
macOS caches icons it has found over time, so it is quicker at actually displaying the icon. This cache can get corrupted over time.
There are a bunch of additional tricks that may help, by rebuilding the icon cache – but they are not the simplests things.
In this article I found a few more tricks that may be helpful. I’d be careful with those suggestions though. These steps will not destroy your mac, but you can potentially do the wrong thing and screw things up.
I hope any of this helps – if you found solution, please post it here, others may run into the same issue and find your solution helpful
Hans