Standard way of Taking Screenshots
Playing Half-Life: Alyx made me want to take screenshots while playing, and to be honest: it is a shame to see that Oculus has defined a simple way to take a quick screenshot in VR games.
Note: other HMD’s (VR headset, or Head Mounted Display) may suffer from the issue – depending on the pre-assigned functions to controller buttons.
Standard Quick Screenshot in SteamVR: System Button and Right Trigger
BillKills974 pointed rightfully out that SteamVR has a standard method to take a quick screenshot by pressing the system button and trigger button simultaneously for 1 second. After a few seconds you will see a notification informing you that the screenshot was taken.
Note: This does not work on the Oculus Quest (with either Oculus Link, ALVR or Virtual Desktop)!
Standard Screenshot in Steam: Useless in VR with an Oculus Quest
Steam DOES has a shortcut to take screenshots, namely the F12 button.
(and of course the previously mentioned menu+trigger button, which does not work with the Oculus Quest).
The quality of the screenshots are really good, arguably better than the screenshot function of the Oculus Quest.
However … in VR we do not see the keyboard of our PC, so this becomes quite unusable while playing a VR game.
You’ll have take off your HMD, find the freakin’ F12 key, and … oh wait, our “position” is completely different now … crap.
The quality of the picture is excellent though.
In my tests, running my laptop screen at 1080p, the resulting PNG was 1920×1080 – a higher resolution screen settings will most likely result in even better pictures.
Note: you may have to enable “Save uncompressed” in the Steam settings to get PNGs (Steam Settings In-Game check “Uncompressed“)
Standard Screenshot with Oculus Quest: useless as well …
I play my VR games with the Oculus Quest – truly a nice and affordable HMD and playing wireless with ALVR is just the best experience ever.
To take a screenshot, one has to press the Trigger on the left controller, keep it pressed, and then press the Oculus button on the right controller.
A screen pops up, where you then have to select “Take Screenshot”, return to the game, wait a few seconds (hold!!!) until the red light in the upper right corner stops blinking, and you’re done. Yikes!
This of course works, but it is far from practical, try this when playing Beat Saber! 
Ad Blocking Detected Please consider disabling your ad blocker for our website.
We rely on these ads to be able to run our website.
You can of course support us in other ways (see Support Us on the left).
A better way of taking Screenshots in SteamVR
After being seriously annoyed by this for a while now, I started thinking about ways to get an easier way to take screenshots to show off my accomplishments in Half-Life: Alyx.
The options I thought about included a huge button (probably wouldn’t find it while in VR) and even using voice control (extra resources needed and she’d probably not listen anyway). But let’s be honest: none of that would be ideal.
Why not use one of the buttons on our controllers? Why not just trigger F12 straight from your controller?
Short version for those that are experienced or impatient …
If you’re quite familiar with Steam, SteamVR and OpenVR-AdvancedSettings, then you may not need to read all the detailed steps.
So here the quick and dirty description:
- In Steam, change the screenshot button to F9, since F12 it is not supported by OpenVR-AdvancedSettings – and maybe set your screenshot directory.
- Install OpenVR-AdvancedSettings by running the installer EXE.
- Edit the OpenVR-AdvancedSettings INI file and change the value for “keyboardThree” to F9 (
keyboardThree=F9 )
- In VR, open OpenVR-AdvancedSettings, and bind “Keyboard Shortcut Three” key to Misc. – Joystick Left – Button – Long.
In the standard SteamVR settings, I was unable to find a proper option to set this.
I did however have OpenVR-AdvancedSettings installed (related to an Audio issue I had with the Quest) and remembered there something being available to change the controller bindings.
Step 1: Install OpenVR-AdvancedSettings on your PC
Close Steam and SteamVR before you begin!
Install OpenVR-AdvancedSettings – it’s free! Kudo’s to Ykeara for developing and maintaining this excellent tool!
A detailed description can be found on the OpenVR-AdvancedSettings Github page, but it is pretty straight forward: Download the OpenVR-AdvancedSettings installer and run it.
Windows may bark at you, since the executable is not signed, just click “Run Anyway“.
On that note: signing executables is in general a good idea. However, to me it feels like yet another way to take money from people. If we really think of security as our main goal, then the needed certificates should be much cheaper, so we can all help in making the world a safer place. As a Freeware developer I can say: I simply cannot afford a couple hundred dollars every year, to sign my freeware applications. So I’m not signing mine either.
Note: from the instructions I read, I can see that this is also available for Linux (not macOS), but I have not tested this.
OpenVR-AdvancedSettings is a very cool addon for your SteamVR, but it has one small issue for our screenshot purpose:
We want to bind the F12 button to our controller, but OpenVR-AdvancedSettings only supports the keys F1 – F9.
For more information: see the OpenVR-Advancedsettings Keyboard-input specifications where it states:
Only F1 through F9 is supported.
This is because there is no way to tell if F12 is meant to be F1+, F1-, 2+, 2- or F12+, F12-.
There is a relatively easy work around for that though, by simply changing the assigned screenshot button.
In my case I picked F9, being totally unaware of any potential conflicts with other games.
Open Steam, and open the “Steam” menu () where you select the “Settings” option ().
A window for the settings will now open up, where we select the “In-Game” options ().
In the section indicated below () we can change the “Screenshot shortcut keys“. Click the button to clear the field, and press the button you’d like to use (F9).
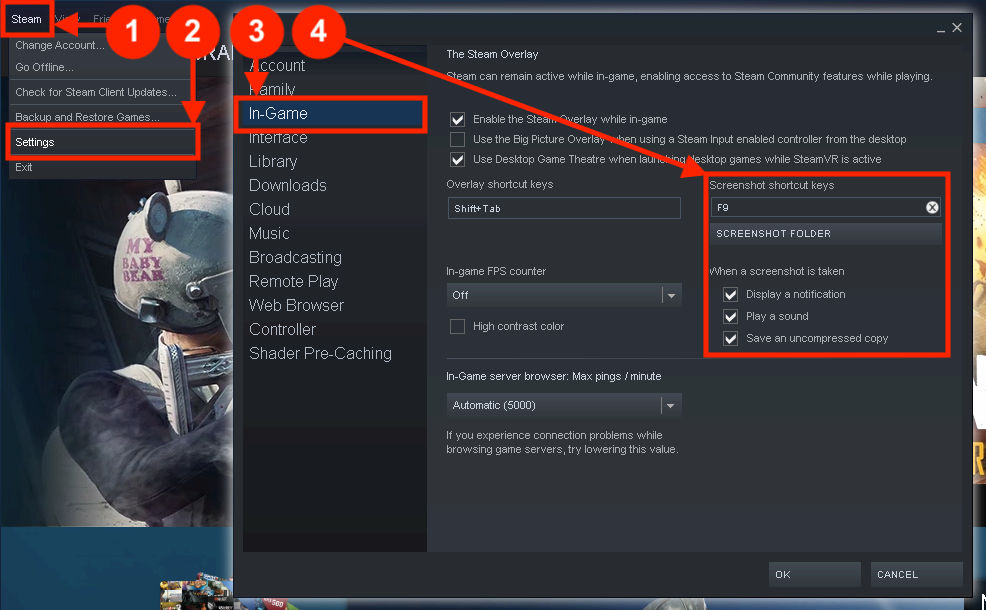
Steam – Remap the button for screenshots
In this same section, while you’re at it, you may also want to change these settings:
- HIGHLY RECOMMENDED: Set the default screenshot directory!
Simply click “SCREENSHOT FOLDER” and browse to a suitable directory – I used a Dropbox directory for this so I can access it on from anywhere,
- Recommended: Make sure you get audio feedback when taking a screenshot (you’ll hear it in you VR HMD as well) by checking “Play a sound“.
- Optional: Make sure it saves an uncompressed PNG as well by checking “Save an uncompressed copy“,
Click the OK button when you’re done.
Step 3: Define Keyboard Shortcut in OpenVR-AdvancedSettings INI file
OpenVR-AdvancedSettings by default defines 3 identical keyboard shortcuts (CTRL+SHIFT+M = Discord Mute Microphone):
Keyboard Shortcuts
| Shortcut |
Keystroke |
| keyboardOne |
CTRL + SHIFT + M |
| keyboardTwo |
CTRL + SHIFT + M |
| keyboardThree |
CTRL + SHIFT + M |
We’d like to change one of them for our screenshot purpose, and for this we need to edit the OpenVR-AdvancedSettings INI file which can be found here:
In Windows you’ll find it in this directory: %APPDATA%\AdvancedSettings-Team (you can copy and paste this path straight into Explorer or the Run command)
Note: In Linux this should be ~/.config/AdvancedSettings-Team/.
The file is called “OpenVRAdvancedSettings.ini“.
In this file, you can open the file with Notepad for example, you’ll find a section that looks like this:
1
2
3
4
| [keyboardShortcuts]
keyboardOne=^>m
keyboardTwo=^>m
keyboardThree=^>m |
Now change the “keyboardThree=” line to keyboardThree=F9, so that it will look like this:
1
2
3
4
| [keyboardShortcuts]
keyboardOne=^>m
keyboardTwo=^>m
keyboardThree=F9 |
You can now save and close the file.
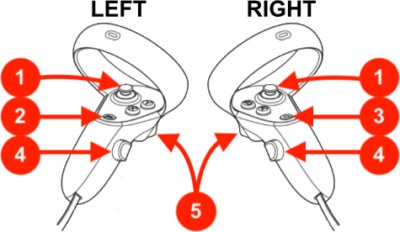
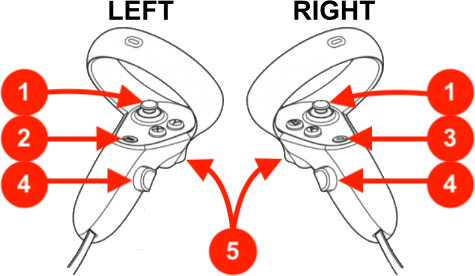
Now here you’d want to be careful, and pay attention if you’re right-handed or left-handed, and check your VR controllers, if you’ve not using an Oculus Quest.
Lefty vs Righty …
The instructions here are written for a right-handed user (me!  ), where I assume the game (Half-Life: Alyx in this case) doesn’t do anything with the Joystick-button on the Left Controller. It has no function assigned to it.
Left-handed users should be able to do the same thing for the Right Controller – all depending how you user VR controllers of course.
Written with Oculus Touch Controllers in mind …
I have only one HMD, and that is the Oculus Quest, so this guide is based on my experiences with the Oculus Touch Controllers that came with my Oculus Quest.
I assume this works the same way for other Oculus models, like the Rift and Rift-S.
Other HMD’s (Valve Index, HTC, Samsung, etc) may work similar.
If your controller is properly supported by SteamVR, then you should be able to do this as well, but you may have to pick another button – make sure it is not used in the game though.
Before we can do these steps: Start your VR system and get into a SteamVR game or the SteamVR home.
So SteamVR is running and your HMD (headset) is showing SteamVR content.
To get to the OpenVR-AdvancedSettings menu, we first need to open the SteamVR Settings (in VR!).
On the Oculus Quest this is done by pressing the MENU Button () briefly – it is on the LEFT controller.
Oculus Touch Controllers
Now the SteamVR menu should popup (in VR), showing something like the screenshot below.
Select the indicated button in the lower left corner to open OpenVR-AdvancedSettings.
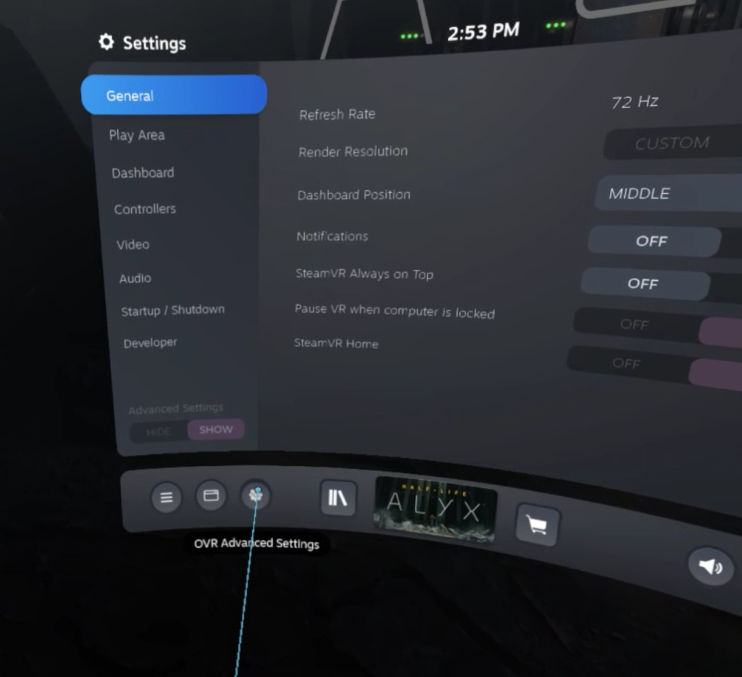
SteamVR Menu – Open OpenVR-AdvancedSettings
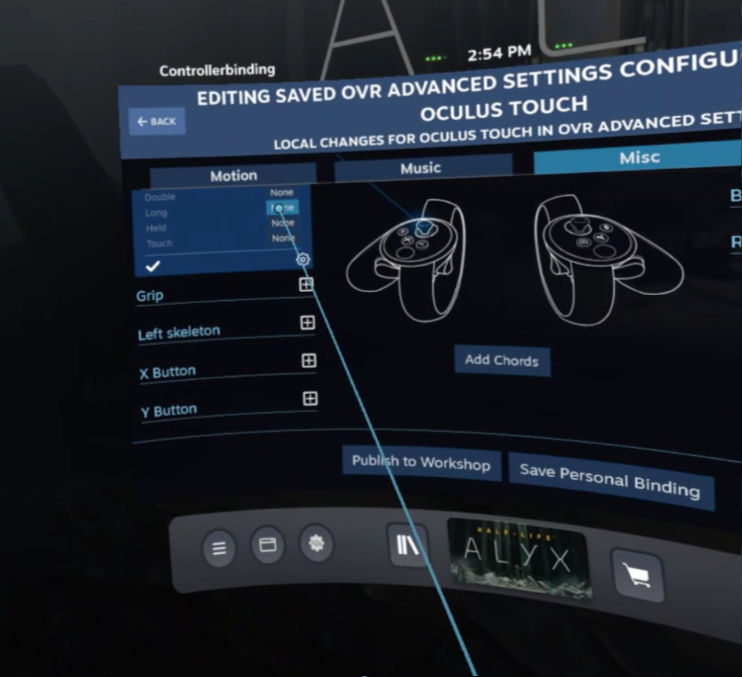
In the next step, we need to go to the “Bindings” of OpenVR-AdvancedSettings.
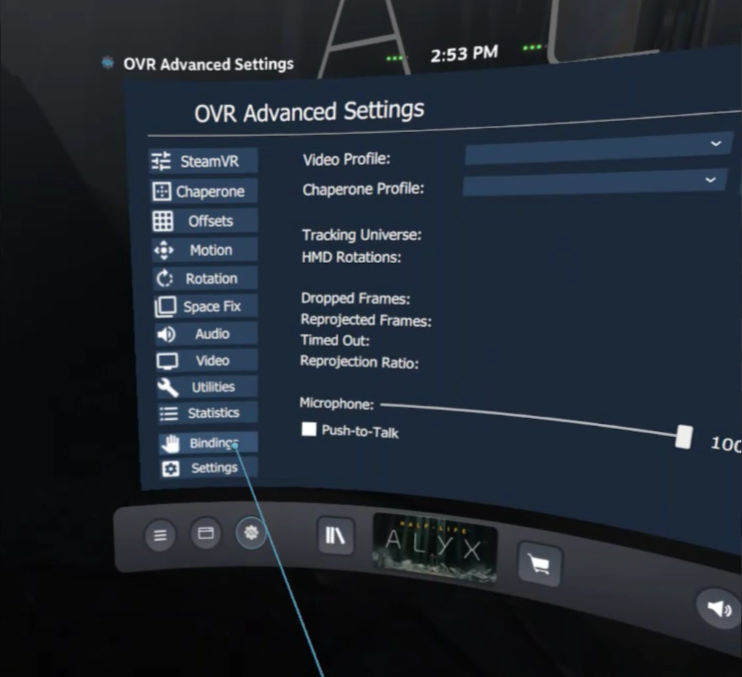
OpenVR Advancedsetting – Bindings needed for Screenshots
On my screen, with the version I was using anyway, I did briefly see a screen flashing by where it seemed like you could select an application. But before I could select anything (tried it 4 times, all with the same result) OpenVR-AdvancedSettings jumped to this screen where we have to select the “Misc” tab.
The other options, Motion, Music and System, will not allow you to bind a keyboard shortcut.
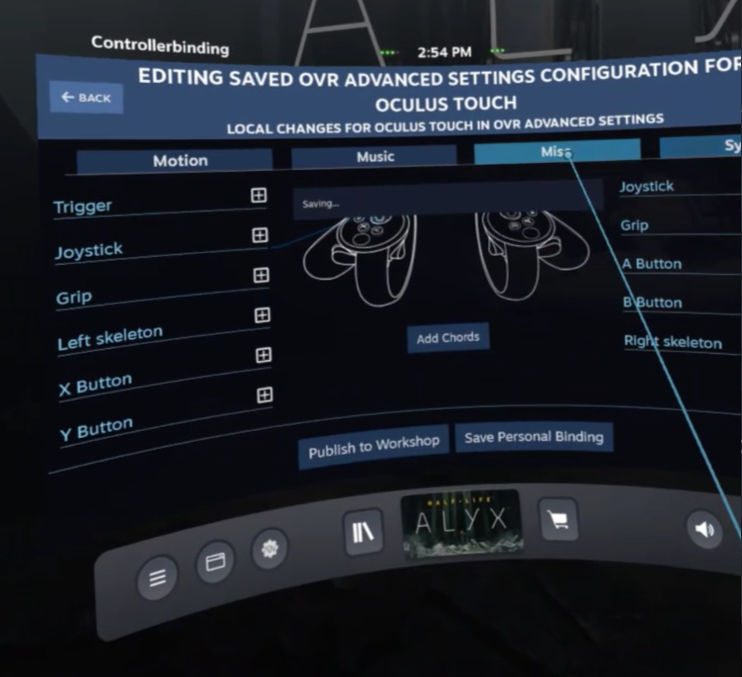
OpenVR AdvancedSetting – Misc Tab
In this next step, we have to select the LEFT Joystick (if you plan to use the Joystick on the left controller, like I did):
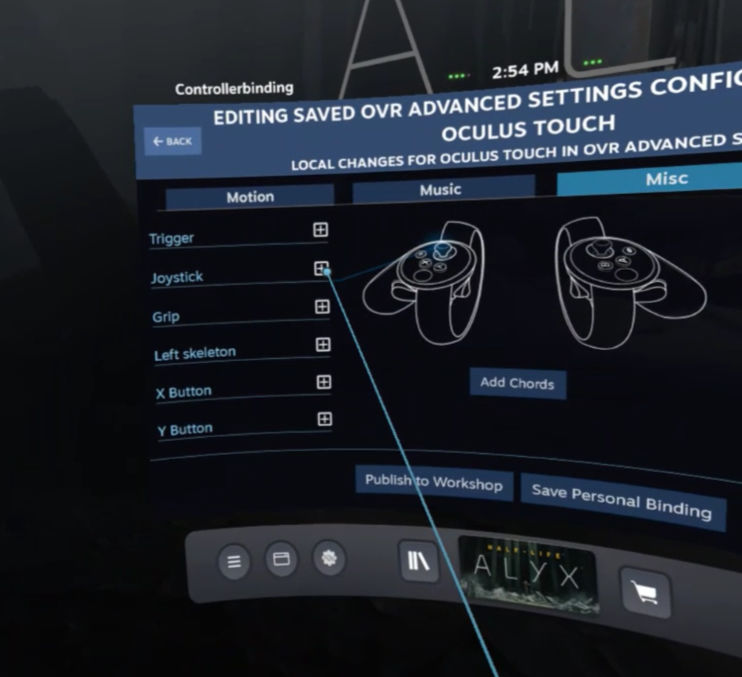
OpenVR AdvancedSetting – Left Joystick
In the Joystick section we will now (unless you already have something defined here), we will now be ask what you’d like to do, and here we choose “BUTTON“.
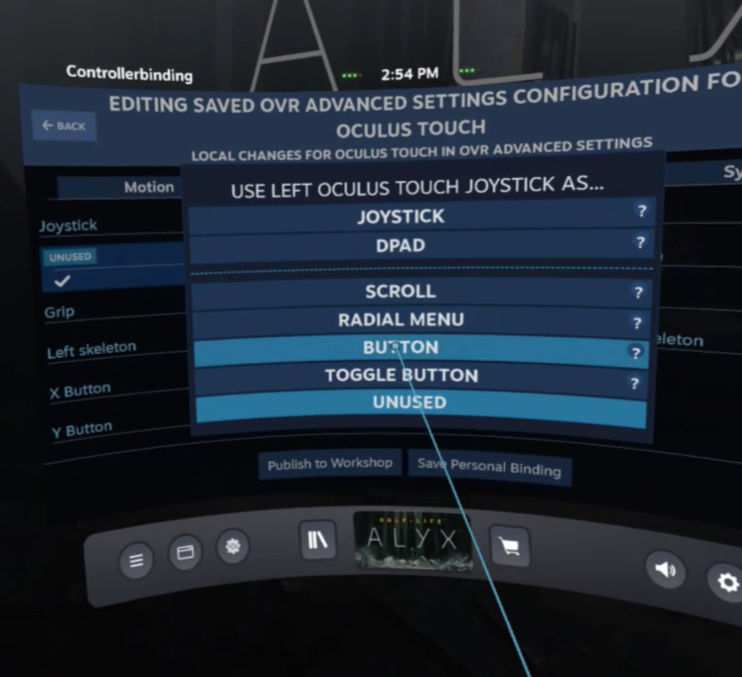
OpenVR Advancedsetting – Left Joystick BUTTON for Screenshots
Since the button only shows us the 2 basic options (Click or Touch), we will need to click “More options“, to reveal the “Long” (long press) option.
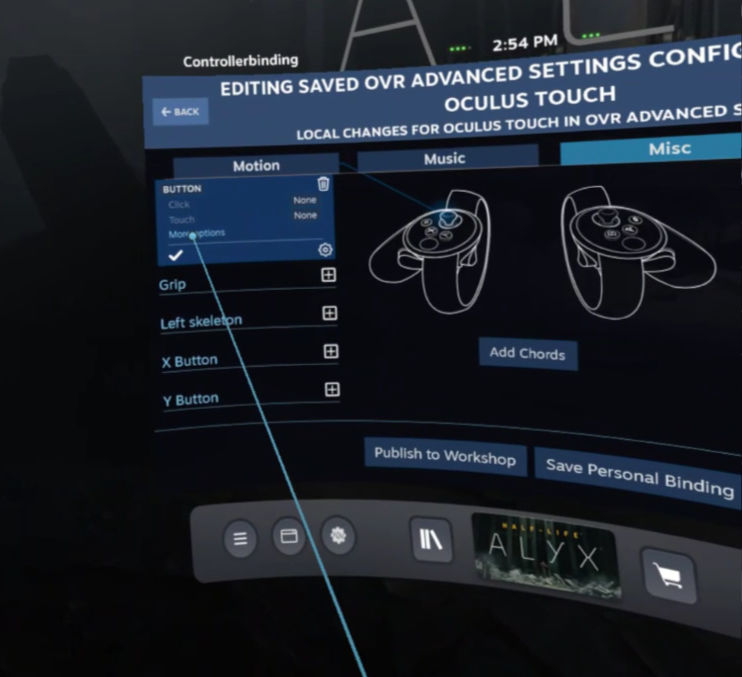
OpenVR AdvancedSetting – Left Joystick Button – More Options
Now we can define what happens when we do a long press on the joystick. We wouldn’t want to take screenshot constantly by accident of course, but you’re totally free in selecting another option. Click on the “NONE” block next to “Long“.
OpenVR AdvancedSetting – Using Long Press for Screenshots
Now we can select our keyboard shortcut, called “Keyboard Shortcut Three“.
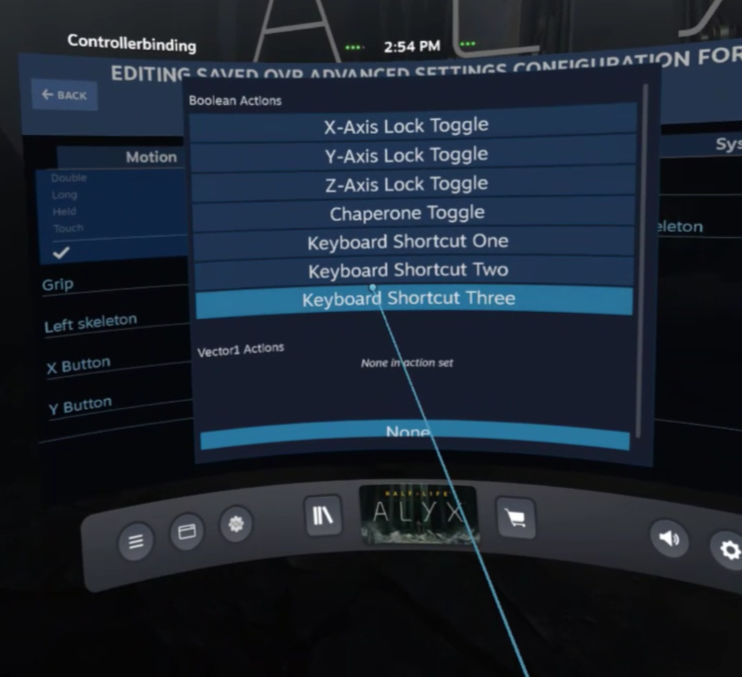
OpenVR AdvancedSetting – Keyboard Shortcut Three is our Screenshot key
Now we are pretty much done, just don’t forget to save your settings:
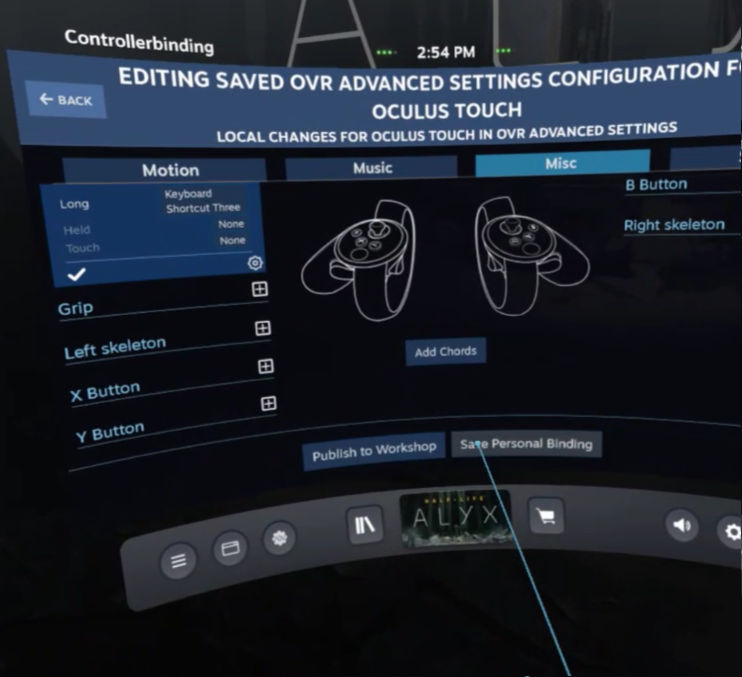
OpenVR AdvancedSetting – Save Settings
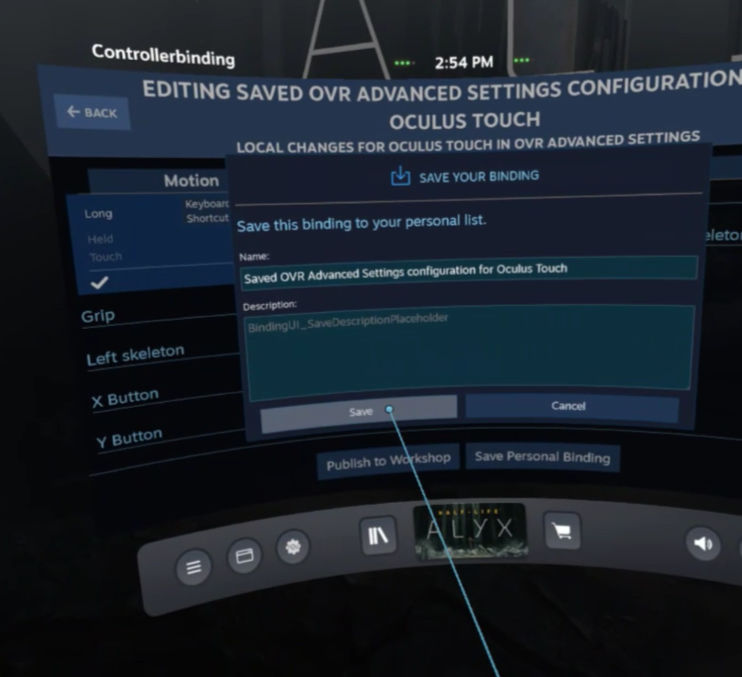
OpenVR AdvancedSetting – Save Settings Details
And that’s it …
Just a reminder: SteamVR or your VR game needs to be the active window on your PC – otherwise this won’t work.
The window is by default active, unless you’ve been clicking on stuff on your PC in between starting and playing a game.
How to use the new Screenshot Feature?
It’s pretty simple: anywhere in the game, or in SteamVR for that matter, press and hold the joystick on the left controller.
You’ll see a tiny Steam animation and you’ll hear an audio feedback that the screenshot has been created, you can release the joystick now, as shown in the short video below.
Make sure the SteamVR window is the front most / active window on your PC, which is default the case, unless you started clicking around.
After that you’ll find your screenshot in your screenshot folder – you did change the default setting to a directory of your own, right ? 
Ad Blocking Detected Please consider disabling your ad blocker for our website.
We rely on these ads to be able to run our website.
You can of course support us in other ways (see Support Us on the left).
Comparing Results
Now, one thing to keep in mind is the difference in screenshot when comparing a SteamVR screenshot and a native Oculus Quest screenshot.
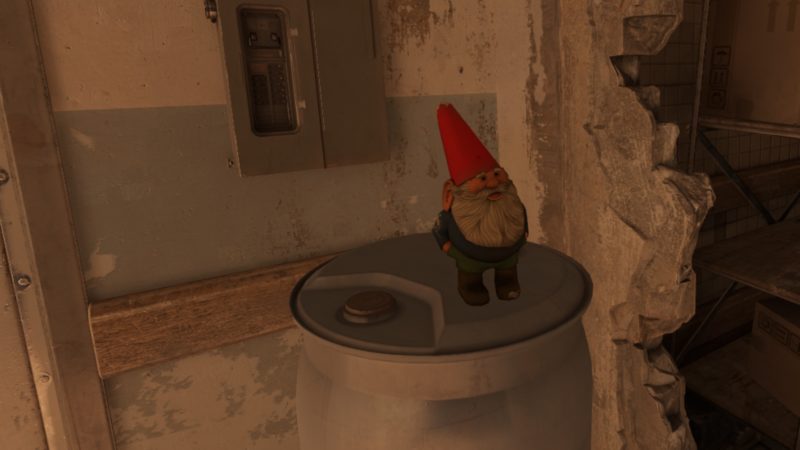
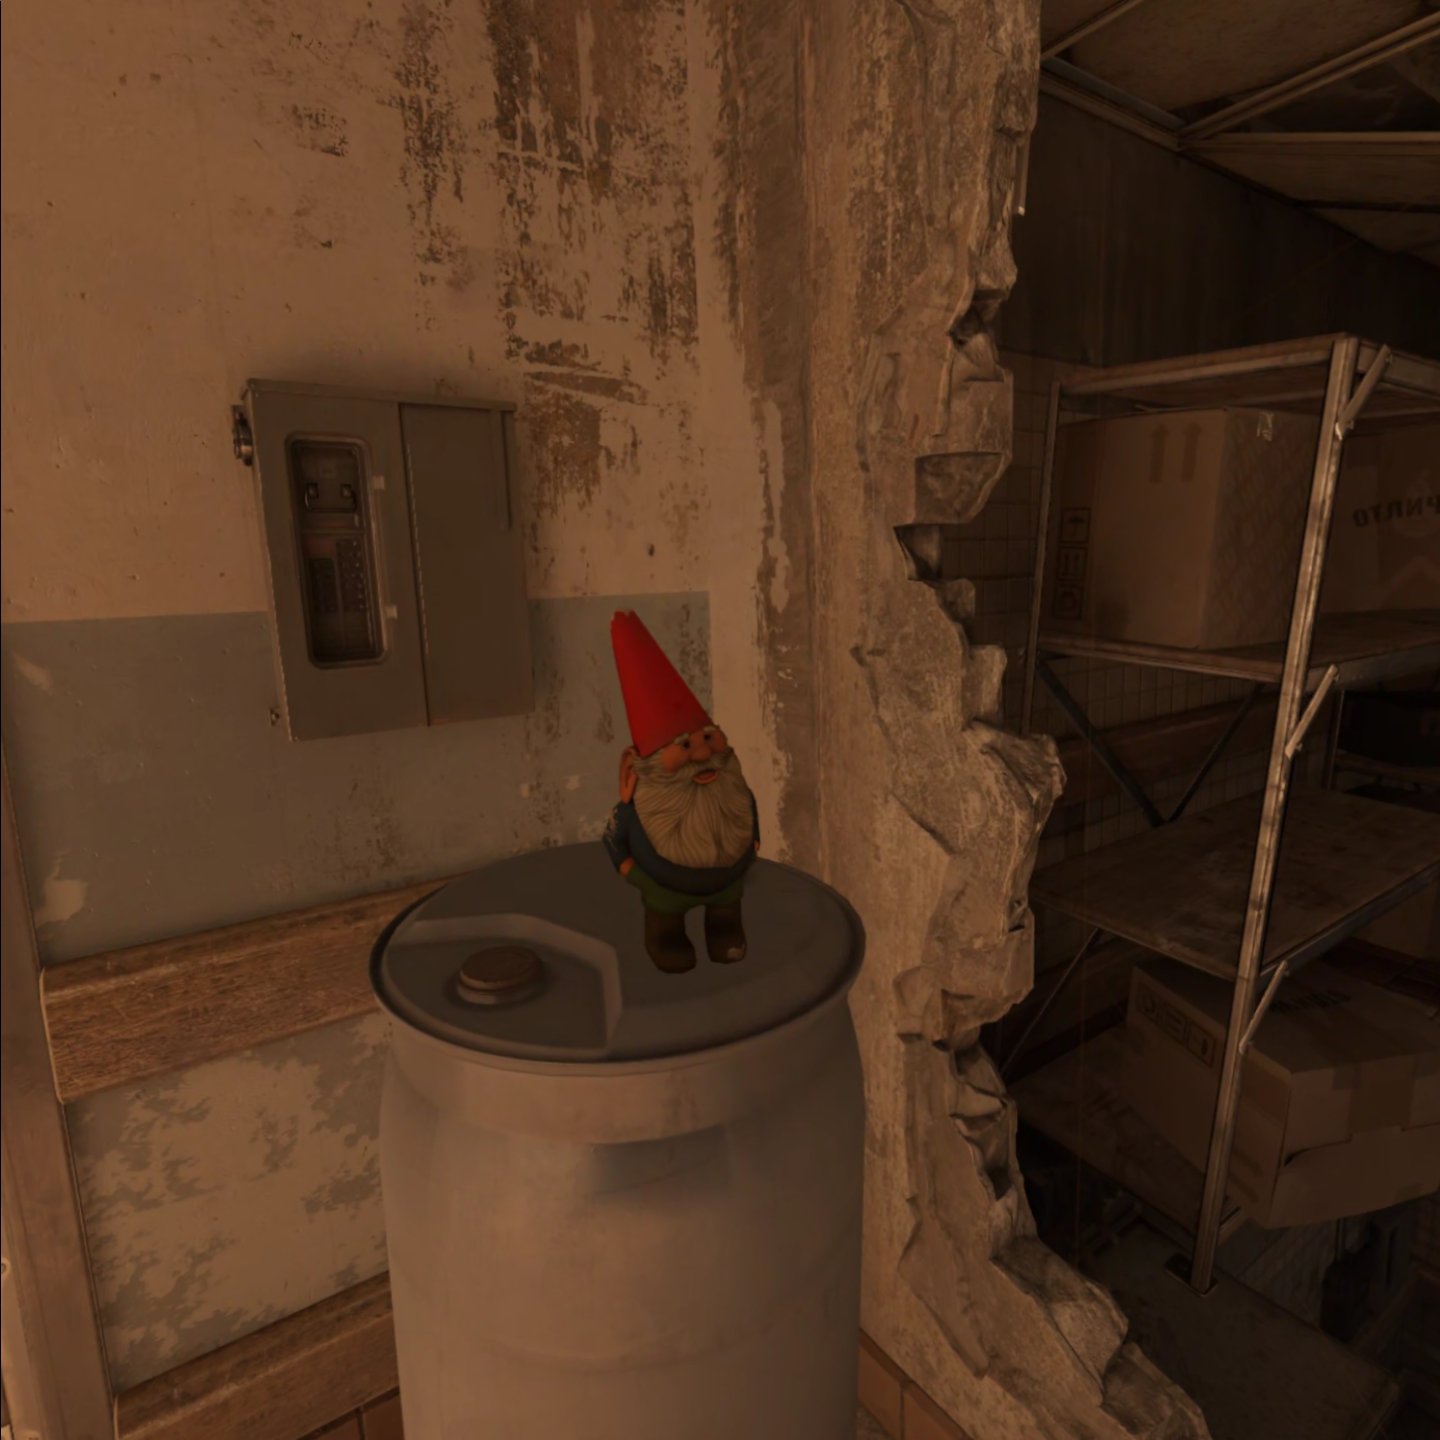
The Oculus Quest will take the screenshot of what is being displayed in your HMD, where as SteamVR seems to take a screenshot of what is being displayed on your computer monitor. Here an example, where I tried to take the same screenshot of Chompski (the garden gnome, seen in Half Life and other Valve games).
A few notes:
- SteamVR seems to be using your screen resolution.
My laptop display was set to 1920×1080, so I assume that if your screen has a higher resolution, your screenshot will as well.
- The resulting PNG in SteamVR is probably related to enabling “uncompressed pictures” for screenshots in Steam settings.
- To retrieve an Oculus Quest screenshot: See this description at Oculus.
Short version: Connect you Quest to your PC with a USB cable, and it will appear in explorer like a regular camera would.
Unless you have your Quest in Developer Mode (required for ALVR), in that case I use SideQuest to find the screenshots in the “Oculus” directory.
- Where the Quest image seems better when it comes to what you see, the SteamVR screenshot will be of a higher quality and easier to retrieve on your PC.
- The SteamVR option obviously only works for SteamVR Games and not for native Oculus Quest games.
Oculus Quest Result
This screenshot was taken using the Left Trigger and Oculus button method on the Oculus Quest.
Format: JPEG
Resolution: 1,440 x 1,440 (the image here has been proportionally scaled down to accommodate the website)

Oculus Quest – Chompski Screenshot
SteamVR Result
The following screenshot was done with the SteamVR screenshot functionality:
Format: PNG
Resolution: 1,920 x 1,080 (the image here has also been proportionally scaled down)
SteamVR – Chompski Screenshot


Comments
There are 11 comments. You can read them below.
You can post your own comments by using the form below, or reply to existing comments by using the "Reply" button.
Seriously?? “Quick screenshot” in SteamVR exists since the first released version! Just press the trigger+”system button” on your VR controller…
BillKills974
Thanks for this tip – I’m always open to learning new things, however “System Button and Right Trigger” does not work with Oculus Quest.
I assume you’re using a different HMD?
Note: the “system button” on Oculus Quest, already has a specific Oculus functions assigned.
Just to make sure, I did test it just now with either “System” buttons (left vs right controller) and on the Quest “System Button and Right Trigger” does not work. It jumps straight to the Oculus menu. I’ve tried all 4 combinations, none of them work on the Quest.
Point well taken though; I’ll emphasize “Quest” a little better.
Hans
I did some more test, but no matter what I try (on a Quest!), the standard SteamVR method does not work on the Quest.
(suggestions are always welcome, especially if you know a better method)
I did modify the title and text to emphasize Quest a little more and added you tip.
Thanks!
Hans
I do not own a Quest so I can’t confirm, but apparently you can try this: hold down the Oculus button on the right Touch controller and press either trigger. It seems that it does a screenshot using an Oculus function, so I don’t know if SteamVR will pick it.
BillKills974
Oculus does have a “shortcut” to take a screenshot. However, after pressing the Oculus button, you’ll have to select “take screenshot” from the dashboard, and then and only then it will take a screenshot (based on what the Quest sees – which results in a portrait type screenshot).
The screenshot done through SteamVR, if the standard method would work for Oculus, would take a more landscape like screenshot (higher resolution as well). So this is why I was looking for a working function for the Quest.
I do appreciate your feedback though, it made it pretty clear to me that I did not emphasize “Quest” enough and the article seemed to “generic”.
I hope you like the changes I have made.
Hans
I know this is an old thread now, but i wanted to thank you for the clear instructions that i did for my Quest 2 and it worked as charm, i appreciate your hard effort hope for you and who reads a great life
Khalid Alotaibi
Hi Khalid!
Thank you for taking the time to post a thank-you note!
It is much appreciated! Have fun with the Quest 2 (I know I have fun with it)
Hans
SteamVR default screenshot shortcut (Left Menu + Trigger) works flawlessly on Quest 2 over Virtual Desktop. It has notification delay of a few seconds but the actual screenshot is taken at the time of shortcut press.
Screenshotter
Thanks for the heads up!
You’re very right about that and it works very well indeed – it may even work with Link or AirLink!
Also note that when taking a screenshot when running Virtual Desktop, you can check the option to save the screenshot right away on your PC’s desktop.
Quest and Virtual Desktop have come a long way in the past 18 months – thank goodness
One small side note though:
Left Menu + Trigger is used for the Quest taking the screenshot and not SteamVR – you’ll notice a difference in aspect ratio and resolution.
Hans
so this way you can map geforce instant replay key to oculus touch controller i guess
akira
Worth a try for sure.
I’m not sure if this is relevant though: the screenshot shortcut is a Steam specific shortcut.
I have never used the NVidia Instant Replay function, but it probably is a function of the NVidia software. I’m not sure Steam(VR) will pass that key combo to the NVidia software.
Again: worth a try!
Hans