Overview
Root Access or Elevated Privileges
Before you start reading; get something to drink and some food – it’s a lot to read … 
Note: SMJobBless has been deprecated
Although still available and working in macOS Tahoe, SMJobBless has been deprecated and a similar, but simpler, approach has been made available for macOS 13 and newer through SMAppServive.
Why do we need Elevated Privileges?
So the story started with me trying to read and write to disks directly (backup and restore of an entire disk), the proper way, for use in ApplePi-Baker.
When I started with the first versions (1.x) of ApplePi-Baker, I used command-line tools to access the drives if you’d use “sudo”. It was just a toy and convenience for myself. But after more than half a million downloads and several updates, I wanted more. The old version felt a little half assed, and was more like a frontend, even though it worked well and was actually quite fast.
One of the biggest downside of using command-line tools, besides having to enter the sudo password over and over again, is that Apple keeps changing the output of these tools – making it hard to parse the results and yet remain compatible with other MacOS versions. But there are other downsides, like stability and usability.
To get full access to disks one needs to have admin (root/sudo) rights, which is something Apple will not allow from regular applications (with a GUI). No matter what you try, it won’t work. The only exception is by starting the binary of your app bundle from Terminal using sudo. Which obviously is not an option for the average user, and most certainly has no place in a graphical user environment.
Modern Approach: Main Application and Privileged Helper Tool
Apple’s concept to protect the user (and his or her system) is done by separating the main application from the task that needs elevated privileges.
For this the developer has to separate the regular functions, that do not require elevated privileges, from the functions that do require elevated privileges, and a method on how these 2 can communicate.
This does make sense. After all, not every function in your application needs admin rights (or: elevated privileges). Just a very few functions actually need this. In my case, the application only needs elevated privileges when it directly reads or writes a disk device (/dev/diskx). Conceptually this seems a good approach; why have elevated privileges for all the other functions in your application? Doing that would expose the system and its users to more risks than needed.
So … the regular functions remain in the main application. Functions like user feedback, handling the user interface, etc.
The function(s) that require elevated privileges, which are more dangerous, and are to be placed separately in a so called “Helper tool“. This Helper Tools is in essence a tiny separate application geared towards a very specific tasks. Since the Helper Tool will run in a protected area, it will be much less likely that malicious software will abuse your program’s access rights (in theory anyway).
You do not need to limit yourself to just one Helper Tool – it is allowed to have multiple if needed, even though rarely needed.
To illustrate the concept of Main Application and Helper Tool, see the diagram below.
The top image represents an old school straightforward application that holds all the functions, including the ones that require root access rights.
The image below that represents the same application, however the functions that require root access reside in a separate application – the Helper tool – which “lives” in a [more] protected environment. I have drawn this as a “protected space”, which is governed by launchd.

Traditional vs Modern Application Approach
In the new scenario, with the Helper Tool;
When your main application starts, everything will work as usual with the functions that are part of the main application.
However when your application wants to execute a task that requires elevated privileges, the task will be handed off to the helper tool – carefully watched by launchd. This will be transparent to the end-user and sometimes even results in slightly better performance. After all, the main application could be running on one processor core, whereas the Helper Tool could be running on another core – spreading the workload potentially over 2 cores instead of only 1 core.
Main application and Helper Tool communicate through messages. If implemented correctly, launchd will automatically start the Helper Tool as soon as the Main Application starts “talking” to the Helper tool.
Warning: The Helper Tool is supposed to be a small, task oriented “application”. Per the rules of Apple, it cannot have a user interface, and threads seem not allowed as well (or it could be that the Lazarus/FPC implementation conflicts with this). So … do not even try to use TApplication, TCustomApplication, or TThread. The Helper Tool will be rejected by launchd and/or crash at runtime.
Communication between Main Application and Helper Tool
Based on what we just learned; communication between Main Application and the Helper Tool with elevated privileges, is done through messages. But not just any messages – as you can imagine, a certain level of security is needed. Because of this we can only use a handful of different kind of “messages”.
NSXPCConnection vs CFMessagePort
Typically, with Objective-C and Swift, the XPC mechanism is recommend and used as the method for IPC (Inter-Process Communication). For this, commonly, the function NSXPCConnection is being used in the Apple world. The NSXPCConnection seems a wonderful thing, since it allows all kinds of seemingly really cool stuff. However, there is a problem with this puppy. There are no bindings to be found (yet) for Lazarus Pascal, and I have not been able to create a binding myself (most likely due to the heavy Objective-C features that are being used).
I did however find an alternative for this, even though it’s a little more limited.
In a great article, written by NSHipster, I did find that we can use so called Mach Ports through CFMessages (CFMessagePort) as well.
Again: I am NOT and expert on any of this, but did get it to work anyway. I’m sure there is a more elegant way to do this though.
Chatting back and forth
To be able to communicate between Main Application and Helper Tool, the Helper Tool needs to be registered, installed, and at runtime create a communication port.
This is partially done through a special launchd plist file, which registers the mach port with launchd and defines what applications, under what conditions, are allowed to “talk” to the Helper Tool. These conditions include for example that the Main Application needs to have a certain name (CFBundleIdentifier) and needs to meet certain signing criteria.
The second part, in the Helper Tool, is to actually open such a port. For this we use the function CFMessagePortCreateLocal (more details later).
From the Main Application’s perspective we need to define which of the Helper Tool(s) can be started with Elevated Privileges by the application. This is done in the application’s Info.plist. Here again we define criteria for allowing to setup a connection. This time we define the criteria the Helper Tool needs to meet. This includes the name of the Helper Tool and again some signing criteria.
Once this is in place, we will need to “open” the port to Helper Tool in the Main Application, for which we will use “CFMessagePortCreateRemote“.
Communicatie now works … if the Helper tool has been installed and blessed by the end user (SMJobBless – in the beginning I just kept reading “SM Jobless, eg. unemployed hahah).
None of this will work however, if we did not have the Helper Tool installed to begin with.
By default your Helper Tool must be placed in your application bundle in the Contents/Library/LaunchServices directory.
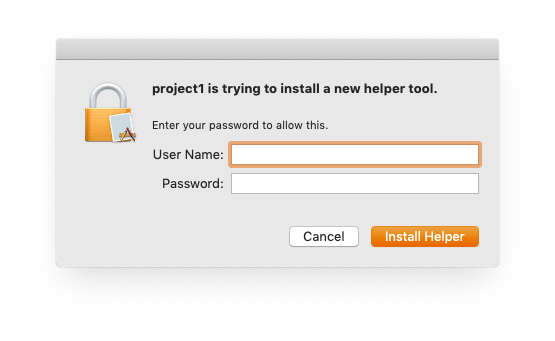
Installation of the Helper Tool is done with SMJobBless, which in turn requires authentication (permission) by the end user, done with AuthorizationCreate.
SMJobBless will ask launchd to “install” your Helper tool in /Library/PrivilegedHelperTools/.
After installation, the end-user will not need to give permission again to start the Helper Tool.
SMJobBless will overwrite an already installed Helper Tool if you run it again – effectively “updating” the existing Helper Tool in /Library/PrivilegedHelperTools/. Naturally, the end user will need to give permission again.
Application Start
The basic flow that I follow in my application:
At Main Application start we ask the Helper Tool for it’s version number:
If we received an answer and the correct version number: we’re good to go!
If there is no answer Execute the “Install Helper Tool Process” (installs Helper Tool)
If the answer is the wrong version Execute the “Install Helper Tool Process” (Updates Helper Tool)
The “Install Helper Tool Process” …
Ask the user for permission (create an Authorization)
Ask launchd to install our Helper Tool (through SMJobBless)
Ad Blocking Detected Please consider disabling your ad blocker for our website.
We rely on these ads to be able to run our website.
You can of course support us in other ways (see Support Us on the left).
Structure and Requirements
Before we start coding anything, there is a lot of work to be done before we can get started, and we need to get a better idea how this construct is put together.
Some of the following steps explain on how things work, others provide steps and examples on what to do.
App bundle structure
The Helper Tool(s) for your application actually come with the app bundle of your application. Distribution wise, this makes sense.
However, launchd will NOT start it from there – it will only copy it from there when you tell it to install the Helper Tool.
Let’s take a look at the structure of an .app bundle – it helped me a lot to have a visual, when trying to figure all of this out.
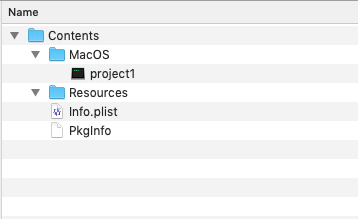
With a regular application, without any helper tool(s), the basic structure of an application, looks something like this – the content of the so called app-bundle (in our case project1.app):
App Bundle Structure
The binary/executable of our main application is stored in /Contents/MacOS (here called “project1”).
When having Helper Tool(s) with your application, these Helper Tools are stored in Contents/Library/LaunchServices (here called “com.tweaking4all.SMJobBlessHelper”) which could look like this:
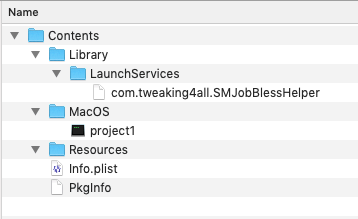
App Bundle Structure with Helper Tool
As I said before, launchd will not run the Helper Tool straight from your app bundle.
As mentioned before; we need to install the Helper Tool first. Usually done at first application run or first run after an application update.
By default, these Helper Tools are stored in /Library/PrivilegedHelperTools/ – a location that requires admin/root access to work with. So how do we install the Helper Tool? Well, “we” actually don’t.
Instead we use SMJobBless, a function call that asks launchd to install your Helper tool for you.
Successful install by launchd only ocurs when the requirements have been met (proper signing and plist files).
Your application will have to ask the end-user for permission though and we do that with the function AuthorizationCreate, which typically looks something like this:
Asking for Permission – Install Helper Tool
Permission is only needed at installation of the Helper Tool. Future use of the already installed Helper Tool will not require user authorization again.
Keep this in mind: As you develop a Helper Tool, you may get several versions, so at each start you’d want to check the version of your Helper Tool.
As explained later on; you can actually ask your Helper Tool for it version. If it doesn’t match, simply install the one you do need. Launchd will overwrite the existing one for you.
If all went well, launchd will copy your Helper Tool to /Library/PrivilegedHelperTools/.
You will notice that you cannot execute the Helper Tool on it’s own. It’s not even recognized as an executable.
Now this all sounds pretty simple and straightforward right?
Well … let me tell you  … this probably took me the most time to figure out.
Some Lazarus Pascal tips before we can get started
In this paragraph, I’ll point out some things you’ll need to go through, or be aware of, before you can start coding.
First of all; This is how I work on my Lazarus project – how you do it, is of course totally up to you.
- I have a main project directory in which I develop the main application (here called “project1”).
- In the main project directory I have a separate Helper Tool project sub-directory, which is also a project on its own (I named the directory “Helper” and the Helper Tool “com.tweaking4all.SMJobBlessHelper”).
- I created an .app bundle for the main application for testing purposes (debugging is a pain!), which holds the actual compiled binaries. Keep in mind that Lazarus Pascal creates by default a bundle in which it links to the actual binary that is not in the app bundle. This will not work, hence storing the actual binaries in the bundle.
- I use a simple script to prepare the bundle for testing, see the code below – feel free to ignore it, or improve on it (suggestions welcome) …
Right now; It should be executed from the project directory. It copies the compiled binaries, strips these binaries, signs the Helper Tool and finally signs the .app bundle.
1
2
3
4
5
6
7
| cp Helper/com.tweaking4all.SMJobBlessHelper project1.app/Contents/Library/LaunchServices/
strip project1 project1.app/Contents/Library/LaunchServices/com.tweaking4all.SMJobBlessHelper
codesign --force --sign "Developer ID Application: John Doe (XXXXXXXXXX)" project1.app/Contents/Library/LaunchServices/com.tweaking4all.SMJobBlessHelper
cp project1 project1.app/Contents/MacOS/
strip project1.app/Contents/MacOS/project1
codesign --force --sign "Developer ID Application: John Doe (XXXXXXXXXX)" project1.app |
- When signing your application: I always add it to the project1 test bundle, sign the copied Helper Tool, and finally sign the complete app bundle (see the mentioned simple script).
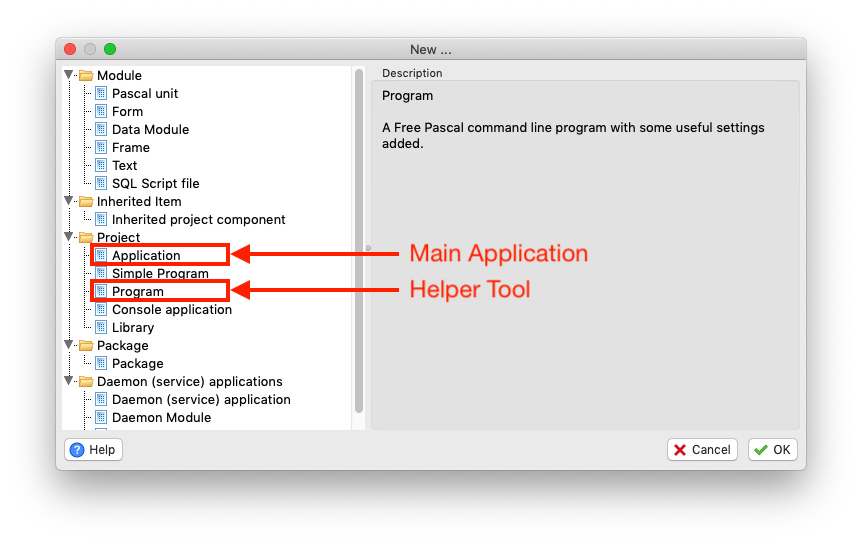
- Your Helper project has to be a “Program” (“File” “New” “Project” “Program“) or “Simple Program”.
A regular Applications (with Forms and such), the console application, daemons, or TCustomAppplication will not to work and just keeps crashing.
- Your Main Application project can be any kind of project – like any other application you’d create in Lazarus Pascal.
Start projects in Lazarus
- Running and Debugging from the Lazarus IDE is pretty much not possible …
Since Main Application and Helper Tool must be signed and the Helper Tool does not run on its own.
This is why I always ended up just using “Build” for the Main Application and the Helper Tool, run the script, and start project1.app.
- In the Helper directory, I have one shared unit which basically holds a function and a version constant, used by Main application and Helper Tool.The constant is the version string for the required Helper Tool version, and is used in the main application and the Helper tool. So this way the Helper tool and Application have the same constant available – you’ll find out that this can be quite useful while developing.Each time I change something in the Helper Tool, I recompile the main application and the Helper tool (use “Build”).To have the main application access this shared unit, add the directory “Helper” to the paths of the project options of the Main Application project (“Project” “Project Options” “Compiler Options” “Paths” “Other Unit Files (-Fu)” enter “Helper” without the double quotes). After adding the path, you can add the shared unit to the uses clause of your Main Application.The shared unit I use, looks something like this – maybe it’s useful for you as well (adapt to your needs).Note that the CFStrToAnsiStr was nicked from macpgmr.github.io by Phil Hess, and converts a CFStringRef to a Pascal AnsiString. You’ll need it! Phil: thanks for making your units public! Awesome!
1
2
3
4
5
6
7
8
9
10
11
12
13
14
15
16
17
18
19
20
21
22
23
24
25
26
27
28
29
30
31
32
33
34
35
36
37
38
39
40
41
42
43
44
45
46
47
| unit SharedFunctions;
{$mode objfpc}{$H+}
interface
Uses MacOSAll;
const HelperVersion = 'VERSION 0.0';
function CFStrToAnsiStr(cfStr: CFStringRef; encoding: CFStringEncoding = kCFStringEncodingWindowsLatin1): AnsiString;
implementation
{ Convert CFStringRef to a Pascal AnsiString }
function CFStrToAnsiStr(cfStr: CFStringRef; encoding: CFStringEncoding = kCFStringEncodingWindowsLatin1): AnsiString;
var
StrPtr : Pointer;
StrRange : CFRange;
StrSize : CFIndex;
begin
if cfStr = nil then
begin
Result := '';
Exit;
end;
{First try the optimized function}
StrPtr := CFStringGetCStringPtr(cfStr, encoding);
if StrPtr <> nil then {Succeeded?}
Result := PChar(StrPtr)
else {Nope - Use slower approach}
begin
StrRange.location := 0;
StrRange.length := CFStringGetLength(cfStr);
{Determine how long resulting string will be}
CFStringGetBytes(cfStr, StrRange, encoding, Ord('?'), False, nil, 0, StrSize);
SetLength(Result, StrSize); {Expand string to needed length}
if StrSize > 0 then {Convert string?}
CFStringGetBytes(cfStr, StrRange, encoding, Ord('?'), False, @Result[1], StrSize, StrSize);
end;
end;
end. |
Get an Apple Developer Account – Main Application and Helper Tool must be Signed
The Main Application and Helper Tool both need to be signed with a valid Apple developer certificate, otherwise none of this will work. Therefor, you will need to sign up as an Apple Developer. No worries – this used to $99/year, but Apple has become more flexible and if you do not need to submit your application to the AppStore, you can get one for free.
Note: I have not tried this yet, but it may be that applications that use elevated privileges may be rejected from the AppStore. Anyone having experience with this – please share!
Your signature typically looks something like this: “Developer ID Application: John Doe (XXXXXXXXXX)” (where XXXXXXXXXX is your developer ID, a combination of numbers and letters).
I know I sound like a broken record, but here it is again:
I did a lot of experiments with the Helper Tool and found that the best way to get started with it, is by creating a “program” or “simple program”.
Do NOT use Console Application, applications based on TApplication or TCustomApplication, Daemons/Services, and TThreads. Your Helper Tool will crash – it appears launchd is pretty picky about it. This will obviously come with some design challenges, more about that later.
Per Apple SMJobBless documentation (some I have mentioned already);
In order to use this function the following requirements must be met:
- The calling application and target executable tool must both be signed.
- The calling application’s Info.plist must include a “SMPrivilegedExecutables” dictionary of strings. Each string is a textual representation of a code signing requirement used to determine whether the application owns the privileged tool once installed (i.e. in order for subsequent versions to update the installed version).
Each key of SMPrivilegedExecutables is a reverse-DNS label for the helper tool (must be globally unique).
- The helper tool must have an embedded Info.plist containing an “SMAuthorizedClients” array of strings. Each string is a textual representation of a code signing requirement describing a client which is allowed to add and remove the tool.
- The helper tool must have an embedded launchd plist. The only required key in this plist is the Label key. When the launchd plist is extracted and written to disk, the key for ProgramArguments will be set to an array of 1 element pointing to a standard location. You cannot specify your own program arguments, so do not rely on custom command line arguments being passed to your tool. Pass any parameters via IPC.
- The helper tool must reside in the Contents/Library/LaunchServices directory inside the application bundle, and its name must be its launchd job label. So if your launchd job label is “com.apple.Mail.helper”, this must be the name of the tool in your application bundle.
So the Helper Tool needs to be signed, but before we can do this, you first will need 2 plist files (Yes two!) and these need to be linked into the binary for the Helper Tool (!). So let’s start with the plist files.
One plist file is comparable to the info.plist file as seen with any regular application.
The second plist file is made specifically for launchd.
In my project directory I store these two with plists directly in the Helper tool directory (project1/Helper).
These plist do not ship with your final product, but you will need them in your project directory as they will be linked into the Helper Tool.
Step 1 – Creating the Info.plist
In the first plist file, we define the BundleIdentifier (use your own, with a reverse DNS notation, something like com.yourcompany.yourapplication) and a few other things of which the most important one, is the SMAuthorizedClients property.
Let’s look at an example.
1
2
3
4
5
6
7
8
9
10
11
12
13
14
15
16
17
18
| <?xml version="1.0" encoding="UTF-8"?>
<!DOCTYPE plist PUBLIC "-//Apple//DTD PLIST 1.0//EN" "http://www.apple.com/DTDs/PropertyList-1.0.dtd">
<plist version="1.0">
<dict>
<key>CFBundleIdentifier</key>
<string>com.tweaking4all.SMJobBlessHelper</string>
<key>CFBundleInfoDictionaryVersion</key>
<string>6.0</string>
<key>CFBundleName</key>
<string>SMJobBlessHelper</string>
<key>CFBundleVersion</key>
<string>3</string>
<key>SMAuthorizedClients</key>
<array>
<string>identifier "com.tweaking4all.SMJobBlessApp" and anchor apple generic and certificate 1[field.1.2.840.113635.100.6.2.6] /* exists */ and certificate leaf[field.1.2.840.113635.100.6.1.13] /* exists */ and certificate leaf[subject.OU] = XXXXXXXXXX</string>
</array>
</dict>
</plist> |
All these properties should look familiar if you’ve create MacOS applications before, with the exception of SMAuthorizedClients.
Take good note of the CFBundleIdentifier of the Helper Tool – you will need it later for the main application.
The SMAuthorizedClients property basically tells launchd which clients (applications) are allowed to “talk” to the Helper Tool. Typically this would be one application, but there is no reason to limit to just one application.
In this example we see that only the signed Bundle “com.tweaking4all.SMJobBlessApp” is allowed to talk to the Helper Tool, if and only if that application is signed by the developer with ID XXXXXXXXXX and some funky conditions are met.
If this is your first run at this; simple copy the text and replace XXXXXXXXXX with your developer ID and “com.tweaking4all.SMJobBlessApp” with the CFBundleIdentifier of your Main Application.
Believe me; I honestly did not make up these crazy codes and took them from several examples.
I did however try to figure out what they mean (more details can be found at Code Signing Requirement Language and my Funky Signing Code Details).
It basically says that the application that wants to talk to the helper must have the bundle identifier “com.tweaking4all.SMJobBlessApp”, has to be signed with a legit Developer ID of a legit Certificate Authority, of the MacOS Developer kind, by the developer with ID XXXXXXXXXX.
Step 2 – Creating the Launchd plist
We need an additional plist for launchd, where we see some less common properties.
1
2
3
4
5
6
7
8
9
10
11
12
13
14
15
16
17
18
19
20
21
22
23
| <?xml version="1.0" encoding="UTF-8"?>
<!DOCTYPE plist PUBLIC "-//Apple//DTD PLIST 1.0//EN" "http://www.apple.com/DTDs/PropertyList-1.0.dtd">
<plist version="1.0">
<dict>
<key>Label</key>
<string>com.tweaking4all.SMJobBlessHelper</string>
<key>ProgramArguments</key>
<array>
<string>This seems required per documentation</string>
</array>
<key>RunAtLoad</key>
<true/>
<key>MachServices</key>
<dict>
<key>com.tweaking4all.SMJobBlessHelper</key>
<true/>
</dict>
<key>StandardOutPath</key>
<string>/var/log/t4a.stdout</string>
<key>StandardErrorPath</key>
<string>/var/log/t4a.stderr</string>
</dict>
</plist> |
Property: Label – This property works kind-a like a CFBundleIdentifier – use the bundle identifier of your Helper Tool.
Property: ProgramArguments – This property is a little weird, the documentation says you need to use it, but I have no purpose for it with a Helper Tool so I just typed some random stuff there.
Property: RunAtLoad – By setting this property to TRUE, launchd will run the Helper Tool at start. I think this may be set to FALSE, since I assume it means: start it at MacOS start?
Property: MachServices – Here we declare a communication port with a specific key (in this case I used the CFBundleIdentifier of the Helper Tool).
Optional properties: StandardOutPath and StandardErrorPath
These two are very helpful while debugging your Helper Tool (a PITA on its own). Certain error messages and standard output can be found in these files, if defined.
You do not need to create the actual files, launchd will do this automatically.
You can find these files in Console as well, assuming you’ve used the same path I did, under “/var/log”.
I do recommend removing these when you’re done with debugging – the files never get cleaned up, unless you handle it yourself, and tend to grow over time.
Other Properties to not use or avoid:
Do not use: There used to be a OnDemand property, but that one is being ignored and no longer has a function.
Avoid using: There is a property called KeepAlive, but it’s recommends to avoid using this one. It (obviously) keeps your Helper Tool running for ever.
This one is a tricky one. It took me some effort to find out that this was even needed but to be honest can be found in the documentation of SMJobBless.
How to actually do it with Lazarus Pascal was yet another challenge.
With your Helper Tool project open in Lazarus Pascal, under the menu “Project” “Project Options” “Compilation and Linking” “Linking” you will have to check the option “Pass options to linker with “-k”, delimiter is space” and enter the following line;
-sectcreate __TEXT __info_plist Helper-Info.plist -sectcreate __TEXT __launchd_plist Helper-Launchd.plist
Where “Helper-Info.plist” is your regular (first one) Helper Tool info.plist file, and “Helper-Launchd.plist” is the Helper Tool launchd plist file – both residing in the directory of your Helper Tool project (eg. /project1/Helper/).
This will embed both plists at the end of the binary in the sections __TEXT,__info_plist and __TEXT, __launchd_plist.
You can verify the embedded text in Terminal (where Helper is the binary of your helper tool):
$ launchctl plist __TEXT,__launchd_plist Helper

$ launchctl plist __TEXT,__info_plist Helper
An example of my own project (where XXXXXXXXXX = my developer ID):
1
2
3
4
5
6
7
8
9
10
11
12
13
14
15
16
17
18
19
20
21
22
23
24
| $ launchctl plist __TEXT,__launchd_plist com.tweaking4all.SMJobBlessHelper
{
"StandardOutPath" = "/var/log/t4a.stdout";
"StandardErrorPath" = "/var/log/t4a.stderr";
"MachServices" = {
"com.tweaking4all.SMJobBlessHelper" = true;
};
"RunAtLoad" = true;
"Label" = "com.tweaking4all.SMJobBlessHelper";
"ProgramArguments" = (
"This seems required per documentation";
);
};
$ launchctl plist __TEXT,__info_plist com.tweaking4all.SMJobBlessHelper
{
"CFBundleIdentifier" = "com.tweaking4all.SMJobBlessHelper";
"SMAuthorizedClients" = (
"identifier "com.tweaking4all.SMJobBlessApp" and anchor apple generic and certificate 1[field.1.2.840.113635.100.6.2.6] /* exists */ and certificate leaf[field.1.2.840.113635.100.6.1.13] /* exists */ and certificate leaf[subject.OU] = XXXXXXXXXX";
);
"CFBundleName" = "SMJobBlessHelper";
"CFBundleVersion" = "3";
"CFBundleInfoDictionaryVersion" = "6.0";
}; |
Signing your Helper Tool is as easy as signing a regular application (Apple: couldn’t you have done this a little easier?).
You’ve seen it already in my script example, but in case you skipped that, here ya go.
Please note that “HelperBinary” is the compiled Helper Tool, with the plist files linked into it (automatically done during a normal build if you followed the previous steps).
codesign --force --sign "Developer ID Application: John Doe (XXXXXXXXXX)" HelperBinary
Creating a plist and Signing the Main Application
The Helper Tool was the hardest one to start with, because of the wonderful lack of readable/complete documentation.
The Main application will be a little easier, but only just a little.
Step 1 – Creating the Info.plist file
For the main application we will need a plist file as well, just one this time.
This Info.plist file is almost the same as any other application’s plist file, again with an exception.
As you can see in the example below, the property “SMPrivilegedExecutables” is not your average one.
This property indicates which Helper Tools can be started from the application with elevated privileges.
As you may recall from the first plist for the Helper tool (using SMAuthorizedClients), this is kind-a the reverse of that one.
It basically says that (in this example) only the Helper Tool “com.tweaking4all.SMJobBlessHelper” can be used for Elevated Privileges, if signed etc (see the funky criteria in the first plist file we created for the Helper Tool).
Unlike the plist file for the Helper tool, this file is placed in the usual location of your app bundle (/Contents/Info.plist ).
1
2
3
4
5
6
7
8
9
10
11
12
13
14
15
16
17
18
19
20
21
22
23
24
25
26
27
28
29
| <?xml version="1.0" encoding="UTF-8"?>
<!DOCTYPE plist PUBLIC "-//Apple Computer//DTD PLIST 1.0//EN" "http://www.apple.com/DTDs/PropertyList-1.0.dtd">
<plist version="1.0">
<dict>
<key>CFBundleDevelopmentRegion</key>
<string>English</string>
<key>CFBundleExecutable</key>
<string>project1</string>
<key>CFBundleName</key>
<string>project1</string>
<key>CFBundleIdentifier</key>
<string>com.tweaking4all.SMJobBlessApp</string>
<key>CFBundleInfoDictionaryVersion</key>
<string>6.0</string>
<key>CFBundlePackageType</key>
<string>APPL</string>
<key>CFBundleSignature</key>
<string>proj</string>
<key>CFBundleShortVersionString</key>
<string>0.1</string>
<key>CFBundleVersion</key>
<string>1</string>
<key>SMPrivilegedExecutables</key>
<dict>
<key>com.tweaking4all.SMJobBlessHelper</key>
<string>identifier "com.tweaking4all.SMJobBlessHelper" and anchor apple generic and certificate 1[field.1.2.840.113635.100.6.2.6] /* exists */ and certificate leaf[field.1.2.840.113635.100.6.1.13] /* exists */ and certificate leaf[subject.OU] = XXXXXXXXXX</string>
</dict>
</dict>
</plist> |
Step 2 – Signing your Application Bundle
Signing your application bundle is as easy as signing a regular application.
Again: You’ve seen it already in my script example, but in case you skipped that, here ya go.
Please note that “project1.app” is the application bundle of your application, with the plist file in place (/Contents) and the actual binary copied into /Contents/MacOS (default Lazarus Pascal places a link to the binary here, which will NOT work, you WILL have to copy the actual compiled binary to the app bundle – my example script handles this for you).
codesign --force --sign "Developer ID Application: John Doe (XXXXXXXXXX)" project1.app
Verification of your Main Application and Helper Tool
After compiling, making the app bundle, signing etc. you may want to test your app bundle – just to make sure you didn’t goof up with the plists (the most common mistake), linking, or signing.
There is a Python script for this, called “SMJobBlessUtil.py” created by Apple, which can be found here.
Just for your convenience I’ve included them in the downloadable example bundle as well.
In the main application project directory, in Terminal, simply type (don’t forget to type the word “check” – I forget that about half the time):
SMJobBlessUtil.py check project1.app
If this comes back with no answer, then everything appears to be OK.
The most common problems I have encountered (and solved with this tool) are related to the details in the plist file, wrong signature, etc.
Make very sure things match and are correct when it comes to those things.
Tip: You may also see “Error Domain=CFErrorDomainLaunchd Code=X” issues in the console on an install attempt, then these are typically related to the same problem as well – some mistake in the plist files, mostly related to the SMPrivilegedExecutables and SMAuthorizedClients properties and their signing criteria (your developer ID and the funky conditions).
Coding Challenges
So now that we know what to do with the end product, time to look into some of the coding challenges ahead of us.
Before you start working on your Helper Tool, keep in mind that there are limitations in what you can and cannot do in your Helper Tool.
I’ll just say this again, and again, and I really can’t say it enough since I’ve spend DAYS tinkering with all of these with nothing but crashing Helper Tools:
The following will NOT work:
- Regular LCL applications, or any application with User Interface elements like Forms and such,
- Programs based on TCustomApplication or TApplication,
- Programs using TThread, or anything that seems to “open” a new thread for that matter (RunCommand and such),
- The standard Console Application
- Any of the Daemon (service) applications
To start a Helper tool project use either “program” or “simple program” template.
Even though you cannot use any of the widget sets, including units like CocoaAll or MacOSAll is perfectly legit (and even needed in some cases, just stay away from anything GUI related).
Debugging Tips
Since both “applications” need to be up and running, and signed (!) to even test if they work, you’ll find yourself compiling (I only use the “Build” option) both the Main Application and Helper Tool, over and over again, and debugging can be a pain since the regular debugger (GDB or LLDB) will be pretty much useless in this scenario.
Debugger information has almost no use, since you cannot run the Main Application or the Helper tool from the IDE. Unless you’re trying to run the Main Application without calling the Helper Tool of course.
This was the first thing I tested, was to see if my Helper Tool actually did get elevated privileges (which made me cheer – since it worked!).
The functions FpGetUID and FpGetUID (from BaseUnix unit) should both return zero if the Helper Tool is running as root.
In Pascal:
1
2
3
4
5
6
7
8
9
10
11
| ...
uses ... BaseUnix, CocoaAll ...;
...
var
tmpString:string;
...
begin
...
tmpString := 'UID='+IntToStr(FpGetUID)+' ,EUID='+IntToStr(FpGetUID)+' ,PID='+IntToStr(FpGetPID);
NSLog(NSSTR('SMJOBBLESS HELPER: %@'),NSSTR(PChar(tmpString)));
... |
NSLog is your friend or: Log Messages in the Console Application
Every MacOS version comes packed with a bunch of very useful tools.
Console (found under “Applications” “Utilities“) provides great use when debugging as it shows you log results almost realtime.
The question is of course: how the heck do I get messages in those logs?
This is where NSLog() comes in, a great function found in the CocoaAll unit.
A few examples from my own code:
1
2
3
4
5
6
| NSLog(NSSTR('MYAPP - A simple log message')); // We need to convert a Pascal string to a NSString (NS stands for Next Step, a predecessor of MacOS) in order to pass it to NSLog().
NSLog(NSSTR('MYAPP - Some Status: %d'),MyVariable); // Where "MyVariable" is an integer.
NSLog(NSSTR('MYAPP - Some Status: %ld'),MyVariable); // Where "MyVariable" is an Int64.
NSLog(NSSTR('MYAPP - A message: %@'),NSSTR(PChar(messagePascalString))); // Where messagePascalString is a regular Pascal string
NSLog(NSSTR('MYAPP - A messages: %@'),messageCFString); // Where messageCFString is a NSString, NSError or CFStringRef
NSLog(NSSTR('MYAPP - Some Messages: %@, %@, %@'),messageCFString1,messageCFString2,messageCFString3); // Where messageCFString1, 2 and 3 are a NSString, NSError or CFStringRef |
NSLog() is pretty flexible as you may find out -you can pass multiple parameters, and multiple formats – pretty neat!
To easier find your messages in console, I always start a message with the application name.
So for example start each message with “MYAPP MAIN – ” and “MYAPP HELPER – ” so you can distinguish where a message comes from and you can filter the messages in Console to show only the ones you need (set “search” to “MYAPP”).
Save Search Criteria: In console, just under the “search” box, you can see a “Save” button only when you have entered search criteria and actually pressed the ENTER key. This “Save” button allows you to save the search criteria, which will add them to the favorites just under the menu bar – easy for recalling your search at a later time.
I use compiler directives to easily toggle debug messages, with NSLog, on and off at compile time, to keep the application as small and fast as possible when building a release version;
...

{$DEFINE DEBUG}

...

{$IFDEF DEBUG} NSLog(NSSTR('some message')); {$ENDIF}

...
During development I can see a bunch of NSLog messages, but for production I only have to comment out the line that says “{$DEFINE DEBUG} ” to “// {$DEFINE DEBUG}” and the compiler will skip those NSLog lines. I have seen a better trick, which places “//” with compiler directives, but have not been able to find the example again. Suggestions are welcome.
Common Error messages in Console
I’m pretty sure there are plenty more examples, here a few I ran into while testing.
Launchd Error Codes
You may find these when you’re starting with your first Helper Tool tests.
It took me a while to find them, so again: I thought I’d like them here.
The errors appear in the Console typically in the “cferrordomainlaunchd code=X” format, and are triggered by the SMJobBless call.
Launchd Error Codes
| X |
Error |
| 2 |
kSMErrorInternalFailure |
| 3 |
kSMErrorInvalidSignature |
| 4 |
kSMErrorAuthorizationFailure |
| 5 |
kSMErrorToolNotValid |
| 6 |
kSMErrorJobNotFound |
| 7 |
kSMErrorServiceUnavailable |
| 8 |
kSMErrorJobPlistNotFound |
| 9 |
kSMErrorJobMustBeEnabled |
| 10 |
kSMErrorInvalidPlist |
A few situations I ran into:
kSMErrorInternalFailure (2) indicates a general issue, for example the helper tool plists are wrong, or the file name is incorrect, or the file is in the wrong location.
kSMErrorToolNotValid (5) indicates that the tool cannot be found at all (for example, the helper tool is not in project1.app/Contents/Library/LaunchServices/).
Service exited with abnormal code
This is another cute one. You’ll see them in the format like this: “Service exited with abnormal code XYZ” (217 seems favorite).
I have not been able to find any list of what these codes exactly mean, but in my experience it typically is caused by an Access Violation error.
I ran into those mostly when playing with alternatives like TCustomApplication, Daemons, or Threads, or while trying to allocate too much memory for my Helper Tool (the latter is probably fixable with the correct compiler settings).
It is good to look at the crash reports in console under “User Reports”, or the stderr file (if you assigned on in the launchd plist).
Use launchd plist’s “StandardOutPath” and “StandardErrorPath”
As you may recall, in the launchd plist of the Helper Tool, we can define StandardErrorPath and StandardErrorPath.
I have used them less than NSLog() but it is very helpful to find crashes and such.
Just keep in mind that there is no cleanup for these files.
You can remove them with sudo rm /var/log/<yourlogfile> , when starting the Helper Tool again, new empty log files will be created automatically.
I remove these properties from the launchd plist file when I make my application ready for distribution.
Crash Reports
The Console application logs crash reports under the section “User Reports”.
The content is not always that useful, but sometimes it’s good to see what happened, for example with a crash where nothing was logged in stderr.
Crash reports can be very detailed, but more than half the time I have no idea what to do with them  .
.
I’ve run into a few mishaps where the Helper tool simply would NOT stop and after killing the Helper tool, it would just keep restarting.
Just removing the Helper tool from /Library/PrivilegedHelperTools doesn’t work either, when it’s still in memory.
You’ll need to do both!
So this is how you can get rid of such a stubborn helper tool (probably not the recommended way to do this – but it works in case of an emergency):
1
2
3
4
5
| $ sudo rm /Library/PrivilegedHelperTools/com.tweaking4all.SMJobBlessHelper
$ ps -ax | grep tweaking
35617 ?? 0:00.03 /Library/PrivilegedHelperTools/com.tweaking4all.SMJobBlessHelper
35677 ttys000 0:00.00 grep tweaking
$ sudo kill -9 35617 |
The PID you have to choose is obviously the one that mentions your Helper tool with full path.
Check your launchd plist, and see if you didn’t by accident added the property “KeepAlive” (default this is set to FALSE, and Apple even recommends not using this property).
Keep in mind that launchd may keep restarting your Helper Tool if you did not implement a proper way to close the Helper tool (more about that later).
There are more methods and trick – feel free to post yours!
There are a few methods to determine if your Helper Tool is actively running – keep in mind that launchd starts your Helper Tool when needed and this may or may not have happened. So if you do not see your Helper Tool, then this may not mean anything bad.
You can check if the Helper tool is installed bij looking into the /Library/PrivilegedHelperTools/ directory. You should see the your Helper Tool there. But you cannot run it from there!
You can check if the Helper Tool is active with (just an example for my own Helper Tool):
1
2
3
| $ launchctl list | grep com.tweaking4all
25101 0 com.tweaking4all.SMJobBlessApp.34924 |
If this does not list your Helper Tool, then this only means that it’s not active at the moment – and it does not mean that it will not start when your Main Application needs it!
Note that the first number is the PID (process ID) and the second one the exit code.
In general if the exit code is 0 , then the Helper Tool successfully finished.
A positive exit code often indicates an error, and a negative number means it was terminated with a signal.
Alternatively you can use “ps -ax | grep <yourhelpertoolbundleidentifier> “.
There you’ll find something interesting since the process ID listed by launchctl is not the same as the process ID listed with “ps”.
The one shown by launchctl refers to the Mach port it seems, and the one listed with “ps” the actual executable (that’s my best guess anyway).
Ad Blocking Detected Please consider disabling your ad blocker for our website.
We rely on these ads to be able to run our website.
You can of course support us in other ways (see Support Us on the left).
Coding your Main Application and Helper Tool
Alrighty then – we know a lot more now, so it’s time to get started with coding the Main Application and the Helper Tool.
Theoretically you could develop the Helper Tool first and then the Main Application that actually uses the Helper Tool.
Since I had a lot to learn with this project, I actually developed both at the same time. Well, I should probably rephrase that: Instead of a Main Application, I actually wrote a simple “Test” Main Application. Kind off a dummy application, just to be able to test the Helper Tool.
Just to give you some sorts of visual, here a “flow” I’ve doodled with the function calls in it:

Privileged Helper Tool – Message Flow
About using Messages
Since we already know that Main Application and Helper Tool will communicate through short messages, it may be a good start to imgaine how this communicatie may work. Based on that you could define some sorts of “protocol” on how you expect Main Application and Privileged Helper Tool to communicate.
I’ll use a simple example here and will not go all the way into reading and writing disk devices.
This example is completely based on CFMessages – I could not get NSXPCConnection to work.
Define a Communicate Protocol
Communication works basically just one way: From Main Application to Helper Tool.
The Helper Tool can however send a “reply” back, one time, and one time only per message sent from Main Application to Helper Tool.
Just an example protocol:
Communication “protocol”
| Msg to Helper Tool |
Response from Helper Tool |
Action |
| GETVERSION |
VERSION x.y |
Returns the version of the Helper Tool |
| DOSOMETHING |
OK |
Returns “OK” and started its privileged task |
| STATUS |
<a number> |
Returns the status of a running task (-1 if idle) |
| ACTIVE |
YES or NO |
Returns if the Helper Tool is running a task |
| LASTERROR |
Some sort of error |
Returns the last error message of the Helper Tool |
| QUIT |
OK |
Returns “OK” and terminates the Helper Tool |
Keep in mind: This will be a simple protocol. There is no real even triggering as seen in regular Lazarus Applications (based on TApplication etc).
Sending the first message in a session will ask launchd to start the Helper Tool to start. If launchd did find the Helper Tool, it will be started and right away receive that first message.
The Helper Tool will remain running as of that point until you terminate it (hence the “QUIT” message) – it would be a waste of resources to keep an unused Helper Tool running in the background.
So in this example, if the Main Application sends a message “GETVERSION” to the Helper Tool, the Helper Tool can right away return reply “VERSION x.y”. Incase we get the wrong version, or no reply, then we know that we have to install the correct Helper Tool.
You should have the Helper Tool respond promptly, otherwise the message will time-out and your Main Application will not receive the reply.
Before proceeding, please make sure you did a proper definition of the launch plist file (in which we “register” the port, see “Step 2 – Creating the Launchd plist“).
Creating/Opening a port is pretty straight forward by calling CFMessagePortCreateLocal, and will look something like this:
1
2
3
4
5
6
7
8
9
10
11
12
13
14
15
16
17
18
19
20
21
22
23
24
25
26
27
28
29
30
31
32
33
34
35
36
37
38
39
40
41
42
43
| program com.tweaking4all.SMJobBlessHelper;
{$linkframework ServiceManagement}
{$linkframework Security}
{$linkframework Foundation}
{$linkframework CoreFoundation}
{$calling mwpascal}
// Comment out this line to stop showing debug messages in the console:
{$DEFINE DEBUG}
uses Classes, SysUtils {$IFDEF DEBUG}, CocoaAll {$ENDIF}, MacOSAll, BaseUnix;
function ReceiveMessage(local:CFMessagePortRef; msgid: SInt32; data: CFDataRef; info:Pointer): CFDataRef; mwpascal;
begin
...
end;
// ***** MAIN *****
var
tmpString:string;
receivingPort:CFMessagePortRef;
context: CFMessagePortContext;
shouldFreeInfo:boolean;
begin
{$IFDEF DEBUG}
tmpString := 'Started at '+TimeToStr(Now)+': UID='+IntToStr(FpGetUID)+' ,EUID='+IntToStr(FpGetEUID)+' ,PID='+IntToStr(FpGetPID);
NSLog(NSSTR('SMJOBBLESS HELPER: %@'),NSSTR(PChar(tmpString)));
{$ENDIF}
receivingPort := CFMessagePortCreateLocal(nil, CFSTR('com.tweaking4all.SMJobBlessHelper'), @ReceiveMessage, context, shouldFreeInfo);
{$IFDEF DEBUG}
if receivingPort=nil then
NSLog(NSSTR('SMJOBBLESS HELPER: FAILED CFMessagePortCreateLocal'))
else
NSLog(NSSTR('SMJOBBLESS HELPER: SUCCESS CFMessagePortCreateLocal'));
{$ENDIF}
...
CFRelease(receivingPort);
ExitCode:=0;
end. |
As you can see, it’s a straight forward Pascal program.
I’ve included some of the frameworks (maybe one or the other isn’t needed) and I’ve defined calling as “mwpascal” which is needed so your Pascal Helper Tool will chat back and forth properly with the MacOS API frameworks.
You’ll also see an empty function “ReceiveMessage”, which will be used as a so called “CallBack” function. More about this later.
And of course; a bunch of DEBUG code, which I highly recommend using when starting with a project like this, so you can see plenty messages in the Console application.
The function CFMessagePortCreateLocal (part of Core Foundation) is defined as such:
1
2
3
4
5
| // Obejctive-C
CFMessagePortRef CFMessagePortCreateLocal(CFAllocatorRef allocator, CFStringRef name, CFMessagePortCallBack callout, CFMessagePortContext *context, Boolean *shouldFreeInfo);
// Pascal - unit CFMessagePort
function CFMessagePortCreateLocal( allocator: CFAllocatorRef; name: CFStringRef; callout: CFMessagePortCallBack; var context: CFMessagePortContext; var shouldFreeInfo: Boolean ): CFMessagePortRef; external name '_CFMessagePortCreateLocal'; |
The “allocator” (a CFAllocatorRef) is used to allocate memory for the new connection object.
We pass the value “nil” so it will use the default allocator (kCFAllocatorDefault).
The “name” is the name we’d like to use to register the port with. I used the Bundle Identifier of the Helper Tool.
This has to be a CFStringRef (a pointer to a CFString), so we need to use the function CFSTR (unit MacOSAll) to convert a Pascal String.
“callout” is the address of the function in our Helper Tool, called by the external framework, when our message arrives at oru communication port.
Note that if the function returns “nil” something went wrong!
This callback function has to follow this format:
1
2
3
4
5
| // Objective-C
typedef CFDataRef (*CFMessagePortCallBack)(CFMessagePortRef local, SInt32 msgid, CFDataRef data, void *info);
// Pascal - unit CFMessagePort
CFMessagePortCallBack = function( local: CFMessagePortRef; msgid: SInt32; data: CFDataRef; info: UnivPtr ): CFDataRef; |
So in Pascal this will look like this:
function ReceiveMessage(local:CFMessagePortRef; msgid: SInt32; data: CFDataRef; info:Pointer): CFDataRef; mwpascal;
The parameter “context” will return contextual information of the messageport, so it needs to be a variable of type CFMessagePortContext. I have not used it (yet).
And finally “shouldFreeInfo” returns a flag (boolean) that tells you if “context” should be freed or not. You can set this to nil, however this has to go through a variable.
Awesome that we have a port now … but we cannot test it, without an application talking to it.
Even worse, without the Main Application, we cannot even install the Helper Tool – why am I getting the chicken and the egg feeling here? 
Main Application – Install the Helper Tool
For my Main Application, I created a regular Lazarus Pascal Application, with Forms etc. The works.
I decided to add some buttons, so I can go through each step in a controlled fashion (see also the downloadable example).
Now to be able to chat with the Helper Tool, we will need to have launchd install our Helper Tool.
In my example code, you’ll see the button “Initialize”, which will first try to open a port and ask the Helper Tool for it’s version information.
Naturally this one will fail, since we have not installed the Helper tool yet, but at least we will see how to open a communication port.
1
2
3
4
5
6
7
8
9
10
11
12
13
14
15
16
17
18
19
20
21
22
23
24
| ...
const
helperLabel = 'com.tweaking4all.SMJobBlessHelper';
...
var
messageID: SInt32;
timeout:CFTimeInterval;
HelperPort:CFMessagePortRef;
errorString:string;
answerString:CFStringRef;
begin
...
{ Create a communication port }
HelperPort := CFMessagePortCreateRemote(nil, CFSTR(helperLabel));
{ Check if port opened - if not; try to re-install the Helper Tool }
if (HelperPort=nil) and not(installHelperTool) then
begin
{$IFDEF DEBUG} NSLog(NSSTR('SMJOBBLESS APP: Failed to Install and/or Connect to Helper Tool')); {$ENDIF}
Result:=false;
exit;
end;
...
end; |
To open the port, to the Helper Tool, we need to use CFMessagePortCreateRemote which is defined as:
1
2
3
4
5
| // Objective-C
CFMessagePortRef CFMessagePortCreateRemote(CFAllocatorRef allocator, CFStringRef name);
// Pascal - unit CFMessagePort
function CFMessagePortCreateRemote( allocator: CFAllocatorRef; name: CFStringRef ): CFMessagePortRef; external name '_CFMessagePortCreateRemote'; |
As seen with the Helper Tool, we need an allocator (where nil will make it use the default allocator: kCFAllocatorDefault), and the name of the port. The name should be the name of the port on the Helper Tool!
Right now of course, this function will do nothing useful – more on this function when we actually start sending a message.
If the port however, doesn’t open, we already know our Helper tool is missing, so we can proceed to Step 2: installing the Helper Tool.
If this function returns “nil“, the port could not be created for some reason.
In the next step, since we never ran this application and installed the Helper Tool, is to install the Helper Tool. For this purpose I’ve created a separate function that does just that: Install the Helper Tool with SMJobBless.
Installing a Helper Tool requires proper plist files, a compiled Helper Tool with the 2 plists linked into it, and both applications need to be signed! Without meeting these condition, this will guaranteed NOT work.
1
2
3
4
5
6
7
8
9
10
11
12
13
14
15
16
17
18
19
20
21
22
23
24
25
26
27
28
29
30
31
32
33
34
35
36
37
38
39
40
41
42
43
44
45
46
47
48
49
50
51
52
53
54
55
56
57
58
59
60
61
62
63
64
65
66
67
68
69
70
71
72
| const
kSMRightBlessPrivilegedHelper = 'com.apple.ServiceManagement.blesshelper';
helperLabel = 'com.tweaking4all.SMJobBlessHelper';
...
function SMJobBless(domain:CFStringRef; executableLabel:CFStringRef; auth:AuthorizationRef; outError:CFErrorRef): boolean; external name '_SMJobBless'; mwpascal;
var kSMDomainSystemLaunchd: CFStringRef; external name '_kSMDomainSystemLaunchd';
...
function TForm1.installHelperTool:boolean;
var
status:OSStatus;
authItem: AuthorizationItem;
authRights: AuthorizationRights;
authFlags: AuthorizationFlags;
authRef: AuthorizationRef;
error:NSError;
AuthenticationCount:integer;
begin
Result := False;
{ Get proper Authentication }
authItem.flags := 0;
authItem.name := kSMRightBlessPrivilegedHelper;
authItem.value := nil;
authItem.valueLength:= 0;
authRights.count := 1;
authRights.items := @authItem;
authFlags := kAuthorizationFlagDefaults or kAuthorizationFlagInteractionAllowed or kAuthorizationFlagPreAuthorize or kAuthorizationFlagExtendRights;
authRef := nil;
error := nil;
AuthenticationCount:=0;
{ Get authentication to install helper }
status := AuthorizationCreate(@authRights, kAuthorizationEmptyEnvironment, authFlags, authRef);
if status<>errAuthorizationSuccess then
begin
{$IFDEF DEBUG} NSLog(NSSTR('SMJOBBLESS APP: Authentication Failed (Error %d)'),AuthenticationCount, status); {$ENDIF}
Result := false;
Exit;
end;
{ Attempt Helper Tool install if authentication succeeds }
if status=errAuthorizationSuccess then
begin
{$IFDEF DEBUG} NSLog(NSSTR('SMJOBBLESS APP: Trying to install Helper tool')); {$ENDIF}
{ SMJobBless - Try to actually installl privileged helper tool - overwrites any existing version automatically }
Result := SMJobBless(kSMDomainSystemLaunchd,CFSTR(helperLabel),authRef,@error);
if Result then
begin
{$IFDEF DEBUG} NSLog(NSSTR('SMJOBBLESS APP: Helper Tool Installed')); {$ENDIF}
end
else
begin
{$IFDEF DEBUG} NSLog(NSSTR('SMJOBBLESS APP: Helper Install Failed (Error: %@)'),error); {$ENDIF}
end;
end
else
begin
{$IFDEF DEBUG} NSLog(NSSTR('SMJOBBLESS APP: Authentication Failed (Status: %d)'),status); {$ENDIF}
end;
AuthorizationFree(authRef,0);
end; |
A lot going here, and I’ll try to briefly point out a few things of the code here.
Step 2A – Request Authorization
Before we can install a Helper Tool with Elevated Privileges (root access), we will need to ask the end-user for permission to actually install such a Helper Tool.
To do this we use AuthorizationCreate, which takes a bunch of parameters which define what type of Helper Tool this will be and what it can or cannot do once it is installed.
The AuthorizationCreate function is defined as below and returns a status:
1
2
3
4
5
| // Objective-C
OSStatus AuthorizationCreate(const AuthorizationRights *rights, const AuthorizationEnvironment *environment, AuthorizationFlags flags, AuthorizationRef _Nullable *authorization);
// Pascal - unit Authorization
function AuthorizationCreate( rights: AuthorizationRightsPtr; environment: AuthorizationEnvironmentPtr; flags: AuthorizationFlags; var authorization: AuthorizationRef ): OSStatus; external name '_AuthorizationCreate'; |
The parameter “rights” allows us to define what rights we’d like to use in your wehn running our Helper Tool (once it is installed). This can be nil, if none are needed right away, or we pass what we really need. In this case we created one critical right “kSMRightBlessPrivilegedHelper” – after all, we wanted Elevated Privileges. These rights (authRights) are basically an array of rights. In our case we need only one rights-item (authItem), which has to be placed in the array.
Since the current bindings that come with Lazarus Pascal does not have kSMRightBlessPrivilegedHelper defined, I needed to add this one manually with:
const kSMRightBlessPrivilegedHelper = 'com.apple.ServiceManagement.blesshelper';
The next parameter “environment” can be set to “kAuthorizationEmptyEnvironment”, which basically means that we start from scratch with an empty authorization environment. With “environment” we can do things like passing an icon, prompt text, and even username and password (see also AuthorizationItemSet).
Notes concerning the “environment” parameter;
- These do not seem to be used in OS X v10.2 and earlier,
- In macOS 10.3 and later, you can pass an icon or prompt data to be used in the authentication dialog box.
- In macOS 10.4 and later, you can also pass a username and password in order to authorize a user without user interaction. (see AuthorizationTags.h).
The AuthorizationItemSet is also an array of items, where each item has a “value” and a “valueLenght”. If a tekst is passed to “value” then obviously “valueLenght” reflects the data length of “Value”.
AuthorizationTags.h
| Key |
Defined as |
Value |
| kAuthorizationEnvironmentUsername |
“username” |
Username of the user (10.4+) |
| kAuthorizationEnvironmentPassword |
“password” |
Password of the user (10.4+) |
| kAuthorizationEnvironmentShared |
“shared” |
N/A |
| kAuthorizationRightExecute |
“system.privilege.admin” |
Full path to tool you wish to execute |
| kAuthorizationEnvironmentPrompt |
“prompt” |
Tekst for the authorization dialog |
| kAuthorizationEnvironmentIcon |
“icon” |
Full path to an image suitabel for NSImage |
Note that I have not used these yet, but they sure sound inviting to play with in the near future.
The parameter “flags” helps us specify some authorization options, and are combined with the OR statement.
AuthorizationFlags
| Flag |
Purpose |
| kAuthorizationFlagDefaults |
Place holder when you do not want any flags to be used |
| kAuthorizationFlagInteractionAllowed |
Permits user interaction as needed |
| kAuthorizationFlagExtendRights |
Permits the Security Server to attempt to grant the rights requested |
| kAuthorizationFlagPartialRights |
Permits the Security Server to grant rights on an individual basis |
| kAuthorizationFlagDestroyRights |
Instructs the Security Server to revoke authorization |
| kAuthorizationFlagPreAuthorize |
Instructs the Security Server to preauthorize the rights requested |
| kAuthorizationFlagNoData |
Private flag. Do not use |
As you can see in the code, I’ve used kAuthorizationFlagDefaults, kAuthorizationFlagInteractionAllowed, kAuthorizationFlagPreAuthorize and kAuthorizationFlagExtendRights. To be honest; based on following some examples.
The last parameter, “authorization“, is a reference to an authorization which we need to pass to SMJobBless.
Only if this function returns value “errAuthorizationSuccess” all went well, and the end-user gave permisson to proceed — In all other cases something went wrong.
Now that we have permission from the end-user, time to put SMJobBless to work and have it install our Helper Tool.
Unfortunately, the current bindings that come with Lazarus Pascal does not include a binding for “SMJobBless“, so I had to add this one manually as well (it is part of the Service Management framework). The same goes for the variable “kSMDomainSystemLaunchd“.
SmJobBless is defined as such:
1
2
3
4
5
6
7
8
9
10
| // Objective-C
Boolean SMJobBless(CFStringRef domain, CFStringRef executableLabel, AuthorizationRef auth, CFErrorRef *outError);
const CFStringRef kSMDomainSystemLaunchd;
// and in Pascal this becomes:
function SMJobBless(domain:CFStringRef; executableLabel:CFStringRef; auth:AuthorizationRef; outError:CFErrorRef): boolean; external name '_SMJobBless'; mwpascal;
var kSMDomainSystemLaunchd: CFStringRef; external name '_kSMDomainSystemLaunchd'; |
On successful install of the Helper tool, this function will return TRUE. In all other cases FALSE, in which case you need to look at the error return value.
The “domain” parameter, at the moment anyway, is a silly one. Only kSMDomainSystemLaunchd is supported.
The parameter “executableLabel” has to match the label we’ve using in the launchd plist file for the Helper Tool
The label of the privileged executable to install. This label must be one of the keys found in the SMPrivilegedExecutables dictionary in the application’s Info.plist.
The authorization reference “auth” is what we just created AuthorizationCreate and must contain the kSMRightBlessPrivilegedHelper right.
“outError” is a return value describing an error, if an error occurred – note that NSLog spits out the correct text if you use it there.
Main Application – Send a Message and Receive a Reply
Now that we can install the Helper Tool, and have a Helper tool that can receive a message, time to actually send a message.
The basic steps are:
- Open a communication port
- Send a message request
I’ve glued that all together in a function – you may recognize some of it from the “opening a part” code;
1
2
3
4
5
6
7
8
9
10
11
12
13
14
15
16
17
18
19
20
21
22
23
24
25
26
27
28
29
30
31
32
33
34
35
36
37
38
39
40
41
42
43
44
45
46
47
48
49
50
51
52
53
54
55
56
57
58
59
60
61
| function TForm1.SendMessage(aMessage:string):string;
var
data, returndata:CFDataRef;
messageString:string;
messageID: SInt32;
status:SInt32;
timeout:CFTimeInterval;
HelperPort:CFMessagePortRef;
answerCFString:CFStringRef;
begin
timeout := 1; // 2 second timeout
messageID := 0; // arbitrary
Result:='';
{ Create a communication port }
HelperPort := CFMessagePortCreateRemote(nil, CFSTR(helperLabel));
{ Check if port opened - if not; try to re-install the Helper Tool }
if (HelperPort=nil) then
begin
{$IFDEF DEBUG} NSLog(NSSTR('SMJOBBLESS APP: Failed to Connect to Helper Tool')); {$ENDIF}
Result:='';
exit;
end;
{ Verify Helper Tool version - in case of needed update }
{$IFDEF DEBUG} NSLog(NSSTR('SMJOBBLESS APP: Sending Message = %@'),CFSTR(PChar(aMessage))); {$ENDIF}
messageString := aMessage;
data := CFStringCreateExternalRepresentation(nil,CFSTR(PChar(messageString)),kCFStringEncodingUTF8,0);
status := CFMessagePortSendRequest(HelperPort,
messageID,
data,
timeout,
timeout,
kCFRunLoopDefaultMode,
@returndata);
{ Message sent? - Yes: Check version and reinstall if needed }
if status = kCFMessagePortSuccess then
begin
if returndata=nil then
{$IFDEF DEBUG}
NSLog(NSSTR('SMJOBBLESS APP: Reply Received (SendMessage - empty)'))
{$ELSE}
//
{$ENDIF}
else if returndata<>nil then
begin
{ Copy Answer }
answerCFString := CFStringCreateFromExternalRepresentation(nil,returndata,kCFStringEncodingUTF8);
Result := CFStrToAnsiStr(answerCFString);
{$IFDEF DEBUG} NSLog(NSSTR('SMJOBBLESS APP: Reply received: %@'),answerCFString); {$ENDIF}
CFrelease(answerCFString);
end;
end;
if HelperPort<>nil then CFRelease(HelperPort);
end; |
To send a message, 2 functions are needed: CFMessagePortSendRequest and CFStringCreateExternalRepresentation.
The latter I only use to copy the data locally – just in case the object disappears.
CFMessagePortSendRequest is defined as such:
1
2
3
4
5
| // Objective-C
SInt32 CFMessagePortSendRequest(CFMessagePortRef remote, SInt32 msgid, CFDataRef data, CFTimeInterval sendTimeout, CFTimeInterval rcvTimeout, CFStringRef replyMode, CFDataRef *returnData);
// Pascal - Unit CFMessagePort
function CFMessagePortSendRequest( remote: CFMessagePortRef; msgid: SInt32; data: CFDataRef; sendTimeout: CFTimeInterval; rcvTimeout: CFTimeInterval; replyMode: CFStringRef; returnData: CFDataRefPtr ): SInt32; external name '_CFMessagePortSendRequest'; |
Again a list of parameters …. keep in mind that this is a “request”, so pay attention to the return value.
The parameter “remote” is the port we just opened with CFMessagePortCreateRemote.
“msgid” is an arbitrary integer value that you can send with the message, which may be useful for tracking messages.
The “data” parameter contains the actual text message that we’d like to send.
With the “sendTimeout” parameter, we can indicate how long we’re willing to wait for the request to be actually granted (and the message is being send).
The “rcvTimeout” parameter indicates how long we are willing to wait for a reply.
The parameter “replyMode” is a tricky beats as it depends on how we deal with the receiving end in the Helper Tool. If the message is a one way (so no response is expected), then replyMode should be nil (in a variable!). If replyMode is non-nil, the function runs the run loop waiting for a reply, in the defined mode. replyMode can be any string name of a run loop mode, but it should be one with input sources installed.
My advise: Use the kCFRunLoopDefaultMode constant unless you have a very specific reason to use a different mode.
Finally we have “returnData” which holds the reply message.
The return value (SInt32) is one of these values:
CFMessagePortSendRequest Error Codes
| Value |
Error |
| kCFMessagePortSuccess |
The message was successfully sent, a reply was received if a reply was expected |
| kCFMessagePortSendTimeout |
The message failed – send timeout |
| kCFMessagePortReceiveTimeout |
The message was successfully sent, but no reply was received before timeout |
| kCFMessagePortIsInvalid |
The message failed – message port is invalid |
| kCFMessagePortTransportError |
The message failed – an error occurred |
| kCFMessagePortBecameInvalidError |
The message failed – message port was invalidated in the meanwhile |
Since I wrote this as a function, returning the reply message as a regular Pascal string, we can basically do something like this:
if Sendmessage('GETVERSION')<>'VERSION 1.0" then ...
You can probably already test this, but you will not get a useful answer yet.
In order to send a proper reply, we will need to do some processing of the incoming messages. So far that “function” was empty.
Here a simple example of what this function could look like with our communication protocol in mind:
1
2
3
4
5
6
7
8
9
10
11
12
13
14
15
16
17
18
19
20
21
22
23
24
25
26
27
28
29
30
31
32
33
34
35
36
37
38
39
40
41
42
43
44
45
46
| function ReceiveMessage(local:CFMessagePortRef; msgid: SInt32; data: CFDataRef; info:Pointer): CFDataRef; mwpascal;
var
messageString:CFStringRef;
messagePascalStr:string;
returnString:string;
returnData:CFDataRef;
begin
messageString:=CFStringCreateFromExternalRepresentation(nil,data,kCFStringEncodingUTF8);
{$IFDEF DEBUG} NSLog(NSSTR('SMJOBBLESS HELPER: Received Message = %@'),messageString); {$ENDIF}
messagePascalStr:=CFStrToAnsiStr(messageString);
if messagePascalStr='GETVERSION' then
begin
{$IFDEF DEBUG} NSLog(NSSTR('SMJOBBLESS HELPER: CMD - GET VERSION')); {$ENDIF}
returnString := 'VERSION 1.0';
end
else if messagePascalStr='ACTIVE' then
begin
{$IFDEF DEBUG} NSLog(NSSTR('SMJOBBLESS HELPER: CMD - CHECK IF ACTIVE')); {$ENDIF}
returnString := 'NO';
end
else if messagePascalStr='DOSOMETHING' then
begin
{$IFDEF DEBUG} NSLog(NSSTR('SMJOBBLESS HELPER: CMD - DO SOMETHING')); {$ENDIF}
returnString := 'Something complicated just Started';
end
else if messagePascalStr='LASTERROR' then
begin
{$IFDEF DEBUG} NSLog(NSSTR('SMJOBBLESS HELPER: CMD - GET LAST ERROR')); {$ENDIF}
returnString := 'We had no errors - all good!';
end
else if messagePascalStr='QUIT' then
begin
{$IFDEF DEBUG} NSLog(NSSTR('SMJOBBLESS HELPER: CMD - QUIT HELPER')); {$ENDIF}
returnString := 'OK';
//TerminateHelper:=true;
end
else
begin
{$IFDEF DEBUG} NSLog(NSSTR('SMJOBBLESS HELPER: CMD - UNKNOWN')); {$ENDIF}
returnString := 'UNKNOWN COMMAND';
end;
returndata := CFStringCreateExternalRepresentation(nil,CFSTR(PChar(returnString)),kCFStringEncodingUTF8,0);
Result := returnData;
end; |
I’m sure this is easy to follow, and the example project that you can download will most certainly get you started with some example messages.
This is where my head had to do a little reset in the way I was thinking about Lazarus Pascal programs, and you’ll see soon why.
Not Getting Stuck in a Loop
In order to keep receiving messages in the Helper Tool, we will need to use some sorts of loop. After all, the luxury of event driven applications is kind-a gone for this one since we’re working with a simple program, without the availability of TApplication and threads.
Let me start by showing the receiving loop in the Helper tool;
1
2
3
4
5
6
7
8
9
10
11
12
13
14
15
16
17
18
19
20
21
22
23
24
25
26
27
28
29
30
31
32
33
34
35
36
37
38
39
40
41
42
43
44
45
46
47
48
49
50
51
52
| var
tmpString:string;
receivingPort:CFMessagePortRef;
receivingRunLoop:CFRunLoopSourceRef;
context: CFMessagePortContext;
shouldFreeInfo:boolean;
reason:SInt32;
begin
{$IFDEF DEBUG}
tmpString := 'Started at '+TimeToStr(Now)+': UID='+IntToStr(FpGetUID)+' ,EUID='+IntToStr(FpGetEUID)+' ,PID='+IntToStr(FpGetPID);
NSLog(NSSTR('SMJOBBLESS HELPER: %@'),NSSTR(PChar(tmpString)));
{$ENDIF}
TerminateHelper := false;
receivingPort:=CFMessagePortCreateLocal(nil,CFSTR('com.tweaking4all.SMJobBlessHelper'),@ReceiveMessage,context,shouldFreeInfo);
{$IFDEF DEBUG}
if receivingPort=nil then
NSLog(NSSTR('SMJOBBLESS HELPER: FAILED CFMessagePortCreateLocal'))
else
NSLog(NSSTR('SMJOBBLESS HELPER: SUCCESS CFMessagePortCreateLocal'));
{$ENDIF}
receivingRunLoop:= CFMessagePortCreateRunLoopSource(nil, receivingPort, 0);
{$IFDEF DEBUG}
if receivingRunLoop=nil then
NSLog(NSSTR('SMJOBBLESS HELPER: FAILED CFMessagePortCreateRunLoopSource'))
else
NSLog(NSSTR('SMJOBBLESS HELPER: SUCCESS CFMessagePortCreateRunLoopSource'));
NSLog(NSSTR('SMJOBBLESS HELPER: Executing CFRunLoopAddSource'));
{$ENDIF}
CFRunLoopAddSource(CFRunLoopGetCurrent(), receivingRunLoop, kCFRunLoopDefaultMode{kCFRunLoopCommonModes});
//if CloningProcessRunning then
CloningClosefiles; // Clears all variables and file handles
{$IFDEF DEBUG} NSLog(NSSTR('SMJOBBLESS HELPER: Executing CFRunLoopRunInMode')); {$ENDIF}
repeat
reason := CFRunLoopRunInMode(kCFRunLoopDefaultMode, 0.1, false);
// do your thing here
until (reason<>kCFRunLoopRunTimedOut) or TerminateHelper;
{$IFDEF DEBUG} NSLog(NSSTR('SMJOBBLESS HELPER: BEYOND CFRunLoopRun (Terminating)')); {$ENDIF}
CFRelease(receivingPort);
ExitCode:=0;
end. |
The procedure I’ve described before, to creating a communication port, was easy.
Call CFMessagePortCreateLocal with the right parameters and the port exists.
But that’s about it. You’ll find that none of the messages will actually arrive, since the applications exits real quick. After all, we have no mechanism to keep the Helper tool running, so it can receive messages.
To prevent the application from exiting, we need to use a loop that keeps going indefinitely, or at least until we tell it to stop.
Basically we create a CFRunLoop (CFMessagePortCreateRunLoopSource), and register an “observer” (CFRunLoopAddSource), which watches for our messages outside of our Helper Tool. By default CFRunLoop is used for this, by calling CFRunLoopRun, a function of Core Foundation, which provides a loop function. The downside is that CFRunLoopRun runs a loop in our current thread. With that comes a big problem as it “locks” our single thread application.
After some playing around, I did find that we can make our own “loop” with CFRunLoopRunInMode like so:
1
2
3
4
| repeat
reason := CFRunLoopRunInMode(kCFRunLoopDefaultMode, 0.1, false);
// do your thing here
until (reason<>kCFRunLoopRunTimedOut) or TerminateHelper; |
Do not forget that we cannot wait too long in sending a reply to our Main Application, so the “do your thing here” part has to be build carefully so the individuel steps in that part are short enough so we can receive and answer messages.
Just a quick highlight on the functions I’ve used for this;
CFMessagePortCreateRunLoopSource will create a RunLoop Source Object for us.
1
2
3
4
5
| // Objective-C
CFRunLoopSourceRef CFMessagePortCreateRunLoopSource(CFAllocatorRef allocator, CFMessagePortRef local, CFIndex order);
// Pascal - unit CFMessagePort
function CFMessagePortCreateRunLoopSource( allocator: CFAllocatorRef; local: CFMessagePortRef; order: CFIndex ): CFRunLoopSourceRef; external name '_CFMessagePortCreateRunLoopSource'; |
CFRunLoopAddSource adds a CFRunLoopSource object for the RunLoop.
The parameter “rl” (the “RunLoop”) can be retrieved with the function CFRunLoopGetCurrent for our Helper Tool.
The next parameter “source” is the result of the previously called CFMessagePortCreateRunLoopSource.
Finally, the “mode” parameter defines in what mode the RunLoop will run, and here we choose “kCFRunLoopDefaultMode“.
1
2
3
4
5
| // Objective-C
void CFRunLoopAddSource(CFRunLoopRef rl, CFRunLoopSourceRef source, CFRunLoopMode mode);
// Pascal - Unit CFRunLoop
procedure CFRunLoopAddSource( rl: CFRunLoopRef; source: CFRunLoopSourceRef; mode: CFStringRef ); external name '_CFRunLoopAddSource'; |
CFRunLoopRunInMode runs the RunLoop until there is a reason to jump out of the loop, and returns the reason what this reason was.
We use the parameters “mode” (kCFRunLoopDefaultMode), a very short interval (0.1 seconds), and I choose not to return when the source has been handled. I’ll have to do an experiment to see what happens if I set that last parameters to “true” – it may speed up things with more time critical tasks.
There are 4 possible return values; kCFRunLoopRunFinished (RunLoop finished), kCFRunLoopRunHandledSource (a specific source was processed), kCFRunLoopRunStopped (CFRunLoopStop was called), and kCFRunLoopRunTimedOut (timeout).
That last one will be our criteria to exit our own loop.
1
2
3
4
5
| // Objective-C
CFRunLoopRunResult CFRunLoopRunInMode(CFRunLoopMode mode, CFTimeInterval seconds, Boolean returnAfterSourceHandled);
// Pascal - unit CFRunLoop
function CFRunLoopRunInMode( mode: CFStringRef; seconds: CFTimeInterval; returnAfterSourceHandled: Boolean ): SInt32; external name '_CFRunLoopRunInMode'; |
Processing Steps in your Loop
Let’s look back to the original reason why I started tinkering with this: copying an entire disk.
Obviously such a process will take several minutes, which is too long for the application to wait for. Not to mention that our application cannot do anything (eg. respond to messages!) while it’s running this heavy duty task.
Keep in mind: A timely response is needed otherwise we’d miss out on messages, which means that each “step” should be relatively short/quick. After all, the Main Application wants to keep taps on the copying process, and would like to see if the Helper Tool is still available and alive.
So in my situation, I’ve set a global variable that tracks where I am in my process, splitting up the entire process in smaller steps, allowing the Helper Tool to receive messages and respond to messages in between.
In my example, the “normal” process would be:
- Open the disk device
- Open the backup file
- Read a block from the drive
- Write that block to the file
- Repeat 3 and 4 until we reach the end of the drive
- Close backup file
- Close disk device
And of course, we want a progress report in between …
So this already provides us with the “chunks” we want to process in each step of our loop.
In my Helper tool, based on the value of a global variable (“Status”), I’d execute one of these steps in the “repeat … until” loop.
An example of our loop:
- Status = -1 by default: We are waiting for a command (the “DOSOMETHING” option in the communication protocol).
- Once we receive the “DOSOMETHING” message to get started, we set Status = 0.
- If we get a status request message: return the value of “Status”.
- If Status = 0 in the repeat-loop, just open the disk and the file (global variable in the Helper Tool for the file handles) and set Status = 1.
- If Status>0 in the repeat loop, Read ONE block and write ONE block and increase the value of Status with the number of bytes we have read.
- If during reading/writing of blocks, we have reached the end of the disk: Close disk and file, and set status back to -1.
Note: I found that I could read easily 4 blocks of 16Mb in one cycle – further testing will have to reveal if this is working OK for slower systems, and if different block sizes will improve performance. Again; suggestions and ideas are most welcome.
Up to you of course how you’d like to design and implement this for your project, this is just an idea and I’m sure there may be smarter ways to do it.
Sometimes an uninstall is desired and with that we’d always like to clean up and remove ALL related files.
One of those files would be the Helpertool and these are removed as such.
First we need to unload the helpertool from launchd, and this is done based on the plist file you’ll find in the “/Library/LaunchDaemons/” directory.
Once unloaded we can delete the actual helper tool from “/Library/PrivilegedHelperTools/”.
So let’s say our helper tool is called “com.foo.bar” and its plist is called “com.foo.bar.plist” then this is how you remove the helpertool:
1
2
| sudo launchctl unload /Library/LaunchDaemons/com.foo.bar.plist
sudo rm /Library/PrivilegedHelperTools/com.foo.bar |
Download my Example Project
I’ve included an example project and you’ll have to compile and sign them yourself. Read the following instructions carefully!
I’ve made the code available on GitHub as well: macOS-SMJobBless-Lazarus-Pascal
Download - Lazarus Pascal MacOS SMJobBless Example
A few notes before you get started with the Example Project
I’ve created and tested this with Lazarus 2.1.0 r60620M FPC 3.0.4 x86_64-darwin-cocoa (alpha) (from SVN), under MacOS 10.14.3.
Both Helper Tool and Main Application will have to be compiled as 64 bit applications (which it will if you use the included project files).
To test the Example project, you must have a valid Apple Developer ID for signing the Main Application AND the Helper Tool.
In these files, replace “XXXXXXXXXX” with your Developer ID:
SMJobBlessTest/project1.app/Contents/Info.plist
SMJobBlessTest/Helper/SMJobBlessHelper-Info.plist
In SMJobBlessTest/prepareproject1.sh replace “John Doe (XXXXXXXXXX)” with your Developer name and ID.
To test the application, follow these steps:
- Open the com.tweaking4all.SMJobBlessHelper.lpi project in Lazarus and compile it with “Build” (NOT “run”!).
- Open the project1.lpi in Lazarus and compile it with “Build” (NOT “run”!).
- In Terminal, go to the “SMJobBlessTest” directory and run the “./prepareproject.sh” script.
This script will copy the binaries, strip them, and sign them.
- In Terminal you can optionally verify the app bundle (project1.app) with “./SMJobBlessUtil.py check project1.app“.
Errors often point to typo’s in the plist files and/or signing issues – do not forget to double check the prepareproject.sh script.
- Open Console (Applications/Utilities) and set the search filter to “SMJOBBLESS” – so you can see the NSLog messages from the Main Application and the Helper Tool.
- Double click project1.app in the “SMJobBlessTest” directory.
You’ll see a few buttons, and this is what they are supposed to do:
– “Initialize” is the first one to use, as it will install the Helper Tool
– “Start Complicated” will start the “main task” which as an example keeps putting timestamps in the log
– “Is Active?”” will show if the “main task” is active or not
– “Abort Complicated” will stop “main task”
– “Last Error” will just show a dummy message
– “Get Version” will show the current Helper Version
– “Quit Helper” will terminate the Helper tool
Clean up when done playing:
Remove Helper Tool in Terminal with:
$ sudo rm /Library/PrivilegedHelperTools/com.tweaking4all.SMJobBlessHelper
Kill a running Helper Tool in Terminal with (in case things go South):
1
2
| $ ps -ax | grep com.tweaking4all
$ sudo kill -9 <PID></strong> |
Where <PID> is the PID from the “ps” line that had the full Helper name in it (com.tweaking4all.SMJobBlessHelper).
I hope this is useful to someone … suggestions, comments and ideas are most welcome.
Ad Blocking Detected Please consider disabling your ad blocker for our website.
We rely on these ads to be able to run our website.
You can of course support us in other ways (see Support Us on the left).
Funky Signing Code Details
Since I did the all effort to try and decode the funky codes used when signing the Helper Tool and the Main Application, I figured I’d post it here in case it’s of use to anyone. In my case I just wanted to make sure that such a code makes sense and was applicable for what I was trying to accomplish.
So based on the list below: 1.2.840.113635.100.6.2.6 means:
1 = iso,
    .2 = member-only,
        .840 = us,
            .113635 = Apple,
                .100 = Apple Security,
                    .6 = Apple Certificate Extensions,
                        .2 = intermediate marker,
                            .6 = Developer ID CA
Based on this list:
1 iso
    .2 member-only
        .840 us
            .113635 Apple OID
                .100 apple Data Security
                    .1 apple Trust Policy
                    .2 apple Security Algorithm
                    .3 apple Dot Mac Certificate
                    .4 apple Extended Key Usage
                        .2 iChat Signing
                        .3 iChat Encryption
                        .4 System Identity
                        .8 Safari Extensions
                        .9 3rd Party Mac Dev Installer
                        .11 Mac Provisioning Profile
                        .12 CSR signing
                        .13 Developer ID Installer
                        .14 Passbook signing
                        .15 Website Push Notification
                        .16 Profile Signing
                        .17 QA Profile Signing
                    .5 apple Certificate Policies
                        .1 Apple Signing
                        .2 .Mac
                        .3 Apple Dev Connection
                        .6.1 Mac App Store Receipt
                        .7.1 AppleID Sharing
                        .12 Mobile Store
                    .6 apple Certificate Extensions
                        .1 Code Signing
                            .2 iOS Software Dev Signing
                            .4 iOS Software Submission Signing
                            .5 Safari Extensions
                            .7 Software Submission Signing
                            .8 Mac Installer Packages
                            .9 Mac App Store App
                            .10 Mac App Store Installer Package
                            .11 Mac App Store Receipt Signing
                            .12 Software Development Signing
                            .13 Developer ID Applications
                            .14 Developer ID installers
                            .16 Apple Pay/Passbook
                            .17 Website Push Notification
                            .18 Developer ID Kexts
                            .21 OS X Server Authentication
                            .25 TestFlight Distribution (25.1, 25.2)
                            .26 Enhanced Passbook Certificates
                            .32 Apple Pay Merchant Services
                            .46 Apple Pay Merchant Services
                            .39 Provisioning Encryption
                        .2 Intermediate Marker
                            .1 WWD relations CA
                            .6 Developer ID CA
                        .3 Apple Push Notification Service
                            .1 APS Dev
                            .2 APS Production
                            .3 VoIP Push
                            .4 VoIP Push
                            .5 VoIP Push
                            .6 WatchKit
References

Comments
There are 2 comments. You can read them below.
You can post your own comments by using the form below, or reply to existing comments by using the "Reply" button.
Thanks for all the info – this is what I was looking for. I suppose I still have a lot of catching up to do, but at least I now know it can be done in Lazarus.
Thanks again for the write-up.
Angelo
Thanks Angelo for taking the time to write a Thank-you note.
Especially with this article as it took me a very long time to find all this information.
Enjoy!
hans