Overview of this Chapter
A complete overview of this course can be found here: Course Overview.
Now we have done quite a lot with the Serial Monitor – just so we can see the results of our programs. But all of that has been quite static, right? Everything was “fixed” and we did not deal with input from a user.
The reason why I’ve skipped that part, is that the Arduino unfortunately doesn’t have a really simple and obvious way to read text (or numbers) from the Serial Monitor as input. Pretty silly if you ask me, but you also have to keep in mind that the Arduino was not build with the intend to have a keyboard and a monitor. For learning the language however, one would need to at least see what the code is doing that you’re testing.
The Arduino is not really intended to work with a keyboard and monitor,
therefor simple printing and reading input is a little bit more challenging.
The Serial Monitor however does offer a way to send “input” to the Arduino, which the Arduino can read, indicated in the screenshot below. Here we can enter text and click the “Send” button to send a string to our Arduino.
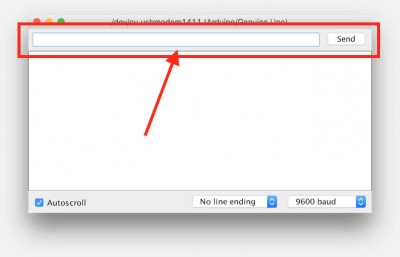
Arduino Serial Monitor – Input field
Tip: Restarting your Arduino Program with Serial Monitor
Each time you open the Serial Monitor, your Arduino receives a reset signal and will restart. This way you get a clean and complete output of your program.
You can also use this to restart a program. Close the Serial Monitor and press the Serial Monitor button and your Arduino program restarts. Great when you want to test a program a few times.
Restart a program: Close and Re-Open the Serial Monitor
Ad Blocking Detected Please consider disabling your ad blocker for our website.
We rely on these ads to be able to run our website.
You can of course support us in other ways (see Support Us on the left).
Read String from Serial Monitor
Let’s quickly revisit how the Arduino programs work.
When your Arduino starts (connect it to USB or connect a power supply), it will right away start the program in memory. This memory will NOT be cleared when shutting the Arduino down, unlike a regular PC.
At it’s start it will run the “setup()” function right away and it will run this only once.
Once completed, it will run “loop()” over and over again.
That makes great sense, considering that the Arduino was not intended for your average program, but is for example used to read sensor data over and over again. However, this can also be serial data, and this is where our new “function” comes in play.
More advanced methods of reading input from the Serial port involves waiting for individual characters to appear, and to be added to our string, as if the Arduino was reading a “sensor” (keystrokes).
I wrote this simple function for this little course and it basically:
Displays your question, keep waiting for the user to input something and press the ENTER key.
1
2
3
4
5
6
7
8
9
| String WaitForInput(String Question) {
Serial.println(Question);
while(!Serial.available()) {
// wait for input
}
return Serial.readStringUntil(10);
} |
We’ve dealt with functions before and we know how to make our own. So let’s go through this one briefly.
We first define our function as “WaitForInput” which returns a “String” – remember: the object String with capital “S” – and takes a question as a parameter. This question is also a “String” object. The returning String is what the user entered.
This means we can call this function as such: Answer = WaitForString("My question");
Since we need to make the question visible to our user in the Serial Monitor, I’ve used “Serial.println” to first display the question we entered as a parameter for our function.
After that, you see a weird “while”-loop. Remember the “while”-loop? It will first check something, and as long as the condition is true, it will keep repeating the program block.
The condition in this “while”-loop is “not Serial.available”. “Serial.available() ” is a method of the “Serial” object, which returns the number of bytes it has read from the Serial input. If nothing was entered, then this will return zero.
Serial.available() returns the number of read bytes of the Serial port.
If no bytes where read, it returns zero.
Now remember that false was the same as zero, and that the “while”-loop wants a true condition?
With the operator not ( ! ) we can flip the zero (= false) to true.
This way, the “while”-loop will keep running as long as there has been no input on the serial.
Since we just want to wait, and really do not want to do anything in the “while”-loop, we just keep the code block empty. I just added a comment so it’s easier to read our code at a later time, and so we know we didn’t forget to type code there by accident.
Once a user types a character (which is the same as a byte), the “Serial.available()” will return a number not equal to zero. The not operator flips this to false, and the “while”-loop will be exited as the condition is no longer true.
In line 8 we use the “return” statement – which, as you might recall, is used to send information back.
But in that same line we also use the Serial method Serial.readStringUntil(10); .
Serial.readStringUntil() reads bytes that have been received from the Serial port.
It stops when it receives the character or byte that we passed as a parameter,
or when a time-out occurs (the user waited too long).
Unfortunately, if there are no bytes available before we call this method (function), it will return with nothing right away. That’s why I’ve added the “while”-loop so we wait for any input first before trying to read it.
The parameter that we pass to this method (function) is the byte (or character) which it should consider “end of transmission”, and in our case we’d like that to be the ENTER key (you could also wait for the NULL character). The ENTER key however is ASCII number 10 (see character table) and that’s why we pass the number 10.
If wanted input to stop when a user pressed the A key, then this would have been ASCII number 97 (assuming a lowercase “a”).
The output of “Serial.readStringUntil” will be send to the “return” statement right away, which in turn returns it to whichever part of the code that called our homebrew function.
Let’s glue this in a little demo program:
1
2
3
4
5
6
7
8
9
10
11
12
13
14
15
16
17
18
19
20
21
22
23
24
25
26
27
28
29
30
31
32
| void setup() {
// set the speed for the serial monitor:
Serial.begin(9600);
Serial.println("Your Arduino is awake ...");
String ReceivedInput;
ReceivedInput = WaitForInput("Please enter your first name.");
Serial.print("Your first name is: ");
Serial.println(ReceivedInput);
ReceivedInput = WaitForInput("Please enter your last name.");
Serial.print("Your last name is: ");
Serial.println(ReceivedInput);
Serial.println("Your Arduino is done now and will start the loop, forever doing nothing ...");
}
void loop() {
// leave empty for now
}
String WaitForInput(String Question) {
Serial.println(Question);
while(!Serial.available()) {
// wait for input
}
return Serial.readStringUntil(10);
} |
To avoid endless looping, we write our test code in the “setup()” again.
First we define a variable of the data type “String” object. We will need it to capture the answer to our questions.
In the next part we will see two similar chunks of code, asking for first name, and last name.
Each time we ask a question and receive an answer from our “WaitForInput()” function.
Once received, we print some text followed by what was given as an input.
Once first- and lastname are done, a message will say that we’re done with the “setup()” function and for ever will keep doing the (empty) “loop()” function.
Read Integers from Serial Monitor
OK so we can read strings, … how about numbers?
The challenge here is that we can only read characters, which combined form a string. This can be numbers, but also characters or even special symbols. Even if we would receive only numbers, we still would have a string as an answer, which is not the same as a number.
As an example, let’s say that in the previous example, the user entered the number “3” and pressed the ENTER button.
The retuning “value” is a string, which consists of one character (byte). If we look in the character table that I have mentioned a few times, then we see that the byte will have the value: 51. ASCII 51 = “3”. But … 51 is clearly not the same as the number “3” we actually wanted to read. So we need to convert this string to an actual number. We will focus on whole numbers – integers or “int“.
The pain of Converting a String to an Integer
You can skip this if you’d like. I’m only giving an idea here on how conversion could work, which might help developing a way of thinking which can be of use when developing your own programs in the future. By the way: there are better methods to convert text to a number!
The conversion can be a rather tedious job. Read a character, see if it’s a number and now convert it.
Let’s assume we get the number “3456” as a string an we want this to become an integer.
We would have to start at the end of the string. The first character we read is “6”, which is ASCII number 54.
In an ASCII table, numbers start at 48. So to get 6 out of that 54, we need to subtract 48 from 54.
“6” = ASCII 54, “0” = ASCII 48 => 54 (“6”) – 48 (“0”) = 6
Answer = 6
Next we take the number before that, which is “5”. “5” has the ASCII number 53, so here we go again, or not?
Not! Because the number “5” actually stands for “50” …. oh oh!
We need to modify our formula to keep 10’s, 100’s, 1000’s, etc. in mind.
See a pattern there? There is!
For each character, going from right to left, an extra “0” is being added.
So for 6 it’s no zero added, for 5 it’s one zero added (50), for 4 it’s two zero’s added (400) and for 3 it’s three zero’s added (3000).
To make that easier, let’s flip the string around and make “6543” from the “3456”.
Remember with arrays that counting starts with zero? Same here, since we at heart do work with an array again!
So we define our string (3456) and integer (0) and flip the string to “6543”.
Next we go through a loop, and access each element of the string array.
For the first element we take 54 – 48, which is 6.
For the second element we take ( 53 – 48 ) * 10, which is 50, and add the previous number to it: 50 + 6 = 56.
For the third element we take ( 52 – 48 ) * 100, which is 400, and add the previous result: 400 + 56 = 456.
And for the last element we take ( 51 – 48 ) * 1000, and add the previous result: 3000 + 456 = 3456.
The trick with 10, 100 and 1000 is that we can write that as 10 to the power.
Keep in mind that we actually need: 1, 10, 100, 1000.
100 = 10 to the power 0 which is the same as 1,
101 = 10 to the power 1 which is the same as 10,
102 = 10 to the power 2 which is the same as 10 × 10 (=100), and
103 = 10 to the power 3 which is the same as 10 × 10 × 10 (=1000).
Now you might not be very familiar with “to the power” yet, but you might recall when we talked about this before, and you can probably see how we can use this to make a loop to convert a string to a number. Using “to the power” is super handy in our situation, since we count 0, 1, 2, 3 in our example (real people count: 1, 2, 3, 4).
Remember:
“To the power” says how many times a number is being used in a multiplication.
In other words:
How many times you must multiply the number “1” with this number.
So 10 to the power 3, is written as 103.
Reading the text above says that we need to multiply the number “1” three time with the number “10”. So that would become:
10 to the power 3 = 103 = 1 × 10 × 10 × 10 = 1,000
Some more examples:
10 to the power 1 = 101 = 1 × 10 = 10
2 to the power 4 = 24 = 1 × 2 × 2 × 2 × 2 = 16
3 to the power 2 = 32 = 1 × 3 × 3 = 9
And last but not least a funny one …. to the power “zero”, so readin our previous statement: multiply the number “1” zero times with the number “2”, so that would result in “1” as the answer. Always remember that to the power zero results in “1”.
2 to the power 0 = 20 = 1
OK now that we went totally sideways on what we were really doing: back to converting a string to a number.
Converting a String to an Integer easier
It must be obvious that this is a cumbersome thing to do … and that’s why there is a method (function) for the “String” object that does this for us in one simple statement.
The main reason why I went through the cumbersome way is to help you develop a way of thinking of we can solve problems we might run into, and see the advantage of having build-in functions or methods allowing us to re-use code and not have to re-invent the wheel over and over again.
So the “String” object has a method called “toInt()” which takes the string you entered and converts it to a integer (int).
The method “toInt()” will start with the first character of the “String”. If this is not a number, then it will stop right away and return zero (0). However, if it is a number, then it will continue remember that number and go to the next character. If that next character is not a number, it will stop and convert the number(s) it remembered, if this one is a number, then it will remember that number as well, and continue with the third character. It will keep doing this until it runs into a non-number or it reaches the end of the string.
Some examples of conversions:
toInt() examples
| String |
Converted int result |
| 1234 |
1234 |
| 12Hello34 |
12 |
| Hello1234 |
0 |
| 12.3 |
12 |
| 0123 |
123 |
I marked the numbers that get converted from the “String”, in the “String” column, bold so you get an idea.
Here an example, using the same function we used in our previous example:
1
2
3
4
5
6
7
8
9
10
11
12
13
14
15
16
17
18
19
20
21
22
23
24
25
26
27
28
29
| void setup() {
// set the speed for the serial monitor:
Serial.begin(9600);
Serial.println("Your Arduino is awake ...");
String ReceivedInput;
ReceivedInput = WaitForInput("Please enter a whole number.");
Serial.print("The string you entered was: ");
Serial.println(ReceivedInput);
Serial.print("Converterd to a number this is: ");
Serial.println(ReceivedInput.toInt());
}
void loop() {
// leave empty for now
}
String WaitForInput(String Question) {
Serial.println(Question);
while(!Serial.available()) {
// wait for input
}
return Serial.readStringUntil(10);
} |
This example looks a lot like the previous one. The only thing that is clearly different can be found in lines 13 and 14. Line 13 is obvious of course, but line 14 calls the “String” object’s method “toInt()”. See how we call the variable “ReceivedInput”, add a dot ( . ) and then type the method “toInt()”. This is the same way we call the “begin” and “print” methods of the “Serial” object.
A method of an Object is called, by calling the variabele of the object, followed by a period and the method name.
Ad Blocking Detected Please consider disabling your ad blocker for our website.
We rely on these ads to be able to run our website.
You can of course support us in other ways (see Support Us on the left).
Read Float numbers from Serial Monitor
We have seen how cumbersome converting a string to a whole number can be, so you can imagine how complicated this will become when we want to convert a string to a float – a number with numbers behind the decimal point.
NOTE: If your native language is not English: the decimal separator in a programming language is a period, so one and a half is 1.5 and not 1,5.
Again our “String” object offers a method for this to do it easier. Look at this example, which is nearly identical to the integer version. The only difference is that we do not call “toInt()” but instead use the method “toFloat()“.
Remember: a “float” is a number with numbers after the decimal point.
1
2
3
4
5
6
7
8
9
10
11
12
13
14
15
16
17
18
19
20
21
22
23
24
25
26
27
28
29
| void setup() {
// set the speed for the serial monitor:
Serial.begin(9600);
Serial.println("Your Arduino is awake ...");
String ReceivedInput;
ReceivedInput = WaitForInput("Please enter a number.");
Serial.print("The string you entered was: ");
Serial.println(ReceivedInput);
Serial.print("Converterd to a number this is: ");
Serial.println(ReceivedInput.toFloat());
}
void loop() {
// leave empty for now
}
String WaitForInput(String Question) {
Serial.println(Question);
while(!Serial.available()) {
// wait for input
}
return Serial.readStringUntil(10);
} |
Other String object methods (functions)
We have seen two method of the “String” object just now – but there are many more. The Arduino Reference page on the String object will show you more methods of the “String” object.
Here you will find functions to, for example, trim a string (remove redundant spaces), make a string all uppercase or lowercase, see if a character or sub-string exists in the string, etc.
The Arduino Reference page shows you more of the functions and methods you can use, and is a great resource for Arduino Programming in general!
I will list a few of those other functions here. I encourage you to experiment a little with them. Read on the Arduino Reference page what they do and how they are supposed to work – it will give you practice and insight on how to use the Arduino Reference and will make searching for functions in the future easier.
Methods
Below a list of some of the more common methods (functions) of the “String” object.
The keywords (method names) link right away to the matching Arduino Reference page.
- String() – Creates a String object
- charAt() – Access a character at a specific position in the string
- compareTo() – Compares two strings
- concat() – Appends a string to the string
- endsWith() – Tests if the string ends with a given piece of text
- equals() – Checks if two strings are the same (case sensitive!)
- equalsIgnoreCase() – Checks if two strings are them (not case sensitive!)
- getBytes() – Copies the individual bytes of a string to a buffer
- indexOf() – Locates a character or string within the string and returns it’s location
- lastIndexOf() – Locates the last occurrence of a character or string within the string
- length() – Returns the length of the string, not including the NULL character at the end!
- remove() – Removes one or more characters from a string
- replace() – Replaces a character or a sub-string of a string
- setCharAt() – Change a character in the string to something else
- startsWith() – Tests if a string starts with a given piece of text
- substring() – Get a part of the string
- toCharArray() – Converts the string in the “String” object to a “string” array of characters
- toInt() – Converts the string to an integer
- toFloat() – Converts the string to a float
- toLowerCase() – Makes the string all lowercase
- toUpperCase() – Makes the string all uppercase
- trim() – Removes leading or trailing spaces from the string.
Ad Blocking Detected Please consider disabling your ad blocker for our website.
We rely on these ads to be able to run our website.
You can of course support us in other ways (see Support Us on the left).
Final words …
Well, we have done 9 chapters now, introducing you to Arduino Programming in the language “C”, using a free program on your computer (the Arduino IDE) and a simple Arduino like the Arduino Uno.
I hope you enjoyed it, and I hope you picked up a few things.
You should now be able to write a simple program for your Arduino. Just keep in mind that in the long run you will remember a lot of the things you’ve learned here. Most of it will become second nature. Some aspects however, you might forget and you will need to look them up again. But don’t worry. I’ve been programming since 1978 and I still have to look up certain things – that’s why there are so many reference books and websites.
Also keep in mind that this is just the beginning …
The Arduino was created with electronics in mind. It can be used as a standalone device which handles certain tasks without you needing a lot of electronics, or needing a computer to manage whatever the Arduino will be doing.
So the next step is learning how to connect certain electronic parts, like LEDs, switches, sensors, relays, motors, and even displays.
If you look at the Tweaking4All menu on the left side, and look under “Hardware” “Arduino”, then you’ll see some examples of how I have used the Arduino in some of my projects. Projects like connecting your Arduino to the network, control LED strips with all kinds of exciting colors, how to detect light, motion or temperatures, create ambient light behind your TV and even connect a LCD display.
Eventually, with enough imagination, you’ll be building your robot …
If there is an interest for it, then please let me know in the comments below, I just might start a similar guide to electronics for the Arduino.
Also note that you’re free to ask questions in the comments below, just remember: the only stupid question, is the unasked question, and … we all had to start with nothing, so feel free to ask!
Since this is the last chapter, either go back to the beginning, or to the chapter overview.

Comments
There are 19 comments. You can read them below.
You can post your own comments by using the form below, or reply to existing comments by using the "Reply" button.
Aplause for you Hans. But umm i dont know how i can realy write a basic program for my led strip. I just thinking of ForLoop dor a basic strip move. Any suggestion. Cus akso i need define colors in strip.
Stan
Thanks Stan!
Well, I usually start by writing down the steps I want to do – not in the programming language, just in normal people language .
.
This forces me to rethink everything and make sure I find the correct steps. Of course, over time you’ll do most of that in your head.
After that I see what steps I need to do in my program … so, the question is: what would you like to create?
hans
Hi. I completely lost on this;
String WaitForInput(String Question) { }
Accolades??
String name; is a defining
String name=”Hans”; is also defining
But what is this;
String WaitForInput(String Question) { }
With accolades? I m loat deeply.. srring is nit a function like
Void example() {
}
I m complete lost becauae of this i cant understand the rest of the chapter.
stan
Hi Stan,
functions are defined as such:
returnvalue functionname (functionparemeters) {function code
}
So the parameters are passed between the two brackets ( and ).
The function code is written between the two accolades. See anything between two accolades as a “block”, as you might have seen with the “if” statement and such.
The return value can be “void” (as seen in void loop() ) or a data type like char, int etc.
hans
No no we not in same case.. i say String is a data type. How we can make a function with a String?
stan
Thank you for your efforts in helping us learn new things, it’s much appreciated, have a wonderful day.
Ian
Hi Ian,
thank you very much for taking the time to post a Thank-You note – it’s very much appreciated.
I’m glad to hear that these articles have been of use to you
hans
Hey there,
I’m a beginner and confused how to declare the WaitForInput function. Why does this declaration:
String WaitForInput(String Question) {
Serial.Println (Question)
}
occur after the Loop code?
If i have code in this section, referencing the values that were inputted into the serial monitor, wouldn’t this function need to be declared sooner?
Adi
Hi Adi!
An Arduino sketch normally has 2 functions defined: setup() and loop(). You’ll see the “void” in front of it indicating that it will not have a return value. The function “WaitForInput” (which returns a “String”) has to be defined as well, in a similar fashion. So not in loop() or setup(). This would usually be the case for functions that you may define. This way the function “WaitForInput” can be accessed and called anywhere in the sketch (called “global” scope).
If the function would have been defined IN the loop() for example, then the function would only be accessible from within the loop() and nowhere else (called “local” scope).
Its OK to define this before or after the loop() and setup() functions.
The compiler will see that a function has been defined so it will allow you to use it wherever you may need it.
Other languages, like for example Pascal, expect you to define the format of the function in the beginning (for example: String WaitForInput(String Question)) and later in the code define the function (this is called a forward declaration), but with C/C++ this is not needed.
In the example you have therefor only 3 functions (loop, setup and WaitForInput).
If at a later time you decide to make a 4th function, then this 4th function would be able to call WaitForInput as well.
I usually define setup() first, then loop() and then all the following functions I came up with.
This way I see the key functions (loop and setup) right away in the beginnen of the code.
Hope this answers your question
hans
See also the chapter about functions, which may not have explained this as thorough.
hans
hello , i m trying to find an example about connecting two arduinos to each others.
I’m making a project where i need to use arduino nano with arduino due (where the nano will be connected to a remote receiver and the due will be connected to some motors )
If you can help me to find something close to my project and thank you
rebecca
Hi Rebecca,
there are a few options you can look into; you’ll need either 2 Bluetooth or 2 small 2.4Ghz RF module.
The Bluetooth modules will be more expensive, and may not add any value to your project.
The RF modules (for example these at Amazon), are much cheaper, and typically can have a better range (about 50 meters/150 feet).
I have not played with either of them, so I’m not able to provide you an example.
hans
After doing some reading up … you milage may vary with the RF modules. You may need an external antenna to get to 150 feet.
Please read the comments when ordering from Amazon, you may find valuable info there.
hans
Great
vijay
Thanks Vijay
Hans
Hello, This was quite helpful.
I need a program that reads the values from an excel sheet and inputs that through serial monitor. Is that possible?
Bhadra
Hi Bhadra,
since this is quite off-topic, please consider posting your question in the Arduino forum.
Short answer: yes this could be an option, for example by storing an Excel file on an SD card and having an SD card reader connected to your Arduino.
Due to the potential complexity of an Excel file, I’d probably use a CSV (Comma Separated Values) file instead though (Excel can save it as CSV).
Hans
This beginner’s Arduino programming tutorial is the best subject matter I have ever found on the Internet! Your humorous writing style and thoroughness are tremendous. I am certain that you have devoted many hours of time in preparing this material. I would highly recommend it to anyone who wants to learn how to use an Arduino. Please be aware that your investment of time and effort in this project continues to benefit new users of this device.
Charles Brombaugh
Hi Charles,
thank you very much for the very nice compliment – it made my day, and a great start of 2021!
It is very much appreciated!
Happy New Year and enjoy the articles!
Hans