Not every WordPress admin uses them, but as some of you might know: you can add custom fields to your posts (amongst others). Here at Tweaking4All we use if to enter a shorter title, a shorter description and for example to indicate the difficulty level for the individual posts.
The problem I found however is that sometimes I forget to enter those custom fields for my new post and it would be helpful to see those values in the overview of all posts in the admin pages, so I can see right away if I forgot one or not.
It appears that adding and removing columns is actually really not all that difficult, so I’ll explain what I did to get it to work.
Using Custom Fields
This articles focusses on columns for custom fields, but it’s probably easy to adapt for other purposes – this will give you an idea how it works.
What Custom Fields?
You might have noticed, or not, that when editing a post, a special box appears allowing you to add custom fields. Most admins do not appear to be using this, but when you develop your own theme it can be very useful.
Tip
If you do NOT see this under your post, click “Screen Options” (upper right corner of the post editing page) and check “Custom Fields“.
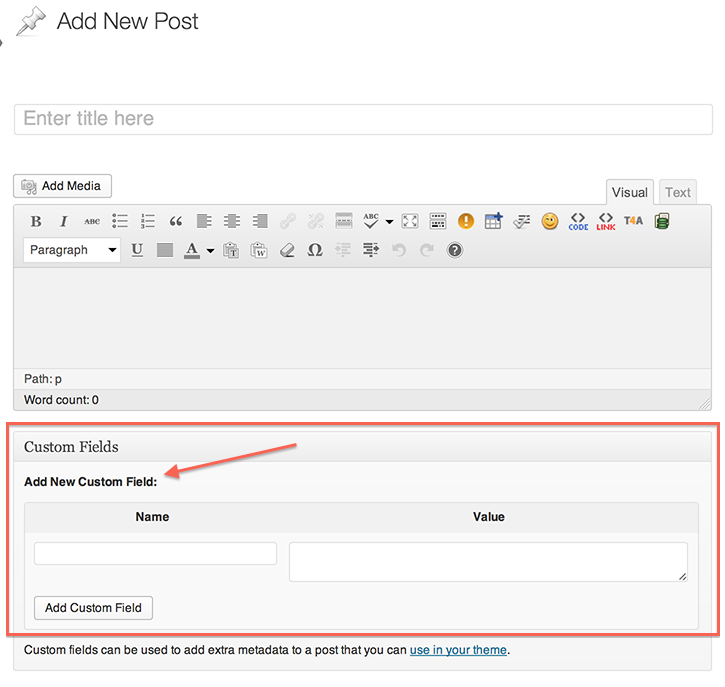
WordPress – Add Custom Field
The coolest thing is that once you’ve added a custom field, that when editing another post, the earlier entered custom field will be available from a drop down – prevents a lot of typos!
Retrieve Custom Fields in your Code
Retrieving the Custom Field values in your code is pretty easy, and WordPress offers more than just one way to do it.
The easiest way to retrieve the value is by using get_post_meta().
In the example below, I’ve created a custom field called “DifficultyLevel” which I use to indicate how difficult the topic in the post might be.
$difficulty_level = get_post_meta($postID,'DifficultyLevel',TRUE);
This line basically says: store the value (if available) of the custom field “DifficultyLevel” of the post with ID “$postID” in the variable “$difficulty_level“. The “TRUE” parameter makes sure that the returned result is only the first one it finds, and as a string (which will be empty if the custom field does not exist for this post). Up to you what to do with it next of course …
Caution
Even when you’re in “the loop“, you will still have to provide the post ID!
In “the loop” it’s easiest to use “get_the_ID()” for this – which returns the post ID of the active post.
Anyhow … you get the picture …
Adding and Removing Columns
Now that we know what custom fields are, how to create them, and how to read their values, time to make something visible in the posts admin page.
As I mentioned before, I use 3 custom fields: ShortTitle, ShortText, and DifficultyLevel.
I’d like to see them in the admin page where you can see an overview of all posts but by default they do not show of course.

Before adding the custom field columns
The next image shows what it looks like after I added the columns, and since I’m the only author, I also removed the “Author” column.

After removing the Author column and Adding Custom columns
I know there are a bunch of other columns – it’s the Yoast SEO plugin …
Code to Remove columns and Add Custom Field Columns
If you’ve played with PHP and worked in your functions.php file before, the following code will look pretty straight forward.
The following code goes into your functions.php file after you modified it for your needs of course:
1
2
3
4
5
6
7
8
9
10
11
12
13
14
15
16
17
18
19
20
21
22
23
24
25
26
27
28
29
30
31
| add_filter('manage_posts_columns', 't4a_remove_unwanted_columns');
add_filter('manage_posts_columns', 't4a_add_post_columns', 5);
add_action('manage_posts_custom_column', 't4a_get_post_column_values', 5, 2);
// Remove unwanted columns
function t4a_remove_unwanted_columns($defaults){
unset($defaults['author']);
return $defaults;
}
// Add new columns
function t4a_add_post_columns($defaults){
// field vs displayed title
$defaults['DifficultyLevel'] = __('Level');
$defaults['ShortTitle'] = __('ShortTitle');
$defaults['ShortText'] = __('ShortText');
return $defaults;
}
// Populate the new columns with values
function t4a_get_post_column_values($column_name, $postID){
if($column_name === 'DifficultyLevel'){
echo get_post_meta($postID,'DifficultyLevel',TRUE);
}
elseif($column_name === 'ShortTitle'){
echo get_post_meta($postID,'ShortTitle',TRUE);
}
elseif($column_name === 'ShortText'){
echo get_post_meta($postID,'ShortText',TRUE);
}
} |
A short explanation of the code to help you on your way:
Line 1 – Add the remove column function (t4a_remove_unwanted_columns) to the “manage_posts_columns” filter.
This is optional, and can be removed if you don’t want to remove columns – I use it to remove the “Author” column.
If you don’t want to use this, remove lines 6 – 10 as well, you wont need that then either.
Line 2 – Add the function to add columns (t4a_add_post_columns) to the “manage_posts_columns” filter.
You will see the extra number (5) which has to do with priority.
Lines 6 – 10 – The actual function that removes the row ‘author‘ from the array $defaults – the array passed to this function with all columns listed in it.
Lines 12 – 19 – This function adds rows to the $defaults array. The first value being the fieldname (DifficultyLevel) and the second one (Level) the title as displayed above the column in the admin page.
Lines 21 – 32 – Just showing the columns is not enough, we also would like to see the values. This function takes 2 parameters passed by WordPress: the column name and the post ID.
Here I use a rather clumsy if … elseif … construct, but it is good enough for just 3 columns.
In each “if” you’ll see that it compares the $column_name with the possible custom field name. If it matches it echo’s the value of that field for this post (see previous explanation on how to retrieve the custom field values).
Note: You’re not stuck with only echoing text – you could also display a picture for example.
That’s all there is to it … Pretty straight forward, right?


Comments
There are 3 comments. You can read them below.
You can post your own comments by using the form below, or reply to existing comments by using the "Reply" button.
how add modify quick edit link
cristian
Hi Cristian,
I’m not sure what you mean with your question?
hans
[…] that in order to get the ‘day’ value in the Admin column I can use the example explained on the Tweaking4All […]