Overview
What is SSH?
Before explaining how SSH Login without a password works, a quick look at what SSH really is and when you’d be using it.
Personally, I use SSH most often to access the Shell or Terminal on a remote computer, for example my web server, my QNAP NAS, or my Raspberry Pi running LibreElec (KODI).
Often to execute one or the other command line statements, typically modifying something or installing/removing something on the remote machine.
See it as a Shell/Terminal/Command Prompt window, directly running on the remote machine.
On most platforms (macOS, Linux, Windows) it will look like you’re working on the local machine, but instead of running it all local, things are executed on the remote machine.
Note: For macOS and Linux users, the command one executes will typically be very similar to what you’ve been used to in a Shell or in Terminal.
Windows users on the other hand will see that commands are a little different, since most of these remote machines run one or the other Linux variant.
Ad Blocking Detected Please consider disabling your ad blocker for our website.
We rely on these ads to be able to run our website.
You can of course support us in other ways (see Support Us on the left).
SSH Login Without a Password – How does this work?
Folks starting with SSH, especially first few times, will just use a username and password.
This could be fine for that one time you need access, but it is not the most secure method as passwords are often easy to guess, or relatively easy to break with a brute force attack.
There is an alternative though, the use of SSH-keys, which not only makes the password very difficult to guess, but also significantly longer.
The entire matter behind this is something to discuss I’m sure, but in this article I’ll keep it simple.
Public Key vs Private Key
When looking at encryption, you quite often see mention of “Public Key” and “Private Key” – something we’re about to use for SSH.
So what are those and how do they work?
Private Key
A Private Key can be used to decrypt a message.
Because of that, you should keep a private key private, and never share it with anyone else.
Public Key
The Public Key can only be used to encrypt a message, and can be shared with others without a problem.
It can never be used to decrypt a message.
Note: When using such keys, we typically generate them with OpenSSL tools, more about that later.
The basic idea is this:
We create two keys;
one to “encode” and one to “decode” a message;
A “Private Key” to decode (encrypt) a message,
A “Public Key” to encode” (decrypt) a message.
A simplified example:
Let’s say Max asks Bram to send him a secret message, but Max wants to be sure that no one else can read the message.
To keep the message secret he send Bram a request for such a secret message and includes his “Public Key” with that.
The Public key allows Bram to encrypt the secret message.
After encryption, not even Bram can decrypt it. So now Bram sends the encrypted message to Max.
Max has the “Private key”, allowing him, and only him, to decrypt the secret message.
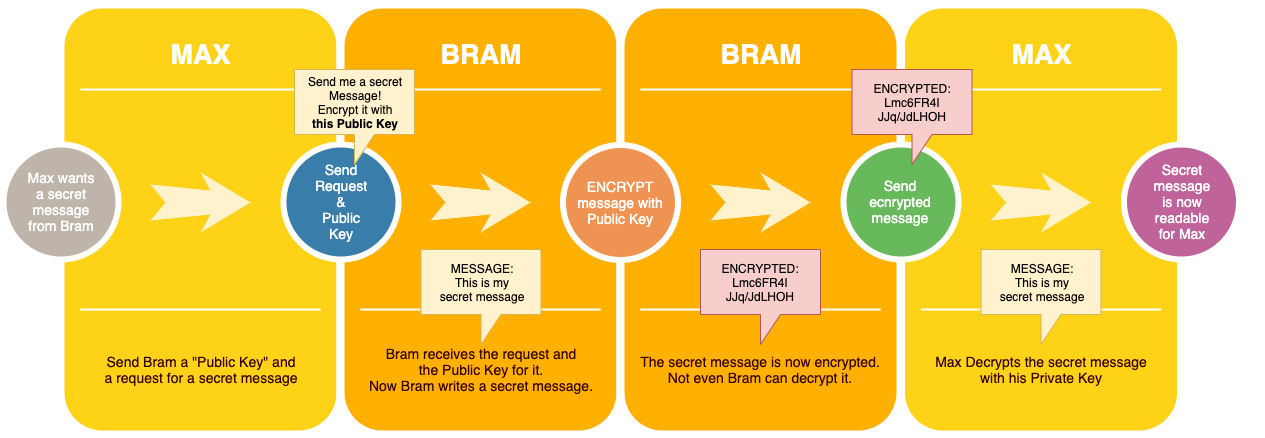
Simple example of Private vs Public Keys
SSH Login using SSH-keys explained
Now how does this work when applied to our SSH connection?
The procedure consists of 2 steps.
Step 1 – Get us some keys
Obviously we first will need to actually have a Public and a Private key. So we need to generate those first.
Note that the same key can be used for several different SSH servers. You could also generate a set of keys per server, but that comes with a few extra challenges.
Step 2 – Give the server our Public Key – We only need to do this once.
The second step is to make sure the server has our Public Key and for the given server this needs to be done only once.
This way the server “knows” which Username and Public Key combinations could potentially be allowed SSH access.
In this step, we need to connect to our SSH server, with our usual username and password login, and give the server our “Public Key”.
As of this point, the server “knows” that this key is OK to use for this particular user.
The key is store in a special file, usually store in the home directory of that user (~/.ssh/authorized_keys ).
Step 3 – For each SSH Login – Give the server our Username and our Public Key
Each time we want to login with SSH, the following steps are done.
As a user you will not have a clue this is happening, as it’s fully automated.
- Send the server we want access to, our username and our public key (usually called “id_rsa.pub“).
- The server will now look and see if it knows this key (stored in “authorized_keys“).
- If found, the server will now create, encrypt, and send a passphrase (each time a unique secret message).
- Our computer will now be able to decode the passphrase and send the decoded message back to the server.
- The server will compare the received passphrase and if it matches the original secret message, we get access.
In a similar diagram as used before, this would look something like this:
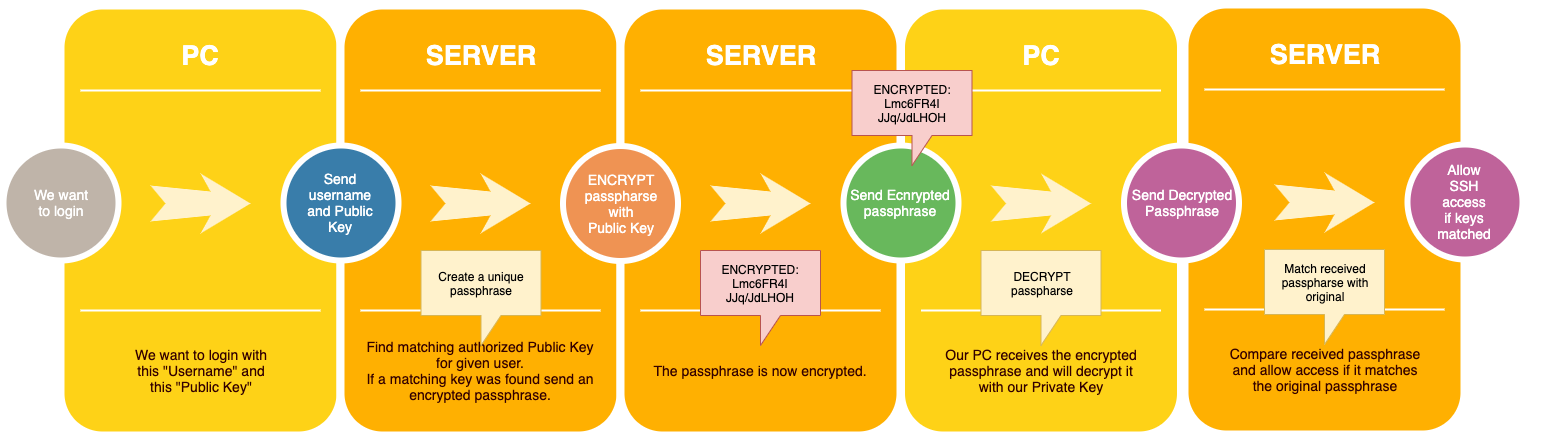
SSH Login process with Private and Public Keys
SSH Login Without a Password – In Practice
Now that we know how this works in the background, time to set this all to work.
Here we will use a simplified and straight forward method, since there are plenty of more complex approaches possible.
For example protecting your keys with a passphrase and using other encryption methods (I’m using RSA here).
Step 1 – Generate out Public and Private Key (one time only)
Obviously we will need a key … so let’s generate one.
This works for macOS, Linux and Windows.
After this step we will have 2 files: The Private Key (id_rsa) and the Public Key (id_rsa.pub).
Both files can be found in your user home directory (Linux/macOS: ~/.ssh/ and Windows: C:\Users\<username>\.ssh\.
It appears that the .ssh directory under macOS and Linux already exists or automatically is being created.
If you get an error message, please verify that this directory actually exists.
I have added a few parameters that may or may not be needed, the short version would be: ssh-keygen.
The extra parameters make sure that we know where the file goes (-f) and that we do not wish to use a passphrase (-P).
macOS/Linux:
ssh-keygen -f ~/.ssh/id_rsa -t rsa -P ""
Please note: Under macOS and Linux, a filename or directory name starting with a period (like .ssh), is invisible under normal circumstances.
Windows:
Windows users need to create the .ssh directory first …
I have tested this only with Windows 10, and it seemed OpenSSL tools were installed by default.
Unfortunately, you will have to create a directory first, where to store your SSH-keys.
In Command Prompt: mkdir C:\Users\<username>\.ssh
Obviously replace “<username>” with your username (do a dir C:\Users\ to see what your may be).
ssh-keygen -f C:\Users\<username>\.ssh\id_rsa -t rsa -P ""
Please note: replace “<username>” with your username or user directory name (check with: dir C:\Users\).
The output will look something like this:
Generating public/private rsa key pair.

Your identification has been saved in \Users\Hans\.ssh\id_rsa.

Your public key has been saved in \Users\Hans\.ssh\id_rsa.pub.

The key fingerprint is:

SHA256:N0k/xd1qAAX77qoG8HAfIUGmU1Co4Y72kWSJ+GqabHg hans@MAC

The key's randomart image is:

+---[RSA 2048]----+

| .=* .|

| . .+ . . +.|

| . o +o o . + +|

| . . * o + = ..|

| . = .S = + +. |

| + + * o + .|

| . o . . o . .|

|+ E . . . . |

|*+ o..oo|

+----[SHA256]-----+
Step 2 – Give the Server you Public Key (one time only)
Warning: if you generate new keys, you will have to give the new Public Key to the server again, as it will be different than a previously generated key!
There are 2 ways to do this, the old school method and the method that uses ssh-copy-id.
Unfortunately, ssh-copy-id does not seem to exist under Windows (I did find one at GitHub though).
Replace “<username>” with the login username you’d use for this server, and replace “<server-ip-address>” with the IP address of your server.
The option “-o StrictHostKeyChecking=No” only prevents that SSH will automatically add the server to it’s list of “known hosts” – so you won’t be bother with that question.
You will have to enter your password though.
macOS and Linux – The easy way with ssh-copy-id
ssh-copy-id -i ~/.ssh/id_rsa.pub <username>@<server-ip-address> -o StrictHostKeyChecking=No
ssh-copy-id -i ~/.ssh/id_rsa.pub admin@192.168.1.100 -o StrictHostKeyChecking=N
macOS and Linux – The harder way by using cat
cat ~/.ssh/id_rsa.pub | ssh <username>@<server-ip-address> 'mkdir -p .ssh; cat >> .ssh/authorized_keys'
cat ~/.ssh/id_rsa.pub | ssh admin@192.168.1.100 'mkdir -p .ssh; cat >> .ssh/authorized_keys'
Windows – The long way, since ssh-copy-id does not exist
Replace “<userdirectory>” with the proper directory name (check with: dir C:\Users\).
type C:\Users\<userdirectory>\.ssh\id_rsa.pub | ssh <username>@<server-ip-address> -o StrictHostKeyChecking=No "umask 077; test -d .ssh || mkdir .ssh ; cat >> .ssh/authorized_keys || exit 1;"
type C:\Users\Hans\.ssh\id_rsa.pub | ssh admin@192.168.1.100 -o StrictHostKeyChecking=No "umask 077; test -d .ssh || mkdir .ssh ; cat >> .ssh/authorized_keys || exit 1;"
Step 3 – Test if SSH Login without a Password actually works
The easiest way to test this is by simply starting and SSH session like so (works the same way for macOS, Linux and Windows) – this is how you start your SSH connection in the future;
ssh <username>@<server-ip-address>
Ad Blocking Detected Please consider disabling your ad blocker for our website.
We rely on these ads to be able to run our website.
You can of course support us in other ways (see Support Us on the left).
Extra: Execute a Command in one line
Now that we can login without a password, just a quick tip how you can execute a single command on the target server.
We have kind-a used this already in step 2, but here a few simpel examples.
Notes:
In these example you’ll have to replace user with your username, and server with the target server/computer name or IP address.
With these examples, you’ll see at the end of the statement ” || exit 1; ” which means as much as “close the SSH connection/shell” and “return success” (=1).
The commands used here are Linux/macOS based. Windows may work in a similar fashion.
Example 1: List a directory
The directory list command would be normally just “ ls “.
Everything else around this statement can be reused for other commands as well.
ssh -t user@server "ls || exit 1;"
Just to illustrate that you can use parameters in your commands as well;
ssh -t user@server "ls -al / || exit 1;"
In this example we use the Caffeinate command on a Mac, which comes with macOS, to wake up its screen through SSH.
The statement is: caffeinate -u -t 1
Which means: -u will turn on the screen (user “active”), and -t 1 sets the timeout, so we keep it short.
I used this for helping me wake up a Mac remotely.
In my specific case, I used it since my MacBook Pro didn’t seem to do much with a WOL (Wake On LAN) message.
I finally found out that if a Mac laptop is powered by a Power Brick, connected to WiFi before it went to sleep, and the WiFi chipset of the laptop supports WOL, you do not even need to use a Wake on LAN message. (does NOT work for USB Ethernet dongles!)
What happens is that the WiFi connection remains active, even though the Mac sleeps.
As soon as we send the command below, your Mac will wake up.
ssh user@server "caffeinate -u -t 1 || exit 1;"

Comments
There are 7 comments. You can read them below.
You can post your own comments by using the form below, or reply to existing comments by using the "Reply" button.
Thanks for a very nice explanation of something that kept being confusing to me.
John
Hi John!
thank you very much for taking the time to post a Thank-You note – it is very much appreciated.
I totally understand the confusing part – it took me some reading up as well to get it
hans
[…] More detail on how these “keys” work can be found in the article: SSH Login without a Password […]
Probably the easiest to understand explanation I’ve seen so far – thanks!
John Seed
Awesome!
Thanks for the excellent feedback John – it is very much appreciated!
Hans
A very concise and helpful explanation.
Thanks a lot.
Slimane from Algeria.
Slimane
Thanks Slimane for taking the time to post a Thank You note – it is very much appreciated!
Hans