Overview of this Chapter
A complete overview of this course can be found here: Course Overview.
Quick exploration of the Arduino IDE
If you followed Part 1, then you should have your computer connected to an Arduino by means of a USB cable, and you should have the Arduino IDE up and running. If all went well, you also succeeded in running the test application that made a LED (light) blink.
Since the Arduino IDE is our main tool to work with, a quick tour of this application could make life easier in the near future, so let’s do that.
Let’s first open the Arduino IDE. If this isn’t your first time of opening the Arduino IDE, start a new project by clicking button “C” as show in the image below:

Arduino Software – Useful shortcuts
After clicking the “C” button, or if this is the first time you open the Arduino IDE, your window will look something like this:
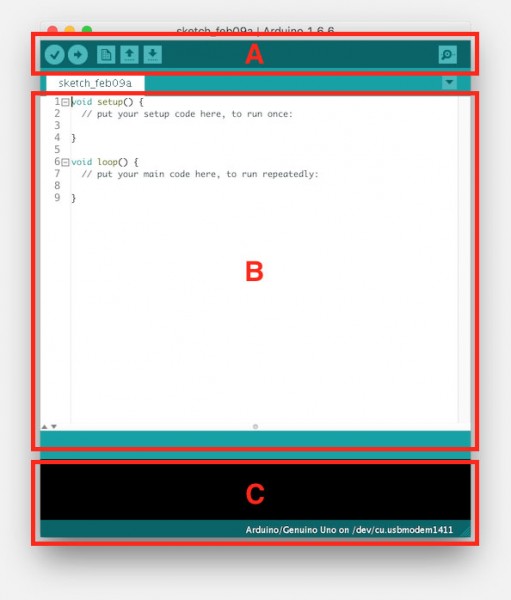
3 Main Sections in the Arduino IDE
We see 3 “main” sections (see figure 2 above):
In the section “A” we find the buttons we have mentioned earlier (see figure 1) with one additional button we have not mentioned before. The magnifying glass button on the far right. This button is called the “Serial Monitor” button, or sometimes referred to as the “Debug Window” button.

Serial Monitor button
Section “B” is where we can edit our Source Code, which is basically a simple text editor with so called “code highlighting”. Code highlighting just means that special words, symbols, or character sequences get a special color, so it’s easier for us to read the code.
Section “C” is the area where the Arduino IDE will give you messages. For example that it’s compiling something, or that something went wrong or was completed.
The Arduino IDE also has a lot of functionality hidden in the application menu’s – for now we will stick to what we need. We already covered selecting the right Arduino type and the correct communications port.
Other functions that can be found there are the use of libraries, managing your Sketches, and some advanced options we probably should not play with until we really know what we are doing.
Ad Blocking Detected Please consider disabling your ad blocker for our website.
We rely on these ads to be able to run our website.
You can of course support us in other ways (see Support Us on the left).
Communication with the Arduino …
Now with a normal computer we have a keyboard, mouse and monitor to interact with, and as you might have noticed: The Arduino has nothing like that besides a small LED that can blink. Kind of a black box and not a very “rich” way of communicating with us humans, now is it?
This is where the “Serial Monitor” comes in.
What USB offers for Arduino Programming
Let’s quickly take a look at the USB connection we have been using. It serves a few purposes.
1. USB provides power for the Arduino.
As with most electronics, the Arduino needs power, electricity, to actually work.
A USB connecting, under normal circumstances, provides 5V power from your computer, which is enough for the Arduino to run.
2. USB functions as a way to send our program to the Arduino
We write our code or program on our computer, and the program of course needs to be send to the Arduino so we can actually have the Arduino run it. This “sending” part is done over the USB connection
3. USB can Receive data from the Arduino
The communication we use for sending a program can also be used for sending data from the Arduino back to your PC, and this is practical when we want to see information coming back from the Arduino, so we know what’s going in.
Serial Communication over USB
As we can see in point 2 and 3: our USB connection is used for communication.
Now you have to know that back in the day, a Micro-Controller, like the one we have in the Arduino, communicates over a so called serial port. Serial ports used to be available on all computers and were often referred to as “com port” or “Serial port“. You’ve actually already worked with one of those when you selected the port for your Arduino in the Arduino IDE.
A com-port or serial port transfers data one bit at a time.
A bit is can have a value of either one (1) or zero (0).
Now a single bit doesn’t do much for us, we can only indicate ON or OFF, or TRUE of FALSE, or YES or NO, and that’s why they came up with a “byte“.
A “byte” combines 8 bits to a group, which can represent 256 values, making it suitable for us to use it to represent a character of the alphabet, a number, or even a special symbol.
So a bit can have 1 of 2 values, either zero (0) or one (1).
A byte has 8 bits, which mathematically means that it can have one of 28 = 2 to the power 8 = 2 × 2 × 2 × 2 × 2 × 2 × 2 × 2 = 256 values. If you haven’t dealt with “to the power” calculations, then never mind, just know a byte can have one of 256 values which can be any number in the range 0 … 255.
“To the power” says how many times a number is being used in a multiplication.
In other words:
How many times you must multiply the number “1” with this number.
A serial port or com port “talks” with a certain speed, often called baudrate. This indicates the communication speed expressed in how many bits per second can be send/received. A common baudrate is for example 9600, which means 9600 bits per second, which translates to 1200 bytes (or characters) per second. Remember: a byte is 8 bits, so 9600 ÷ 8 = 1200.
A little side note: the calculations bit baudrates and number of characters per second is a little bit more complex than this, for example extra data to verify can be added, or to indicate the “end of a byte”, etc. making this calculation a little different. But it’s a nice rule of thumb anyway.
These speeds need to be set the same on both ends of course. So the computer needs to communicate at the same speed as the Arduino.
Some common baudrate are:
Common Baudrates
| Baudrate |
| 110 |
| 300 |
| 600 |
| 1200 |
| 2400 |
| 4800 |
| 9600 |
| 14400 |
| 19200 |
| 38400 |
| 56000 |
| 115200 |
There are other values, but these are the ones considered “supported by all”. Especially Linux and Mac tend to have the ability to go much higher, where as certain Windows configurations are known to occasionally cause problems when you go beyond 115200.
OK, enough historical information for now ….
Since most computers no longer have such a com-port, an alternative is being used. A so called USB-to-Serial converter can be found on the Arduino, which converts the “com port” data to serial data for USB. This is the reason why your computer sees this com port as a USB device.
We now know that this serial USB connection is used for sending our program to the Arduino. But the fun part is that it can also be used to receive data from the Arduino.
Serial Monitor – Receiving Data from the Arduino
When running a program on our Arduino, we would of course like to see what’s going on. Even if it’s just to see the answer to a calculation for example. However, it’s also quite often used to find problems in our code – which is called “debugging“.
Debugging is the process of finding and resolving “bugs“.
In other words: finding and fixing problems and/or mistakes in our code.
This is where the “Serial Monitor” comes in handy …
Tip: Restarting your Arduino Program with Serial Monitor
Each time you open the Serial Monitor, your Arduino receives a reset signal and will restart. This way you get a clean and complete output of your program.
You can also use this to restart a program. Close the Serial Monitor and press the Serial Monitor button and your Arduino program restarts. Great when you want to test a program a few times.
To get the Arduino to send us information, we need first tell it to open a serial communications port at a given speed – remember: Computer and Arduino need to communicate at the same speed, otherwise they will not understand each other. We need to set that in our code for the Arduino.
Now the Arduino IDE detects automatically try to figure out what kind of speed you’re using in your code, but we can also tell the serial monitor what speed to use manually.
Let’s get started with an example. For this we have the Arduino IDE open, your Arduino connected to your computer, and click the “Serial Monitor” button (the magnifying glass on the far right top of the Arduino IDE).
Serial Monitor button
After clicking the “Serial Monitor” button you either get an error message (did you forget to connect your Arduino?) or a window like this:
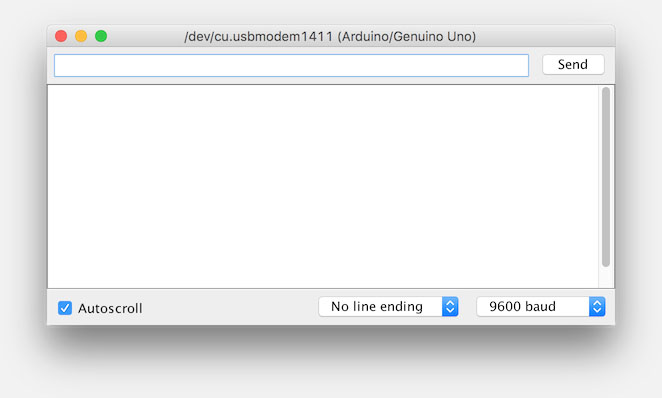
Arduino IDE – Serial Monitor window
In this window we can receive or send information from or to the Arduino.
Let’s look at our “first” program that talks back …
In the code below I have added 2 extra lines to the initial “code”, lines 3 and 4.
1
2
3
4
5
6
7
8
9
10
| void setup() {
// put your setup code here, to run once:
Serial.begin(9600);
Serial.println("Hello from your first Arduino program!");
}
void loop() {
// put your main code here, to run repeatedly:
} |
The line “Serial.begin(9600); ” basically tells the Arduino to start talking over the serial port at a speed of 9600 baud.
See the “9600 baud” selected at the bottom right of figure 6 (below)? Same speed – that’s what we need!
The next line “Serial.println("Hello from your first Arduino program!"); ” tells the Arduino to send a text line to the serial port.
OK, copy and paste the code in your Arduino IDE, replacing the existing content.
Next click the “Compile and Upload” button (button “B” in figure 1).
Your Arduino will, again, do a little LED blinking and when the program starts to run the following will appear in the Serial Monitor Window.
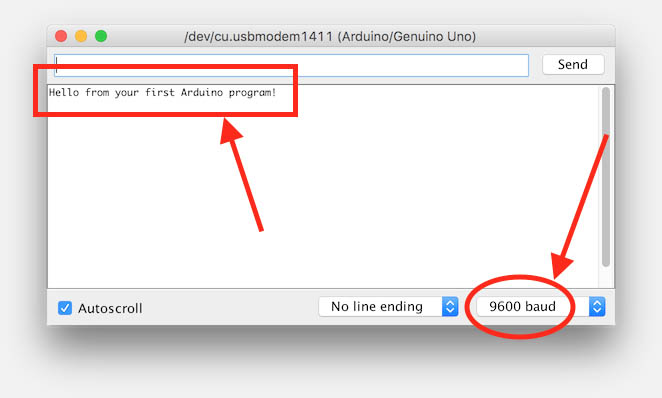
Arduino IDE output of your first C program
Looks simple and straight forward, doesn’t it? Let’s take a closer look.
Your Basic Arduino Program Layout
Setup() and Loop()
Each Arduino program has a basic layout, which is displayed when you start a new project (click button “C” in figure 1).
1
2
3
4
5
6
7
8
| void setup() {
// put your setup code here, to run once:
}
void loop() {
// put your main code here, to run repeatedly:
} |
Here we see two basic elements called “setup()” and “loop()“, and both, even if they stay empty, need to be defined.
When the Arduino starts, it will go through whatever is written in “setup()” one time, and one time only.
After that it will endlessly repeat what is written in “loop()”, hence the name “loop”.
The code already tells you that, since the Arduino IDE creators already added comments for that.
Each Arduino program has a “setup()” function which is only ran once at startup, and a “loop()” function which keeps repeating endlessly until you shutdown the Arduino.
If we would modify our previous code as shown in the code below, then the message “Hello from your first Arduino program!” would be printed over and over again until we shutdown (disconnect power / USB cable) the Arduino.
Here we kept “Serial.begin(9600); ” in the “setup()” section, after all we need to set the speed only once, so we do it in “setup()”.
We moved the line “Serial.println("Hello from your first Arduino program!"); ” to the “loop()” section, so that’s why it keeps repeating.
1
2
3
4
5
6
7
8
9
| void setup() {
// put your setup code here, to run once:
Serial.begin(9600);
}
void loop() {
// put your main code here, to run repeatedly:
Serial.println("Hello from your first Arduino program!");
} |
Adding comments to your code is something I highly recommend.
First of all, it makes it much easier for you to read what you’ve been doing in your code, in case you need to modify it at a later time. But maybe just as important, is that others have it easier when they try to read your code.
Always properly Comment your code !
In the code we have seen, an example of how comments can be added can be seen.
You simply start a line with 2 slashes “//“.
But there are more techniques to add comments.
First thing to know is that a comment indeed starts with “//“, which means that everything (even code!) following the 2 slashes will be considered a comment. Which in turn means that it will be ignored by the translator (compiler). So comments will only make you text (code) larger, but it will not affect the size of your program once the compiler is done with it.
Comments do not make your final program bigger,
Comments just make your Source Code bigger, but also more readable for yourself and others.
Another way to create comments is to enclose them with “/*” and “*/“, which you’ll see in some of the comment examples below:
1
2
3
4
5
6
7
8
9
10
11
12
13
14
15
16
17
| // Single line comment
Serial.begin(9600); // Comment at the end of the line
// The next line uses comments to disable the code
// Serial.begin(9600);
/* This is a comment block on one line */
/* But comment blocks
can also span
multiple lines */
/* Comment blocks can also be used to disable code over multiple lines
Serial.begin(9600);
Serial.println("Hello from your first Arduino program!");
*/ |
Here we see that a comment can be a single line, at the end of a line, or a block.
Here we also see that comments can be used to quickly disable a line of code. For example when you’re testing something, or when you want to disable a part of the code because you only used it while you where developing your program.
Statements and Code blocks
Another thing we learn from this is that a line can be empty, be a comment, or have a statement. Note that a statement (instruction) always ends with a semi colon ( ; ). This is one to remember, because (for me anyway) this is one of the most often made mistakes – forgetting to type the semi colon at the end of the line.
A statement ends with a semi-colon ( ; ) …
In the example code we did see 2 sections, these are called “code blocks” and enclosed in accolades.
1
2
3
4
| void setup() {
// put your setup code here, to run once:
Serial.begin(9600);
} |
If we dissect this piece of code, then we see on the first line “void setup() {“.
Which is what we do to define a function – the Arduino will look for this function, and at a later time we will go into the finer details of functions. For now we need to know that this says:
“here starts the definition of the function setup, which takes no parameters and returns nothing“.
The empty brackets indicates that the function “setup” takes no parameters – we do not have to pass it any information.
The phrase “void” is like thin-air, nothing, … and since it’s written before the function name “setup”, it means that nothing comes back from this function. Not something you need to memorize at this moment, but it’s good to see this.
A code block starts and ends with accolades .( { … } )..
The accolade starts the so called “code block”. Anything from this point on, until the closing accolade, is considered a block, and this block belongs to the function definition of “setup”. Which means that the comment and the “Serial.begin(9600);” line are included and part of the function “setup”.
OK, so now we know how we can send information from the Arduino back to our computer, which is going to be handy when we test our first programming steps.
If you have questions, just ask them below in the comment section, and keep in mind: There are no stupid questions! We all had to start at some point!
Next chapter: Arduino Programming for Beginners – Part 3: Working with Data


Comments
There are 2 comments. You can read them below.
You can post your own comments by using the form below, or reply to existing comments by using the "Reply" button.
I m into understanding the Logic of coding as much as Learning it(not just memorize the blocks). Becauase i cant write my own code if i dont understand the logic and the way it works. And even in the starting of these learning chapters i started to say ” oh thats why we write it like this and that etc.” For example i never cld find why we write Void and Setup words and why we use ( ) this brackets before “void setup” but never put something in it and whats the logic in this! Now i realy understand and even english is not my mother language! but i feel like it is when i read the article focused. I dont realy know much phrases in english but i want to say ; My friend you are Golden! You realy living in the same planet with me? ;) Peace.
Stan
Thanks Stan!
I’m super happy to hear this is helping you on your path to programming!

Excellent! And yes, I assume I live on the same planet hahah …
hans