Arduino and ENC28J60 Ethernet Shield
This article is based on using an Arduino ENC28J60 Ethernet shield, as discussed in our “How to web-enable your Arduino“, which we will use with one or more DS18B20 digital temperature sensors (you can consider using other sensors as well of course). The goal is to READ the data of these sensors from our Arduino over a network connection.
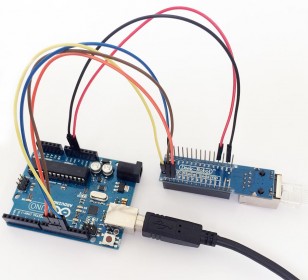
We use the exact same setup as we’ve used in our Data Push article.
The “UIPEthernet” Library can be downloaded from the Github website or from Tweaking4All, but as usual we recommend you check out the Github page first so you have the most recent version.
Since we will be using the DS18B20 sensors, we will will also need the “OneWire” library, which can be found at OneWire Project Website (recommended) or can be download straight from Tweaking4All.
Using the demo with the standard Arduino Ethernet Shield
For the examples we use “UIPEthernet” which is a fully compatible drop-in library for the standard “Ethernet” library that comes with the Arduino IDE. So you should be able to use it with the standard, W5100 based, Arduino Ethernet controller and standard Ethernet library as well. Just replace the include line (#include <UIPEthernet.h> ) with these two lines:
1
2
| #include <SPI.h>
#include <Ethernet.h> |
Wiring your Ethernet Shield
The wiring of the Ethernet shield is pretty straight forward, for more details read the “How to web-enable your Arduino” article.
Any Ethernet Module uses the GND and +3.3V or +5V pin, after all: we do need power.
For my eBay module I used the +5V (it has a voltage regulator onboard to handle that).
Below a table, based on a Arduino Uno, Arduino Nano and my eBay Ethernet module, with the additionally needed pins …
ENC28J60 Pins
| Pin name |
UIPEthernet |
My eBay Module |
| SS |
10 |
10 |
| MOSI (SI) |
11 |
11 |
| MISO (SO) |
12 |
12 |
| SCK |
13 |
13 |
My Arduino with ENC28J60 – A wiring example
Wiring your Temperature sensor
The temperature sensor is connected pretty simple. We will use pin 2 as the data pin of our sensor, and in my test setup I used two sensors, but you’re free to use one or more sensors.
For more details on how to wire a digital temperature sensor please read “How to measure temperature with Arduino and DS18B20“.
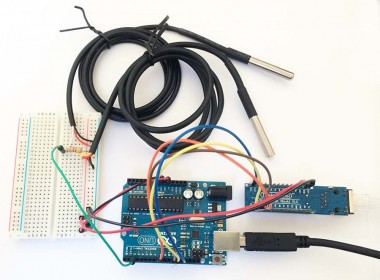
My Arduino with ENC28J60 and 2x DS18B20 – A wiring example
Everything wired
Depending on your Arduino board and the model of your ENC28J60 Ethernet shield, wiring could look like the illustration below. Keep in mind that I used my “Deek Robot – Nano Ethernet Shield” (from eBay) connected to my Arduino Uno, just as an example (I did not use the supplied Arduino Nano).
Follow the pins as illustrated in the table earlier on.
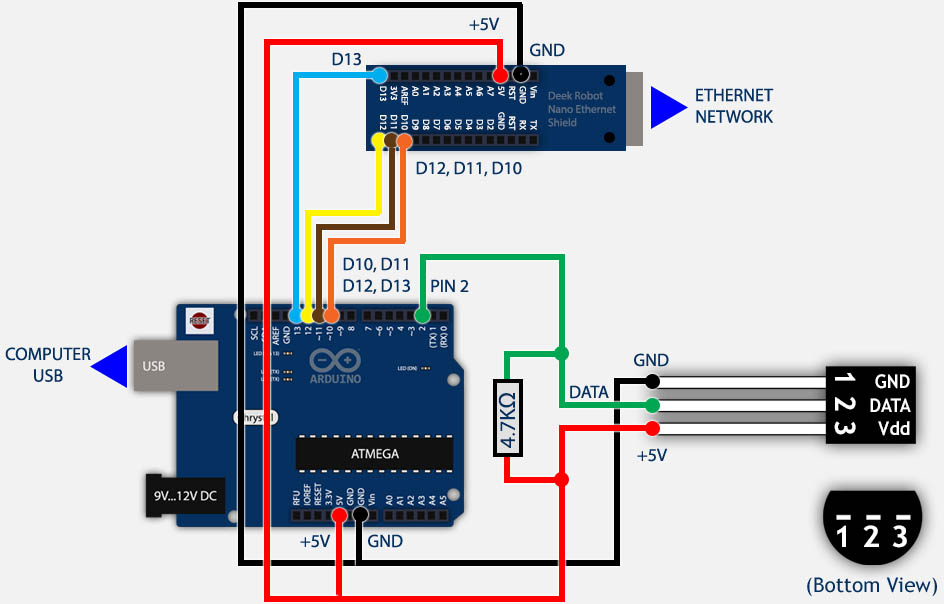
Arduino, ENC28j60 and DS18B20 wiring example
Ad Blocking Detected Please consider disabling your ad blocker for our website.
We rely on these ads to be able to run our website.
You can of course support us in other ways (see Support Us on the left).
Retrieving Data remotely
In this example, I’ll take the temperature sensor of my DS18B20 article and I’d like to be able to read the temperature data from my computer, phone or tablet, over a network connection. For simplicity we will take a computer connected to the network and our Arduino connected to that same network.
Pulling or Pushing Data
We have two options to get our Arduino data, and the best option depends on your purpose:
– Pull: An application on our computer (or server) that is going to ask the Arduino for the data.
– Push: The Arduino will connect to a server application to push the data to.
In this article we will focus on PULLING DATA to our computer.
This is the one I started with, since I didn’t need an application that would ask the Arduino for data. Instead I used a web-browser for testing purposes. In essence we are going to grab the data from the Arduino in the shape of a “webpage”.
Please note that you can format the output anyway you prefer, but for convenience I decided to use XML as a format. There is however nothing wrong with using CSV (Comma Separated Values), HTML, or your own home brew data structure. In the end it’s all text and if you decide to use your home brew application to retrieve the data, then it’s totally up to you what and how you do this.
If you look at the code of the “Hello World!” example that we used for “UIPEthernet” (see this “How to web-enable your Arduino“), then you’ll see in the loop that it’s basically waiting for a connection to be made (line 23). If a connection is detected and a connection actually exists (line 23 and line 30), data will be sent to the connecting party (line 41) and the connection will be closed (line 61).
Pretty simple right? We can grab this example code and replace line 41 with whatever data we would like to sent back to the connecting party.
Reading the DS18B20 Temperature Sensor(s)
This is the point where I’m very happy with UIPEthernet since the print function here is identical to the one we use when sending data to the serial port using Serial.print or Serial.println .
Even though my code might not be the most awesome code out there, it sure works great. I did my experiments successful with 1 and 2 sensors (I only have 2).
The function “TemperaturesToXML“, in the code below, basically captures the Sketch we used in the DS18B20 Temperature Sensor article using pin 2 for the temperature sensors. For those who actually read the article, now you know what my “other plans” for pin 10 was about. I had the Ethernet module in mind.
The rest of the code is just a modified version of the earlier mentioned “Hello World!” example code.
You can either copy/paste my code or download it as an .ino file.
Download - T4A TemperatureDrone
A few notes on the use of the client.print and client.println functions (dito for the Serial.print variants):
- Prevent combining different datatypes in the same statement – you might get unexpected results.
- You can use “\n” in a string to add a line feed (start new line).
- Look at the Arduino Reference for “Serial.print” for more tricks.
Output Examples
My example code will give you the following output in your browser, when using 2 sensors, should look something like this when going to http://192.168.1.179 (match the IP address in your sketch):
1
2
3
4
5
6
7
8
9
10
11
12
13
14
15
16
17
| <?xml version='1.0'?>
<sensordata>
<sensor>
<serial>28 88 84 82 05 00 00 6a </serial>
<status>OK</status>
<chip>DS18B20</chip>
<celsius>20.44</celsius>
<fahrenheit>68.79</fahrenheit>
</sensor>
<sensor>
<serial>28 da ca 27 05 00 00 49 </serial>
<status>OK</status>
<chip>DS18B20</chip>
<celsius>20.31</celsius>
<fahrenheit>68.56</fahrenheit>
</sensor>
</sensordata> |
The Serial Monitor output of your Arduino IDE will show something like this:
Tweaking4All.com - Temperature Drone - v1.0

-=-=-=-=-=-=-=-=-=-=-=-=-=-=-=-=-=-=-=-=-=-


IP Address: 192.168.1.179


-> New Connection


   Collecting Sensor Data:


   Sensor     : 28 88 84 82 05 00 00 6a

   Temperature: 20.44 C  (68.79 F)


   Sensor     : 28 da ca 27 05 00 00 49

   Temperature: 20.31 C  (68.56 F)


   Done Collecting Sensor Data

   Disconnected
Walking through the code
Some basics to get started:
Line 1 and 2 are the obvious Library includes, needed for the Arduino ENC28J60 Ethernet module, and the DS18B20 1-wire temperature sensor(s).
In the lines 5 – 11, we setup IP and MAC address and define port 80 for our data requests (HTTP).
Line 13 is a global variable use to “hold” the Ethernet Client connection, which allows us to communicate with the connected client.
For the temperature sensors we define pin 2 as the data pin in line 19.
Setup()
In the “setup()” function we open the serial port for debug data to the “Serial Monitor” of your Arduino IDE (menu “Tools” “Serial Monitor” and make sure it’s set to “9600 baud“). It seems that Arduino Leonardo users need to add a wait loop here for the serial port to initialize (after line 25, something like while (!Serial) { } ). Once that’s done, Ethernet is setup with given IP and MAC address (line 28) and some initial debug data is pushed to the serial port.
All “Serial.begin”, “Serial.print” and “Serial.println” lines can be removed if you don’t want any serial output.
Loop()
The “loop()” function is where we will be waiting for a connection and when found data will be retrieved from the sensors and returned to the requesting party. As usual: this loop keeps going until you remove power from your Arduino.
TemperatureToXML()
As mentioned before, the function “TemperaturesToXML()” captures the Sketch of the DS18B20 temperature sensor demo. Instead of pushing the data to just the serial port, we now also push it to the ethernet connection. Read the DS1820 article for more details on the inner workings.
Demo Sketch
Below the code that I used for it (see download link above) – once your Arduino is up and running, open a web-browser on your computer and type the following address (correct the IP address if you changed it in the example code): http://192.168.1.79
After a second or so your sensor reading(s) will appear in your browser.
1
2
3
4
5
6
7
8
9
10
11
12
13
14
15
16
17
18
19
20
21
22
23
24
25
26
27
28
29
30
31
32
33
34
35
36
37
38
39
40
41
42
43
44
45
46
47
48
49
50
51
52
53
54
55
56
57
58
59
60
61
62
63
64
65
66
67
68
69
70
71
72
73
74
75
76
77
78
79
80
81
82
83
84
85
86
87
88
89
90
91
92
93
94
95
96
97
98
99
100
101
102
103
104
105
106
107
108
109
110
111
112
113
114
115
116
117
118
119
120
121
122
123
124
125
126
127
128
129
130
131
132
133
134
135
136
137
138
139
140
141
142
143
144
145
146
147
148
149
150
151
152
153
154
155
156
157
158
159
160
161
162
163
164
165
166
167
168
169
170
171
172
173
174
175
176
177
178
179
180
181
182
183
184
185
186
187
188
189
190
191
192
193
194
195
196
197
198
199
200
201
202
203
204
| #include <UIPEthernet.h> // Used for Ethernet
#include <OneWire.h> // Used for temperature sensor(s)
// **** ETHERNET SETTING ****
// Ethernet MAC address - must be unique on your network
byte mac[] = { 0x54, 0x34, 0x41, 0x30, 0x30, 0x31 };
// ethernet interface IP address (unique in your network)
IPAddress ip(192, 168, 1, 179);
// ethernet interface IP port (80 = http)
EthernetServer server(80);
EthernetClient client;
// **** TEMPERATURE SETTINGS ****
// Sensor(s) data pin is connected to Arduino pin 2 in non-parasite mode!
OneWire ds(2);
void setup() {
// Open serial communications:
Serial.begin(9600);
// start the Ethernet connection and the server:
Ethernet.begin(mac, ip);
server.begin();
Serial.println("Tweaking4All.com - Temperature Drone - v1.0");
Serial.println("-=-=-=-=-=-=-=-=-=-=-=-=-=-=-=-=-=-=-=-=-=-\n");
Serial.print("IP Address: ");
Serial.println(Ethernet.localIP());
Serial.println();
}
void loop() {
// listen for incoming clients
client = server.available();
if (client)
{
Serial.println("-> New Connection\n");
// a http request ends with a blank line
boolean currentLineIsBlank = true;
while (client.connected())
{
if (client.available()) {
char c = client.read();
// if you've gotten to the end of the line (received a newline
// character) and the line is blank, the http request has ended,
// so you can send a reply
    if (c == '\n' && currentLineIsBlank)
        {
          client.println("<?xml version='1.0'?>\n<sensordata>");
          Serial.println("   Collecting Sensor Data:");
          TemperaturesToXML();
          client.println("</sensordata>");
          Serial.println("\n   Done Collecting Sensor Data");
          break;
        }
if (c == '\n') {
// you're starting a new line
currentLineIsBlank = true;
}
else if (c != '\r') {
// you've gotten a character on the current line
currentLineIsBlank = false;
}
}
}
// give the web browser time to receive the data
delay(10);
// close the connection:
client.stop();
Serial.println(" Disconnected\n");
}
}
void TemperaturesToXML(void) {
byte counter;
byte present = 0;
byte sensor_type;
byte data[12];
byte addr[8];
float celsius, fahrenheit;
ds.reset_search();
while ( ds.search(addr)) {
client.println("<sensor>");
// Get Serial number
client.print(" <serial>");
Serial.print("\n Sensor : ");
for( counter = 0; counter < 8; counter++)
{
if (addr[counter]<0x10) client.print("0");
client.print(String(addr[counter], HEX));
client.print(" ");
if (addr[counter]<0x10) Serial.print("0");
Serial.print(String(addr[counter], HEX));
Serial.print(" ");
}
Serial.println();
client.println("</serial>");
// Check CRC
if (OneWire::crc8(addr, 7) != addr[7])
{
client.println(" <status>Invalid CRC</status>\n</sensor>");
Serial.println(" ERROR\n");
return;
}
client.println(" <status>OK</status>");
// Get Chip type (the first ROM byte indicates which chip)
client.print(" <chip>");
switch (addr[0])
{
case 0x10:
client.println("DS18S20</chip>");
sensor_type = 1;
break;
case 0x28:
client.println("DS18B20</chip>");
sensor_type = 0;
break;
case 0x22:
client.println("DS1822</chip>");
sensor_type = 0;
break;
default:
client.println("undefined</chip>");
return;
}
ds.reset();
ds.select(addr);
ds.write(0x44); // start conversion, with regular (non-parasite!) power
delay(1000); // maybe 750ms is enough, maybe not
present = ds.reset();
ds.select(addr);
ds.write(0xBE); // Read Scratchpad
// Get Raw Temp Data, we need 9 bytes
for ( counter = 0; counter < 9; counter++)
{
data[counter] = ds.read();
}
// Convert the data to actual temperature
// because the result is a 16 bit signed integer, it should
// be stored to an "int16_t" type
int16_t raw = (data[1] << 8) | data[0];
if (sensor_type)
{
raw = raw << 3; // 9 bit resolution default
if (data[7] == 0x10) {
// "count remain" gives full 12 bit resolution
raw = (raw & 0xFFF0) + 12 - data[6];
}
}
else
{
// at lower res, the low bits are undefined, so let's zero them
byte cfg = (data[4] & 0x60);
//// default is 12 bit resolution, 750 ms conversion time
if (cfg == 0x00) raw = raw & ~7; // 9 bit resolution, 93.75 ms
else if (cfg == 0x20) raw = raw & ~3; // 10 bit res, 187.5 ms
else if (cfg == 0x40) raw = raw & ~1; // 11 bit res, 375 ms
}
celsius = (float)raw / 16.0;
fahrenheit = celsius * 1.8 + 32.0;
client.print(" <celsius>");
client.print(celsius);
client.print("</celsius>\n <fahrenheit>");
client.print(fahrenheit);
client.println("</fahrenheit>");
Serial.print(" Temperature: ");
Serial.print(celsius);
Serial.print(" C (");
Serial.print(fahrenheit);
Serial.println(" F)");
client.println("</sensor>");
}
return;
} |


Comments
There are 35 comments. You can read them below.
You can post your own comments by using the form below, or reply to existing comments by using the "Reply" button.
Hi,I tried using the code your provide here. However the code just hangs. I use a Nano v3 + Ethernet shield. I like the idea of having some extra details in the XML, so I tried your code.The serial reports it launches, but thats it.Any suggestions how to find the problem?Thanks,Robert
Robert
Hi Robert,
I’m assuming you mean the W5100 Ethernet shield? The Arduino sells?
In that case you’d need the regular Ethernet library and not the UIPEthernet library (I assume you already tried that).
Unfortunately I’m not experienced with the regular Ethernet library, but I’m planning on testing that in the near future (I won’t be able to test it within the next 2 months). Both libraries should be interchangable, but I can imagine that there are minor differences.
I’d add a few “Serial.println(“xyz”);” lines to see where it hangs, if it hangs. If anything, I’d checkout line 35 – 77.
hans
Hi Hans,
No I am actually using an Arduino Nano V3.0 + ENC28J60 Ethernet shield. For some reason however the code hangs after the moment it connects to the Arduino, somehow the sensor is not read out. If I run a standalone test for TCP webserver it works fine. If I run a temp sensor code seperately, it runs fine. I will try to do some debugging with your suggestions. I want this nano + shield to work, because it’s so darn nice and small.
Thanks for your help
Robert
Hi Robert,
Oh OK,… I’m planning to use the Nano for the exact same reason, just never got to it.
Unlikely, but could the power supply be too low?
I’ve seen quite a few people using this setup without issues, and some how I doubt the Nano is to blame.
hans
Hi Hans,
Ok. I will go and try. If I find a solution I will let you know. As far as I can see your code should just work. Even though there is little memory space left (almost 30k of code)..
L8r
Robert
Weird this is the serial output:
The skets does not print any sensor data at all. But when I run the sensor only skets:
The weird thing is that the code doesnot respond to the “ping” command either, which it should.
Hmmm, any suggestions on next steps are welcome.
Robert
Seems “TemperatureToXML()” is not doing anything … that’s weird.
Are you using the same pins as in the example above – I assume you wired it exactly like described, keeping in mind the physical differences of the Nano of course?
What’s the Wattage/Amps of the 5V power supply you’re using (although I doubt that would be the problem)? Can you try a strong 5V Power Supply? I’ve had some cheap Chinese PSU’s in the past that claim a certain Amps but in the end do not even get close to what was claimed which caused the Uno (and Raspberry Pi) to become unstable at times.
I’ve tried to find difference (electronically) between the Uno and the Nano,but could not find anything that would explain this … (I checked this list and the Arduino Forums and even Google for random blogs and such)
hans
Hans,
Found the problem, sometimes you just need to put down your work for a while and then look again. I reread your responses and it became clear right away.
The issue is that you cannot use pin 10 twice :-( I should have been more carefull when reading all the articles. It became clear right away after I looked at it again. The TCP server worked. The temperature reading worked. Just not at the same time. Because you can only use a pin once.
So leasson learned: only use every pin just once…
Thanks for you pointers, it helped.
Robert
Glad to hear that it works.
The “reading too quick” problem happens to most of us ;-)
hans
Hi Hans,
Thanks for your work! I started to build something similar and this helps a lot in the beginning..
I just have one improvement (from my point of view :-)). If you have only DS18B20 sensors on your 1wire bus, it takes a lot of time from opening the Webpage til get all the data. My advise is to let the sensors start conversion in the begining all at once:
after that you can run your original while(ds.search(addr)) {…} without conversion and the big delay.
This will help when you have 8 and plan for more sensors (my case) :-)
and again, Thanks for practical example with perfect description! Michal
Michal
Hi Michal!
Thank you very much for the suggested improvements!
I do not have the chance to test it yet (no equipment nearby, since I’m not home), but I most certainly will add it to the “to do” list.
Thank you for the compliment as well of course …
hans
hi Hans,
First,Thanks for this work u have done here.It was very helpful for my project.I encountered a problem.
Everything seems to work very well.Im pulling the data from ethernet as an html file.I want to write a php code to get the html content and save it on my database.However when i tried to use simple_html_dom function which extracts the contents of html i seem to get the error “file_get_contents(): send of 20 bytes failed with errno=10053 An established connection was aborted by the software in your host machine. in C:\wamp\www\mytry\simple_html_dom.php on line 1081”.
how to solve this problem?The way i want to do is it,in PHP when i give a http request to the ip address of the ethernet shield ,it should reply with an html file which i would be using to store in a database.
Please help..Thanks:)
This is the php code:
<html>
<head>
</head>
</body>
<?php
include ‘simple_html_dom.php’;
$html = new simple_html_dom();
$html->load_file(‘http://192.168.1.99/’);//This is the ip address of the ethernet shield.(This is where the error occurs)
?>
</body>
</html>
This is the arduino code:
#include <SPI.h>
#include <Ethernet.h>
// Ethernet MAC address – must be unique on your network
byte mac[] = { 0x54, 0x34, 0x41, 0x30, 0x30, 0x31};
// ethernet interface IP address (unique in your network)
IPAddress ip(192, 168, 1, 99);
// ethernet interface IP port (80 = http)
EthernetServer server(80);
EthernetClient client;
void setup() {
// Open serial communications:
Serial.begin(9600);
// start the Ethernet connection and the server:
Ethernet.begin(mac, ip);
server.begin();
Serial.println(“Tweaking4All.com – Temperature Drone – v1.0”);
Serial.println(“-=-=-=-=-=-=-=-=-=-=-=-=-=-=-=-=-=-=-=-=-=-\n”);
Serial.print(“IP Address: “);
Serial.println(Ethernet.localIP());
Serial.println();
}
void loop() {
// listen for incoming clients
client = server.available();
if (client)
{
Serial.println(“-> New Connection\n”);
// a http request ends with a blank line
boolean currentLineIsBlank = true;
while (client.connected())
{
if (client.available()) {
char c = client.read();
// if you’ve gotten to the end of the line (received a newline
// character) and the line is blank, the http request has ended,
// so you can send a reply
if (c == ‘\n’ && currentLineIsBlank)
{
client.println(“<html>”);
Serial.println(” Collecting Sensor Data:”);
TemperaturesToXML();
client.println(“</html>”);
Serial.println(“\n Done Collecting Sensor Data”);
break;
}
if (c == ‘\n’) {
// you’re starting a new line
currentLineIsBlank = true;
}
else if (c != ‘\r’) {
// you’ve gotten a character on the current line
currentLineIsBlank = false;
}
}
}
// give the web browser time to receive the data
delay(10);
// close the connection:
client.stop();
Serial.println(” Disconnected\n”);
}
}
void TemperaturesToXML(void) {
client.println(“<head>”);
client.println(“</head>”);
client.println(“<body”);
client.println(“<div class=\”sensorsdata\”>”);
client.println(“99”);// i wrote a sample html to check parsing of values to html variable in php
client.println(“</div>”);
client.println(“</body>”);
// Get Serial number
delay(1000); // maybe 750ms is enough, maybe not
}
Eswaran
Hi Eswaran,
sorry for the late reply – I had to think about this one, or better said: think how I can help.
You could try changing this part of the code:
to:
Maybe this way it will pick up the HTML correctly?
Just a thought, I did not test this.
hans
Hai hans,
Sorry for a long and messed up comment. Actually the problem was found to be the K9 Security software that i have installed in my system.It somehow did not allow the computer to communicate with arduino server.
Thanks for the help and reply :)
Eswaran
Good to hear you’ve got it resolved!
And … thanks for posting your solution – other will benefit from it!
hans
First of all
Thanks too much for the gr8 code u posted
i need the simple keywords of the UIPethernet that i can write a code to send and receive data through ethernet
i mean i need to deal with enc28j60 like Serial ports
Moustafa NAbil
Hi Moustafa,
I have no experience with using the ENC28J60 like a serial port … maybe one of the users/visitors here might know how and what is possible,
Sorry I cannot be of more help …
hans
it is like any another ethernet driver i just need to know how to code with UIPEthernet library exactly like it was arduino shield
Moustafa NAbil
As far as I know, the UIPEthernet library is an almost 100% compatible dropin for the standard Ethernet library that comes with the Arduino IDE (ie. The “standard” Ethernet Shield). So it should mostly work the same as the standard shield.
hans
i dont know how to use any ethernet library
Moustafa NAbil
Then I’m not quite sure what you’re asking …?
hans
I have written 3 articles that deal with the ENC28J60 …
Generic Arduino Ethernet (ENC28J60 included) article,
How to Push Data from Arduino to server,
How to Pull data from Arduino from a computer.
They all come with examples, I’d start reading through those.
(sorry if this is not answering your question)
hans
Hi,
I am very beginner of this field , now I am using HTU21D temperature sensor for my project, so please send the TemperaturesToXML() function code for HTU21D sensor. And my project task is want to save sensor sensing temperature values into text file on my local PC.
sivasankari
Hi Sivasankari,
I wish I could help – I do not have that model sensor.
Maybe others here have used this one and are willing to post their conversion code?
By the way, I noticed that AdaFruit has a fully functional Library for this sensor: AdaFruit HTU21D. .
.
Maybe that help
hans
When working with a raspberry, I had to replace the following line:
client.println(“<?xml version=’1.0′?>\n<sensordata>”);
with the code below:
client.println(“HTTP/1.1 200 OK”);
client.println(“Content-Type: text/xml”);
client.println(“Connection: close”); // the connection will be closed after completion of the response
client.println();
client.println(“<sensordata>”);
The arduino was sending the XML file correctly, but the raspberry was not able to interpret this as xml,
Thomas
Thanks Thomas!
Good to know, and thank you for posting the work around.
Could it be that the following lines screw it up?
I used “client.println” for the 3 cases, which would start a new line for the “</chip>” (the one with “default” should remain a println) – maybe using “client.print” resolves this issue?
So the code could be produce a cleaner results by doing this:
Just doing a stab in the dark here of course, but who knows.
hans
I just modified the example code to make the XML look cleaner – of course, I do not know if this helps the issue you ran into.
hans
UPDATE:
Bug in the code (for a leading “0” for the address bytes, I used <10, this should however be <0x10) and cleaner XML output (<chip> and </chip> on the same line now).
hans
[…] //www.tweaking4all.com/hardware/arduino/arduino-ethernet-data-pull/ […]
Hello,
Thanks for the nice tutorial. I’ve tried the code and successfully send data from Arduino to localhost but unable to receive the content from the server. I’ve modified the Arduino code as followed:
#include <UIPEthernet.h> // Used for Ethernet
// #define DEBUG
// **** ETHERNET SETTING ****
// Arduino Uno pins: 10 = CS, 11 = MOSI, 12 = MISO, 13 = SCK
// Ethernet MAC address – must be unique on your network – MAC Reads T4A001 in hex (unique in your network)
byte x;
byte mac[] = { 0x54, 0x34, 0x41, 0x30, 0x30, 0x31 };
// For the rest we use DHCP (IP address and such)
#define DEBUG true
EthernetClient client;
char server[] = “192.168.1.4”; // IP Adres (or name) of server to dump data to
void setup() {
Serial.begin(9600); // only use serial when debugging
Ethernet.begin(mac);
#ifdef DEBUG
Serial.print(“IP Address : “);
Serial.println(Ethernet.localIP());
Serial.print(“Subnet Mask : “);
Serial.println(Ethernet.subnetMask());
Serial.print(“Default Gateway IP: “);
Serial.println(Ethernet.gatewayIP());
Serial.print(“DNS Server IP : “);
Serial.println(Ethernet.dnsServerIP());
#endif
}
void loop() {
String inData;
// if you get a connection, report back via serial:
if (client.connect(server, 80))
{
Serial.println(“-> Connected”); // only use serial when debugging
// Make a HTTP request:
client.print( “GET /quizee.club/gateway/arduino.php?”);
client.print(“test”); // print: sensorx=
client.print(“=”);
client.print(x++);
client.print( ” HTTP/1.1″);
client.println( “Host: 192.168.1.3” );
client.println( “Host: “);
client.print( server );
client.println( “Connection: close” );
client.println();
boolean currentLineIsBlank = true;
String http_response;
int response_start, response_end;
while (client.connected())
{
if (client.available()) {
char c = client.read();
http_response += c;
// if you’ve gotten to the end of the line (received a newline
// character) and the line is blank, the http request has ended,
// so you can send a reply
if (c == ‘\n’ && currentLineIsBlank)
{
Serial.println( http_response );
break;
}
if (c == ‘\n’) {
// you’re starting a new line
currentLineIsBlank = true;
}
else if (c != ‘\r’) {
// you’ve gotten a character on the current line
currentLineIsBlank = false;
}
}
}
client.stop();
}
else
{
Serial.println(“–> connection failed !!”); // only use serial when debugging
}
}
This code sends the data from Arduino to the PHP server but in response the PHP server sends the message as following:
-> Connected
HTTP/1.1 200 OK
Date: Tue, 25 Apr 2017 06:47:23 GMT
Server: Apache/2.2.6 (Win32) PHP/5.2.5
X-Powered-By: PHP/5.2.5
Set-Cookie: PHPSESSID=8jj3eidsfaub76md3t0jq1kr76; path=/
Expires: Thu, 19 Nov 1981 08:52:00 GMT
Cache-Control: no-store, no-cache, must-revalidate, post-check=0, pre-check=0
Pragma: no-cache
Content-Length: 77
Content-Type: application/json; charset=utf-8
Everything is fine here, except I missed the content actually send by the server.
What’s wrong with this?
Bright
Hello,
I am using this setup and have it working, but noticed on the web page that it shows all of tags ie:
<?xml version=”1.0″?>
– <sensordata>
-<sensor>
On and on.
Is there any way to remove the tags and just display the data?
Thank you
Steve
Hi Steve,
yes of course. The reason why the XML tag is added, is so your browser shows data more structured. But it is not a requirement.
starting at line 53, set remarks before lines 54 and 57 as such:
I’d start with that and see what your browser does.
Likewise, in lines 93 and up, set remarks (//) before the lines like these:
client.println("<sensor>");The “<” (or “</”) and “>” lines are markers used in XML to enclose data section start/stop.
hans
I have been able to get the page to show only the temperatures of the two sensors I have on the unit.
I still have some tags left that I apparently need in order for it to show it how I would like it to.
However I was wondering is there a way to put a label on each of the sensors?
Instead of simply putting the serial number of the chip could it be configured to say something like Inside and Outside temp?
Here is a screen shot of what I have it set to now:
http://prntscr.com/lq8t6a
Steve
I have not tested this, but you could try something like this (lines 99-109):
hans
[…] http://www.tweaking4all.com/hardware/arduino/arduino-ethernet-data-pull/ […]