What is a Stack in the MacOS Dock?
A “Stack” is in essence a shortcut in your Dock, to a directory (folder) on your Mac, represented as a “stack” of icons.
In the following steps, we will illustrate this by using the “Applications” directory, where all your applications can be found, for much easier access to your Applications. You can of course do this with any folder/directory you’d like.
Adding A Stack to your Dock
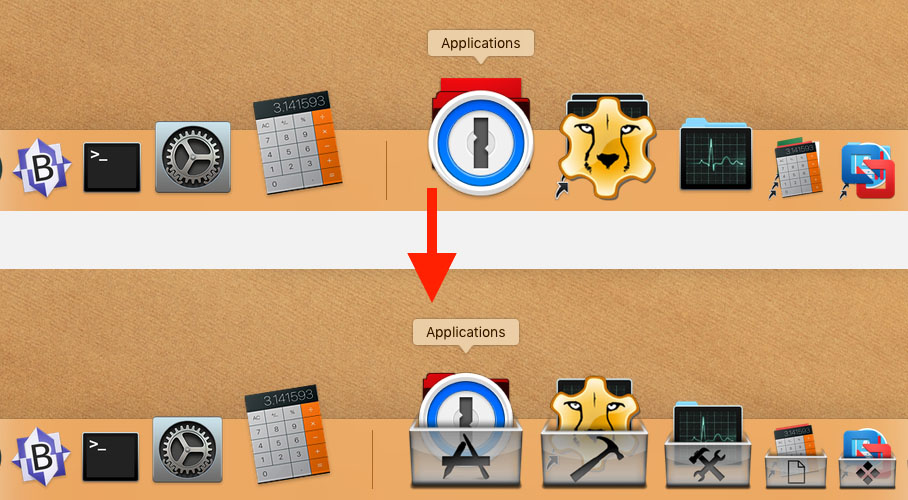
The easiest way to add a folder to the Dock, is by dragging a directory/folder from the Finder, onto the Dock.
For the “Applications” folder; in Finder (does not seem to work in PathFinder!) you can drag “Applications” from the favorites onto the Dock and drop it there.
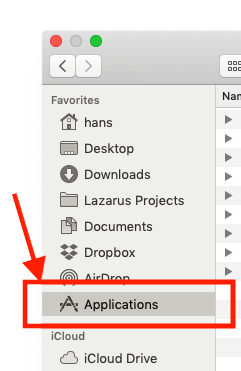
MacOS – Applications in Finder
A “stack” of icons will now be displayed, representing your “Applications” folder.
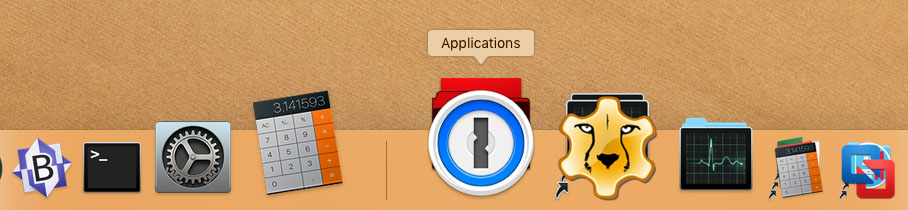
MacOS – Standard Dock look
When you click on this “stack”, all your applications (in the Applications folder) will be shown, either in a grid, fan, or list.
Note : Again, you can do this with any directory on your Mac, here we just use the Applications folder for illustration purposes, as this is probably the most common one to add to the Dock.
Stack Appearance Options
Now notice how the icon is shown in the Dock.
To represent the “stack” in the Dock, a compilation (or “stack”) of the icons of applications and/or files in that folder is shown (the Application folder in our previous step).
They are stacked in a certain order, something you can define per individual stack that is placed in the Dock. In this example, stacked alphabetically with the first icon on top.
Right click the stack in the Dock and you’ll see a menu appear allowing you to determine appearance and sort order.
I recommend playing a little with the different settings to get a feel for it.
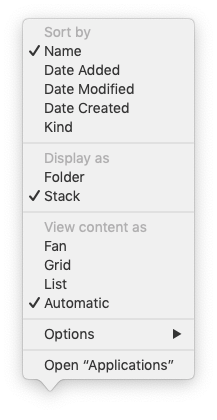
MacOS – Dock Stack Options
In the example above (figure 3):
Icons are Sort by name, the stack is Displayed as a stack in the Dock and the Content is viewed/displayed “Automatic“ (in my case it would show as a “Grid”).
Ad Blocking Detected Please consider disabling your ad blocker for our website.
We rely on these ads to be able to run our website.
You can of course support us in other ways (see Support Us on the left).
The Concept of a Stack Overlay
The idea behind dressing up a stack with a so called overlay, is based on the fact that icons of files and/or applications in that particular folder are “stacked” (placed on top of each other), and the fact that MacOS icons can be transparent.
Since the “stacked” icons are sorted alphabetically, you can see above, in figure 2, that the icon of “1Password” is on top (“1” comes before “A”).
Transparent Icon for our Buckets
Now to make an overlay, we’ll need an icon, say one that is transparent mostly and kinda looks like a bucket.
As for the file format for an icon, you could use the “icns” file format if you want to create them yourself. However, you do not need to worry too much about this, since there are quite a few icon collections out there that can be used for our purpose (see “Download Stack Overlay Icons” below).
A Japanese designer, Yasushi Chida’s, has created some really nice looking buckets for this purpose – unfortunately his website at GeoCities/Yahoo is down and his Deviant Art page is empty. Below an example of one of the buckets he created.
You can see the transparency at the top opening of the bucket.
The edges of the bucket itself are NOT transparent and this is done intentionally so it will “cover” the other icons.
Yet at the top, the other icons will be visible since the bucket icon is transparent in that area, and appear to be “in” the bucket.

MacOS – One of Yasushi Chida’s Stack Overlays
Using a Space Character to ensure the Icon stays On Top
If we would add such an icon file to the folder we are working with (“Applications” in our example), it would simply be added to the stack. Depending on it’s name it would be somewhere between the icons in the stack.
Now if we would give the icon have a filename that starts with a character that would always sorts alphabetically as the first file in the list, then it would become the top icon. Which is what we would want.
Alphabetically, a space seems to come before anything (you can see this for example in our ASCII list).
Usually files or application names do not start with a space. So if we name the icon file, starting with a space, it will always show on top.
Preferred Stack Options to make Stack Overlays work …
For the trick we are going to apply, we need to make sure that a few of these options are set right … (right click the stack, see also figure 3)
Set the “Display As” option to “Stack” – if you would set this to “Folder”, then a simple folder icon would be shown instead, which would not work with our Stack Overlays trick.
Make sure the “Sort by” is set to “Name“, besides the obvious practicality of it (searching for files in alphabetical order is easier), we want to use a space character to make sure the icon stays on top.
The “View content as” option can be set to whatever you prefer. My preference goes to the “Grid” option – but you can select whatever you like best.
Adding the Stack Overlay
Download Stack Overlay Icons
To get you started, I’ve made some of the stack overlay icons available. I’m sure you can find more on the Internet, these just are some of my favorites.
Below some examples (#2 and #3 are my favorites):
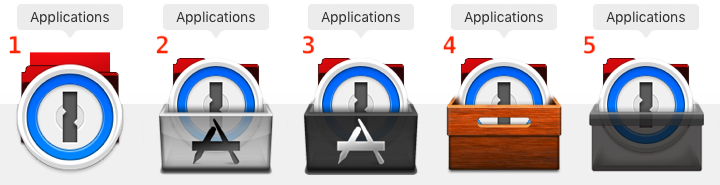
MacOS – Stack Overlay Examples
1 – The default Apple Dock stack look – no overlay.
2 – Yasushi Chida’s stack overlays, as done by him in 2007.
3 – A set of very nice looking stack overlays done by fb4yc at DeviantArt.
4 – A cool wooden stack overlay by tomqq at DeviantArt.
5 – A generic but very nice gray transparent stack overlay by turnpaper at DeviantArt.
As you can see … a good place to start looking for stack overlay icons is DeviantArt.
I’m offering these files here just as a backup feature and highly recommend downloading the original files from DeviantArt.
Unfortunately, Yasushi Chida’s website and his DeviantArt pages are either dead or empty, so I hope (with all respect for Yasushi Chida) it’s OK to offer the original files made by Yasushi Chida here.
I’ve created a ZIP file for each of the sets – after downloading the ZIP file, unzip it to be able to access the icon files.
Download - MacOS Stack Overlay Icons 2
Download - MacOS Stack Overlay Icons 3
Download - MacOS Stack Overlay Icons 4
Download - MacOS Stack Overlay Icons 5
Placing Stack Overlay Icons
Placing the icon is pretty straight forward:
After you unzipped the file (if you downloaded it here), find the icon you’d like to use and drag it in the directory you used for the stack.
Make sure the filename of the icon starts with a space.
So now that we know we need an icon file and where to get it, and that it’s filename should start with a space; time to add the icon to our example folder: Applications.
Find the icon you like and in Finder drag it into the “Applications” folder – and that’s all there is to it.
Caution: Some Folders require Admin Rights
Certain folders, for example the utilities folder in your Application folder, require you to authenticate when adding or removing a file – so this applies to icon files as well. This should not be a problem if this is your Mac, and you’re able to install applications. But if your account is not an admin account, this will not work for those folders. In that case you’ll have to ask, for example with an office Mac, an Admin to elevate your rights or have him/her copy the icon(s) for you.
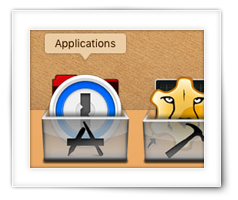
The effect should be instantly visible in the Dock (top: before, bottom: after):
MacOS – Stack Overlays in the Dock – Before and After
Removing the Stack Overlay
Removing the icon for the Stack Overlay is as simple as adding it. Simply grab the icon file and delete it (eg. drag the icon to the Trashcan).
Stack Overlay Icons in Directories
Please note that one possible downside of using Stack Overlay icons is that an icon file will reside in the folder – it’s harmless and can be ignored, but you will see the icon file in Finder when browsing this directory/folder.
Small Groups of Applications as a Stack
Now sometimes you may want to make a small group of applications for example for specific tasks.
The best way to do this is by creating a folder in your home directory, or in the Documents directory, and make/move an alias of the application in that folder.
Do NOT move an applications to other folders as this may cripple the application.
Next add the newly created folder to your Dock and optionally place a Stack Overlay icon in it.
(you can see in the screenshot that I did this for my Developer tools, Generic Tools, Office stuff and Virtual Machines)

Comments
There are 12 comments. You can read them below.
You can post your own comments by using the form below, or reply to existing comments by using the "Reply" button.
Just what I was looking for. Great explanation, and finally found the files I could no longer find, since Yasushi’s website has been down for such a long time.
Thanks man!
John
Thanks John, for taking the time to write a Thank-You note – it’s very much appreciated!
Glad this worked well for you as well!
hans
Just wanted to say thanks. I had seen these overlays before, just didn’t know how to use them.
Sascha
Sorry for the very late reply ….
Thanks Sascha for leaving a thank-you-note, it’s much appreciated
hans
Thanks so much for this — quick question: if I want to have my desktop as a stack, is there a way to keep the desktop stack overlay from appearing as an icon on my desktop?
Thank you!
AJR
Hi AJR,
So if you made the desktop a stack as well, then the icon will indeed appear on your desktop. I’m not aware of a trick to hide the overlay icon. There is a way to hide the overlay icon, but then it would not be visible in the dock either (start the filename with a period makes file invisible).
Unfortunately, dragging the icon outside of the visible desktop space will not work on a Mac either, since MacOS will not allow icons to be dragged outside of the screen.
In all this I assume that you’d still like to see the “normal” icons on your desktop.
If not, then you could consider moving the desktop icons into a separate folder, and add that separate folder to your Dock.
This is what I do for program or document groups. For example “Office”, “Programming”, “Web Development”, “Design”, etc.
This separate folder could still be on your desktop of course (for alternative quick access).
hans
These are fantastic and I’ve been using them for years, but unfortunately they no longer work in MacOS Catalina. I think it’s because Catalina no longer supports 32 bit apps, and these are (technically) .app files. Is there any tech-savvy genius out there who could re-save them as modern 64 bit apps? Thanks in advance! :D
Barry G
Hi Barry G,
good news, there is an easy fix for this … simple change the extension from .app to .icns …
hans
p.s you’ll see that in the zip files, those files are called .icns as well – I think Yasushi Chida may have originally used .app extension.
But the files here are all .icns and you can rename your files simply from .app to .icns.
hans
Fantastic. Thank you! 😃
Barry G
I downloaded this to use in Catalina and the file is called HUDstacks.icns but I cannot get it to work in Catalina. Does anyone know how to fix it?
Emery Emery
Hi Emery,
I’ve just tried “MacOS-StackOverlayIcons-5.zip“, which holds “HUDStacks by turnpaper“.
Dragging the file “wooden_stack_by_tomeqq.icns” to a directory, show up immediately in Catalina.
Did you set the view of that directory in the Dock to “sort by Name”, “Display as Stack” and “View Content as Grid” (that last one is not required)? Does the file list as the first file in your directory – otherwise rename it so it does, for example rename it to ” myfolder.icns” – note the space in front of the name?
Hans