Overview of this Chapter
A complete overview of this course can be found here: Course Overview.
What is an Arduino?
The Arduino is a small board with all kinds of electronics on it, build around a so called Micro-Controller, which we will use for Arduino Programming in these articles.
A Micro-Controller is basically an almost complete computer, just a lot smaller and a lot less powerful than your desktop PC, laptop PC or even your cell phone. Micro-Controllers are found in a lot of devices you have at home, even though you might not know this. Anywhere from Alarm clock, to Dishwasher, Micro-Controllers can be found.
In our case the particular Micro-Controller in the Arduino is a so called Atmel AVR. Atmel is the manufacturer and AVR is the model series. In essence the Atmel AVR is a processor, including memory, a kind of “Operating System”, and the necessary connections for interfacing (talking) with electronics like lights, switches, sensors, etc.
The downside, for beginners and those who’d like to experiment, is that it’s just a chip, which makes it cumbersome to connect all the wires, connectors and extra parts, each time we want to start working with it.
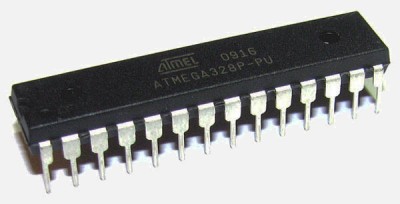
Atmel AVR ATMega328p Chip
That’s why a organization/company called “Arduino” created a board to make life easier … and in the years they have developed numerous models and variations of these boards, some smaller, some faster, some with more memory, etc.

Arduino Uno R3
As you can see in the image above, the Arduino board has the earlier mentioned chip (the Micro-Controller) installed. It also has a power connector, USB connector, and black strips to connect extra hardware like lights, sensors, relays, motors, etc.
Ad Blocking Detected Please consider disabling your ad blocker for our website.
We rely on these ads to be able to run our website.
You can of course support us in other ways (see Support Us on the left).
Which model will we use for Arduino Programming?
For the purpose of Arduino Programming, I have chosen the Arduino Uno R3, which is affordable and one of the most common Arduino’s at this moment of writing this article. You can find these for example at Amazon or eBay, but plenty other stores have these for sale as well. Also notice that eBay is not always the cheapest source to get your Arduino, and notie that you can buy “just” the Arduino Uno R3 or kits which include a USB cable or a complete starter kit with all kinds of extras. Up to you what you’d like to start with.
Please note that we need a USB A to USB B cable to connect the Arduino to our computer as well.
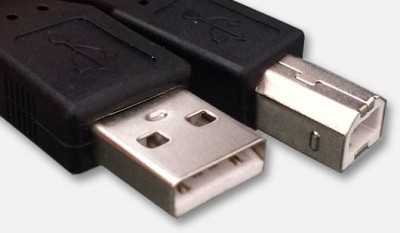
USB Cable with Type A and Type B connectors
Now, our Asian friends have made a lot of so called clones, or look-a-like copies, which can work exactly the same, just for a fraction of the costs. Since some of these clones do NOT work exactly the same, I highly recommend purchasing a genuine Arduino.
We recommend a genuine Arduino Uno R3 for your first Arduino experiences
The genuine Arduino’s can be recognized by their typical blue/white front and back.
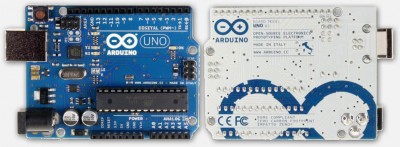
Arduino Uno R3 – front and back view
There is also a so called “SMD” version, which is the same as the regular model with only one difference: the Micro-Controller is much and much smaller and soldered on the board, but works just the same as the regular one. Because of that, the non-SMD version has te possible advantage that you can swap the chip in case you’ve destroyed yours or if you’d like to use the programmed chip elsewhere.
You can see the difference in the illustration below – see the big black chip on the left, which is just a little dot on the right (SMD).
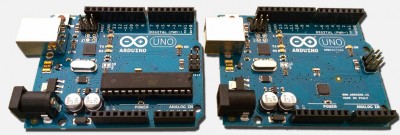
Arduino UNO R3 – Standard (left) vs SMD (right)
Note that you’re not required to get the Arduino Uno R3. Other Arduino models will most likely work just as well with the code and examples we present in these articles – but for simplicity reasons we stick to the Arduino Uno R3 for our Arduino Programming project.
What is an IDE and what is a Compiler?
An IDE is what they call an Integrated Development Environment, which means as much as “all the tools we need to program in one package”. The fact that all needed tools are combined into one package makes it easier to get started, and te Arduino organization offers this software package for free – you can download it here.
We have a version available at Tweaking4All as well, but keep in mind that might be outdated.
Download - Arduino Windows
Download - Arduino MacOS X
Download - Arduino Linux 32 bit
Download - Arduino Linux 64 bit
The IDE “package” includes a text editor (so we can write code), the means to connect to our Arduino, some extra libraries (code to make our life easier), and a so called compiler.
Translating languages
The compiler is one of the most important parts, since we write our programs in what they call a higher level language. It’s called higher level because we write in a language that us humans would understand better. In our case we do Arduino Programming in the language “C”, an English like language that has been around for quite a while.
The problem with humans and computers is that they do not speak the same language, and for most of us humans reading so called machine code is pretty difficult. A language like C however is more readable, but not so much for your Micro-Controller. So we need a translator.
There are two ways of translating our English kind-a language to machine language which your Micro-Controller would understand.
Interpreter – Translate on the fly
One way is translating on the fly, and in such a case we use what is called an interpreter.
See it as if you’re trying to read a book in a foreign language and a translator is sitting next to you, reading out loud the translation.
The advantage is that you can started right away, but te disadvantage is that you actually need to the translator to be present, and that the translator will first have to read the foreign language and then translate it line-by-line to your language, which makes it slower than regular reading. Such is the case with and an interpreter used on your computer.
Compiler – Translate before using it
The other way is what they call a compiler.
A compiler can be seen as a translator already having translated the entire book. So when you start reading, you simply open the book and start reading. No need to have a translator near by, and you’d be reading at your own pace, which is faster than when having a translator read and translate.
The downside however is that you cannot read the book without the translation being completed for the entire book.
The same goes with our computer: the translation of all our code takes a little longer, but the result is faster and you’d don’t need to have the “interpreter” handy, making things a little bit smaller and easier.
The Arduino IDE uses a COMPILER.
Ad Blocking Detected Please consider disabling your ad blocker for our website.
We rely on these ads to be able to run our website.
You can of course support us in other ways (see Support Us on the left).
How do we setup the Arduino IDE?
After you have downloaded the Arduino IDE suitable for your computer, time to install it and set it up the right way.
Download and Install the IDE
For the installation, use the usually application installation for your system.
Windows users double click the EXE file and follow the instructions, Mac and Linux users need to extract the archive first before they can install the application. After that, Mac OS X users drag the Arduino IDE app to their applications.
Once done, start the Arduino application, which will look only slightly different on each Operating System, but the “core” view is the same for all (Well done Arduino team!). As usual the MacOS X menu is in the top bar of your screen, where as Linux and Ubuntu have their menu in the top of the application window.
Connect your Arduino, to you PC, using the USB cable!
Note : During installation, appropriate drivers will be installed for the USB port as well. The more recent versions do this very well, even for Windows.
Arduino Software under MacOS X, Ubuntu and Windows
Initial Configuration of Arduino Software
After installation we need to do some initial settings in the Arduino software so it picks up our Arduino.
(don’t forget to connect your Arduino to your computer!)
Windows users
First we need to connect to the right device.
Open the menu “Tools” “Serial Port” and select the proper “Com” port (USB device), this will strongly depend on your computer, but it could be for example COM4. Most newer computers no longer have standard COM-ports build in, so in those cases this might even be COM1.
Next we need to set what type of Arduino board we’re using.
From the menu “Tools” “Board” select the Arduino board you have, in my case “Arduino Uno“.
Linux users
First we need to select the right device.
Open the menu “Tools” “Serial Port” and select the serial device for the USB connection to the Arduino (on my Ubuntu setup this was /dev/ttyMCA0 , yours might be different).
After that we can set what kind of Arduino we’re using.
From the menu “Tools” “Board” select the Arduino board you have, in my case “Arduino Uno“.
Mac OS X users
Mac’s don’t have com-ports, so we need to select the right device port for our Arduino.
From the menu choose “Tools” “Port” and look for the something like this (if you have an Uno): /dev/cu.usbmodem1421 (Arduino Uno) and select it.
Next we need to pick our Arduino type from the menu “Tools” “Board“, in my case “Arduino Uno“.
Now that we have completed this, we’re ready to run our first application on any of these platforms.
Test our setup
Now that we have installed and configured everything, time to test our setup.
For this we use a simple program that makes one of the LEDs on your Arduino keep blinking, based on code found on the Arduino website.
The first step is to copy the following code in the text editor of the Arduino IDE, replacing the text that was in there.
1
2
3
4
5
6
7
8
9
10
11
12
13
14
15
16
17
18
19
20
21
22
23
24
| /*
Blink
Turns on an LED on for one second, then off for one second, repeatedly.
This example code is in the public domain.
*/
// Pin 13 has an LED connected on most Arduino boards.
// give it a name:
int led = 13;
// the setup routine runs once when you press reset:
void setup() {
// initialize the digital pin as an output.
pinMode(led, OUTPUT);
}
// the loop routine runs over and over again forever:
void loop() {
digitalWrite(led, HIGH); // turn the LED on (HIGH is the voltage level)
delay(1000); // wait for a second
digitalWrite(led, LOW); // turn the LED off by making the voltage LOW
delay(1000); // wait for a second
} |
The next step is to verify if we made typos, compile (translate) the code to machine code, and upload our program to the Arduino. The IDE is very helpful in that, since we need to press only one button.
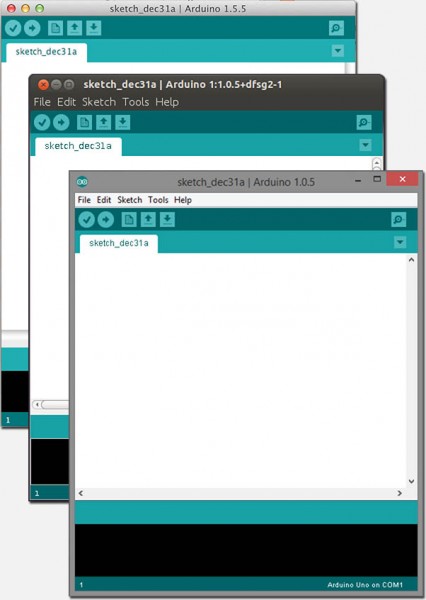
In the top of the Arduino IDE, you will see 5 buttons, or shortcuts, as shown below in figure 7.
After pasting the text in the text editor we press the “B” button.

Arduino Software – Useful shortcuts
Useful Arduino Shortcuts
| Shortcut button |
Purpose |
| A |
Verify – Verify Code |
| B |
Upload – Verify, Compile and Upload to Arduino |
| C |
New – Create New Sketch |
| D |
Open – Open existing Sketch |
| E |
Save – Save Sketch |
As you can see in the table, button “A” is only used to check if our code is correct.
Button “B” will do that as well, but it will also compile and upload our program if the code was verified successfully.
The button “C“, “D” and “E” are you usual file operations like creating a new file (C), opening an existing file (D) and saving a file (E).
You will notice that I’ve used the word “Sketch” in the table.
This is the lingo used for a file holding our source code, or often called just “code” – in other words: our program written in the language C.
Arduino Source code in a file is called a SKETCH
After you’ve clicked the “B” button, your program will be uploaded to your Arduino – lights will flickr a few times until it’s done uploading and our program will start. In this case it will switch the light (LED = Light Emitting Diode) marked in the drawing below: 1 second ON, 1 second OFF, 1 second ON, 1 second OFF etc …
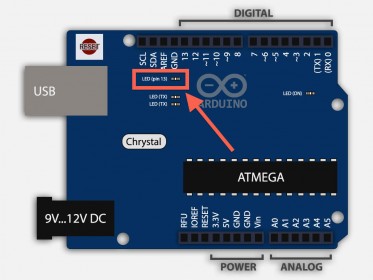
Arduino Uno: LED on pin 13
Congratulations, you’ve got an Arduino connected, the Arduino IDE installed and configured, and your first Arduino program running. You just did your first Arduino Programming, even though the “program” might not make much sense yet … that’s for the next part.
If you have questions, just ask them below in the comment section, and keep in mind: There are no stupid questions! We all had to start at some point!
Next chapter: Arduino Programming for Beginners – Part 2: Output


Comments
There are 2 comments. You can read them below.
You can post your own comments by using the form below, or reply to existing comments by using the "Reply" button.
The light blinks on and off but then stops, It does not repeat the program infinitly.
Here is what I wrote
int led=13;
void setup() {
pinMode(led,OUTPUT);
}
void loop () {
digitalWrite(2, HIGH); // turn the LED on (HIGH is the voltage level)
delay(1000); // wait for a second
digitalWrite(2, LOW); // turn the LED off by making the voltage LOW
delay(1000); // wait for a second
}
Laurie
Hi Laurie,
apologies for the late response, I was on vacation.
The problem may be that you entered a fixed number (2) when calling DigitalWrite in the loop().
Try this, and if needed change the first line to “int led=2;“;
hans