Raspberry Pi – Get an Operating System (free)
The Raspberry Pi, like all computers, doesn’t do much without an Operating System.
There are plenty so called IMG image files for an Operating System, and if you’re just starting, look at the Raspberry Pi Downloads page for some established Operating Systems. The offered IMG files are so called raw-image files.
The easiest way for Raspberry Pi beginners to get an Operating System, is NOOBS (New Out Of the Box Software), which at the time offers a menu at first boot, allowing to select which distribution you’d like to use. NOOBS at this time includes Raspbian (Debian variant), Pidora (Fedora variant), RiscOS, Arch Linux, OpenElec (XBMC) and RaspBMC (XBMC). The list of included Operating Systems may vary over time though …
When selecting an Operating System, wether it’s through NOOBS or by using an IMG file, to keep in mind that for those of you who just start getting familiar with Linux and Raspberry Pi, Raspbian is recommended. It’s the most commonly used Operating System for the Raspberry Pi, so plenty documentation can be found online in relation to the Raspberry Pi.
Keep in mind though that there are plenty of other good Operating Systems for the Raspberry Pi available, sometimes dedicated to a particular purpose.
Some run independently, others are based on one or the other Linux distribution (often Raspbian).
Raspberry Pi
Some examples:
- RPIx86 (run DOS on your Raspberry Pi – Raspbian based)
- RiscOS (derived from AcornOS from back in the day)
- Chameleon Pi (optimized for emulating old computers and old games – Raspbian based)
- PiMAME (emulate old Arcade Machines – Raspbian based)
- Raspbian (Debian Linux variation)
- Arch Linux (Linux distribution geared towards ARM CPU’s)
- OpenElec (Embedded Linux variant highly optimized for XBMC use)
- RaspBMC (Rasbian based, highly optimized for XBMC use)
- PiDora (Fedora based Linux distribution)
- RetroPi (Emulation of old computers and game consoles – Raspbian based)
- IPFire (Use your Raspberry Pi as a Firewall)
Note : Haiku, a BeOS inspired Operating System, is being ported to the Raspberry Pi as well. However at the moment that I’m writing this article, there is no “easy” IMG file available yet. Keep your eyes open on this one though, as it might have some serious potential.
Once you’ve decided what OS you’d like to use, simply download the IMG file and get a proper SD-Card ready for use (I’m assuming you do have a Raspberry Pi).
In most scenario’s a 4Gb SD-card will do, but you might want to look around for 8Gb or 16Gb cards – since they are not all the more expensive at form example Amazon or eBay.
Ad Blocking Detected Please consider disabling your ad blocker for our website.
We rely on these ads to be able to run our website.
You can of course support us in other ways (see Support Us on the left).
Installing a Raspberry Pi Operating System on SD-Card
As said before, an IMG file is a raw image file of a drive (in this case a SD-Card), and there are several ways to write the IMG file to an SD-Card.
Simply dragging an IMG file to an SD-Card is NOT one of them unless … you use the NOOBS method …
Methods to choose from to get an Operating System for Raspberry Pi on an SD-Card:
Re-using a previously used SD-Card
It’s not uncommon to re-use a SD-Card that you’ve used for the Raspberry Pi before.
Often these cards can be tricky when it comes to identifying the SD-Card as they often have multiple partitions.
I recommend “cleaning” such an SD-Card before starting any of the IMG based methods to minimize confusion.
WINDOWS
By using “Control Panel” “Administrative Tools” “Computer Management” “Storage” “Disk Management“, you can remove all partitions of the SD-Card and create one simple partition. Don’t forget to set the “Filesystem” to “FAT32“. If asked, format the drive.
MACOS X
Use “Application” “Utilities” “Disk Utility” where you’ll have to click your SD-Card in the list on the left (Apple SD-Card reader will say something like “Apple SDXC Reader Media” or find it by size of the SD-Card, for example “16 Gb”. Next click the “Partition” tab and choose “1 Partition” under the “Partition Layout” drop down. Set “Format” to “MS-DOS (FAT)” and optionally enter a recognizable name under “Name”, for example “RPI” or “RASPBERRY”. And last but not least, click the “Apply” button.
Easiest – the NOOBS Method (Windows, MacOS X and Linux)
This is probably the easiest way to get an Operating System running on your Raspberry Pi.
The downside is that your selection of Operating Systems, is limited to what RaspberryPi.org bundles in the NOOBS package.
Step 1 – Download the NOOBS archive
You can download NOOBS from the raspberrypi.org download page for free. There are two versions: the offline and the online (network) installation, where the latter is a much smaller file to download, and needed data will be downloaded once you selected your Operating System of choice. The offline version has everything you need and does not require an Internet connection.
Place your SD-Card (4Gb minimum) in your computer and prepare to partition and format it. Zie “SD-kaart hergebruiken” voor details.
The SD-Card needs to be one single partition and MUST be FAT-32 formatted. Older FAT versions (FAT, FAT-12 or FAT-16) and NTFS will NOT work.
MacOS X – DiskUtility
When using MacOS X’s DiskUtility, you’ll find only FAT or exFat as an option. FAT however is actually FAT32 and will work just fine.
Step 3 – Copy the files from the archive to the SD-Card
After unzipping the NOOBS archive, you’ll find (I used the offline version as an example) the following files and directories:
defaults <DIR>
os <DIR>
BUILD-DATA
INSTRUCTIONS-README.txt
RECOVERY_FILES_DO_NOT_EDIT
bootcode.bin
recovery.cmdline
recovery.elf
recovery.img
recovery.rfs
riscos-boot.bin
Copy these files and directories to the root of the SD-Card (meaning: drag and drop them on the SD-Card).
After you finished copying, you will need to make sure that you eject the SD-Card properly, according to the rules of the OS you’re using. A delayed write to the SD-Card might still be in progress in the background and premature removal without proper eject might corrupt the card and/or files.
Step 4 – Boot Raspberry Pi from the SD-Card
The next step is pretty obvious. Power up your Raspberry Pi after inserting the SD-Card in your Raspberry Pi, and having keyboard (mouse optional) and monitor connected.
NOOBS will boot quickly and show you a few messages, including a menu where you can select your Operating System.
After you made your selection press the “i” key and your SD-Card will be repartitioned and the Operating System of your choice will be installed. It will take a while, and during this process a message will display progress and possible login information (might want to take note of that!).
SD-Card won’t boot …?
If you run into problems (Raspberry Pi refuses to boot from the SD-Card), you can use a free tool that can be downloaded from sdcard.org for Windows or MacOS X to help you partition and format the SD-Card.
Linux users are less fortunate, but can use the standard parted command-line tool, or GPartEd if you prefer, to create a single FAT-32 partition. Don’t forget to format it!
NOOBS Video Mode at Boot
NOOBS will by default will boot in HDMI video mode.
If you’d like to change video mode press the 1, 2, 3 or 4 key on your keyboard to select:
- Standard HDMI mode (default),
- HDMI safe mode,
- Composite PAL mode (RCA) or
- Composite NTSC mode (RCA).
IMG to SD-Card under Windows
Step 1 – Download the IMG file of the Operating System of choice
First we will need to download an IMG file of the Operating System of choice.
The IMG file for most of the Operating Systems mentioned before can be found on their websites or you can pick an IMG file from the Raspberry Pi Download Page.
Note : Most of the time, a IMG has been compressed with ZIP, RAR, GZIP, 7z, or something like that. Uncompress these files before using them!
WinFlashTool – A very good alternative to Win32 Disk Imager
WinFlashTool is probably the best alternative when it comes to ease of use – I’d almost say that I think it’s even better than Win32 Disk Imager.
When using WinFlashTool, you might have to uncheck the “Hide devices with mixed media” option to make you SD-Card visible.
Your SD-Card might show with an unexpected name though, for example mine shows as /dev/rdisk1 USB device – not your usual Windows notation.
Step 2 – Download Win32 Disk Image
Under Windows, a free utility called Win32 Disk Imager, is often used, which can be downloaded for free from the SourceForge Page if Win32 Disk Imager or straight from Tweaking4All. As usual, the warning to get the file from the developers website as it will most likely be a more recent version.
Download - Win32diskimager
After downloading, unzip the file, and start the application (Win32DiskImager.exe). Under Windows 7, 8, or newer, you might be needed to start this program with elevated rights (in other words: Right click the executable and click “Run as administrator”).
OPTIONAL:
For those who run into issues with Win32 Disk Image, or for those would rather like to use WinFlashTool, please download it from the WinFlashTool homepage, or download it from Tweaking4All. Again, we recommend downloading this from the developer’s website, to make sure you have the latest version.
Step 3 – Write the IMG to the SD-Card
In Win32 Disk Imager, we now need to identify the drive letter of our SD-Card and select the drive letter of your SD-Card.
Next we need to select the Image File in Win32 Disk Imager and click the “Write” button.
This process will take a couple of minutes, depending on the size of your IMG file and the speed of your computer, SD-Card reader and SD-Card.
Win32 Disk Imager does not seem to like IMG files stored on network shares, copy the IMG to your computer first if that’s the case.
Make sure not to pull the SD-Card out of your computer without a proper Eject – some systems might have a write delay, and removing the card without following the proper eject procedure might corrupt the data on the card.
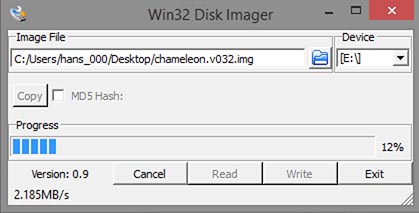
Win32 Disk Imager – Writing an IMG file to an SD-Card
Step 4 – Boot your Raspberry Pi from the SD-Card
Power on your Raspberry Pi after inserting the SD-Card and connecting Monitor and Keyboard.
IMG to SD-Card under MacOS X
As with Windows, several tools can be used. Some examples: Pi Filler (GUI), PiWriter (GUI), RasPiWrite (script), RPi SD-Card Builder (GUI) or even the standard with MacOS X included “dd”.
In this article we will focus on the basic command-line option, by using the dd statement.
The alternative tools (if I’m not mistaken) utilize the dd statement internally as well.
Update: ApplePi-Baker – Making it easy for Mac users …
To meet my own needs to have a more practical way to “flash” an IMG file to an SD-Card, I wrote a program to do just that for me. It’s free for anyone who finds it practical. I will leave the “hardcore” method in this article for reference, but I do recommend ApplePi-Baker if you’re a Mac user.
Read the article “ApplePi-Baker” for details on how it works and where to download.
Step 1 – Download the IMG file of the Operating System of choice
First we will need to download an IMG file of the Operating System of choice.
The IMG file for most of the Operating Systems mentioned before can be found on their websites or you can pick an IMG file from the Raspberry Pi Download Page.
Note : Most of the time, a IMG has been compressed with ZIP, RAR, GZIP, 7z, or something like that. Uncompress these files before using them!
Step 2 – Insert and identify SD-Card
This is the step where you have to pay attention – if you make a mistake here, you will destroy data on the wrong disk!
Insert the SD-Card in the SD-Card reader.
Open Terminal (“Application” “Utilities” “Terminal“), so we can start with identifying the SD-Card.
Type the following followed by pressing the ENTER key: df -h.
The “df” statement will list all mounted drives and their available/used disk space. You will see something like this:
1
2
3
4
5
6
| Filesystem Size Used Avail Capacity iused ifree %iused Mounted on
/dev/disk0s2 465Gi 444Gi 21Gi 96% 116387144 5541085 95% /
devfs 186Ki 186Ki 0Bi 100% 645 0 100% /dev
map auto_home 0Bi 0Bi 0Bi 100% 0 0 100% /home
//user@Someserver/Documents 16Ti 14Ti 2.0Ti 88% 3827538534 530866340 88% /Volumes/Documents
/dev/disk1s1 15Gi 2.3Mi 15Gi 1% 0 0 100% /Volumes/RPI |
To find our SD-Card, only look at the lines that end with /Volumes ... (the last 2 in this example). All other mounts have nothing to do with your SD-Card. Now find the name of your SD-Card, in our example this is RPI. We find that [a partition of] our SD-Card is /dev/disk1s1.
Tip : If you’re not sure, simply eject the SD-Card and do a df -h again, insert the SD-Card again and do a df -h once again. Now look which line was added – this will be your SD-Card.
We now need to determine the actual device and not the partition that we found.
You will have to pay attention here, as we do not want to end up selecting the wrong device and wipe your harddisk clean.
So we found, in our example, that the SD-Card is /dev/disk1s1.
The s1 part is indicating the partition we’re looking at.
The /dev/disk1 part is the SD-Card device, which is what we need.
The raw device (much faster!) in this case would be /dev/rdisk1 (notice the “r” in front of “disk1”).
Now apply this “trick” to the device you found.
Recap based on our example (replace with your findings) – we will need this info in the following steps:
SD-Card partition: /dev/disk1s1
SD-Card device: /dev/disk1
SD-Card RAW device: /dev/rdisk1
Step 3 – Unmount the SD-Card partition(s)
Please note that un-mounting is NOT the same as ejecting the SD-Card.
In terminal type the following line, where you have to replace /dev/disk1s1 with the SD-Card partition we found in Step 2: sudo diskutil unmount /dev/disk1s1
Your admin password will be asked and the result will say something like: Volume RPI on disk1s1 unmounted (RPI is the name of the SD-Card volume that you unmounted).
If you get an error message saying that the unmount failed, then please check your spelling of the SD-Card partition name.
If you get an error message that the Resource is Busy, then your unmount didn’t work, or more than one partition can be found on the SD-Card.
If there are multiple partitions on the SD-Card, then please consider the previously mentioned “Re-using a previously used SD-Card” or unmount all partitions of the SD-Card.
Step 4 – Write the IMG to the SD-Card
Note : This step work with the SD-Card device (/dev/disk1 in our example) and the SD-Card Raw Device (/dev/rdisk1 in our example). Using the raw device will speed up things significantly, on my computer with a Class 10 card, the speed was about 11x faster when using the Raw Device (rdisk).
In Terminal type the following line and replace “file.img” with the filename of your IMG file, and replace “/dev/rdisk1” with the SD-Card Raw Device we determined in Step 2.
In this example we assume you start the dd statement in the same directory as where your IMG file is stored. If this is not the case, then please enter the IMG filename completely with path (for example: ~/Downloads/file.img).
sudo dd bs=1m if=file.img of=/dev/rdisk1
A brief explanation of what’s happening here:
We use sudo to run dd with admin rights (and your admin password will be asked), bs=1m means that we set the input and output blocks to 1 Mb, if=file.img is where we set the input file to file.img, and of=/dev/rdisk1 is where we set the output file to /dev/rdisk1. Note that the parameters in this statement are case sensitive,
Tip : Progress monitoring with dd sucks. Half the time you have no idea what’s going on. Press CTRL+T to occasionally see what the progress is – it will also give you an idea if dd got stuck or not (I’ve never seen dd being stuck).
Once dd completed, execute a “sync” and optionally eject from th command line:
1
2
3
| sync
diskutil unmountDisk /dev/disk1
diskutil eject /dev/disk1 |
Step 5 – Boot your Raspberry Pi from the SD-Card
Power on your Raspberry Pi after inserting the SD-Card and connecting Monitor and Keyboard.
IMG to SD-Card under Linux
Linux users can follow the steps outlined under “IMG to SD-Card under MacOS X” when utilizing the shell statement “dd“.
For finding the proper device, it’s easiest to simply eject the SD-Card and do a df -h, insert the SD-Card again and do a df -h once again. You will see that a new line has been added, which will be your SD-Card.
The mentioned “Volumes” mounts under MacOS X doe not apply to Linux.
Tip : Instead of dd one could also use dcfldd – which is basically the same as dd, however it keeps you updated about progress. The command-notation is the same, just replace “dd” with “dcfldd”.
I had no luck with other recommended applications like ImageWriter under Ubuntu (Unable to locate package) or Gnome-Disks (dependency issues). Which of course does not mean that in the near future these options might work again.
Note :
- In contrast to MacOS X, under Linux the value for the “bs” parameter should be written in capitals. So for example “bs=4m” would be correct for the Mac, but under Linux this should be “bs=4M”. Also note that when reading a card, “bs=2M” might be slightly faster.
- Linux does not know the “diskutil” command, so you will have to eject the SD card the “usual” way.


Comments
There are 4 comments. You can read them below.
You can post your own comments by using the form below, or reply to existing comments by using the "Reply" button.
Although I already new the facts how to write an image to a USB stick or SD Card it is always good to see how it works in detail for the specific application.
Thanx a lot for your detailed explanation!
Hannes
UPDATE:
Added for MacOS X and Linux: Execute the “sync” command after dd has completed writing.
hans
hey im having alot of trouble with trying to get my rasbery pi to boot up ive followed everything for it on my windows computer and still nothing help!
chanin84
Hi Chanin84,
I’d be happy to help, which image file did you use?
If it was compressed (since you’d be using Win32DiskImager), did you decompress it?
Did you try another SD card? (SD cards are not know for being the most reliable)
hans