With the average “life-span” of a cellphone (the time we actually use the phone) of 1 to 2 years, a lot of folks should have one or two “old” smartphones laying around collecting dust. Quite a few of those most certainly outperform my first PC’s with ease. So wouldn’t there be good ways to repurpose our “old” smartphones?
Without realizing, I kind-a already did this when I started using my 1st generation iPhone as a monitor for my Foscam IP camera’s.
In this article I’ll show you how I’m using my old iPhone (1st generation) as a monitor for my IP camera’s, and hopefully this will be the first of many articles in which we repurpose our old cellphones.
Version for your iPhone
Using an old iPhone can potentially come with a downside: The operating system may be outdated and not allowing the installation of needed apps, or not supporting functionality we’d like to use (other phrases used for operating system are system software, ROM, or firmware). With an iPhone we’re talking about the version of iOS.
The first problem I ran into was that my old iPhone was a really old, a 1st generation iPhone (a.k.a. iPhone 2G) …
Apple’s App Store isn’t supporting it anymore (shame on you Apple – I would have bought the apps that I needed!). Basically anything older than iPhone 4 is screwed out of the option to install apps (and with the introduction of the next generation of iPhones, this will be bumped again!).
But there is a solution for us old iPhone owners that have been abandoned by Apple!
Whited00r (outdated)
Outdated: WhiteD00r abandoned …
Unfortunately, Whited00r seems abandoned these days and the links go to some outfit that conveniently use the Whited00r name. I’m not sure if there is a connection or not but the Whited00r solution is no longer available.
Some awesome guys made an iOS version which offers functionality and looks of the newer iOS version. It is called Whited00r and best of all: it’s free. It also comes with a custom app store, which currently (August 2013) offers 500+ apps for free – some of those are the ones we can use for this purpose!
So for older devices (older than iPhone 4): Go to Whited00r and install it by following their installation guide (this should take about 15 minutes).
Using your old iPhone as an iPod …
Apple is playing nice when it comes to using your old iPhone as a iPod like device – i.e. an iPhone that cannot be used for cellphone calls. See: Apple Knowledge base.
If you however installed Whited00r then this is a none-issue to begin with as it allows you to unlock/jailbreak the phone instantly …
Ad Blocking Detected Please consider disabling your ad blocker for our website.
We rely on these ads to be able to run our website.
You can of course support us in other ways (see Support Us on the left).
Use your old iPhone as a “Security” Monitor
The first thing I used my old smartphone for was as a monitor – I couldn’t see my drive way from my desk, so I bought an IP Camera, the Foscam FI8910 – They are pretty cheap, and very widely supported by all kinds of apps, you can even get a Foscam FI8910 3-pack.
An IP Camera is basically a camera connected to your network, wired or wirless, with a build “computer” that allows you to see the video feed on another device.
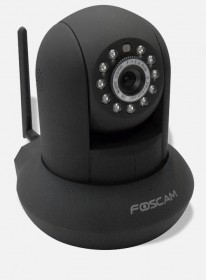
IP Camera – Foscam FI8910
Using a program or the web-browser on your computer works great, but the point is that I’m constantly working on my computer and an additional window open on my screen is not exactly practical.
The same goes for my cellphone – there are plenty of apps that allow me to see the video feed. However I’m mainly using it for making calls or send text messages, and guess what: that is when I cannot see my driveway.
Since I had an old iPhone (1st generation also referred to as iPhone 2G) laying around, I figured: why not use that one? And that’s how it all started …
Note : In the following steps I assume that you have an IP camera like the Foscam 8910 (or another brand/model), either wired or wireless connected to your network, that you know how to access it (IP address, port number, username, password), and that the camera is compatible with the app you’re about to use. I also assume that you have your “old” iPhone connected to the same network, wireless.
Getting the right App …
Depending on your iPhone model, you might need to install Whited00r (see previous chapter) – in this explanation we assume you did. Newer iPhones can just go to the Apple App Store and get the Live Cams Pro app there ($3.99).
Note : I like the app “FoscamPro” even more, specifically for my Foscam camera’s. It’s quicker and … slow as it my be, it even works over EDGE! It’s $5.99 at the time I’m writing this article, but I’ve found it well worth the investment. Unfortunately, you must have an iPhone with the most recent iOS installed, otherwise the app store won’t work. I was not able to find it in Whited00r …
For my purposes I used “Live Cams” (which I actually bought for my iPhone 4S).
Note : There are multiple IP cam apps out there – Live Cams is just the one I bumped into that worked right away with my camera and has a very wide support for other camera brands and models.
Follow these steps to install the app:
Start the “App Market” (1), swipe left (2) and choose “Time Machine” (3) in the App Market.
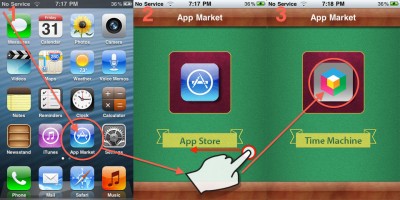
Whited00r – Go to Time Machine
Enter “Live Cams” (4) in the search box and press the “Search” button.
Once found, Tap the “Install” (5) button next to “Live Cams Pro“, a new window will open where you tap the “OK” button.
Note : At the bottom of screen 5, you will see a small box appear saying “downloading”, “installing” and “installed”.
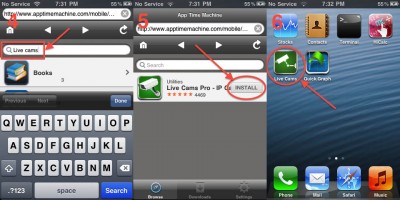
Whited00r – Install Live Cams
“Live Cams Pro” will now be installed and should appear on your phone (6).
Start the app, tap “Select Cams” (7), choose “My Cameras” (8) and tap “Add Camera” (9).
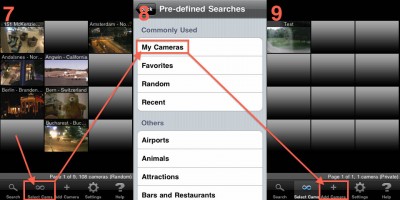
Whited00r – Add your camera
Under “Add Camera” you’ll have to find the brand and model of your camera, and enter the access settings like IP address, etc.
Once you’ve completed and saved those settings, your camera will appear in the list of “My Cameras” (see the illustration above a point 9, where you can see – in the upper left corner – that I have already added my camera).
Tap the camera you’d like to watch on your “monitor” – rotate your phone for landscape view:
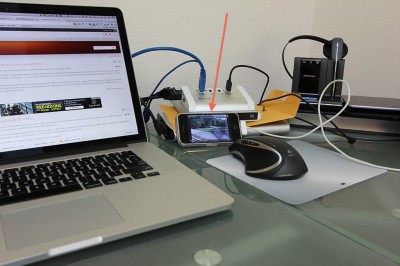
My old iPhone as a security monitor
For those wondering:
Yes … I actually used regular Scotch tape, folded, to hold my phone in place – one of these days I’ll print something with my 3D printer.
My iPhone is also constantly connected to my computer (powered USB hub or charger) – the battery of my old phone isn’t the best after many years of use …
It’s up to you where you’d like to place your new “monitor” – kitchen, garage, backyard, deck,… what ever works for you to keep an eye on things – as long as you stay in range of your Wifi.
Accessing your camera’s outside of the range of your Wifi
So you’d like to access your camera’s remotely, meaning outside of the range of your Wifi – for example at work, or when you’re on vacation. This is very well possible, as most smartphones have a fast Internet connection as well (3G, 4G, UMTS, whatever they call it). I have even had success with good old snail slow EDGE.
Before you can access you IP camera from the Internet (including 3G etc.), you’ll do need to do some Port Forwarding and possible need the use of a Dynamic DNS service. Please read the last paragraphs of the “Home Network Basics” article and consult the manual of the IP Camera you’re using. Some App providers do provide a small tutorial for this as well.
The short version:
1) You need to be able to reach your home network.
Your home network can be reached through it’s public IP Address. This can be problematic, specially when your Public IP Address changes each time you disconnect from the Internet. A service like DynDNS.org however provides the means to work around this problem by linking a web-address (http://www.example.com) to your IP Address and having your modem or IP Camera for example automatically update the Public IP Address information when it changes.
2) Redirect the IP Port(s) to your IP Camera.
To access your home network is one thing. Next you’ll need to tell your modem or router where to direct incoming traffic to.
For this purpose we assign an IP Port which will be mapped or forwarded to your IP Camera.
Some IP Camera’s, like those from Foscam, already have something like that setup for you.



Comments
There are no comments yet.
You can post your own comments by using the form below, or reply to existing comments by using the "Reply" button.