You probably will not need this every day, and I admit that goes for me as well. Today however I needed this: screen recording things I’d be doing on my iOS device (iPhone, iPad, iPod).
In the past we’d need to JailBreak our iOS device, but with the arrival of Mac OS X Yosemite (10.10) and iOS 8, we can do this straight on our Mac without any extra tools or tricks – just with the build-in tools from Mac OS X and iOS, in this case QuickTime.
In this article I’ll show you how you can make a screen recording (make a video of the screen of your iOS device) with a well hidden feature of QuickTime.
Screen Recording or How do I record the screen of my iOS Device
You’ve probably seen it before … so called “screen recording”, where a person makes a video of his or her actions on their computer, typically for instruction purposes. One of the best known applications for that purpose is Camtasia. But it’s unfortunately not free and it doesn’t record your iOS screen (yet).
Note that QuickTime can do Screen Recording of your Mac as well – “File” “New Screen Recording“.
But why look for a 3rd party application when you can do it just with the build-in tools of Mac OS X?
There are several reasons, of course, why you’d might want to use a commercial application, but for the occasional user, this solution works well and is completely free.
I’ve tested this in Yosemite and in El Capitan (beta 3), and it works butter smooth.
What we need
With OS X Yosemite and iOS 8, you can now create high quality videos of your iPhone or iPad screen using QuickTime. So we need:
- Mac running Mac OS X 10.9 or newer (Yosemite, El Capitan, etc)
- iOS device (iPhone, iPad, or iPod) running iOS 8 or newer
- USB cable
Recording the screen of your iOS device
Step 1 – Connect your iOS device to your Mac
For this we need the USb cable that came with your iOS device – so either the old connector, the newer lightning cable, or once they become available a USB-C cable (not sure if that’s going to happen).
Connect your iOS device to your Mac.
You will need to unlock your iOS device and click the “Trust” button when asked if you trust this computer.
Step 2 – Start QuickTime Player on your Mac
On your Mac, go to your Applications folder and start QuickTime (or: QuickTime Player). The name of the application is a little misleading … since we’re NOT going to be using it to play anything …

Start QuickTime Player
Step 3 – Preparing Recording your iOS device screen
When QuickTime starts, it will begin by asking what file to open – which is not what we need at this point.
You can click right away the “File” menu and choose “New Movie recording“, or press the key combination Option-Command-N (N).
QuickTime will initially start by using your build-in iSight camera (webcam), again not what we wanted.
To select the correct video source, click the downwards facing “v” next to the red record button (1) to open up a menu with source options. This is where you can now select your iOS device (2).
You may have noticed that (might be depending on your Mac OS X version) you can even select which microphone to use – in case you’d like to narrate your video – and if you’d like “High” quality or “Maximum” quality.
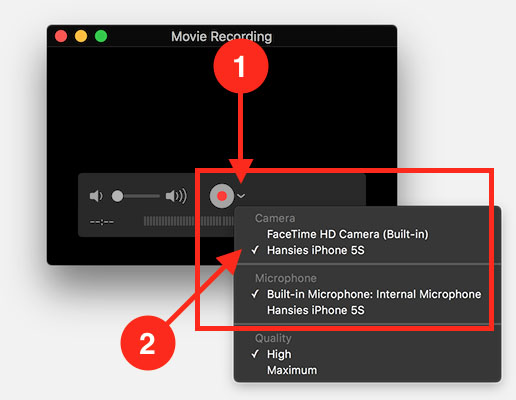
QuickTime – Select your iOS as the video source
Right after clicking your iOS device, you should see the screen of your iOS device on your Mac desktop. If your phone is locked however, nothing will show, so make sure to unlock your phone (and possible “trust” this computer).
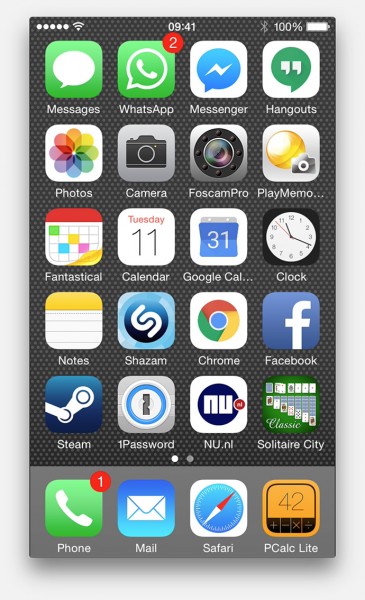
Your iOS screen on your Mac
Step 4 – Make your video recording
Click the “record” button and do whatever you wanted to record. QuickTime will record it just fine.
Click the “stop” button to finish.
Step 5 – Saving your recording
This part is a little confusing …
You can save the file as a .mov file. This is an older QuickTime file format.
Simply click “File” “Save“, enter a filename and click “Save“.
Now, the .mov format is ancient and will result in a big file.
The better option is to use an MP4 variant (M4V) and this can be done by using “File” “Export“.
Here we can select several options:
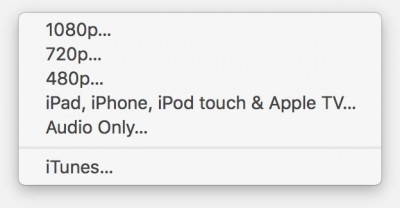
QuickTime Export Formats
My prefered format would be “iPad, iPhone, iPod touch & Apple TV“, and then pick the option on the far right, which currently is “iPad 2, iPhone 5 & AppleTV” and results in the highest resolution.
QuickTime Export Formats
| Option |
Format |
Information |
| 1080p |
.mov |
Older .mov format |
| 720p |
.mov |
Older .mov format |
| 480p |
.mov |
Older .mov format |
| iPad, iPhone, etc. |
.m4v |
MP4 Video variant |
| Audio Only |
.m4a |
MP4 Audio variant |
| iTunes |
.m4v |
no file, goes straight to iTunes |
Some observations …
A few interesting things I’ve observed are:
Time, Battery, and Reception are incorrect
As a gag, or just to make it look good, you’ll notice that the status bar:
- Does not show your cellular provider
- Reception is 100%
- Battery is 100%
- and the time is set to 9:41 (AM) or 9:42 (AM).
As for the very particular time; legend goes that 9:41 AM was the desired time for the Keynote presentation of the first iPhone (January 9th, 2007). True or not … it’s amusing at best. Some iPhones show 9:42 AM, so … not sure what to think of that  .
.
Minor lag …
Although this will have no influence on your actual screen recording, a very minor lag is noticeable. So this method might not always be the best for realtime things like gaming.
This will however have no influence on the recorded audio.
QuickTime will adjust to the orientation of your screen.
It’s definitely a good idea to keep in mind on what kind of device you’d like to playback the video.
For example, if you are planning on using a TV and you’d like to use the available screen space optimally, then landscape would be the best option – if the application you’re demonstrating actually supports/uses landscape mode.
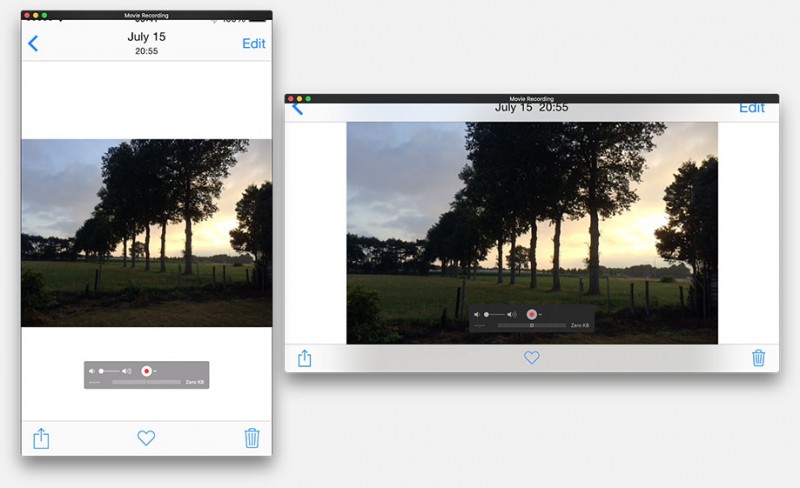
iOS screen orientation detected
The lock screen can be recorded, but time isn’t keeping up with 9:41 AM.
As you can see … the fake 9:41 AM time is not quite making it to the lock screen …
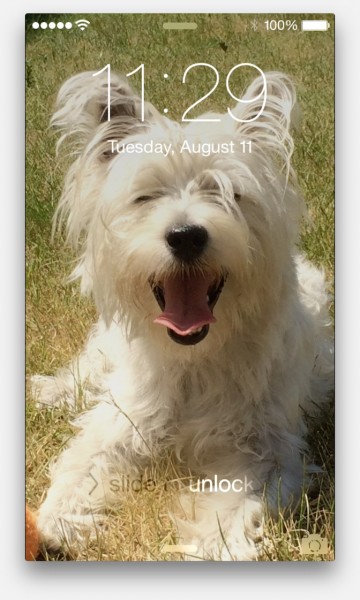
iOS Lock screen can be recorded too


Comments
There are 35 comments. You can read them below.
You can post your own comments by using the form below, or reply to existing comments by using the "Reply" button.
Thank you for sharing this valuable tips. And for people who have Windows PC, Apowersoft iPhone Recorder may be a good option.
escorte
Hi Escorte,
normally I would have taken out this message, as it seems like you’re promoting your product (or someone you’re affiliated with).
I’m leaving it here though, as it indeed might be useful for some …
Thanks!
hans
Hi, how can we record iphone screen capture including touch pulsations?
Luis Enrique
Hi Luis,
I read that Camtasia can do this (link), but have not tested this (yet).
hans
Has the record iOS feature been removed using El Capitan? I am not seeing the option to choose my device once I follow the steps.
Jessica
Hi Jessica,
I just double checked with the latest iOS (9.3.2) and MacOS X version (10.11.6 beta) and this trick still works.
You might have to click “Trust this computer” on your iPhone once it’s connected to your Mac.
You iOS device should appear as seen in figure 2 (above).
In case you get an error message in QuickTime, just try it again without disconnecting your phone.
(I had this happen once, retried it and things worked just fine)
hans
An interesting alternative would be an App called AirShou, written by Tyrone.
It’s free, does not require a jailbreak, provides better recording supports.
You can download it from Cydiageeks.com.
hans
Hey Hans,
This is a very comprehensive post, love the way you break down each step together with instructive images (made it easier to follow). Although it has been a year since you wrote this article, still, it holds pretty well. QuickTime works amazingly great. Like you, I also love using the app to record iOS screen videos on my Mac whenever I need.
Just two piece of quick feedback:
#1: In case you want to update your article (in the second section). Camtasia does include the feature now, you can use it to record iOS device screens just like QuickTime does. And the nice thing about the software is that it allows you to add device frames and edit the videos (which QuickTime doesn’t support). However, the feature is only available either you’re using the 30-day free trial or have purchased the full version.
#2: There are some apps out there that do allow us to directly record screen videos on the device (without connecting the iOS device to Mac). I’ve tried Refector 2 and it works. However, it’s not free (about $15 if I remember correctly).
By the way, funny enough…:) I just published a new article exploring the same topic on my blog. If your time permits, I want to invite you to check it out. It’s here: http://www.softwarehow.com/ios-screen-recorder-guide/
Keep up the great work!
JP Zhang
Thank you JP for the tips!
Just went through your won article, looks pretty good …
…
Keep up the good work as well!
hans
[…] to do that? Take a look at the step by step tutorial made by Hans from Tweaking4All, it’s quite good and fun to read (he’s humorous […]
Very detailed post! Thank Hans, but unfortunately, this solution only can be used on Mac. I’m using Windows PC, it’s hard for me to find a good screen recording app.
I’ve recently found a post here, it didn’t help me directly since all the solutions for Windows require installing a paid application. But then I had the idea that I could install an app allowing me to mirror the iPhone screen to the PC, then I use Camtasia (a Windows application I already have) to record it. The video quality is not extremely good but I think it’s enough for me.
Maybe it’s kind of crazy but just want to share my experiences. :D
Laysia
Hi Laysia!
Yes, this trick is Mac based … not sure if the QuickTime version for Windows supports this, but honestly doubt it would work (Apple even dropped QuickTime support for Windows).
Thanks for posting your fix – which made me think of looking for AirPlay capable software, which might have recording abilities.
With help of Google I’ve found: X-Mirage (commercial, not sure how well the trial works) … might be worth a try and result in better quality …
hans
There are many alternative apps are out there to record iOS Device and Mac OS X. My recommendation is AirShou App which is better than any other app like iRec, Vidyo Screen Recorder. Admin do suggest airshou app to your users so that you will get huge followers. Thanks
Sreekal
Thank you for these instructions, really helpful!! But I cannot get my iPhone 6 to connect – I don’t see them as an option in the drop down menu on Quicktime. The lightening cord works/connects just fine. Any thoughts on what else I could check to fix this? I used to record my iPhone screen with Acethinker iPhone screen recorder, never had that problem.
Owen Taylar
Hi Owen,
Sorry to hear you’re running into issues … let’s see if I can help …
To make 100% sure that this still works, I just tested it with my iPhone 6S Plus, and my MacBook Pro (2015 model) running macOS Sierra 10.12.3, which came with Quicktime Player 10.4. After connecting with the lightning-USB cable to my phone and MacBook Pro, I had to unlock my phone and click the “Trust” button when asked if you trust this computer (had not done this in quite a while). Next, from the QuickTime menu I could choose “New Movie Recording” and select my iPhone in the window that opens just fine – so this trick still works …
Are you running MacOS or Windows (QuickTime for Windows hasn’t been updated in a very long time – pretty sure Apple doesn’t even support it anymore)?
Did you confirm/get the “Trust this computer” on your iPhone after unlocking the iPhone?
Do you see “New Movie Recording” in QuickTime Player?
hans
I am using airshou screen recorder to record my ios device. I have been using this screen recording app for a long time. Though there were some issues with the application. airshou is back again. THe best screen recording application for iPHone or iPad
Marcus
Hi Marcus,
Thanks for the tip, however when looking at the use of “Tutu Helper”, I’d be very nervous about how safe it is to use this.
According to this Reddit post it’s most certainly not safe, even though I wouldn’t go that far. The problem is that it seems to require a lot of access to services on your phone that may not be related to what you’re planning to use the app for. I wouldn’t use it, simply because I don’t know if Tutu Helper can be trusted.
hans
I had the same doubt like you Hans. But, I have not faced any issues with the application. I downloaded the application from http://tutuhelperappios.com I did not face any issues so far. But using the app is up to your privacy. Thanks
Kristen
Thanks Kristen! …
…
Always good to have others post their experiences. I guess I’ll have to take a look as well then
hans
For anyone considering TuTu Helper;
I still feel that safety might be an issue, several sources concur, and the fact that it offers paid apps for free suggests that some things might be sketchy as well. Just saying,… on Android I noticed that a lot of users complain how it requires a lot of questionable access rights.
Does anyone know where to find the list of available apps?
hans
Hey Hans,
If you feel unsafe to use tutu helper, you can download Everycord instead of AIrshou screen recorder. Because, we cannot use AIrshou without tutu helper app. Everycord is also providing the same features. Infact, everycord screen recorder is far better than Airshou IMO. You can check the installation here: http://everycord.org
Julian
Hi Julian,
in this day an age, we all should become more skeptical about applications that go around the app store.
None-the-less, I did try everycord, but when tapping “Install iOS” my iPhone says “Safari cannot open the page because it could not connect to the server” … it does make me wonder how it goes around the limitation setup by Apple …
hans
Note; the first attempt was through my cellular data. A second attempt through WiFi did work, but it’s telling me to install an app I have no interest in or wait 10 minutes … it feels a little sketchy to me …
hans
TutuApp is totally legit, I can assure you that. There are some pesky ads but that’s about it. It doesn’t snoop around in your data or install sneaky software on your iPhone.
Luca
Thanks Luca for the feedback.
I’m always very sceptical when it comes to things like this – but I’ll give it a try
hans
Just found out a new and better alternative (Panda Helper) that I am using on my iPhone. https://yalujailbreak.net/panda-helper-vip/ Seems good so far.
Luca
Hi Luca,
Thank you for the link. I’m still not comfortable with these kind of tools, especially when they are of a commercial nature.
For all reading this: Use this at your own risk, at this point I cannot recommend going this route for most users.
hans
Even I find some interesting text written in everycord-ios.com when I was searching for a Screen recorder from iRec. I am using EveryCord now, I didn’t see any issues so far except the certificate revoke.
I hope tutu helper Team is providing legitimate apps.
Chris
I have not yet tried Tutu – the revoked certificate though might indicate the trick they are applying.
hans
Thank you, Hans, for the Very detailed post! but unfortunately, I am a Windows 10 user and this method is all about MAC and it looked hard to find a good screen recorder app.
I’ve recently found a post here, He shows that by using the Cydia we can record iPhone screen via the AirShou, which is a tweak app. The video quality is not quite good but I think it’s enough for me.
Maybe it’s kind of crazy idea but i just want to share my experiences with you.
Tahir
Hi Tahir,
no need to Jailbreak your iPhone with iOS 11 and newer. The iPhone can now do it by itself;
To use the new screen recording feature, you’ll first need to add the feature’s button to Control Center.
Open Settings -> Control Center -> Customize Controls, then tap the green plus button next to Screen Recording.
On your “Control Center” you’ll now see a new button, it’s round with a dot inside of it.
When you tap that button, you will have 3 seconds to get to the screen where you want to start record. The statusbar of your iPhone should now turn red. You even have the option to narrate your actions right away (long press the button, instead of a single tap).
When done recording, tap the red bar and your video can be found in “Camara Roll”, where you can share it with others or download it to your computer. Super crisp video quality!
Hope this helps
hans
I was looking for a guide just like that. Thanks a lot for helping me out! :)
Tim
Tim
Awesome Tim!
Glad it was of use to you – and thank you for taking the time to post a Thank-You note!
hans
Hi, how can we record iphone screen capture including touch pulsations?
Davil Siv
Hi Davil Siv,
I have been looking for something like that for a while now as well, and haven’t found any application that does this out of the box (if anyone know an app that does: please post it here).
Note: as of iOS 11 there is a built in screen recording option, but this does not record screen touches – unfortunately a serious flaw in my opinion (see this description).
If you are a developer, then you could use something called FingerTips. However, this requires using the iPhone simulator on a Mac. So definitely not for the average user, but great for developers that want to make a demo of their app.
If you have enough money ($199) then Camtasia, but this doesn’t seem to record touches either, but does allow you to add fake touches to a video.
So this is not “real” touching either, but at least you can mimic the effect – they do have a trial version.
hans