Overview
Automatically download TV-Series with Sonarr
The purpose of this article is to introduce you to Sonarr and show you how to install Sonarr on a QNAP NAS.
Warning!!!
This article is in no way intended to promote piracy!
You are responsible for finding out what is and what is not legal in your country before proceeding!
Sonarr needs a Download Manager/Client!!!
Sonarr does not download your TV shows for you, it needs a download manager of some sorts for that.
On a QNAP I can HIGHLY recommend NZBGet, but SABNZBD will work as well.
Usenet user NEED a Usenet account!
If you decide to use Torrents (not recommended), then make sure to have a Torrent Download Manager installed on your QNAP, like for example Transmission.
In this article I assume you have one, or both of these, already installed.
The sole intend of Sonarr is to download episodes of your favorite TV series, fully automatically. You could see it as your personal super PVR.
It can retrieve episodes from Usenet NZB’s or Torrents, names them properly, adds the appropriate information, thumbnails, etc, and renames and organizes your files as well. Typically, but not required, you’d use an application like Kodi or Plex to playback those downloaded episodes.
Note: Sonarr is not [yet] able to retrieve subtitles.
It’s just my opinion, but if you’re a Plex user … give Kodi a spin, you might like it better and it’s free.
In this article we only focus on a QNAP NAS installation, and since one of the packages appears to be Intel dependent (Mono), this will only work on an Intel CPU based QNAP. It’s unfortunate that QNAP still manufactures AMR based NAS devices, too often these users are left out in the cold with zero support for some of these great tools. (as far as I know!)
Anyhow: you’ll need an Intel CPU based QNAP.
Ad Blocking Detected Please consider disabling your ad blocker for our website.
We rely on these ads to be able to run our website.
You can of course support us in other ways (see Support Us on the left).
Pro’s and Con’s versus SickBeard and SickRage
Migrating from SickBear or SickRage?
Migrating from SickBeard (SB) or SickRage (SR) is relatively easy, every now and then I will make comments in the article for those who migrate.
First of all, all 3 of these applications do a marvelous job!
And when I talk about the pro’s and con’s, then please keep in mind that a lot of these aspects are based on personal preference!
So the bottom line is personal preference … here are my personal impressions … and by the looks of it my selection would be in this order of preference:
- Sonarr
- SickRage
- SickBeard
Sonarr Pro’s
The first thing I noticed is how clean the User Interface looks. SickBeard and SickRage are not ugly either, but Sonarr comes a cross a little bit more elegant.
Of course, this is very personal, but with SickBear and SickRage make me search quite often where the heck “that particular option” can be found. In Sonarr this seams easier …
SickBeard does not (at the time) support the use of Torrents, and if you like Torrents, well, then this is a nice option to have. This does not apply to SickRage!
An advantage of Torrents is that episodes seem to “live” longer on the Internet. With Copyright Trolls and the watching eye of your ISP, Torrents might not be the best choice.
- Better integration with NZBGet
Since I would use NZBGet, this can be important. It seems that integration and communication with NZBGet is just better.
- Seemingly better Queue management
Again, probably a personal thing, but I feel like Queue (wanted, backlog, searches, etc) management seems just better.
- Support seems better and more responsive
This is what I have experienced and heard all over the Internet: Support by the dev team of Sonarr is just great and fast. Unlike my experiences with SickBeard and SickRage. Then again, keep in mind that these folks do not develop this as a day time job, so we should allow them some “life” outside of Sonarr, SickBear or SickRage as well.
Sonarr Con’s
Well, not that I would notice much of it, but using Mono as a development tool on a QNAP is a little nuts. But that is just my opinion, and it’s solely based on the ludicrous size of Mono. When it comes to performance it most certainly can keep up with Python and such.
Now, this can be personal as well, but I have the impression that for example SickRage does a slightly better job at detecting shows.
- Does not look into the past
Unlike SickBeard and SickRage, Sonarr only looks at RSS feeds for downloads that newly became available. To hunt for missing episodes, you’ll have to manually click the magnifying glass in show details to start looking for old episodes that are still missing.
Step 1 – Files we Need to install Sonarr on a QNAP
Again: this will only work for Intel based QNAP’s!
Please pay attention here: UNZIP the downloaded files after downloading!
Naturally we will need Sonarr … the best way to get a QNAP QPKG for that is through the QNAP forum, where you will find the most recent version. I really highly recommend getting the latest version there, here is the link: QNAP Forum Sonarr QPKG (many thanks to QNAP-Stephane for creating and maintaining the QPKG).
Please note that the two QNAP Forum links that I’ve posted in this paragraph are a great resource for when you run into problems with either Sonarr or Mono!
Tip: Easier installation by adding the QNAPClub repository to the QNAP App Center
This article is already a little dated (2015), and as one may expect, and QNAP and QNAP-fans have made things a little easier.
TommieDePommie pointed out to me that we can add a repository to the QNAP App Center, which allows for a much easier installation and right away using the latest version.
This is how you can add the QNAP Club repository (see also this illustrated explanation):
1. Open “App Center”
2. Klik the cog in the upper right corner
3. Select the tab “App Repository”
4. Click the “Add” button
5. Paste this link (without the quotes) in the URL field: “https://www.qnapclub.eu/en/repo.xml”
6. Click the “Add” button and you’re done …
The applications provided by QNAPClub.eu will now appear in the “App Center”.
Just for purpose of convenience, just incase the file magically disappears, we do offer a copy at Tweaking4All as well. This copy is not maintained by us, and therefore might be outdated by the time you read this article.
Download - QSonarr 1.150412 Qpkg
Sonarr is build using Mono, a .NET (dot NET) implementation for multiple platforms like Windows, Linux and MacOS X. I honestly have no clue why it’s developed using Mono. Anyhow, we need it, but it’s a monstrosity (in line with Microsoft tradition, so on that part it’s already doing a great job in mimicking Microsoft’s dot NET approach).
Again, we recommend strongly that you look at the QNAP Forum Mono QPKG page for the most recent version, and again we offer a not-maintained copy at Tweaking4All, just in case.
Download - Qmono 4.0.4.1 X86 Qpkg
Ad Blocking Detected Please consider disabling your ad blocker for our website.
We rely on these ads to be able to run our website.
You can of course support us in other ways (see Support Us on the left).
Step 2 – Installing Sonarr and Mono on your QNAP
The screenshot here are based on QTS 4.1.4, so if you have a newer QNAP OS running, things might look a little different. But as always with QNAP, the same functionality can still be found.
The first thing we should install is Mono, since Sonarr depends on it.
Go to the web-interface of your QNAP, and go to “App Center” where we click the “Install Manually” button in the upper right corner.

QNAP App Center – Install Manually
A window will popup, where we click the “Browse…” button, locate the file Mono QPKG (in this example: Qmono_4.0.4.1_x86.qpkg) and click “Open” (might be different on your operating system or web browser), and finally click “Install“.
After clicking “Install”, you will be asked to confirm that you want to install this QPKG where we click “OK” and patiently wait. It takes a while for your poor QNAP to process this huge QPKG.
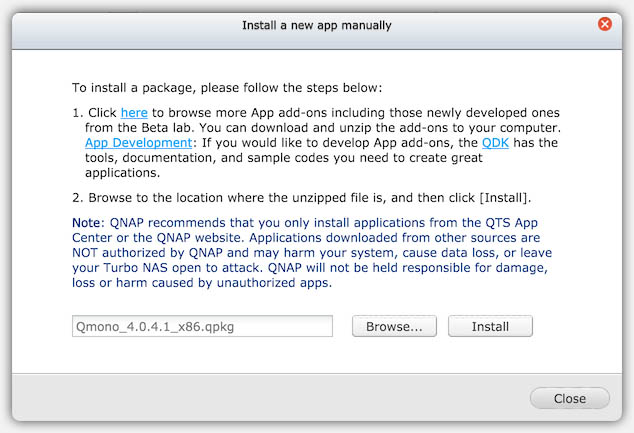
QNAP Manual Mono QPKG Install
Once installation has been completed you will see a message saying “The App has been installed and is ready to use.“, click “OK“.
Normally the “Install Manually” window should remain open, if not click the “Install Manual” button again to open it.
Again click “Browse…“, now select the Sonarr file (in this example: QSonarr_1.150412.qpkg), click “Open“, and click “Install” …
Once the “The App has been installed and is ready to use.” appeared again and you clicked “OK“, click the “Close” button of the “Install a new app manually” window – we’re done installing the needed files.
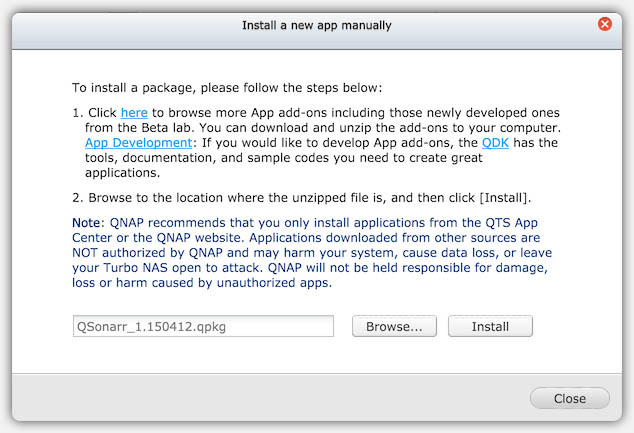
QNAP Manual Sonarr QPKG Install
Allright, Mono and Sonarr are now installed on your QNAP, time to do some configuring …
Where are the Config files?
Like most other QPKG’s, Sonarr has config files as well.
They are located here:/share/homes/admin/.config/NzbDrone
Unlike other Operating Systems, where you can find the config files as follows (see also Sonarr Wiki FAQ):
- Windows –
C:ProgramDataNzbDrone
- OS X –
/Users/<user>/.config/NzbDrone
- Ubuntu –
/home/<user>/.config/NzbDrone
- Synology –
/usr/local/nzbdrone/var/.config/NzbDrone
Step 3 – Start Sonarr and Initial Settings
Now that we’ve installed Sonarr, you should see the Sonar “tile” in your “App Center” window, and it should be turned ON.
If not: switch it ON now. If this fails, then you might have forgotten to install Mono, or the downloaded QPKG(s) might be corrupted. Please try again.
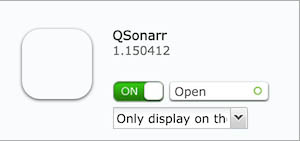
Sonarr is running on your QNAP
Click the “Open” button to open the Sonarr web-interface, where you will be welcomed …
For future reference, the link will be http://<IP address of your QNAP>:8989/
As an example, mine is: http://192.168.1.100:8989/
Sonarr will look something like this in your browser:
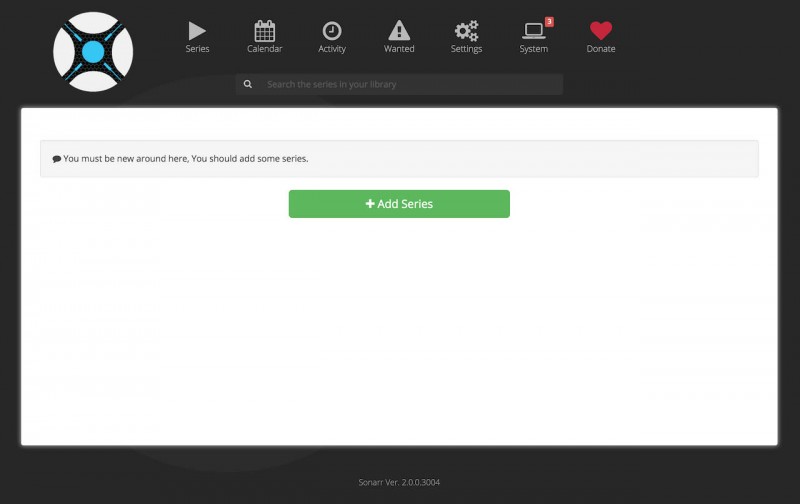
First time we start Sonarr
Update to the latest version
This window is kind-a useless at this point, this is also a good point to update Sonarr to the latest version (optional but recommended).
Click “System” and click the tab “Updates“. A list with recent changes will appear, with a small button “Install this version” (if you do not see this, then you’re in luck and your Sonarr is already up-to-date.
Sonarr will download and install it’s updates and will restart Sonarr. Once restarted you can continue with this guide …
Permanently fixing /tmp/ and failing update issues
If your run into update (of Sonarr) issues because your /tmp directory is too small (disk full), then check or apply the following:
Add to the file /share/MD0_DATA/.qpkg/QSonarr/start.sh the following line (just before the other “export” line):
export TMPDIR=$WebShare/SONARR_CONFIG
Restart Sonarr with /share/MD0_DATA/.qpkg/QSonarr/QSonarr.sh restart .
(thanks to Stephane, the QPKG creator)
TIP: Sonarr fails to cleans up /tmp ..
It can happen that after installing Sonarr, that your /tmp directory keeps filling up with nzbdrone files and directories. Which in turn can make MySQL behave oddly. This can also cause Sonarr updates to fail.
A problem that I ran into after updating Sonarr, is that Kodi started acting weird.
I’m using the shared MySQL database setup, and for some reason I could no longer open a TV Show folder.
The Kodi log showed an unknown (126) MySQL error with a SQL statement.
Trying to run that query straight in PHPMyAdmin resulted in a “#126 – Incorrect key file for table” error, which is a pretty vague statement. Some web searching told me that it might be a full /tmp directory on my QNAP.
So (through SSH) I tried analyzing this with the following command line statement: df -h /tmp
In my case it showed 97% full of the available 64Mb (!), I also noticed that a directory called “nzbdrone_update” snf”nzbdrone_backup” used the vast majority of that space. Since the update I had done had been completed, I figured removing it might be harmless (correct me if I’m wrong).
I removed the directories with rm -rf /tmp/nzbdrone_update andrm -rf /tmp/nzbdrone_backup and … Kodi started acting normal again.
If this keeps happening; consider removing shows that have ended from the Sonarr database.
I have yet to find a permanent solution for this. Too bad Sonarr doesn’t have an option to make these directories user configurable, and shitty of QNAP to maintain such a pathetic small /tmp directory.
Doing some initial settings
Click the “Settings” icon …

Sonarr – Settings button
At first the settings screen might be overwhelming, but no worries, we will go through each step.
After clicking on the “Settings” button, and the first tab appears: “Media Management” …
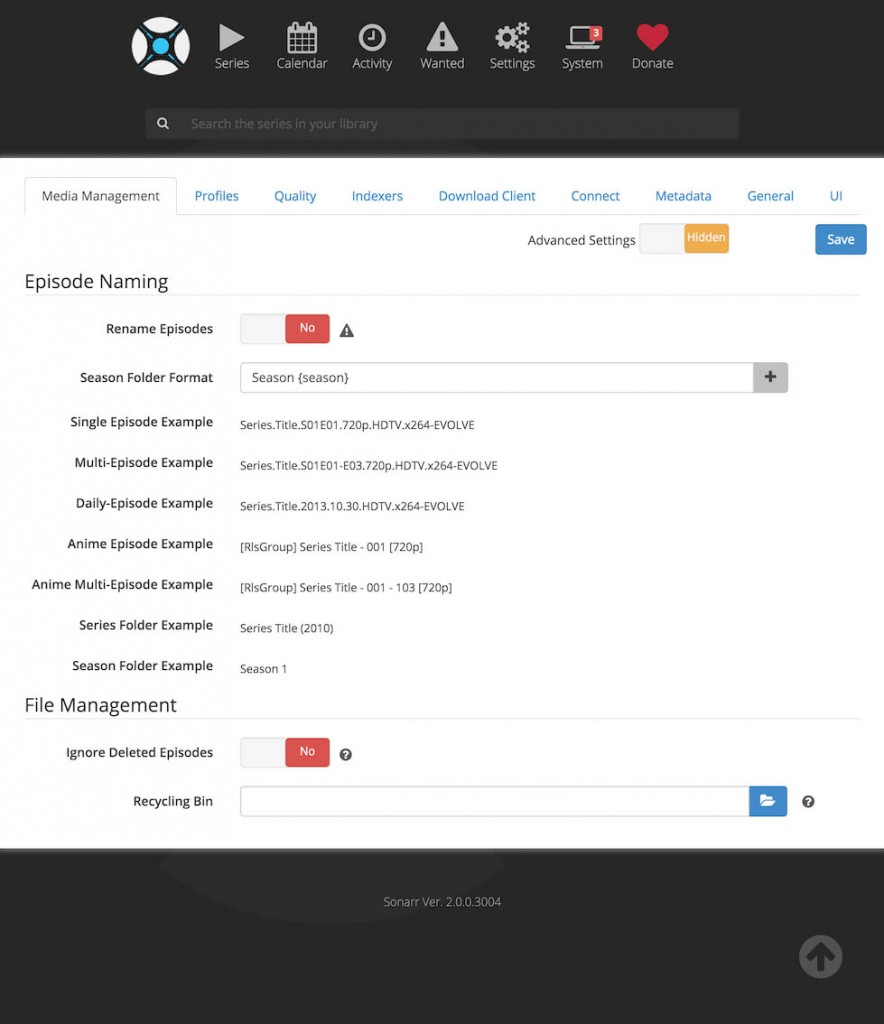
Sonarr Settings – Media Management
The first thing we will do in this screen is to make the advanced settings visible by clicking the “Advanced Settings” toggle in the upper right cornet so it says “Shown“:

Sonarr – Show Advanced Settings
Below, a screen shot of the settings I have used, but maybe it’s easier to just read the text below even though the picture is pretty large.
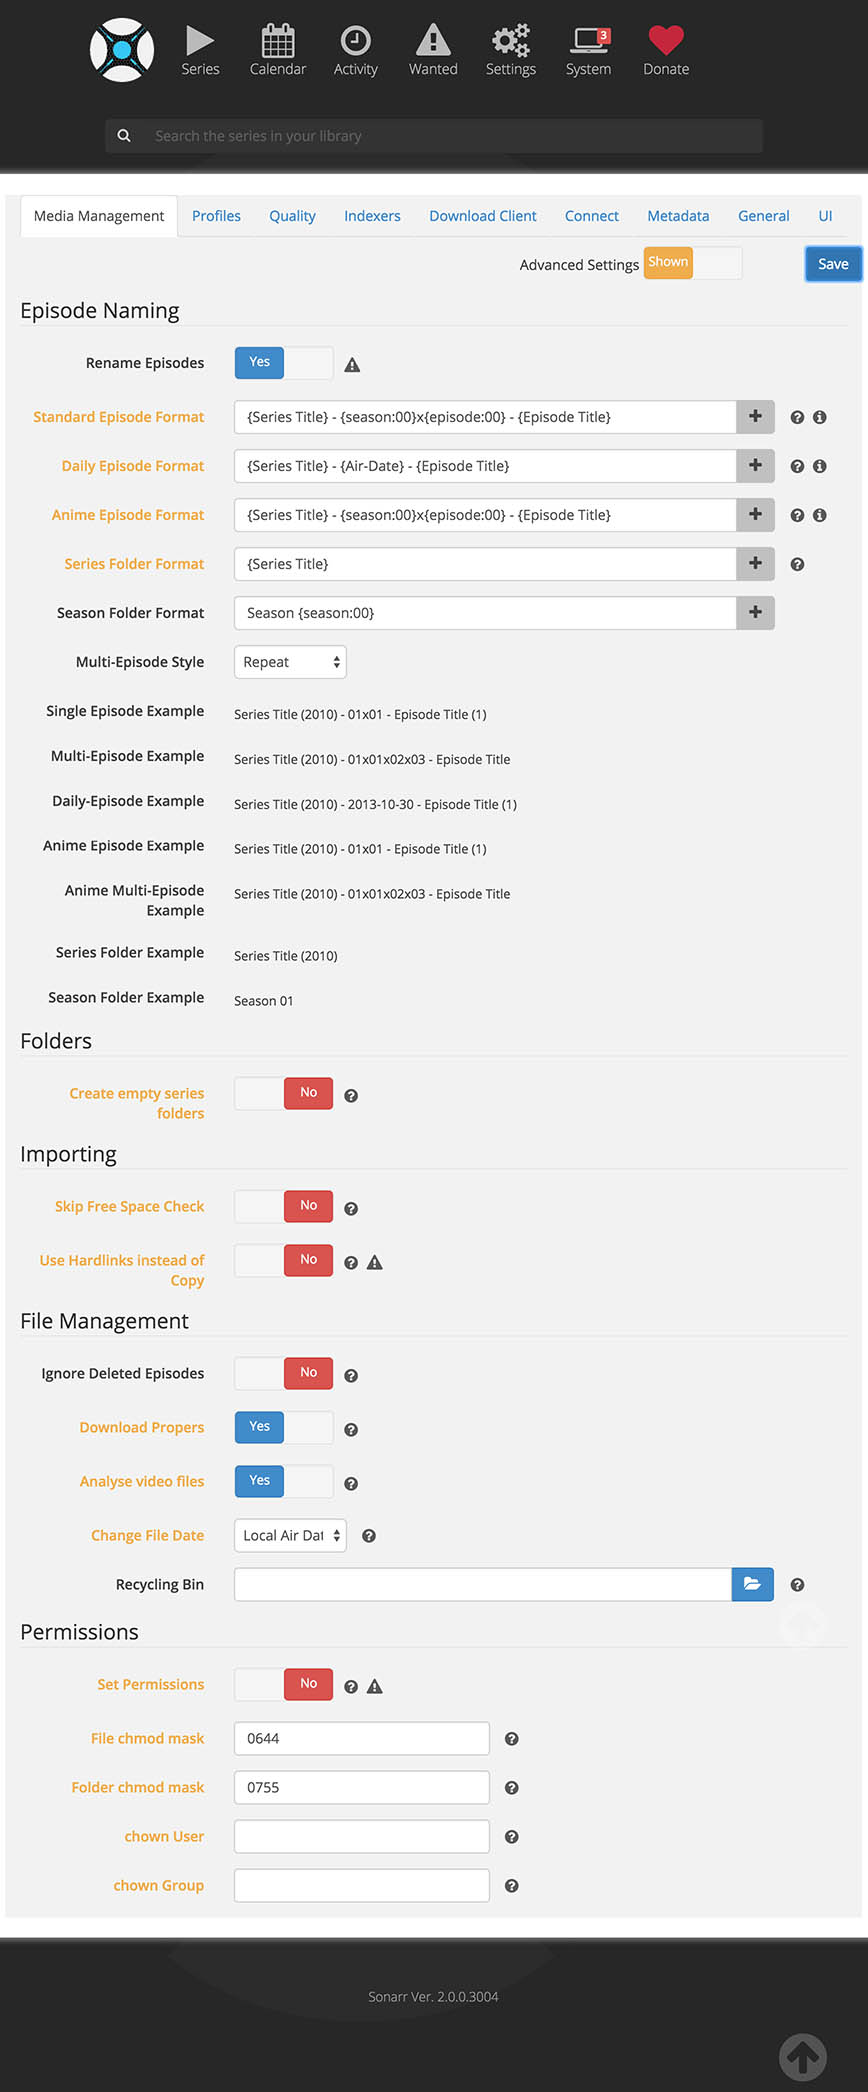
Sonarr – My Media Management Settings
In the section “Media Management” we have to tell Sonarr how to handle our media files, including post-processing (after a download completed), etc.
Tip : For the now following fields, you can use the “+” button next to the field to insert predefined fields.
Tip : Changing these fields will right away produce examples below these fields.
Tip : If you’d like you can use my Rename My TV Series tool as well.
Migrating from SB/SR : Match your file and folder names with the settings of SR/SB under “Post Processing” – “Episode Naming”
OK, so before we begin, my preferred file and folder format is something like this (yours can be different of course):
Name of the Show Season 01 Name of the Show – 01×01 – Episode Title . AVI
and for multiple episodes in one file (for example episode 1 and 2 have been broadcasted as one “episode”):
Name of the Show Season 01 Name of the Show – 01x01x02 – Episode Title . AVI
So let’s get crackin’ on that one. First we enable the “Rename Episodes” option by setting it to “Yes“.
Now we need to set the fields as follows:
My Rename Settings for Sonarr
| Field |
Value |
Creates |
| Standard Episode Format |
{Series Title} – {season:00}x{episode:00} – {Episode Title} |
Name of the Show – 01×01 – Episode Title.AVI |
| Series Folder Format |
{Series Title} |
Name of the Show |
| Season Folder Format |
Season {season:00} |
Season 01 |
| Multi-Episode Style |
Repeat |
Name of the Show – 01x01x02 – Episode Title . AVI |
For the other two formats, Anime and Daily episodes, which I never use, I used the following (which could be horribly wrong – up to you what format you prefer):
“Daily Episode Format” to “{Series Title} – {Air-Date} – {Episode Title}” and
“Anime Episode Format” to “{Series Title} – {season:00}x{episode:00} – {Episode Title}“.
These settings should produce a list of examples as such (just play a little with the settings and see what you’ll get):
Example strings of file renaming
| Type |
Example |
| Single Episode Example |
Series Title (2010) – 01×01 – Episode Title (1) |
| Multi-Episode Example |
Series Title (2010) – 01x01x02x03 – Episode Title |
| Daily-Episode Example |
Series Title (2010) – 2013-10-30 – Episode Title (1) |
| Anime Episode Example |
Series Title (2010) – 01×01 – Episode Title (1) |
| Anime Multi-Episode Example |
Series Title (2010) – 01x01x02x03 – Episode Title |
| Series Folder Example |
Series Title (2010) |
| Season Folder Example |
Season 01 |
Other settings
First of all, leave all settings as they default are, and only change the following (if you’d like to):
“Folders – Create Empty Series Folder” can be set to “Yes“.
So when you add a show, but have no episodes yet, a folder will be created.
“Skip Free Space Check” can be set to “No“, on a NAS I’d expect the file to be on the same disks for both download and storage. So your download manager should have already ran into any diskspace issues.
“Use Hardlinks instead of Copy” should be set to “No” unless you are using torrents, where Sonarr might start fumbling with a file that has not been downloaded completely yet.
“Ignore Deleted Episodes” could be set to “Yes”, but I actually intentionally leave to on “No“. This way a deleted episode will automatically be downloaded again. Up to you, how you save, watch and handle episodes.
“Download Propers” should probably be left at “Yes“. It happens that an uploaded episodes has flaws in it and that it’s being reposted, maybe a day later, without the flaws. These corrected versions are called “Proper” and you might want to have that one instead of the broken one.
“Analyze Video Files” is a neat feature that should stay on “Yes” as well, unless you notice that the CPU load is too much for your NAS. It analyses the video file, the codec, etc.
“Change File Date” is something I set to “Local Air Date” which sets the file date and timestamp to the date this episodes was aired.
“Recycling Bin” can be left blank, unless you’d like episodes that are being delete will not be deleted permanently. Might be practical, when you want a safeguard against accidental deletion of files.
I’d leave all settings under “Permissions” as they are, unless you really know what you’re doing.
When done with these settings, click the “Save” button in the upper right corner.
A short message at the bottom right will briefly popup confirming that settings have been saved.
Sonarr – Quality Settings (optional)
The next tab would be “Profiles“, but in order to use Profiles properly, we should probably first look at the “Quality” tab. The settings in quality are used to create profiles after all.
Note that this one can be a bit overwhelming in the beginning, don’t worry, most of the default settings are already good and functional. So tweaking these settings is optional.
Under the tab “Quality”, we define each named quality type based a part of the filename (of the file that we might want to download) and the file size. The latter is actually a nice feature where we can set minimum and maximum size of a file.
I’ll illustrate these settings based on one of them, SDTV, and I’ll show you the settings I have used my self.
It’s up to you if you’d like to divert from the default settings, were each file can be between 0 and 3.15Gb for a 30 minutes episode.
Since I do not want those huge files with my slow dinky Internet connection, I’ll fine tune these.
The default settings for “SDTV” is:

Sonarr – Default SDTV settings
This means that a 30 minute episode can be between zero bytes and 3.15Gb, a 60 minute episode between zero and 6.39Gb.
First problem I have with that, is those silly tiny episodes that have been compressed well below 100Mb. I don’t like those, so we’d like to avoid those. So (and you’ll need to try this out for yourself) I’m setting the minimum size for a 30 minute episode to 120Mb.
Since SDTV isn’t always the best quality, we’d like to cap it at a certain size as well. So in this case I chose that a 60 minute episode should not exceed 500Mb, since at that point, we could already get a HDTV version.
Unfortunately, we cannot manually enter these values, so we have to start playing with those tiny sliders. The closest I could get was 94.37Mb and 503.32Mb. Close enough … which results in the following:

Sonarr – My SDTV settings
Please note though that through trail and error, you might have to tweak these to your preferences.
Below the settings I finally ended up with, I might still tweak these even more in the future as they might still not be perfect, but as you can see: I like to avoid ridiculous large files. It does not only take forever to download an episode, but it also takes a lot of disk space. This is definitely one of the cool features of Sonarr compared to SB/SR.
Don’t forget to click the “Save” button (upper right corner).
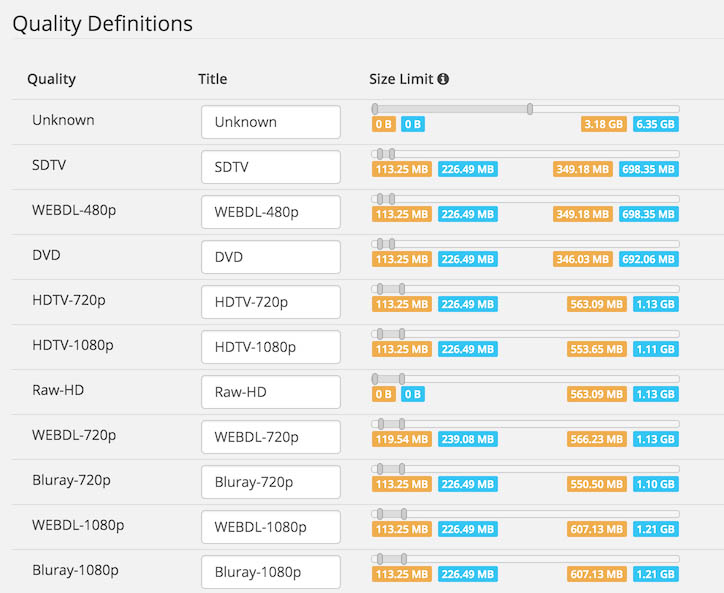
Sonarr – Quality Definitions
Not the right sizes after all …?
The first run I did, was with NZBGet paused, so I could see the result of these settings.
Of course I ran into the problem that it started downloading huge episode files (larger than 3Gb!), so I needed to tweak my initial settings (to what you see above). To refresh things, I simply removed ALL downloads from NZBGet, went to Sonarr, clicked “Series” and after that “Update Library”.
Sonarr – Defined Profiles (optional)
Now that we have our “qualities” defined, we can actually create some profiles.
In a profile we can define which qualities are allowed, and which one is our final goal or minimum requirement.
Removing all profiles
Let’s start by removing all the profiles, which is optional, I just like to work with a clean slate.
Repeat for each profile:
Click the profile, and in the popup window click “Delete” and in the confirmation window click “Delete” again.
Creating your profiles
Now to create a profile, click the big “+” in the profile list and give your profile a name.
For my default TV-Shows, I’ll just call it “TV Shows Default“. I see this as the profile I will always, by default, use for any TV Show.
Later you could make an other one, say for a show that you really want to save in very high quality, or something like that. Or maybe you’d like a given show to be only for mobile use. Either way, the steps to create a profile is the same.
So let’s say and episode becomes available today, typically this would be SDTV, but we’d be happy with the Qualities HDTV-720p, DVD, Bluray-720p and WEBDL-720p as well. Obviously the DVD and Bluray versions will not be available at the date it’s being aired, but … but SDTV and HDTV-720p are something we do not mind watching initially.
However, for archiving we would like to have at least the HDTV-720p one (Cutoff). But … in the list we see, we need to make sure we order things the right way. In my case, I’d like the formats we use, but for archiving we can stop downloading and finding episodes once we have the 720p version. The list is ordered in such a way, that the highest listed quality is the most preferred quality.
I prefer my shows in the original language, and in my case that would be “English”.
So our profile “TV Shows Default” will download anything up to 720p, preferably in English, and will stop looking for episodes as soon as it has found at least HDTV-720p.
So let’s see what that would look like, when done click “Save“.
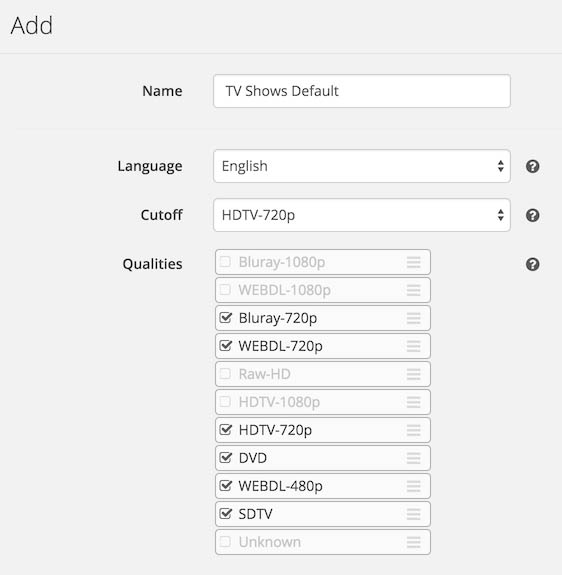
Sonarr – Profile example
After clicking “Save” you will see it as such in the profiles list. Here the dark blue box indicates the preferred language, gray boxes the allowed qualities and the light blue box the quality as of which we stop trying to find better quality episodes.
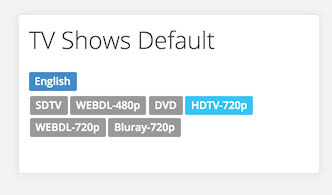
Sonarr – Profile example
Now if you would set “Cutoff” to “SDTV”, Sonarr will try to download anything, but will be happy if it found at least an episode in SDTV format. This can be practical in cases where you prefer small files (SDTV) but want to make sure you get those episodes anyway even though SDTV might not ever become available.
Bottom line: All these setting depend on your preferences. Do you want the highest quality, or do you have to be careful with dis space.
If you’d like, you could make multiple profiles, matching specific needs. At a later time you can assign such a profile to a TV Show, so Sonarr will use the set profile specifically for that show.
Delay Profiles
Delay Profiles, just below the defined profiles, allows you to set which protocol you prefer (Usenet or Torrents) and how many days of delay you’d like. So for example: We’d like to use Usenet only, then the default settings are already good.
Note that these settings apply to ALL profiles! It’s not specific for one or the other quality profile that we just created.
You might also change that and say: we prefer Usenet, right away as of day one. But if it cannot b found on Usenet, or downloads keep failing, then after 7 days revert to Torrents. That would look something like this (after you clicked the icon):
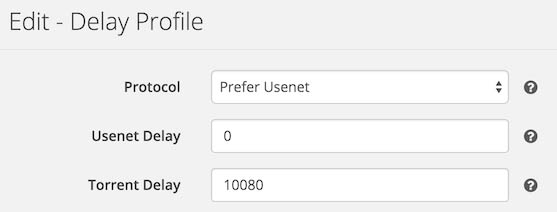
Sonarr – Protocol Preferences
Note : The delay is entered in MINUTES … so number of days x 24 hours x 60 minutes per hour. So 7 days = 10,080 minutes.
Note : I cannot really recommend the use of torrents, so I’d actually use the “Only Usenet” option at the “Protocol” field.
Sonarr – Setting the right Indexers
Indexers
Indexers are services that help Sonarr (and similar applications like SickBeard, SickRage, Couch Potato) find episodes.
It’s definitely required to add at least one index service.
Keep in mind that some of these index services require a membership, some are not free, etc. Those would typically come with a so called API key. You’ll have to enter that API key in the settings of that indexer, and you find the key on the website of that indexer (after you logged in).
Please enter your preferred indexers here, I do recommend using more than one. For example “Wombles” is free and is probably one of those you should enable by default.
Note : A list of Usenet indexers can be found here and here.
Note : You can even build your own indexer, with for example Newznab, but … this is probably for the more experienced users.
Note : Torrent users should definitely add KickAss Torrents and EZTV.
Options
Under “Options” we can set things like minimum age, and retention. Retention, for Usenet, indicates how many days your Usenet provider keeps articles. These days most of them claim retention in the thousands of days, so I set this to zero (= unlimited).
The RSS interval is definitely an important one as well, which is default set to once every 15 minutes.
I’d take a higher number, as there is no need to add excessive strain on these servers.
A good number is maybe 60 minutes.
Restrictions
This section can be pretty important. It allows you to make sure certain “garbage” is not picked up.
Here we can add phrases that MUST be included, or ARE NOT ALLOWED.
For example:
I prefer English shows, so not German, Swedish, Dutch, Hebrew or French.
I hate it when subtitles are “burned in”.
I’ve had bad experiences with files that had these phrases in it: core2hd, reenc, MrLss,.FR
So this would be an example of a list of phrases that might accomplish that (add to “Must not contain“):
german, french, core2hd, dutch, swedish, reenc, MrLss, .FR., ingebakken, NL subs, nlsubs, hebrew
This works the same way for “Must Contain“.
Don’t forget to click the “Save” button!
Sonarr – Download Client
Download Client
Now that we have done some of our basic settings, time to make the link to something that actually downloads our episodes.
There are several download clients you can use with Sonarr.
The rows marked green would be my choice, and the ones marked yellow would be my second choice.
Completely up to you which one you want to use of course, Sonarr supports all of these.
Download Managers
| Application |
Protocol |
Link(s) |
Comments |
| NZBGET |
Usenet (nzb) |
Homepage (QPKG) |
Highly recommended.
Light weight, fast and looks great. |
| SABNZBD |
Usenet (nzb) |
Homepage (QPKG) |
Best second choice.
Little bit slower than NZBGet, slightly dated UI. |
| Pneumatic |
Usenet (nzb) |
GitHub |
XBMC/Kodi add-on for NZB downloading. |
| Usenet Blackhole |
Usenet (nzb) |
N/A |
Not a downloader as such.
With this option NZB files will be dropped in a folder
where any other application can pick them up. |
| Transmission |
Torrents |
Homepage (QPKG) |
Lightweight Torrent client.
Transmission can even be found in the QNAP App Center. |
| uTorrent |
Torrents |
Homepage |
If I’d be using Torrents, then this would be my favorite.
However, I have not found a a QNAP QPKG for it. |
| Deluge |
Torrents |
Homepage |
Lightweight Torrent client.
I don’t know if there is a QNAP QPKG for this. |
| Torrent Blackhole |
Torrents |
N/A |
Not a Torrent client as such.
With this option Torrent files will be dropped in a folder
where any other application can pick them up. |
Uncomfortable with Torrents, but you still want to use them?
Consider using a service like Put.io. (recommended)
Use “Torrent Blackhole” and upload the files dumped there to Put.io where they will be downloaded for you and at a later time you can download the episodes from there.
Note : you can add one manager for NZB files and one for Torrent files.
As an example, we will setup NZBGet as our download manager.
NZBGet can reside on your QNAP, which I highly recommend, by installing the needed NZBGet and Python QPKG’s – see this QNAP Forum Post.
Add the download manager you wish to use by pressing the big “+” and choose “Nzbget”. A window will popup which is easy to complete.
Typically you’d only have to enter “Username” and “Password” … if NZBGet resides on the same machine (your QNAP) as Sonarr.
If NZBGet is to be found elsewhere, then I’m sure you know what you’re doing, and filling in this form will be easy as well.
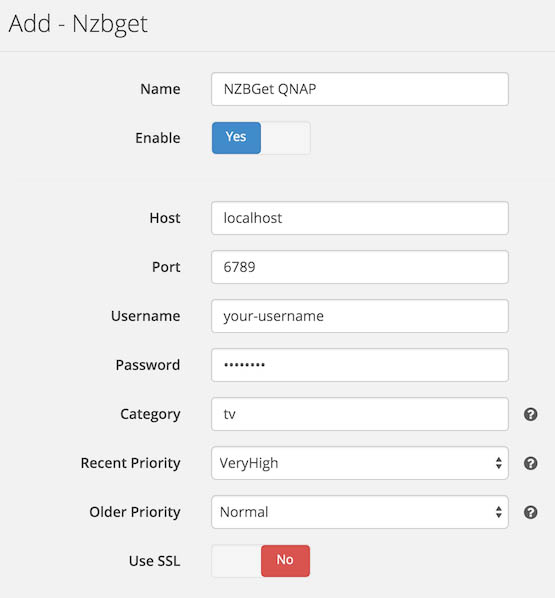
Sonarr -NZBGet settings
As you might have noticed, there are 3 additional fields of interest.
Priority
“Recent Priority” is the priority given to episodes that recently have been broadcasted (in the past 14 days).
I typically want those really fast, so I’m setting this to “VeryHigh“.
“Older Priority” is used for retrieving older episodes, ie. older than 14 days. Since I’m not in a hurry with those, as they are often backlogged anyway, I set those to “Normal“.
Category
The field “Category” I have set to “tv“.
This is a category defined in NZBGet! So make sure it matches perfectly!
So make sure it exists there and make sure the post processing script is set right.
Migrating from SB/SR – With SB/SR you’ve used a category as well. It’s best to define a NEW category for Sonarr, otherwise the scripts will get confused.
NZBGet Category Settings
To create this category, in NZBGet, go to NZBGet, and go to “Settings” “Categories“. Click the “Add Category” button. The new category will be added at the bottom.
Enter the desired name in the “Name” field, for example “tv”, “TV”, “SonarrTV”, or which ever you like. Just make sure to enter that exact same name in Sonarr!
Leave “PostScript” field EMPTY – Sonarr handles this automatically.
Finally click the “Save all changes” button in the lower left corner of NZBGet. NZBGet will restart.
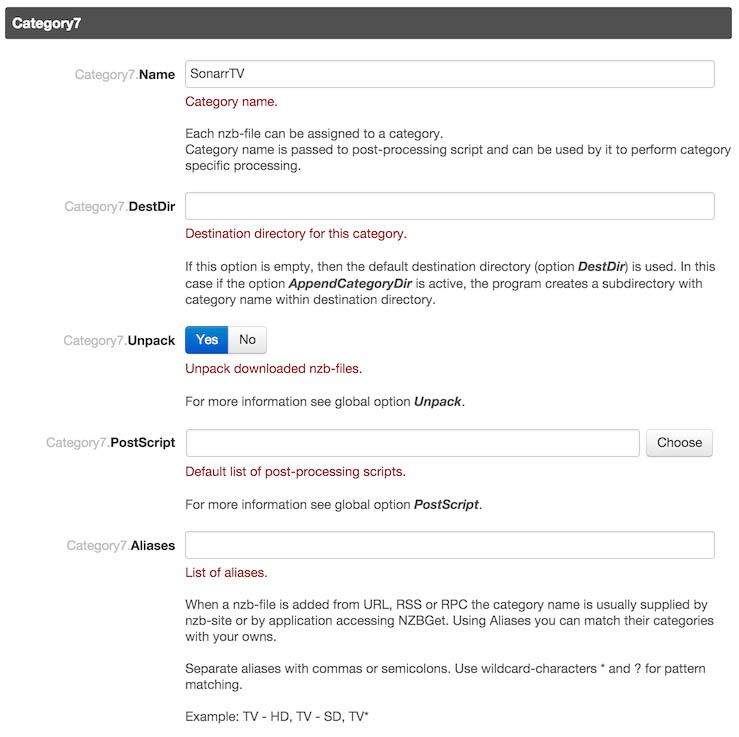
NZBGet – A category for Sonarr
Other Download Handling Options
After adding a download client, we need to verify or set a few additional settings:
“Completed Download Handling” should be Enabled (Yes), so Sonarr handless fresh downloads.
The “Remove” option should be set to “No“, otherwise they’d be removed from the download client history. Not sure how and what, but we will stick with the default setting, which happens to be “No”.
“Failed Download Handling” should have “Redownload” set to “Yes“, so Sonarr looks for another version in case the download failed, and “Remove” should be set to “Yes” as well, so failed downloads get cleaned up.
“Drone Factory Options” is a function that scans content of a given folder to see of anything in that folder might be a episode we would like to have. This download typically has not been handled by Sonarr or your download client, unless it’s a result of one of the “Blackhole” options.
Here we enter a path to a directory in the field “Drone Factory” which we would use to dump these files in – I recommend this to be a dedicated directory for this purpose only.
Caution: this may not be any of the directories used by your Usenet or Torrent download client, or the directory where the TV shows are stored!
To make Sonarr scan frequently, we should enter an interval at “Drone Factory Interval“. I’ve set mine to every 15 minutes, which is plenty fast. Do no take a too low number as it might interfere and/or cause unneeded CPU loads on your QNAP.
Sonarr – Connect or Notifications Settings
Under the tab “Connect” we can set all kinds of ways that Sonarr can notify us about:
- When a new episode has been found
- When a new episode has been downloaded
- When a better version of an episode has been downloaded
Depending on the type of notification, you can tell for example XBMC/Kodi to show a notification or update their Library.
Connecting to Kodi seems to fail …
It does not seem uncommon that Sonarr is unable to connect to your XBMC/KODI …
Obvious you’ve done everything right … like the enabled webinterface, IP address and correct port number (often: 8080).
The only option that seems to work: removing username and password (yikes!) on your Kodi box.
Sonarr does not just rename your TV episodes, it can also add meta data (data about the data).
This means it can add thumbnails, and TV Show and Episode information automatically.
Check which of the devices you have and enable it. If unsure, just pick XBMC and enable it.
Sonarr – General Settings
Be careful what you do here, and make sure to take good note of changes you make.
On this tab we can change things like port number, login method, log level, etc.
When you’re just starting: leave all as is. For now.
If you’d like you can change the “Security” settings, but honestly: get familiar with Sonarr first.
Sonarr – Basic User Interface settings
Under “UI” you can set all kinds of basic UI settings like date and time formats – which should be pretty self explanatory.
Ad Blocking Detected Please consider disabling your ad blocker for our website.
We rely on these ads to be able to run our website.
You can of course support us in other ways (see Support Us on the left).
Step 4 – Adding Existing or New TV Series
Now that we have done some of the basic settings, time to add TV Series.
Let’s start by clicking the “Series” button (upper left):

Series button
We will be show the initial screen again, which we saw when we opened Sonarr for the first time.
Click the “+ Add Series” button.
Note : It is said, that Sonarr by default skips the “Specials”.

You must be new here …
After clicking “+ Add Series” we see a screen that allows us to manually add a show, or import existing show(s).

Sonarr Import Existing or Add New Show
Import Existing TV Series
If you’ve used something like SickBeard or SickRage before, or if you manually maintained your TV Series, then you’d like to start with importing your existing TV Series.
Click the “Import existing series on disk” button. A file dialog will open asking you to point to the directory that holds all your TS Shows.
Note that on a QNAP, you’d want to start browsing from the “share” directory. Most QNAP’s will have a “MD0_DATA” directory. This is where you’ll find your shares.
Click the checkmark button ( ) on the right.
Right away a new window opens, where one after the other show will appear.
For each show we must now verify if it’s the right show Sonarr picked up (click on the picture of the show to see TheTVDB details).
The settings by default look OK, but you might want to double check.
Monitor = Missing
Profile = <the profile we created earlier>
Series Type = Standard (unless it’s a “Daily” or “Anime” show)
And click the “+” button to add, or the “ ” button to add and right away start looking for missing episodes.
You’ll have to repeat that for ALL the shows you want to import.
All in all, I had to go through importing a few times, either I was clicking too fast or Sonarr didn’t recognize the show name correctly. But in the end it was relatively easy.
Don’t go too fast …
When confirming shows, do not go through them too fast, give Sonarr and your QNAP a few seconds so things do not get congested.
Tip … using TheTDVB ID instead of the Show Name …
If your show is not identified properly, but you can find it on the TV DB, then just add the id in this format:
tvdb:12345
For example: Flash Gordon (2007).
Goto TheTVDB and type “Flash Gordon” in the search box. A list will appear, select the item you think is the right one and click it.
It opens a webpage, for example http://thetvdb.com/?tab=series&<strong>id=<span style="color: #ff0000;">80441</span></strong>&lid=7.
Do you see the show ID in the link? So now enter for the showname (in Sonarr): tvdb:80441
This number can also be retrieved from SickRage or SickBeard from the show details page.
Adding New TV Series
The process for adding a new TV Show is pretty similar.
Click the “+ Add Series” button, and enter the name of your show in the “Start typing the name of series you want to add …” (you can enter “tvdb:12345” if you know the TVDB ID as well).
Sonarr will show what it found, and you can either click the “+” button to add, or the “ ” button or add and search for episodes.
Some Additional Coolness
Now that we have Sonarr running, lets take a look at some additional coolness that Sonarr offers.
Tab: Series
Under the “Series” tab you will find a full list of all shows you have or are following.
Add Series (occasionally used)
We already have seen and used the “Add Series” button. But there are more buttons.
Season Pass (rarely used)
On the “Season Pass” page you can quickly change the way Sonarr looks at a TV Show. For example, you can select one or more shows and set monitoring to “None” so Sonarr no longer looks at them (to change and apply, look at the bottom).
Series Editor (rarely used)
The “Series Editor” allows you to quickly change settings of a show. For example change quality profile, monitored or not, path of the TV Show, etc.
This button forces Sonarr to update the RSS feeds it’s reading, in case the scheduled update is not keeping up.
Update Library (occasionally used)
This will “force” and update of the entire library – the only practical use I have seen so far is when you decided to change the quality profile definition of the profile you used for all your TV shows, or when you bey accident cleared your entire download manager queue.
Tab: Calendar
This one I do really like. It shows a calendar with expected upcoming TV Show Epsiodes. It even can produce an iCal link so you can hook it into your Calendar.
Mind you that using the iCal link requires you to be able to access Sonarr from the outside world, unless you only intend to use this at home.
An iCal link will look something like this (I made up the API key, so it does not really work):
http://192.168.1.100:8989/feed/calendar/NzbDrone.ics?apikey=71ac85a6543be210a0e318f7cfddc181
Depending on your Calendar App (on your computer, phone or tablet), this can be added so you can always see in your calendar when to expect the next episode of your favorite show.
As you can see, it refers to an IP address in your local network … to get access when you’re on the road, you will need to do some port mapping and use your public IP address to access the link. Your public IP address can be found through websites like GetMyIP or by looking to the left, under “Statistics”, or bij opening our Browser Info page. Keep in mind that your IP address might be subject to change. In such a case you can consider a service like DynDNS.
In the list you can click an episode to see the details of the clicked episode.
Tab: Activity
The “Activity” tab shows you which episodes, at what quality, have been pushed to what download manager (ie. nzb vs torrent). You can even remove it there so it will be removed from the download manager as well. This might not always work, as it depends on the functionality of the download method and application you’re using.
In this tab, you can click the Show Name, or Episode Name to see the details of the show or episode.
I noticed when I cleared my NZBGet queue that Sonarr somehow picked this up automatically – nice!
(unlike SB/SR which keep the status at “snatched”)
Tab: Wanted
On this tab you will see a list of episodes that have been missed and are still “wanted”. Options like manual import and doing a forced scan of the “dump” directory are available here as well.
Tab: Settings
This tab has been discussed in the steps of setting up Sonarr.
Tab: System
The “System” tab show quite a lot of interesting options.
First of all, there is the “Status” tab, which shows us Sonarr version info, possible config issues, and available disk space.
The tab “Updates” shows us new updates and previous updates including change log.
Under “Tasks” we find some function that normally are handled automatically, but here we can force them to do them right now.
This includes application updates, rescanning for episodes, etc.
The “Backup” tab shows you the most recent back that has been made.
The “Logs” tab shows logs (duh!) which is great when trying to trouble shoot. Log files can be downloaded here as well.
Where are the Sonarr log files located on a QNAP?
On a QNAP, the log files can be found at:
/share/MD0_DATA/homes/admin/.config/NzbDrone/logs
Note that not all QNAP models use the “MD0_DATA” directory, so this might have a different name on your QNAP.
Tab: Donate
This is where you can show your gratitude to the developers of Sonarr … please consider donating, even if it’s just a little bit.
Wouldn’t you give these guys a beer …?
Show Details
When you click a Show to see it’s details, something like this appears:
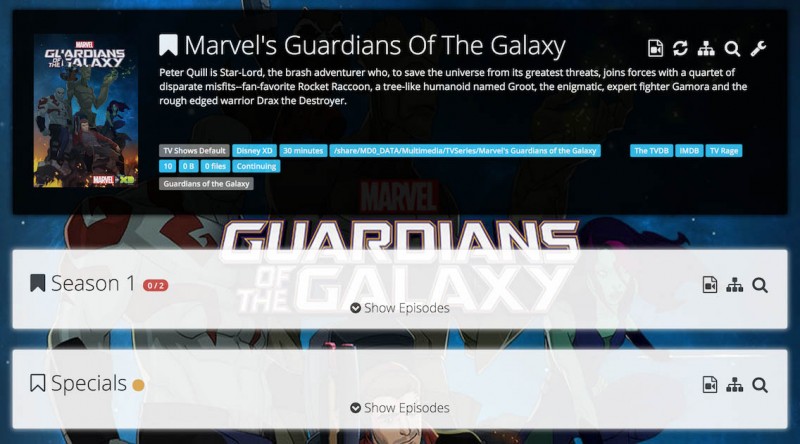
Sonarr – Show Details
Let’s review this screenshot … note that these icons appear on the show name level and on
 First of all, we see this solid bookmark icon in front of the title, which indicates this show is being monitored.
Notice that the book mark is SOLID. If it would be an outlined bookmark icon (not solid) then this would mean that the show is NOT monitored.
We see this with “Season 1” ( = monitored) and with “Specials” ( = not monitored).
 On the right side of the title we see this icon. It’s the button to press if you’d like to modify or edit the show or episode(s). You can also set quality here and remove files.
 When we click this icon, then we trigger an update which also scans the files on your hard disk and update the meta-data. Practical when you’ve done some “manual” work with your TV Show files.
 This button is supposed to preview you the renaming of your Episode files. I have yet to find a purpose for that though … but I assume it works …
 When we click this button, Sonarr will start looking for all episodes of this show or season.
 With this button we can edit the show, so for example we can set the Quality Profile, etc.
Now when you click the “Show Episodes” link, below a season, then we see some more details:
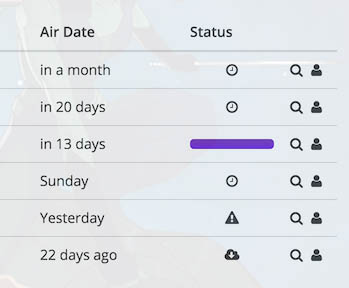
Sonarr – Episode details
First we see the expected air date, followed by a status.
The clock icon indicates that Sonarr is still waiting for this one to appear, the purple bar means that it’s downloading this episode, the warning sign indicates that this episode is missing, and the little cloud indicates that that episode has been downloaded and is available.
The other 2 icons can initiate an automatic or manual search for that given episode.
There is much more to be found in Sonarr, and so far I’m very impressed by it … I hope you enjoyed this article, and enjoy the use of Sonarr on your QNAP.




Comments
There are 41 comments. You can read them below.
You can post your own comments by using the form below, or reply to existing comments by using the "Reply" button.
Updated just now to QTS 4.2.0 and Sonarr is still working just fine.
hans
UPDATE:
Added a tip for those running into the “disk full” error (/tmp/) when updating Sonarr.
Add to /share/MD0_DATA/.qpkg/QSonarr/start.sh the following line (just before the other “export” line) and restart Sonarr:
hans
Thanks for the great article. Just got my QNAP-TS251 last night and was able to get Sonarr, NAZBGet and Plex all loaded. I am stuck getting the Sonarr post processing scripts to run. They keep failing after the file is unpacked. Have you had any trouble with this? If you could point me in the right direction that would be very helpful.
Thanks!
Todd
Todd
Hi Todd,
I would recommend using Kodi on your HTPC and regular Windows shares (SMB) over Plex, if your HTPC can open shares and/or install Kodi.
You will notice that things become much more responsive, faster and more stable.
But that’s just my 2 cents.
As for post processing scripts: I use NZBGet as well (I assume that’s what you mean) and have no issues with post processing.
Do you see any messages in the NZBGet logs? You might want to look under the “Messages” tab. Maybe one or the other decompressor is missing on your QNAP.
hans
Hi Hans,
Thanks for the quick reply. I have Roku3s through out the house, so I am using the TS251 as a media streaming for the whole house. So far Plex has been running well. I have the 1GB RAM version, so I might be picked up a few more GB over the weekend to smooth some of the RAM spikes. I plan to use Kodi on the projector in the basement which is directly hooked up to the QNAP via HDMI but haven’t gotten that part setup yet.
As for the post processing, it fails for Sonarr and Couchpotato2. Something happens right after the extract and I get the below messages. Have you seen anything like this?
I haven’t touched the files mentioned so Im not sure why they are failing. I am also running a few versions of python as I wasn’t sure what version was needed (2.7, 3.5). Could that have anything to do with it?
Thanks so much for your help
Todd
Todd
Hi Todd,
it seems to have issues with the undefined Category. In both NZBGet and SickBeard you’ll need to set a category (the same), for example “TV”. The correct script seems to be called, it just doesn’t know where to put it.
I don’t know the SickBeard settings by heart, but you should be able to find the category in SickBeard: Config -> Search Settings -> NZB Search … if I’m right (see also this article).
In NZBGet go to Settings -> Categories and make sure you have a matching category name there as well.
hans
Hi all,
Anyone getting the error “This pave can’t be displayed’ when trying to access Sonarr (V1.150412) after restarting your QNAP? (Model: TS-453mini version: 4.2.0). It would appear that after rebooting multiple times that after a while I get lucky and it starts up again. Multiple could be as many as 10 times.
If you have and you have a fix, please care to share. Keep in mind I have zero experience in Linux.
Thanks in advance,
ArnoS
ArnoS
Hi Arnos,
sorry to her you’re running into issues.
First question: is the TS-453 Intel based?
Second question: Did you install Mono 4.x? If so try 3.x (see QNAP Forum for downloads).
Oh and when you get access … can you take a look at the log file?
I know that when your database is large, that Sonarr becoming available after staring Sonarr can take a while.
p.s. please do not post log files here.
I do not mind looking at your log file, but then pretty please by starting a forum topic and posting it there.
hans
hi Hans,
Thank you for the quick response and secondly no need to apologise.
The QNAP TS-453mini is Intel based. I also have Mono version 3.10.0 according to the App’s home page. I have tried both version already and I didn’t seem to see any difference in stability to be honest.
Is there perhaps a way where I could run something to retrieve all the relevant installed apps with their versions to be able to share?
Is there something I could do “manually” by ssh’ing onto the QNAP and starting the relevant service?
I will be sure to create a post in the relevant topic page once I get the Sonarr logs. (might be a while as I am currently rebuilding RAID 5, trying to identify a noisy HDD)
Thanks in advance.
ArnoS
I tried both versions as well and both work just fine on mine, but some seem to favor 3.x for Mono.
You could, with SSH, check if Sonarr is running:
Should give something like:
You can start, stop or restart Sonarr from the command line:
The logs helped me very well when updates kept failing. So they would provide (potentially) valuable info.
hans
Thank you for the information provided. I am able to confirm that the service has been started as expected and Sonarr is back up and running.
You mentioned earlier that it could take a while for Sonarr to start-up pending on the db size; in your opinion, how long can that take?
I will get that log file uploaded for you shortly.
Thank you once again….much appreciated.
ArnoS
The startup time depends on how many shows, and how many episodes these shows have. .
.
I have never clocked how much time it takes, but have been impatiently been waiting for the page to finally load before
I would guess that available memory and CPU resource play an important role here as well.
After starting Sonarr (reboot or manual), just give it quite a bit of time to “wake up”. Just to develop a feel for how much time it takes. Like I said: haven’t clocked it myself, but just try a long wait, …. just to get a feel for it.
I have a TS-869, with upgraded memory, and on that one I have had times were it felt like 15 minutes. But … I didn’t have a stopwatch with that, and in cases like that I can be a little impatient, so it easily feels like “forever” haha.
hans
hiya Hans…
Just thought to give you a quick update..so restarted again this morning and Sonarr is not coming online now. I left it running for 8 hours today and it never came up.
Running the command ‘ps -ax | grep QSonar’ returns the below:
24337 admin 536 S grep QSonar
If I run the last command posted by yourself, it states that: -sh: QSonarr.sh: command not found. It would appear that the share(/share/MBO_DATA/.qpkg/QSonarr) hasn’t been created.
Any suggestions, fixes would be much appreciated.
ArnoS
Hi Arnos!
You “ps -ax | grep QSOnar” tells me that Sonarr did not start, or better said: is not running.
Some QNAP’s use a slightly different path instead of “/share/MB0_DATA/.qpkg/QSonarr”, it might be that the “MD0_DATA” is called differently on your machine.
Did you type MD and then ZERO? (your text shows that you typed and “Oh” instead of a zero)
It should be a zero …
hans
I just found a neat trick to determine the base path of your shares:
It should respond with something like:
Type “/.qpkg” behind this path to get to the directory that stores all QPKG’s.
hans
Forgot to mention that 8 hours is of course not right … haha. I’m experiencing it here in minutes.
Does this happen when restarting your QNAP?
Does it show switched “ON” in “App Center”?
hans
Hello Hans,
Apologies for the delay in my response…
After running the command ‘ps -ax | grep QSonar I get the below response to the path:
/bin/sh shareCACHEDEV1_DATA/.qpkg/QSonarr/start.sh
My base path shows the below: (thank you sharing the neat trick)
/share/CACHEDEV1_DATA
So, apologies if I haven’t been to clear about what actually happens…let me try once again.
I have been having to restart/shutdown my QNAP a lot of late while trying to get applications installed/configured/RAID configured etc (Probably blame my Windows OS background for that)
What I have seen is that not every time after rebooting that the Sonarr app services comes online. I get the error: “This page cannot be displayed” message.
Thanks to your neat script (ps -ax | grep QSonarr’) I can definitely see that the service appears not to be able to start up. I have seen it where I reboot it once and then it comes online the very next time and I have had cases where it would take me 3-4 times to get the service to start.
It would appear that its only the Sonarr service that doesn’t always want to start.
I can confirm that the shows “ON” in the App Center. Even turning this on and off again doesn’t bring the service online.
Is there perhaps a way of manually “kicking off” the service if it fails to start? Or add a command in the console? Any suggestions/neat tricks would be greatly appreciated.
ArnoS
Hi Arnos,
seems you have one of those QNAP’s that has the “other” path (“CACHEDEV1_DATA” instead of “MD0_DATA”), which is not a bad thing, just something to be aware of when reading how-to’s or forum posts.
As for starting Sonarr manually, the following should do the trick, but it can be unpractical:
You could put it in a script and maybe someone knows a better trick.
It’s a little strange that Sonarr doesn’t always seem to start autmatically, maybe something you’d want to mention to Stephane in the QNAP Forum – he’s the one who did all the great work to get a QPKG.
hans
Very nice guide !
tubezleb
Thanks Tubezleb!
hans
Hello, very interesting tutorial.
I have recently purchased a QNAP TS-251 and I have tried QSickrage and QSonarr. After having problems with Torrent searches on QSickrage, I’ve moved to QSonarr but I can’t find the way to download subtitles as you said in:
“It can retrieve episodes from Usenet NZB’s or Torrents, names them
properly, adds the appropriate information, subtitles, thumbnails, etc,
and renames and organizes your files as well.”
Can you go a little deeper in that particular?
Manilow
Hi Manilow,
That’s definitely my bad. Sonarr can not [yet] retrieve subtitles. The rest works.
After having tested Sonarr for a while I ran into the same issue but have not found a solution to that yet.
I’ll correct the text.
hans
OK Hans, thank you for your answer.
We will have to find a workaround…
Manilow
Let me know if you do …
So far I have had KODI look for subtitles. Works, but not perfect.
hans
Hi,
Thanks for this VERY good guide – it’s like when some one take your hand and guide your through the wilderness; you have been here before, but never seemed to find your way out again!!
I had one issue though. I started with SABnzbd, but Sonarr wouldn’t recognise the “tv”-category no matter what… used a couple of hours with that. Then I installed ZCBget (got it from your supplied link, thanks) and that worked almost out of the box. What I miss is the possibility to fetch subtitles automatic directly from Sonarr, but I found this article (http://chris.schalenborgh.be/2012/03/26/subliminal-qnap/) and will give it a shot.
Thanks again you for your great work
Regards
Jock Iuel (Denmark)
Jock Iuel
Thanks Jock for the compliment!
It’s always a motivator and much appreciated!
The lack of grabbing subs is indeed a minus point for Sonarr. I do know there is a script for it, see this GitHub link. I haven’t had the time yet to test this one though.
Please post your finding is you find something working well … if you can.
Hans (currently The Netherlands, pretty soon the US)
hans
Everything went well, Sonarr was up and running. Then I tried to update it and it kept failing to update. So, I thought to try to restart it, and now it will not even start; either by refreshing the page or going back to my apps and opening it again. So I was going to add the line to the file you show for problems with updates in the file (/share/MD0_DATA/.qpkg/QSonarr/start.sh) but I don’t see a share folder and even if I did, I wouldn’t know how to edit a file in the QNAP system. You might guess I’m new to QNAP but I know my way around computers pretty well. Any help, do I need to uninstall it and reinstall? Also, is it possible to port my configuration of Sonarr from my Windows 7 to my QNAP version (copy the file or an import/export)?
kthorne
Hi Kthorne!
Sorry to see you ran into issues with Sonarr.
To execute shell commands on a QNAP, you’ll need to access the QNAP through SSH (see this guide).
In essence, with SSH, you make a “shell” connection to your QNAP (call it “DOS prompt” if you will).
Editing text files on a QNAP can be done with one of the text editors, my favorite is “nano”.
To use nano, with an SSH shell: nano filename
To exit the editor, use CTRL+X, it will ask if you want to save the changes, where you press “Y”.
If it says that you do not have access rights, then you might have needed “sudo”: sudo nano filename
(this gives you elevated rights to edit files)
Since you’re new to QNAP; please be careful which files you edit.
As far as porting from Windwos -> QNAP for Sonarr data; I honestly have no idea. I would guess that it’s not possible though. You’ll have to reimport the directory where you TV series are (Add existing series).
So far the biggest “issues” I have found are:
1) Mono is required (.NET on the Windows platform), which initially had some issue between different versions,
2) I have had one update that wiped my entire database, and I had to re-import everything (but that’s quite few version ago),
3) My temp directory was too small for making a backup (recent versions seem to have addressed this),
4) Starting Sonarr will take quite a bit of time when your database is rather large, so be patient.
Hope this helps …
hans
Hans, thanks that was a huge help. I added the Chrome extension for ssh and it worked great. I wasn’t exactly sure what I needed for nano, I think I need to install it on the QNAP but I’m not sure how to go about that. So, I just restarted Sonarr to see if it still had the problem updating, and it didn’t! So, I think I’m ready to start configuring it and sabnzb.
I just checked out your site info, and saw you are from the Netherlands. I just returned from my second trip there two weeks ago. We were tourists of course but love to visit. Wish we could spend more time there but really enjoyed the time we had. Thanks for the help, you tweaks are very helpful!
kthorne
Hi Kthorne!
Thank you for the compliments …
…
Nano could have come with one or the other QPKG’s I have installed in the past, maybe OptWare or something like that.
“vi” is an alternative, but slightly more difficult to use.
I am indeed from The Netherlands … but am moving to the US this week, to live there a few years (I have lived there before). Where are you located?
hans
I am in Atlanta, GA area. Where will you be living? Also, I ran into an error when configuring Sonarr. It looks like my version of SABNZB is “develope” and when I try to configure Sonarr’s downloader I get the error “unknown version: develop”. If you have any idea how to get around this it would be helpful.
kthorne
I’ll be moving to Houston TX
As far as SABNzbd goes;
I haven’t used it in quite I while. I switched to NZBGet, much cleaner and about 10% faster.
You can get the QPKG here: QNAP Forum – NZBGet Topic.
Unfortunately, I have not made a description of the setup yet though.
Not sure where you downloaded SABNzbd from, you could try this version.
hans
I have recently upgraded by QNAP TS-451 to 4.3. I feel this may have been a mistake being I can not get Sonarr/Mono to work again for anything. I have been trying for a couple days now. I have installed various versions on Mono and Sonarr. When I try to run the start.sh from CLI, I get the following error:
/share/CACHEDEV1_DATA/.qpkg/Qmono/bin/mono: No such file or directory
I have verified that mono is located in that directory.
Any help you can provide to isolate the issue would be greatly appreciated.
Brian Corbet
Hi Brian,
Mono can be pita indeed … I assume you already removed everything (mono and Sonarr – after making a backup in Sonarr if needed), and reinstalled everything.
If you haven’t done so, then I’d recommend doing that (reboot after uninstall):
I’m running Mono 4.2.1.0 (http://download.qnap.com/QPKG/Qmono_4.2.1.0_x86.zip),
and Sonar Version 2.0.0.4427 (after numerous updates – you can find the QPKG here).
In case that doesn’t work … (to be done after uninstalling Mono)
Somebody in the QNAP Forum posted his solution by installing QMono via SSH:
Hope this helps, and if so: please let us know
Merry Christmas!
hans
Thank you for the response. That is actually my own update to my post on the QNAP forum. I posted to multiple forums after I got so frustrated, but then tried 1 suggestion about installing Mono from SSH and that is what finally worked for me.
Brian Corbet
Hi Brian,
haha, that’s a fun coincidence.
I’m glad the SSH approach worked for you!
Merry Christmas!
hans
Tip:
For those running into the ” MediaInfo could not be loaded libmediainfo.so.0″, it seems that the library might not be linked right.
Fix:
Open a SSH session to your QNAP and check if this file exists:
If not, then execute these:
hans
Hi there, a newie here, after reading and reading and trying all my best. I’m stuck.
Installed Mono, Sonar in 4.3.B.
Created a shared point NZBGet.
But when I open the app in the NAS ts251 safaris says that Can not connect to the server. It can not open the page of my ip address of then NAS.
Pretty sure that has to be very simple, but I can´t resolve it. So I ask for a little help.
Thank you very much
Raul
Hi Raul!
Let me see if I can help …
I assume you installed Mono first, then Sonarr after that.
I also assume that your mean that trying to open http://192.168.1.100:8989/ (were 192.168.1.100 is your NAS) is simply not working and displays the “Cannot connect to server” message ..?
And … that you can still access your QNAP’s main admin pages as usual?
hans
Hans, thank you for your answer so fast.
The main reason that I was stuck was because I was trying to install x86 version in 4.3 intel, instead of the x64 of BZN. I think that I have everything set, so lets wait and see if the jtvshows appear in my NAS.
Again, thank you.
Raul
Awesome! Thanks for posting the solution – I’ll keep my fingers crossed
hans