Overview
What is Wake On LAN ?
Wake On LAN, or WOL, is a Ethernet standard that allows you to “wake up” computers or network devices that are in stand-by, and is originally intended for use in a local network. This means for example your home network.
WOL is probably most commonly used to wake up a server or NAS, just before access to these machines is needed – for example a media server, which can sleep all day long until you want to watch a movie. There can be several motivations to do this; save on power, save on the environment, save on wear-and-tear of your equipment, etc.
To be able to use Wake On Lan, yoru computer requires the network card of this device to be semi-awake, and still listen to traffic when the computer is in standby, just in case a “magic packet” is being send to the device. While the NIC (network interface controller) is listening, a lot of traffic might pass that might not even be intended for this network connection, so just listening to network traffic would keep your network device awake even when you don’t want it to be awake. That’s why a standard was defined with data of a specific format – the so called “Magic Packet”.
WOL support on WiFi, Switches, NICs etc …
Note that not all devices or networks will support Wake On LAN.
Devices / networks where Wake On LAN may not work (not supported / not implemented):
- WiFi can support WOL, however most devices do not support WOL over WiFi.
- Modern switches may not support WOL (eg. 10 Gbps switches and some newer 1 Gbps switches (some only support WOL on port 1).
- Most 10Gbps NICs will not support WOL (eg. Intel cards, some cards with multiple ports amy support WOL on port 1).
- Most fiber connections may not support WOL either.
- WOL over Internet can be problematic.
The magic packet is a 102 bytes long broadcast frame containing a of payload 6 bytes, all set to 255 (FF FF FF FF FF FF in hexadecimal), followed by 16 repetitions of the target computer’s 48-bit MAC address. (48 bit = 6 bytes)
Example (Mac Address = A2:3B:41:00:7A:9B):
1
2
3
4
5
6
7
8
9
10
11
12
13
14
15
16
17
| FF FF FF FF FF FF
A2 3B 41 00 7A 9B
A2 3B 41 00 7A 9B
A2 3B 41 00 7A 9B
A2 3B 41 00 7A 9B
A2 3B 41 00 7A 9B
A2 3B 41 00 7A 9B
A2 3B 41 00 7A 9B
A2 3B 41 00 7A 9B
A2 3B 41 00 7A 9B
A2 3B 41 00 7A 9B
A2 3B 41 00 7A 9B
A2 3B 41 00 7A 9B
A2 3B 41 00 7A 9B
A2 3B 41 00 7A 9B
A2 3B 41 00 7A 9B
A2 3B 41 00 7A 9B |
The Magic Packet (UDP) is typically send to port 9, some systems default to port 7, and some systems allow you to define your own port number.
Normally just one single packet should do the trick, but most Wake On Lan applications actually send more than one packet – just to make sure.
To get started with Wake On Lan, you’ll need to follow these steps:
- Enable Wake On Lan on te device which you’d like to wake up.
- Write down the Mac Address of the device you’d like to wake up –miniWOL does not need this, but most other applications do.
- Find a WOL tool that can send the Wake on Lan packets.
- Configure your tool.
- Put your “server” in standby.
- Test the tool by sending the Wake On Lan Packet and verify that your device fires up.
Ad Blocking Detected Please consider disabling your ad blocker for our website.
We rely on these ads to be able to run our website.
You can of course support us in other ways (see Support Us on the left).
Hardware Requirements
To enable Wake on Lan, your network card (or WiFi card) needs to be Wake On Lan compatible – and not all of them are (especially very cheap or “older” network cards). The network card needs to be powered by your computer, even when the computer is in standby, and should be able to monitor network traffic on a defined port, so it can catch an incoming Magic Packet and see if it’s intended for this computer (MAC address).
A note on WiFi cards;
Since Wifi is often used in mobile devices, then this would mean that your battery keeps being drained, for those devices that support Wake On Lan over WiFi. So be aware and not surprised to run out of juice before you can use your laptop for example.
Obviously, this also means that you device (computer) needs to support going to standby, and have BIOS and/or driver support to handle a “power on” signal when the network card sees a correct Magic Packet.
You can already guess that there is no simple “one-fits-all” description on how to do this.
Some Operating Systems (mostly NAS devices, and MacOS X devices) make it easy for the user. Just enable it in one spot. Others (Windows and Linux for example) can make it a little bit more of a challenge, sometimes you will need to set the option in the BIOS/UEFI, sometimes in the drivers, or sometimes both.
Power Management – Standby and Wake Up
Not only do you need Wake On Lan to be enabled, often a setting found under Power Management, but you’ll also like to make sure your device automatically goes to sleep (standby) again after a number of minutes of inactivity. Unless you’re happy with pressing the “go to standby” button on your device of course.
Power Management is on some systems very well implemented, which makes it easy to enable “falling a sleep”. Other systems require 3rd party applications or hackery to get the server to fall a sleep again.
It goes a little beyond this article to describe how to get your computer to go into standby based on your criteria, but most often these settings are found under the power management settings of your operating system.
Windows in Standby based on low network traffic
For Windows you can use the very powerful TOff as well, which allows your Windows computer to go to standby when there is no network traffic for a given number of minutes. Of course this application offers way more, yet remains super small. I highly recommend it!
Ad Blocking Detected Please consider disabling your ad blocker for our website.
We rely on these ads to be able to run our website.
You can of course support us in other ways (see Support Us on the left).
How to Enable Wake on LAN?
Enabling Wake on Lan on your server, computer, NAS or other device, very much depends on the capabilities of that device. Not every device supports Wake On Lan.
BIOS settings
Some systems, typically Windows or Linux based, require you to do some BIOS settings to enable Wake On Lan on a BIOS level.
For some of these systems, this would be enough. For others you’ll need to tinker with the driver settings as well.
This does NOT apply to Mac’s, and most NAS devices
Note that some Operating Systems, may not require you to set this in modern (UEFI) “BIOS”‘es.
Since there are so many different BIOS variants around, a few screenshots that I have found online can be seen below.
To get into the BIOS, either consult the manual or manufacturers website, or … carefully watch the messages on your monitor when booting your computer. Some common ways you might see this BIOS access message (source):
- Press [key] to enter setup
- Setup: [key]
- Enter BIOS by pressing [key]
- Press [key] to enter BIOS setup
- Press [key] to access BIOS
- Press [key] to access system configuration
Take note of the key – this is the key or key combination you should press to get into the BIOS.
Common keys are: F1, F2, Del, and F12. For a good list of BIOS Hotkeys, see CPUCare – BIOS Access.
To find your settings in your BIOS, if needed:
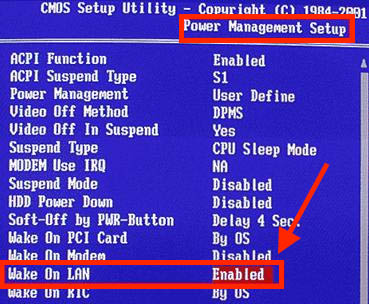
- Look for “Power Management” options.
- Look for “Wake On Lan“, “Remote Wake Up“, “WOL“, etc.
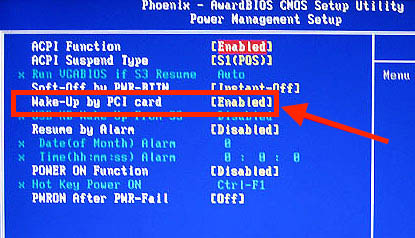
- If not explicitly called “Wake On Lan”, look for something like “Power On by PCI device” or “Wake up by PCI device“.
If you found different settings, then please help us out, and post your settings in the comments. Please mention the type of hardware/PC you’re using, others will tank you for helping out.
Doing the settings in the BIOS might be enough to get things going. If Wake On Lan still doesn’t work, time to check the Operating System settings.
Below a few screenshots of different BIOS variants.
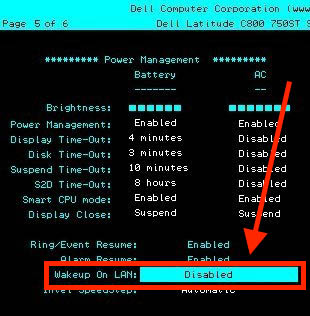
Wake On Lan – Bios Example 1
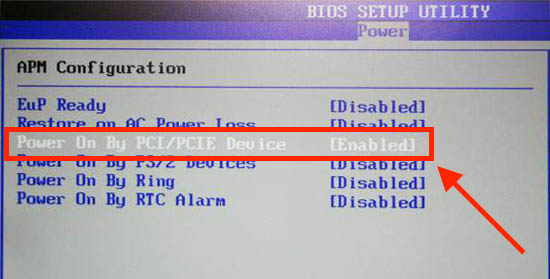
Wake On Lan – Bios Example 2
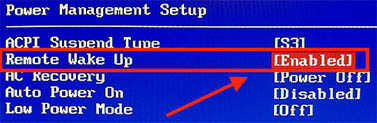
Wake On Lan – Bios Example 3
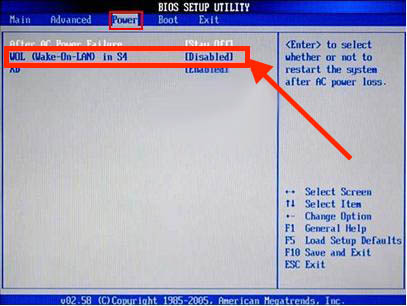
Wake On Lan – Bios Example 4
Wake On Lan – Bios Example 5
Wake On Lan – Bios Example 6
NAS Devices
NAS devices are usually very easy to enable Wake On Lan – no toying with the BIOS, drivers and such.
Such is the case with QNAP and Synology NAS devices.
If you have a different NAS, then please feel free to post the setup steps in the comments below – it’s much appreciated by other visitors and myself of course.
QNAP
Go to the web interface and go to “Control Panel” “Power” “Wake On Lan” tab, check “enable” and click on “Apply” (see QNAP User Manual).
As far as I know, all QNAP models support Wake On Lan. If you run into problems, the QNAP Forum is a great resource.
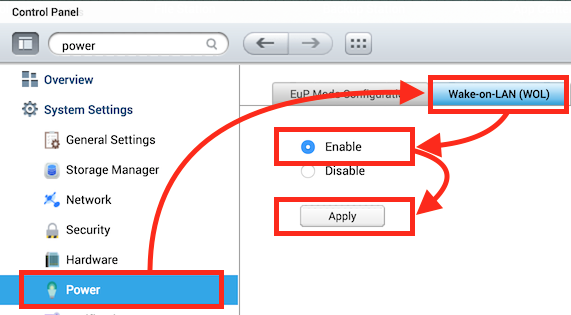
QNAP NAS – Enable Wake On LAN
Synology
I personally do not have any Synology NAS devices, but I did find this little bit of information on how to enable Wake On Lan for a Synology device. Please note that not all Synology models support WOL – see “Synology – Which Synology NAS models support WOL (Wake on LAN)?“.
Go to your Synology’s “Control Panel” “Hardware & Power” “General” tab and check “Enable WOL on LAN x” where x is the ethernet port on your Synology (this can be more than one on some models). (source)
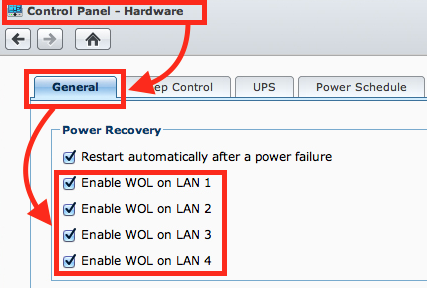
Synology NAS – Enable Wake On LAN
Desktops, Servers, Laptops
You can wake up your desktop, laptop, or server, running an Operating System capable of handling Wake on Lan.
Most modern Operating Systems are very capable of doing this, it just can be a challenge to find the right setting.
MacOS X
Wake On LAN not working for your Mac?
Check out my article (look for Example 3) which explains how to login to SSH securely without a password, and wake up a MacBook Pro without even using a Wake On LAN application.
Note: You’ll still need to do the settings listed below, and your MacBook needs to be powered by a power brick, and the lid (potentially) must be open. Additionally “Remote Login” must be enabled (System Preferences Sharing).
Tip: Executing a script after sending a Wake On LAN can be done with (for example) miniWOL2.
I’m assuming you’re using at least Mac OS X 10.11, but older versions will have a the same setting.
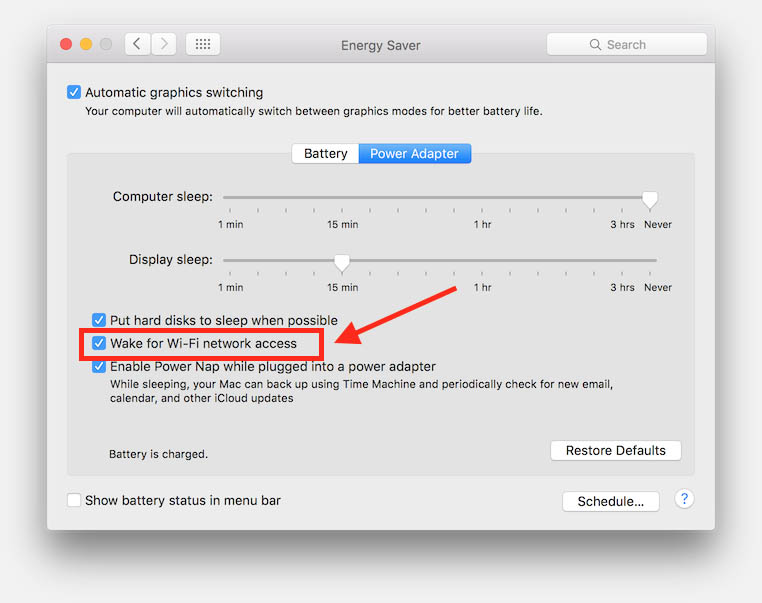
Go to “System Preferences” “Energy Saver“.
Check the option “Wake for network access” or “Wake for Wi-Fi network access”. That’s all there is to it, you can close this window now.
Note: Enabling Wake On Lan on a laptop will drain your battery even when you’re not using your laptop.
Note: Older Mac OS X versions might call this option in Energy Saver “Wake for Ethernet network administrator access”.
MacOS X – Enable Wake on Lan
Windows
Under Windows, I typically, double check and see that the BIOS has Wake On Lan enabled as well.
Now the next step will be to enable, if available, Wake On Lan support on your network card.
For this (assuming Windows 10), you’ll have to go to the “Device Manager” (press the Windows key + F and type “device manager”).
In the device manager, locate the group “Network adapters”, where you’ll find your network card (skip all the Bluetooth etc devices).
Right click your network card and select “properties”, which will show you the details in a separate window.
Windows 10 – NIC details
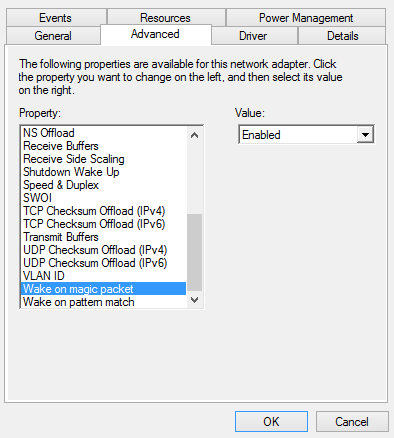
Step 1 – Click the tab “Advanced“.
Here you could see a list of options – be careful to not screw up any settings, just scroll until you see something like:
“Wake On Lan”, “Wake on Magic Packet”, “Shutdown Wake Up” or “Wake Up Capabilities”.
Set that option to “enabled”. If “enabled” does not exist, choose “Both”. If that’s not an option either, choose “Magic Packet” – if available of course.
Step 2 – Click the tab “Power Management“.
Here you might find the option “Allow this device to wake the computer” – check it if it’s available and enabled.
Just below that another option might be visible or appear called “Only allow a Magic Packet to wake the computer” which you’d want to enable/check as well.
Click “OK” when done and your Windows computer should have WOL enabled.
Windows 8 and Fast Startup – WOL doesn’t work or not available …
Windows 8 might have issues with WOL when Fast Startup is enabled. You will have to disable Fast Startup.
You can do this by going to “Control Panel” “System and Security” “Power Options” “Choose what the power buttons do” “Change settings that are currently unavailable”. Now scroll down, and uncheck “Turn on fast startup (recommended).”.
The consequence will be that your PC will start up a little bit slower, which probably does not affect the speed of coming out of standby, but you’ll be able to use Wake-on-LAN.
Linux
There are numerous Linux variants available and each might have it’s own quirks when it comes to setting up.
I strongly recommend checking the BIOS to see if it has Wake On Lan enabled before doing anything else.
Ubuntu (and similar distro’s)
These steps seem to work for CentOS and Fedora as well.
First we need to determine whether the network card (NIC) supports WOL.
Before we can do this, we will need to determine the NIC name (network connection on your computer), which can be done with “ifconfig”. In my test setup:
1
2
3
4
5
6
7
8
9
10
11
12
13
14
15
16
17
18
19
20
| $ ifconfig
eth0 Link encap:Ethernet HWaddr 00:0c:29:15:c8:8c
inet addr:192.168.1.195 Bcast:192.168.1.255 Mask:255.255.255.0
inet6 addr: fe80::20c:29ff:fe15:c88c/64 Scope:Link
UP BROADCAST RUNNING MULTICAST MTU:1500 Metric:1
RX packets:280481 errors:6 dropped:0 overruns:0 frame:0
TX packets:143653 errors:0 dropped:0 overruns:0 carrier:0
collisions:0 txqueuelen:1000
RX bytes:379209958 (379.2 MB) TX bytes:11171656 (11.1 MB)
Interrupt:19 Base address:0x2000
lo Link encap:Local Loopback
inet addr:127.0.0.1 Mask:255.0.0.0
inet6 addr: ::1/128 Scope:Host
UP LOOPBACK RUNNING MTU:65536 Metric:1
RX packets:3969 errors:0 dropped:0 overruns:0 frame:0
TX packets:3969 errors:0 dropped:0 overruns:0 carrier:0
collisions:0 txqueuelen:0
RX bytes:401117 (401.1 KB) TX bytes:401117 (401.1 KB) |
I know my computer has the IP address 192.168.1.195 (line 4), looking up where this list starts, we see in line 3 that our NIC is called “eth0“. Your might of course be different.
Next we will use the tool “ethtool” for to determine WOL capabilities (if “ethtool” is not installed yet, install it with: sudo apt-get install ethtool ).
Here <NIC> is the device name of your NIC, for example “eth0” (without the quotes). This command will output some information about your the capabilities of your network card, for example:
1
2
3
4
5
6
7
8
9
10
11
12
13
14
15
16
17
18
| Settings for eth0:
Supported ports: [ MII ]
Supported link modes: 10baseT/Half 10baseT/Full
100baseT/Half 100baseT/Full
Supports auto-negotiation: Yes
Advertised link modes: 10baseT/Half 10baseT/Full
100baseT/Half 100baseT/Full
Advertised pause frame use: No
Advertised auto-negotiation: Yes
Speed: 100Mb/s
Duplex: Full
Port: MII
PHYAD: 1
Transceiver: external
Auto-negotiation: on
Supports Wake-on: g
Wake-on: d
Link detected: yes |
Pay attention to the highlighted lines.
If this output contains a line similar to: Supports Wake-on: <some characters> where <some characters> contains the letter “g“, the NIC should support the WOL (as show above, line 16).
If you card supports WOL, we should check if WOL is already enabled or not. We can fid that in the same output of “ethtool”. This time look for: Wake-on: <some characters> (as show above, line 17).
If <some characters> contains “g” and not “d“, then WOL is enabled. If it contains “d“ then WOL is not yet enabled.
To enable WOL:
sudo ethtool -s <NIC> wol g
Now to make sure WOL remains enabled after reboot (which is required even after doing this setting), you might have to edit /etc/network/interfaces . For example:
1
2
3
4
5
6
7
8
9
10
11
12
| # This file describes the network interfaces available on your system
# and how to activate them. For more information, see interfaces(5).
# The loopback network interface
auto lo
iface lo inet loopback
# The primary network interface
auto eth0
iface eth0 inet static
address 10.0.0.1
netmask 255.255.255.0
gateway 10.0.0.138
up ethtool -s eth0 wol g |
This should ensure that WoL is enabled on each boot.
In case your WOL is not working, then this hint from the AskUbuntu forums might help:
Add NETDOWN=no in /etc/default/halt to prevent powering off the network card during shutdown.
Other Linux Systems References
Since there are so many varieties, here some references:
Besides all the needed settings (see below), you of course will need an application that can send Wake On Lan Magic Packets.
There are quite a few around, some pretty, some advanced, some ugly. But they exist for pretty much any platform and system, and usually they are free.
Just keep in mind that most of these applications are intended for use in your local network. Sending magic packets over the Internet is typically not supported, with a few exceptions of course.
Find below a list of some of the Wake On Lan (WOL) applications I’ve used, or have found online.
There are tons more to be found, so if you see your favorite one missing, or noticed that one of the listed apps being crap, then please mention it in one of the comments below. I’ll try to keep the lists updated based on your input.
Windows
miniWOL2, miniWOL, AquilaWOL, NIRSoft WOL, WakeOnLanx, Wake On Lan Applications in the Microsoft Store, and Depicus Wake on Lan for Windows.
MacOS X
miniWOL2, miniWOL, WakeOnLan, WakeOnMac, Remote Wake Up, and Depicus Wake On Lan for OS X.
Linux
miniWOL2, gWakeOnLAN (GUI), WakeOnLan (Shell), and etherWake (Shell).
Android
WakeOnLAN, EasyWol, WOL Wake On Lan Wan, another WakeOnLan, Depicus Wake On Lan, QManager (QNAP), Unified Remote, and Fing Network Tools.
iOS (iPhone,iPad)
EasyWOL, iNet WOL, Mocha WOL, WakeUp, Fing Network Scannner, Depicus Wake On Lan, QManager (QNAP), Unified Remote, and RemoteBoot.
DSLReport, WakeOnLan.me, RemoteWakeUp, and Depicus.
Kodi, since v13, is capable of sending Wake On Lan packets as well – ideal for your media server to wake up when needed. (source: wiki article)
You can enable wake-on-lan under “Settings” “System” “Power saving” “Try to wake remote servers on access“.
Kodi will try to find the MAC Address and such by itself, and create a specific file called “wakeonlan.xml” and is located in the “userdata” folder. You can tweak this file to fit your needs.
An example of “wakeonlan.xml”:
1
2
3
4
5
6
7
8
9
10
11
12
13
14
| <onaccesswakeup>
<netinittimeout>60</netinittimeout>
<netsettletime>500</netsettletime>
<wakeup>
<host>10.0.0.6</host>
<mac>11:11:F2:11:DF:1E</mac>
<pingport>0</pingport>
<pingmode>1</pingmode>
<timeout>600</timeout>
<waitonline>38</waitonline>
<waitonline2>40</waitonline2>
<waitservices>0</waitservices>
</wakeup>
</onaccesswakeup> |
Ad Blocking Detected Please consider disabling your ad blocker for our website.
We rely on these ads to be able to run our website.
You can of course support us in other ways (see Support Us on the left).
Wake On Lan over the Internet
To make Wake On LAN work over the Internet, for example to wake up your NAS at home, while you’re traveling or in the office, you’ll need to do some port forwarding in your modem/router. Most modems/routers support this, and a good website to find router specific information is PortForward.com.
Since Wake On Lan typically uses port 7 or 9 (UDP), you’ll have to forward that port to your network device that you’d like to wake up. Obviously, when you configured a different port, then you’d need to use that one. Note that port 9 (UDP) is the most commonly used port for Wake On Lan and before going this route, I’d test the proper port number in your local network first.
Instead of using the IP address of your network device, you’ll need to use the public IP address of your Internet connection at home. Look on the left here on Tweaking4All, and you’ll see what your public IP address is under the header Statistics, or go to our IP information page. You can of course also go to Whatismyip.com to find your public IP address.
Since some Wake On Lan utilities still might not work that way, you might have to set the subnet mask (if the application allow this) to: 255.255.255.255.
See also: “How To Geek – How to Remotely Turn On Your PC Over the Internet“.
Tip: Using DynDNS, for those who’s public IP address might change frequently, will be very helpful.
Tip: There are several online tools available that can send the WOL Magic Packet over Internet. To name a few: DSLReport, WakeOnLan.me, RemoteWakeUp and Depicus.
Trouble Shooting Wake On Lan – Sniffing Packets
Now I can’t really write a full write-up on how to trouble shoot Wake On Lan, but I can point you to two tools that can help checking if Magic Packets get sent and arrive at your computer.
The ultimate tool for sniffing packets is WireShark, and it’s available for MacOS X, Windows and Linux (for Linux: scroll down on the Downloads page). They even have a helpful article on how to snif Wake On Lan packets. But … Wireshark can however be a little cumbersome to work with if you’ve never used it before.
For Windows users there is a much easier alternative available, if you’re trying to wake up a Windows computer/server: you can try Wake On LAN monitor from Depicus (download link). With this application, you simply enter the proper port number (typically: 9) and click the “start” button. After that send your Wake On Lan packet and you could see something like this if the packet arrived at the right machine:
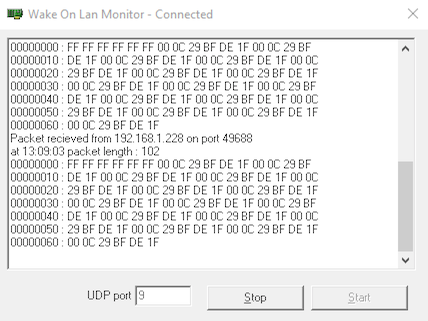
Wake on Lan Monitor (Windows)


Comments
There are 9 comments. You can read them below.
You can post your own comments by using the form below, or reply to existing comments by using the "Reply" button.
Does anybody know of a WOL app for Windows 10 mobile that works.
I have a Lumia 950XL and connect remotely by VPN.
I have tried about 6 WOL apps from the Windows 10 mobile store, but cannot get any to work.
Wayne
Hi Wayne,
I have not had the opportunity to test my own little app, miniWOL, over VPN.
I have noticed however that not all computers/servers/NAS devices/etc respond exactly right when it comes to using WOL.
One trick that might be worth testing with miniWOL (for both Windows and MacOS) is this:
Add you Device to the list with the proper MAC address. I’m not sure if the automatic finding of the MAC address will work over VPN, but if it does, first enter the actual IP address, find MAC address.
Then finally set the IP address use: 255.255.255.255 instead of the actual IP address of the device to which you’d like to send WOL.
Please let us know if this works for you
hans
I finally got the MagicPacket app to work.
Used FQDN for ‘Host(Wake on WAN)’ field, and Port = 9.
Also used Default(Automatic) for ‘Wake on LAN mode’.
All good now.
Wayne
Awesome … !!
Which Magicpacket app did you end up using?
hans
Hi,
Small word of warning when endeavouring WoL;
Newer 10GBe switches often have nowadays the “green ethernet” enforcement permanently enabled.
(mainly due to US legislation in California aka Eco-warriors)
Meaning, when the (10Gbe) switch notices that an ethernet-device connected to a port on that switch is turned off, the switch will cut the power to that particular port.
And therefore 802.1X (WoL) will not work, and thus not wake-up the ethernet-device connected to that port.
Granted, the 10GBe standard (IEEE 802.3ae) does *not* formally support IEEE 802.1X standard, so many manufacturers will thus not support it on the switch, eventhough that switch might also support 1Gbe, 100Mb or even 10Mb Ethernet standards.
In fact, in the really newer 1GBe switches, I have also noticed that this “green ethernet” is permanently turned on and thus will WoL also no longer work.
Hint: Look in the documentation if the switch indeed has Green Ethernet.
But importantly, check if you can disable Green Ethernet.
More importantly, ask the manufacturer if that is indeed a fact (that the Green Ethernet feature can be turned off)
As I also have noticed that due to the aforementioned legislation, a newer firmware-update can disable the ability to set the Green Ethernet option all of a sudden. (!)
Rob Ligthart
Hi Rob,
Thank you for this excellent info.
I was blissfully unaware of this “feature”. Related to this topic, I had read an article that the EU actually promotes the use of WoL …
I think it was a NAS related article that I was reading considering the power modes of my QNAP NAS. I forgot the details.
Interesting as well is that I was able to find mentionings of “green ethernet” all the way back to 2010 (example) – so it has been around for quite a while.
On the other hand, none of my switches (HP, Dell and Zyxel switches – all 1Gb used in a professional environment) seem to be affected by this annoying “feature”.
A few articles I found, refer to cheap 1Gb switches having this feature although I have not ran into one yet.
I suppose there is no alternative for WOL for those devices.
I did see one post mentioning that 10Gb network cards by Intel no longer support WoL, and that some 10Gb switches allow WoL on the first port only.
Anyhow, excellent info, and I’ll add it to this article as a notification, so folks can see this warning!
Hans
Hi Hans!

My pleasure!
My background is that I used to work for various networking companies and my expertises way back then was hardware.
Give me a soldering iron and I can fix the world!
And I have quite a few QNAP’s and ran into WoL challenges, so sharing my experiences.
The EU (and US & UK) promote Green Ethernet actively.
But the switch manufacturers too.
As Green Ethernet means the switch will indeed use less power when not all ports are connected up (and/or devices are switched off) plus, also importantly, the switch will also become way less warm.
QNAP also does not support WoL on the QNAP’s 10GBe ports.
It does support WoL on the 1GBe ports though.
WoL (IEEE 802.1X) was introduced/developed by Intel & IMB in 1996, after forming the Advanced Manageability Alliance (AMA) and releasing it in 1997.
I have to look into some notes but there were several 802.1X releases, I recall 2001 & 2004.
Where switch (and router) manufacturers were endeavouring port-authentication/access control & the likes. (read: enhancing the layer security within a network)
There are some inherent insecurity, or rather: pro’s & con’s (such as security & unreliability) for WoL but it often solves the need to have direct access to the device’s on/off switch. (including QNAP’s)
As modern-day devices hardly have a true on-off switch but rather a wake/sleep button instead.
The infamous IEEE at roughly the same time (it started to work on that standard in 2005) released Energy Efficient Ethernet (802.3az) and became a standard in 2010.
(Green Power Over Ethernet)
Green Ethernet is a superset of that standard, used by some switch/router manufacturers before the standard was ratified.
The idea is that Green Ethernet can save up to 80% of the energy plus reduce the heat dissipation very significantly.
Green Ethernet offers the ability to switch a port on the switch/router into standby mode when the connected device is switched off and, also important can detect the cable-length amd reduce the transmit-power to reduce crosstalk & such shenanigans. Hence, the reason why you can use various cable-types nowadays for 1GBe. It measures & monitors the link-connection, adjusting the power, state of the link and so forth.
Mind you, I not only talking about regular switches & routers but also WiFi Access Points; they reduce (or increase) the transmitting power of the wireless connection to allow for more wireless clients, increase the available bandwidth (as it is by defato a shared medium) and more of such.
In my environment I’m “standardized” on Netgear, mostly Enterprise & VLE’s (very large enterprise), read, hugely expensive switches. (3000 euros starting-prices)
Where I noted that on the 10GBe switches (XS7xxx series for example) have Green Ethernet permanently enabled and no means to switch that off.
Even though you can connect an 1GBe device to its ports, it will not pass-on the means that make WoL work and operate.
I have spoken to the Netgear developers, benefit of a past life, and whilst their chipsets do support (& did allow for) WoL, the Green Ethernet legislation no longer allows them to support the user to disable that Green Ethernet functionality on their switches. That includes the modern-day “1GBe” switches too.
Older switches are exempt for that formal ruling as I understand it.
(read: are often already End Of Life and therefore can’t be dictated to also support the inability to disable Green Ethernet by the user/admin)
There are alternatives to WoL but do not want to make this write-up any longer that it already is.
(I do know my shortcomingd)
There is a simple solution when you endeavour into the 10GBe roam of networking and require WoL, as I do;
Your QNAP (with 1GBe & 10GBe ports) does support WoL (on the 1GBe ports only) and does support dual homed-connections.
Meaning, you can use both the 1GBe & the 10GBe connections at the same time, for example use your “old” 1GBe switch to WoL the QNAP and use the 10GBe for the nicely very fast data transfers. Of course you will need to make sure you do not create a network loop but most Smart switches have that enabled, can detect & avoid such instances…
Rob Ligthart
Hi Rob,
wow that’s a lot of info! And a nice read! Thanks!!
Yeah, last company I worked at used mainly Dell and HP switched, but all 1 GBe. Eventually we switched over to Cisco gear.
Cool stuff, just too expensive, and maybe a little excessive, for home use.
I’d love to switch to 10 GBe, but for now this will be a luxury for business.
Thank you! Your suggested workaround will work indeed.
I have not encountered an issue yet, but I’ll keep it in mind for when I switch to 10GBe hardware!
Thanks for sharing – I’m sure others here will benefit from it.
As you may have seen: I’ve added a notification saying that 10GBe networks may not support WOL.
Just so users know.
Hans
Hi Hans & on-readers,
You’re more than welcome, of course!
Rob Ligthart