Before we begin …
This guide is intended for a computer that is already running Windows 8.1, with enough hard-disk space left so we can install Ubuntu next to Windows. Ubuntu recommends more than 6.4Gb, as it uses 6.4Gb for the install alone. So probably best to aim for at least say 20Gb of disk space you will need, but go higher if you can – I took 100Gb (84Gb Ubuntu and 16Gb swap).
Tip : Read the entire article before actually doing anything ..
Note : Leave some Gb’s available for your Windows partition … Windows needs extra space for it’s swap file.
Note : Windows 8 and newer will very likely work much the same way.
Note : I’m not a Linux expert, I assume there are better ways to do certain steps, but this worked for me.
Tip : You can open this webpage in Ubuntu when you’re running the live version from your USB stick. Makes Copy/Paste easier  …
…
Total Destruction at your own risk!
Not likely that this will happen, total destruction, but the steps we take in this guide can result in a computer that will no longer boot your Windows setup, and might require a total reinstall of everything from scratch. Consequences like loss of all data should be expected!
So please please please pay attention to what you’re doing,… don’t blame us if your house implodes!
Running Ubuntu straight from USB … just 3 steps …
If you are more interested in just running Ubuntu from a USB stick, then you will only need to follow these 3 steps:
Step 1 – Create a Bootable Ubuntu USB stick
Step 4 – Turn OFF Fast Boot
Step 5 – UEFI BIOS Settings to Enable boot from USB
Using the boot menu or giving USB the highest boot priority in the BIOS, will make it that you can boot Ubuntu when you see fit.
Specially on USB 3.0 drives in a USB 3.0 port, this work surprisingly well …
You might however need a separate storage devices to save your files … or figure out how to save files on your Ubuntu USB stick.
First you’ll need a Ubuntu 14.x install ISO file, which can be found on the Ubuntu website.
For most modern computers, the 64-bit version will do. Take the 32-bit version if your computer has limited memory (<2Gb).
The 64-bit AMD (Mac) version is a special 64-bit version for MacOS X computers, so don’t confuse that with the regular 64-bit version.
I used Ubuntu Desktop 14.04 64-bit and my computer was already running Windows 8.1.
Next we need a tool called “Universal USB Installer” which helps us create a bootable USB drive or USB stick.
Download it from their website, to make sure you get the latest version, or download a copy from Tweaking4All.
Download - Universal-USB-Installer
OK, when you have all that, and of course a computer running Windows 8.x, time to get started …
Ad Blocking Detected Please consider disabling your ad blocker for our website.
We rely on these ads to be able to run our website.
You can of course support us in other ways (see Support Us on the left).
Step 1 – Create a Bootable Ubuntu USB stick
We have 2 options here: either create a bootable USB stick or a installation DVD.
For convenience and not wanting to waste another DVD, I recommend using the USB Stick method, specially when you have USB 3.0 available (computer and stick).
For those that wish to burn a DVD : Use your favorite disk burning application to burn the downloaded Ubuntu ISO file to DVD.
Creating a bootable USB stick is relatively easy with “Universal USB Installer“.
Download the application and double click it to get it started.
- Select Ubuntu from the “Select a Linux Distribution” drop down.
- Click “Browse” and select the downloaded Ubuntu ISO file.
- Select the correct drive at “Select your USB Flash Drive Letter“.
- Check “We will format X:\ Drive as Fast32“.
- Click “Create” to start the process.
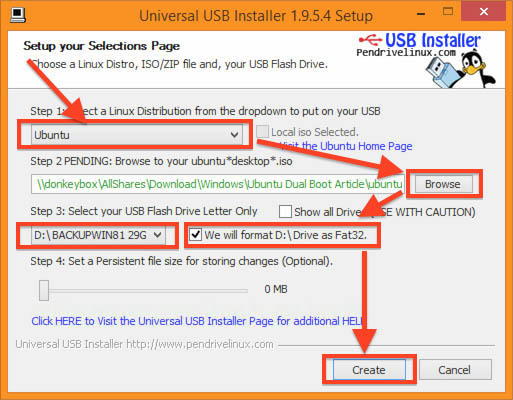
Universal USB installer
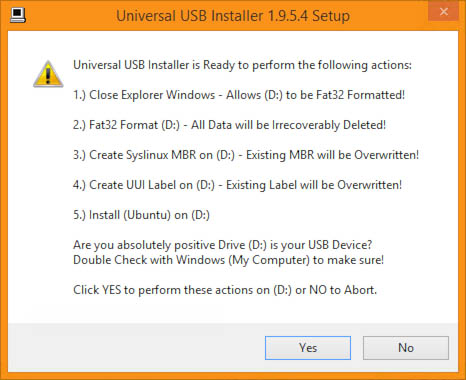
After clicking “Create” a recap will be shown of the planned actions – please verify them before clicking “Yes“.
Universal USB Installer – Planned Actions
After clicking “Yes”, a few windows will fly by indicating work in progress …

Universal USB Installer – Prepping USB Drive
Note that during this process, the ISO fill will be taken apart (which takes a little time), and your USB stick will be prepped.
Once you see the message “Installation Done, Process is Complete!” (in the black part of the window, in green text), your USB stick is done and ready.
Click “Close” to close Universal USB Installer.
Step 2 – Make a backup of your current Windows setup
Backups are funny – you only need them when you didn’t make one … so we better play it save, since we will be doing some pretty drastic things to your harddrive. Windows 8.1 comes with the tools we need to create a recovery drive (USB Stick, at least 16GB, USB 3.0 recommended if your computer supports it) and a backup of your personal files (depending on your computer, this might be a lot of files, and a network share or larger USB drive might be needed).
There are other ways of doing this, so be my guest to pick your preferred method and tool. Here we use the standard Windows tools.
Before making backups …
This is a good time to:
- Make sure all Windows UPDATES are DONE … Avoid a nasty forced Window update in the process.
- Old stuff (documents, programs, Ubuntu ISO, etc) are REMOVED. No need to backup those.
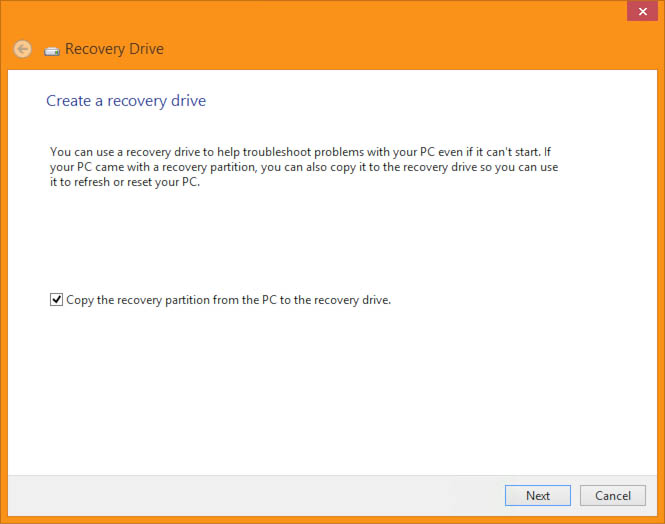
Creating a Recovery Drive
For this you will need a 16 Gb USB Stick (or larger). If your computer supports USB 3.0 and you have a USB 3.0 stick laying around, then by all means use it! It makes a huge difference and will save you a lot of time. This is NOT the same USb stick we just used for Ubuntu!
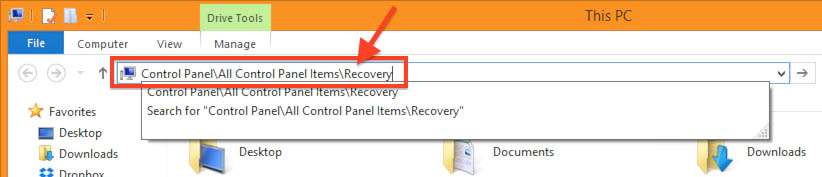
To get to Windows Recovery, open a Windows Explorer window and paste “Control Panel\All Control Panel Items\Recovery” in the address bar (without the double quotes of course) and press ENTER.
Note : I assume that this Recovery option will look similar for Windows 8. For Windows 7 however, it will look very different, and it most certainly does not exist under Windows XP.
Windows 8.1 – How to get to Recovery Tools
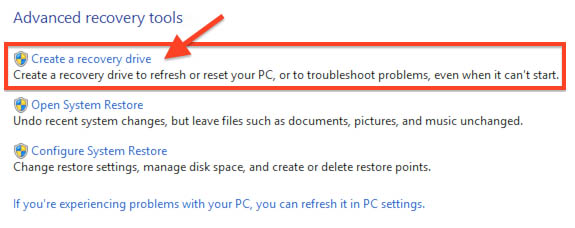
From the “Recovery” window, select the “Create a recovery drive” option.
Windows 8.1 – Recovery – Select “Create a recovery drive”
This will guide you through a wizard to create a recovery drive.
Check “Copy the recovery partition from the PC to the recovery drive” and click “Next“.
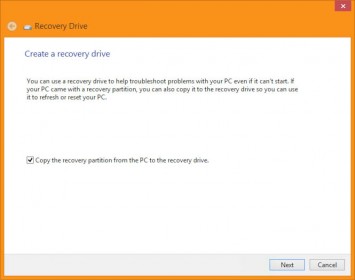
Recovery Wizard – Check “Copy the recovery partition”
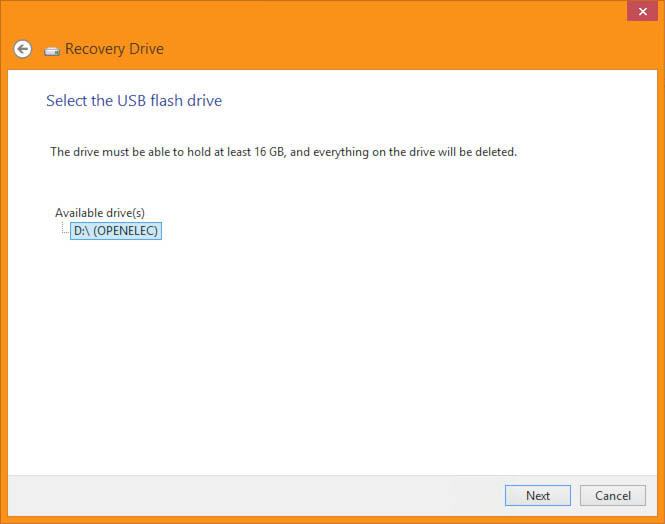
In the next window, you’ll have to select the right USB drive – this will be the drive that Windows will use to store the recovery data on.
Click “Next” when done.
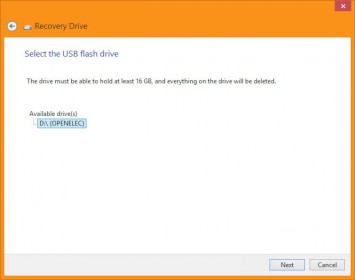
Recovery Wizard – Select the USB drive
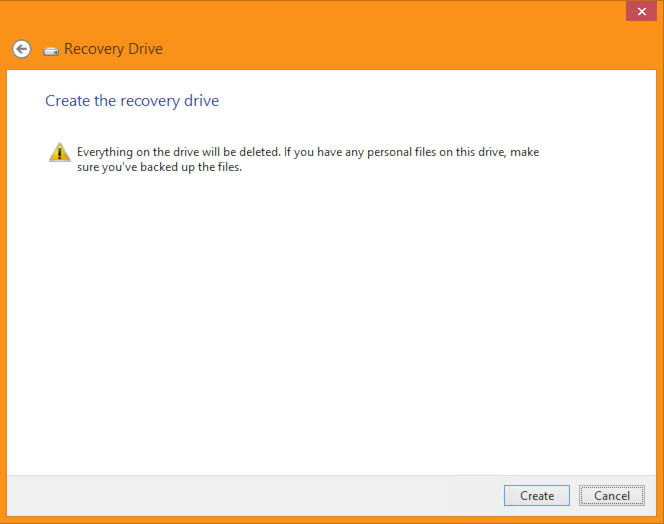
In the next window, you’ll get a warning that the selected drive will be totally erased, and if you’re sure you selected the right drive, click “Next“.
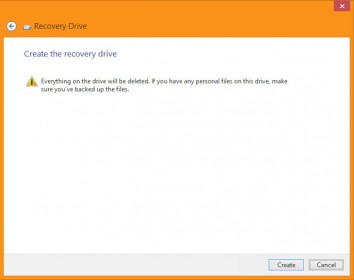
Recovery Wizard – Confirmation to erase
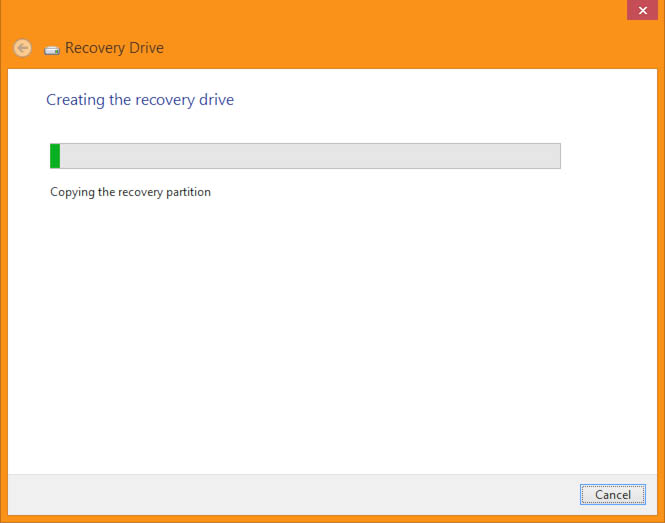
Now it’s a matter of waiting … grab a snack and a drink if you’d like … or write an article for your website (that’s what I’m doing) … 
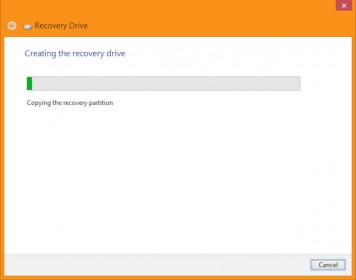
Recovery Wizard – Creating Recovery Disk
The entire process took only a few minutes on my setup – but this all depends on the speed of your computer, USB port and USB drive.
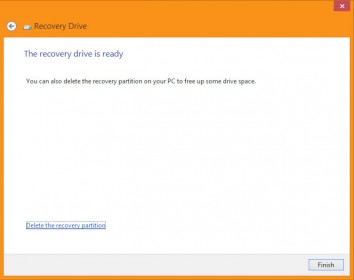
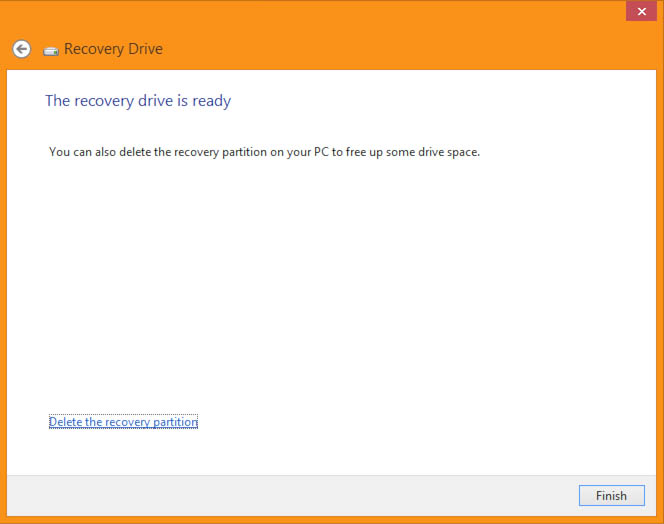
Recovery Wizard – Finished
Once completed, click “Finish“, and remove the USB drive properly (use the Windows Eject option), and store it in a safe place … you’ll need it when things go South on ya.
Backup your Personal Files
In this step we will backup your files and such, which might need more space – all depending on what you’ve collected over time.
I will not spent too much time on this particular backup method, I store all my files on my NAS, so anything on my computer can go anyway.
For files that are stored in “My Documents”, you can use the “File History” tool.
First you’ll need to connect a drive, a USB drive for example.
To get to this tool, paste “Control Panel\System and Security\File History” in the address bar of Windows Explorer.
It will right away seek a suitable drive. You’ll see a button “File History” which most likely is set to “OFF” at this moment.
Set it to “ON” and click the now functional button “Backup Now“.
Warning: this will only backup your files from “My Documents“!
So if you have stuff laying around elsewhere, you will need to manually back those up as well.
Ad Blocking Detected Please consider disabling your ad blocker for our website.
We rely on these ads to be able to run our website.
You can of course support us in other ways (see Support Us on the left).
Step 3 – Make room on your hard-drive for Ubuntu
Now that we have either a bootable USB Stick/Drive (or DVD disk), and a recovery drive for Windows, time to make prepare your hard-drive for Ubuntu.
Resizing/Shrinking your Windows partition is relatively easy – given that you have enough hard-disk space.
For this we will use the “Disk Management” tool, which can be found in the “Control Panel” – if you can’t find it, type “Disk Management” in the search box of the Control Panel window.
Once “Disk Management” opens, you will most likely see an unexpected number of partitions … the days of Windows XP and one or two partitions seem over with all the recovery partitions these days. Multiple Recovery Partitions (really?), an EFI partition and finally a “C:” partition.

Windows 8.1 – Disk Management
To shrink the “C:” partition, right click the C-partition first and select the “Shrink Volume…” option from the popup menu.
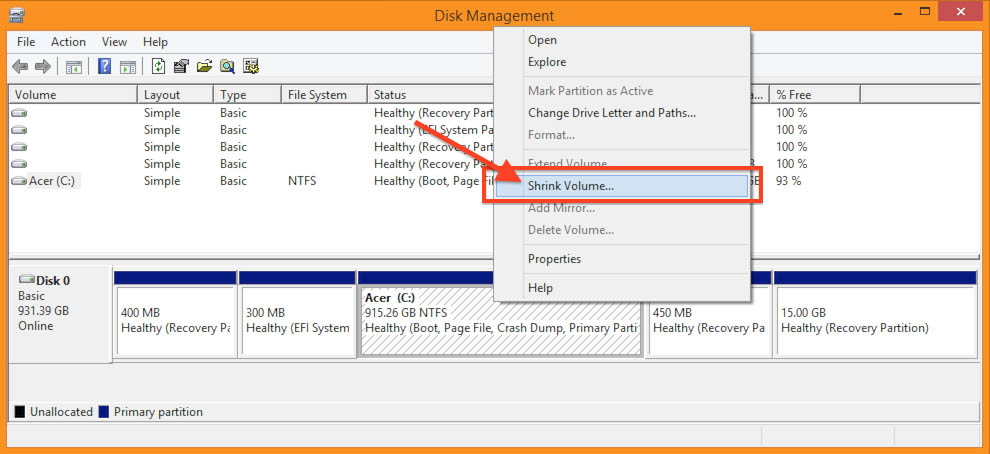
Windows 8.1 – Disk Management – Shrink Partition
A popup window briefly appears, analyzing available space.
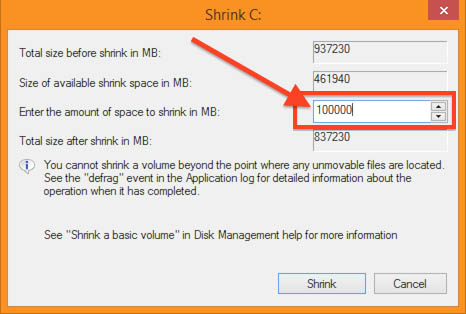
After that a “Shrink C:” window appears where we can define how much space we want to take away from the C:-drive.
In the field “Enter the amount of space to shrink in MB“, we basically enter the amount of MB we’d like our Ubuntu partition to be. In the example below, I reserver 100 GB for my Ubuntu partition (100,000). Depending on your disk space and Ubuntu needs, you can of course decide on different values. I would carefully guess that 10 GB (10,000) is what you should take as a minimum, but I’m sure that number can be tuned.
Remember this value … it will help you select the right partition at a later time.
Windows 8.1 – Disk Management – Define Ubuntu Partition Size
Once decided how much space you’d like to use, click the “Shrink” button – this process can be surprisingly fast …
After completion, you will see that “Disk Management” indicates a nice chunk of “Unallocated” space – which is exactly where we will place our Ubuntu setup.
Step 4 – Turn OFF Fast Boot
We need to turn of Fast Boot, so we can actually boot from our USB drive. Note that this option might or might not be applicable for your computer.
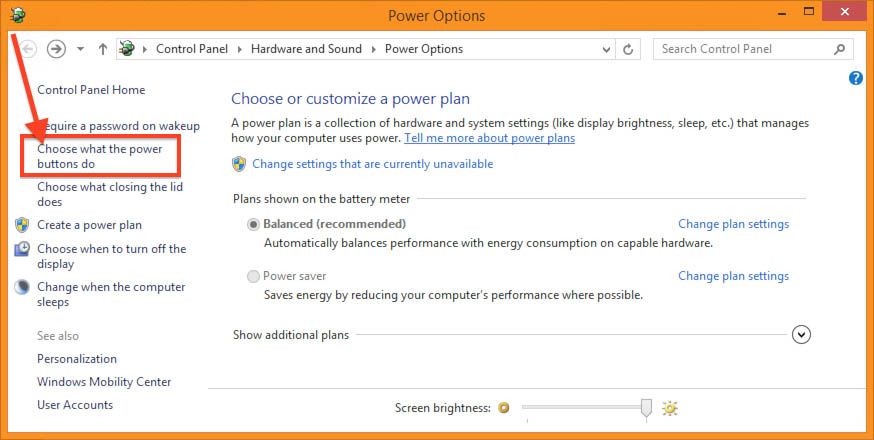
Fast Boot can be found in the Power Options (Control Panel) and to get there, open a Windows Explorer window and paste “Control Panel\Hardware and Sound\Power Options” in the address bar and press ENTER.
Windows 8.1 -Power Options
In the Power Options window, click the “Change what the power buttons do” option.
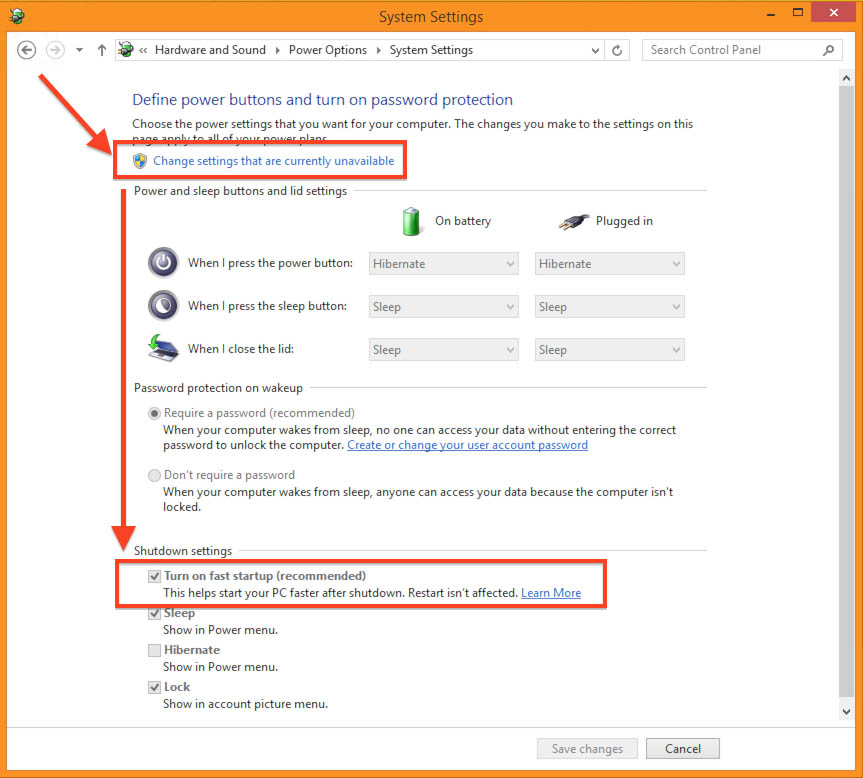
Windows 8.1 -Power Options – Disable Fast Boot
Here we uncheck the “Turn on fast startup (recommended)” option.
If this option is disabled (grayed out – like shown above), then first click the “Change settings that are currently unavailable” to enable the option.
When done, click the “Save changes” button.
Ad Blocking Detected Please consider disabling your ad blocker for our website.
We rely on these ads to be able to run our website.
You can of course support us in other ways (see Support Us on the left).
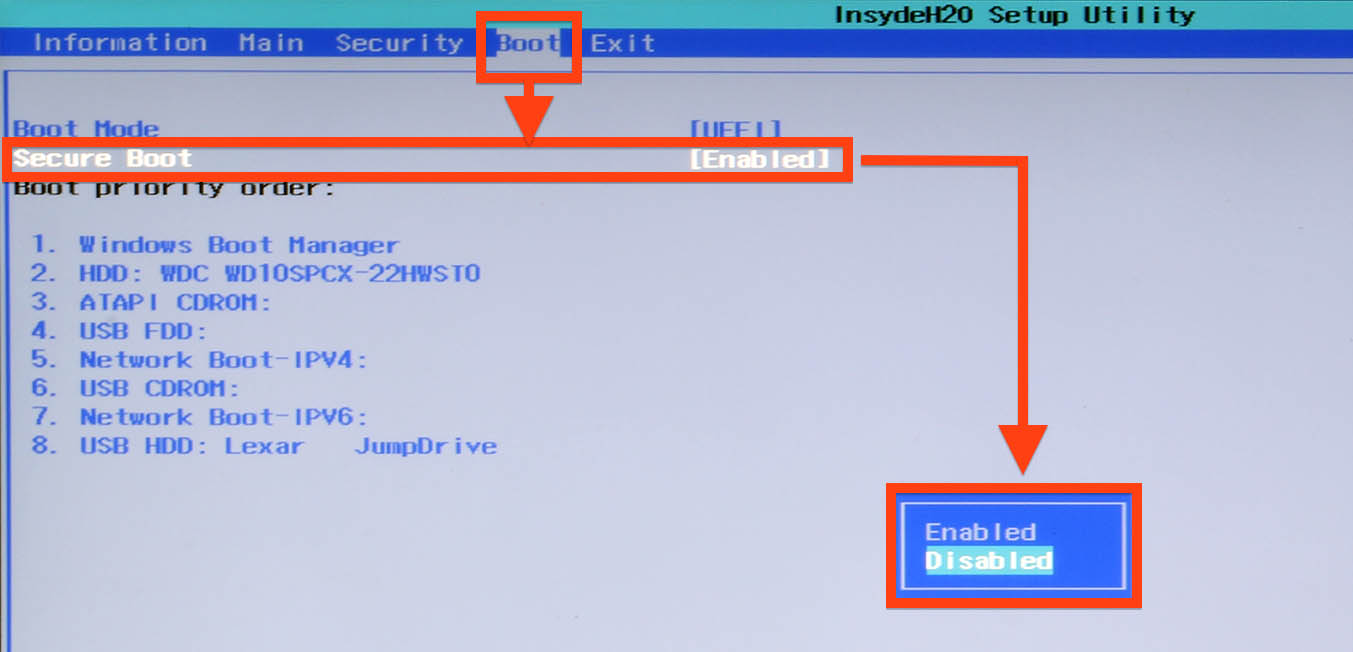
Step 5 – UEFI BIOS Settings to Enable boot from USB
Secure Boot is actually a BIOS (or more correct UEFI) option, which makes sure that the computer is only booted with software the PC manufacturer trusts (see also this Microsoft TechNet Article). Please note that “Secure Boot” is not a requirement for any Operating System (as far as I know), rather an attempt by hardware manufacturers to get PC’s more “secure” … (can you hear me couch?)
“Secure Boot” should not be confused with “UEFI” and “Legacy” boot mode!
When Windows was installed with UEFI Boot Mode, then changing it to “Legacy” will cripple your Windows.
Before proceeding : Insert the Ubuntu USB Stick we just made, so we can see it when we change the boot order.
Note : I ran into this article for older Ubuntu versions on Acer.
Getting in to the UEFI BIOS
Option 1 – Direct
Disabling Secure Boot can be done by going into your “BIOS” at boot up time (the usual F1, F2, F12, Del or Esc keys),…
My Acer Laptop required me to press and hold F2 as soon as you see the Acer logo, and Acer Desktops seem to prefer the Del key instead.
More details for Acer equipment, read this article “How to Enable or Disable Secure Boot” on the Acer website.
Option 2 – Via Windows
Sometimes it’s easier to click “Restart” in Windows while holding down the SHIFT key.
In the upcoming screen go to “Troubleshoot” “Advanced Options” “UEFI Firmware Settings” “Restart”.
See also: Microsoft Technet.
For those who use “Start-Is-Back“: The SHIFT trick (option 2) does NOT work in the Start-menu.
Instead, on the login screen, click the power button (lower right), press and hold the SHIFT button and click “Restart”.
Disabling UEFI Secure Boot
Short version: Go into your (UEFI) BIOS and disable “Secure Boot” …
Long version:
There is a great variation of what BIOS screens will look like. The only (UEFI) Windows box I have is my Acer Laptop (Aspire V5-552P-X440), so I’ll base everything on that – other computers might look similar or very different, but I’m sure that with a little looking around you’ll find what you need.
The “Secure Boot” option can be expected under the “Security” or “Boot“.
“Secure Boot” Grayed Out …
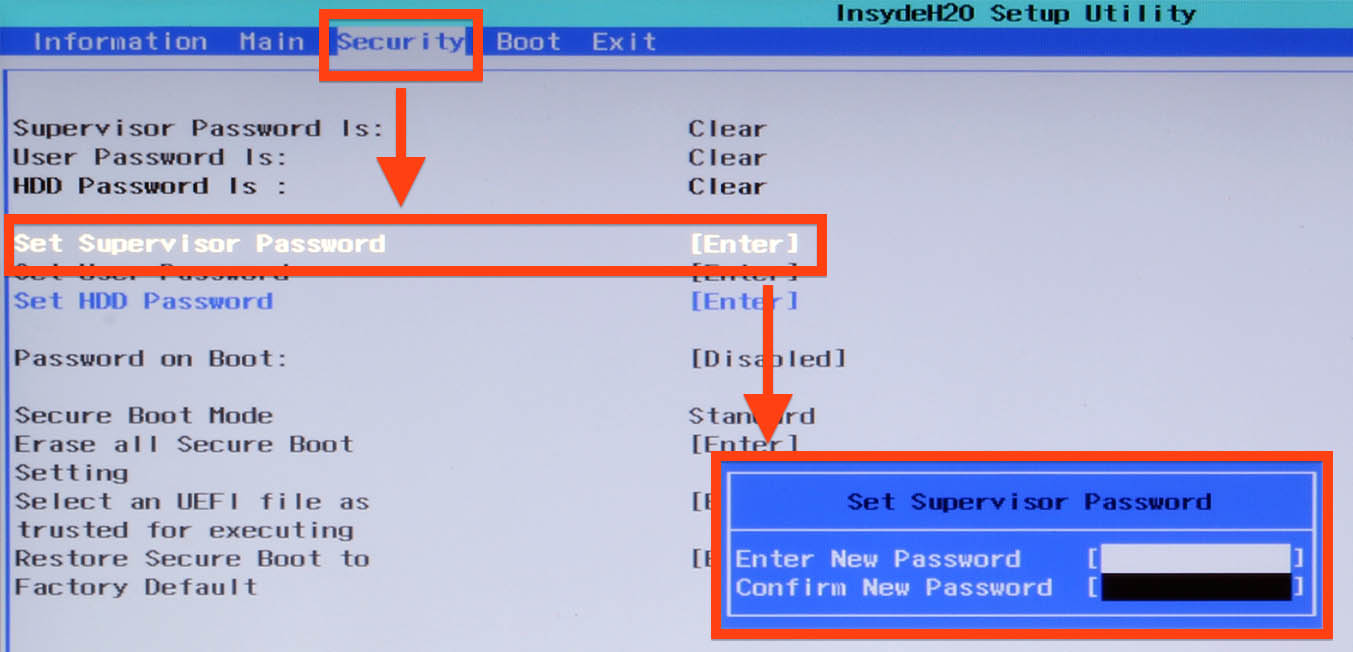
On some systems, Acer for example, you’ll first have to set the “Supervisor Password” on the “Security” screen.
Once the password is set, the “Secure Boot” option becomes enabled (found in the “Boot” screen!).
Once “Secure Boot” is set to “disabled”, you can remove the “Supervisor Password” by setting it to a blank password.
Definitely recommend removing the password – there is nothing worse than forgetting your BIOS password …
Find the “Secure Boot” option – the one that you can set to either “enabled” or “disabled”.
This was on my Acer rather confusing since “Secure Boot” appears on the “Security” screen and the “Boot” screen.
I figured that one out after some tinkering. You will need the one on the “Boot” screen.
Set “Secure Boot” to “disabled“!
Don’t forget to set the “Supervisor Password” to blank again, if you had set it before.
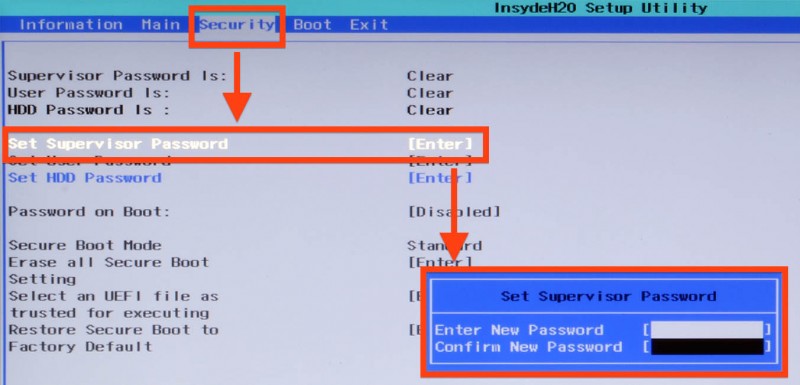
UEFI BIOS – Set Supervisor password (sometimes temporary needed)
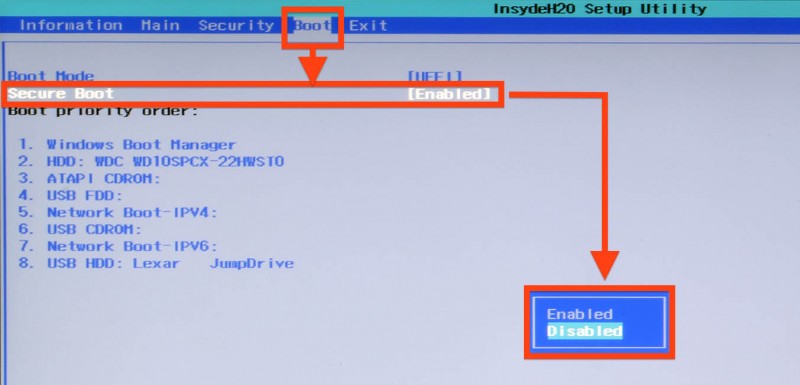
UEFI BIOS – Disable Secure Boot
Enable booting from USB
Since we’re in the BIOS … let’s make sure we can boot from USB …
Option 1 (recommended, if your BIOS allows this) is to set the “Boot Menu” option.
On my Acer this will enable a menu to select a boot device by press F12 during boot as soon as you see the Acer logo.
Handy for future use, and you do not need to go back into the BIOS after we’ve installed Ubuntu … (also saves time when no USB drive is attached)
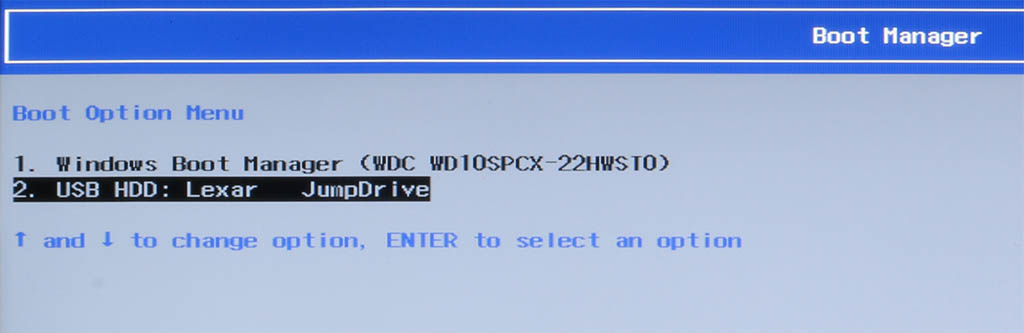
UEFI BIOS – Boot Manager Example (Acer) – Described in Option 1
Option 2 is to change the “Boot order” in your BIOS – Acer for example defaults to the “Windows Boot Manager” FIRST, instead we need to set our USB Stick with Ubuntu to the first one. No need to remember F12 during boot … but when you’re done with the Ubuntu installation you might want to set it back the “Windows Boot Manager” as the first one, to speed up booting and to prevent annoyance when you forgot to remove a USB drive.
Don’t forget to save the settings (under the “Exit” screen) and your computer will reboot.
Step 6 – Installing Ubuntu
OK, on to the next step: Installing Ubuntu …
Start your computer and make sure it boots from the USB drive.
On my Acer I noticed that the USB drive sometimes does not appear in the boot menu, and a warm reboot (CTRL+ALT+DEL) is needed.
Once booted from your USB drive, you’ll see something like this:
GNU GRUB version 2.02^beta2-9
┌───────────────────────────────────────────────────────┐
│ * Try Ubuntu without installing │
│ Install Ubuntu │
│ OEM install (for manufacturers) │
│ Check disk for defects │
└───────────────────────────────────────────────────────┘
We have two options now, install straight from here (untested!). or conveniently use the graphical interface Ubuntu offers us by booting into Ubuntu straight from the USB drive (the first option “Try Ubuntu without installing”).
This would the same option you’d use if you decide to always run Ubuntu from the USB drive.
Select the option “Try Ubuntu without installing“.
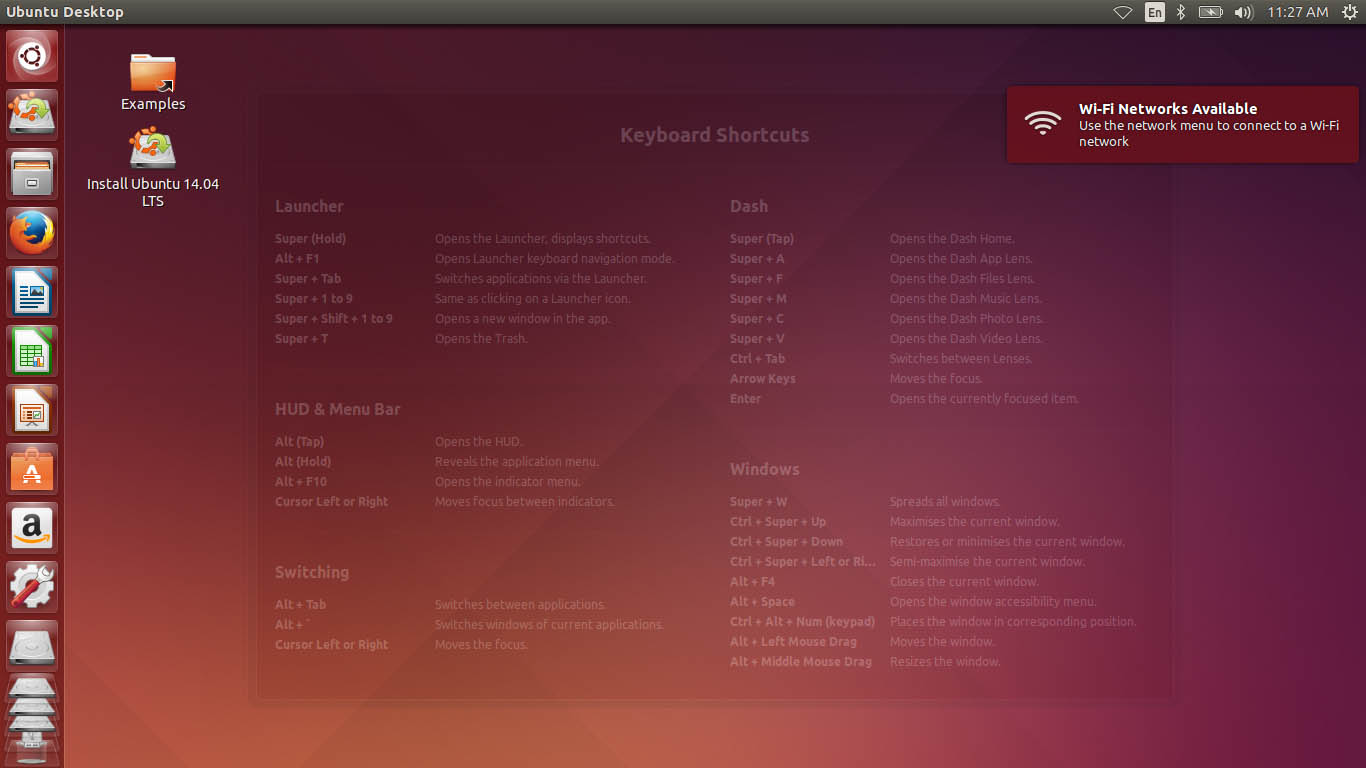
Depending on the speed of your USB port and USB drive, Ubuntu will boot pretty quick and show a screen like this:
Ubuntu – Running from USB
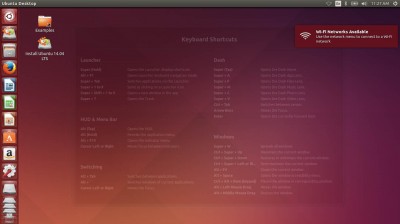
You will initially see a window with some hints concerning keyboard shortcut. You can close this window by clicking the button or by clicking somewhere on the desktop.
Next we double click the installation icon on the desktop called “Install Ubuntu 14.04 LTS” (name will be different for other Ubuntu versions).
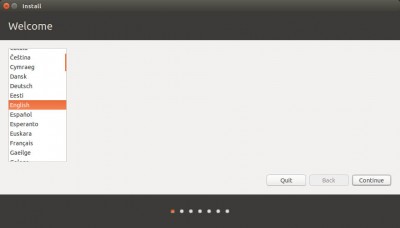
Ubuntu Setup – Select Language
A screen will appear where you have to select your preferred language.
Select the language and click “Continue“.
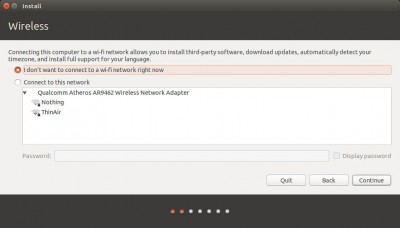
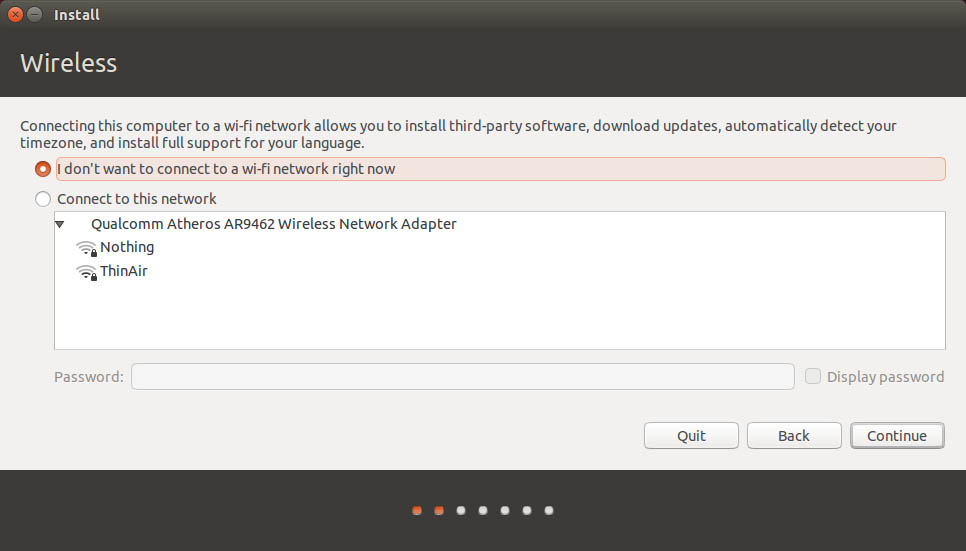
Ubuntu Setup – Enable Wifi/Network
In case your computer has WiFi, a dialog will appear asking for WiFi access. If needed, select your WiFi, enter your WiFi password and click “Connect“.
It takes a few seconds to connect and strangely enough the screen remains almost similar even after connecting.
Note that we do need a network connection at some point …!
Click “Continue” to go to the next screen.
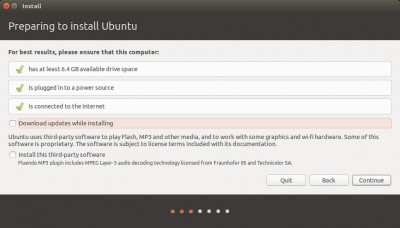
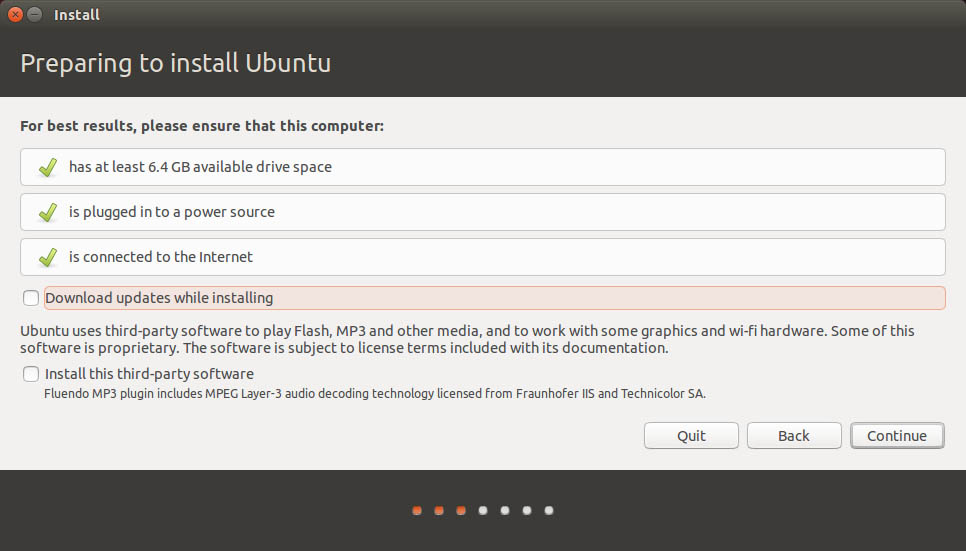
Ubuntu Setup – Download Updates?
In the next screen you can optionally choose to right away download the latest updates and 3rd party applications (for Mp3 audio). To speed up the installation process, I skipped this – you can still do the updates and 3rd software installation at a later time.
In this screen you will also see the disk space requirements (6.4Gb), and that an Internet connection and your computer plugged into a power-supply (Laptops) are recommended.
Click “Continue“.
If Ubuntu asks to unmount certain mounted partition, then click “No”. Your hard-drive should not be mounted at this point anyway, so it is most likely referring to an additional drive, like for example an extra USB drive (which I did to save screenshots).
The following screen asks you for what type of install you’d like to do …
Now be VERY careful here!!!
You want to select the “Something else” option, the other option will clear the entire hard-drive and that’s not what we want.
Click “Continue” after selecting the “Something else” option.
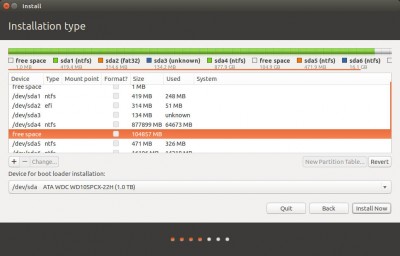
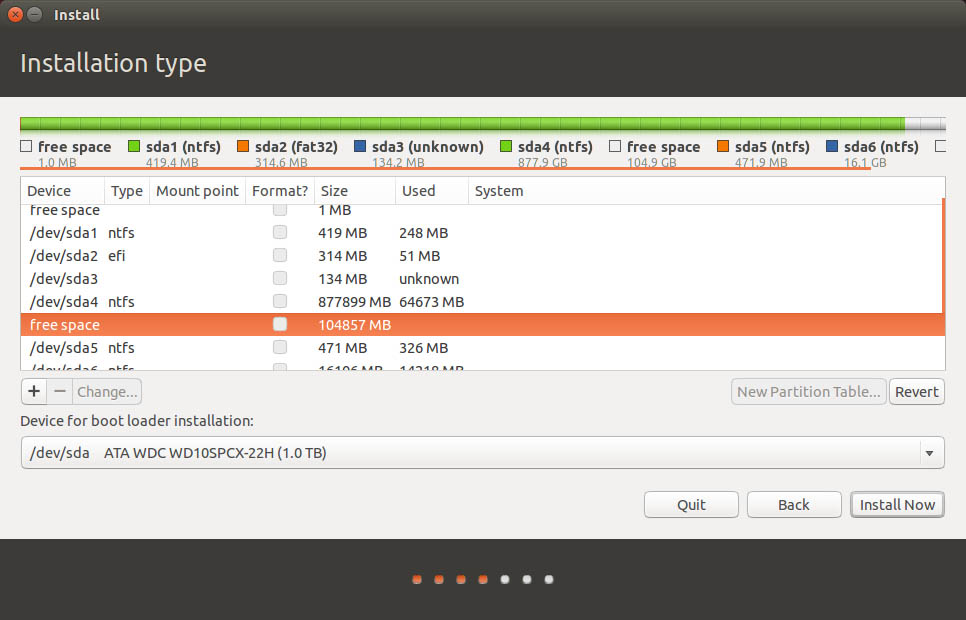
Ubuntu Setup – Partition table
The next screen, after a few seconds, shows the layout of your hard-disk partitions. Maybe it looks intimidating, but don’t worry.
Be VERY careful here!!!
Here we will select the destination partition! The selected partition WILL be destroyed! (You made a Windows backup right?)
When looking through the list you should see at least one row with the Device called “free space“.
On my hard-disk there were 3 “free space” rows but only one came close to the free space I created earlier when I shrank the C:-drive.
The other two looked like none-sense (1Mb partition? 0Mb partition?).
We are going to split that partition in 2 parts, one for Ubuntu and one for Swap.
You can make a 3rd partition if you prefer for just your files (documents, media, etc) or a 4th for /tmp, etc.
You can read more about it in “Deciding on Ubuntu Partitions and Sizes“.
Since I have a hard time deciding my space needs for my documents, and since I make a habit out of saving documents on my NAS, I simple decided to use only two partitions. One for Ubuntu and one for Swap.
Some people argue that “Swap” is no longer needed.
If you decide to create a “Swap” partition, then a rule of thumb is to make this partition twice the size of the amount of RAM your computer has. If disk space is limited, take 1.5x RAM.
How much memory does my computer have?
If you’re not sure how much memory is installed in your computer, open a Terminal window and type:
cat /proc/meminfo
The first line will say “MemTotal” which shows you how much memory is installed (in kB).
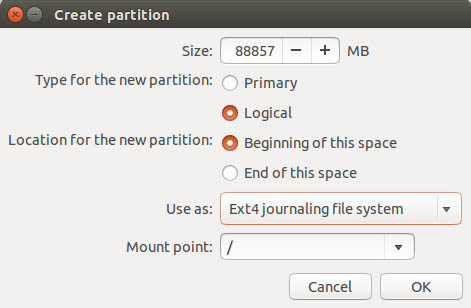
We will create the first partition for Ubuntu. For determining the proper size you will need to know how much swap space you want to use and I used the 2x RAM rule. I have 8Gb of memory in my laptop so the swap size will be 16 Gb.
Since my “free space” is 104857 MB (say 100 GB), I have to reserve 16Gb for the swap partition. You can do the math with Google.
Open a Google Window in your browser and type “104857 MB – 16 GB in MB” and Google will give you the answer: 88857 MB.
Obviously you will need to do this with your numbers to get the right answer for you. Watch the uppercase MB and GB!
OK, so I will end up with a 84Gb (88.857 MB) Ubuntu partition and a 16Gb Swap partition – let’s do it …
Select the “free space” row that looks like the free space you created earlier.
Click the “+” button at the left, under the list of partitions.
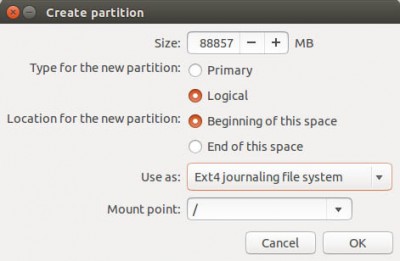
Ubuntu Setup – Root Partition
As shown above:
In the field “Size” we enter the calculated number (which was 88857 for me),
set the “Type of the new partition” to “Logical“,
set “Location for the new partition” to “Beginning of this space“,
set “Use as” to “Ext4 journaling file system“,
set “Mount point” to “/” (root).
Click “OK” to apply these changes.
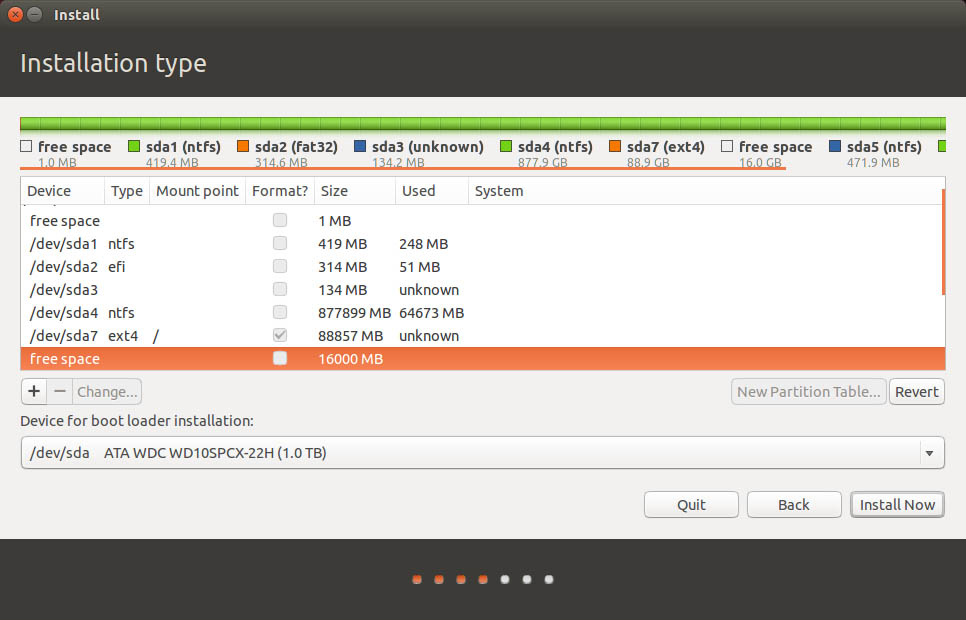
After Ubuntu created this partition, the list of partitions will be updated.
Find the row you just created (look at the “Size” column and the “Type” column, which should reflect the number you just entered and the “ext4”).
The immediately following row should be “free space” and have the size we calculated for our swap space.
Select this row.
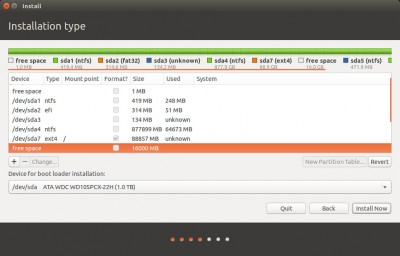
Ubuntu Setup – Space left for Swap
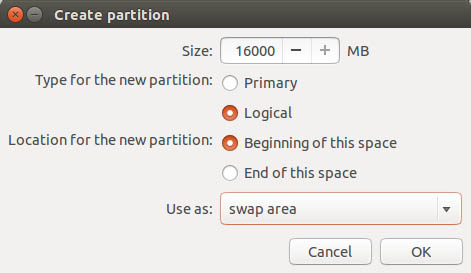
Once you selected the “free space” row, of the size you determined for your swap partition, click the “+” below the partition list again.
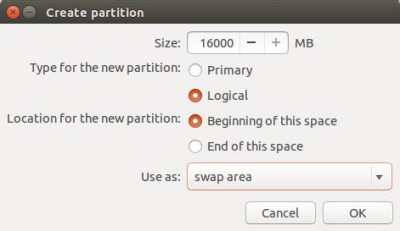
Ubuntu Setup – Swap Partition
As shown above:
The “Size” field should already hold the right value (the desired swap partition size).
Set “Type for the new partition” to “Logical” again,
set “Location for the new partition” to “Beginning of this space“,
and set “Use as” to “swap area“.
Click “OK” to apply these changes.
By default the boot-loader will be installed on “/dev/sda” – do not change that value, and unless you have multiple disks and really know what you’re doing.
I’m not sure if it’s needed, but my paranoia makes me select the partition that we just created for Ubuntu, before continuing.
Click “Install Now” if you’re comfortable with the partitions we just made and installation will begin.
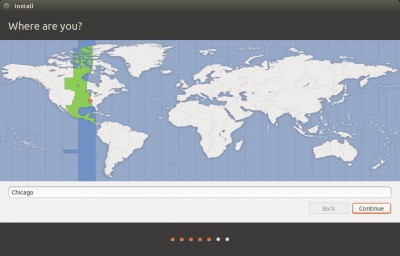
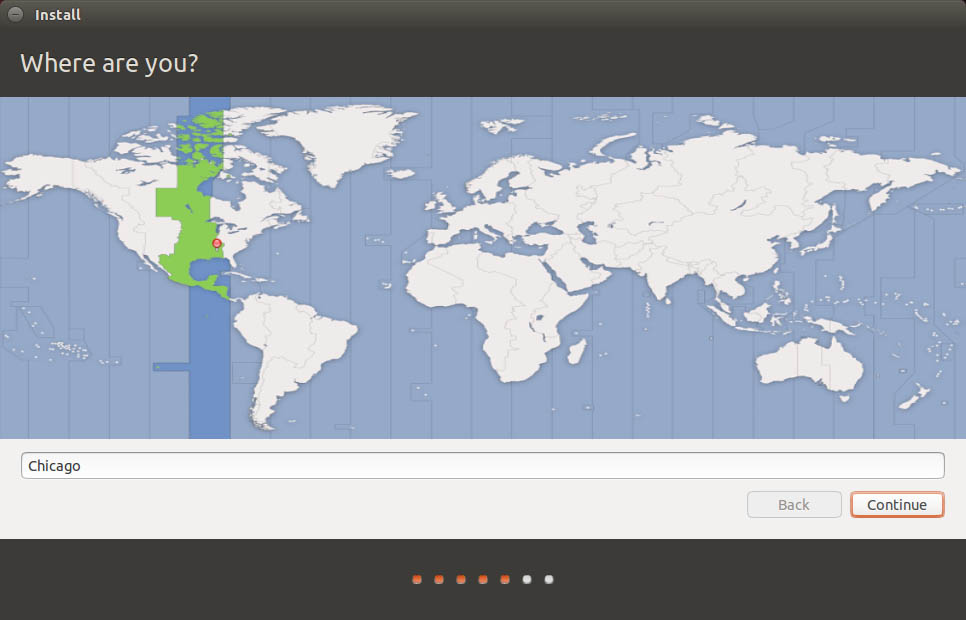
Ubuntu Setup – Location
In the next screen you’ll have to select your location – you can type your location to see if it’s in the list or find a location near you.
Click “Continue” when done.
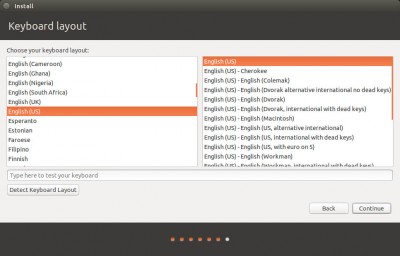
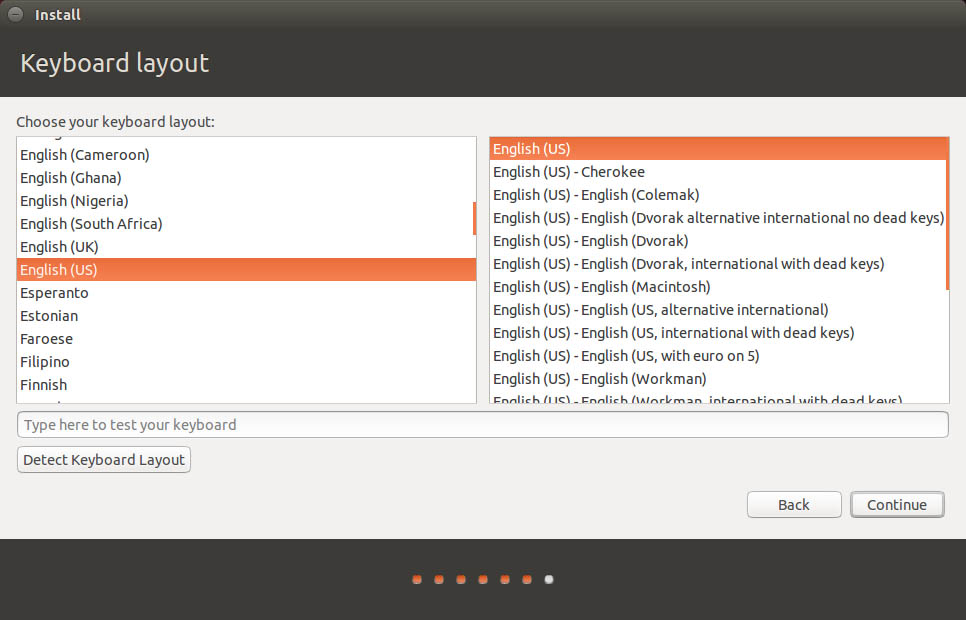
Ubuntu Setup – Keyboard
In the next screen we select our keyboard, and click “Continue“.

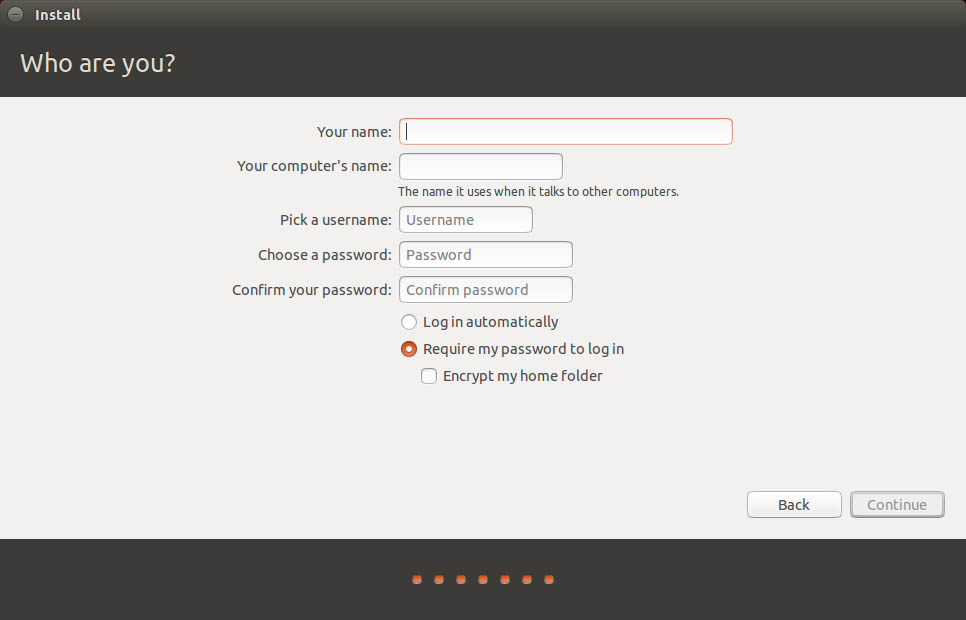
Ubuntu Setup – Create User Account
In the next step we will create a user account.
Up to you what names you’d like to enter and if you like login to be automatically.
When completed, click “Continue” and installation will start.
Ubuntu Setup – Installing ….
Installation, depending on your setting, can take a while, so this might be a good time to walk the dog or get a snack.
At the end of the process, Ubuntu will ask to reboot your computer – DO NOT REBOOT and stay in the Ubuntu Live environment. We still need to tweak a few things, because at this point your computer will boot straight into Windows again.
Click “Continue Testing“.
Ad Blocking Detected Please consider disabling your ad blocker for our website.
We rely on these ads to be able to run our website.
You can of course support us in other ways (see Support Us on the left).
Step 7 – Getting Dual Boot Windows 8.x and Ubuntu to work
When we boot our computer at this point, it will go to Windows right away, which is not what you’d expect from “Dual Boot”. So we need to repair a few things.
If you screwed up and rebooted anyway: reboot your computer and boot from the Ubuntu USB stick.
Before we continue, we do need a network/Internet connection! So if you are not connected yet – do so now (click the network icon in the upper right corner and follow the steps).
First we will use a little program called “Boot Repair” which by default is NOT installed, so we will have to install it.
Open a Terminal window (click the Ubuntu icon in the upper left corner and type “terminal” and click the “Terminal” icon).
Type the following statements (more info at Ubuntu Help):
1
2
3
4
| sudo add-apt-repository ppa:yannubuntu/boot-repair
sudo sed 's/trusty/saucy/g' -i /etc/apt/sources.list.d/yannubuntu-boot-repair-trusty.list
sudo apt-get update
sudo apt-get install -y boot-repair && (boot-repair &) |
These statements will add a repository so we can get “Boot Repair”, update your setup, install “Boot Repair” and finally start “Boot Repair”.
Quite a lot of messages will fly by and eventually Boot Repair starts scanning.
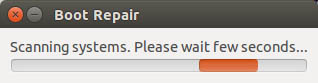
Boot Repair – Scanning your drives
At the end of the scan it will most likely notify you that EFI was detected, just click “OK“.
Right after a warning appears about packages that will be installed, just click “OK” again and the main window of “Boot Repair” will show.
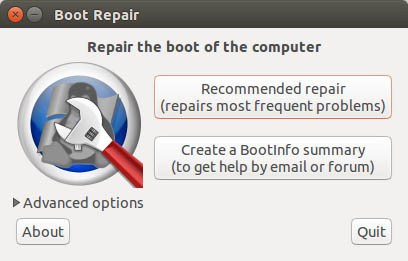
Boot Repair – Main Window
Here we click the “Recommended repair” button, and “Boot Repair” will do it’s magic.

Boo Repair – Repair in progress
After a few seconds a message might appear. In this message you’re asked to copy and paste the statements displayed and execute them in Terminal. So we open another Terminal window. Right click the text (possible choose “Select All” first) and select “Copy“. Next go to the new Terminal window you just opened, right click in the window and choose “Paste“.
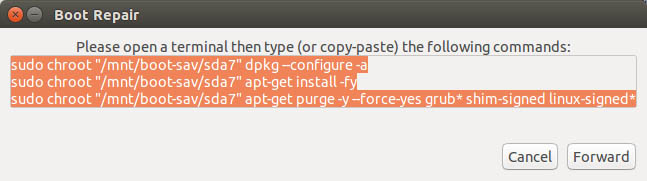
Boot Repair – Execute these lines in Terminal
You might notice that the first statements will be executed, but the last statement is just sitting there. Press ENTER to execute this last line as well.
Again a lot of info flying by …
Once you see the prompt return in the Terminal window, click “Forward” in the message window from which we just copied the statements.

Boot Repair – Execute these lines in Terminal as well
Again a window opens with text that we need to copy and execute in terminal, so repeat the same steps we just did.
And again a lot of info flying by …
Once Terminal completed the task, click the “Forward” button in the message window, as we did before.
“Boot Repair” will now reinstall Grub.
Some people, like myself, run into an error message at the end saying “An error occurred during repair”.
If you’d like you can write down the link, but honestly: I wouldn’t know what to do with it anyway – I did look at it though … but still don’t know what to with it.
Click “OK” .
Once “Boot Repair” finished it’s magic, time to go to the next step: Fixing the boot-loader from the Windows end of things.
Reboot your computer … and most likely your computer will boot straight into Windows …
Once Windows is booted, login and start a command prompt as administrator.
The easiest way to do this is by pressing the Windows key + X. ( + X)
In the opening window select “Command Prompt (Admin)“.
In the command prompt window type the following and press ENTER:
bcdedit /set "{bootmgr}" path \EFI\ubuntu\grubx64.efi
You can now close the command prompt and reboot your computer.
During the boot of your computer you should now see a menu that allows you to boot – your menu may look different.
I recommend testing “Ubuntu” and “Windows Boot Manager” – just to make sure it all works as expected.
GNU GRUB version 2.02^beta2-9
┌───────────────────────────────────────────────────────┐
│ * Ubuntu │
│ Advanced options for Ubuntu │
│ Windows Boot Manager (on /dev/sda2) │
│ System setup │
└───────────────────────────────────────────────────────┘
If your computer is NOT booting into the Grub Bootloader …
I ran into this issue myself. My computer (Acer Aspire V5 552P) has a priority list in the BIOS (“Boot” screen) which sets the “Windows Boot Manager” as the highest priority. To get Grub to appear, I had to give my hard-disk hghest priority by moving it to the first position.
After doing that Grub booted just fine.
An application (untested!) like EasyUEFI, which runs under Windows, might be of assistance for this as well.


Comments
There are 180 comments. You can read them below.
You can post your own comments by using the form below, or reply to existing comments by using the "Reply" button.
Thank you very much. This saved my life
Marko
Glad to hear it was useful for you … thanks for posting a positive feedback!
hans
Now while working with ubuntu I cannot access my drive though I have shutomdown my windows properly,error comes like your window is hibernated
rushabh nirmal
Hi Rushabh!
I’m sorry you’re running into issues, but I’m not sure I understand the problem you’re running into?
hans
It was extremely usefull but when I boot from USB it shows “boot from this device failed”. Please help.
Gaurav Raj
Hi Gaurav Raj,
Failing to boot from an USB device can be caused by several things, these are the most common ones:
hans
When i use boot repair it gives a error,
“The current session is in Legacy mode. Please reboot the computer, and use this software in an EFI session. This will enable this feature. For example, use a live-USB of Boot-Repair-Disk-64bit (www.sourceforge.net/p/boot-repair-cd), after making sure your BIOS is set up to boot USB in EFI mode.”
Please help! What should i do?
maikel
Hi Maikel,
As far as I can see, that sounds like your BIOS is booting in legacy mode,… either EFI is not enabled, or your BIOS does not support EFI.
I honestly have no idea how to do this with legacy mode.
hans
Legacy mode is far easier to dual boot
Ladiesman
It most certainly is, but I’m not sure what the proper way would be to do that without hurting other installations (like Windows).
Windows seems sensitive to it, so you’d have to bring your Windows installation back to a legacy install as well.
hans
Dude, you are a rockstar!!!!
Issac Newton
Thanks Issac,…. but I wouldn’t call myself a rockstar. Thanks for the compliment though …
…
hans
I guess you don’t need step 7 if you choose /dev/sda instead of /dev/sda[number]… at least it worked on my new lenovo.
Maxi
Hi Maxi,
using /dev/sda instead of /dev/sdax can cause potential issues, so if possible I’d use the more specific designation /dev/sdax.
Good to know though that it worked just fine on your Lenovo, maybe the software has a build in safety mechanism that catches this.
hans
Hi would just like to say this is a great tutorial and I actually managed to nearly get right through to the end but did have a slight hic up which i’ll explain
got as far as
sudo add-apt-repository ppa:yannubuntu/boot-repair
sudo sed ‘s/trusty/saucy/g’ -i /etc/apt/sources.list.d/yannubuntu-boot-repair-trusty.list
sudo apt-get update
sudo apt-get install -y boot-repair && (boot-repair &)
but the second command just would not take anyways I went over to ubuntu help and there info was slightly different
sudo add-apt-repository ppa:yannubuntu/boot-repair
sudo apt-get update
sudo apt-get install -y boot-repair && boot-repair
your second step was dropped.
I did this and the process kicked in that’s all I did I didn’t even have to go into Windows to fix the boot loader everything worked perfectly so thanks again for a great piece
paul
Hi Paul!
Thanks for the positive and helpful feedback – I’m sure others will benefit from your info!
Thanks again, and great that you found the article helpful!
hans
Thanks; it workend!
Shivam
Excellent!
hans
Used all steps but still not booting with grub in startup screen
avishek
I had that problem when I forgot to set the boot order in the “BIOS” … did you change that one?
hans
avishek
Can you set your EFI BIOS to start with a boot menu? Where you can select which device to boot from?
Some BIOS’es allow this without a setting by pressing F12.
See if it shows your Ubuntu in the list …
hans
Thank you for this excellent tutorial!
I have an Acer S7 191-6440 and all my settings and screenshots match the one you posted in the tutorial. However, I got stuck with a problem after hitting ‘Install Now’. When the window that prompts me to choose my location appears, I get a small error window with a ‘??? ???’ error message and an ‘OK’ button. Since i cannot continue the installation unless I close this window, I hit ‘OK’ and it takes me back to the screen where you choose the ‘Something else’ option. And I cannot get past this point.
Any help would be appreciated.
Cheers,
lolero
lolero
Hi Lolero,
I’m sorry to hear you’re running into such a silly error message …
I assume you’ve tried everything from scratch again?
I also assume it’s the Ubuntu “Install now”? So it did show you the partitions …
Could you trying this while connected to the Internet?
I’m just guessing here … sorry
hans
Hi Hans,
I have tried from scratch a few times with a different USB drive (in case the problem was there). Also tried this but I still get the same problem.
Right, everything runs exactly as expected up to the point of hitting the ‘Install now’ button. I am able to create the partitions as instructed and everything runs normal.
I noticed that when I try the installation process after the error message comes up, the root and swap partitions no longer appear as ext4 and swap. Im not sure what is the problem.
I found this reply to a similar problem, but I dont know how to run gparted while running Ubuntu from the Live USB. Will keep looking.
Thanks for your help anyway, perhaps someone else comes across these problems and can shed some light on the cause.
Cheers,
lolero
lolero
I would be careful with gPartEd … you could ruin things without even meaning to do so …
Having said that …
I think you can start gPartEd using
Ubuntu even claims it’s standard available on the Live CD. Their very extensive manual on the matter (LOL):
“Boot a Ubuntu live-CD (or live-USB), select “Try Ubuntu”, open GParted“.
If not available on your live CD then try:
After reboot it will be gone again though, but who cares if everything got done, right?
hans
Actually now that I think about it, there was one difference in my installation procedure and the tutorial. I could only find one 64-bit version in the Ubuntu website and the file is called ‘ubuntu-14.04.2-desktop-amd64.iso’.
I noticed that you wrote that the 64-bit AMD version was a special one for MAC but I could not find any other versions available for download.
Do you know if this is the right one to install alongside Windows in a conventional Acer PC?
Cheers,
lolero
lolero
I can see how that can become a problem … sorry if I didn’t write that clearer …
Right now, when I look at the Ubuntu Download page, I can choose only 32 or 64 bit (Ubuntu 14.10).
That 64 bit version is the one you’d want to use, but that is not the version I have used.
I would however expect this version to work as well.
I used 14.04 (see here) 64 bit, even though it has AMD now in the filename. Confusing! Thanks Ubuntu!
hans
Well, I just tried installing 14.10 and the error does not come up any more. So I guess that will do for the time being.
Thank you very much for your time and help though!
Cheers,
lolero
lolero
You’re welcome! And great to hear that you’ve got things running!
hans
I actually had some problems with the 14.10 installation so I kept trying to get the 14.04.2 LTS going and finally was able to make it work. I posted the detailed procedure here.
Your tutorial was really helpful. Thank you!
lolero
Thanks Lolero!
And thank you for posting my link on AskUbuntu as well – it’s much appreciated!
hans
Hey Hans, I am thinking of buying the Aspire V5-552P-X882 Touchscreen Notebook. This is sorta irrelevant to your post but doesn’t hurt to check; do you know if the Acer model I listed supports Virtual Machines? Thanks in advance mate!
Noni
No problem Noni!
Yes, this laptop should be able to run virtual machines (using VMWare, Parallels, or VirtualBox).
Specially the fact that it’s quad core will help!
Hope this helps
p.s. this looks like a pretty good laptop … graphics seems good too.
hans
Hi
Installed Ubuntu 14.04 dualbooting with win8.1.
After installation, i am able to boot into ubuntu or windows first time, but after that I always get the grub prompt.
Entering bios and just choose F10 to save, ill get the grub boot list and is able to select ubuntu or windows boot.
I can get the grub boot list if I push F12 during power on.
I have disabled recoveryenabled on windows via bcdedit, and set boot entries via efibootmgr without any effect.
Any ideas?
Best regards, Kims
Kims
Hi again
Figured it out – “Fast boot” was enabled in BIOS again. After disabling it works like a charm :-)
By the way – hardware is Asus ROG G751JY.
BR Kims
Kims
Hi Kims!
Awesome!!
Thanks for posting the solution and your hardware as well!
hans
I just got an Aus 751JY and looking at installing dual boot for Ubuntu 12.04.5 and was trying to find out why my BIOS is setup to boot from SSD in legacy mode. It seems UEFI is not setup at factory. Is that correct?
Marvin
I would not know, maybe Kims knows?
hans
Kim’s reply:
My G751JY came with UEFI boot set from factory.
hans
This was very useful, thank you! it worked for me on an Acer Aspire E 17, although I had some minor bumps through the road:
– boot repair install did not work for me. It did after I reverted the effects of the sed command on the configure file (i.e. “saucy” back to “trusty”)
– boot repair did not output any command for me to copy-paste
– boot repair told me to use \EFI\ubuntu\shimx64.efi, not \EFI\ubuntu\grubx64.efi (which I did, successfully)
– watch out: you need no quotes around {bootmgr} in the command to run under windows
And same as it happened for you, I had to set the windows partition at the top of the boot order in the BIOS, otherwise GRUB would not start. I am also using a cheap Acer.
pietro
Thank you Pietro, for leaving a nice feedback and some additional tips that might help others!
Excellent! Thanks!
hans
Hi,
I have dell3543 laptop which cam with ubuntu 14.04 pre-installed.
then I have done clean install of Windows 7 (by removing all OEM and recovery partitions)
After that, I have installed ubuntu 14.04.2 (http://releases.ubuntu.com/14.04/ubuntu-14.04.2-desktop-amd64.iso) as per this tutorial
At the end of Boot-Repair when i rebooted my laptop for going into Windows 7 It is showing black screen with “Grub >_” prompt
I am stuck here as I don’t know what to do next.
P.S.
I have already tried changing Boot List Option from UEFI to Legacy mode
My Secure boot is disabled.
First Boot option is Harddrive
Please Help
prax
Hi Prax,
Looks like Grub can’t find the partition it wants to boot from. I have never ran into this problem, but I did find this guide on how to rescue a non booting Grub.
It will walk you through some of the steps to get things going again.
Hope this helps.
hans
Hi Hans,
Thank you very much for your reply,
I have read the tutorial you have given , it seems my ubuntu partition is lost
when i did
grub> ls (hd0,1)
It says no such partition,
I am going to install Ubuntu Again,
Just wanted to know
What is the BIOS setting I should keep
Boot List Option = UEFI or Legacy?
I have disabled secure boot.
prax
Hi Prax,
you should set Boot List Option to UEFI. When Windows was installed with UEFI Boot Mode, then changing it to “Legacy” will cripple your Windows.
Hope this helps and glad to hear that other guide helped you on your way .
.
hans
[…] //www.tweaking4all.com/os-tips-and-tricks/uefi-dual-boot-windows81-ubuntu/ […]
Hi,
Thank you very much.It ran correctly.
gov
Cool! Thanks for leaving a positive feedback!
hans
First of all, thanks for this cool article. Installed and running dual boot perfectly.
But at time of installing, I tried to install boot-repair in ubuntu but it gave me some error. “E: unable to locate package boot-repair.” I restarted my laptop and to my surprise, it directly loaded GRUB! Logged on in ubuntu and it was working fine. So, I would like to know, what the boot-repair was supposed to do? And why it was giving me that error?
Thanks in advance for you reply. :)
evilhead
Hi Evilhead!
Well, what can I say,… during the process of setting up the dual boot I have seen my share of “weird” messages.
The boot repair was supposed to fix GRUB issues when one cannot boot Ubuntu (see Boot-Repair in the Ubuntu documentation).
As far as I can see, boot-repair is normally needed in a setup like this, but for some reason it either did fix your Grub/boot or it was not needed for some reason. I know in my setup it made the difference between booting and not booting Ubuntu.
Not sure if that clarified that …
…
hans
After all, it’s working. That matters.
evilhead
Yeah sometimes it’s worth it to not overthink t too much …
hans
Hi,
I want to install ubuntu alongside already installed windows 8.1. I have already prepared separate partition for it. But I might not have uefi and i don’t know if the dual boot will work properly. I checked my bios mode and it says it’s an older version (American Megatrends Inc. 306, 2008-07-24). And I also don’t have anything big enough for backup (but in case of something going wrong I can install windows again), but I suppose there should not happen anything to the windows partition since I will only operate on free memory. My main concern is still the booting part. Will it work?
Johnny
Hi Johnny,
Well, I’ll admit that I haven’t done a dual boot in years with a “classic” BIOS, which you seem to have. Are you sure your computer has an older BIOS? No sign of EFI or UEFI anywhere in the BIOS?
If it’s a classic BIOS then the classic dual boot should work. See for example the guide for dual boot (Windows/Linux) or multi boot (more than 2 OS’es) at the Ubuntu Wiki, just to verify.
The default process seems “easy” (link):
1. Make room on your harddisk for a Ubuntu partition (resize your Windows partition)
You should be able to do this with standard Windows tools (Control Panel -> Administrative tools -> Computer Management -> Disk Management).
2. Install Ubuntu from the Live CD on the “empty” space on your harddisk.
The 2n step will install GRUB as well, allowing you to choose which OS to boot.
You could of course also consider WUBI, where Ubuntu is installed from within Windows, without the need to repartition etc. It uses the Windows Bootloader to select the boot OS. However, it does not appear to support hybernation.
hans
Hey!
Thank you for your awesome tutorial! It worked perfectly and I actually didn’t even have to use the boot-repair.
Beemo
Awesome!
Thanks Beemo for the positive feedback!
hans
first of all, sorry for my bad English. i love elementary os that is base on ubuntu. i have a lenovo with win8 with uefi. y download the new elementary freya os thats it suppose to support uefi mode. i have make the followings steps: download rufus and create an usb for uefi with the freya os version on 64 bits. plug the usb on the pc and the usb didnt start so i change de bios settings to legacy mode and star again. that work for me and i manege to install elementary freya os on the pc without deleting the win 8 and the recovery options. but my problem is that wehen i restar the pc and go too the boot menu and select win8, windows do not start because the bios is set en legacy mode. so y change it to uefi mode, but when i do this it doesnt appear a boot menu option it continues directly to windows 8. my question is how can i fix this problem, how can i put uefi mode on and select the operating system that i whant to use. please helppp!
francisco
Hi Francisco,
The method described only focusses on using UEFI … since Windos 8 (and newer) typically are installed that way.
As you have noticed, switching to Legacy Mode screws up your Windows, and switching back ruins your Linux Bootloader.
What you could try: try to install Freya (for those of us, including myself, not familiar with this OS see Elementary OS, it appears a distro based on Ubuntu) as described above. So in UEFI mode. When selecting a partition, use the partition you’ve used before.
To get your UEFI BIOS to boot from USB, you might need to change the boot order in your BIOS.
Sometimes you need to enter the admin password to get to that option.
I did see a post at SuperUser.com about that (they were talking about an Asus Zenbook, but your BIOS might work similar).
In essence you disable FastBoot, and optionally enable the boot menu (my laptop uses F12 for that if I recall correctly).
Any UEFI BIOS should be able to boot from USB … it just might take a little searching.
If you find out how that worked on your computer, could you post brand and model and the steps you took? (in case someone else runs into the same issue).
hans
Hans, thanks for the answer i will try what you just suggest at night. If i manage to set win8 and elementary to boot on uefi y will post it with all the steps y follow. Wish me luck!
Francisco
Hi Francisco!
I’m keeping my fingers crossed for you – thanks for talking about Elementary OS by the way. Based on your question, I gave it a try (in VMWare) and it’s running really smooth and looks really good.
Again: keeping my fingers crossed!
hans
p.s.
For those who’d like to try Freya OS, simply enter “0” dollar at the download and you can download it for free.
Please consider donating in the future if you decide to keep using it …
hans
Well hans, i did step by step what you said and the two systems are working just fine on uefi mode. I really apriciate your help! I am with a lot of things and i dont have the time to do a proper guide on how i manage to solve all my problems. Apart of this the pc i was working on, was my girlfrind pc and she need it a soon as possible. So i am just posting to say thanks for your help and when i have time y will post a proper guide with screenshots and all the steps. Pd: if some one need any helps just ask i will try to help. I have elementary os on my computer for 2 years now and is fantastic. It a really simple nice os
Francisco
Hi Francsico!
Awesome – glad to hear things are working …
…
Thank you for taking the time to say “Thank you!”, that’s always very much appreciated.
The Elementary OS is indeed nice and clean, I really like it and it might replace my Lubuntu or Xubuntu setups! Thanks for the tip!
hans
Hi,
I am only able to boot from CSM – legacy mode and get Ubuntu options. When I set BIOS to UEFI, I am getting a “grub rescue” error. Have no idea how to proceed. I see the windows partition is till there. Any suggestions on how to “fix” / repair grub 2?
Farooq
Hi Farooq!
CSM (Compatibility Support Module) boots in a similar way as Legacy Mode does (I have to admit that I had to look that up – see UEFI Wiki page), if I understand things right.
I am however unclear about what you have done so far and if you’re trying to boot from USB or the new partition. If it is the latter (new partition) then Step 7 needs to be done/repeated. That’s what did the trick for me anyway.
hans
Hi, I have ubuntu 14.04 LTS and windows 8.1 on my dell laptop. I want to repair windows 8.1, I tried but failed to do that. Can anybody let me known how can I do that without loosing my data and affecting ubuntu?
Muhammad Ajmal
Hi Muhammad,
The only way I’m aware of is following Step 7 in this guide to repair.
Please make sure you did NOT switch your BIOS to Legacy mode … if you did, then please go back to UEFI mode. Your Windows will not work in case you switched to Legacy. (see also comments above)
hans
I’m having a very difficult problem. I deleted Ubuntu 14.04 – had It downloaded on its own partition. It worked well til I screwed something up in installing backtrack. So it pissed me off so I went and followed a tut on how to delete it. I went and deleted the partition, followed all those steps, have only a usb with my Windows 8.1 recovery on it, I went and deleted the partition and expanded the windows partition and rebooted. Since then. I am stuck and no matter what I do, any command, etc will not work. I boot it up, holding F12 and even just rebooting without pressing anything, and I get
GNU GRUB version 2.02~beta2-9ubuntu1
Minimal BASH-like line editing is supported. For the first word, TAB lists possible command completions. Anywhere else TAB lists possible device or file completions.
grub> _
I researched and tried many different things people suggest and nothing works. Like I said I have windows on my usb the way they told me to create the recovery and I have no clue what to do to access the usb to redo my computer… Is there a simple code to type into grub? I can not for the life of me get past this damn screen lol. Please help!
Asus N550J Windows 8 – Upgrade to 8.1. Nvidia GeForce 750M Intel Core i7
Sean
Hi Sean!
Well that sounds like a scenario that wouldn’t make me happy either …
…
I have not run into this issue and I do not have an Asus laptop either, so I did some searching, in the hopes that they are helpful to you. (please let us know if it does!)
Key is that we need to remove GRUB,… which I had not have to do before.
As I understand from your comment, you cannot boot from the USB drive with your Windows backup.
Somewhere I’ve read that you’d need to disable the secure boot in your BIOS to be able to boot from USB – which I suspect you’d already done since you had installed Ubuntu probably with secure boot disabled.
Next thing you could try is to do a regular factory restore so the boot manager gets wiped, and after that restore your Windows from USB – this might be your best option. I’m not sure if this is relevant for your computer, but you could check this forum discussion: Unable to Factory Restore – Win 8.1-Asus N550jv (oem).
While looking for an answer, I also noticed that some Asus models offer a boot menu by tapping “Esc” several times during boot. Hopefully this is the case for yours as well, and you might be able to boot from USB.
If nothing helps, maybe you can look at the 3rd comment in this “Ask Ubuntu” topic “How To safely uninstall Ubuntu and restore Windows 8?” by Rob Smith.
Here I found a post of some one who did the same thing you did: “Uninstalling GRUB from UEFI laptop“.
He got to a semi normal boot after getting back into Windows through a “System Recovery” option in the laptop’s BIOS settings. Here you can also find some other methods.
Sorry I do not have a direct answer, but I hope these links help,…
hans
I got lucky.. Finally. The one time it let me access the BIOS by repeatedly hitting Esc. while starting the computer. Found out that Ubuntu made its way to be the first thing on the Boot list. I didn’t even consider that since I didn’t make that change. But I got lucky, changed the boot sequence and deleted the Ubuntu options. I see why nothing worked now. Lol. Everything was uninstalled except part of GRUB and wouldn’t let me input code, etc. Everything is good now and computer is back to normal, and I re-partitioned my HD so all is good. Next time I’m gonna experiment on my HP Pavilion p6774y Desktop haha. It’s older and don’t have to worry about it as much.. Except for my Nvidia Geforce 660 graphics card. I love that card. Lol. But thank you for your help! Take care!
Sean
Awesome Sean!
Glad to hear you’re up and running again …
…
hans
I have a HP laptop with UEFI BIOS and Windows 8.1 is installed in it but not with UEFI (installed in CSM mode), and there are no recovery partition or EFI partition in the hard drive, except one C: partition where the Windows is installed and one F: for documents and music. I was wondering if this process mentioned here will work in my laptop for setting up a dual boot system with Windows 8.1 and Ubuntu 14.04 LTS ?
One more thing, when I boot Ubuntu using live-USB it doesn’t detect the Windows operating system which is already installed. Can I still make it to dual boot ?
Abhishek Das
Hi Abhishek Das!
Interesting question … so you have a UEFI capable BIOS but you’re running it in “legacy” mode, and you want to install Ubuntu for dual boot.
I have not tried this, but I would assume that the regular dual boot install for Ubuntu would work just fine. See the official Ubuntu Dual-boot guide.
No guarantees though, I have not tested this, but if everything runs in “legacy” mode, then the good old method should work.
The Windows partition might not be visible in regular Ubuntu, but if you made space available, then during setup the disk manager app should see the Windows partition just fine.
hans
The Windows partition is visible when I select ‘Something Else’ in the Installation Type step, but I am hesitant to go any further.
I will go through the official guide once and then try.
Abhishek Das
I can totally relate to being nervous … I would be nervous too.
Can you see your “free” space, for the Ubuntu Partition?
hans
Finally it is all done. Windows 8.1 dual booting with Ubuntu 14.04.2 LTS, everything seems to be working well.
I went forward with Something Else and created the partitions for Ubuntu and the rest of the installation process was smooth. The problem appeared when I rebooted. It booted directly into Ubuntu. After some searching I stumbled upon the following post and it just fixed it :
Ubuntu 14.04.1 Installer does not detect windows 7
The deal was to run these two in the terminal:
Then after rebooting I was presented with the grub menu where I could choose to boot either Ubuntu or Windows.
Abhishek
Hi Abhishek!
I’m not sure why Windows 7 and up have not been “addressed” in the standard Ubuntu Installer, it’s been around long enough one would think, right?
Thank you very much for posting your solution! I’m sure others will benefit from it!
Thanks
hans
Hello,
Thank you so much for this tutorial. It worked perfectly for me. Acer Aspire V with Windows 8.1
I installed Linux Mint 17.1 Mate edition.
everything worked as expected.
Paul Janzen
Thanks Paul!
Great to hear it worked well for you too, even with Linux Mint!
Thank you for taking the time to post feedback!
hans
Thanks for the great article. It was very helpful. I’m using HP Pavilion 17-e1847ca. After doing everything it was still booting straight to Windows without showing any option during the boot. In BIOS Ubuntu was not listed. After some searching I found out that HP has this additional thing in their machines during the boot process. Every time you boot, you have to press ESC and then F9 to get to the OS selection menu. A small annoyance but I can live with that. :) Thanks again.
Asif
Thanks Asif for posting the HP tip!
Could it be that “Secure boot” is still enabled in your BIOS? I’ve seen with other computers that “Secure Boot” kind-a forces to boot into an Operating System that is know and secure according to the manufacturer … which typically excludes pretty much every Linux version.
hans
Hi,
Thanks for the wonderful article. I tried installing ubuntu on my Acer laptop and made some mistakes, and unfortunately lost the entire OS. I would like to give it a shot again, but want to find out if it is possible to install the ubuntu on D (since my PC has two drives). I presume the windows is installed on C, while D is almost empty! The thing is I decided to shrink ‘D’ but found out it only shows me ‘0’ GB of storage space after. Is it possible to install on D instead? Can I be certain to see the same option to partition the D drive as you explained?
Regards,
Nate
Hi Nate,
I’m sorry to hear you’ve lost the OS … bummer and a big thank you to Microsoft.
Yes, of course you can install Ubuntu on your second harddrive. You’ll have to pay attention that you pick the right drive and partition it correctly.
I unfortunately do not have a second harddrive (laptop) so I won’t be able to walk you through it.
Maybe these articles/posts are helpful: AskUbuntu and UbuntuForums.
hans
Great tutorial, I am able to install successfully without any issue with Win 7. Just one thing, I got dual boot menu even without trying windows step.
Still I tired to run commond on Win 7 command prompt and got error following error, but thats not issue as I already got dual boot option on startup.
bcdedit /set "{bootmgr}" path \EFI\ubuntu\grubx64.efiThe boot configuration data store could not be opened.
Access is denied.
Rishikesh
Hi Rishikesh!
Glad to hear your setup is working and thanks for posting your findings as well.
I’m guessing your computer (BIOS) and/or Windows 7 are less picky than Windows 8/8.1?
hans
[…] de a poco este articulo que me ayudo a solucionar este tema, por entonces les dejo el enlace Uefi dual boot, creo que es uno de los mas completos y […]
Great work man i like your explanation style .
Dhanraj
Hi Dhanraj!
Thanks for leaving a nice comment – it’s great to hear that you like my writing style …
hans
Done.
Thanks for the valuable direction
Sharaf
Hi Sharaf!
Thank you for taking the time to leave a nice comment – it’s much appreciated!
hans
Hans
Excellent article. One of the most detailed I have seen in implementation and explanation. I have done the dual boot on separate drives (One worked well with Ubuntu and one was a disaster with Red Hat).
My question is the following. I want to purchase an ASUS ROG G751JY-DH72X with 32GB Memory 1TB HDD 512GB SSD and GTX 980M 4GB
Is the Windows 8.1 partition on the SSD ? If it is how would I see it in the Disk Manager ? And would I go through the same procedure as you have outlined to install Ubuntu. I have had limited to no luck finding the answers to these questions. The best answer I got so from Asus is there would be a C and D partition. The C: partition would be SSD with Windows on it and the D: would be the 1TB HDD where Linux would go. One last question would be if this is correct regarding C; and D: partitions why could I not install both operating systems on the SDD?
Any help here would be greatly appreciated.
Thanks
Rick
Rick
Hi Rick,
Thanks for the compliment!
With a 512Gb SSD you could most certainly steal some space for your Ubuntu. I do not see why that would not work. The procedure would be the same, although I do not have experience with this particular computer. The 2nd drive should have no influence on that. Just make sure you choose the right drive in the procedure.
I have a MacBook Pro with 256Gb SSD and I have 2 Operating Systems running on that without a problem.
The 1Tb HDD could function as a data and/or backup drive for both Operating Systems – for this you might want to test if Ubuntu can read NTFS, otherwise you might want to reformat it to exFAT or FAT32 so Ubuntu can read that same partition.
Also: before doing the procedure: make sure to have the recovery media nearby – just in case.
With most newer computers you’ll have to create that yourself, but at least you’d be able to revert back to factory state in case it fails.
hans
Thanks again Hans for the quick reply. Couple more questions. When you did the 2 OS partition on the Mac SSD did you split it 128 GB (OS#1)/128 GB (OS#2) and does the Disk Manager show the difference between the SSD and the HDD. Also, I believe Ubuntu can read NTFS if I am understanding this link correctly http://askubuntu.com/questions/504080/will-i-be-able-to-use-my-ntfs-data-partition-in-ubuntu . And thank you again for your help and assistance.
Rick
RIck
You’re most welcome Rick!
I actually enjoy helping out – wish I could make it my daytime job! (not kidding)
The Mac works a little different – I have not even dared to test Ubuntu dual boot yet … I’m running bootcamp right now (Windows 8.1 and MacOS X).
In you case, I would just take about 100Gb (or if you need lees; less than 100Gb) for Ubuntu. This way Windows has space left – since it fills up pretty quick. On your D-drive (the 1Tb disk) you could store data and if needed install your applications once your SSD gets too full.
I don’t know if the disk manager will show the difference between SSD and HDD, but the size of the disk should give you a good indication.
p.s. As prices of SSD’s seems to be dropping, maybe replace that 1Tb HDD with an SSD as well in the future?
I saw a 1Tb for about $380 at Amazon (Samsung if I recall correctly).
hans
While in step 7 after given the
Recommend repair
It show msg “please use this software in live -session (live-cd or live USB).This will enable this feature ” and only OK button .If click OK then operation aborted.
Please give me a f/b.
Govindaraj
Hi Govindaraj,
I wish I could help – this error is unfamiliar to me.
Does this message appear right away when you start BootRepair?
hans
This is one of the best guides to installing for dual boot. Touches on actions often left out of other guides.
The only thing I would add is that with GPT, you can ignore your memory of primary and extended partitions (which is great).
Thanks.
B
Bruce Lerner
Thanks Bruce!
I very much appreciate the GPT tip and the compliment of course …
hans
[…] to dual boot Win 10 and Ubuntu. I repartitioned the disk and then followed the instructions here (//www.tweaking4all.com/os-tips-and-tricks/uefi-dual-boot-windows81-ubuntu/) which did the job […]
hi I have DEll N5050 laptop I have window * installed on my laptop then I have installed Ubuntu 14.04 for it installed but i lost all partitions and data of the drives also
please tell me how can I retrieve my lost data. The data are very important please help me
Ravi
Hi Ravi.
I’m very sorry to hear that. You’ll have not yet had to recover a partition, but there are a lot of tools out there when you search it with Google. These tools might work for you, unless the space the partition once used has been overwritten by another partition.
You might get lucky with tools like Partition Find and Mount or EaseUs Partition Recovery Wizard.
hans
Hi.
I had a dual boot of pre-installed windows 8.1 on a lenovo g710 with linux mint rafaella 17.2 Cinnamon.One day messing with sudo linux wouldn’t start at the next restart.I deleted the partitions from windows and got rid of grub with http://superuser.com/questions/681379/how-to-boot-windows-after-uninstalling-ubuntu. After that pc boots directly to windows.I want to dual boot again.After every installation attempt at the first restart grub is there,but if i choose windows from grub menu no more linux after that. I tried boot repair from live cd with no result ,every boot repair returns an error url.Except that time i did it from linux but again at the next restart,when i went to windows no grub just windows as alawys.If i use the live cd to mount the efi partition dev/sda2 under /mnt/EFI there is ubuntu folder which is most times empty.
My system has uefi bios, secure boot is disabled, fast boot is enabled since at the first and sucessful installation everything was fine.
I think that i have to repair efi partition in a way but when i run bootrec /RebuildBcd i get total windows installations identified 0,which maybe causes linux install program to not detect the win Os.All this make me think that a clean install of windows to remove every partition and OEM partition if possible is a solution.
So to the point now,do you think that it worths a try to use your instructions or will i get the same results?
Sorry for writing so much but i want to give the whole problem,because i need a solution before total format.
Thank you for your time!
vaggelis
Hi Vaggelis!
I have no idea if my instructions will give the same results.
AFAIK however, fast boot MUST be disabled in Windows, otherwise it will prevent anything else from booting (step 4).
I’d also check your UEFI “BIOS” settings – you might want to look at step 5 as well, maybe even before trying all the described steps. See if you can achieve something by working with the boot order.
I’m not an UEFI expert, but an empty “ubuntu” folder on your EFI partition is a good reason why Ubuntu will not boot.
Also: removing the “OEM” folder might not be a good idea – I’m not 100% sure, but as far as I could see on my Acer laptop, this points to a recovery version of Windows.
If none of this helps, going through each step will most likely make your dual boot work, but I cannot guarantee anything – I’m not an UEFI expert either.
Hope this gets you started, and I apologize if it did not resolve your issue.
hans
Thanks for answering.
I am going to try later to follow your instructions for installation.
vaggelis
You’re welcome!
Feel free to post your working solution in case you get things up and running again.
hans
Hi!
I finally restored dual boot thanks to your instructions! I did the same till the point where you type the efi ubuntu boot in windows cmd.The only difference at what i did is at the boot repair point.From the live cd i typed the following commands
sudo add-apt-repository ppa:yannubuntu/boot-repair
sudo apt-get update
sudo apt-get install -y boot-repair && boot-repair
I did that,because the last of your commands said boot-repair is not a package ,anyway something like that.
I can’t thank you enough for your help! Greetings from Greece!
vaggelis
Awesome!
Glad to hear it worked out for you, and thanks for posting how you did it – others might benefit from that as well …
hans
after doing everything id dint work…what to do…lastly after changing the default grub to grubx64.efi nothing showed up even after waiting for a long time. what should I do..??
akshay
Ok you said you did all the suggested steps.Can you boot to Windows directly or from bios? Also write if possible the steps you did. Are you sure your boot is uefi and secure boot is disabled?Also check in your windows installation fastboot to be disabled
vaggelis
Thank you so much :D
Fishai
Hi Fishai!
Thanks for taking the time to write a “Thank you” note – it’s much appreciated!
hans
Ana Onymus
hi again, i tried your method to update and reinstall GRUB, but none of the commands actually worked in the terminal, i must have done something wrong……. But! i have no idea how this works – i logged out of Ubuntu and i couldnt get back in again, it wouldnt let me do anything at all, so i took a leap, and, i shut the computer down completely. when i turned it back on again, it came up with the GRUB selection!! i was so happy i forgot that i only had 10 seconds before it defaulted to ubuntu. now i have tried to install a startup manager to control the GRUB default and time through the terminal with – sudo apt-get startupmanager – but no matter what i try, i cant install anything from the terminal. Is this something i’ve done? thanks, Ana,
 thank you very much for this article, it has helped me tonnes!!!
Ana Onymus
Hi Ana Onymus!
5 long days working on the same problem, that’s pretty impressive, I mean: that you didn’t give up!
So do I understand correctly that it now works, but that you’d like to customize Grub?
I’ll have to admit that I have never had a need for that, but I understand that this is a good working method (pay attention to what you’re doing, and … I assume you can get into Ubuntu). I found it at StackOverflow, so to help out, I copied it here, other solutions are discussed there as well, so the StackOverflow post might be a helpful read.
GRUB can be configured using the /etc/default/grub file. Before you make any changes to it, it may be a good idea to back it up by creating a copy:
You can restore the copying the backup over the original:
Open the file using the text editor with root privileges:
The line GRUB_DEFAULT=0 means that GRUB will select the first menu item to boot. Change this to GRUB_DEFAULT=saved. This change will make it easier to change the default item later.
Save and close the file. Run this command to apply your changes to GRUB’s configuration:
The configuration change we made allows the grub-set-default and grub-reboot commands to be used at any time. These allow you to change the default boot item permanently or only for the next boot, respectively.
Run grub-set-default or grub-reboot (with sudo) with the number of the menu item to boot (the first item is 0). This command will change the default to the second item:
Hope this helps.
hans
Thank you soooooo much for your reply, but i am a bit lost…. GRUB isnt working again, i turned on my computer on this morning and it defaulted straight to Windows. i have no idea why. i really, really appreciate your help, i would like to figure this all out. hopefully after i get GRUB reinstalled i’ll be able to reach ubuntu, and follow your instructions to change the default settings.
i am not giving up. thankyou very much for your guidance here, Ana,
P.S. the school holidays are over so i’ll have to do all this in my spare time, sorry,
Ana Onymus
Hi Ana Onymus,
First thing I’d check is the UEFI (BIOS) settings. Just to make sure it even boots right, and to make sure things like Safe Boot are not still enabled. In Windows also check that Fast Boot is disabled, otherwise Windows your PC will boot right away to Windows (AFAIK after you’ve run Windows the last time).
hans
thank you for your help, :) it is greatly appreciated.
Ana Onymus
You’re welcome …
hans
[…] of 2015.10.10, followed the instructions here and installation was successful. It is new laptop, so did not bother with Step 2 – that of […]
I have Dell Inspiron with Win 8.1. My E drive, which is a Primary partition, has 350 GB and is empty. How do I install Ubuntu on this partition?
dummy
Untested, but you should be able to follow the same steps.
Obviously step 3 is not needed (making room) and in step 6 you’d need to install Ubuntu on that extra primary partition.
Maybe other users have recommendations as well …?
hans
[…] //www.tweaking4all.com/os-tips-and-tricks/uefi-dual-boot-windows81-ubuntu/ […]
Hello sir,
Thank you so much for this detailed step by step procedure. I was able to boot into Ubuntu thanks to it!!!! The guide is absolutely awesome!!!!!
Thanks again.
Suraj
Thank you Suraj for the nice compliment – it’s much appreciated!
hans
Great job. But still, i do have some problems :)
During using boot-repair i was given a massege : ” Please use this software in a live-session (live-CD or live-USB). This will enable this feature.”. After this error nithing happen.Still i cant boot to ubuntu. Please help me.
Jan
Hi Jan!
Did you boot from the USB stick (or live-CD)?
I rebooted too early as well, and then this tool will not work, so I had to boot from the USB stick again as well.
hans
Hi, egen ever I try to boot into Windows, it try to repair it self, but it fail to do so. What can I do, what have I done wrong?
Kristiane
Hi Kristiane,
I have not ran into this particular issue.
A few things I’d check first:
– BIOS settings, to make sure it is not set to boot from the Windows partition
– Disable Fast Boot in Windows
hans
Hey even my computer has 3 recovery partitions and 1 partition for the C: drive. I have already made space for the Linux installation but I am afraid that when I make a partition during installation, I will brick my HDD because the number of partitions would be >4.
Pranav
Hi Pranav,
I never payed attention to a limitation of partitions, but it seems that older MBR setups indeed have a limitation of 4 primary partitions. Newer GUID can handle up to 128 primary partitions. (source)
I also read (in that same article) that both Windows and Linux can boot just fine from logical partitions as well.
hans
i did the process as u said, but after restarting windows8 is loading without asking any options.
harish
This means GRUB is not starting. Did you try the last comment, way at the bottom of the article, in the blue box?
Did you verify boot priority in the BIOS/UEFI?
Did you disable Fast Boot in the BIOS/UEFI?
hans
Hans, firstly thanks, great tutorial. I am also using an Acer Aspire V13 V3-371-50BT 64bit and running Win8.1 and uBuntu 15.1, dual boot.
I will like to try Kali Linux, 64bit, which I have loaded onto a USB, and made it bootable. I have set the BIOS to boot from USB, however it does not come up as an option in ubuntu Grub. Only windows or uBuntu to select from.
Is there a way to add this in the grub so I can boot off a USB if I like? Thanks
node
Thanks Node for compliment – that’s always appreciated!
In your situation you could try using the boot menu at start up. On my Acer (if enabled in the BIOS) this is done by pressing F12 when your computer boots.
You can also look at this article in the Ubuntu documenation: BootFromUSB
From that article:
Booting via GRUB
The easiest way to boot from a USB Drive is to boot via GRUB. To check if your BIOS is able to detect the USB drive and hand it over to GRUB, just run GRUB from your hard drive if it already installed, or from a GRUB boot floppy or CD. At the GRUB menu, hit the C key to enter command mode. Now search for your USB drive, using the root command to choose a drive/partition and the find command to see if you found the right one.
You can go through your devices like in this example:
Note: If you have two internal drives including your CD/DVD drive, the USB drive probably is hd2,0 and so on.
Boot the drive by entering:
For convenience, add these commands to your GRUB configuration (usually in /boot/grub/menu.lst):
Of course, if you don’t have GRUB installed on your hard drive, change the menu.lst on your GRUB floppy or CD.
If you are not able to find the drive with the help of GRUB, you have to use the Linux kernel as explained in following sections.
Warning
The method described above constitutes the biggest security risk in Linux. Using GRUB, any OS can be booted from any USB or CD/DVD drive (as above), circumventing BIOS restrictions. Placing passwords or locking menu items (in the GRUB configuration files) does not prevent a user from booting manually using commands entered at the GRUB command-line. Once a foreign OS is booted, it can be used to access any part of an unencrypted hard drive.
Hope this helps
hans
Hans,
Thanks, for the in depth info, will keep it handy, if, when I run into trouble.
I was able to do it, finally. What I did, so others can do as well, if faced with the same situation, and will like to try another OS.
I reloaded the Kali Linux with Rufus 2.8, but this time I choose “dd command mode” when writing the ISO. Before I was not, but selecting Rufus, recommended burn.
On reboot I got “Secure Boot Fail” with a padlock on the screen, I entered the Bios, and Disabled “secure boot” and sure did not forget to remove that “security password” before accepting and confirming the change.
When the machine reboot, I got the option to choose Kali Linux : uBuntu or Win 8.1.
Selected “USB Kali Linux” and it booted fine.
I am using it now to send this message.
node
Thanks Node for posting your solution! Awesome!
hans
Hans a quick question. I decide that I will like to load Kali-rolling Linux 2016.1 to my setup, after playing with it now for a few days. My HardDrive is partition as follows:
https://mega.nz/#!X5sxhZZK!xhw23YthNtOmW6laY1voklWFFl0–Hv4L7SPbTRhB8k
I will like to put Kali on Partition (F), will uBuntu Grub 2 still handle the boot process? Thanks.
node
As far as I know, Grub should not have a problem with this. .
.
But keep in mind that I’m not a Grub guru either
hans
Hans,
Sure can do will some help here. I can install Windows & Kali fine, I can install Windows & uBuntu fine. But when I try and install the three, is where I am having issues.
With Windows & Kail on, both boot fine. I then install ubuntu and get stuck at the screen that that says “Running update-grub”. It will not move after this.
Do not matter where I tell the bootloader to be installed. on sda sda2 or on the ubuntu /boot sdb9
When I load Windows & Ubuntu same issue; once the Kali installer reach “Running update-grub” the loading hangs at 67% and will not move.
Both Kali and Ubuntu are on separate USB sticks. I have no issues getting back into Windows. Only when grub starts to run update I get stuck. If I can surpass this I will an sure I can boot into the three OSs.
Any guidance would be appreciated, I have a good backup img of Windows & Ubuntu that I had before I started this quest. Thanks
node
Hans,
Any help would be appreciated. Can boot Win & Kali fine, same Win & Ubuntu, but not all three. In either Kali or Ubuntu install with Wins, the installer hangs at “running update-grub” when trying to load the other. Thanks.
node
Not sure how helpful I can be …
I did read a suggestion that you recommends having Kali and Ubuntu each on it’s own disk (see this AskUbuntu post).
Not sure if this is still valid though.
When you try to install the 2nd Linux distro, can you avoid setting up Grub?
ie. have a partition with Kali, then install Ubuntu just without Grub/Boot, then boot into Grub and manually tell it to add Ubuntu?
(see also this post and this post at AskUbuntu)
hans
Oops missed a link: Install Ubuntu without Grub
hans
Hans,
Massive thank you; success!! all the way. “Sweet Jesus”. I spent so many hours searching, trying this and that, and the answer was a few command away.
My success story for others, On a Machine with Windows, and will like to “tipple boot” with two Linux flavor, Ubuntu being one, load it last, after doing the following.
Start the uBuntu Live-CD and open terminal and type
node
Awesome!!!!
Glad to hear you’ve got this to work Node!
And thank you so much for posting the fix!
I know others will benefit from this as well …
hans
[…] //www.tweaking4all.com/os-tips-and-tricks/uefi-dual-boot-windows81-ubuntu/ […]
finally a guide that works … thanks!
wracker
Hi Wracker!
Thanks for the compliment and thank you for taking the time to post! It’s much appreciated and I’m glad to hear this worked for you as well!
hans
Thanks Man ! This helped me very much . And i was able to dual boot completely without using step 7 in my HP cc102tx
Nishant
Nice!
And most of all: thanks for letting us know that it worked with your HP as well.
hans
Thanks it works for me successfully
Muftau
Thanks Muftau for posting that it worked for you as well! Much appreciated!
Happy New year!
hans
Hans,
I did dual booting
with windows 8.1 and Ubuntu 18.04,
In BIOS i didn’t disable Secure boot,
1st i installed windows 8.1, in disk manager i separated 1st partition for windows 2 partition for Ubuntu and 3 partition (450 GB) for data.
After i installed Ubuntu 18.04 during set up of Ubuntu i didn’t check the secure boot,
After installation, i was able to run through grup the Ubuntu
But i select windows boot manager from grup windows not showing up, neither any message. (blank screen only)
i checked “sudo fdisk -l”
and got the following, help me please i think i did something wrong in selecting the Ubuntu boot manger
Mohamed
Looks like your Ubuntu is sitting on /dev/sdb3 – personally I would do the install again with secure boot disabled.
Unless one of the other users has a helpful tip!
hans
Thank You for taking the time to write this. I followed your method but I have gotten stuck at the Installation step and I was wondering if you could tell me what I have done wrong;
I shrunk the disk to create Unallocated space as displayed in Windows Disk Management:
(C:) 94 GB (Unallocated) 74 GB (D:) 107 GB (E:) 190 GB
But during Installation of Ubuntu, under the “Something Else” Option the following gets displayed:
/dev/sda
/dev/sda1
/dev/sda2 ntfs
/dev/sda3 ntfs
/dev/sda4
There is no free space available as shown in the screenshots provided by you.
How do I rectify this??
Thanks and Regards.
hsp
Hi HSP,
Ehm yeah that’s kind-a hard to judge without more details.
I’m guessing this one single hard-disk divided in 4 partitions?
Maybe sda1 is the empty one (74Gb)? But that’s really just a guess, since I cannot see any details.
Another issue could be that the partitions reside on an extended partition?
Does the list show anything like size or sectors (common: if size in sectors, then multiply those numbers by 512 to get bytes)?
hans
Thank you for replying.
Yes it is one single hard drive divided into 4 partitions.
I have attached links to screenshots taken in both the above mentioned cases. Hope the data on it gives you some idea.
Windows Disk management: https://ibb.co/VTjjPyH
Installation Screen under “Something Else” option: https://ibb.co/34hcqrC
hsp
I think I see what your problem is: Your partitions disks are dynamic.
As far as I can see, all your partitions “live” in /dev/sda4, and Linux can’t “see” them.
sda1, sda2 and sda3 just hold data for windows (I think /dev/sda1 holds the actual “database” used for managing those dynamic disks).
So the disks C, the newly created blank space, D and E, are kind-a like virtual partitions on /dev/sda4.
Interesting that even Microsoft says (source):
To “fix” this you will have to convert your dynamic disks back to so called “basic” disks (the old fashioned regular partitions).
The downside is that you will have to delete all the dynamic partitions and effectively lose your data. Not a fun!
When converting, you may be able to move the empty space to the end of the disk as well
hans
Thank You for replying.
Is there any way to save the data??
I cant explain how desperately I need this to work, a whole lot depends on this working.
So if you are sure it will rectify the error I am willing to lose the data as will if there is no other gi.
Awaiting your reply.
hsp
I can imagine getting nervous about a task like this..
My approach would be:
1) Make a full backup of your disk, for example with Acronis True Image.
I’ve used this back in the day and I see that Acronis kept their software up to date.
Basically you create a bootable Acronis disk/cd/dvd, boot from that disk, make a full backup of your disk to another disk.
2) Do the conversion from Dynamic to Basic disk with one of the tools I mentioned. I can imagine that some of these tools may have a backup feature build in. Theoretically you should be done now.
3) If it all fails; Restore with the Acronis boot disk, so you’re at least back to where you started without losing data.
hans
I got Ubuntu installed on my laptop but there is no dual boot functionality available .
It just boots straight into Ubuntu. But the other volumes and the data from my drives are still there.
What do you think has happened??
Can I get Ubuntu installed for the entire hard-drive space atleast? Is that possible??
hsp
I’m not sure which steps you’ve taken to get to this point, but it sounds like the boot manager is not kicking in.
You may want to repeat Step 7.
hans
p.s. I’ve updated the article based on your experiences.
hans
Hans I tried the 7th step again and it worked perfectly.
Thanks a ton Man.
hsp
Awesome!
Thanks for letting us know you’re up and running again!
hans
hsp
Hey hans, Do you recommend any way to switch my laptop from legacy to uefi? I currently have windows, ubuntu dual booting in legacy mode (Bios with MBR hdd) so I saw an easy with no data loss way to convert the hard drive to GPT hence I can make my system uefi? Is that right? or I will have to re-install the OSes – I don’t have a problem re-installing linux, but is there a way to switch without removing windows
gee
Hi Gee,
I personally have never converted legacy to UEFI (or vise versa).
So I’d have to Google it as well. I think I’d reinstall everything (nice clean machine after that), but I can imagine that not everybody is eager to do this (backup files, reinstall applications, etc).
I recall there being a command line tool under Windows called “mbr2gpt”, but you may have to read up on that one.
I did find this article which seems to do a good job at explaining how to do this.
I think there is a good chance you’d loose the Ubuntu partition, but again; I’ve never tried this.
(another reason why I’d start from scratch – just te prevent a messy situation)
hans
Thank you for your response, I’ve followed the article you mentioned and I did successfully with no errors now I have a fully functioning uefi windows 10 install after decade of using mbr on all of my devices, and frankly I’m happy about that transition as I can see a huge improvement in boot time. Truly I’ve learned a lot from this article about uefi system and I thank you for your time you dedicate to help others.
Gee
You’re welcome Gee!

Great to hear it worked out well!
hans
Hi Hans,
I recently tried your tutorial to dual boot ubuntu and windows 8.1 (in this case ubuntu 18.04.2).
The vast majority of the tutorial went smoothly, but I got an error when attempting to do the boot repair and I was hoping you could guide me before I inevitably destroy my partitions.
The message was as follows:
Locked-ESP detected. You may want to retry after creating a /boot/efi partition (FAT32, 100MB~250MB, start of the disk, boot flag). This can be performed via tools such as gParted. Then select this partition via the [Separate /boot/efi partition:] option of [Boot Repair].
Louis
Hi Louis,
apologies for the late reply, I was on vacation …
I have no experience with this particular error message. From what I have found it can be caused by;
1) Hardware failure. Potentially your hard disk is corrupted. (see this thread)
I wouldn’t assume this right away, so let’s keep this situation as a last resort.
2) The EFI partition may have gotten corrupted. A workaround can be found in this thread.
This is what I’d look for first.
I did see more posts of folks with this error message and most point to a damaged or corrupted EFI partition it seems.
hans
hi,
I have a Question..After dual booting with Ubuntu is it still possible to set default boot to windows 8.1….i.e no grub menu to choose b/w ubuntu/Windows. I use Linux occasionally. thanks.
Starc
Hi Starc!
You could try enabling FastBoot again in Windows.
This way, I suspect (since I’m no longer using dual boot) that your PC will keep booting into Windows, until you disable FastBoot again.
I could be wrong though …
Hans
There you go, another ultra-detailed, awesome and fool-proof tutorial from Dedoimedo forges, unlike any you will find elsewhere on the Web. I give you Asus VivoBook, an Ultrabook preinstalled with Windows 8, later upgraded to Windows 8.1, safely and successfully dual-booting with Ubuntu 14.04 Trusty Tahr, complete with the rather dreaded and difficult factory setup. But it all works well, and now that you’re here, it’s no longer so frightening.
Buttler
Hi Butter,
I’ll take this as a compliment haha … not sure who or what Dedoimedo is, but your Asus VivoBook seems to be in good shape now. Excellent
Hans
I’ve been looking for this solution for a month
I finally found it here
Thank Hans
jon
Hi Jon,
thank you for taking the time to post a thank-you note, it is much appreciated — good to hear it was useful!
Hans
thank you
smq cargo
Thanks for posting a Thank you! 😊
Hans