What is Ajax?
AJAX stands for Asynchronous JavaScript and XML (HTML is similar to XML) and in short and oversimplified:
Ajax is a combination of techniques to allow the developer to load data into an HTML element of already visible webpage, without the need to reload the entire page.
In this article we combine JavaScript, HTML, CSS and PHP to accomplish this.
For way more in depth detail, you can visit the Ajax Wiki page. There is a lot of in depth info if you’d really would like to know.
So what does this mean?
Note : Ajax has many applications, this is just a very simple example.
Let’s say you have a web page, with all kinds of interesting data on it.
On that page you show the status of something that is constantly changing and frequently is in need of updating.
Let’s assume this data is a <table> located in a <div>.
In HTML something like this:
<div id="mydiv">

  <table>

    <tr>

      <td>Server</td>

      <td>Status</td>

    </tr>

    <tr>

      <td>1</td>

      <td>OK</td>

    </tr>

    <tr>

      <td>2</td>

      <td>Down</td>

    </tr>

  </table>

</div>
Back in the day, in order to refresh the data (the status of something), we would have to reload the entire page.
As JavaScript became more common, one could even automatically reload the page at a preset time interval.
As you can imagine, not is a great user experience, as it is potentially slow, the entire page goes blank for a fraction of a second, and it uses more bandwidth than really needed.
Enter Ajax …
Let’s assume we have a small PHP file that generates only the <table> … </table> section of this example – ideally this would of course be data that we pull from, say, a database. So each time we’d load just that file, we’d just see the table with refreshed data. Nothing more, nothing less.
With Ajax, we can now replace the “content” of the <div> either by timer or by having the user click a “refresh” button.
In essence a small JavaScript can load the file we dedicated to the fresh data <table> into the <div>, as the replacement of content of the <div>.
Advantages are obvious: it’s a much better user experience, much faster, and gives the user more the experience that they are working with an application instead of a static page.
Ad Blocking Detected Please consider disabling your ad blocker for our website.
We rely on these ads to be able to run our website.
You can of course support us in other ways (see Support Us on the left).
Ajax and WordPress
WordPress installs all over the world already utilize Ajax.
You may see it in the theme, but most certainly in the admin pages.
Because of this, the good folks of WordPress did include a lot of helpful functions to support Ajax.
Two of the pages I’ve used the most to get Ajax to work are to be found in the WordPress Codex:
I recommend looking into these two pages if you’ve decided to do more with Ajax and WordPress.
A Working Example of Ajax in WordPress
As I was creating my own first plugin for WordPress, to replace the old WP-Filebase plugin (a download manager for WordPress, abandoned by its developer), I wanted to use Ajax to show several lists (files, categories, etc) and the details of selected items. A so called Master-Detail view.
I’ve followed the instructions, tested a few examples I found elsewhere, but none of them worked.
Either because the samples where just so called “code dumps” (someone just showing parts of their code without any proper explanation), or the documentation was poorly (eg. the names of “add_action” statements), or I didn’t read all that well.
Either way: they all produced errors, and the most annoying error would be “400 (Bad Request)” (tricky to debug at times).
So, in order to help others, I decided to write this article with a simple working example, with some additional notes and comments.
The Ajax Examples
I’ll work through 2 example.
The first example will be a button. Once pressed data will be retrieved and placed inside a <div>.
the second example will be a dropdown list. When the user changes the selection, the <div> will be filled based on that selection.
Your Ajax-setup depends on a few files – aside from the fact that you need a working WordPress setup of course.
- The PHP file that will generate the Ajax content.
This file can be the “functions.php” of your theme, or the main file of your WordPress plugin (plugin-name.php).
It has to be a file that WordPress loads when looking at relevant HTML page (2), otherwise it may not know certain WordPress related details.
This file will also be used to register and process the Ajax call!
- The HTML file that is shown to the end-user.
This would be the file accessed by the end-user, showing your “data” in a nicely formed page.
It could be a straight HTML page, but since we’re working with WordPress, this of course will be a PHP file, used by WordPress.
This file, is the file making the Ajax call!
Step 1: Create your Ajax function for WordPress (PHP)
In the PHP file that will register and process the Ajax call, we must create and register a function so WordPress can handle the Ajax call. This could be for example functions.php of your theme, or the file you’re working on for your plugin. Make sure theme or plugin have been activated before you start testing!
As an example, I made a super simple and silly function called “t4a_ajax_call()“.
The only thing it does is dump the $_POST values, just to have some sorts of output, and to get an idea what kind of data is being relayed.
Warning : Pay good attention to the name of your function – you’ll need it later on!
1
2
3
4
5
6
7
8
9
10
| function t4a_ajax_call(){
echo 'Ajax call output:';
echo '<pre>';
var_dump($_POST);
echo '</pre>';
wp_die();// this is required to terminate immediately and return a proper response
} |
Step 2: Register your Ajax function for WordPress (PHP)
So that WordPress knows your function to handle Ajax calls, we need to let WordPress know it exists.
In order to register your Ajax function we need to use the “add_action“, which takes 2 parameters for this purpose. A so called “tag” and the name of the “callable function“.
For Ajax purposes, the “tag” name that starts with “wp_ajax_” (logged in users only – reference) or “wp_ajax_nopriv_” (all users – reference) followed by the name of your function.
If you need both, then you can add both as separate lines, and it’s OK for them both to call the same function.
So if we have the PHP function “t4a_ajax_call()” then this would look something like shown below.
For logged in users it will be wp_ajax_t4a_ajax_call and for not-logged-in users it will be wp_ajax_nopriv_t4a_ajax_call.
The “callable function” is the name of your function, so here this would be “t4a_ajax_call“.
Warning: Again – pay good attention to the naming here – since this is where things can go wrong.
In PHP code:
1
2
| add_action('wp_ajax_t4a_ajax_call', 't4a_ajax_call'); // for logged in users only
add_action('wp_ajax_nopriv_t4a_ajax_call', 't4a_ajax_call'); // for ALL users |
All of this combined (assuming access for logged in users, and all other users) looks like this:
1
2
3
4
5
6
7
8
9
10
11
12
13
| add_action('wp_ajax_t4a_ajax_call', 't4a_ajax_call'); // for logged in users only
add_action('wp_ajax_nopriv_t4a_ajax_call', 't4a_ajax_call'); // for ALL users
function t4a_ajax_call(){
echo 'Ajax call output:';
echo '<pre>';
var_dump($_POST);
echo '</pre>';
wp_die();// this is required to terminate immediately and return a proper response
} |
Step 3: Prepare your HTML file
Since we are “receiving new data” with our Ajax function, we will need to prepare our HTML to actually be able to place it somewhere and to trigger the “refresh”.
In this example I used:
- A <div>, to receive the data in, named (id) “receiving_div_id“, and
- A <button> for the user to press, named (id) “button_to_load_data“.
Warning: Remember those names, we need them in our JavaScript.
In HTML code:
1
2
3
4
| <div id="receiving_div_id">
<p>Nothing loaded yet</p>
</div>
<button id="button_to_load_data">Get Ajax Content</button> |
Step 4: Create a JavaScript to make the Ajax call
The final step in this puzzle is the JavaScript, in the “HTML” file, to make the actual Ajax call.
Note : here we can use the JavaScript variable “ajaxurl” to get the URL to call for our Ajax call. Since WordPress 2.8 ajaxurl is always defined in the admin header and points to /wp-admin/admin-ajax.php.
When “ajaxurl” is unknown …
As an alternative for “ajaxurl” you could use <?php echo admin_url('admin-ajax.php'); ?> for those cases where “ajaxurl” is not defined.
As another alternative, since “ajaxurl” is in WordPress only known in the backend (admin functions) but not always known in the frontend (thanks Tom for catching that and providing the tip!), you can use this code (add to functions.php) which includes access to ajaxurl:
1
2
3
4
5
6
7
8
| add_action('wp_head', 'myplugin_ajaxurl');
function myplugin_ajaxurl() {
echo '<script type="text/javascript">
var ajaxurl = "' . admin_url('admin-ajax.php') . '";
</script>';
} |
The JavaScript will, for our example, look like this.
You can place this straight into your HMTL file, but it would be more common to load it when the footer gets loaded – I’ll show you later how that is done. For the purpose of this experiment, you can paste it in your HTML.
“action”–Calling the right Function!
You’ll see that the Ajax call will pass data. In the data you will see that we include a variable called action.
It is absolutely critical that you enter the correct function name at the action field, which is the name of the PHP function we defined and registered as the function to handle our Ajax call. In this example “t4a_ajax_call“.
1
2
3
4
5
6
7
8
9
10
11
12
13
14
| <script type="text/javascript" >
jQuery("#button_to_load_data").click(function() {
var data = {
'action' : 't4a_ajax_call', // the name of your PHP function!
'function' : 'show_files', // a random value we'd like to pass
'fileid' : '7' // another random value we'd like to pass
};
jQuery.post(ajaxurl, data, function(response) {
jQuery("#receiving_div_id").html(response);
});
});
</script> |
In more detail:
We use jQuery to add a “click()” handler, for when the user clicks the “button_to_load_data” button.
This function will set some data, post it to the Ajax URL, and will then place the received content into “receiving_div_id” <div>.
jQuery – What happened to the dollar ($) sign?
Normally in jQuery one would use $ to access jQuery functions.
However in WordPress this will not work, and instead of “$” we have to use jQuery.
This is CASE SENSITIVE!
Now HTML and JavaScript combined will look like this:
1
2
3
4
5
6
7
8
9
10
11
12
13
14
15
16
17
18
19
| <div id="receiving_div_id">
<p>Nothing loaded yet</p>
</div>
<button id="button_to_load_data">Get Ajax Content</button>
<script type="text/javascript" >
jQuery("#button_to_load_data").click(function() {
var data = {
'action' : 't4a_ajax_call', // the name of your PHP function!
'function' : 'show_files', // a random value we'd like to pass
'fileid' : '7' // another random value we'd like to pass
};
jQuery.post(ajaxurl, data, function(response) {
jQuery("#receiving_div_id").html(response);
});
});
</script> |
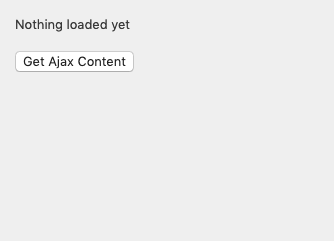
If we load out HTML page now, we will see some text and a button:

WordPress – Before Ajax Click
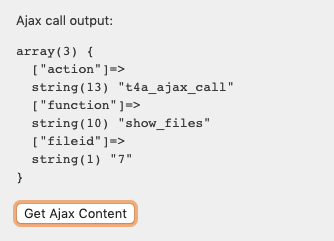
Pressing the button will now retrieve the data through Ajax, showing us the $_POST data.

WordPress – After Ajax Click
Now, I wanted to use a dropdown list instead of a button, so the user can select for example to select a category.
We will use the same code as well in the button example, but we’ll have a make a few minor changes to make this work.
In your HTML:
1
2
3
4
5
6
7
8
9
10
| <div id="receiving_div_id">
<p>Nothing loaded yet</p>
</div>
<select id="pick_a_value">
<option value="-1">All Categories</option>
<option value="1">Category 1</option>
<option value="2">Category 2</option>
<option value="3">Category 3</option>
<option value="4">Category 4</option>
</select> |
Your JavaScript:
1
2
3
4
5
6
7
8
9
10
11
12
13
14
15
16
| <script type="text/javascript" >
jQuery("#pick_a_value").change(function() {
var data = {
'action' : 't4a_ajax_call', // name of the PHP function to handle Ajax
'function' : 'show_files', // a random variables we'd like to pass
'category' : this.value // the value of the selected option in your <select>
};
// since
jQuery.post(ajaxurl, data, function(response) {
jQuery("#receiving_div_id").html(response);
});
});
</script> |
Here we see that we add a “change” function (instead of a “click” function) to the dropdown list (<select>).
If the user changes the value of this dropdown list, this function will be fired and in essence do the same Ajax call as the button example did.
The only thing I’ve added is the value of the selected item (this.value).
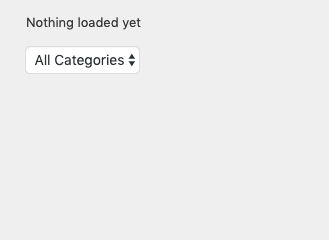
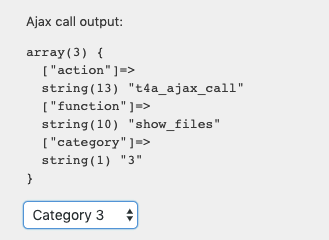
The result:

WordPress – Before Ajax Dropdown Select

WordPress – After Ajax Dropdown Select
Ad Blocking Detected Please consider disabling your ad blocker for our website.
We rely on these ads to be able to run our website.
You can of course support us in other ways (see Support Us on the left).
Loading JavaScript at the end
It is common and better practice to load the Javascript in the footer of your WordPress theme, instead of hardcoding it into you HTML. Doing so is not all that hard, as shown below.
Instead of having the JavaScript in your HTML file, the JavaScript code can be placed in the PHP file as a function output, so we can have WordPress handle it:
1
2
3
4
5
6
7
8
9
10
11
12
13
14
15
16
17
18
19
| add_action( 'admin_footer', 't4a_ajax_javascript_actions' );
function t4a_ajax_javascript_actions() { ?>
<script type="text/javascript" >
jQuery("#button_to_load_data").click(function() {
var data = {
'action' : 't4a_ajax_call', // the name of your PHP function!
'function' : 'show_files', // a random value we'd like to pass
'fileid' : '7' // another random value we'd like to pass
};
jQuery.post(ajaxurl, data, function(response) {
jQuery("#receiving_div_id").html(response);
});
});
</script>
<?php
} |


Comments
There are 27 comments. You can read them below.
You can post your own comments by using the form below, or reply to existing comments by using the "Reply" button.
One of your WordPress plugins seems to have been ghosted by its developer? What does that mean? Has the developer summoned ghosts into your plugin?
Good Job
Hi Good Job!
“Ghosted” means that the developer basically abandoned development and support for the plugin.
Like when a person “ghosts” another person. According to the Wiki;
hans
Almost forgot: Happy New Year!
hans
Ah I see. Thank you, happy New Year!
Good Job
Thanks Good Job!

hans
Wow! This is the first wordpress ajax tutorial I have found that works and is clear and easy to follow! I would love something on using ajax to update the database with some userdata (either usermeta or custom field) .
Thanks for that walkthrough, it was great!
As ajaxurl didn’t work with my theme (at least I think that was what was going on) i made a few changes. My functions.php ended up with this:
  add_action('wp_head', 'myplugin_ajaxurl');
  function myplugin_ajaxurl() {
    echo '<script type="text/javascript">
          var ajaxurl = "' . admin_url('admin-ajax.php') . '";
          </script>';
  }

  wp_enqueue_script( 'jquery' );
  add_action('wp_ajax_t4a_ajax_call', 't4a_ajax_call'); // for admins only
  add_action('wp_ajax_nopriv_t4a_ajax_call', 't4a_ajax_call'); // for ALL users
  function t4a_ajax_call(){
    echo 'Ajax call output:';
    echo '<pre>';
    echo $_POST[fileid];
    echo '</pre>';
    wp_die();// this is required to terminate immediately and return a proper response
  }
Tom
Hi Tom!
Thank you for the compliment!
When trying to do something with Ajax, I too ran into incomplete and overly complex examples. Hence the article and good to hear it did work for you as well.
Sorry to hear you ran into a little snag – thanks for posting it here!
I had to look it up as well and found confirmation at StackExchange.
Great catch! I’ll add it to the article!
Hans
Tip : As an alternative for “ajaxurl” you could use <?php echo admin_url('admin-ajax.php'); ?> for those cases where “ajaxurl” is not defined.didn’t work for me. Aren’t they doing the same thing effectively, albeit in different ways?
Thomas
Effectively this should do the same thing yes …
However,… My best guess is that the original tip worked just fine in certain scenario’s? (I was developing a download manager for my website so all content was created just by my addon, on admin pages only)
So I assume the “add_action()” function will queue the javascript correctly, where as my initial tip would place it somewhere in the HTML code, depending on whatever you had outputted before?
I’m seriously just guessing here.
Hans
Sounds plausible to me!
Thomas
Haha, I couldn’t find a better excuse
Hans
Thank You So Much! Literally best explained and easiest to understand on the whole internet. Recently learned and implemented on my project just because of you. Thanks a ton!
Saad
Hi Saad!
Thank you for the very nice compliment!

And I’m glad it helped you as well (I actually wrote this because I ran into all kinds of overly complicated or incomplete explanations myself as well)
Hans
oh my god, two days continually i am trying on how to undestand this wp ajax. tried many tutorials.
non of them were easy and clear as this.
Thank you!!!
Fazihuzzamaan Rasheed
Hi Fazihuzzamaan!
Thank you very much the compliment, and I’m glad to hear this was helpful for you

When I tried to work my way through Ajax and WordPress, I ran into the same challenges – hence the article
Hans
I got this to work after 6 hours…and trials and errors. So, I do share how this is done 2021 so that it works:
–use chrome developer tools and take off cache from network tab
–look to console if you get any errors, first goal is to get to console “ready!” when you click the button and if all works you get some nice output too!
–add to wordpress website as custom html block:
<div id=”receiving_div_id”>
<p>Nothing loaded yet</p>
</div>
<button id=”button_to_load_data”>Get Ajax Content</button>
–add to theme/js/button.js (create js folder):
jQuery(“#button_to_load_data”).click(function() {
console.log( “ready!” );
var data = {
‘action’ : ‘t4a_ajax_call’, // the name of your PHP function!
‘function’ : ‘show_files’, // a random value we’d like to pass
‘fileid’ : ‘7’ // another random value we’d like to pass
};
jQuery.post(my_ajax_object.ajax_url, data, function(response) {
jQuery(“#receiving_div_id”).html(response);
});
});
–add to theme functions.php:
/* custom script in theme functions.php */
/* read button.js (->my-script) and localize admin-ajax.php for my-script */
function add_my_script() {
wp_enqueue_script( ‘my-script’,
get_template_directory_uri() . ‘/js/button.js’,
array ( ‘jquery’ ),
false,
true
);
wp_localize_script( ‘my-script’, ‘my_ajax_object’,
array( ‘ajax_url’ => admin_url( ‘admin-ajax.php’ ) ) );
}
add_action( ‘wp_enqueue_scripts’, ‘add_my_script’ );
/*ajax result */
add_action(‘wp_ajax_t4a_ajax_call’, ‘t4a_ajax_call’); // for logged in users only
add_action(‘wp_ajax_nopriv_t4a_ajax_call’, ‘t4a_ajax_call’); // for ALL users
function t4a_ajax_call(){
echo ‘Ajax call output:’;
echo ‘<pre>’;
var_dump($_POST);
echo ‘</pre>’;
wp_die();// this is required to terminate immediately and return a proper response
}
kenguru
Hi Kenguru!
Thank you very much for sharing the changes, it is much appreciated.
Hans
You saved my life ! This example is simple and works like a charm ! Thank You !
Nunzio
Hi Nunzio!
That is awesome! And thank you for taking the time to post a thank-you! It is much appreciated
Hans
Thanks Hans! Question: I want to integrate this with a download button to retrieve a file from my aws s3 bucket using the php aws sdk. How can I pass a parameter from the button to specify which file I want to download? Thanks!
Brian Duffy
Hi Brian,
It has been quite a while since I touched any of this, and I’m not sure how happy a browser these days will be when downloading something from another (aws) server.
I’d probably do a simple test first, with something like this:
where “awsurl” is the full URL to get you file from the AWS server.
Just to see of that works.
Hans
My plugin wasn’t in the admin section so I need to change:
add_action( ‘admin_footer’, ‘t4a_ajax_javascript_actions’ );
to
add_action( ‘wp_footer’, ‘t4a_ajax_javascript_actions’ );
Then I was able to get a response every time I changed the selection on the drop down list.
Scott
Scott
Thanks Scott for the tip!
Hans
Thanks mans! this is clear and to the point.
Ramiro Suarez
Thanks Ramiro!
Great to see this was useful for you and thank you very much for taking the time to post a thank-you – it’s much appreciated!
Hans
THANKS!!!!! After I don’t know how many hours of searching the web and trying all kinds of instructions without success, I finally found you. Got it working in not time.and actually understand why!
I cannot thank you enough.
Alain
Hi Alain!
Thank you for posting a thank you!

It’s very much appreciated and it’s always cool to hear that I’ve been able to help someone!
Hans