I’m not sure about other developers, but I occasionally like to use my own custom font for my Lazarus Pascal applications. Typically I do this so I have access to better icons and symbols available in my application, instead of semi blurry bitmap icons. If you use this the right way, your icons and symbols will look much better and will scale really great.
Usually, I use a TTF font for this which I generate at IcoMoon.
IcoMoon is an awesome website where you can compile your own TTF font (or SVG or PNG images of symbols) for use with your website (Tweaking4All uses it as well) or … in your applications.
Since there are plenty examples out there how to do this in Lazarus Pascal for Windows, here an article that shows you how to do this in Lazarus Pascal under macOS.
Some background on adding a custom font to your application
Fonts (TTF) are typically vector based, meaning they are expressed as math ofrmulas, which in laymen terms means as much as: they remain great looking even if we scale the symbol or character.
The website IcoMoon is a great way to create your own TTF font, it not only let’s you create a custom font file, but it also provides lots and lots of free symbols and icons that you can use in your custom font. This custom font of course only needs to hold the symbols you actually need and can remain really light weight – sometimes even smaller than bitmap representations of those symbols.
When it comes to distribution of my applications, I’d hate to have to install a font on the computer of a end-user. There is no need for polluting the font list on the end-user’s computer.
So how do we add a font to our macOS application, with Lazarus Pascal?
The trick can be found in a feature offered by macOS. It appears to be almost a well kept secret, on how to use a font in your application without the need to install the font. This option can be used with Lazarus Pascal and other development tools/environments that utilize the “.plist” (property list) file. This “.plist” file allows you to prepare some details and settings for your application, which macOS will look at before executing your application.
One of these “keys” in the “.plist” file is “ATSApplicationFontsPath“.
Per the Apple Developer Documentation:
ATSApplicationFontsPath (String – macOS)
Identifies the location of a font file or directory of fonts in the bundle’s Resources directory. If present, macOS activates the fonts at the specified path for use by the bundled app. The fonts are activated only for the bundled app and not for the system as a whole. The path itself should be specified as a relative directory of the bundle’s Resources directory. For example, if a directory of fonts was at the path /Applications/MyApp.app/Contents/Resources/Stuff/MyFonts/, you should specify the string Stuff/MyFonts/ for the value of this key.
So we can use this to add a custom font to our Lazarus Pascal application as well … (note: I have only tested this with 64 bit Cocoa widget-set based applications, it will probably work with 32 bit Carbon apps as well – but since Apple is abandoning 32 bit, we probably should not worry too much about that)
Ad Blocking Detected Please consider disabling your ad blocker for our website.
We rely on these ads to be able to run our website.
You can of course support us in other ways (see Support Us on the left).
How to add a custom font to your Lazarus Pascal Application under macOS?
Before we get started; I carefully assume you know a little bit about how to create an application for macOS under Lazarus Pascal. Some of the basics like what an application bundle is, and how to distribute such an application. Reading and following the following text should work right away even when you’re not super familiar with these steps, but it will be helpful in understanding the details.
Step 1 – Get your custom font
Naturally, this can be any kind of font you’d like to use. I prefer to use standard fonts for text display, but you could of course pick your own as well. As mentioned before, I use it for symbols, so they look better and can be applied wherever I can add a font.
For creating your own symbol font, you should definitely checkout IcoMoon.
Tip: During development of your application – install the font!
When you’re still developing your application, I’d recommend installing the TTF font on your computer like any other regular font. This way you can access the font and see the result in the development phase of your application. Keep in mind that you need to restart Lazarus after installing or removing a font, for Lazarus to “see” the font.
Font installation is quite simple: double click the TTF file and follow the steps to install.
Removing the font (to test if your application actually picks up the custom font, even when the font is not installed) is pretty straight forward as well: open FontBook (“Applications” “FontBook”), find your font, right click the font-name, and select “Remove XYZ family”.
Step 2 – Make sure you have created an Application Bundle (.app directory)
Create an Application Bundle for macOS under Lazarus Pascal
Lazarus Pascal can create an application bundle (.app directory with structure) for you.
You can find this option under the Lazarus Pascal menu “Project” “Project Options” by clicking the “Create Application Bundle” button.
Note that the text on this button may not be entirely visible, it is under the “For macOS (Darwin)” section on the “Project Options” “Application” tab.
Step 3 – Copy the custom font file to you .app bundle
Once you have a TTF font file for your custom font (step 1), simply copy .ttf file into a subfolder of the resources directory of your .app bundle.
Let’s walk through this by example:
Let’s say you have create you application here:
/Users/<username>/Projects/Lazarus Projects/MyApplication
and the application bundle can be found here:
/Users/<username>/Projects/Lazarus Projects/MyApplication/MyApp.app
You may already know that the .app “file” is actually just a directory holding all the files for your application.
In this .app directory you’ll find a “Contents” directory.
In this “Contents” directory, there should be a “Resources” directory.
Now, in this “Resources” directory we will have to create a directory that will hold our font or fonts. In this example I simply call that directory “fonts“.
You can use any name you’d like, as long as you remember to use that same name later on in the .plist file.
/Users/<username>/Projects/Lazarus Projects/MyApplication/MyApp.app/Contents/Resources/fonts
Now copy your font file (typically a .ttf file) in this new directory. In the example below the font is called iconmoon.ttf.
/Users/<username>/Projects/Lazarus Projects/MyApplication/MyApp.app/Contents/Resources/fonts/iconmoon.ttf
The file/folder tree should look something like this:
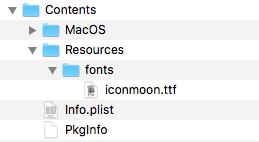
.app file/folder tree for custom font
Step 4 – Add the fonts directory to the .plist file
The .plist file, if you had Lazarus Pascal create an application bundle, should already exist and can be found here (in our example):
/Users/<username>/Projects/Lazarus Projects/MyApplication/MyApp.app/Contents/Info.plist
Now the only thing we need to do is add the font path by adding the font path to the .plist file – which is a key in the <DICT> section (somewhere between <dict> and</dict>).
Note: The name of the fonts directory a relative to the “Resources” directory!
The key and it’s value look like this (both lines belong together):
<key>ATSApplicationFontsPath</key>

<string>fonts</string>
Note: if you picked a different directory name for your fonts, then just make sure you use that name in the second line as well (ie. replace “fonts” in “<string>fonts</string>” with the correct directory name).
As an example, this is what you .plist file could look like (line #19 and #20 are the lines we just added):
1
2
3
4
5
6
7
8
9
10
11
12
13
14
15
16
17
18
19
20
21
22
23
24
25
26
27
28
29
30
| <?xml version="1.0" encoding="UTF-8"?>
<!DOCTYPE plist PUBLIC "-//Apple Computer//DTD PLIST 1.0//EN" "http://www.apple.com/DTDs/PropertyList-1.0.dtd">
<plist version="1.0">
<dict>
<key>CFBundleDevelopmentRegion</key>
<string>English</string>
<key>CFBundleExecutable</key>
<string>MyApp</string>
<key>CFBundleName</key>
<string>MyApp</string>
<key>CFBundleIdentifier</key>
<string>com.company.MyApp</string>
<key>CFBundleInfoDictionaryVersion</key>
<string>6.0</string>
<key>CFBundlePackageType</key>
<string>APPL</string>
<key>CFBundleSignature</key>
<string>Appl</string>
<key>ATSApplicationFontsPath</key>
<string>fonts</string>
<key>CFBundleShortVersionString</key>
<string>0.1</string>
<key>CFBundleVersion</key>
<string>1</string>
<key>CSResourcesFileMapped</key>
<true/>
<key>NSHighResolutionCapable</key>
<true/>
</dict>
</plist> |
Step 5 – Testing your application with a custom font
Now, before we test our application – to make sure the custom font actually works – I’d recommend uninstalling the font from your system through FontBook (see also Step 1). Just to make sure it’s actually using the font in your application bundle.
Naturally, you could also test the application on another computer – just make sure you do not forget to copy the binary, since Lazarus Pascal links to the compiled binary instead of actually placing the binary in MyApplication/MyApp.app/Contents/MacOS/.
Tip: after testing the font, and still being in development of your application, make sure to reinstall the font on your system. Restarting Lazarus will be required for Lazarus to “see” the font.

Comments
There are 4 comments. You can read them below.
You can post your own comments by using the form below, or reply to existing comments by using the "Reply" button.
Thank you, this will be tremendously useful in my work. Thanks again.
Marco
Hi Marco,
awesome! Glad to hear this was useful, and thank you for posting a thank-you note!
hans
Bravo and thank you.
I had a Mac in my hands at a certain time because I wanted to use my own custom font for my Lazarus Pascal applications on Mac and it was a nightmare to install. I probably will less galley with this tutorial.
So again thank you very much for writing this tutorial.
avensis david
Hi Avensis!
Thank you very much for the “Thank you” note!
I too had the same issues haha … but this saved my bacon, especially when using custom fonts, for example from IcoMoon, much sharper (and often smaller) than bitmap icons
hans