Favicons – Use and History
So what are favicons really?
A Favicon is that small image, a logo for example, displayed on the left (or right) of the URL (link) you’re looking at in your web-browser.
The main purpose would be to easily recognize a link for example in a list of bookmarks or tabs (for tabbed browsers). Not every browser supports this, but most modern browsers do – even on mobile/cellphone platforms like Android and iOS. Below some examples (in order: Internet Explorer, Firefox, Chrome, Safari, Opera):
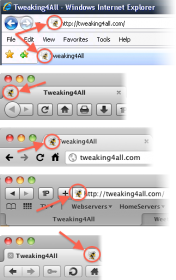
Favicon examples
Once upon a time …
The first implementation of favicons was done by Microsoft in version 4.0 of their Internet Explorer. At that time the specifications were simpel and limited:
The favicon was literally an icon, more precise: a 16 × 16 pixels image saved in the Windows .ICO file format, typically stored in the root of your website.
A simple piece of code was added in the webpages, typically right after the <HEAD> tag of the HTML code.
<link rel="shortcut icon" href="images/favicon.ico" />
Ad Blocking Detected Please consider disabling your ad blocker for our website.
We rely on these ads to be able to run our website.
You can of course support us in other ways (see Support Us on the left).
Animation
Not to long after the first implementation (I’m guessing people mainly got annoyed by the .ICO file format and it’s limitations) browser started supporting the GIF format for use with favicons. On top of that; the GIF file didn’t need to be stored in the root of your website anymore.
GIF opened another little gimmick: animation! GIF had the ability to animate images and some browsers (mostly Firefox) actually display this animation – pulling attention to the icon, for example with little jokes or a message scrolling by.
To do this, you’d need to create a 16 × 16 pixels animated GIF and place it on your website, and of course add the proper HTML tag right after the <HEAD> tag.
The code to use this was slightly modified:
<link rel="shortcut icon" type="image/gif" href="/images/favicon.gif" />
Note …
Initially the type=”image/gif” was omitted, which is probably not correct.
The location of the animated GIF can be on your own website as long as you provide the full path. The can also reside on other websites – in that case you’d have to provide the entire URL: href=”http://www.example.com/favicon.gif”
Animated icons is frowned upon by some. Although I do not entirely agree with this, keep in mind that most browsers will not show the animation anyway. So far I know Firefox supports it, and some say that Opera does as well. I can’t confirm the latter.
PNG Transparency
As time moved on, and PNG as a graphical file format started gaining on GIF (I believe as an Open Source alternative), W3C adopted PNG as their preferred file format for icons. As did some operating systems like MacOS X and certain Linux variations.
Some advantages of PNG over GIF were:
- Support for 24-bit and 32-bit color palettes (more colors)
- Support for transparency
- Supports layers
- etc.
The use of this format (if transparency is used) allows us to get rid of the odd background color which typically does not match with the browser tabs.
If you look carefully at the previous examples, then you will see in the first example (Internet Explorer) that on the tab there is a white box holding the favicon.
Not exactly elegant right?
In the other examples you will see what the bee favicon looks like with the use of a PNG – they blend in with the design of the browser.
I recommend that you make the PNG in 32 × 32 pixel format – Windows 7 for example uses this nicely in the taskbar:

Windows 7 FavIcon
For PNG the code will look like this:
<link rel="icon" type="image/png" href="favicon.png">
Note …
– here the icon can be located pretty much anywhere on the web as well, as we did see with the GIF variation.
– notice that the word shortcut in rel=”icon” has been omitted and is no longer needed.
– All modern browsers seem to support the PNG format
Ad Blocking Detected Please consider disabling your ad blocker for our website.
We rely on these ads to be able to run our website.
You can of course support us in other ways (see Support Us on the left).
Special options: Internet Explorer 9
Internet Explorer 9 and higher support icons of a larger size for a function they call “taskbar pinning” where you drag the favicon or the tab of your Internet Explorer browser to the Windows taskbar (recommended icon size: 64 × 64 pixels) to “pin” a shortcut on your taskbar.
Note …
For this, Internet Explorer is still relying on the .ICO file format.
.ICO files can contain icons in different sizes in one single file, but 256 seems the maximum widt and height of an icon. You will need to compile these icons using a suitable icon editor.
For normal use the 16 × 16 icon will be used, but for taskbar pinning the 64 × 64 pixel icon will be used.
Transparency is supported, but I found it cumbersome to work with – I guess I haven’t seen the light yet.
The size of the icons is not the only option you can find.
A great and free favicon generator can be found at Dynamic Drive.
Internet Explorer 9 add’s more functionality with the “pinning” feature; when right clicking the shortcut in the taskbar to your website, additional functions/links can be shown with relatively simple codes like (partial Twitter example):
1
2
3
| <meta name="msapplication-task" content="name=New Tweet; action-uri=http://twitter.com/home; icon-uri=images/ie/tweet.ico" />
<meta name="msapplication-task" content="name=Direct Messages; action-uri=http://twitter.com/inbox; icon-uri=images/ie/dm.ico" />
<meta name="msapplication-task" content="name=Mentions ; action-uri=http://twitter.com/replies; icon-uri=images/ie/mentions.ico" /> |
If you’re interested in these features, find more details here: Scott Hanselman’s ComputerZen.com.
Apple Touch Icons
On Apple devices running iOS (iPad, iPhone, iPod Touch), you can create a shortcut on your “desktop” for which you’d of course would like to use a higher resolution icon as well. These icons are commonly referred to as “Apple Touch Icons”.
As you can see below; resolution of your FavIcon files DOES matter. The icon on the left is definitely sharper than the one on the right (lower resolution PNG).
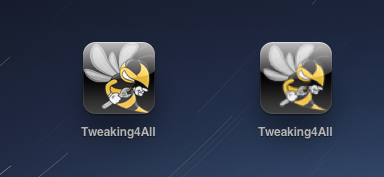
Apple Touch FavIcons
For this purpose Appleuses a custom tag by which the device automatically puts the “glassy” look on it and a default black background (if you use transparency):
<link rel="apple-touch-icon" href="shortcut_icon.png" />
If you do not want the device to put the glassy look on it (ie. have full control over it yourself), use:
<link rel="apple-touch-icon-precomposed" href="shortcut_icon.png" />
These appear to be recognized by certain Android and Blackberry browsers as well.
The file format is (of course) PNG and the currently recommended sizes seem to be:
57 × 57 pixels for the older (non-retina) iPhone and iPod Touch generations,
72 × 72 pixels for the first generation iPad,
114 × 114 pixels for iPhone 4 (and possibly other retina display based devices),
512 x 512 pixels for larger retina displays (for example iPad3).
For all correctness you can define these in your HTML (I recommend this order):
1
2
3
4
| <link rel="apple-touch-icon" sizes="512x512" href="apple-touch-icon-512x512.png">
<link rel="apple-touch-icon" sizes="114x114" href="apple-touch-icon-114x114.png">
<link rel="apple-touch-icon" sizes="72x72" href="apple-touch-icon-72x72.png">
<link rel="apple-touch-icon" href="apple-touch-icon.png"> |
These links (for iOS anyway) do not need to be defined though; Simply placing the files in the root of your website and iOS will find them – if you stick to the correct naming convention.
Non-Apple devices …
Android devices (2.1 and 2.2 anyway) need the definition in your HTML, and Android 2.1 seems to only like the “precomposed” version.
Blackberry OS6 seems to support these as well, just doesn’t support the precomposed versions.
Standard
apple-touch-icon.png (this one has been suggested as a “fallback” 57 × 57 pixel icon)
apple-touch-icon-57×57.png
apple-touch-icon-72×72.png
apple-touch-icon-114×114.png
apple-touch-icon-512×512.png
The file names are pretty self explanatory … right?
Precomposed
apple-touch-icon-precomposed.png
apple-touch-icon-57×57-precomposed.png
apple-touch-icon-72×72-precomposed.png
apple-touch-icon-114×114-precomposed.png
apple-touch-icon-512×512-precomposed.png
As you can see; we just added “-precomposed“.
Ad Blocking Detected Please consider disabling your ad blocker for our website.
We rely on these ads to be able to run our website.
You can of course support us in other ways (see Support Us on the left).
So what should I use?
Personally I would recommend the following for a “normal” webpage:
1. Define a normal favicon for use in an older browsers
Create a .ICO file with icons in it in the size 16 × 16 pixels (16 colors).
Place the favicon.ico file in the root of your website.
2. Define a PNG icon for other browsers if you would like to use transparency
The PNG should be 32 × 32 pixels, use either 8 (256 colors) or 24 bit (16.7 million colors) color depth (both seem to work), transparency is supported.
Place the favicon.png also in the root (not required, just practical to have them all together) of your website.
3. Define special PNGs for Apple devices (if you wish)
Create the PNGs using the naming convention mentioned above (apple-touch-icon.png, apple-touch-icon-72×72.png, apple-touch-icon-114×114.png), use either 8 or 24 bit color depth. Modify if needed for a precomposed version (match the names in step 4!).
Place it in the root of your website as well.
4. Add the favicon code to your webpages right after the <HEAD> tag
1
2
3
4
5
6
| <link rel="icon" href="favicon.ico">
<link rel="icon" type="image/png" href="favicon.png">
<link rel="apple-touch-icon" sizes="512x512" href="apple-touch-cion-512x512.png">
<link rel="apple-touch-icon" sizes="114x114" href="apple-touch-icon-114x114.png">
<link rel="apple-touch-icon" sizes="72x72" href="apple-touch-icon-72x72.png">
<link rel="apple-touch-icon" href="apple-touch-icon.png"> |
The browser of your visitors will now first look at the old favicon and ignore the PNG if the browser doesn’t support it. Supporting browsers however will grab the PNG version when it sees it, “overwriting” the previously made ICO choice.
Lines 2 – 6 define the Apple iOS icons – which are used by some Android devices (2.2+) and Blackberry (OS6+) as well.


Comments
There is only one comment, you can read it below.
You can post your own comments by using the form below, or reply to existing comments by using the "Reply" button.
Thank you for the post. I preffer to use this tool https://favicon.io/ for creating favicon. The benefit of the ICO is that it can contain multiple resolutions and bit depths, which works very well and is especially useful for Windows.
keansargent