So you have a Unibody MacBook Pro and want to switch between the slow Intel and the faster nVidia video?
Apple equipped most of their Unibody MacBook Pro models with 2 graphics processors; one for long lasting battery life (Intel) chip and the other one for gaming and high performance graphics (nVidia).
The switching happens automatically and there appears to be no easy or obvious way to control over override the switching yourself … or is there?
The Problem
Apple equips most of their Unibody MacBook Pro models with 2 video chipsets.
The Operating System automatically switches between the two chipsets as it sees needed – and sometimes not for the right reasons (although I have to admit that my current MacOS X Lion 10.7.3 does seem to do a better job at it than previous MacOS X versions).
CAUTION: This may no longer work on newer Macs!
This article is rather dated, so this may or may not work with newer macOS versions.
Also note that this article is about the older unibody Mac laptops – so this will never support any Apple Silicon based Mac’s.
Integrated vs Discrete
Typically one of the graphics chips (often an Intel chip) is used for regular office applications that are not graphics intense – which takes less battery juice and makes your laptop run longer on it’s batteries. This is referred to as the “integrated” chipset and commonly identified on your MacBook Pro as “Intel® HD Graphics” (OK, you can stop laughing now  ).
).
Integrated chipsets often utilizes some of your main RAM.
The other video chipset (commonly nVidia) is power hungry, but with good reason; it’s much more capable in handling graphics intens applications like video, games, Photoshop, etc. We refer to this chipset as the “discrete” or “dedicated” video chipset, for example the “NVIDIA® GeForce GT 330M“. Dedicated chipsets typically have their own memory.
Auto Switching – how it works
The switching between chipsets is done automatically and triggered by the use of Mac’s Core Animation framework (OpenGL, OpenCL, Quartz Composer, and Core Graphics). So when an application access the Core Animation framework, the more power hungry chipset is being used. This can lead to unexpected results when developers access this framework without having a real need for it.
For 3D Games, iMovie, and for example Photoshop, this makes perfect sense.
For others it does not … a list of applications is maintained in the Apple Discussion Forum.
Ad Blocking Detected Please consider disabling your ad blocker for our website.
We rely on these ads to be able to run our website.
You can of course support us in other ways (see Support Us on the left).
Which one am I using right now?
There are several tricks out there to identify which video chipset is being used. I found the easiest trick to be looking in the “System Information” of your MacBook Pro (click the Icon, select “About this Mac” → “More Info” → “System Report“) – later we will see that gfxCardStatus makes it even easier.
Look under the heading “Graphics / Displays” where you will see 2 video chipsets listed. Only one of them has a display “Color LCD” connected – that would be the one you’re using right now. You could of course use the shell command “system_profiler” as well, but you’d see a great deal of info flying by that you’d have to scroll through to find the exact same info.
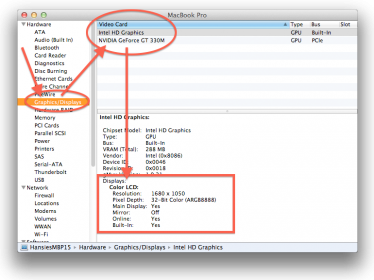
MacBook Pro – System Profiler shows which video chipset you are using …
I leave it up to you why you’d like to switch between the two, saving memory, saving battery power, or just wanting max performance. In the end the question is; how do I force the MacBook Pro to use either the discrete chipset (nVidia) or the integrated chipset (Intel)?
The answer is of course: Yes you can, with a little tool by Cody Krieger called gfxCardStatus.
It’s free and you can download it from his website.
Tip:
– Read the FAQ on Cody’s website for more details, supported models, side-effects (if any), tips, and tricks.
– Make a small donation through PayPal if you appreciate the application.
After downloading and unzipping the application, you might want to move it to your Applications or Utilities folder (inside the Applications folder) and start it from there. In the Apple menu bar you will now see a “i” (integrated chipset), or a “d” (discrete chipset), or a “n” (for nVida – “use smart menu bar icons” must be checked for the latter, in the gfxCardStatus preferences).
The menu offers switching to “integrated“, “discrete” or “dynamic” (automatic). You can also see right away which “card” is being used (in the example below that would be the “Intel HD Graphics“).
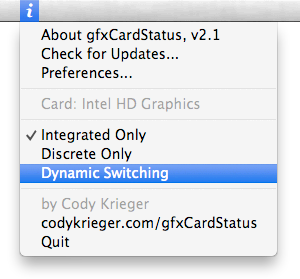
gfxCardStatus – Switching made easy …


Comments
There are no comments yet.
You can post your own comments by using the form below, or reply to existing comments by using the "Reply" button.