Some of you may have read my article on how to Dual Boot Windows 8.x and Ubuntu 14.x … which works great, but what if you want to undo this; remove Ubuntu Dual Boot and remove the boot manager?
For example when you’ve decided that running Ubuntu from a USB stick is sufficient, or maybe run Ubuntu in a virtual machine with VMWare, Parallels, or VirtualBox. Or maybe you’re selling your computer and the new owner has no desire to have a Dual Boot on their “new” PC?
In this article I’ll show you how to remove the Dual Boot. I’m doing this based on the way I have installed Dual Boot, but it will very likely work for installations that have not followed my article. No additional tools are needed, like special applications, a repair or recovery CD or a live USB stick.
Do keep in mind though that this article is based on a computer that has a UEFI “BIOS” and not an old regular BIOS.
Remove Dual boot Windows and Ubuntu
The idea of this article is that you have a computer setup with Dual Boot Windows (7, 8, 10) and Ubuntu (or another Linux distro), where your computer has an UEFI “BIOS“, as you might have done based on our article “how to Dual Boot Windows 8.x and Ubuntu 14.x“.
We assume a DUAL boot of Windows and Ubuntu! So only 2 Operating Systems!
For all options that I found out there, one would have to execute these basic steps:
- Remove Linux boot loader, in other words: remove Grub.
- Remove Linux partition(s) and optionally expand your Windows partition.
- Restore the Windows boot.
The short version for the impatient …
And believe me, I count myself as one of the “impatient” … but I do recommend reading the details …
The short version is:
- determine which partition(s) are Linux related,
- in Linux remove the “ubuntu” directory from “/boot/efi/EFI”,
- reboot into Windows,
- remove the Linux partitions, and
- resize your Windows partition if so desired.
Alternative method with one single tool …
If you don’t like the method I’m using, then please consider a Linux tool called OS-Uninstaller – it does all these steps for you within a few clicks.
- Boot your computer on a Ubuntu DVD or live-USB and choose “Try Ubuntu”
- Open a new Terminal (Ctrl+Alt+T), then type:
sudo add-apt-repository ppa:yannubuntu/boot-repair
- After that type:
sudo apt-get update; sudo apt-get install -y os-uninstaller && os-uninstaller
- Follow the on-screen instructions.
So we should probably first understand what we are looking at:
A Windows partition (which we’d like to keep), a Linux partition (the one we’d like to remove), a bunch of other partitions of which we might have no clue why Microsoft even put them there (depends on your Windows version and hardware manufacturer), and GRUB.
All those Partitions …
The partitions are probably obvious if you’re playing with your computer at this level.
However, if you’ve looked at the partitions on your computer (especially with Windows 8 and up), you’ll see a boat load of partitions. This can lead to confusion and mistakes …
So the trick is to find which one is your Linux partition – to avoid that we damage vital partitions.
Tools we need: None
I have seen many articles write about the use of extra tools, and frankly, I’m just too lazy to create a Windows Repair or Recovery disk, and I didn’t feel like creating an Ubuntu Live CD/Stick either. Installing additional tools wasn’t what I wanted either. I really wanted to fix this with the tools already on my computer.
So we will only use what is already available …
For additional information on other methods, please see the list of links below.
Warning …
I assume that you’re looking at a dual boot PC, which boots into either Windows or Ubuntu (possibly another Linux distro), where the PC has an EFI or UEFI BIOS.
Systems with more than 2 Operating Systems should keep in mind that this method might prevent access to the other operating systems!
Mac users should also not proceed with these steps, as I have no clue if it would work the same way.
Step 1 – Determine your Linux partition(s)
This is one of the step where you really have to pay attention – we would not want to destroy partitions that we still need.
For this step, simply boot into your Linux (Ubuntu) where we will use the command line statement “lsblk” (spelled in capitals: LSBLK).
Open a terminal window, type “lsblk” (without the quotes) and press the ENTER key. You should see something like this:
1
2
3
4
5
6
7
8
9
10
11
| $ lsblk
NAME MAJ:MIN RM SIZE RO TYPE MOUNTPOINT
sda 8:0 0 931.5G 0 disk
├─sda1 8:1 0 400M 0 part
├─sda2 8:2 0 300M 0 part /boot/efi
├─sda3 8:3 0 128M 0 part
├─sda4 8:4 0 817.6G 0 part
├─sda5 8:5 0 450M 0 part
├─sda6 8:6 0 15G 0 part
├─sda7 8:7 0 82.8G 0 part /
└─sda8 8:8 0 14.9G 0 part [SWAP] |
Note : Under normal circumstances, you would not need to use “sudo”. If however you get an error, try sudo lsblk . It will ask for your admin password though.
Note : If your Linux distro does not come with “lsblk” then please look at this article to see how it’s installed. Typically this is done with sudo yum install util-linux-ng or sudo apt-get install util-linux -y .
Let’s take a closer look at what is being presented here:
- My computer has only one disk in it which is
/dev/sda (see line 3).
- The disk has 8 (!) partitions … OMG … wouldn’t 2 or 3 have been enough?
- The partition sda2 is the UEFI partition (see line 5),
- The partition sda7 is mounted as our Linux root (see the “/” symbol at the end of line 10?).
- The partition sda7 is 82.8Gb.
- The partition sda8 is our Linux swap partition ([SWAP] is a pretty clear indicator in line 11).
- The partition sda8 is 14.9 Gb.
This is the info we really need.
The other partitions can be pretty much anything, let’s not touch thouse …
So for this article I will need to remove sda7 and sda8.
Take note of their sizes, as this will become useful in step 3.
On your system these will likely be different – so pay good attention and use the partitions and sizes you’ve found for your system!
It can be that your system does not have the swap partition, so that case you’d only have to remember the root partition.
Step 2 – Modify UEFI, while we still have Linux access
Since we are still in Linux, I’d consider this a good time to modify the UEFI files on the UEFI partition.
efibootmgr
It has since brought to my attention that you should use “efibootmgr” to remove the Linux (grub) entries one by one.
The method I used however, worked perfectly fine on my setup.
UEFI maintains which Operating Systems it can boot from in it’s EFI partition. In step 1, we did see this to be mounted as /boot/efi.
When you look in that directory, you’ll see something interesting:
1
2
3
4
5
6
7
8
9
10
11
12
13
14
15
16
17
18
19
20
21
| $ cd /boot/efi
$ ls -l
total 896
drwxr-xr-x 0 root root 4096 Aug 31 07:43 boot-sav
-r-xr-xr-x 1 root root 512 Apr 18 2014 BOOTSECT.BAK
drwxr-xr-x 6 root root 4096 Jul 15 2014 EFI
-rwxr-xr-x 1 root root 880640 Dec 31 1979 FSCK0000.REC
-rwxr-xr-x 1 root root 4096 Dec 31 1979 FSCK0001.REC
-rwxr-xr-x 1 root root 4096 Dec 31 1979 FSCK0002.REC
-rwxr-xr-x 1 root root 4096 Dec 31 1979 FSCK0003.REC
-rwxr-xr-x 1 root root 4096 Dec 31 1979 FSCK0004.REC
-rwxr-xr-x 1 root root 4096 Dec 31 1979 FSCK0005.REC
-rwxr-xr-x 1 root root 4096 Dec 31 1979 FSCK0006.REC
$ ls -l EFI
total 16
drwxr-xr-x 2 root root 4096 Aug 22 2013 Boot
drwxr-xr-x 3 root root 4096 Aug 22 2013 Microsoft
drwxr-xr-x 3 root root 4096 Feb 22 2014 OEM
drwxr-xr-x 2 root root 4096 Jul 15 2014 ubuntu |
Here you see the directories that EFI maintains on it’s own tiny partition. Do you see “Microsoft” and “ubuntu”? I’m sure you can guess where this is going … we need to remove the “ubuntu” directory … (other Linux distro’s might use a different name!)
If you look in the Ubuntu directory then you’ll see an old friend as well: GRUB …
Anyhow … we will remove the Ubuntu directory by going to the EFI directory and removing the directory as follows:
1
2
| $ cd /boot/efi/EFI/
$ sudo rm -rf ubuntu |
Now that you have removed the Ubuntu “entry”, time to reboot. Your PC will now boot straight into Windows!
N.b. : Depending on your system, it might show a “Updating your System” message and possibly reboot.
Step 3 – Reclaim Disk Space in Windows
So now that your computer is booting in Windows again, time to reclaim the space Linux used.
Note : You can only merge the disk space of your Linux partition(s) with the partition right before or right after the unallocated space. If you happen to have a D: drive between the C: drive and the unallocated space, then you can only merge with the D: drive.
Note : If you had your Linux partition in an extended partition, then you still need to remove the primary partition that held that extended partition as well. See this SevenForums post for more information.
In this step we will use “Disk Management”, which can be started in several ways.
- By far the fastest way is from “Run” dialog ( + R) or Command Line, where you type: diskmgmt.msc
- Or … right click on “My Computer” (or “This PC”), select “Manage” and go to “Storage” “Disk Management“
There are several other ways to get there, these 2 just seemed the most obvious for me personally.
First we need to locate our old Linux partitions. You can identify them based on a few facts:
- Partition Size (remember those from Step 1?),
- Often a “Primary Partition”,
- Often no drive letter (ie. like “C:” for your Windows partition),
- Often no file system format is mentioned (like “NTFS” for your Windows partition).
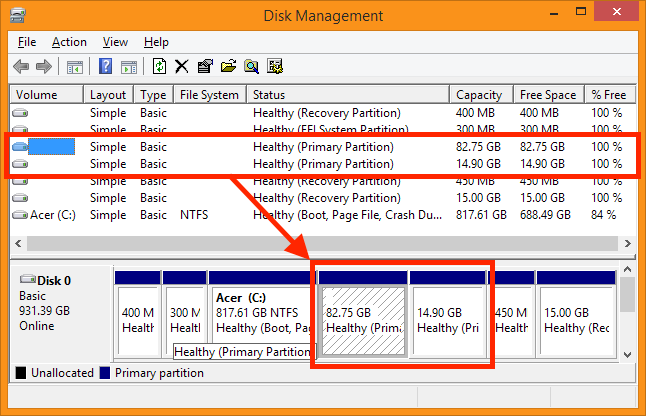
Disk Management – Locate your old Linux partitions
Right click the old Linux partition and select “Delete Volume…“.
If you had more than one Linux partition, then please repeat for the other one(s) as well – this would typically be the swap partition.
Do yourself a favor and triple check you’re picking the right partition. There is no undoing this …
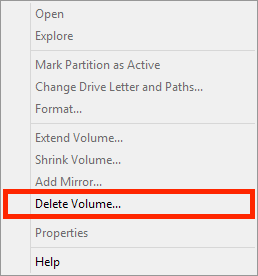
Disk Management – Right click partition and select “Delete Volume”
Disk Management will ask for confirmation, just to make sure your eally want to do this … click “Yes”.
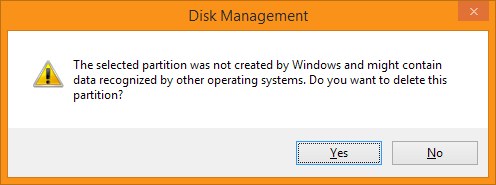
Disk Management – Are you sure?
After deleting your old Linux partition(s), you should see an “Unallocated” block, which indicates unallocated disk space.
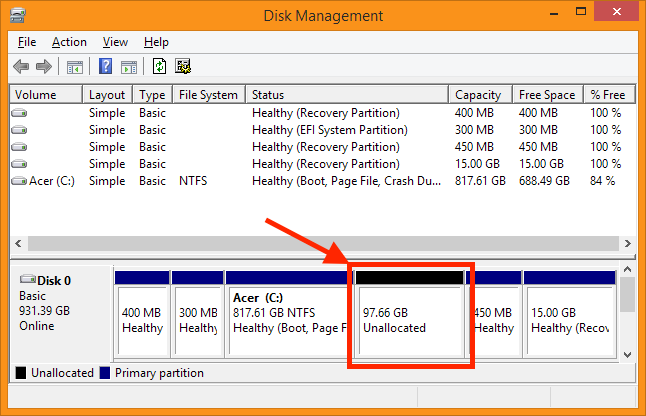
Disk Management – Unallocated disk space
Having unused disk space on your drive is a waste, so if you’d like add it to your Windows partition.
To do this, right click the Windows partition (typically drive “C:”).
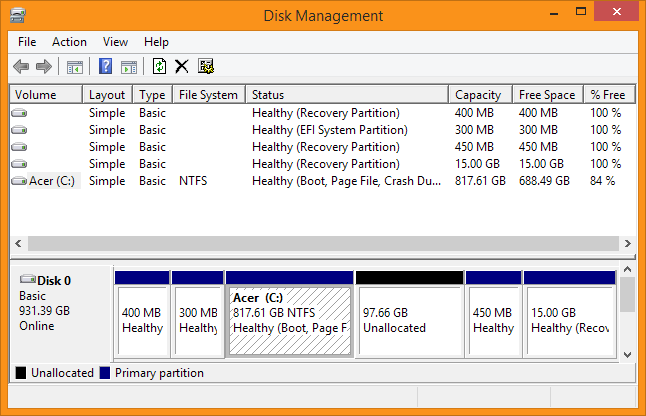
Disk Management – Right click your Windows Volume
From the upcoming menu, choose “Extend Volume…” …
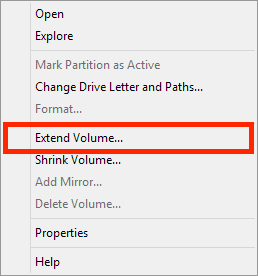
Disk Management – Select “Extend Volume”
A wizard will start, click “Next”.
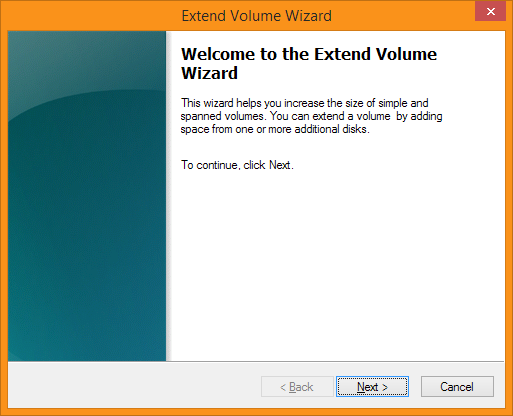
Disk Management – Extend Volume Wizard
It’s completely up to you what you’d like to d here.
To maximize your Windows partition, the value for “Select the amount of space in MB” should match “Maximum avaialble space in MB” – which it by default does. Click “Next” when you’ve made up your mind.
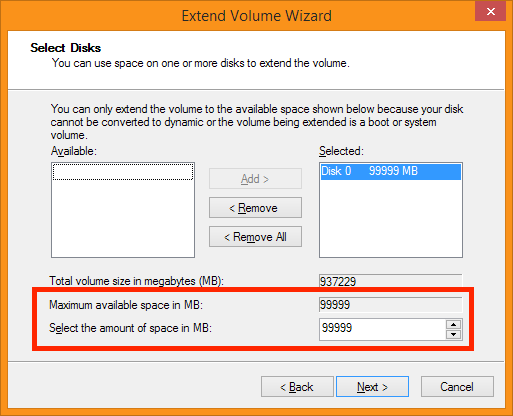
Disk Management – Maximize Volume
The wizard will show an overview of the action you’ve selected, click “Finish” to complete this task.
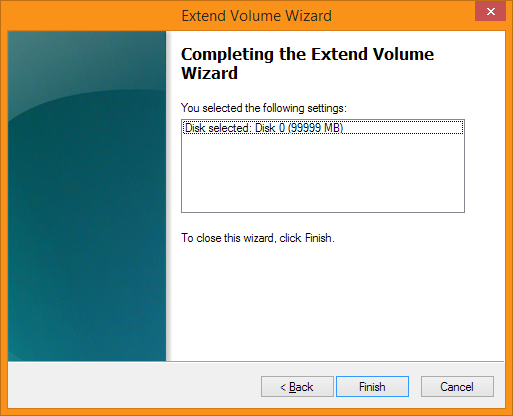
Disk Management – Review Actions
The extending of a partition goes pretty fast and within seconds you should see your newly extended Windows partition.
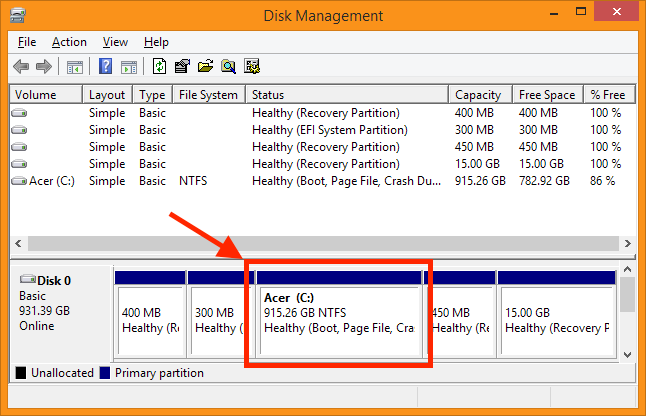
Disk Management – Newly resized Windows Volume
Related Links
I did some research before writing this article – only to find out that all methods mentioned are unneeded complicated and all seem to require additional tools.
For those interested, here a list of a few articles and forum posts that I have read.
Note that none of these use the approach I have used here, but these article might be practical for those not running an UEFI BIOS, or just for those who are curious and want to do their homework first.


Comments
There are 30 comments. You can read them below.
You can post your own comments by using the form below, or reply to existing comments by using the "Reply" button.
Thank you
Pran
Thank you Pran for taking the time to post a “Thank You” – it’s much appreciated.
hans
Thanks a lot!
Xekushnr
Thanks Xekushnr for posting a “Thank you” – it’s much appreciated!
hans
dear sir or madam, i love you
argosar
Thanks Argosar
hans
I had been searching around for this for a long time but didn’t find an easier solution than this. Thanks it worked perfectly
Shiva
Hi Shiva!
Awesome that this worked for you as well and thank you for taking the time to post a “thank-you” note – it’s much appreciated!
hans
Man,
very good article!!
helped me a lot.
thanks :)
Guy
Thanks Guy!
And thanks for taking the effort to give a positive feedback – it’s much appreciated!
hans
thank you so much, i will try it. This is exactly what i need
PNP
Awesome! Hope it’s what you’re looking for PNP!
hans
Is this technique gonna work on win 10 and ubuntu 15.10 ??
Because my Ubuntu started to lag very much and i cant find a solution to fix it so i just want to remove it and replace it with some other lighter version of Ubuntu.
Please help,
Bara
Hi Bara,
I would think this would work just fine for Win10/Ubuntu 15.10. But I’ll be the first one to admit that I have not tested this.
Maybe one of the readers here can confirm this?
hans
Thank you so much. its the easiest one i found till now and it worked perfectly.
Phir Milenge
Hi Phir!
Awesome, glad it worked well for you, and thank you very much for taking the time to post your findings here!
hans
I have tried everything and finally, success! Thanks so much. I had a problem with permissions. I was unable to change directories any farther than boot and had to sudo to get there. But I used the sudo rm -rf efi/efi/ubuntu and then sudo ls -l efi/efi and ubuntu was gone! The rest was easy. Thanks again.
Bradley
Bradley
Thanks Bradley for posting your findings!
Glad to hear you’ve got it to work, and thank you for taking the time to post – it’s very much appreciated!
hans
If you want to include the part about efibootmgr, see http://askubuntu.com/a/63613/25639 for a helpful walkthrough. I believe the safest is to first delete the menu entries there, then delete the EFI/ubuntu folder (this worked for me, and I’ve seen reports of simply deleting the folder giving some people trouble). Other than that, great guide! It’s nice to have it all in one place like this :-)
abc
Hello ABC, and thanks for the compliment and the great tip!
For those interested, please visit AskUbuntu (and awesome resource for Ubuntu users anyway!).
Just to keep it together, below a copy from that particular AskUbunto post (link):
You should be able to do this via a Live Ubuntu CD.
Install efibootmgr:
Then add to the kernel efi support
Then run
to check your boot entries. It will return something like this:
Then delete the option you dont want. In this example, Ubuntu is entry 5. the following could be called to delete entry 5 and remove it from the BootOrder.
(CAUTION: Before executing the following command make sure you enter the correct Boot entry number)
Further details described here: http://linux.die.net/man/8/efibootmgr
Note: as for anything that changes your bootloader, please ensure you have a good disk image that you can boot with.
Now you should also delete the ubuntu subdirectory in the EFI partition to prevent the UEFI firmware from restoring the entry into the BootOrder.
To do that, first find your EFI partition. Run sudo fdisk -l to see the partitions on all attached drives. The EFI partition has EFI Partition under the Type column.
Now we have to find the directory Ubuntu or any other distro’s name in this partition. It is mostly under EFI/distro_name.
Remove that directory and its contents by (PLEASE MAKE SURE YOU ARE DELETING THE CORRECT DIRECTORY)
hans
Hi! I have a problem which is I have installed Windows 10 & Ubuntu 16.04 in one partition! No separate partition is existed. Then how can I remove Ubuntu without formatting C partition and keep windows alive?
zara
Hi Zara,
without the original instructions how you got both on the same partition, I cannot really tell you how to remove Ubuntu.
Do you have these instructions or a link on how it was installed to begin with?
Personally, I’d choose the Windows 10 build-in option to clean Window 10. But again, I don’t know how you’ve gotten both on the same partition.
hans
Hello – Thank you for the guide btw….
I rebooted after I changed the boot order in ubuntu terminal. It worked, I now am booting directly into windows, but I can no longer access grub to boot into ubuntu to delete GRUB boot entirely – Can I just delete the partitions in Windows? Please advise – Thank you!
Bob
Hi Bob,
I’ll admit not having used dual boot in a while.
If you want to get rid of Ubuntu, you could try deleting the partition and reclaiming it in Windows.
Probably not the best or cleanest method, but I suspect it will work.
hans
So basically it is deleting the directory /boot/efi/EFI/ubuntu
This is very nice to know :)
Thx man
Thorsten
It’s not the 100% perfect method, but it works
Hans
Thanks for help..
Dharmesh
Hi Dharmesh!
Great to hear it was helpful for you, and thank you for taking the time to post a “thank you” note (it is appreciated!)
Hans
Thanks a lot! This solved my mysterious UEFI problems!
Chan
Hi Chan!
Nice to hear that! Cool! And thanks for writing a Thank-You note – it is much appreciated.
Hans