For those of us coming from the Windows platform, that have used the Image Resizer PowerToys for Windows XP (yeah I know: from way back in the day), here a free application for MacOS X users to have that same functionality as well.
Simply right click an image, choose the desired size and your images will be resized automatically without modifying the original file.
I’ve expanded the functionality a little bit, by adding the option to convert a Retina image straight to “classic” (50% size reduction) and after resizing the option to automatically attach the resized images to an email, ready to be send to friends and family …
Windows XP PowerToys – Image Resizer
Back in the day, my favorite PowerToy was the Image Resizer. PowerToys were small applications offered for free by Microsoft offering slick and easy to use “toys” that could make your daily work just easier.
The Image Resizer allowed quick resizing of pictures, something I still miss as a standard part of Windows 7, Windows 8, and yes also under MacOS X.
For those interested, Image Resizer can still be downloaded:
Finding a version for MacOS X was harder than expected, and while playing with Apple Automator and AppleScript, I decided to create my own application that would achieve the same …
Ad Blocking Detected Please consider disabling your ad blocker for our website.
We rely on these ads to be able to run our website.
You can of course support us in other ways (see Support Us on the left).
Resize eMail Picture(s)
Being new to AppleScript and Automator, my little app (only 7 Kb!) is not an exact clone of the original Windows XP Image Resizer PowerToy, but it does offer the same functionality. It probably will not win a beauty contest when it comes to the user interface, I was limited by the capabilities of Automator and in my experience in using it …
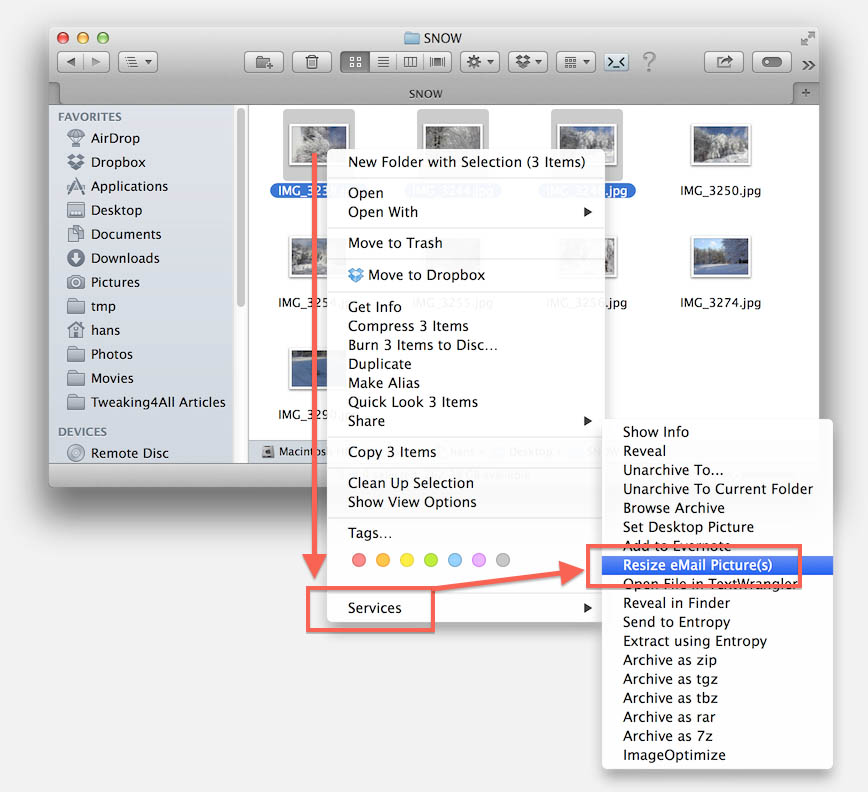
The little service allows you to right click one or more images to resize them:
- Mini (320 pixels)
- Small (640 pixels)
- Medium (800 pixels)
- Large (1024 pixels)
- Larger (1280 pixels or 720p)
- Big (1920 pixels or 1080p)
- Retina to Classic (50% size reduction)
- Do not resize (for use if you only want to email the pictures)
The indicated pixels is the maximum width and maximum height.
When resizing a picture, a copy of the original will be made, with a prefix in the filename to indicate it’s new size.
The original image will not be modified, and the new image will be stored in the same format – so JPEG remains a JPEG.
If you selected “Do not resize”, no extra files will be created of course.
After resizing you can optionally choose to have all these resized image to automatically be attached to a new email, making it easier to quickly send some (optionally) resized pictures to friends or family.
Keep in mind that this service only works with Apple Mail when using the “mail as attachment” option …
Download and Install
Select the version appropriate for your macOS version!
For Big Sur, the original method to attach images to an email simply froze Apple Mail.
For Mojave and Catalina, apple changed the Mail.app icon filename, and changed some path behaviors.
For Catalina, some of the AppleScript functions changed.
The ZIP file either includes a PKG file or WORKFLOW file, which one needs to double click to install the script.
Big Sur and Catalina Errors – Update your Security Settings …
Under Big Sur, and certain Catalina versions, the script will fail to resize images.
This is due to the increased security precautions implemented in macOS.
You’ll get an error something in the lines of:
The action “Run AppleScript” encountered an error: “Image Events got an error: image “<imagename>” doesn’t understand the “save” message”.
Unfortunately, Apple did not make the new security settings easy. For disk access, adding the resize script (which would be more appropriate) doesn’t work. So you’ll have to add the “Image Event” instead.
Add /System/Library/CoreServices/Image Events to System Preferences Security & Privacy Privacy Full Disk Access.
Download - Resize-eMail-Pictures-for-Big-Sur.zip
Download - Resize eMail Picture(s) (Catalina en Mojave)
Download - Resize EMail Pictures
Download - Resize And Email Picture (Yosemite Version)
The installer works like any other installer on the Mac, and the script will be copied in the /Library/Services directory, so it will be available for all users.
Uninstall
To remove this application, simply delete the file Resize eMail Picture(s).workflow from the /Library/Services directory.
Ad Blocking Detected Please consider disabling your ad blocker for our website.
We rely on these ads to be able to run our website.
You can of course support us in other ways (see Support Us on the left).
Usage
Big Sur
Big Sur users will find this script under “Quick Actions“.
You can enable/disable/locate the script from System Preferences Extensions Finder.
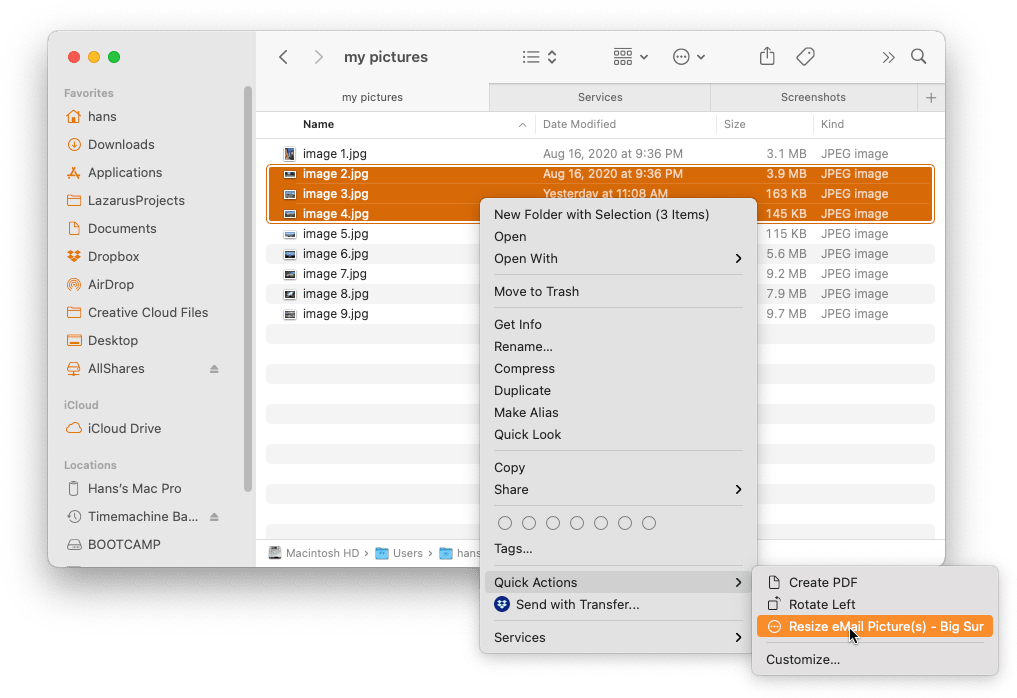
Image Resizer in Big Sur – Under Quick Actions
Older macOS versions
Using this service is simple: right click one or more images and select from the “Services” menu the option “Resize eMail Picture(s)“.
MacOS X Service – Resize and/or eMail Picture(s)
A small window will popup allowing you to select the desired maximum resolution.
The option “Do not resize” allows you to attach one or more images, unaltered, to an email.
The “Retina to classic (50%)” option resizes a Retina screenshot (for example) to the regular non-Retina resolution.
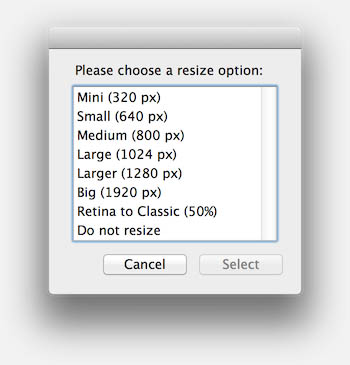
Resize Image – Select maximum width/height
You can double click the preferred option, or single click your preferred option followed by a click on the “Select” button.
Each selected file will now by copied and resized (unless you choose “Do not resize”). Depending on the selected size, a prefix will be added to the file name so you can easily identify the ones that you’ve resized.
As you can see in the example below:
I selected 3 files and had them resized to “Medium”, which resulted in 3 copies with the prefix “Medium”. The original files remain untouched.
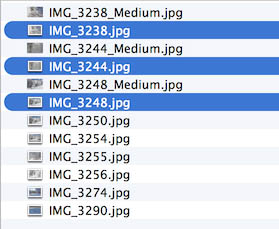
Some example files after resizing
After making your selection a dialog will popup, asking you if you’d like to attached the resized (even if you picked “Do not resize”) to a new email.
If you select “Yes” (default is “No thanks” which will be selected when you press the Enter key), a new email will open with the pictures attached to it.
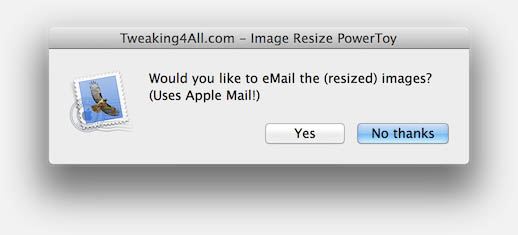
Would you like to attach the resized images to a new email?
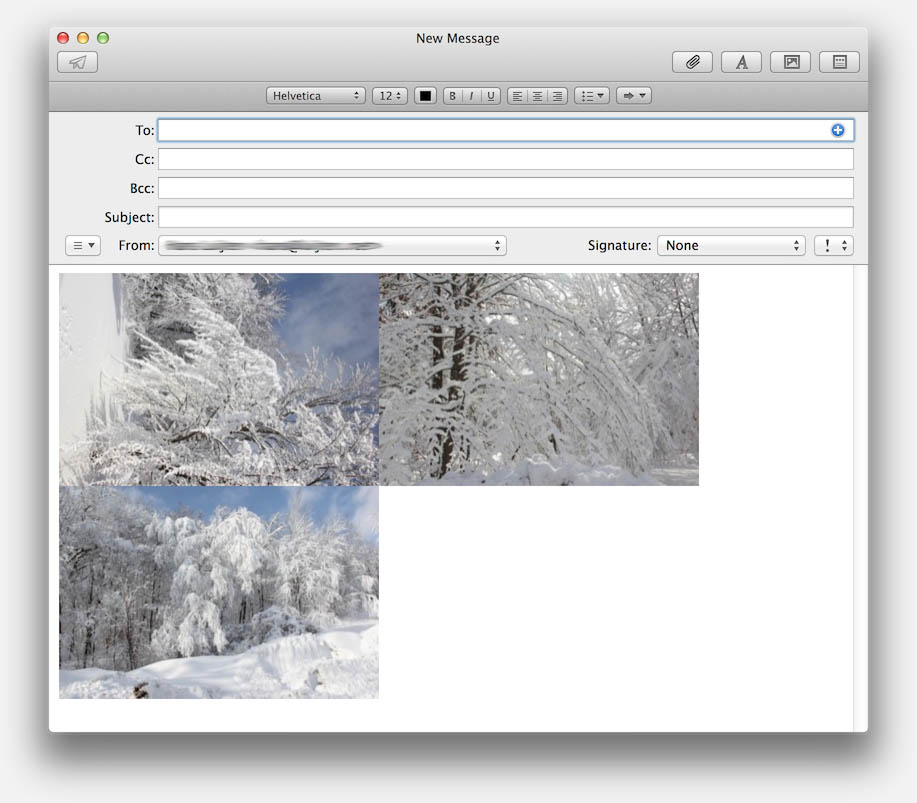
Example of a new email with 3 pictures attached


Comments
There are 22 comments. You can read them below.
You can post your own comments by using the form below, or reply to existing comments by using the "Reply" button.
Tiny update … this app is now also visible in the services menu of Path Finder …
hans
UPDATE:
In Yosemite, Apple decided to change the icon location/name, which causes an error message.
A specific Yosemite (MacOS X 10.10) is made available under the downloads in the article above.
hans
UPDATE:
Today I released a version specifically for Catalina (works under Mojave as well).
Installation: unzip, double click .workflow file.
During first run your Mac will ask for permission to rename files and/or access Mail.
hans
Love this! I was looking for something like this.
However, the generated images are bigger than the larger original versions. I thought the smaller converted versions would be smaller in file size.
Anything you can do to fix this? Thanks!
E C
Hi EC!
Glad you like this little script.
Ehm, did you mean the actual file size (eg. the number of bytes)?
I haven’t paid attention to that actually … I usually throw my images through ImageOptim to compress them better without losing quality.
I’ll take a look and see why the resulting file size ends up being bigger – that is not what I’d expect.
What type of image (jpg/png/etc) are you resizing?
Hans
After creating a version for Catalina, I had to find out the hard way that the next release of Cataline (10.15.3) broke Automator again.
For now I’m giving up – if there is an interest in it, then I can try to build a dedicated application for this purpose.
Just FYI:
1) 10.15.3 has some serious issues when it comes to Apple’s “new and improved” security. Full Disk Access prevents Automator to do what it is supposed to do and adding Automator (and/or Core services) to Full Disk Access is probably not a good idea …
2) Seems Apple scrapped the Automator team in 2016 … so Automator, at best, is in maintenance mode (eg. nothing new to be expected there).
Hans
The script gives me this error on OSX Catalina 10.15.6:
The action “Run AppleScript” encountered an error: “Image Events got an error: image “(INSERTNAME)” doesn’t understand the “save” message.”
Any fix for this?
Adrian Boeing
Hi Adrian,
I’ve just downloaded and installed the Catalina version (1st download in the list).
Simply extracted the workflow file, double clicked it, where it asked me to install or run (select “install”).
Next I right clicked a picture, in Finder, and selected from the “Quick Actions” menu, the “Resize email picture(s) Catalina”.
It worked as expected and resized.
I’m running Catalina 10.15.6 as well. So I’m unable to reproduce the error.
Could it be that you ran the script directly (eg. not by right clicking an image)? Or maybe downloaded the wrong version?
Hans
I’m running into this problem with Big Sur now as well.
Fix: Add the following file to -> System Preferences -> Security & Privacy -> Privacy -> Full Disk Access:
Unfortunately, Apple did not make this easy, since adding the resize script (which would be more appropriate) to Full Disk Access doesn’t work. So you’ll have to add the “Image Event” instead.
Hans
UPDATE:
Today I released an updated version for Big Sur.
I’ve also added instructions on how to prevent an AppleScript error.
Hans
Hi Hans. Are you still interested in smoothing out issues that arise with your scripts? If so, please just give a brief sign of life. and I’ll write them up for you.
Thank you for ‘Resize eMail Picture(s)’!
Lee
Lee Binder
Hi Lee!
Yes I most certainly am interested!
I’ll give you a shout by email
Hans
Great. My main macOS is Catalina. Monterey installed, too (also Big Sur but to HDD). For now I only tested and focus onto your “Catalina Edition” (but can run tests in the other OS’s , too, if needed). Here you go:
1) As soon as the pop-up to choose if to mail or not has opened, Apple Mail already gets opened prematurely. It should open only when clicking onto “Yes”. My guess is you never realized that because you always have Apple Mail running.
Solution: nest
one level higher.
2) At the current state, your workflow only resizes and leaves the compression level as is. But the real magic in byte size reduction does not come from resizing but from compression.
As others have found out, image event’s compression parameter for jpg
is below mediocre. For tangible byte size reduction, sips needs to be used (see @robservatory). It can easily be applied in Automator. The dutch Mac dev Twan Spierts shared a prompts-less workflow here@stackoverflow last July. It works perfectly in Catalina. It’s based on Ariel Eric Elkin’s automator script from 2012 (some posts up from Twan’s) which does give the user the option to enter the desired compression level from 1-100. I think this is how it’s supposed to be – but the value should be stored as a variable and apply itself to all the images in the batch queue, rather than having to be entered again for each image.
A sample image to play around with: http://cdn.cnn.com/cnnnext/dam/assets/150601115126-01-in2white.jpg (5.9 MB)
I hope I worded everything in a good-to-understand way.
What do you think :) ?
Lee Binder
Hi Lee!
Thank you for the suggestion – always fun to discuss ideas
1) if I move the “do shell script” one nest level up, then it would actually open an email even if the user would not have clicked “Yes” to the question “Would you like to eMail the (resized) images?”. Or did I misunderstand your idea?
I had to look at the Mojave/Catalina code (I’ll have to setup a virtual machine later on to do some actual testing, for when we refine this script).
See this code:
set dialogResult to display dialog "Would you like to eMail the (resized) images? (Uses Apple Mail!)" buttons {"Yes", "No thanks"} default button 2 with title "Tweaking4All.com - Image Resize PowerToy" with icon myIcon

if button returned of dialogResult is "Yes" then
  set newAttachments to ""

  if selectedResolution is 0 then
    repeat with i in selectedFiles
      set newAttachments to newAttachments & " " & "'" & (POSIX path of i) & "'" as text
    end repeat
  else
    repeat with i in newFiles
      set newAttachments to newAttachments & " " & "'" & (POSIX path of i) & "'" as text
    end repeat
  end if

  do shell script "open -a Mail" & newAttachments
end if
This is what it is right now, and one next level up would be outside of the “if then” loop …
2) I did indeed skip the standard compression to avoid making the pictures terrible.
I’ll try to take a look tomorrow of day after to see what interesting stuff you found there and see if we can incorporate that.
Looks promising!
Hans
1) Hans, figured it out :):
replace
with
Reasons: ‘path to’ requires it opens an app to find its path. Unless one specifically wants that, therefor above script via ‘application file id’ and (merely internal handling of) Finder is advised to circumnavigate the probed app opening.
2) sips compression algorithm is really eye-friendly. And with a prompt a user has full control over the quality. For .jpg, a pre-set/ active value of 80 is fail-safe from what I know and see.
Lee Binder
Probably not even necessary to mention: if you manage to incorporate compression via sips, the user would not want to be confronted with a 3rd pop-up. For the least number of clicks, it would be most convenient if the compression options were included in the first display dialog at the bottom, underneath the list with the size to choose (maybe even with a button “Don’t compress” to make it as easy as possible if only the size shall be changed):
Choose Quality (1-100)
[ ]
(Don’t compress) (Compress)
In their Preview app, Apple uses a slider. I need to admit that I wouldn’t know how to do that in AppleScript.
Lee Binder
Added your image — due to certain people I had to block posting images in the comments.
I’ll see if I can get this work in one of my virtual machines (still have to setup a VM for Catalina).
Would be nice if an Automator script would simply work for all OS variations, wouldn’t it?
Hans
I see, and understand (and appreciate the edit).
The editable script part(s) of Automator workflows could be differentiated with OS-queries (“which macOS”) and subsequent if conditions, so theoretically it might be possible to have one script for several macOS versions. But I agree that in “real code/ script life” it’s sometimes easier to split than to try and concoct the ONE complicated script to rule’em all .. ;)
I haven’t looked at your workflow for 11.x+ so from your comment I figure that the replacement would need to be adapted for it – bummer. You indicated the workflow I’m referring to as made for Catalina and Mojave, so if you have a Mojave VM, that should suffice, I “guesstimate”. You could simply recreate and test in Mojave, and I would cross-test in Catalina.
Lee Binder
I recall certain changes in the different macOS version made the script break of misbehave.
The querying of the macOS version is a method I use in my regular apps, but I’d hate to see the spaghetti code in Automator when trying to do this. Legit option though, but then I am starting to think if I should maybe move to a regular application. That would be too bad though, since Automator should be the ultimate tool for stuff like this
I hope to be home again tomorrow, and will give it a try under Monterey and see what happens. I think I may have one or the other VM laying around — they are terribly slow).
Hans
Yes, in this case, for the sake of a most genuine/ native Finder integration, I also lean towards rather multiple workflows than 1 App.
VM: I have Catalina and Monterey on SSD in one shared APFS container (lovin’ it for space savings) and Big Sur on HDD which proved faster than if run in VMWare Fusion even with the VM on SSD.
For space savings and a seamless desktop experience/ operation regardless of which macOS I’m in, in both (Big Sur and Monterey) I use the personal Apps I installed in the Catalina volume, + several of my Catalina folders via symlinks Works 99,9% perfect, and as long as there is sufficient disk space, a native env. is sure faster than VM. Just felt like sharing :)
Lee Binder
Yeah, running a VM for macOS is terrible, dual booting is a much better option.
I just never got around to doing that, and occasionally comes with a few challenges (in this case, not tooooo terrible though).
I’ll give it a try, hopefully today (depends a little – got some family to take care of as well ).
).
Hans
No hurries.
BTW, since I DO also have Monterey natively installed (and most users will be on macOS 11.x/ 12.x anyway): feel free to simply continue to do any testing and modifications in Monterey, post them here, and I’ll also test them in 12.x and port them to Catalina. So you don’t need to deal with setting up a VM :)
Lee Binder