What is Aria2 and why would I want it?
Aria2 is a command line download manager and it rocks! It supports regular downloads, and even BitTorrents out of the box.
For those that have worked with pyLoad and Download Station … Aria2 is MUCH more stable and much faster.
With the help of 2 available web interfaces, and a Google Chrome addon, this has become my favorite download manager.
The great thing is that I can start downloads on my QNAP, even Bittorrent is support, and never have to look back. It just does what it is supposed to do.
In my previous article, I used the Aria2 version (1.18) that came with QNAPWare, but unfortunately that version has a potential HTTPS issue and has not been updated in a while.
Along comes the user “jokies” in the QNAP Forum who took the time to make a straight forward and easy to install QPKG for Aria2. Much kudo’s for the great work and keeping it up to date!
(at the time of this writing, version 1.19 can be found in the QPKG)
Ad Blocking Detected Please consider disabling your ad blocker for our website.
We rely on these ads to be able to run our website.
You can of course support us in other ways (see Support Us on the left).
How to remove a previously installed Aria2
If you followed my previous guide, here are the steps to cleanup that version.
In case you made an optimized config file in your previous setup:
Make sure to make a backup so you can copy the settings in the new config file!
OK, so now we can start removing the old through Aria2 setup from SSH:
1
2
3
4
| killall aria2c
opkg remove aria2
rm /Apps/opt/etc/aria2.conf
rm -rf /share/MD0_DATA/.qpkg/Aria2 |
Don’t forget to edit the “qpkg.conf” file, we need to remove the Aria2 lines from /etc/config/qpkg.conf .
1
| nano /etc/config/qpkg.conf |
You will have to remove the following lines:
1
2
3
4
5
6
7
8
| [Aria2]
Name = Aria2
Version = 0.9
Author = zyxmon
Date = 2015-01-02
Shell = /share/MD0_DATA/.qpkg/Aria2/autorun.sh
Install_Path = /share/MD0_DATA/.qpkg/Aria2
Enable = TRUE |
If you installed QNAPWare, you could leave it as it might be handy in the future. But if you’d like to, you can uninstall it if you only used it for Aria2.
Go to the QNAP webinterface, choose “App Center“, scroll to “QNAPWare“, click on “More…” and click “Remove“.
Removal will take a bit.
Downloading the Aria2 QPKG
Download the latest version from the QNAP Forum: follow this link.
I highly recommend getting that version!
You could also download it from Tweaking4All, but keep in mind that it’s only available here as a backup and it might be outdated.
Download - Aria2 1.19.0 X86
Ad Blocking Detected Please consider disabling your ad blocker for our website.
We rely on these ads to be able to run our website.
You can of course support us in other ways (see Support Us on the left).
Installing the Aria2 QPKG
Go to the QNAP webinterface, choose “App Center“, and click the “Install Manually“.
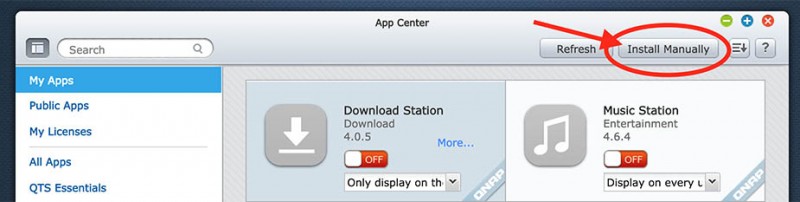
QNAP App Center – Install Manually
In the popup window click “Browse” and select the QPKG file (in my case it was called “Aria2_1.19.0_x86.qpkg“).
Please note that in case you downloaded a ZIP file, that you MUST extract it first!
After that click the “Install” button and patiently wait for the QPKG to install.
Once completed click “OK” and “Close” to complete the procedure and return to “App Center” where “Aria2” should now be listed.
Configuring Aria2
Now you could go with the default settings, which will store Aria2 downloads in the regular Downloads share of your QNAP – which most certainly is not wrong at all. I however prefer a separate directory for each tool I use, so in my case I have a directory called “Aria2” in my Download share. To work with that we need to modify the config file.
Restarting Aria2
If you decide to do that, don’t forget to use killall aria2c to stop Aria2, and /share/MD0_DATA/.qpkg/Aria2/aria2run.sh to restart Aria2.
This way it will read the modified config file. I found that the ON/OFF toggle in App-Center doesn’t always work that well.
I modified my config file with this command and I’ll list my config below – my config does not need to be the most optimal for your situation, but it might be helpful – I made a very few changes compared to the one included with the QPKG because I have to live with a retarded slow Internet connection.
To keep the text short, I also removed all the comments.
nano /share/MD0_DATA/.qpkg/Aria2/aria2.conf
1
2
3
4
5
6
7
8
9
10
11
12
13
14
15
16
17
18
19
20
21
22
23
24
25
26
27
28
29
30
31
32
33
34
35
36
37
38
39
40
41
42
43
44
45
46
47
48
49
50
51
52
53
54
55
56
57
58
59
60
61
62
63
64
65
66
67
68
69
70
71
72
73
74
75
76
77
| dir=/share/Download/Aria2
log=
max-concurrent-downloads=10
check-integrity=true
connect-timeout=600
lowest-speed-limit=0
max-connection-per-server=4
max-file-not-found=5
max-tries=40
min-split-size=5M
remote-time=false
reuse-uri=true
retry-wait=5
split=5
timeout=600
enable-http-keep-alive=true
ftp-pasv=true
ftp-type=binary
ftp-reuse-connection=true
bt-detach-seed-only=true
bt-enable-lpd=true
bt-force-encryption=true
bt-hash-check-seed=true
bt-max-open-files=150
bt-max-peers=100
bt-metadata-only=false
bt-min-crypto-level=plain
bt-prioritize-piece=head=10M,tail=10M
bt-remove-unselected-file=true
bt-require-crypto=true
bt-request-peer-speed-limit=5K
bt-save-metadata=false
bt-seed-unverified=false
bt-stop-timeout=0
bt-tracker-connect-timeout=120
bt-tracker-timeout=120
dht-file-path=/tmp/aria2_dht.dat
dht-file-path6=/tmp/aria2_dht6.dat
dht-listen-port=6881-6999
dht-message-timeout=15
check-certificate=false
enable-dht=true
enable-dht6=false
enable-peer-exchange=true
follow-torrent=true
listen-port=6881-6999
max-overall-upload-limit=0
max-upload-limit=0
peer-id-prefix=-TR2810-
seed-ratio=0.0
follow-metalink=mem
enable-rpc=true
rpc-allow-origin-all=true
rpc-listen-all=true
rpc-listen-port=6800
#rpc-user=username
#rpc-passwd=password
rpc-save-upload-metadata=false
rpc-secure=false
allow-overwrite=false
allow-piece-length-change=false
always-resume=true
async-dns=true
auto-save-interval=30
daemon=true
disable-ipv6=true
disk-cache=50M
file-allocation=trunc
force-save=false
piece-length=1M
summary-interval=30
max-overall-download-limit=0
max-download-limit=0
parameterized-uri=true
save-session=/tmp/saved.aria2
input-file=/tmp/saved.aria2
save-session-interval=30 |
Downloads keep failing … SSL/TLS Handshake Failure …
I ran into the following error after certain HTTPS downloads kept failing.
Doing a manual download (in SSH):
1
2
| cd /share/MD0_DATA/.qpkg/Aria2/bin/
./aria2c https://yourfailinglinkhere |
Showed me this error:
errorCode=1 SSL/TLS handshake failure: self signed certificate in certificate chain
There are 2 ways to “fix” this, one is by adding --check-certificate=false to the command line call, the other (more permanent) is by setting the variable check-certificate=false in the config file.
The config file that I just showed has this correction already in it, but it was added after this article was published. So if you run into this problem, check if check-certificate=false has been set in the config file.
About Username and Password
The current version uses the variable rpc-user and rpc-password, which will become obsolete when you read the Aria2 documentation. So please keep that in mind.
In my configuration, I have temporary disabled username and password, to make working with web-interfaces and Chrome addons easier. Once things work, you could start experimenting with the username and password settings.
If you’d like to use a username and password, then find the following variables in the config file:
In case you add them yourself, please make sure there are no other occurrences.
Two examples:
The first one uses a username (myname) and password (mypassword) to gain access.
The second one disables username and password. Simply add a hash (#) sign in front of the variables.
1
2
| rpc-user=myname
rpc-passwd=mypassword |
1
2
| #rpc-user=whatever
#rpc-passwd=etc |
Ad Blocking Detected Please consider disabling your ad blocker for our website.
We rely on these ads to be able to run our website.
You can of course support us in other ways (see Support Us on the left).
Setting up a Web-Interface and a Google Chrome Plugin
Since Aria2 is “just” a command line utility, interaction is usually limited to the command line. Which works great!
However, I prefer a nice web-interface and so far I have found two, each serving a different purpose.
For Google Chrome users there is an Addon which I can highly recommend, it makes using Aria2 even easier.
Default JSON link
With the Web Interface, Google Chrome AddOn and prety much all other applications that can talk to Aria2, we need to provide a JSON-RPC Path.
Default this is
http://<IP of your QNAP>:6800/jsonrpc
So for my QNAP this is: http://192.168.1.100:6800/jsonrpc
WebUI-Aria2 for Aria2
WebUI-Aria2 is a very nice, but not perfect.
It offers a nice graphical display of the download speed and a nice queue overview.
The configuration options are very extensive, even so extensive that I keep loosing overview of what’s going on.
You can download the latest version from Github (recommended!) or from Tweaking4All (which could be outdated!):
For details on how to install, I refer you to my previous Aria2 article under “Installing WebUI-Aria2 for your QNAP”. The settings are the same.

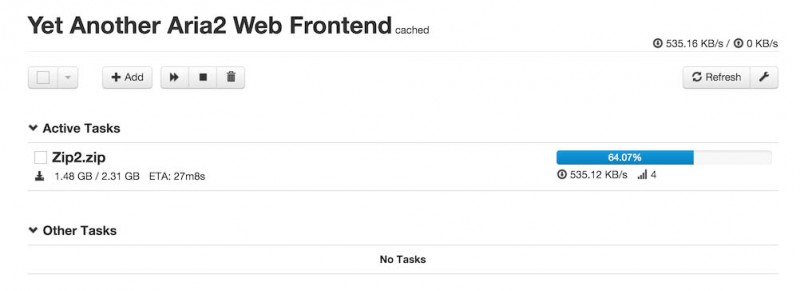
Aria2 on my QNAP, downloading the test file
YAAW
YAAW (Yet Another Aria2 Webinterface) is super clean, and gives you the basic functionality.
And that includes very basic setting options.
Installation is straight forward.
Download the latest version from GitHub (highly recommended), or download it right here from Tweaking4All (note that it might be outdated!):
Download - Aria2-yaaw-webinterface
On your QNAP, go to the “Web” share (/share/Web) and create a directory for YAAW, for example:
Now copy all the files from the ZIP file into that new directory.
Next step is to open your browser and go to the new webpage. In my situation, my QNAP has the IP address 192.168.1.100, and I named the directory “yaaw”, so the link would be:
http://192.168.1.100/yaaw
Following the format:
http://<IP of your QNAP>/<YAAW directory>
If you didn’t change anything crucial in the config file, it should right away work.
Using Username/Password or Toke/Secret with YAAW …
Thanks to the user Binux, here the needed information if you use a username/password or token/secret:
When using –rpc-secret=<secret> if you are using aria2 1.18.4(or higher):
http://token:secret@hostname:port/jsonrpc
When using–rpc-user=<username> –rpc-passwd=<passwd> if you are using aria2 1.15.2(or higher):
http://username:passwd@hostname:port/jsonrpc
An example of YAAW running a download:
The YAAW Aria2 web interface
Aria2-Integration Google Chorme Addon
Aria2-Integration is an awesome tiny addon for Google Chrome users, which I highly recommend.
Installation and configuration can be found in my previous Aria2 article as well, under “Browser Extension to make things easier …”. The settings are, again, the same.
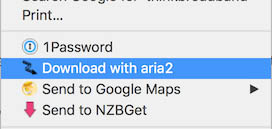
Select “Download with Aria2”
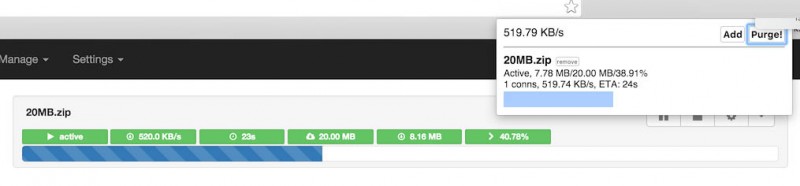
Chrome Add on and WebUI at the same time


Comments
There are 8 comments. You can read them below.
You can post your own comments by using the form below, or reply to existing comments by using the "Reply" button.
You can set username and password for YAAW with this format: http://username:passwd@hostname:port/jsonrpc or http://token:secret@hostname:port/jsonrpc if using `–rpc-secret=<secret>`
It’s introduced here: http://binux.github.io/yaaw/
binux
Thanks Binux!
I totally overlooked that one – thank you very much for posting it here!
I will update the article!
hans
UPDATE:
After some weird SSL errors, like this one:
I found the following solution to fix this:
Add this line to your Aria2 config file:
This should resolve this error.
hans
You should put at the very top of the article in BOLD that you only have a qpkg for x86 as I diligently just worked my way down the instructions deleting my “old” aria2 only to find there was no “new” arm aria2 available. The opkg command also was “opkg remove aria2” as opposed to “aria2c”. You mentioned this in the first article but you used “aria2” there as your coding example as opposed to aria2c in this one.
Rudi Pittman
and of course now I see that you DID and I just missed it. *shakes head*
“Please note that this QPKG is Intel only!”
Rudi Pittman
Haha, it’s OK Rudi, maybe I should make it red as well … we all do occasionally overlook a slightly important piece of text (so do I).
Sorry you did all the work to then find out it’s Intel only …
I’l modify the little mistake with aria2 vs aria2c.
hans
Despite adding the check-certificate=false in both the config and the command line as so:
It unfortunately is still giving the error for put.io:
Is there a way to get a version of the code compiled for QNAP that doesn’t have this check? Nothing else, including pyLoad or any browser, detects put.io as having a self-signed certificate. I just want the check gone because it seems there’s a bug somewhere in the check.
doublehelix
Hi DoubleHelix!
I’ll admit that I have not played with this yet.
I do recall (hopefully correct) that you can force aria to accept the certificate, self-signed or not.
As far as I can find, “–check-certificate=false” should already have fixed this back in 2013 (source), I therefor assume the QNAP binary supports this as well (but obviously something still goes wrong).
As far as I understand the Aria2 manual, one could provide a cert file to make it accept self-signed CERTs. However, I haven’t tried this yet, and I have zero experience with it. Sorry …
Please; if you find a solution, post it here so others (including myself) can use it as well …
hans