What is Wake On LAN ?
Wake On LAN, or WOL, is a Ethernet standard that allows you to “wake up” computers or network devices that are in stand-by, and is originally intended for use in a local network.
WOL is probably most commonly used to wake up a server or NAS, just before access to these machines is needed – for example a media server, which can sleep all day long until you want to watch a movie. There can be several motivations to do this; save on power, save on wear-and-tear of your equipment, etc.
WOL also requires the network card of this device to be semi-awake, and still listen to traffic, just in case a “magic packet” is being send to the device. While the NIC (network interface controller) is listening, a lot of traffic might pass that might not even be intended for this network connection, so just listening to network traffic would keep your network device awake even when you don’t want it to be awake.
MiniWOL at Alternative.to ….
Of course miniWOL is being listed at Alternative.to … please give it a like there to support us! (totally optional)
WOL support on WiFi, Switches, NICs etc …
Note that not all devices or networks will support Wake On LAN.
Devices / networks where Wake On LAN may not work (not supported / not implemented):
- WiFi can support WOL, however most devices do not support WOL over WiFi.
- Modern switches may not support WOL (eg. 10 Gbps switches and some newer 1 Gbps switches (some only support WOL on port 1).
- Most 10Gbps NICs will not support WOL (eg. Intel cards, some cards with multiple ports amy support WOL on port 1).
- Most fiber connections may not support WOL either.
- WOL over Internet can be problematic.
The magic packet is a 102 bytes long broadcast frame containing a of payload 6 bytes, all set to 255 (FF FF FF FF FF FF in hexadecimal), followed by 16 repetitions of the target computer’s 48-bit MAC address.
Example (Mac Address = A2:3B:41:00:7A:9B):
1
2
3
4
5
6
7
8
9
10
11
12
13
14
15
16
17
| FF FF FF FF FF FF
A2 3B 41 00 7A 9B
A2 3B 41 00 7A 9B
A2 3B 41 00 7A 9B
A2 3B 41 00 7A 9B
A2 3B 41 00 7A 9B
A2 3B 41 00 7A 9B
A2 3B 41 00 7A 9B
A2 3B 41 00 7A 9B
A2 3B 41 00 7A 9B
A2 3B 41 00 7A 9B
A2 3B 41 00 7A 9B
A2 3B 41 00 7A 9B
A2 3B 41 00 7A 9B
A2 3B 41 00 7A 9B
A2 3B 41 00 7A 9B
A2 3B 41 00 7A 9B |
The Magic Packet (UDP) is typically send to port 9, some systems default to port 7, and some systems allow you to define your own port number.
Normally just one single packet should do the trick, but most Wake On Lan applications actually send more than one packet – just to make sure.
To prevent that just anything can wake up such a network device, a very specifically formatted “magic packet” has to be send over the network. Naturally, you can guess that this is not 100% fool proof, but it’s better than nothing, and in your local network (at home or in the office) this might be safe enough.
Additionally a broadcasting address (or mask) is supported, which allows you to send the magic packet to the entire network or parts of the network (default: 255.255.255.255). This technique does seem to be required for some devices to work with WOL. This is unfortunate, since broadcasts aimed at a specific device (unicast) appears more secure than subnet-directed broadcast. See also these 2 Microsoft Technet articles: About Subnet-Directed Broadcast and Choose Between Unicast and Subnet-Directed Broadcast for Wake On LAN.
Ad Blocking Detected Please consider disabling your ad blocker for our website.
We rely on these ads to be able to run our website.
You can of course support us in other ways (see Support Us on the left).
Enabling Wake On LAN on your Network Device
Before we can wake up a network device with WOL, you will need setup this device to do so. Quite often you’d need to do some settings in the “BIOS” of your computer, and.or do some settings in the operating system as well.
Certain devices, like most NAS devices, make it a little easier by offering a simple “WOL ON/OFF” function.
Since this will be different for most devices, either consult the manual of your device, read an the manual of your device, a generic online guide like this one at How-to-Geek, or consult Google.
Can’t get Wake On LAN to wake up your Mac laptop?
Check out my article (look for Example 3) which explains how to login to SSH securely without a password, and wake up a MacBook Pro without even using a Wake On LAN application.
To combine this with miniWOL, you can create a script, something like this:
1
| ssh username@ip-address-mac "caffeinate -u -t 1 || exit 1;" |
(replace “username” with the username for your Mac, and “ip-address-mac” with the IP address of your Mac)
Save this script for example as “myscript.sh” (Linux/macOS) or “myscript.bat” (Windows).
Note: Linux and macOS users need to make the script executable (with chmod +x myscript.sh ).
Next add the script to the device definition in miniWOL and check the option “Execute Script after Wake On LAN“.
After sending a WOL, this script will connect to your Mac with SSH and use caffeinate to turn the display on.
Note: don’t forget to enable WOL on your Mac (System Preferences Energy Saver (or: Battery) Wake for network access), and don’t forget to enable “Remote Login” (System Preferences Sharing).
Note: if you’re targeting a laptop: your MacBook needs to be powered by a power brick, and the lid potentially must be open.
Wake-On-LAN local vs over the Internet
miniWOL, and Wake On LAN in general, is intended to be used in a local network, meaning: wake up a network device in the same network you’r in (at home or in the office). To wake up a device at home, over the Internet (ie. you’re in the office or traveling), will require some trickery including, but not limited to, port forwarding. Not every modem/router can even do this. An example can be found here: DD-WRT.
So by default: use miniWOL for devices in your local network.
For waking up devices over the Internet, you will need to do some extra leg work to get everything configured correctly.
miniWOL
The intend of miniWOL is to have a small icon in your SysTray (Windows) or Menubar (Linux and MacOS X), where you can send a Wake On LAN magic packet to a defined server. All this without thinking or seeing all the in-depth details (once you’ve configured it right).
Some example screenshot of the menu, from left to right; MacOS normal theme, MacOS DarkTheme, Linux (Mint) and Windows 10:
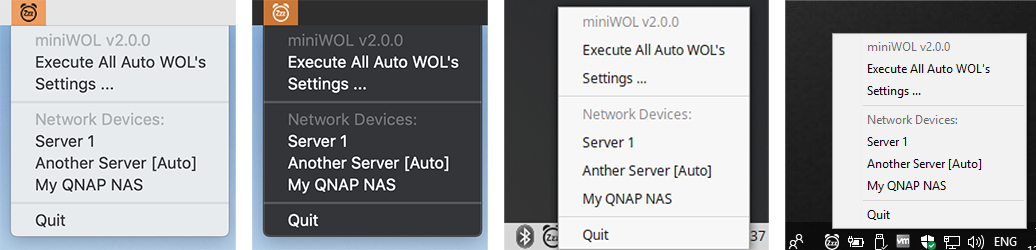
miniWOL2 – MacOS (Normal/Darktheme), Linux and Windows
Download
miniWOL is free, and always will be free … you can download it straight from Tweaking4All.
miniWOL v3 available for macOS users …
miniWOL version 3 has been released through the Apple App Store, and therefor only available to macOS users.
This also means that, besides some code and GUI enhancements, the application has been tested and screened to make sure it meets the strict Apple App Store requirements like sandboxing, ect.
Using version 3 is of course recommended, but optional. Version 2 will remain functional.
This new version will come with automatic updates through the Apple App Store, and at a very small fee ($1.99) to support me developing more apps like this.
For now, I’m not planning a v3 version for Windows or Linux, but maybe I’ll change my mind … who knows 😉
Download - MiniWOL2 MacOS (64 bits Intel)
Download - MiniWOL2 MacOS (64 bits Apple Silicon)
Download - miniWOL v2 Windows 32bit setup
Download - MiniWOL2 Linux GTK
Download - MiniWOL2 Linux QT5
Portable Version for Windows
To use miniWOL as a portable application, simply run setup and select the desired directory.
Note: This used to be a separate version, but this is no longer the case, and integrated in the standard setup.
The application will detect if it was started from the standard Program Files location, which typically would be somewhere in C:\Program Files(x86) since it is a 32bits app.
If it is NOT running in this standard location, then it will save the preferences file in the same location as where the EXE is.
If it is running in the standard location, then the preferences will be saved in the standard location (C:\Users\<username>\ etc.).
Versions
2.1.3 – Some fixes and features:
For all platforms:
– Added option to execute a script after sending a Wake On LAN
– Update on how the controls are positioned in the Settings window
For macOS/Windows:
– Added the option to send a Wake On LAN to devices when your PC/Mac wakes up from sleep
For Windows/Linux:
– Added the option to invert the icon in the system tray (previously existed for Linux already)
For Windows:
– Setup now allows to install miniWOL on a portable device – no longer a separate installer needed for using the application as a portable app.
2.1.2 – Mac only: WOL after your computer wakes up from Sleep added (per device configurable).
2.1.1 – Mac only: Icon fix for Big Sur, Windows: Bug fix in ARP, added portable version.
2.1.0 – Several fixes and features added:
For all platforms:
– Added confirmation dialog when clearing all entries
– Build number visible in menu and settings window
– Bug fix: at first start, occasional 3 empty rows would appear
– Bug fix: cosmetic fix when the list would be empty
Windows:
– Fixed ugly icons
– Added option to left click trayicon and send a WOL to the default server
Linux:
– Option to invert tray icon (eg. Dark dock with not dark theme)
– Bug fix: Settings window can now be moved around
– Bug fix: Updated support for reading arp cache (arp being replaced)
2.0.1 – A MacOS only release which addresses a MacOS specific bug with the Auto Quit function.
2.0.0 – Initial release of miniWOL v2.
Installation
Installation of miniWOL is straight forward.
miniWOL for Windows
To install miniWOL, simply double click the setup file and follow the instructions.
miniWOL is a 32 bit application, which means it should work on any Windows version, starting with Windows XP and up.
Windows Defender – False Positive
UPDATE:
Microsoft confirmed this to be a false positive and has updated this in Windows Defender.
If you still get this message: make sure Windows Defender is up to date.
Windows Defender, depending on the virus definitions on your Windows computer, may flag miniWOL as either a Potentially Unwanted Program, or even as a Severe Virus Infected.
This is unfortunately a false positive, and after review by Microsoft’s Defender Team, the virus definitions have been updated.
If your Windows is still giving a false positive, even after updating the virus definitions of Windows Defender, then follow these steps.
- Open command prompt as administrator and go to directory Windows Defender directory as such
cd "c:\Program Files\Windows Defender"
- Run
MpCmdRun.exe -removedefinitions -dynamicsignatures
- Run
MpCmdRun.exe -SignatureUpdate
If this does not work, then please report in the comments below.
Tip: if you run into situations like this, then you can always try to scan an application or file with the free online Virus scanner at VirusTotal, which uses a ton of virus scanners all at once.
For MacOS X, this has been tested with Mac OS X 10.13 (High Sierra) and 10.14 (Mojave) and supports the Mojave Dark Theme and accent colors, but I suspect it will work on any Intel based Mac running a 64 bit MacOS X. The application is 64 bit and signed.
Sorry – PowerPC is not supported.
Installation is straight forward; Simply double click the DMG file that you just downloaded, in order to mount it, and drag the miniWOL applications to the “Applications” shortcut. That’s all.
At first run, your Mac may request access to system events – miniWOL uses this to add or remove itself from Login-Items (eg. Auto starting miniWOL at login). It is recommended to click “OK” here. Clicking “Don’t Allow” does not prevent miniWOL from working though, but it won’t be able to add itself to the Login Items.

miniWOL – Access to System Events
miniWOL for Linux (64bit)
Installation for Linux is just a matter of extracting the targ.gz file, and move the miniWOL executable to where-ever you’d like it. I’ve included some icons incase you’d like to use those. The application is 64 bit, so this will not run on a 32 bit system.
Note: Since there are numerous Linux windows managers, the miniWOL icon may or may not appear in the menubar at the bottom (or top, or wherever you have it) menubar. I’ve tested this successfully with Linux Mint, but your milage may vary. On Mint support for Dark Theme seems to work, however when changing theme you may have to close and reopen miniWOL to benefit the effects.
Your Linux distro will need to support so called TrayIcons (for example GtkStatusIcon), which is the reason why miniWOL will not work on, for example, ElemetaryOS without installing one or the other Tray tool (like for example Trayer).
For the QT5 version one will need to install libqt5pas1:
1
2
| sudo apt-get update
sudo apt-get install libqt5pas1 |
Configuration
miniWOL looks and behaves almost identical across all 3 platforms; an icon is added to the SysTray (Windows) or Menubar (Mac/Linux).
Clicking the icon will popup a menu (Windows users: only right click will work) where you see the servers you defined, and a few functions.
The option “Execute All Auto WOL’s” sends a Wake on LAN to all devices, set as “Send Wake On LAN to this device when miniWOL starts” and that are “enabled”. More about this later.
Clicking one of a device/server will send a Wake On LAN to the selected device.
The function “Quit” is obvious, and so is the option “Settings“.
Settings – Define Devices and Behavior
To define your devices (or servers), choose the option “Settings” to then see a window similar to these screenshots (top to bottom: MacOS, Windows, Linux) – of course your list of “Network Devices” will initially be empty:

miniWOL2 – Settings for MacOS, Windows and Linux
Let’s go through the elements you see in this window.
Note: Clicking the “Tweaking4All” logo will bring you to this webpage.
We see a few checkboxes in the top right corner:
Show usage hints, when checked, shows those little hint balloons explaining what a button, checkbox, etc is supposed to do.
Show Notifications, when checked shows a notification when a Wake On LAN signal has been sent, and mentions to what device this was sent.
Your Network Devices
Next we see 2 sections; Network Devices and Selected Network Device Details (the latter only visible when a device is selected in the Network Devices list).
Under the Network Devices list, we see a few buttons, that are probably very obvious;
Add so we can add a new network device (a network device can be any network enabled device that can receive a Wake On LAN signal),
Sort so we can sort the devices alphabetically,
Arrow Up ( ) to move the selected device up in the list (position in the popup menu),
Arrow Down ( ) to move the selected device down in the list,
Remove to ehm … remove a device, and finally
Clear to clear the entire list (remove all devices).
So when you start miniWOL for the first time, click “Add” is probably one of the buttons you use right away to add a network device.
For the impatient …
Quick start:
- Start miniWOL
- Click “Settings“
- Click “Add“
- Type a name in the “Alias in menu” field
- Click “Arp List” and select an IP address (MAC address, Port and Broadcast address are filled in automatically)
- Click “Test“
Device details
Once you’ve clicked “Add” you’ll see section Selected Network Device Details become visible with its default data populated.
- Alias in Menu – This is what the server name will be in the menu when click miniWOL in the Systray (Windows) or Menubar (Mac/Linux).
- IPv4 Address – This is the IP address (IPv4) of the network device.
The buttons next to the 4 fields are there to assist;
The “Paste” button will populate the fields if you copied an IP address from somewhere else (in the 123.123.123.123 format).
The “Arp List” will pull IP addresses from Arp (Address Resolution Protocol), in short; some of the IP Addresses your computer has already seen on the network. Which means not necessarily all IP addresses in your network, but it may save you some typing.
- MAC Address – MAC address of the targeted server.
Here again 2 buttons that can make life easier;
The “Paste” button allows you to paste a Mac Address that you copied from else where (in the 12:12:12:12:12:12 format).
The “Detect” button where miniWOL will try to detect the MAC address of the device at the given IP Address.
- WOL Port – The UDP port used for Wake On Lan (typically: 9).
The “Default” button will set this to “9”. Some devices prefer “7”, and sometimes see port “9” as a shutdown command.
- Broadcast Address – The subnet mask for that section of the network you’d like to broadcast to (default: 255.255.255.255).
The “Default” button will set it to “255.255.255.255” – stick with the default unless you know what you’re doing.
- Send Wake On LAN to this device when miniWOL starts – When checked a WOL signal will be send to this device when you start (or autostart) miniWOL. This is indicated in the “Network Devices” list with the “[Auto]” text next to a device name (not shown when the device is disabled) – see figure 3 for an example.
- Send Wake On LAN to this device after Wake up from Sleep – macOS only – This will send a WOL signal to this specific device after you computer wakes up from sleep.
Great for users with computers that rarely reboot (eg. laptops etc). This will be indicated in the menu and devices list with ‘[Wake]‘.
- Enabled (show in Menu, and Auto WOL) – When checked this device will show in the popup menu.
When not checked, “Send Wake On LAN to this device when miniWOL starts” will not be execute when miniWOL starts.
Disabled devices will show “[Disabled]” net to the device name in the “Network Devices” list – see figure 3 for an example.
I included this so you would not have to remove (and loose settings) for devices you temporary would not like to see in the menu.
- Test – To make sure your settings work, this button sends a Wake On LAN to this device.
Auto Start and Auto Quit
The only thing we have left now is 2 checkboxes and 2 buttons;
Auto-Start miniWOL – When checked, this will add miniWOL to the startup or login items. So when you start your computer and login, miniWOL will start right away, and the devices marked as “Send Wake On LAN to this device when miniWOL starts” wil receive a Wake On LAN message.
Auto-Quit miniWOL – This is a tricky one. The intend is to start miniWOL, send Wake On LAN messages to the devices marked as “Send Wake On LAN to this device when miniWOL starts“, and when done, close miniWOL so it’s not taking up system resources.
Obviously this can be a problem, after all; how will you get to the settings to make some changes when miniWOL closes before you get there?
This is why miniWOL will stay running for an additional 10 seconds before it closes down. This may give you enough time to open the settings. Once the settings window opens, the timer will be stop and miniWOL will not close automatically.
Did you miss the 10 second window? Simply start miniWOL manually and try again.
Quit vs Hide miniWOL
Quit miniWOL – Kind-a obvious of course, this will terminate the application (settings are saved automatically).
Hide miniWOL – This will close the settings window, but miniWOL will remain active (icon in SysTray or MenuBar).
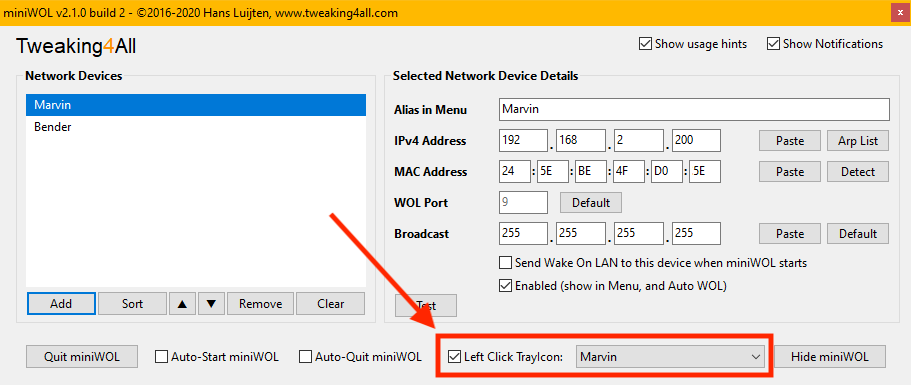
Windows Specific: Left Click option
Windows users have the option, to left click the TrayIcon, to quickly send a WOL to a default defined server.
This is optional and needs to be enabled and the user needs to set a desired default server.
Note: MacOS and Linux, at the moment anyway, will not allow me to do something like this.

miniWOL Windows – Enable Left Click
When this option is enabled, hovering over the system tray will reveal what the name of this default server is:
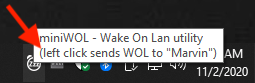
miniWOL Windows – Server targeted for Left Click
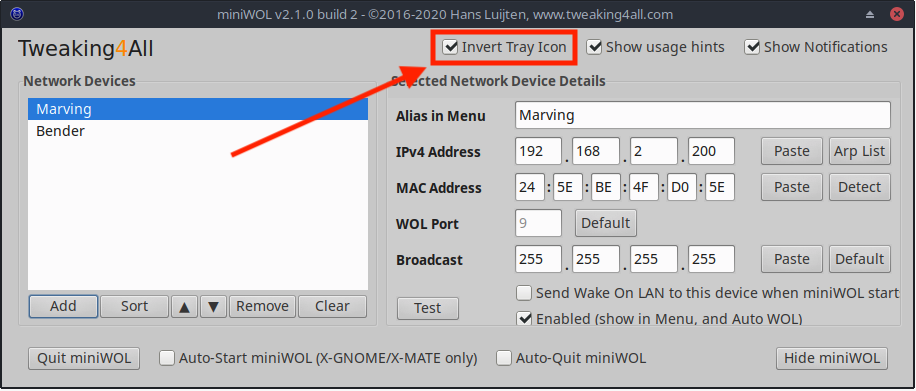
Linux Specific: Invert Dock/Tray Icon
Linux users have the option to invert the tray icon. This is convenient when using a normal (not dark) theme, yet having a dark dock.
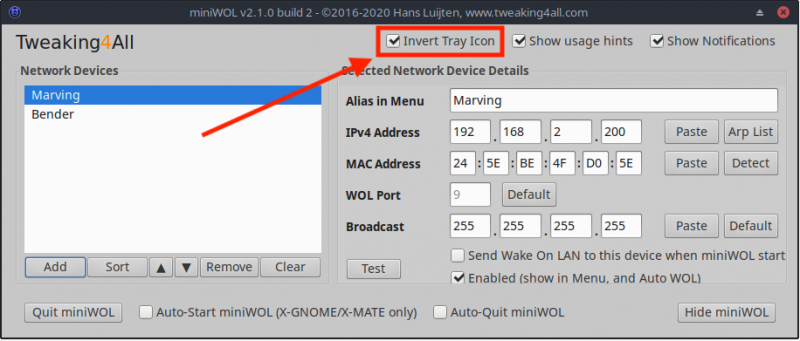
miniWOL Linux – Invert Tray Icon
Copy Configuration files to other computers
With the previous version, one of the users asked if it was possible to copy the settings to another computer, so I figured I’ll clarify this here.
Yes, settings can be copied, even amongst other platforms (for example MacOS to Windows), since they are stored in so called “ini” files. The “ini” can be located here:
- MacOS X:
/Users/<username>/Library/Preferences/miniWOL/miniWOLPreferences.ini
- Windows:
C:\Users\<username>\AppData\Local\miniWOL\miniWOLPreferences.ini
- Linux:
/home/<username>/.config/miniWOL/miniWOLPreferences.ini
Note: Make sure to close miniWOL on both machines before copying the “ini” files.
Uninstalling miniWOL
miniWOL is relatively easy to uninstall, and doesn’t leave much “junk” laying around …
- MacOS X: Move the miniWOL application from your “Applications” folder to the Trashcan.
Next, delete the directory /Users/<username>/Library/Preferences/miniWOL
- Windows: Run “Add/Remove programs” in the Control Panel, locate “miniWOL” and click uninstall.
This will remove the configuration file as well.
- Linux: Delete the miniWOL application, and icons if you used them.
After that delete this directory: /home/<username>/.config/miniWOL


Comments
There are 111 comments. You can read them below.
You can post your own comments by using the form below, or reply to existing comments by using the "Reply" button.
Note for MacOS users and miniWOL 2.0.0;
The Auto Quit function does not appear to work as expected.
I’m working on resolving this bug.
hans
This bug should now be resolved in version 2.0.1 (MacOS only).
hans
It works like a charm. Thank you so much.
I just love this little tools that make life easier and don’t want to be noticed all the time.
Nikolai
Awesome!
So glad to hear that, and thanks for testing!
Merry Christmas!
hans
You present a potential scenario of waking up a device over WAN but that this requires some trickery including, but not limited to, port forwarding.
I run an FTPSE server on an iMac and because traffic is low enough I would love to just sleep the Mac and see it wake up when a connection comes in.
Other than the WRT article is there another site you can point the curious too?
Thanks for all the effort you put into this software, it’s a real treat!
Alex Santos
Thanks Alex
I have yet to setup an FTP server and have it wake up with WOL, so it will be a guess for me as well.
First thing I’d try, since you’re using a Mac, is see if “Wake for network access” is available in the “Energy Saver” option in the “System Preferences” of your Mac.
I’ve honestly never used it, but it kinda sounds what you may be looking for (if it works). I assume you already have port-forwarding setup for this.
Alternatives … hum, well you could assign a specific port for WOL on your router/modem and set this port for WOL in miniWOL. Not sure if that will work though – I have no experience with that.
As an alternative to DD-WRT, you could setup a pfSense firewall – but I’d guess that would defeat the purpose (since it requires a small PC to run).
If you have a suitable modem, using AsusWRT (for these Asus models, or XWRT for Netgear R7000 routers) would be an alternative as well.
Personally I’d start with port (ports 7 to 9) forwarding – your Mac would need a static IP for that.
See this SuperUser discussion, and this article by Phil is very informative as well.
If you found a good solution, please let us know
hans
Does miniWOL show anywhere whether or not each network device is currently awake?
James McLean
Hi James,
interesting idea, but nope … miniWOL does not show if a Device is already awake.
I do like such a feature though, but I’m afraid it would generate a lot of network traffic, pinging each device over and over again.
I doubt there is an elegant mechanism for this, but I will take a look and explore my options.
hans
UPDATE for MacOS users
miniWOL has now been notarized (Catalina requires this).
If you’ve downloaded v2.0.1 before, please download it again.
hans
Thank you for this free WOL download. Works great!
Martina
Hi Martina!
Thank you taking the time to post a thank-you note! It’s very much appreciated.
I’m glad the tool is working for you as well
hans
Hello and thank you very much for this great tiny app!
Would it be possible to add a feature to shutdown the NAS with your tweak?
Thank you!
FredZeNoob
Hi FredZeNoob!
Thanks! Glad you enjoy it!
Well, shutting down is a little trickier. Not so much for my application, but more so for your NAS.
I could send a signal to your NAS, but most NAS devices that I know, do not recognize that signal.
Your NAS would need to have that feature, or have a tool like Sleep-on-LAN installed – but most do not support this.
Since this protocol is not really standard, it’s hard to see what should be implemented (magic packet format and port number).
hans
[…] See also: miniWOL v2 – Quick and Easy Wake On LAN Utility where you can also find more information on how Wake On LAN […]
Hi, it is a couple of times that I try to download the miniWOL 2.0.1, but after downloaded I receive an error message when opening the dmg, it says no activatable file system.
All on OSX 10.11.6
Antonino
Hi Antonino!
Sorry to hear you’re running into issues. Your MacOS version is quite old, and I do not have the means to test it.
Most likely, you’ll need to upgrade to a newer MacOS (if possible).
Is this the exact error message? I couldn’t find any reference to it either
hans
Hi Hans, I use miniwol for a long time now (we had a discussion some time ago). I use it on Windows and on OS X Mavericks in v1.2 and it runs fine! I upgraded from Mavericks to High Sierra now and v1.2 still RUNS FINE on an old iMac from 2010.
BUT I just downloaded v2.0.1 on another macOS High Sierra Macbook pro (old one from 2011). This version seems laggy. Also, I have to click buttons twice to make them work. Is there an option to DOWNLOAD THE OLD VERSION 1.2?
What is your paypal adress so I can set up a small yearly donation? Thanks for your work!
(I would also be interested in getting the SOURCECODE and would like to know which IDE you use to maintain it. If that’s possible. It would be a good thing to practice since I am doing some programmers courses right now. If not it I would perfectly understand and this is no issue. :))
Ben
Hi Ben,
the old 1.x version can still be downloaded (see the original article).
On that note; For security reasons I would recommend switching to a newer macOS version if you can (obviously depends on your hardware and if Apple supports that hardware).
You can make paypal donations with this email address: hans at luijten dot net.
As for opening the source code; I’d rather not release the code. I’m a little code shy.
The application has been developed with Lazarus Pascal, an environment that shares similarities with Embarcadero’s Delphi.
It is super easy to install, totally free, and can be used cross platform (for example: Linux, Windows, macOS, etc) and based on the Free Pascal Compiler (FPC).
Note: Delphi can be had free as well (the Community edition), however it is limited when compiling for other platforms, but the commercial ($$$) version does add iOS and Android support, but lacks Linux GUI applications.
Using Lazarus Pascal to get started with programming may or may not be the best way to start.
I consider Pascal the best language to learn programming, and since I really like the language, I also use it to develop all my applications.
There is also a great support forum if you have questions (and feel free to approach me through the Tweaking4All forum if you have question).
Now, not everybody will see it the same way. Some will say that a language like any of the C variants, JavaScript, Python, Java or Swift are “better”.

I honestly do not agree with that though. C is quite similar to Pascal, just a slightly different notation, and Pascal is stricter (less options to make a mess of it).
Java and JavaScript inherited a lot from C, so if you know C, switching to a another C variant, Java or JavaScript may be easier.
Python on the other hand, even though quite popular and quite often used, would not be my beginning language.
Most of these (just my opinion), seriously lack a good IDE for RAD (Rapid Application Development) in which a beginner can easily create a GUI.
I tried 13 different languages before I decided Pascal was the route for me, so it is a personal preference and “what you’re used to”.
Also interesting note: Yearly the most popular languages are being presented, but it seems the number for this are based on the number of questions … in my opinion not the best way to measure this. To me it says: The language where users have the most questions. Which is not the same as popularity.
Whichever language you choose: if you like the language, then that’s all you’ll need, even if it’s not Pascal.
Hans
Hans, thanks for your comprehensive reply! I changed from Mavericks to High Sierra already. More is probably a bit too much for the old hardware. Since I worked with Mavericks that long and did not have any security troubles at all I don’t care. :) I am really excitet, though, that 10 year old Apple hardware is working so well with its updated OS (of course I put in SSDs for HDDs).
I used to program in Turbo Pascal when I was 14, that is 25 years ago. :) I learned some good ABAP (SAP) and Java in the last year with professional courses. That was deep. Superficially, I looked into JavaScript and C++ and also Bash. I had a job interview this week where they told me they use Delphi (no definite answer yet, they seem to always be afraid I will go for their management job in the long run.). Since I do not have any experience in that I find it really interesting that you come up with it now. So I will check out Lazarus Pascal and the Delphi Environment. Thanks again and have a sunny weekend!
Ben
Yeah, Apple hardware may be “expensive” but it sure lasts …
I do not consider it expensive though. When I was working under Windows, I wanted to get a new computer at least once a year, where as now that I’m using Mac’s this has become every 4 or 5 years. Amazing quality!
As for running older macOS versions: if you’re careful this shouldn’t be a problem. The problem you may run into is that more and more applications will no longer be available for older OS versions. I’m thinking about 32 vs 64 bit, signing and notarizing applications, Carbon vs Cocoa, etc. For me as a developer it is just a lot of work to deal with that. So I’m typically sticking to the last 2 OS versions (Mojave and Catalina).
I’ll keep my fingers crossed for your job application!
I know it can be rough out there (I’ve started looking as well).
Hans
Oh and have a great weekend as well of course
Hans
Yeah, Windows is designed to make hardware obsolete. It is a cartel between hardware manufacturers and software manufactures. I expected Apple to develop in the same direction but they did not yet do it this much. Maybe it’s also because Linux was challenging Windows during those last years so much that Microsoft decided they went too far and Apple did not want to make the same mistake. Yes, I updated from Mavericks mainly because some Software was not usable, for example Eclipse, which I needed for my Java course.
Ben
Haha it sure feels that way – I think the gaming industry makes it even worse.
I don’t think Apple will go that exact same route though, then again; they have been clear in what older hardware they no longer support (iOS and macOS).
Due to their “standard” hardware, Mac’s keep running, where Windows tried to support everything and things become more of a mess.
If my Mac hardware ever becomes outdated, I think I may consider running a Linux variant on it (right now I do like LinuxMint).
Hans
So, I registered to the forum now. Is there an option for private messages? Otherwise I will just post my question here: I run High Sierra and tried to install Lazarus. I did not install Xcode because I got the impression I did not need it (and it is probably messy to install because of my outdated OS). Xcode command line tools are installed (probably standard). I also have homebrew running. I did install Lazarus via download, not with fink (considering doing it with fink now). I also installed the Free Pascal Compiler from the download (version …a) “successfully”. But Lazarus does not find the compiler under `/usr/local/share`. I do neither. Is there another place to search? Running `find` did not bring anything up.
Btw.: I run multiple-boot systems on my macs using rEFInd as bootmanager. It is working well. Although I just use macOS now I would still be able to run Linux or Windows if I needed. So if you want to set it up already now, you could (If you didn’t know by chance).
bvrulez
Private messages is an option (on all pages: in the top right corner you’ll see a “User Menu” where you can select “Messages”).
However … the private messages a very crude and limited (and I’m considering removing this option somewhere in the future), so posting your question in the forum would be the best option (even though the forum isn’t all that great either – still looking for a replacement) especially since its off-topic.
As for your question: You must install XCode and the Command Line Tools from XCode.
I know it it feels messy, but that’s unfortunately what we need to do since it includes SDK files and some command line tools we must have to develop anything on a Mac.
In my experience, using Fink or HomeBrew or something like that comes with unwanted (IMO) complications, so I personally avoid those on my system.
Besides losing sight of where what is going, I also noticed that these (otherwise great) tools sometimes install for example libraries, that I may find missing when distributing applications.
Installing Lazarus has to be done in a certain order;
You can download the standard setup (32bit – since you’re not running Catalina, this would work) or the newer 64bit (required for Catalina, and recommended for all others – link). I recommend the 64bit version, since this will create applications that can run on all recent macOS version, not sure as of what version of macOS though, but I’m guessing at least as of 10.13 …
When compiling for macOS, I do recommend using the “Cocoa” widgetset – Carbon is an option as well, but Carbon is abandoned by Apple, and replaced with Cocoa. So using Carbon would be setting yourself up for future issues.
p.s. feel free to email me at webmaster at tweaking4all dot com. Posting in the forum however would be prefered, so others can read and learn from it as well.
Hans
Thanks a lot, that helped since I was just missing the sources. I will find out how far I get without Xcode for starters. :) Also, I got the job from the interview on monday. :)
bvrulez
Awesome x2!!!
Congrats on the job!!!
Hans
So I changed the job zwice already. :) But it seems there are not so many developer jobs where you actually do something usefull. :) But anyway, the reason for commenting: I accidentally deleted all my entries in Windows 10 by clicking on “clear” when I just wanted to “remove” one of the entries. This is not a good thing. Maybe you could add a dialog box for okaying this before actually proceeding with the clearing of all items. Have a nice day.
Ben
Hi Ben!
Yeah, finding a job as a developer comes with its challenges.
As a former CTO, I had the hardest time to find good developers when you need one.
But when looking for a developer position yourself, you’ll find it a pain to find a good one as well haha.
P.s. I recommend going through a headhunter/recruiter – they are much better at finding a good position.
Anyhoodles, coming back to your comment:
Oh my … that is not good – I’ve added the confirmation right away (when clicking the “Clear” button).
I’ll try to release that version in the next few days (still have a busy schedule for today).
Thanks for the heads up! It’s much appreciated.
Hans
[…] MiniWOL ist eine dieser Softwarelösungen und für Windows, MacOS und Linux verfügbar. MiniWOL ist kostenlos. Vermutlich ist die Freeware nur für Personen nützlich, die zahlreiche Geräte über Wake on LAN aktivieren möchten – oder für diejenigen, die eine grafische Oberfläche bevorzugen. Ich habe miniWOL eine Weile ausprobiert und kann die Software weiterempfehlen. Einfach zu konfigurieren und einfach zu bedienen. Wie gesagt: Ganz Nische, mit einem Skript kann man alles machen. Aber vielleicht ein wertvoller Tipp für Ihre Toolbox. […]
[…] This is an old version … please use miniWOLv2 […]
The opportunity marking a network device as default to start it with left click or double click on tray icon would be nice (for next version).
Klaus
Hi Klaus,
I’m sorry, but I do not quite understand what you are suggesting (maybe I need more coffee – it’s still early here)
Right now, clicking the tray icon brings up the menu with your WOL devices, which you can select there right away?
Hans
Hi Hans,
a leftclick does nothing in Windows 10, a rightclick brings up the context menu with all devices. So it would be easier to start a predefined device when doing one leftclick.
regards
Klaus
Ah, OK, now your previous message makes sense to me – apologies for not catching that right away.
I will add this to my To-Do list, seems easy enough even though this will not work cross platform.
Example: under macOS, left click will open the menu, right click is not an option.
Let me see what I can come up with
Hans
Many thanks and wish you good new week.
Klaus
Klaus
Thanks Klaus ! You have a good week as well
Hans
Implemented your request – hope you like it
Hans
Sure, I like it!
It’s a further step to a perfect minitool!
Thanks again
Klaus
Awesome!
Let me know if you run into issues (I do not use miniWOL myself – I no longer have a need for it).
Hans
Hi
Im using WOL since several years. Now with the V2 is there any options to fill the IP with the hostname – Im using dyndns so the public IP changes every month, so i cant fill Ipv4 up with an IP – like in the V1?
Thank you
Phil
Hi Phil,
v2 indeed dropped the support for a server name (versus IP address).
Mostly because this did not work reliably in most scenarios.
On that note: WOL over the Internet has a ton of problems as well. It is not impossible, but there are quite a few hurdles to deal with, even up to ISP’s not even letting WOL packages through.
Did you ever have that working?
You could try editing the INI file manually, after adding a dummy server, and overwrite the IP address with the machine name instead.
As soon as you open the preferences of miniWOL, you’ll probably lose that name again.
The INI file is located here:
You’ll be looking for the “Address=” line.
No guarantees this will work though.
I’ve taken note of your request, so I’ll try to implement this with a next release.
Hans
Note: Just looking into implementing this for you.
And I had forgotten why I changed it in the first place.
Wake On LAN relies on the Mac address and not the IP address.
So it would not be useful to use the device name and the IP address is only used to help find the Mac address.
Sorry
Per the Wake On LAN Wiki page:
Hans
UPDATE:
I’ve released a new version of miniWOL, with the following changes:
For all platforms:
– Added confirmation dialog when clearing all entries
– Build number visible in menu and settings window
– Bug fix: at first start, occasional 3 empty rows would appear
– Bug fix: cosmetic fix when the list would be empty
Windows:
– Fixed ugly icons
– Added option to left click trayicon and send a WOL to the default server
Linux:
– Option to invert tray icon (eg. Dark dock with not dark theme)
– Bug fix: Settings window can now be moved around
– Bug fix: Updated support for reading arp cache (arp being replaced)
Hans
Hi
A small point: Under Big Sur with a dark menu bar the icon for MiniWol is invisible. All other menu bar icons switch to while, but MW stays black. It still works perfectly (if you can find it)
J
James
Hi James!
thanks for the notification! At least I know now that folks actually use miniWOL
I do have a solution, which I have applied to one of my other applications. It is currently being tested.
As soon as I know the fix works, I will update miniWOL right away as well.
Hans
I just uploaded v2.1.1 for macOS, which addresses the Big Sur icon issue.
Please let me know if this works correctly on your system
Hans
UPDATE for macOS:
To accommodate the new transparent system wide menubar in Big Sur, I’ve released (just for macOS users) version 2.1.1.
Hans
Hi Hans
Yes, that fixed it.
Brilliant support, thanks so much
James
James
Thanks James and you’re most welcome
Hans
Hi Hans,
Very clever product – I am a total novice with computers, but I found your software in order to work alongside ShareMouse virtual KVM. Essentially, I am running one PC laptop and one Mac laptop on two ultrawide external monitors stacked one on top of the other. I use ShareMouse to navigate between the two machines virtually and both laptops run in closed mode behind my desk. The problem is I use the PC more and the Mac tends to go to sleep and cannot be woken up remotely by ShareMouse. I wanted to use your software to remotely wake up my Mac when this happens rather than go around my desk open the Mac and physically hit a key. I have already adjusted the sleep preferences, but don’t think its a great idea to extend to multiple hours etc.
I have configured your software over the same LAN (through my wireless router) on both machines, but I cannot wake the Mac up. Are you able to assist in troubleshooting or point me in the right direction? I don’t think there should be any basic networking issues as ShareMouse is already communicating with both machines over the LAN without issues, but again I am a novice.
PC: 2019 Surface Laptop 2 with Windows 10 Home
Mac: 2017 MacBook Pro with MacOS Big Sur 11.0.1
Ryan G
Hi Ryan,
thank you very much for the compliment – it is much appreciated!
Pretty sweet setup you have there! I’m in the same boat and use an actual KVM for the same purpose ( this one at Amazon.de, or this one at Amazon.com). It supports HDMI and USB-c, and comes with a separate switch so all the wires and the KVM are hidden.
Anyhoo; coming back to your problem, I’ll just start with the basics:
1. Did you set Wake On LAN on your Mac?
Go to System Preferences -> Energy Saver -> check “Wake for network access”.
Theoretically your Mac now has Wake On LAN enabled.
Alternatively you can do this in Terminal (I’d recommend using the system preferences though):
– Check if Wake On LAN is on with the following command, the output has a line that says “womp” which is followed by a zero (Wake on LAN OFF) or a 1 (Wake on LAN ON)
– Set Wake on LAN from command line is done as such:
2. Check if the Wake On LAN port is set to “9” in miniWOL, if that doesn’t work, you can try port “7” as well – but by default this should be port “9”.
Let me know if this still doesn’t work, then I’ll try to setup what you have and do some tests.
Hans
Hans,
Thanks for the quick reply.
I have used physical KVMs in the past at work and generally did like them. However, in my home setup both monitors are 5K resolution which leads to needing a pretty expensive KVM option…I also like the idea of seamlessly moving the mouse to the other computer virtually so wanted to give it a shot.
It seems the “Wake for LAN” setting in “Energy Saver” is now a new setting in Big Sur which is known as “Wake for network access” and is found at System Preferences>Battery>Power Adaptor>Wake for Network Access. I do have this feature enabled and have tested both ports 7 and 9.
For troubleshooting purposes, when I hit the test button from the PC I get a pop up window in the top right of my screen indicating the software has attempted to wake up the Mac. Would I see any feedback on the Mac side if it was awake? I ask because it would speed up troubleshooting to not have to put the Mac to sleep over and over again to troubleshoot.
Is there any tests I should run while both computers are awake to confirm the ports are open and listening between both machines? Some type of ping command etc. to ensure it’s not a silly network/firewall issue (if that could even be the problem…)?
Ryan
Hi Ryan,
Just for reference: for those interested, more info can be found in my Wake On LAN article “how to enable WOL under macOS“.
As for feedback from the Mac: a WOL magic packet is only send to the target computer. No reply is returned.
I guess this does make sense since this is not part of the WOL protocol, probably because it differs per machine how fast it wakes up?
So to see if a packet actually arrives you’d need a network packet sniffer like WireShark which can be quite cumbersome.
I did find one specifically for sniffing WOL packets, but only for Windows – I haven’t found one for macOS
With some machines I have noticed that putting the machine to sleep takes a little, almost like you need to let the machine settle before WOL even works. However I’ve done some testing with my Mac Pro, but even after waiting for 30 seconds, using port 9 and 7, I could not get my Mac to wake up.
While testing I noticed a small bug in the Windows version (detecting the Mac address), so I’ll release an update soon – this will not affect your situation though.
I’ll keep looking into this to see how to wake up a Mac … unfortunately, Googling “wake in lan port mac” results in pretty much anything wake on LAN, since it uses the “mac” address
Hans
Note:
I’m doing some testing with WireShark and I can see magic packets arrive from my virtual machine to my Mac.
The weird thing is though that sending a magic packet from my laptop (ethernet wired to the same switch!) never arrives.
-> I’ll be doing some more research why this happens.
Tip: If you decide to give WireShark a try
1. Download WireShark for macOS and open the DMG
2. Drag “Wireshark” to Applications
3. Run “Install ChmodBPF.pkg“
4. Run “Add Wireshark to the system path.pkg”
When done, do not delete the Wireshark.dmg!
There are two scripts in there to uninstall step 3 and 4 – Wireshark itself can be dragged to the Trashcan when uninstalling. (all this assuming you’d want to remove Wireshark when done with all this)
Now open Wireshark, and select the network interface you’d like to use (on my Mac this was en1, but this could very well be different for your Mac).
Best is to use Ethernet for WOL, but some routers/Macs could support WOL over WiFi.
Now at the top of the Wireshark window you’ll find a box that says “Apply a display filter …”.
Here you simply type “wol” (without the double quotes) and press ENTER. It will now only show WOL magic packets that arrive at the selected network interface.
Hans
Never mind: sending a WOL from my laptop (port 9) now arrives at the Mac as well – I goofed up with the port number.
Wireshark does not seem to see port 7 as a WOL port and expects this to be port 9.
Hans
Very cool that you’re willing and interested in digging into this.
So Big Sur seems to allow Wake for Network Access and the magic packet is arriving when sent over from the PC, but the machine is still not waking? Wondering if Mac is only allowing this feature from other apple devices so that you could say remote into your MacBrook Pro from your iphone.
I will mention that when I asked the ShareMouse developers if their software could wake up my Mac just through ShareMouse, they mentioned that they were not currently aware of anyway to do this so you wouldn’t be the first team to run into the problem. So this may be a known issue/tough problem to solve. With that said, if you solve it you might be one of the first!
Ryan
Oh you’re most welcome – Anything to help users and make the application better!
Since the topic gets a little out of hand for the comments section, due to my own lengthy text, I’ve started a forum topic in the MacOS Software forum.
Hans
Sorry for the delay – I am waiting for my forum registration email to go through and then will post in the proper forum. As a quick note, I was able to replicate your command prompt of caffeinate and achieve the same results…it will now wake my Mac remotely from my PC. So on one hand you have solved my problem, but on the other I agree it would be much much cleaner if I could just right click on the MiniWOL icon on my PC and have this behavior mimicked when I select my Mac under network devices to wake up. I tried creating a Macro on my keyboard to just run that command, but it’s getting hung up on inputting the password once cmd is open. Regarding the ShareMouse test…agree this doesn’t work as ShareMouse drops the connection between the two machine when one goes to sleep (you can see the ShareMouse icon change as it happens).
Ryan
No hurry
I found this an interesting thing to explore.
I’ll wait until you get into the forum – usually you’ll get confirmation right away, so either something went wrong or maybe it ended up in your spam?
If not: please let me know so I can help you get going!
Hans
Windows Defender – False Positive
Windows Defender, depending on the virus definitions on your Windows computer, may flag miniWOL as either a Potentially Unwanted Program, or even as a Severe Virus Infected.
This is unfortunately a false positive, and after review by Microsoft’s Defender Team, the virus definitions have been updated.
If your computer flags miniWOL as well, then please follow these instructions to update the Windows Defender virus definitions.
Update for Windows
Unfortunately, a tiny bug snuck it’s way in the Windows version for when trying to detect the MAC address. In 2.1.1 build 3, this has been resolved.
Hans
I would love to easily use your app as “portable version” without the need for installation.
Is there a way to do so? Or does the developer have any plans in supporting that in the future by chance?
Tom
Hi Tom,
miniWOL for Windows (I’m assuming you’re referring to Windows) doesn’t have any special requirements, so it should be able to run standalone.
The only thing is that INI file needs to be stored in
If you’re using PortableApps (I used to use this when I still worked on Windows computers), then a special directory structure needs to be made.
From what I remember is that PortableApps does have the option to temporary copy the config file to the correct location, and copy it back to your USB stick when the application is closed.
This would potentially make it work for miniWOL.
However, I’ve spend about an hour now trying to make a PortableApps version for you, but it is taking quite a bit of reading to create a setup for this.
See more about the details here – it’s quite a lot of work.
I’ve created some new icons for this, edited some of the INI files, until the point that I got totally confused about what needs to be done.
If you’re using PortableApps, and if you’re willing to help, then let me know …
I sure could use a hand making that one. Too bad there is no “PortableApps generator” (or is there?).
Hans
Hi Hans,
yes, I’m using Windows. But I don’t use the PortableApps system/launcher. I know that it’s common and many people use it for various kind of tools, though.
I just use most of the apps I use in portable mode. Some happen to be from their platform, many not however.
Moving the ini file to a particular location on the pc you want to use the app from is not really an option as that’s not always possible and can be tedious if you happen to switch devices more often. You don’t always have the rights to run the installer in the first place. If the ini could be read from the app folder itself that would be cool. If there are no other requirements you could simply provide everything e.g. packed as zip maybe?
Greetings
Tom
Hi Tom,
storing the INI file in the same location as the EXE used to be the way to go.
But in their infinite wisdom, Microsoft won’t allow you to save files in the EXE directory when it is locate in C:\Program Files as of Windows 7.
So the developer is forced to save the INI file elsewhere (usually C:\Users\<username>\AppData\Local\).
I’ll have to do some experiments, maybe as simple as a checkbox with “use in portable mode”, and on startup have miniWOL check the EXE directory first for the INI file.
I’ll try and see that I find some time to experiment with that.
If I get this done, then I’ll make a ZIP file available for sure.
Hans
Hi Tom,
I’ve created a portable version, just the EXE in a zip file. You can find it here.
Give it a try and let me know how that works for you.
Note:
The application will detect if it is started from a standard program file location (somewhere in %PROGRAMFILES%, which would typically be C:\Program Files(x86) for a 32 bits application).
If this is the case, the default preferences location will be used (C:\Users\etc).
If this is not the case, then the preferences will be stored next to the executable.
I hope that made sense
Hans
UPDATE:
There is now a Portable version of miniWOL available for Windows users.
Hans
Very nice, Hans!
Thanks a lot for your very quick reactions and the even faster update to come up with a solution. Simply Great.
I like the detail, that the app tells you that it runs in portable mode. Hehe
Some notes:
– It would be nice to ask for confirmation when people are deleting entries.
– Did you consider update checks and offer to install new versions from within the app? Only a very small portions of users come here all the time to check for fixes and new additions. So most of your users will probably miss out…
– I’ve seen other apps combine both usage options (install + portable) in a single binary and let users choose between “regular install” and “portable mode” in
the setup. Maybe also an option here to only need to provide one download option for Windows.
Tom
Hi Tom,
You’re most welcome!

As for the “portable mode” in the application haha – I actually needed it for testing so I’d know my “logic” would work, to then realize it would be good for the user to see as well
– Asking for confirmation when deleting: Added it to my to Do list
– Update mechanism;
I’ve looked into that several times and there are few challenges with that, for which I have not yet found a satisfying solution.
Maybe I can display a notification when there is a new version available – what bothers me the most is that querying a URL in the application will potentially trigger errors when a website is not reachable (website down, no Internet, etc). I have to do some more experimenting with that so I can do this in a clean way.
On that note: Whenever there is an update, I do post a comment here. Those that posted a comment before and checked “Notify me”, will get an email that there was a new comment. Not ideal of course, but at least it is something
– Setup Normal vs Portable;
I have to dig into the setup procedure (Inno Setup) to see if I can make a script. This will take some time for me to get familiar with the scripting in Inno Setup. However, since the application is identical for both methods, one can select a different path to install (eg. USB drive or wherever a user would like to).
Since most of my apps can run portable, with the method I’ve used for miniWOL, I’ll probably do something with that in the future.
Hans
Thanx Hans for the tool miniWOL2 :-)
My problem: if I send the WOLcommand from my router (Swisscom iBox3) to the NAS Synology DS220+ the wakeUp starts rightaway.
But when cklicking ‘test’ in the miniWOL2 on my Lap Lenovo Yoga720 Win10 nothing happens.
Just to make shure, I did setup portforwarding from the router to the nas for the whol portrange 1-9, no success neither.
Any hints?
chris
Hi Chris,
Thank you for the thank you
Maybe I’m not quite understanding your setup?
I assume laptop and NAS are in the same network?
-> If yes: Port forwarding is not needed. Did you try using port 7 and port 9? I think Synology uses port 7 but I could be wrong. Also make sure that the broadcast mask is set to 255.255.255.255.
-> If no: WOL over the Internet most of the time does not work – this has to do with ISP’s not forwarding (for example) port 9 traffic.
Hans
Hi,
Unfortunately, I can’t get it running on Linux elementary Hera 5.1 (x64)
Some errors led me to install the following packages:
This does not seem enough: app still stalls on launch (nothing on screen) and syslog says:
Thanks for any advice.
macmpi
Hi Macmpi!
I’m sorry to hear you’re running into issue – thank you for reporting though.
I’m really not a Linux expert, but I’d be happy to see if we can get this resolved (my lack of mentioning dependencies isn’t helping either – apologies for that).
Did you try this:
It should list the dependencies.
Some libraries that may be needed:
(I’m running Manjaro in a virtual machine to test)
Please try those, and please, if you don’t mind, let me know which ones you needed, so I can list it with the setup instructions.
Hans
Thanks for quick feedback. It seems like I already have those matching dependencies as per below.
Seeing there is now a Portable Windows version, would you similarly consider building a self-contained Flatpak version?
(ldd output removed)
macmpi
Hi Macmpi!
Seems all dependencies are met.
Did you install the libraries I mentioned? I’m not sure how this GTK thing hangs together with the rest of the system, after all, I just recompile my application so it will be available under Linux, and test it with Manjaro and/or Mint (sometimes another distro).
As for using something like FlatPak; if they would offer tools to make it it easy, then I would.
I’ve spend the last 30 minutes reading up on it, and ,as with other package managers/tools, it is kind-a cumbersome.
My Linux experience is very limited, so I already get stuck at step 1 …
I’ll try to setup Linux elementary Hera 5.1, see if I can reproduce the issue.
Another thing I’ve been experimenting with is using QT5 instead of GTK, since GTK2 seems quite dated and does not always seem to work well with dark themes (depending on your Linux distro).
Note on the portable Windows version:
The only thing this version does (distribution is basically the same) is store the config file with the executable in case the executable is not stored in the standard program files location. So nothing else is needed under Windows (DLL’s and such).
Hans
Well, finally got ElementaryOS running in VMWare …
After installing, like you did, the application starts without any errors.
However … it seems that ElementaryOS dropped all support for GtkStatusIcon (for a while already – see this post).
The only fix I could get to work was to install Trayer (found in that same post):
The second line starts the application and shows a system tray which works under ElementaryOS.
Granted, this is probably not the most elegant method, but it works.
So I took the effort to compile a QT5 version of miniWOL (I’ll add it to the downloads in this article after posting this), in the hopes this would work, but nope … that one doesn’t work either since ElementaryOS does not support a tray icon for QT5 either (it seems).
Note : Situations like this, is one of the reasons why I do not use Linux as my daily driver yet
Hans
wow, thanks for investigating so quickly.
>Note : Situations like this, is one of the reasons why I do not use Linux as my daily driver yet
I just did take on that challenge, moving from a Mac (where I recently discovered your utility).
Just found that on tray icons for Elementary: may look into it when I can
macmpi
You’re welcome!
I’m always interested in learning more myself, so it was pleasure to explore this issue.
P.s. I’m a Mac user as well, and found Manjaro to be pretty slick.
ElementaryOS looks great too though, I just like how Manjaro supports more standard stuff.
Hans
>After installing, like you did, the application starts without any errors.
Did you get any window displayed on screen?
Have no errors on console, but no GUI window either.
macmpi
After I installed Trayer, a “tray” appeared in the lower right corner of my screen with the miniWOL icon on it (and one for network connections).
Clicking that one showed the menu, and I could access the settings.
Note: I found that it doesn’t matter if miniWOL was started before or after Trayer. Both worked, even though “after” would sound more logical
Hans
UPDATE
Today I have released an updated version for Linux. There is now a GTK version and a QT5 version. You can find them in the downloads section.
Current GTK version do not need to update, as only the version number has changed for the GTK version.
QT5 users: please read the instructions, since it requires “libqt5pas1“.
Hans
UPDATE for Mac users
Added the option to send a WOL after your computer wakes up from sleep.
Windows and Linux users: unfortunately, I’m not yet aware of a method to detect this.
MacOS offers an event registration option where the OS notifies the application.
I have not (yet) been able to find this for Linux or Windows.
Hans
UPDATE v2.1.3
I’ve made an update available for Windows, Linux and macOS;
For all platforms:
– Added option to execute a script after sending a Wake On LAN
– Update on how the controls are positioned in the Settings window
For macOS/Windows:
– Added the option to send a Wake On LAN to devices when your PC/Mac wakes up from sleep
For Windows/Linux:
– Added the option to invert the icon in the system tray (previously existed for Linux already)
For Windows:
– Setup now allows to install miniWOL on a portable device – no longer a separate installer needed for using the application as a portable app.
Hans
Tks ! great work. Easy and useful
Dario
Awesome and thank you for taking the time to write a Thank-You note – it is very much appreciated
Hans
Hello,
thank you for a great WOL app.
May I ask where on macOS the config file / profiles are being stored at?
I do want to use them on several Mac’s to avoid having to re-type every entry again.
Thank you in advance
flash64
Hi Flash64!
Thank you for the compliment and great to hear you like it!
You can find the config files on your Mac here – it is in the documentation, but I can imagine you overlooked it (it took me some effort as well to find it):
For those interested, find the path for Windows, Linux and MacOS: Documentation.
Hans
Hello Hans,
thank you very much for your fast reply. I have to admit that I did not bother to search for the docu in the first place :-)
Flash64
No worries – all good. Having it mentioned here again may be helpful for others
Hans
Hello Hans, I use your tool for several years now, thanks a lot, we also had some discussions here! Recently, I discovered an interesting topic. I try to send a WOL packet into a different subnet. In my case the subnet is also further complicated because it is actually located over the internet and I am connected through a wireguard server and client tunnel. I know that a WOL is normally just broadcast in the local LAN and not forwardet into other LANs but since you provide the option to set an IP address additionally to the MAC I suspect you might be knowledgeable in this area. :) What I actually can do is send a WOL back from the client side of my tunnel. It will travel from the client device to the wireguard client where it has to leave the local LAN and go into the tunnel LAN. It will then travel over my internet gateway router over the internet. From there it will reach my other internet connected router from the ISP, which is actually a bridge, then into my edge router which acts as DHCP and from there it will go to the wireguard server where it will leave the tunnel IP range and go into the third LAN range and will then wake up a client device in that (third) LAN. I am not shure which device will actually send the broadcast into this LAN. Maybe it is the edge router which is the gateway for it. Or maybe it is the wireguard server, which is a Raspberry Pi. Since subnet directed broadcasts are by default deactivated on routers I suspect the Raspberry might be doing it due to a failure in its configuration: When turning it into a wireguard server it will be set to forward packages.
Now, what I cannot do is waking up a device the other way around. Somewhere in this chain a router will not forward the broadcast from the wireguard server’s side into the wireguard client’s side. I did not find any settings on the TP-Link which is involved. But it might also be that the TP-Link delivers the package upstream to the ISP router (after it left the wireguard tunnel) and the ISP router is not broadcasting it.
Well, maybe you have something to say to it. :) I would be glad.
Ben
Hi Ben,
Thank you for using miniWOL – glad to hear its been useful!
well this is a new one for me as well. I have done a little tinkering with Wireguard, but not the way you’re using it. 😜
First of all; miniWOL only allows the user to enter an IP address, just as a means to find the MAC address (always a pain to type those).
The IP address itself is then only used to find the matching MAC address in ARP tables. That MAC address is in the end what miniWOL uses.
(the magic packet is in essence the MAC address several time repeated, no IP address is involved in this)
Now back to your problem, and this is a little beyond my expertise: WOL lives on ISO layer 2, and IP address lives on ISO layer 3 (if I remember that right).
So from what I remember from school is that this will not work (WOL requires MAC address, IP address is not used).
Now what I would consider: setup a helper on the other side.
Maybe a cheap ESP8266 (Arduino, like $5 or $6 at Amazon) or ESP32 like device, that you can connect to based on IP address.
The idea being: call a URL to the webserver on the ESP8266, and have it the send a WOL to the IP address you had in mind.
A quick search showed me this wasn’t a crazy idea to begin with since quite a few others did the same thing.
Not sure which is the most familiar or comfortable for you, but here is a Google Search – look for ESP8266 WOL Server, or Gateway.
The idea would be to call a certain link (http://192.168.1.1/something) in the other network, from your device, which them will send the WOL to the device you have in mind.
Tip: if you go the ESP8266 route, the consider using the USB port of your router as a power source (if your router has a USB port)
As an alternative, not sure what kind of router you’re suing on the other side, there may be a DD-WRT alternative, or OPNSense/pfSense alternative that can act as a WOL server.
After all, you already have that device running. Maybe the device that acts as a WireGuard server?
Hope this helps. 😊
Hans
Wow, thanks for the really detailed and fast reply. I did not read it while typing my second post. Thanks for the suggestion with the URL as a link – this is definitely a usefull way to go.
However, since “wakeonlan -i IP MAC” seems to work quite a large part of the way I want to go maybe you can think about implementing it into your tool. Not for me, but I think it could work easily, depends on what command you use to send the WOL. wakeonlan on linux seems to be quite sophisticated in that regard.
Actually, the other side is not the server, but the client. Maybe just a wording issue but I wanted to make it clear: WOL works over several LANs from clients in the remote LAN to clients in the LAN of the wireguard server. It just does not work the other way around. After my further investigation I now think the TP-Link is the problem but as I said I did not find a setting on its page.
So, definitely I will implement your URL suggestion. Thanks!
Ben
As so often, while writing, I discovered something. I can check with pktstat on my wireguard server for packages and I sometimes see the WOL coming in on eth0. It wil not be shown with source or destination IP but just with two MACs. I can not see it going out on the wg0 interface. So I wonder if this is due to the fact that your miniWOL is not applying the IP I gave to the package or some other reason. Surely, if there is no IP the wireguard server will not be able to forward it into the tunnel (via the fixed route he has for the other LAN).
Now, when I send the WOL from another client in this LAN with the command “wakonlan -i IP MAC” I successfully see the package beeing sent to the wireguard server interface with “udp 192.168.100.1:45145 <-> 192.168.200.115:discard” and I can also see it coming in on the other side of the tunnel! It will be shown in the wireguard client on eth0 as “wol b8:27:eb:80:e4:60 -> 74:d4:35:fb:22:cc”. It will be shown twice and the source mac changes. So I think it is going out. However, it is not reaching the destination, probably, because from there it would have to travel upwards one LAN still and the TP-Link router is not forwarding it.
So I have to solve this.
But I still wonder why it only works for the second device where I don’t use your tool but the command line. With your tool it does not even go into the tunnel. Maybe you don’t use the IP – I am using v1.2 on macOS High Sierra – maybe I have to upgrade?
Ben
Unfortunately, the WOL protocol completely ignores an IP address (see also the magic packet description about and the WOL Wiki Page).
Your “wakonlan -i IP MAC” approach still needs “MAC” (MAC address).
I admit, I had to look that one up: see this wakeonlan man page – the “-i” parameter is your broadcast IP mask, the same as what miniWOL provides (worth a test?).
Anyhoo, having said that, your Wireguard may indeed be aware of the WOL traffic. Odd port number though.
Haha, now I’m confused (reading your second comment)!
So it works in one way (Server -> Client network)? Or you’re good to go? Haha.
Either way; feel free to continue the conversation.
Maybe continue in a forum post (there is a miniWOL subsection) or something like that so we can send some doodles back and forth
Hans
Thanks! I did not understand the broadcast address of your tool until now. This is because you provide it with 255.255.255.255 as a default text and this looks like a netmask. Using it with the LANs broadcast IP “192.168.300.254” it successfully sent the WOL package the same way my own command did!
So, this is already quite a success!
I might do a forum post because I already prepared it. But I am comfortable with you ignoring it for now. :)
ben
Yeah that’s a confusing one indeed. 255.255.255.255 means as much as broadcast to all nodes in the network.
I’m not the most knowledgable person on this topic either, but here you’ll find a good explanation. 😊
As this is a topic where we could use some network experts, here the link to your forum post.
And in the forum I’ll reply for now with a reference to this conversation as well.
Hans
macos 10.14 with miniWOL v2.1.3 build 8. Always says “Your system returned an empty ARP list” for IP’s like 192.168.1.10 and 192.168.1.11 even tho `/usr/sbin/arp -a ` shows mac for both those IPs. Does it look at just wired nics or both wired and wireless???
Bann
Hi Bann,
Thank you for reporting!
Well that’s odd. It should work for just fine both WiFi and Wired, and your Terminal output looks correct as well.
(thank you for posting OS en miniWOL version, and the arp output)
Unfortunately, I do not have 10.14 available for testing (even though I doubt this to be a problem).
Does it show right away after booting your Mac? Or in other words: if you click “Arp List” again, does it then populate?
Hans
I tested on a single macbookpro that is dual-boot 10.14 (mojave) and 12.6.1 (monterey). In 10.14 I get the empty arp error, but on same laptop booting 12.6.1 the arp works correctly and mac-address is automatically detected. If/When I get a chance, I’ll post details, such as output of arp. Is minwol issuing something like “arp -a | grep $IP” or similar?
Bann
Hi Hans,
thank you for your wonderful program and instruction, I was finally able to wake my Macbook M1 Max using miniWOL + script from a windows machine.
The file .bat with ssh + caffeinate command works, however miniWOL 2.1.3 on my windows 10 doesn’t seem to execute the bat file.
I’ve modified the .bat file with permission to be executed from “everyone” user, however miniwol doesn’t execute it.
Any hint ?
thanks
Emanuele
Emanuele
Hi Emanuelle,
As I recall from a while ago; Mac’s can be a pain to wake up with WOL (see this forum post, which you already read I assume).
I assume the script you’re running, runs on your Windows machine, and in that script (the bat file) you open an SSH connection to your Mac so you can execute a caffeinate command on your Mac. The bat file works when you run it from a DOS box, but not from miniWOL. Did I understand that correctly (I still need some coffee to wake up).
I do not have the means available right now to test (in the middle of moving).
I would try a simple script that makes a directory on your Windows machine, so maybe something simple like:
Place the bat file in some different locations, to see miniWOL executes them.
Just to makes sure the bat file location is not a problem, and to make sure even a simple basic bat file executes.
I’ll try to dig up my Windows computer to see if I can do some tests as well. May take a day or so though.
Hans
Hi Hans,
I’ve tried to put the .bat file in a folder that is accessible from everyone, and also tried to start miniWOL with administrative right, but still no luck unfortunately.
I’m looking forward for your testing, thank you so much for your support !
Emanuele
Hi!
Thanks for great program! Is it possible by any chance for you to compile version optimized for Apple ARM architecture?
JKC
Hi JKC,
well, you got luck I guess haha … the compiler initially did not like ARM at all, since some of the code parts relies on Intel Assembler. Thank goodness nothing vital.
You can find the ARM/Apple Silicon version above under the downloads. I only did a brief test and it seems to work. Let me know if you run into issues
Hans
UPDATE:
Apple Silicon version available now as well.
Hans
Thank you! I hope it will be available via homebrew also 😊
JKC
That would be up to the HomeBrew crew … I do not use Homebrew
Just found the Intel version is there, not sure who placed it there or who maintains it.
On top of that; I prefer distribution through my own website, so ads can contribute a little to my server/domain expenses.
Hans
I see :). Thanks again, I have already downloaded new version, and it is working fine for me!
JKC
Awesome!
Hans
Hoi, voor het eerst in jaren kocht ik een app en dat is MiniWOL 3.0.2. Na erg goede ervaringen met de gratis versie en de gebruikelijke gang naar een betaalde app leek me dit logisch.
Nou het schiet niet op. De betaalde versie werkt niet wat ik ook doe. De gratis versie 2.1.4 werkt direct met dezelfde settings. Dit bij herhaald proberen. Ook zit er teveel functionaliteit in die de app overgewicht geven. De focus lag bij de gratis versie een stuk beter. Gewoon WOL en dan betrouwbaar zonder opsmuk.
Omgekeerde wereld dus. Ik dacht het even te laten weten.
Groet
JP
jean-paul
Hoi Jean-Paul,
excuses voor het ongemak. Ik ben bekend met het probleem dat miniWOL nog niet bij de login-items gezet wordt – ik wil dat snel oplossen maar helaas werd dat flink vertraagd door het onverwachtse overlijden van mijn moeder en het onverwachts moeilijk zijn met Apple’s store regels. Een oplossing gaat daar zeker voor komen.
Ik zou graag willen weten wat er precies niet werkt, dan kan ik dat bij de volgende release meteen meenemen.
In principe zou v3 vergelijkbaar met v2 moeten werken. Je kunt eventueel reageren op de notificatie email of via webmaster at tweaking4all.com.
Ik hoor graag van je want v3 wil ik zeker zo goed laten zijn als v2.
Nogmaals excuses voor de teleurstelling!
Hans
Hans