Before we begin …
This article will be a lot shorter than the original article!
The original article however has a ton of useful information in it, so it’s definitely worth reading.
To get Kodi on your Amazon Fire TV or Amazon Fire TV Stick, we will need the following:
Amazon Blacklisted FireStarter …
Unfortunately, Amazon seems to have blacklisted FireStarter, which effectively means that FireStarter might not work on your Amazon Fire TV anymore. I suspect this might have to do with the latest FireOS (the “operating system” for your Fire TV).
You can choose to block updates, if your FireStarter still works.
Alternatively, you can still side-load KODI, and start it through “System” “Applications” “Manage Installed Application” “KODI” “Launch”. KODI will most likely start appearing in your “Recent” items, so you can start it from the front page.
Note: it might also be that FireStarter is not blacklisted, and that Amazon just blocked “listening” to pressing the “Home” button.
Step 1 – Download Kodi
It appears that the download page of Kodi is a little confusing for some readers (absolutely no disrespect intended!), so I’ll walk through this step by step.
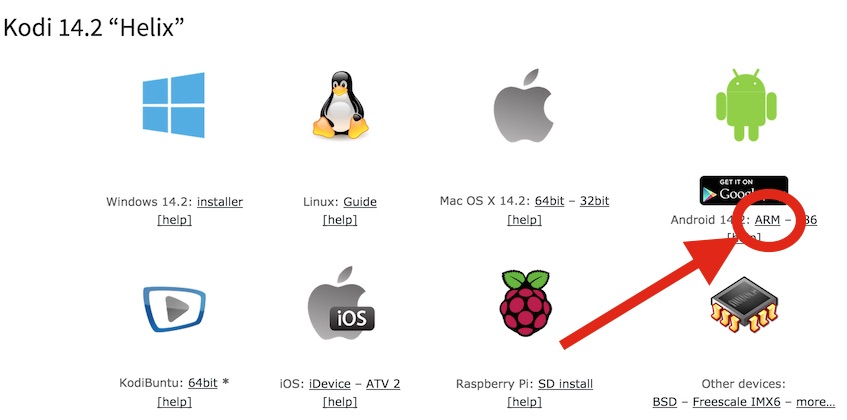
Go to the download page on the KODI website by following this link. It could look something like this (this is a screenshot of an older KODI version):
Amazon Fire TV – Download the right Kodi version
We will need to download the ANDROID version (the green puppet) and click the “ARM” link (as indicated above).
This will result in downloading a file with the extension “APK“.
So if you got “EXE” or “ZIP” then you picked the wrong file!
Step 2 – Download ADBFire
Jocala has kindly requested me to no longer host a copy of ADBFire, so you’ll have to go to his website by following this link.
On that page, scroll down to roughly the middle of the page where you will find something like this (note: version numbers can be different):
Download adbFire 2.01 for Windows
Download adbFire 2.01 for OS X 10.7 or greater
Download adbFire 2.01 for Linux
Click the version applicable for your Operating System.
Note : The screenshots shown in this article will be based on v2.01 for Mac OS X. The screens for Windows and Linux will look very similar.
Step 3 – Setup you Amazon Fire TV
Next we will have to setup our Amazon Fire TV. Just follow the instructions that came with the Amazon Fire TV.
If you run into issues, go through the original article where several issues and hints can be found.
To setup a Amazon Fire TV, you will need to setup an Amazon account, but only a username, password and billing address are needed. You do not need to enter credit card info or anything like that.
Make sure the Amazon Fire TV is working, and has a network (wired is recommended, but WiFi fill work as well) connection that works. This should be the same network of course as used with the computer/laptop we are going to use for this article.
p.s. I love Amazon Prime, so I can really recommend it. It;s totally optional! But if you’d like you can sign up for the free 30-day trial of Amazon Prime. Even if you’d do it just for the 30 trial days, you’d enjoy free 2-day shipping, and thousands of songs, movies and TV Show and yes, you’d support us with that as well … 
Step 4 – Prepare your Amazon Fire TV for Kodi
Before we can upload Kodi to our Amazon Fire TV, we will need to do a few minor settings.
Enabling Developer and Unknown Sources Options
On the home screen of your Amazon Fire TV, scroll down to “Settings“.
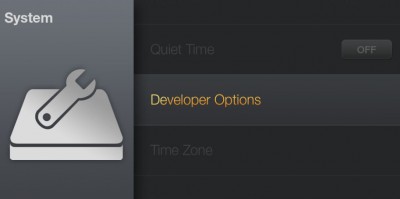
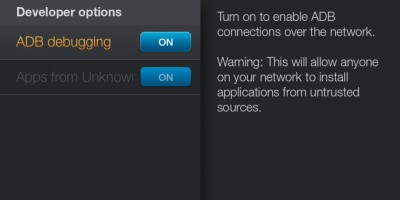
Scroll to the right to the “System” option and select this, where you’ll select “Developer Options” and enable “ADB Debugging” (set it to “ON”).
If available, enable “Apps from Unknown Sources” as well.
When done, press the return button on your remote, so you’re back in the “System” menu.
Amazon Fire TV – Goto Developer options
Amazon Fire TV – Enable ADB and Apps from others
Find the IP address of your Amazon Fire TV
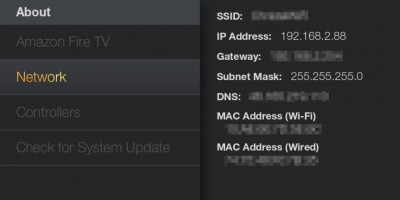
Still in the “System” menu, scroll up to the “About” option. There you scroll down to the “Network” option.
Here we will find the IP address of our Amazon Fire TV, in the example below 192.168.2.88 (yours will very likely be different).
Write this IP address down, we will need the IP address in a next step.
Amazon Fire TV – Finding the IP Address
Step 5 – Sending KODI to your Amazon Fire TV
I assume you have your computer (desktop or laptop) up and running, and that you have installed (!) ADBFire.
Windows and Mac users …
Some AntiVirus software, under Windows, might give a false positive when using AdbFire.
Disable your AntiVirus temporary or allow the execution (if your AntiVirus allows this).
Your Mac might consider this application from an untrusted developer, so you will need to change some settings.
Go to “System Preference” – “Security Privacy”, under “General”, check “Anywhere” at the “Allow apps downloaded from” option. Note that it is required that you install ABDFire in the Applications folder!!!!
Do NOT try to run ADBFire straight from the ZIP (Windows) or DMG (Mac) archives! It will not work!
OK, now that we have ADBFire installed, start it up. The v2.x ADBFire will look something like displayed below.
For those who’ve followed the original article, you will notice that Jocala has done quite a bit of impressive work with ADBFire.
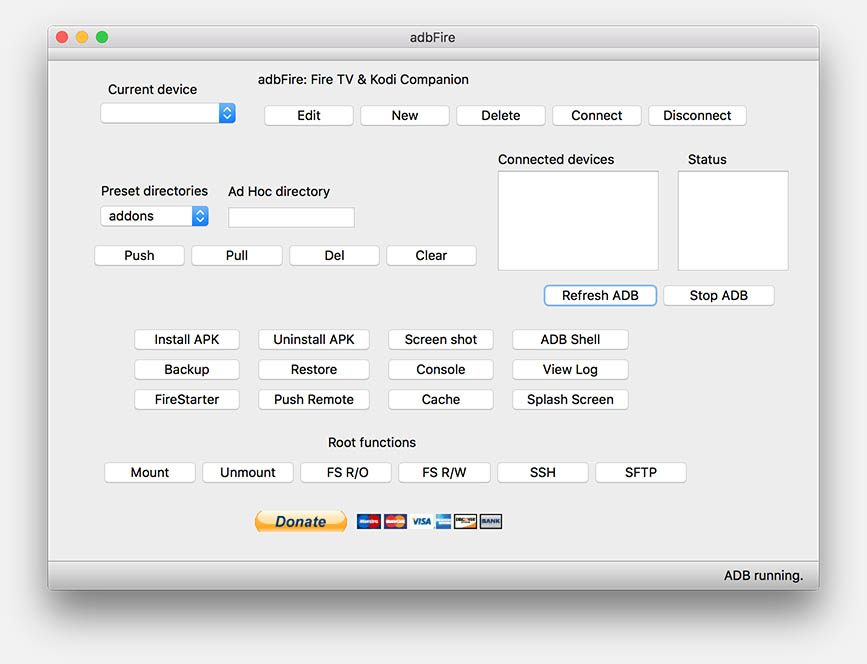
ADBFire – Version 2.x
Now we need to tell ADBFire where to find our Amazon Fire TV – we will need the IP Address from our Amazon Fire TV for that, which you did write down in the step before.
In ADBFire, click “New“, a window will popup where we ONLY fill in the following:
- Give it a name you will recognize in the future, for example “AFTV Living room”. We enter this in the “Description” field.
- Enter the Amazon Fire TV IP address into the field “Address“.
Do NOT change any of the other settings unless you really know what you’re doing.
When completed, the window could look something like this, and you can now click “Save“.
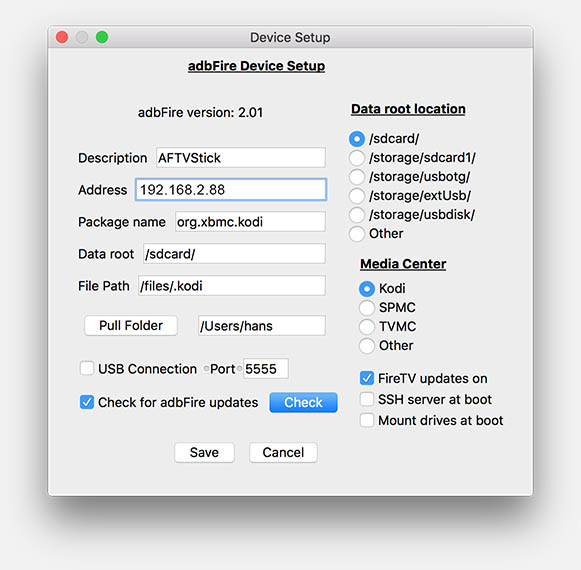
ADBFire – Device setup
After you have clicked “Save”, you might have to wait a few seconds, but eventually the dropdown under “Current Device” should show you the device we’ve just “created”.

ADBFire – The new device we just added
To connect to your Amazon Fire TV, click the “Connect” button.
In the lists “Connected Devices” you will see the IP address of your device, and in the list “Status” it should [eventually] say “device”. Once that’s the case, we’re good to go for the next step.
To install KODI, click “Install APK“. A dialog will open, where we will select the KODI APK file that we downloaded in step 1.
Click “OK” or “Open“, and in the next dialog window (“install …”) click “Yes“.
The upload will take a while, you can see the progress bar at the bottom:

ADBFire – Uploading KODI
Once completed, a message will confirm that KODI has been uploaded, click “OK“:
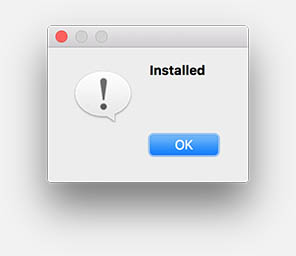
ADBFire – KODI installed
Step 6 – Install and Start FireStarter
FireStarter is a great little tool for the Amazon Fire TV. You can find it at GitHub as well, but with ADBFire we don’t need to worry about that.
The coolest thing of FireStarter is that it “catches” pressing the “Home” button on your Amazon Fire TV remote. In essence the usual action (showing the Amazon Home Screen) will be completed, but in an instant of a second, the FireStarter will show it’s own “home” screen, which will show a link to Kodi, the Amazon Home Screen and the Amazon Fire TV settings.
Anyhow, let’s install FireStarter.
With ADBFire still connected to your Amazon Fire TV, click the “FireStarter” button. A dialog will popup where we click “Install“. After a few seconds (it’s pretty fast). Once completed, a dialog will popup informing you about that.
NOTE: Newer adbFire versions (2.03+) no longer have a “FireStarter” button, and FireStarter can now be found in the menu “File” “Install FireStarter”. Since FireStarter has been blacklisted by Amazon, it might not even work or the function to install it might be removed from future versions of adbFire all together.
Next: get FireStarter started.
To get FireStarter started, the first time, we need to go to the Amazon “Home Screen” (press the “home” button on the Amazon Fire TV remote).
Scroll down to “Settings“, scroll to the right to “Applications“, press the “Select” button on the remote, and scroll down to the “Manage Installed Applications” and select it. A list of installed Apps should appear now.
Now scroll down to “FireStarter” and select it. A new “list” appears where we select “Launch Application“. Right after launching FireStarter, you will see a screen like below …. and this is the screen that will appear each time you press the “home” button on the Amazon Fire TV remote:
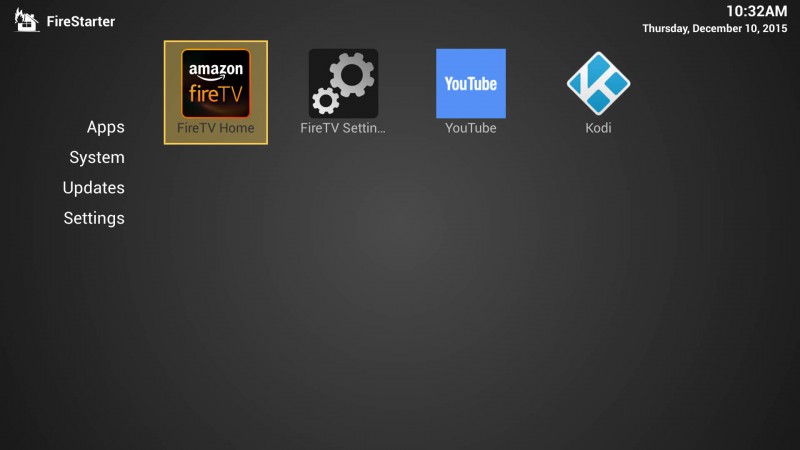
FireStarter – Home Screen
You’re done now … start KODI and it will run the “first time” setup.
Next Steps …
As a next step, if you haven’t done so already, I’d recommend reading the Tips and Tricks section of the original article.
Enjoy your new Kodi HTPC!



Comments
There are 20 comments. You can read them below.
You can post your own comments by using the form below, or reply to existing comments by using the "Reply" button.
Hi I seem to have problems installing kodi onto the firestick I followed all the directions but it seems that the adb running finishes loading but then it restarts. Any ideas on what it could be? The firestick is on version 54.1.2.3. It updated today so can that be the problem?
Wilson
Heres the log
adbFire 2.01
010316175824
OS X
————
creating adbfire.db
getting database record
SELECT Id FROM device WHERE description=””
SELECT daddr FROM device WHERE description=””
server started
“/Applications/adbFire.app/Contents/MacOS/adbfiles/adb” start-server
* daemon not running. starting it now on port 5037 *
* daemon started successfully *
starting server
go to dataentry — new record
opening preferences dialog
go insert a record
Insert new record
getting database record
SELECT Id FROM device WHERE description=”Fire Stick Tv”
SELECT daddr FROM device WHERE description=”Fire Stick Tv”
connectconnected to 192.168.1.18:5555
connection attempt
“/Applications/adbFire.app/Contents/MacOS/adbfiles/adb” connect 192.168.1.18:5555
connected to 192.168.1.18:5555
192.168.1.18:5555
device
“/Applications/adbFire.app/Contents/MacOS/adbfiles/adb” -s 192.168.1.18:5555 install -r “/Users/AlyssaJohnson/Downloads/kodi-15.2-Isengard-armeabi-v7a.apk”
process time duration: 1201 seconds
samba off!
process time duration: 1213 seconds
Wilson
I downloaded both adbfire and Kodi to my apps on OS and on the ads ap/folder that pops up I click on the connect button and repeatedly cannot get “connected devices.” I feel fairly confident that I’ve downloaded both abdfire and Kodi to the Ap folder (since it’s there and listed) but cannot for the life off me figure out why I cannot get addons?connected devices. The IP address is correct but I’m stymied.
john
Hi John,
I’m not sure what you’re asking, my apologies. Did you upload KODI with ADBFire to your Amazon Fire TV, as described above?
Does KODI not connect? Or are you unable to start KODI? Or are addons failing?
Or is ADBFire failing to connect to your Amazon Fire TV?
hans
when downloading kodi, the zip file contains firestarter apk, and ssh helper apk, but no kodi, and no option to
side load
firestarter apk, and ssh helper apk installed on fire stick ok, but no kodi
please help, have tried several times,
thank you,
john
john
Hi John,
You should not unzip the KODI ZIP file.
As for the Firestarter.apk and SSH helper … I have no idea why those would be in the KODI ZIP file?
For the process described above, you’d only need to download ADBFire (which will download and install FireStarter for you) and KODI from the KODI website.
Did you follow the steps described above???
hans
Hi, I am using a mac. It won’t let me download the Android version of Kodi. It says Safari can’t open the file “kodi-16.0-Jarvis-armeabi-v7a-2.apk” because no available application can open it. How do I get around this?
Julia
Hi Julia,
Right click the ARM link, and choose “Download Linked File As”.
For some reason your Safari is trying to automatically open a downloaded file.
Hoep this helps ,…
,…
hans
Hi,
Great write up and easy to follow. I appreciate the hard work you put into this. I had a question on Step 6. I followed everything to the T and got Kodi up and running (Jarvis 16.0)
Step 6 – Install and Start FireStarter
FireStarter is a great little tool for the Amazon Fire TV. You can find it at GitHub as well, but with ADBFire we don’t need to worry about that.
The coolest thing of FireStarter is that it “catches” pressing the “Home” button on your Amazon Fire TV remote. In essence the usual action (showing the Amazon Home Screen) will be completed, but in an instant of a second, the FireStarter will show it’s own “home” screen, which will show a link to Kodi, the Amazon Home Screen and the Amazon Fire TV settings.
Anyhow, let’s install FireStarter.
With ADBFire still connected to your Amazon Fire TV, click the “FireStarter” button. A dialog will popup where we click “Install“. After a few seconds (it’s pretty fast). Once completed, a dialog will popup informing you about that.
I couldn’t find the FireStarter button on ADBFire program. Am I missing something? I would love to use this feature.
Andy
OMG. Stupid me. It’s under “File” right there. Sorry. Found it.
Andy
Haha!
Well, don’t feel bad Andy – we all have those glorious moments, me included … .
.
Thank you very much for the compliment, it’s vey muc appreciated! Glad you liked the guide
Hope you enjoy your “new” Amazin Fire TV
hans
Hi, just want to thank you for all this valuable information. I’m a new to all this and want to set up my own fire stick using my MacBook Pro. I intended on purchasing one on eBay already set up but i’m having second thoughts as the prices and comments about the end results are all over the place so i figured i’d give it a shot.
Mike
Thanks Mike!
Well, I’ve done it with a MacBook Pro as well, and both the regular Amazon TV (faster but larger) and Amazon Fire TV (cheaper) work great. I have not yet found any other [small and Android based] device that is as powerful as the Amazon Fire TV. You won’t regret it!
Not sure what the new Amazon Fire TV will bring, besides being more powerful and supporting 4K, but it might also bring issues like being unable to install KODI etc. who knows.
Oh and you could also look at Amazon, the frequently sell refurbished Amazon Fire TV’s, which sometimes is cheaper then getting one on eBay. Today (when I’m writing this comment) there were none, but with a little patience, you might find one.
And … look at the tips and trick in the previous article I wrote as well. They can be most helpful
hans
I noticed that Firestarter was no longer coming up on my Fire TV so I just went round the whole installation process again – new version of abdFire – 2.03 – as previous poster mentions Firestart has moved from being a button on the main screen to being an action on the File menu.
Anyway, Firestarter installed but just is not appearing in the list of installed applications
Ian
Hi Ian,
OMG, I should have probably update the article so it reflects the changes of ADBFire 2.03, just had not gotten to it yet. My apologies for that.
It seems that Amazon has blacklisted FireStarter around April 5th. (source)
They also posted a warning, suggesting KODI might be next on the victim listed of blacklisted apps.
Mine is still running just fine, but then again, I haven’t done any updates on the Amazon Fire TV in a while.
There are seemingly 2 ways to block updates: source 1, source 2 (for the latter you’d need a DD-WRT or AsusWRT modem/router, or a modem/router that has DNSMasq or a service like DNSMasq running). In your case however, it is probably already to late.
I’ve read at other sources that the old method still works though. Well, at least it will show side-loaded apps in the “Recent” items. I have not yet tested this, and I presume that you’d have to start KODI through System->Applications->Manage Installed Applications->KODI->Launch.
hans
UPDATE:
I’ve added a warning that FireStarter has been blacklisted, and that the install option for FireStarter in ADBFire can now be found in the “File” menu (thanks Andy and Ian for making me aware of this!!!)
hans
Thanks so much for this Hans, I’m no tech hermit but was a complete noob to the world of amazon fire & internet tv
let alone kodi. Just bought an amazon fire tv box (2nd gen) and whilst I’m giving their prime services a go, i really wanted to try kodi for extra spots channels etc.
followed your instructions & installed adbfire on my mac & added firestarter and it all works fine of (30/4/16) so I think I just need to find & link the repositories now (about to start a search for genesis etc as i’ve heard a few names mentioned)
So all good I believe – just wanted to say thanks, nice clear easy instructions to follow, top man.
jay
Hi Jay!
Thanks for posting a thank-you!
It’s much appreciated and I love hearing that folks get things to go on their Amazon Fire TV.
Cool
hans
HI. While try to install the kodi psk I am not getting the drop down dialogue box. I am getting the dropdown box on the unistall tab but not the install. It just pulls up my folders (i.e downloads, apllications. what not…but none of them can be opened from there. Thanks for your help. I really appreciate that.
Cheers,
Brandan
Brandan
Hi Brandan!
I’d love to help, but I’m a little confused where you get stuck.
Would you mind posting the individual steps, so I can find where it might go wrong?
p.s. these steps might not work with the latest Amazon Fire TV’s …
hans