Introduction
When the Raspberry Pi, a small computer for $35 (for the more advanced model) capable of handling 1080p video and capable of running Linux and applications like XBMC or MAME, was announced, I had to get my hands on one. As some of you; that wasn’t easy. They were pretty much sold out before they became available.
The beauty of this little guy that it’s price is equal or lower that much more limited microcontrollers like the Arduino and Basic Stamp microcontrollers.
For me this meant that this could be the best alternative to a computer for running XBMC.
Once I got that running smooth, I really wanted an LCD display connected, and bought a HD44780 based 20×4 display complete with LCD2USB adapter (I got this LCD display). I have worked with the HD44780 and a BasicStamp 2 before and figured; it couldn’t be all that complicated.
But since my first LCD project things have evolved segnificantly. Linux, through LCDproc, supports LCD’s now in a magnificent way. No more tinkering with the parallel port and half-assed self coded programs needed (see one of my older LCD projects).
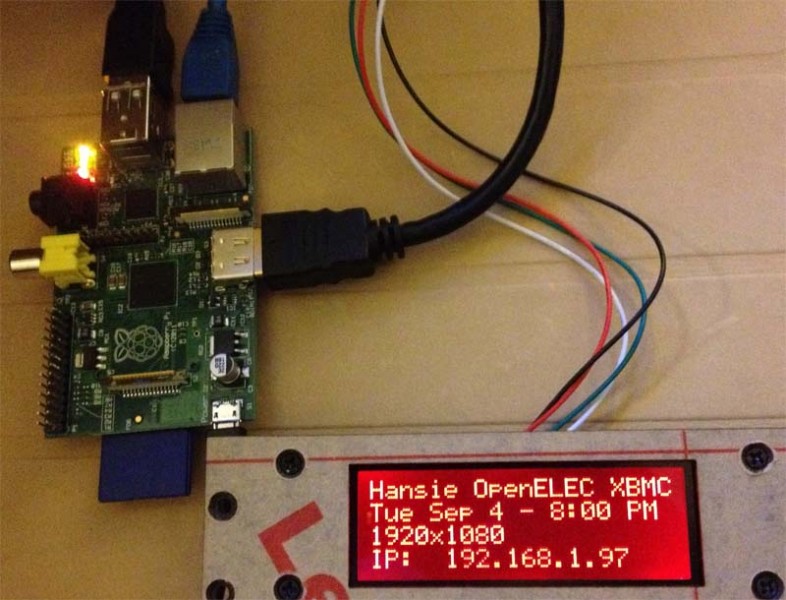
Raspberry Pi running OpenELEC XBMC with a HD44780
The Basics
We are going to use LCDproc, a client/server setup where the server handles the display of information on a LCD display (it can also handle some basic input through buttons). The LCD’s can be of different models and manufacturers, and be connected through several interfaces (like USB, serila port, I2C, GPIO, etc). Supported devices are simply added through drivers.
The client application(s) talk to the server through TCP sockets. LCDproc comes with such a client application to display things like CPU load, system load, memory usage, uptime, and a lot more. Another example of such a client is our beloved XBMC …
So for the server side of LCDproc we need a display driver (for example the driver for the HD44780).
By default OpenELEC only has a very few drivers included (to conserve space), and unfortunately for us; the HD44780 is not included. To include this drive we need to go build our own image.
I’ll admit (see some posts here) that I’m not an expert, but I took the effort to write down all the steps I went through and hope it might be helpful for others.
Building an OpenELEC image
Based on information found in the very informative OpenELEC Wiki page: Building and Installing OpenELEC for Raspberry Pi. This version is condensed and very much geared towards LCD support. All of this has been done running Ubuntu 12.04 as a virtual machine on VMWare Fusion on a Apple Mac.
Step 1. Get the tools to be able to build an OpenElec image
We first will go to our “home” directory and then use apt-get to install some tools we need to build an image.
1
2
| cd ~
sudo apt-get install g++ nasm flex bison gawk gperf autoconf automake m4 cvs libtool byacc texinfo gettext zlib1g-dev libncurses5-dev git-core build-essential xsltproc libexpat1-dev libusb-dev lcdproc git-core autopoint libxml-parser-perl xfonts-utils zip |
Step 2. Download latest OpenElec source
We can get the source code from github as follows:
1
2
| cd ~
git clone git://github.com/OpenELEC/OpenELEC.tv.git |
Step 3. Initial Project settings before building
For the Raspberry Pi OpenELEC image to support the HD44780 LCD display we should first do some initial settings before we start our initial build:
1
2
| cd projects/RPi/
nano options |
Find the line that starts with LCD_DRIVER and modify it to:
Close nano with CTRL+O (save file) and CTRL+X (close nano).
Step 4. Make an initial build
This will download additional sources and such that we need to make some modifications.
Build time this first time can take several hours but following builds might go faster (specially when making minor modifications).
1
| PROJECT=RPi ARCH=arm make |
Mounting your Buils
After the build you can mount the system file – see Mounting Squashfs section below this article.
Step 5. Settings.xml: LCD settings
Edit settings.xml:
1
2
| cd ~/OpenELEC.tv/packages/mediacenter/xbmc-addon-settings/source/resources/
nano settings.xml |
Find the line with LCD_DRIVER in it and add “|hd44780” (so it will appear in the OpenELEC settings under XBMC):
1
| <setting id="LCD_DRIVER" type="labelenum" label="2051" values="none|irtrans|imon|imonlcd|mdm166a|MtxOrb|hd44780" sort="yes" default="none" /> |
Step 6. lcdproc server configuration
Now we will change some default LCD settings in LCDd.conf, the configuration file of LCDproc.
1
2
| cd ~/OpenELEC.tv/packages/sysutils/lcdproc/config
nano LCDd.conf |
Change the line that says: Driver=irtrans
to: Driver=hd44780
Replace the [hd44780] section with:
1
2
3
4
5
6
7
8
9
| ## Hitachi HD44780 driver ##
[hd44780]
ConnectionType=lcd2usb
Contrast=850
Brightness=800
OffBrightness=0
Keypad=no
Backlight=yes
Size=20x4 |
Optionally you can change the welcome message (Hello=””) – keep the character width and row count in mind when doing so. There is also a GoodBye message but that appears to not work.
Some additional Default Settings
Set the hd44780 as a default:
1
| cd ~/OpenELEC.tv/packages/mediacenter/xbmc-addon-settings/config |
Edit the file default_settings.xml:
1
| nano default_settings.xml |
Modify the LCD_DRIVER line to:
1
| <setting id="LCD_DRIVER" value="hd44780" /> |
You can also set a different hostname (default is OPENELEC), for example:
1
| <setting id="NET_HOSTNAME" value="RPiXBMC" /> |
Step 7. Rebuild image with the settings we made
This will go MUCH faster compared to the first time:
1
| PROJECT=RPi ARCH=arm make |
Creating an SD card
A quick description how to make an SD card to boot from – if you are experimenting then you’ll have to do this only once and for new builds just copy the kernel.img and the SYSTEM file again overwriting the previous versions. Be aware though that certain settings for OpenELEC from your previous set will remain on the SD card if you do this which may affect your experimentations.
Step 1. Determine device name of you SD card (reader).
I found the easiest way is to insert the card an use dmesg to determine what was added last.
On my computer is was /dev/sdb.
Let Op!
As of this point we will assume that the SD card device is /dev/sdb!
Modify to what is applicable to your device!
Step 2. Create mount points for the partitions
1
2
3
| mkdir /media
mkdir /media/System
mkdir /media/Storage |
Step 3. Create partitions on your SD Card
Be careful; if your SD card device is not is not /dev/sdb then replace all occurrences in the following examples with the proper device name for your SD card.
Note: just incase you have used this SD card before, we will unmount all partitions first, unmount them all of if you had more than 2 partitions on yours.
1
2
3
4
5
6
7
8
| sudo umount /dev/sdb
sudo umount /dev/sdb1
sudo umount /dev/sdb2
sudo parted -s /dev/sdb mklabel msdos
sudo parted -s /dev/sdb unit cyl mkpart primary fat32 -- 0 16
sudo parted -s /dev/sdb set 1 boot on
sudo parted -s /dev/sdb unit cyl mkpart primary ext2 -- 16 -2
sudo parted -s /dev/sdb print all |
It should look similar to:
1
2
3
4
5
6
7
| Model: Generic- Multi-Card (scsi)
Disk /dev/sdb: 7965MB
Sector size (logical/physical): 512B/512B
Partition Table: msdos
Number Start End Size Type File system Flags
1 1049kB 132MB 131MB primary boot, lba
2 132MB 7948MB 7816MB primary |
Step 4. Format partitions
1
2
3
| sudo mkfs.vfat -n System /dev/sdb1
sudo mkfs.ext4 -L Storage /dev/sdb2
sudo partprobe |
Step 5. Mount the partitions
1
2
| sudo mount /dev/sdb1 /media/System
sudo mount /dev/sdb2 /media/Storage |
Step 6. Copy the files
1
2
3
4
| cd ~/OpenELEC.tv
sudo cp build.OpenELEC-RPi.arm-devel/bcm2835-bootloader-*/arm128_start.elf /media/System/start.elf
sudo cp build.OpenELEC-RPi.arm-devel/bcm2835-bootloader-*/bootcode.bin /media/System/
sudo cp build.OpenELEC-RPi.arm-devel/bcm2835-bootloader-*/loader.bin /media/System/ |
Note: it appears that “loader.bin” no longer exists in current OpenElec distributions (source).
Copy the SYSTEM file and the kernel, note that the * must be replaced with the build number, for example:
replace * with “20120902221901-r11850” when your build looks like this:
OpenELEC-RPi.arm-devel-20120902221901-r11850.kernel
1
2
| sudo cp target/OpenELEC-RPi.arm-devel-*.system /media/System/SYSTEM
sudo cp target/OpenELEC-RPi.arm-devel-*.kernel /media/System/kernel.img |
And we need to create smdline.txt:
1
| echo "boot=/dev/mmcblk0p1 disk=/dev/mmcblk0p2 ssh quiet" | sudo tee /media/System/cmdline.txt |
Step 7. unmount the SD card before removing it …
1
2
| sudo umount /dev/sdb1
sudo umount /dev/sdb2 |
Step 8. Insert card in Raspberry Pi and boot …
The first time you boot from a previously empty SD card will be a bit slower since OpenELEC creates SSH key, swap, and XBMC folder structures. Following boots will be faster.
Step 9. Change some more settings
Enable the support for LCD:
Go to the shared network folder “userdata” and edit the file guisettings.xml. Change the line
to:
Verify in OpenELEC settings (on your TV when running OpenELEC) that the “hd44780” is selected as the LCD display. The OpenELEC settings can be found in the Programs menu.
Scrolling to fast?
I had it happen with my LCD display; I could barely decipher what the scrolling messages where. To slow this down you will have to edit the advancedsettings.xml file in the “userdata” shared network directory:
Add to advanced settings:
1
2
3
| <lcd>
<scrolldelay>8</scrolldelay>
</lcd> |
The higher the number (0 – 10), the slower the scroll.
LCD messages
You might also want to edit the LCD.xml file in the “userdata” shared network directory – just to make sure it matches your LCD rows and columns.
A good source for available data for a LCD display: XBMC LCD.xml, XBMC Infolabels.
Below an example of what I have done with my (for now anyway) – I tried to have the lines as much as possible to stick to a 20 character width to prevent scrolling. Watch for example the use of the System.Date(ddd mmm d) and System.time(hh:mm xx):
1
2
3
4
5
6
7
8
9
10
11
12
13
14
15
16
17
18
19
20
21
22
23
24
25
26
27
28
29
30
31
32
33
34
35
36
37
38
39
40
| <lcd>
<!-- set this to video,music to disable the LCD on playback of music and video-->
<disableonplay>video</disableonplay>
<navigation>
<line>$INFO[System.CurrentWindow]</line>
<line>$INFO[System.CurrentControl]</line>
<line>$INFO[System.Date(ddd mmm d)] - $INFO[System.time(hh:mm xx)]</line>
<line>IP: $INFO[Network.IPAddress]</line>
</navigation>
<music>
<line>$INFO[MusicPlayer.Title]</line>
<line>$INFO[MusicPlayer.Artist]</line>
<line>$INFO[Player.Time]/$INFO[Player.Duration]</line>
<line>$INFO[LCD.ProgressBar]</line>
</music>
<video>
<line>$INFO[VideoPlayer.Title]</line>
<line>$INFO[VideoPlayer.Genre] </line>
<line>$INFO[Player.Time]/$INFO[Player.Duration]</line>
<line>$INFO[LCD.ProgressBar]</line>
</video>
<general>
<line>Hansie OpenELEC XBMC</line>
<line>$INFO[System.Date(ddd mmm d)] - $INFO[System.time(hh:mm xx)]</line>
<line>$INFO[System.ScreenWidth]x$INFO[System.ScreenHeight]</line>
<line>IP: $INFO[Network.IPAddress]</line>
</general>
<screensaver>
<line>$INFO[System.CurrentWindow]</line>
<line>$INFO[System.Date(ddd mmm d)] - $INFO[System.time(hh:mm xx)]</line>
<line>$INFO[Player.Time]/$INFO[Player.Duration]</line>
<line>$INFO[LCD.ProgressBar]</line>
</screensaver>
<xbelaunch>
<line></line>
<line>Playing</line>
<line>$INFO[System.LaunchXBE]</line>
<line></line>
</xbelaunch>
</lcd> |
This is also a good time to copy other config files to for example the “userdata” network share (like sources.xml, advancedsettings.xml, passwords.xml etc.) – you might want to do this before making the other modifications.
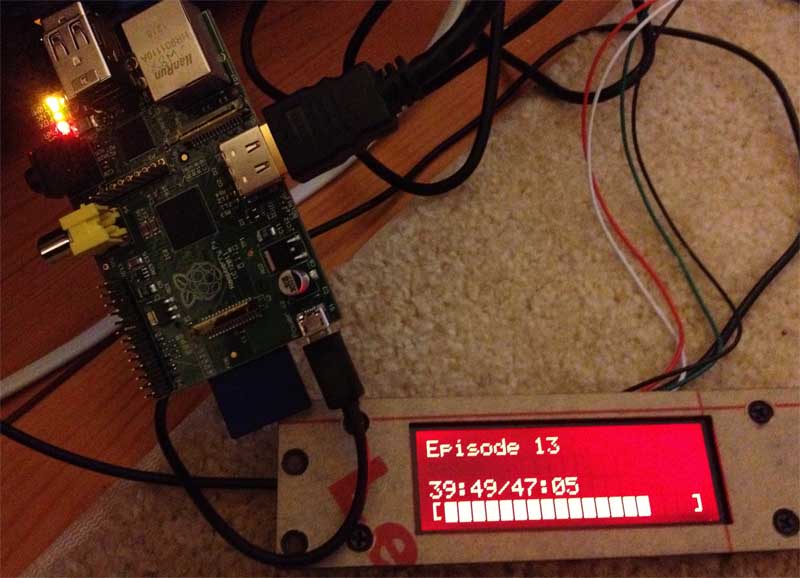
Raspberry Pi OpenELEC XBMC and a HD44780 LCD display
Mounting Squashfs
Actually, the SYSTEM file contains a entire filesystem in the squashfs format.
You could mount it to a directory (Read only!) to verify certain files.
For example; with a few compile attempts I had to discover on the SD card that /usr/lib/lcdproc/hd44780.so did not exist.
Instead of pepping the SD card over and over again, I simply mounted the system file, for example (under the assumption that you have nothing mounted to /media/System):
1
| sudo mount ~/OpenELEC.tv/target/OpenELEC-RPi.arm-devel-20120903133050-r11850.system /media/System/ -t squashfs -o loop |
The version number and release number in the filename should of course match the build you just made or wish to mount and explore.
In /media/System you will now be able to browse through the file structure.
When done, don’t forget to unmount:
1
| sudo umount /media/System |


Comments
There are 12 comments. You can read them below.
You can post your own comments by using the form below, or reply to existing comments by using the "Reply" button.
Hey Man Great work. I keep coming back to your website cuz its the one that has the best organized and easy to understand instructions. I wanted to ask you if you have been able to get this working under OpenELEC Gotham. Ive been trying to get my lcd back up but Gotham is not playing along with me. Keep up the good work. Missing more post like this one or the ambilight.
willy
Thanks Willy for the compliments!
I have not tried this with XBMC Gotham (OpenElec 4.x) yet. I’ll have to see when I find some time to give it a try. …
…
As you can imagine, tinkering with all this stuff can consume a lot of time … but I enjoy doing it
I hope to post more articles soon – topic suggestions are always welcome (specially when i think they’re awesome too haha)!
hans
Hi Hans,
really good job, thank you.
I’ve tried to compile together with the drivers for the Wolfson Audio Card and it seems working.
My release is Openelec 4.2.1
But I can’t find the “~/OpenELEC.tv/packages/mediacenter/xbmc-addon-settings/” directory
Did the location of “default_settings.xml” change ?
Cheers
Klaus
Klaus
Thanks Klaus!
I’m unfortunately nowhere near my computer (long holiday), so I’ll try to answer what I can.
It can be that the directory simply does not (yet) exist, you could try creating it and creating a text file called “default_settings.xml”. As far as I recall, but I could be wrong, this file is not created by default [anymore].
hans
Howdy,
Great tutorial! Any chance of doing an Openelec Raspberry pi 3 build?
michael
Hi Michael,
Thank you for the compliment!
 .
.
I might do it in the near future for the Pi3, well that is: once I get a Pi3. Actually debating getting a Pine64 though
I’m not sure how much different it will be for the Pi3/OpenElec though (although the new OpenElec version might require a few different steps).
hans
Hadn’t seen the pine. It looks good. I’ll wait see if it get support first. Are you the same guy that wrote the tutorial for qnap, sab, sickbeard and couch potato? I had that set up running for years it’s was awesome! I updated my qnap last month and everything broke. They’ve moved some of the system directories and that tutorial doesn’t work now. Might be time for an upgrade anyway. Just found the qnap has a 16tb volume limit.
Michael
For the price, I figured: why not (the Pine64) …
Yep, I wrote those articles as well. Not sure what changed though?
I update my QNAP every time a new version comes out and have not ran into issues.
Granted, I moved on to NZBGet and Sonarr recently.
Feel free to ask where I posted those articles (or in the forum).
Thanks for the compliments
hans
What are your thoughts on nzbget and sonar? Better? Wish I new that last week!
Michael
Ehm, well NZBGet is definitely cleaner to work with, and I have the impression it’s a little bit faster than SABNzbd.
If I’d have to compare, then I would say that SickRage (fork of Sickbeard) and Sonarr are very close.
Sonarr just a lot cleaner, but misses subtitle support and requires the Mono famework.
Both SickRage and Sonarr support Torrents (although I do not have a use for them).
I’d say that both are better than SickBeard – or maybe better said: more complete.
I’d definitely take NZBGet over SABNzbd. It seems faster and it looks cleaner. But don’t get me wrong; SABNzbd is pretty good!
hans
Sorry if I’m not supposed chat in here. I just started messing around with openelc this weekend. In the openelec settings menu I see there is already support for Lcd display. Is this a new feature that means you no longer have to compile your own build?
Michael
Well, you can chat here – but it’s off topic, so it would have been better under one of the related articles, or in the forum .
.
I have not yet had the chance to checkout the latest OpenElec as far as the display goes. I think you’d still need the specific LCD driver since not all work the same.
hans