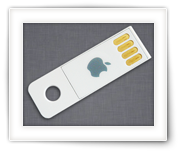
Certain Apple models, like the MacBook Air, have been delivered with a convenient 8Gb USB stick for a system restore.
Obviously, after upgrading to a newer Mac OS X version, this stick has become kind off useless.
When trying to format the Apple USB Restore stick however, you’ll notice that it’s a Read-Only stick, so how can we format this USB stick for normal use … Or to store the image of your current Mac OS X version on?
Format Apple USB Restore stick
The trick is actually not all that hard, but it took me a while to find a solution that would work on a Chinese website (WeiPhone.com). As you can imagine: My Chinese sucks … so I thought it might be practical for other users to translate it and add some of my own experiences to it.
Note : Technology moves forward, so you might run into the situation that this does not work for the stick you’re looking at. This has been successfully tested with 2 MacBook Air Apple USB Restore sticks. Your milage may vary of course …
Note : The 2 tests I performed where succesfully done under Windows XP running under Parallels Desktop 9. A native Windows PC, BootCamp, VMWare Fusion or VirtualBox running a Windows version will work as well of course.
Needed software
To “unlock” this type of USB stick you’ll need an application called “SMI Mass Production Tool” which is a Windows Application (!) – I tried to find the original developer without luck, so you can download either from the WeiPhone.com website or directly here.
Download - SMI Mass Production Tool
Download the ZIP file and unzip it.
Removing the “Read Only” debacle
To remove the “read only” limitation of the Apple USB Restore stick, so we can format it and use it for other purposes, follow the following steps.
Step 1 – Run the program
After unzipping the file you will find a program called “sm32Xtest.exe“, double click it to start it.
Step 2 – Insert Apple USB Restore stick
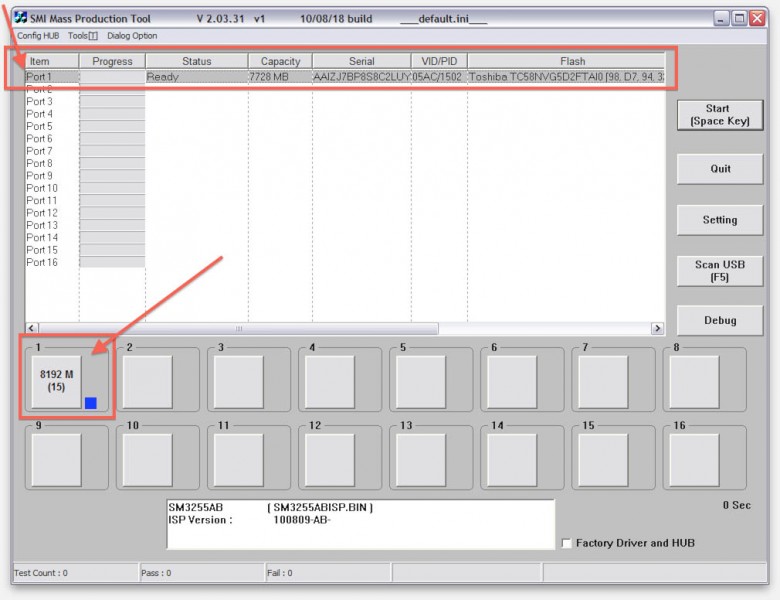
Insert the Apple USB Restore stick in a USB port of your computer. You will now see that one of the “ports” will become populated with information as you can see in the example below.
Here we see that a [almost] 8Gb USB stick has been inserted. I guess they used Toshiba chips for this one (see under “Flash”).

Format Apple USB Restore – USB Stick info
Step 2 – “Fix” the USB stick
Select the “port” that holds your USB stick (2) – if you see more than one, simply remove the Apple USB Restore stick, wait until it disappears from the list, and reinsert it. Now select the newly added “port”, which would be your Apple USB Restore stick.
Now click on the big “Start” (1) button (or press the Space-bar) and formatting of the stick will start.
The progress bar (2) will show some info while processing the USB stick.
![Select your Apple USB Restore stick [1] and click the Start button [2]](//www.tweaking4all.com/wp-content/uploads/2013/11/format_apple_restore_usb_formatting-780x600.jpg)
Select your Apple USB Restore stick [2] and click the Start button [1]
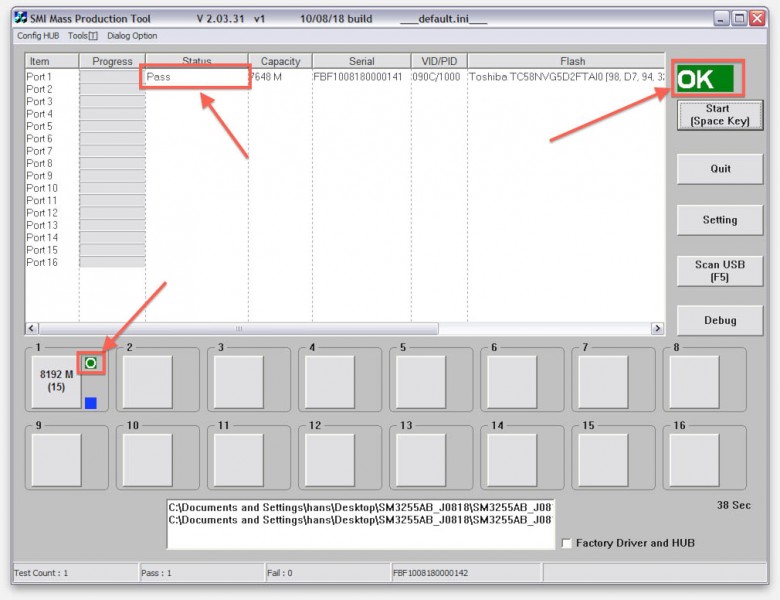
Once completed, you’ll see some indicators that the stick is ready:

Indicators that your Apple USB Restore stick is now Formatted
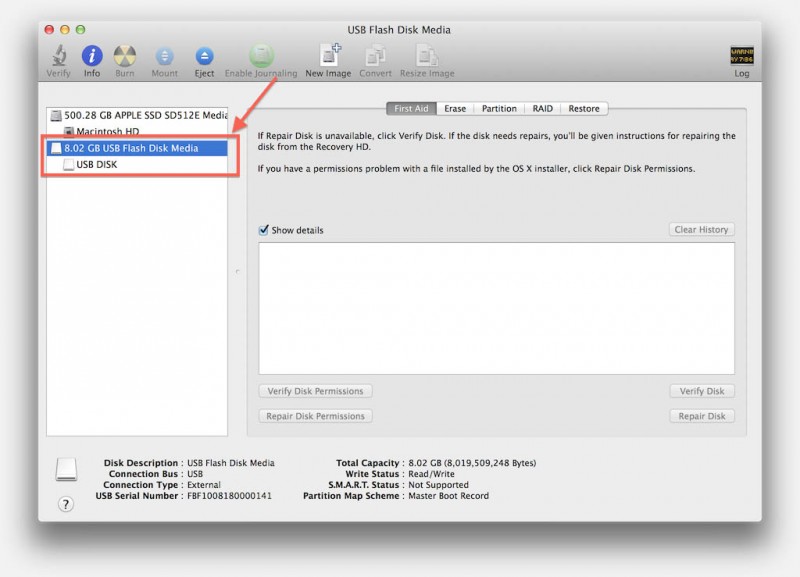
When you insert the newly formatted stick in your Mac, and you open the “Disk Utility” (under “Applications” “Utilities“), you’ll see that it’s available like any other USB stick:

Disk Utility – Your newly formatted USB stick is ready for use


![Select your Apple USB Restore stick [1] and click the Start button [2]](http://www.tweaking4all.com/wp-content/uploads/2013/11/format_apple_restore_usb_formatting-780x600.jpg)


Comments
There are 17 comments. You can read them below.
You can post your own comments by using the form below, or reply to existing comments by using the "Reply" button.
[…] these […]
Thank you for this…it worked exactly as you said. Once quick question – what is the original purpose of this application, to mass produce USB sticks with the same image?
A4diziac
My guess is that Apple made a deal with someone in China to mass produce USB stick yes … I guess these days a small USB stick is in the end as expensive or even cheaper than a CD or DVD.
Or did you mean the application? Then I would have to guess yes, considering the name of the application. I just never used it for that purpose.
Would have been nice if Apple would have been thinking a little bit more environment friendly and provide these stick out of the box as a normal re-usable stick.
hans
Worked like a charm! Thanks!
Wizzard
Thanks Wizzard!
Great to hear it worked well for you as well and thank you for leaving a thank-you note!
hans
Thanks, it worked exactly as described!
uterator
Hi Uterator!
Thanks for confirming and I’m glad it worked for you as well …
hans
Thank you! You are the MVP!
Felix
Thanks Felix!
It’s always great to see appreciation, and … it’s a great motivator to keep going
Thanks again!
hans
Thanks! Is there a way to lock it again?
James
Hi James,
not that I’m aware off, then again I never even tried it haha
hans
Hi, mine did not work, it says FAIL in red. Whar could it be?
Jose
Hi Jose,
it’s been quite a while since I have done this.
There could be a few reasons why it failed;
1) The stick you’re using is different from the one I used in my setup, and the trick does not work for this stick,
2) An incompatibility issue with the USB controller on your PC may prevent you from doing this (try another PC and/or another USB port – I’d try a USB 2.x port, and avoid a USB 3.x port).
Not sure of this helps, but I’ll keep my fingers crossed trying it on another PC will.
Happy New Year!
hans
Thanks a lot, now I have an USB flash from Apple for work in 2020. that so cool
TienVien
Hi TienVien!
That’s cool to hear!
Thank you for taking the time to post a thank-you message, it is very much appreciated!
Hans
please help!
i got the following error,
Initial Param Fail (0F) (Boot CardMode Can`t Create)
Ibrahim
Hi Ibrahim,
I’ve never seen this error – where do you see this message?
What steps did you do before getting to the error?
Also, if you used APB, which version are you using?
And what version of MacOS are you running?
Hans