Overview
Why Customize Z-Shell Prompt?
The default Z-Shell prompt on macOS is quite elaborate as it shows username, hostname, and the current directory.
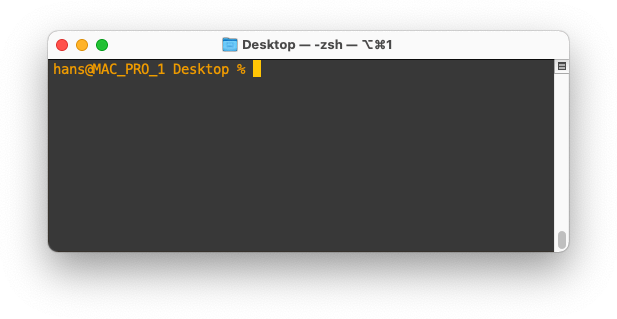
Deafult Z-Shell prompt Example
In my opinion, some of this default info is of little use to me.
I already know it’s me that is logged in (I’m the only user anyway), and I know the hostname of my Mac (and rarely even use it).
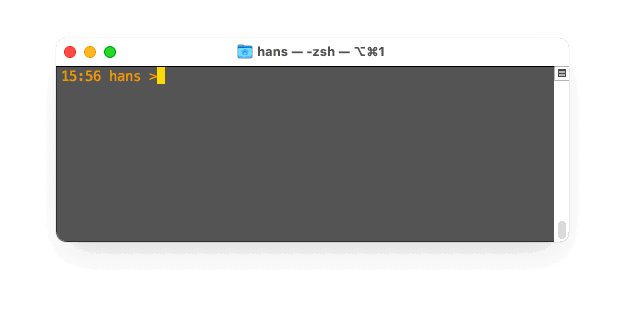
Instead, I’d rather see for example a time stamp, and have the prompt stand out (color), so I can easier spot where I had entered commands when scrolling through the text.
Tip: There is a valid argument why Username and Hostname can be very useful. For example when working with multiple Terminal sessions, so you can easier identify what server you’re working on, or what user account was used to login. However, since I usually use SSH for connecting to connect to other machines, the prompt of said connection will typically reflect that anyway.
Ad Blocking Detected Please consider disabling your ad blocker for our website.
We rely on these ads to be able to run our website.
You can of course support us in other ways (see Support Us on the left).
Temporary vs Permanent Custom Z-Shell prompt
Before we begin with the details on what we can modify, let’s first look at the fact that we can change the prompt temporary or permanently.
A temporary change would be great for testing, or for very particular tasks.
However, when we found our favorite we can make this a permanent change.
To see how this works, first some basics on how the prompt is changed.
Temporary custom Z-Shell Prompt
The “format” used for your Z-Shell prompt is stored in an environment variable called: PROMPT.
Note: zsh uses the environment variable PS1 for the prompt definition. The environment variable PROMPT, which we’ll use here, is a synonym for that. So in some articles you’ll see reference to PS1 and in others PROMPT is being used. They are one and the same thing, and personally I prefer using PROMPT as it is easier to remember. 
We can change that for the current session (temporary!) by simply assigning it a new format string like so (in Terminal of course):
When entering this and pressing Enter, you’ll see the effect right away.
However when you close Terminal and start a new Terminal session, you’ll see your old prompt again, and not the prompt we just defined.
Like I said: great for testing, and maybe great for particular tasks.
Permanent custom Z-Shell Prompt
The Z-Shell, when started, will look for a file called .zshrc in your home directory (~) – which by default does not exist.
Note: Since this filename starts with a period, this file will be hidden by default and applications like Finder may not show them.
In this file, we can save the statement we used to change our Z-Shell prompt.
Next time you open a new Terminal session, this file will be read and the prompt will right away be the way you liked it.
Note: You can edit the file with a plain text editor, for example nano (in Terminal), TextEdit (comes with macOS) or a third party text editor like BBEdit (my favorite – you can use it for free, or get the commercial version which offers some extra features you may not ever need).
Back to the default Z-Shell Prompt
In case you changed the prompt permanently, and you’d like to go back to the default prompt: simply delete te file ~/.zshrc.
Starting a new Terminal session will then again show the default prompt.
Warning! Before deleting this file, please make sure there are no other configuration items in this file! If there are, then only remove the line that defines the PROMPT format.
Custom Z-Shell prompt definition
Now that we know that we can experiment to our hearts content: let’s look at what we can do. Below I’ll list the options I’m aware of, so you can lookup what you’d like to see.
So what can we customize?
First of all, as seen in our initial example, the PROMPT definition is stored as a string surrounded by single quotes.
Between these single quotes, you can add any kind of special codes to show dynamic info, influence colors and other formatting details, etc.
But we can also add regular static text.
Note: “%” and “)” are considered special characters. If you want to display these characters for some reason, you’ll have to escape them with a “%” in front of it. So to display a “%” in your your custom z-shell prompt, you will need to enter “%%“. The same goes for “)” which then becomes “%)“.
Note: I limited the list to elements that can be useful for common use under macOS, where the bold ones are the most commonly used ones.
More details and elements can be found in the zsh manual PROMPT topic.
Dynamic Prompt Elements
These are the elements that change based on what is going on. For example current date and time, or current directory.
Z-Shell offers a nice selection.
Dynamic Elements
| Login Information |
| %l |
The TTY device you’re using, strips “/dev/” or “/dev/tty” |
Note: Lowercase letter “L” |
| %M |
Full hostname |
|
| %m |
Hostname up until the first dot |
A number after ‘%m’ will indicated how many dots should be included |
| %n |
Username |
The user that is logged in |
| %y |
Same as “%l” just does not strip “/dev” or “/dev/tty” |
|
| Shell State Information |
| %? |
Show the return code from the previous executed command |
Typically returns “0” when executed successfully |
%d
|
Current directory
(alternative: %/ ) |
a number following the “%” indicates how deep the displayed path will be,
a negative number indicates starting from the beginning instead of the end of the path |
| %~ |
Current directory, use “~” if home directory |
Does the same thing as %d, however when it is your home directory a “~”
will be displayed instead of the path |
| %h |
History event line number (alternative: %! ) |
|
| %C |
Trailing directory of the Current Directory |
See also %d and %~. Alternatives %c and %. |
| Date and Time Information |
| %D |
Current date in YY-MM-DD format |
|
| %T |
Current time in 24-hours format (HH:MM) |
|
| %t |
Current time in 12-hour format (HH:MM) with AM/PM |
Alternative: %@ |
| %* |
Current time in 24-hour format with seconds |
|
| %w |
Current date in day-DD format |
|
| %W |
Current date in MM/DD/YY format |
|
| %D{string} |
Current date/time formatted based in {string} |
See strftime format options.
Example: PROMPT=’%D{%a}’
Most commonly used:
%a = Day of week abbreviation
%A = Full day of week name
%w = day of the week (0-6)

%d = day of the month (01-31)

%b = Abbreviated month name
%B = full month name
%m = Month (00-12)

%y = Year (00-99)
%Y = Year (4 digits)

%H = Hour (00-23)
%k = Hour (0-23)
%I = Hour (01-12)
%l = Hour (1-12)

%M = Minute (00-59)

%S = Seconds (00-59)

%p = AM or PM
%P = am or pm
|
Visual Elements
Visual elements are used to format the appearance of the text, like color, bold, italic, etc.
For example this make the text red:
Visual Elements
| Start |
Stop |
Effect |
| %B |
%b |
Bold |
| %U |
%u |
Underline |
| %S |
%s |
Highlighted |
| %F{color} |
%f |
Change foreground color (font) |
| %K{color} |
%k |
Change background color |
Color: Z-Shell understands these color names: black, red, green, yellow, blue, magenta, cyan and white.
However it is also capable of using color numbers (0-255) – see the color sheet below or this more extensive XTerm Color Cheat Sheet.
Placing Text on the Far Right
One thing I was missing in this list was the option to align text … well, more specifically the option to place text on the far right.
The reason why I was missing that one, is because text displayed on the far right are not defined in PROMPT, but rather in the environment variable RPROMPT.
To show, as an example, the current time on the far right, you can do this (which of course can be stored in the file .zshrc, in your home directory (~), as well):
Ad Blocking Detected Please consider disabling your ad blocker for our website.
We rely on these ads to be able to run our website.
You can of course support us in other ways (see Support Us on the left).
Color Cheat Sheet
Here a quick list of the 16 basic colors. You probably do not need more colors, but more colors are supported and a more extensive list can be found in our XTerm Color Cheat Sheet.
XTerm 16 Colors Set
000
#000000 |
001
#800000 |
002
#008000 |
003
#808000 |
004
#000080 |
005
#800080 |
006
#008080 |
007
#c0c0c0 |
008
#808080 |
009
#ff0000 |
010
#00ff00 |
011
#ffff00 |
012
#0000ff |
013
#ff00ff |
014
#00ffff |
015
#ffffff |
Some Examples
When customizing your Z-Shell prompt, you just have to keep in mind that you have to “assemble” your string with the elements we have seen before, and you can combine this in any way you please.
In the few examples below, you’ll see how we can build our own prompt string.
Also keep in mind, that when just using the statements below, the prompt will not be permanent. So if things go crazy: just close Terminal and open a new Terminal session.
Once you’ve found your preferred PROMPT (and/or RPROMPT), you can add them to your .zshrc file.
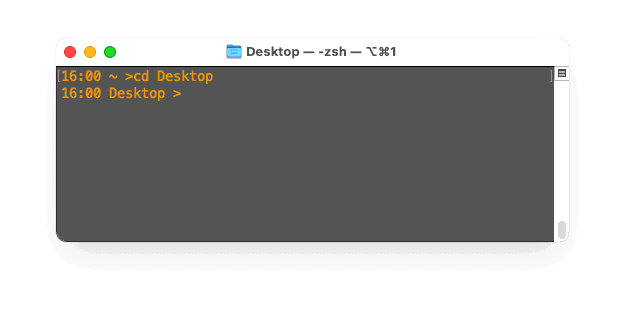
Current time and Current Directory short
Alternative:
Z-Shell voorbeeld – Huidige tijd en directory
You can make it that your home directory will be displayed as a tilde ( ~ ) by using this:
Z-Shell voorbeeld – Huidige tijd en directory met home directory als tilde
Current Directory left and clock on the right
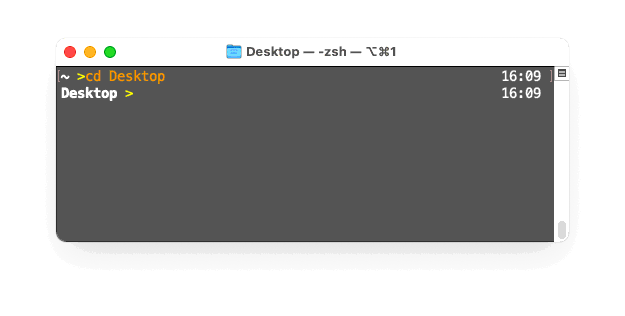
PROMPT='%1~ >'

RPROMPT='%F{015}%T%f'
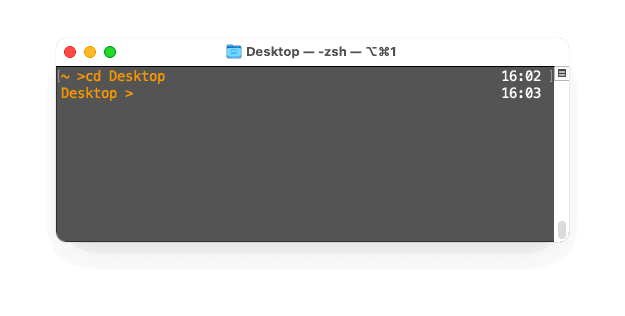
Z-Shell example – Current time bright on the right, and directory
Note: instead of “015” (white in the color table), you can write the word “white” as well. However under macOS this results in a more grey color and not real white.
Time and directory with more colors
PROMPT='%B%1~%b %F{011}>%f'

RPROMPT='%F{015}%T%f'
Obviously you can change the colors as you see fit.
I do like emphasis on the prompt, especially when I have to scroll through huge lists and need to find where I entered the command to begin with.
Z-Shell example – Current time and directory with more colors
Ad Blocking Detected Please consider disabling your ad blocker for our website.
We rely on these ads to be able to run our website.
You can of course support us in other ways (see Support Us on the left).
Bonus Tips
Two tips that help customizing your Z-Shell a little more …
Changing the Cursor in Z-Shell
Since we are tinkering with all this, you may wonder how you can change the appearance of the cursor.
Here some examples how to change the cursor temporary to blinking or not, and have the cursor be a block, underscore or vertical line.
1
2
3
4
5
6
7
8
9
10
11
| # Cursor is a Block:
echo -e -n "\x1b[\x31 q" # Blinking
echo -e -n "\x1b[\x32 q" # Steady
# Cursor is a underscore
echo -e -n "\x1b[\x33 q" # Blinking
echo -e -n "\x1b[\x34 q" # Steady
# Cursor is a vertical line
echo -e -n "\x1b[\x35 q" # Blinking
echo -e -n "\x1b[\x36 q" # Steady |
So to get the cursor to become a blinking block you copy this code and paste it in Terminal and press Enter.
echo -e -n "\x1b[\x31 q" # Blinking
or without the comment (it will be ignored anyway):
To make this permanent, you can add this line to you .zshrc file as well.
So your .zshrc file could look something like this:
echo -e -n "\x1b[\x31 q"

PROMPT='%B%1~%b %F{009}$%f '

RPROMPT='%F{015}%T%f'
Which makes the cursor a blinking block, displays the current directory in bold, and a white clock at the far right.
Suppressing the Welcome Message
When you open a Terminal session, you’ll get a welcome/status message, something like this:
Last login: Mon May 10 17:41:21 on ttys000

You have new mail.

hans@MAC_PRO_1 ~ %
If you would like to suppress this message, then this can be done by creating the file .hushlogin in your home directory (~).
This is easiest done in Terminal with this simple statement, which will create this file (empty file – see also How to create empty dummy files):
Next time you open a new Terminal session, you will no longer see this welcome/status message.
By deleting this file again, you’ll get the welcome message back as well.
Tip: Explore the man page of zsh to find more neat zsh tricks (man zsh).

Comments
There are 17 comments. You can read them below.
You can post your own comments by using the form below, or reply to existing comments by using the "Reply" button.
This is cool, thanks for sharing!!
Johnny5
Thanks for posting a Thank-You note – it is much appreciated
Hans
I didn’t realize this, but this was just what I was looking for haha.
Thanks dude!
Zarga
Thanks Zarga for taking the time to post a thank you, and thanks for sending some coffee my way
Hans
Awesome – to the point. Thanks!
Still
Thanks Still for taking the time to post a thank-you note – it is much appreciated!
Hans
Thanks for sharing!
I’ve gone with the following:
PROMPT='%B%F{019}%1~%f%b $ 'RPROMPT='%B%F{019}%~%f%b'Ben Thomas
Thanks Ben for taking the time to post a Thank-You message and sharing your prompt
Hans
Hi!
I have had a play and am going to use this:
PROMPT='%T %F{green}%B%~%b%f $ 'I noticed that the following isn’t working on my Mac (12.2.1)
…but it does work with:
Not sure of this is a change or a typo, but thought I’d point it out for others that may be confused.
James
Hi James,
excellent catch! I have no idea how I goofed up that one.
I’ve corrected the text accordingly!
Thanks again!
Hans
pleasure – glad I could help!
james
Excellent collection – thank you very much for sharing.
Lance Jekel
Thank you Lance for taking the time to post a thank you … and more than a year later I’m noticing I didn’t reply.
Anyhoo .. better late than never I suppose.
Have a great 2024 and tank you again for posting a thank-you note
Hans
Awesome collection.
The cursor statements works for BASH as well. Thank you so much for the knowledge sharing…
krazykoder
Hi Krazykoder!
Thank you for taking the time to post a Thank-You – it’s always very much appreciated.
Also thank you for adding the Bash comment. I didn’t know that worked for Bash as well.
Wishing you a happy 2024!
Hans
This is a great resource for anyone who wants to personalize their ZSH experience! The guide clearly explains the steps involved in customizing the prompt and provides helpful examples. I especially appreciate the breakdown of different prompt elements. Thanks for sharing this informative guide!
Juan E. Hairston
Thanks Juan
Hans