Restore AppleTV OS – Ridiculously easy
You have to follow 3 basic steps and have a little bit of patience … and really, it couldn’t get any easier.
This method is based on you downloading the entire image first and write it to a USB stick, which will use to boot and restore you AppleTV with.
This trick worked for my AppleTV even after I had replaced the harddrive with an SSD, but you milage may vary.
CAUTION!
This guide is only to be used to restore AppleTV OS with a FIRST GENERATION AppleTV – i.e. the silver one, not the black one!
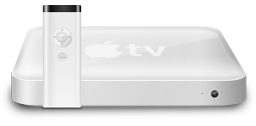
The 1st Generation AppleTV
Step 1 – Download the AppleTV Restore Image
You can download either AppleTV OS v2.3.1 or v3.0.2, depending on your needs. I usually restore v3.
You can download the files from Tweaking4All or from the OpenElec Wiki.
After downloading the desired file, you should have a ZIP file.
Download - AppleTV OS Restore IMG (v3)
Download - AppleTV OS Restore IMG (v2)
Step 2 – Writing the Image to an USB Stick
In this step we will write a Restore Image for your AppleTV OS to an USB Stick.
For this purpose you should have at least a 1 Gb USB Stick, but any size larger than that will work just fine.
Windows
Windows users will first have to decompress the .ZIP file to get the .IMG file.
A tool like 7Zip, WinRar or WinZip can do this for you.
After decompression you should have either a 536,870,912 bytes IMG file (for both versions!).
Once unzipped, use a tool like Win32 Disk Imager to restore the IMG file to your USB stick.
Download it from the SourceForge Page (recommended) or directly from Tweaking4All.
Download - Win32diskimager
After downloading Win32 Disk Imager, start it and click the folder icon to select the .IMG file (Image File).
Next select the proper drive (Device) and when you’re very sure about your choices, click “Write“.
CAUTION: Make sure you selected the correct drive, since it will be completely overwritten!!
This process will take a little bit, and once complete proceed to Step 3.
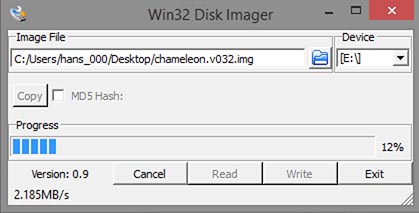
Win32 Disk Imager – Writing an IMG file
Linux
Linux users will have to decompress the .ZIP file to get to the .IMG file first.
The following command-line statement does just that (using “factoryrestore3.img.zip” as an example):
unzip factoryrestore3.img.zip
After decompression you should have a 536,870,912 bytes IMG file (for both versions!).
Next step is to identify your USB Stick under Linux, which I always found rather cumbersome. There are several methods, including the mount statement, the lsusb -v statement and the dmesg statement. More info can be found on the Internet, for example at SuperUser.com and Known-issues.net.
None of those I really liked, and under my Ubuntu setup the following worked better and easier:
On my (virtual) machine this produces something like this (the output and the device name can be different on your machine):
1
2
3
4
5
6
7
8
| lrwxrwxrwx 1 root root 9 Apr 4 16:57 ata-Ubuntu_13__32bit_-0_SSD_ZASYTHJXX3YMXAFMGRSB -> ../../sda
lrwxrwxrwx 1 root root 10 Apr 4 16:57 ata-Ubuntu_13__32bit_-0_SSD_ZASYTHJXX3YMXAFMGRSB-part1 -> ../../sda1
lrwxrwxrwx 1 root root 10 Apr 4 16:57 ata-Ubuntu_13__32bit_-0_SSD_ZASYTHJXX3YMXAFMGRSB-part2 -> ../../sda2
lrwxrwxrwx 1 root root 10 Apr 4 16:57 ata-Ubuntu_13__32bit_-0_SSD_ZASYTHJXX3YMXAFMGRSB-part5 -> ../../sda5
lrwxrwxrwx 1 root root 9 Apr 4 16:57 ata-Virtual_DVD-ROM__1__-_31415B265 -> ../../sr0
lrwxrwxrwx 1 root root 9 May 25 08:08 usb-Lexar_USB_Flash_Drive_AAJHWTC45P2TPINQ-0:0 -> ../../sdb
lrwxrwxrwx 1 root root 10 May 25 08:08 usb-Lexar_USB_Flash_Drive_AAJHWTC45P2TPINQ-0:0-part1 -> ../../sdb1
lrwxrwxrwx 1 root root 10 May 25 08:08 usb-Lexar_USB_Flash_Drive_AAJHWTC45P2TPINQ-0:0-part2 -> ../../sdb2 |
Since I know that my USB Stick is a Lexar, you will see right that the main device is called “sdb” (line 6 – highlighted). This is the device we need – do not pick one of the partitions (sbd1, sdb2, etc). We need the root device!
The proper name (path) for this device would be “/dev/sdb” (add “/dev/” in front of the device you found).
Tip: Once you determine which is the USB drive, remove it and run the same statement again to see if the drive actually disappeared from the list.
Once determined which one is your USB Stick, we will need to use dd to restore the IMG file to the USB Stick.
CAUTION : This will wipe the entire device, so make absolutely sure you’ve chosen the right device!
dd bs=4m if=factoryrestore3.img of=/dev/usbdrive
Where you will need to replace the “factoryrestore3.img” with the filename of the IMG file you’re using, and “/dev/usbdrive” with the device of the USB drive you wanted. In some cases you might need to run this with dd in front of the example code. Your Admin password will be asked before proceeding.
To make the process faster: use the raw device of the USB Stick.
This is done by adding an “r” (R) in front of the USB Device name.
Examples :
– “/dev/usbdrive” becomes “/dev/rusbdrive”
– “/dev/sdb” becomes “/dev/rsdb“.
The process will take a little bit. Once done, eject the USB drive properly and continue with Step 3 …
MacOS X
Apple users will have it much easier – no decompression needed.
A small application I created for Raspberry Pi users, called ApplePi-Baker, can be used for this purpose (as pointed out by Jan).
You can find more details on ApplePi-Baker in this article if interested.
You can download it for free from Tweaking4All.
Download - ApplePi-Baker (32 bit)
After downloading and unzipping the application, start it and your Admin (sudo) password will be asked.
Enter you Admin password and select the USB Drive from the drive list.
CAUTION: Make sure to select the right drive, since it will be completely overwritten!
Next step is to click on the “Restore Backup” button, which allows you to select the .ZIP file you just downloaded.
On a decent computer and a good USB Stick this should only take a minute.
After completion your Mac may display a message that the USB drive is not initialized, just click “Ignore“.
Eject the USB Drive properly (use the eject button in ApplePi-Baker, next to the drive list) and continue with Step 3 …
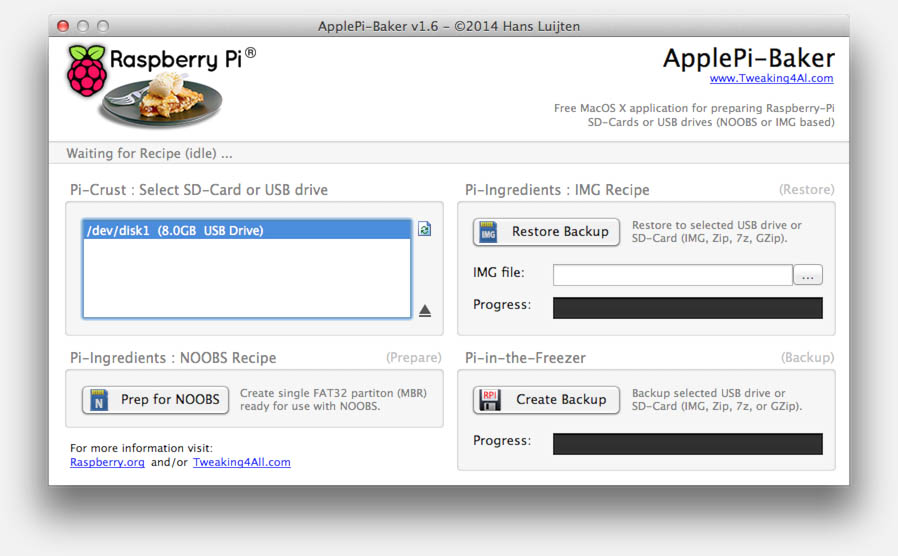
MacOS X ApplePi-Baker – User Interface
Step 3: Boot your AppleTV and Restore AppleTV OS
Power down your AppleTV (i.e. jank the cord).
Insert the USB pendrive into your AppleTV and power the AppleTV up.
Press and hold the “MENU” and the “+” buttons on the remote as soon as you see the orange light, on the front of your AppleTV, light up. When you see activity on your USB Stick (if it has a light for that): let go of the remote buttons.
After a while, you’ll see the OpenElec logo and after a short wait, the “OpenELEC AppleTV Factory Restore” message, which gives you 30 seconds to bail. After the 30 seconds, a few information messages will appear and finally your AppleTV will reboot.
Once rebooted, the AppleTV will ask for your preferred language.
At that first boot a “Apple TV Recovery” message will appear.
Select “Factory Restore” and in the next screen confirm that you want to “Restore” …
Restore might take a minute or so … and after that your AppleTV boots as if it was new …


Comments
There are 264 comments. You can read them below.
You can post your own comments by using the form below, or reply to existing comments by using the "Reply" button.
Thanks for a more convenient method! Works like a charm.
Henry
Glad to hear that! Thanks for the cool feedback!
hans
does not work. no mountable file systems.
all I want to do is boot the Apple TV off a thumb drive because the hard drive may have failed and I need to know if everything else is working before buying a new drive. Nobody has ever figured out how to do this and as expected, its more talk than fact. doesn’t work. cannot create a thumb drive image because the supposedly good files simply do not work.
Dave
Hi Dave,
Sorry to hear this doesn’t seem to work for you and I understand your frustration (one of the reasons why threw away my 1st gen Apple TV).
One of the most common issues I have seen is that the USB stick is not compatible with the ATV-1.
Eg. get an old USB 2.x stick and see if that works.
Also keep in mind that this article was written 10 years ago for the 1st generation Apple TV, to restore an image.
So booting the OS from a USB stick, as you’d like to do, is not what this article is trying to show you.
Finally, the 1st gen Apple TV has proven to be finicky at times when it comes to USB stick support, booting and restoring the OS and using the remote – see comments below. In the end, to restore an Apple TV, theses steps do work – as execute by myself several times, and as confirmed by others in the comments below.
Hans
Seeing as how I can’t even get the disk image onto my old usb 8meg because osx has errors doing anything with it, nevermind try to make a linux disk image from osx which also doesn’t work, I can’t get any further.
How do I even install apple tv OS back on? When it was running all I had to do was select factory reinstall to fix it.
Why doesn’t anything work to make a usb boot? The instruction video just doesn’t work.
Dave
Hi Dave,
are you by any chance mixing up several articles on this topic?
Especially as there is no such thing as an instruction video here in my article?
I also assume you mean a 8 Gb USB stick? (probably a typo)
The article here is about restoring AppleTV OS – granted; the 1st gen AppleTV can be a pain when it comes to booting the restore from an USB disk, especially when it comes to supported USB stick and remotes that may or may not function properly. It’s been a very long time ago that I tossed my AppleTV as the hardware is for example not capable of handling HEVC/H265.
To write the image file to a USB stick, you can (on a Mac) try ApplePi-Baker 2.x. This article is still referring to the no longer supported 32 bit version of ApplePi-Baker.
Hans
I was hopeful. The Apple TV seemed to respond. It rebooted with the apple logo, it asked me for language and then whether I wanted to restart, or restore factory settings. I chose the latter, and then it entered this cycle, where it came back to the language option, and then choosing the factory settings, forever. If I chose restart, it would take me to the same menu again. So I tried unplugging the flash drive, and plugging the ethernet, didn’t work, but then it got me to some weird point where it stays forever, as in a lymbo, in what seems to be like the first 3% to 5% of the restore mode (the first chunk of the bar starts coloring white) and it never advances. I try restarting with MENU and – but it comes back to the same point, it never gets past it.
I feel like I lost my apple TV forever. Please tell me there is something else I can do.
CG
I would try flashing it again … seems like something didn’t go well in your first attempt.
hans
I used menu and – and it worked for me the menu and + didn’t work for me.
thank
kam
Thanks Kam for the tip!
hans
This has happened to me! 😩How did you get out???
Francisco
I did that, several times. Doesn’t work :-(
CG
Got it. I burned a new usb, and did everything from scratch. Should’ve thought of that yesterday.
Thanks
CG
I assume you mean that your AppleTV is up and running again …
…
hans
Tried this method… then saw some logo then is tried to boot but then got “I/O error on device” with many failed attempts. Any ideas?
steve
This would be the most reliable method, the “I/O error” could be related to the brand/model USB stick maybe?
So far I have not seen this error, and I even replace the factory harddisk with an SSD disk.
hans
To be more specific, the OpenElec logo does show up. Then it looks like it’s attempting to update, load, etc. (black screen with a series of white type that repeats over and over again with that I/O message I mentioned. If you’d like the complete error message, let me know. It’s a bit long and it repeats for some time before it just reads “OpenELEC AppleTV Factory Restore”. At that point, it just stays that way. The reason I’m trying to do this is that my Apple TV is flashing a “?” above the Apple TV when I try to boot. I thought this method would do the trick unless it’s a hardware issue. I appreciate the help.
Steve
Use a different USB thumb drive. This drove me crazy then tried a different one and success.
John
I can confirm what John says. Sometimes it’s just a matter of grabbing a different USB stick.
Thanks John!
hans
Hi Steve,
Since I have not yet seen this happen, I’d have to guess that the harddisk of your AppleTV is having issues … but it’s juts a guess. If you have a 2.5″ harddisk laying around, you could swap those. Or take the one from your AppleTV and plug it into one of those IDE to USB adapters to see if it works properly.
I can imagine only 3 I/O issues:
hans
No I encountered the same issue but quickly corrected it by connecting my ATV to my router directly via LAN cable. Try that!
Sisco
Thanks Sisco for the tip! Much appreciated!
hans
I did all this and it worked but now the network and wifi are not working. have tried all the usual reseting all routers and apple tv etc but no joy. Any reason to why this would have stopped working?
Gerard McHugh
Hi Gerard!
I wouldn’t know any reason why this would happen – your procedure to reset routers and such is definitely something I’d done as well.
If Wifi and network are not working, then I flash the AppleTV again – just to make sure.
Note: In my AppleTV there is no Wifi card, since I’ve replaced it with a CrystalHD board to enhance video output. So I’m not able to test WiFi functionality. The firmware here though is an unmodified Apple version, and should work properly right out of the box.
hans
Hey,
Thanks for doing this.
Like Stephen I got to and the “factory restore” and then it froze. I do have some 2.5 drives and an ide adapter. I tried reading the drive prior to finding your page and windows wouldn’t see anything. It spun up with no noise… I’ll try another. How should it be formatted or does the flash do the formatting.
Thanks Again
Paul
Hi Paul,
the partition on your AppleTV drive cannot be read under Windows, unless you have specific file-system extensions installed under Windows. I’m not 100% sure which Linux file system is being used, but most likely something like ext2 or ext3, which Windows natively does not support.
The USB stick that you prepare in this article will handle the partitioning and formatting of your AppleTV’s hard-disk. You can use another (larger) 2.5″ Harddisk or for example (like I did) a 2.5″ SSD drive.
I have found that when the first time fails, the following might help:
hans
OK. I tried a few more times got to the blinking question mark…..tried two more hds all got the same thing. the drives were recognized by windows prior to attempting to put them in the ATV. does that mean the ATV is working? Maybe the cable? A different thumb drive? It seems so close!!!!
This worked great. I did jailbreak it a couple of years ago …worked fine… let it sit for a while 6-12 mo.s then it just wouldn’t boot.
Thanks Again
Paul
If you get the “OpenElec” message, then I think it’s safe to assume that the USB stick is working correctly.
With a total of 3 HDD’s, I’d assume that at least one of them should work, right?
Not using the AppleTV (you’re working with the silver 1st generation model right?) for 6-12 months should not break it, unless it was stored oddly (i.e. way to cold, way to hot, or way to humid).
I have never heard of a cable being broken, but it might be worthwhile to swap it with another cable, if you have one laying around.
It’s hard to diagnose the problem at a distance …
hans
Remade the stick…. got open elec logo…..gotta bunch of messages, quite a few errors, then asked me for open elec password.
Let it sit for awhile as I have no way to enter the password. finally rebooted it and get the blinking question mark. Could I unplug the stick and enter the password w/ usb keyboard.
Feeling pretty stupid.
Thanks
Paul
Never feel stupid Paul … we’ve all had situations like this.
As for the password; there should be no password question, so in your case I assume that removing the USB stick might work to connect a keyboard (it’s most likely “openelec”). But again: there should be no password question.
I suspect that the installation script crashes seriously and just jumps to a regular start up instead.
This make me believe that there are some hardware issues with your AppleTV – most likely issues with the harddrive.
I know that writing down all the errors is impossible, but try to see if it generates some kind of mount or disk errors. Those would point to an issue with the harddrive.
hans
hi there,
i tried this and it finishes and restarts but goes back to the apple question mark, have a tried alot not sure what i’m doing wrong.
cheers
imran
Hi Imran,
During the process, did you see any error messages? Did you everything go as described above?
Are you sure your harddrive (in the AppleTV) is working properly?
hans
Hi,
I get all the way to the Restore option, try to restore and it fails. It looks like it is restoring, with the Apple Logo and the status bar. Then it fails. it says “Restoring to factory condition failed. Your Apple TV could not be restored to original factory condition. try again or go to http://www.apple.com/support for help”
I have tried flashing multiple times. No luck.
any thoughts?
thanks
Mike
Mike
Hi Mike,
Issues could be caused by:
– Unsuitable USB stick (but since you did get some messages, I doubt this will be the case)
– Corrupt download, you could try the original source to download the image again (OpenElec Wiki)
– Corrupt or defective harddisk, if you have another 2.5″ HDD laying around try that one.
– Other defects on the AppleTV (I have yet to hear of that, so I doubt that’s an issue)
You could try the online version of this article (requires a network connection).
hans
Hola
He intentado la instalación varias veces pero lo único que aparece es el logo de OpenElec y de ahi a la pantalla en negro, la retiro y solamente aparece el logo de apple pero no pasa nada que puedo hacer de antemano muchas gracias, saludos.
Robert
Hi Robert,
Please post comments either in English, Dutch or German. Google assumes you wrote in Spanish, the translation:
“I tried installing several times but all I see is the logo of OpenELEC and thence to the black screen, the retreat and only apple logo appears but nothing happens I can do in advance thank you very much, greetings.“
Please look at the previously posted comments concerning this issue. I’d start with v3 but you most certainly could try v2 as well (it will update then to v3 if you choose to do so).
Seems your USB stick boots OK, maybe the HDD of your AppleTV is defective, or the image to the USB drive didn’t go well.
It’s also worth trying the online method, where the image will be downloaded during install (wired network recommended).
hans
I’ll try , thank you very much .
Robert
How long would you say this process takes?
My aTV1 is sitting at
INFO : restoring recovery files
How ong should this take, currently It’s been sitting at this without a curser for 20 minutes or so.,
TIA
Grahame
I would guess that 20 minutes should be long enough … worse case scenario I’d say within 30 minutes …
You might want to retry the process from scratch … I’ve heard of attempt that fail the first run, but succeed the second run.
Also check if the harddisk is fully operational – it might get stuck when part of the harddrive is defective.
Alternatively, you could try the other image (v2 versus v3 or vice versa).
hans
Thanks Hans, I found a old 80GB IDE hard drive and swapped it out. Your fix worked.. :-) Thank you, When I have time I’m going to try spin-rite on the orginal drive to see what happens.
cheers
Grahame
Awesome!
Good to hear that Grahame!
hans
hello I did everything as you said and on the reboot, the apple tv did not start up, it tried to reboot again and again and again…it was like and infinite loop
kyriakos
Try doing the process all over again, including downloading and making a new USB stick.
Maybe something got screwed up with the download or the creation of the USB stick?
hans
Hello, I have downloaded the v2 version and fixed the problem..i don’t know why but THANK GOD it did….god bless you :) the good news is that before the version that I had was 2.3 and now is 2.3.1 hopefully I would be able to download the 3.0.2 directly for the apple tv….if this doesn’t work again what do you think that I should do? maybe the v3 version doesn’t include any settings for e.g sound or wifi and that’s why didn’t worked for me? …..Btw thank you for your reply…
kyriakos
OMG it worked, with the 2.3.1 all the correct data was written in the disk and the update is done. THANK YOU SO MUCH , REALLY GOD BLESS, YOU HAVE HELPED ME VERY MUCH!!!!!!!!
kyriakos
Awesome!!!!
I’m glad to hear you’ve got it to work again! Excellent!
hans
To be honest I didn’t think this would work.
I had already done a lot of internet reading and attempted other “solutions” but without any joy.
However, I followed the instructions above and it worked first time like a dream. Thank you very much
Adam
Thanks Adam for taking the effort to post a nice feedback!
Glad to hear it worked for you too!
hans
Dude, you’re the best…THANKS!
Ironblacklion
Hi Ironblacklion!
Thanks for taking the time to leave a cool feedback!
Glad the article helped you!
hans
Ok. I am likely going to come off a s real dumb ass here but please be patient as i am new to all this stuff. I have an apple tv 1 and it has been jail broke and crystalbuntu and openelec installed. However, it is not working right so I am trying to factory reset it but it is set up as a linux based program. I need to make changes to the programming (lines of code) to allow me to do this. The apple tv wants me to enter an openelec login but there is no keyboard. Is there any way to set up a keyboard wirelessly to enter the data. Is there a zip file that has the changes in it already for a linux based system?
cayjungrl
Hi Cayjungrl!
We all are, or have been, noobs at some point . So don’t feel bad about that …
When restoring your 1st generation AppleTV as described above, it should not ask for a OpenElec password. So that indicates that something is going wrong. First thing I’d do is simply try again, if you haven’t done so already.
If that failed: the most common “issues” I have seen are:
– Download corrupted (I have not found a pattern yet when and how this happens) …
– USB Stick not “flashed” properly …
– AppleTV Harddisk defective ….
Now, the first two are easy to remedy:
Download the image again, flash another USB stick, and try again.
The 3rd issue, which appears pretty common unfortunately, can only be resolved by testing another 2.5″ IDE harddisk ,…
I actually replaced my with a 32Gb SSD (IDE/PATA), a Transcend from Amazon, but those appear no longer available.
Here is a list of alternatives at Amazon. A 32Gb drive can be found for less than $50 – and since all my video resides on my NAS, I did not need a large drive.
Also note that an SSD will make the AppleTV faster and keeps it cooler too …
I assume you’re having a CrystalHD in your AppleTV, in that case I’d look at OpenElec. Unfortunately, the 1st Generation of AppleTV is no longer supported with new builds (the last version for the ATV is OpenElec 4.2.1).
hans
When I rebooted the ATV into the OpenElec USB-flash drive, I didn’t get errors, but it clearly booted into some “OpenElec” version of *nix, ending with the prompt:
OpenElec login:
The one thing I changed from your instructions was that I dumped the factoryrestore3.img file to the USB stick by the following command:
dd if=factoryrestore3.img of=i:
(I was using the excellent ‘rawwrite port’ of gnu dd to Windows from http://www.chrysocome.net/dd).
In the end, i went back and used Win3diskimager (whatever — the utility you recommend above), and the usb stick worked just fine. Is there some reason why using dd would create and improperly formed USB stick?
thanks
scott
Scott Petrack
Hi Scott,
I actually would expect “dd” to do the better job, since it’s writing without thinking … under MacOS it’s actually the “go-to” tool to do this (but since I’m too lazy to look up command line statements, I create ApplePi-Baker, which adds a GUI to “dd” for MacOS).
I know this might be a stupid question, but did you write to the USB device or to a partition on the USB drive? (That would be the only thing I can think of)
hans
You-are-a-god. Fixit. Works using an external USB 80GB hdd.
mactvshows
Hi MacTVShows!
Thanks, haha. I wouldn’t consider myself “a God” but I’m very happy to hear that it worked for you!
hans
Thank you for the help. This was the only place I found to tell me how to upgrade my Apple TV 1G hard drive using my Windows PC.
The gray cover on my Apple TV tore no matter how careful I was being. It’s on the bottom and I intend to keep it til it dies, so no big problem.
I did find that I had to flash my USB drive a second time making sure that Win32 Disk Imager was ‘Run As Administrator’ under Windows 7 Pro 64 bit. Maybe doing this will help someone avoid a second flashing. Doing this allowed the Apple TV to complete the Factory Restore to the new hard drive without further issues.
Mary Ford
Hi Mary!
Thank you!
Great to hear that this worked for you, and thanks for posting the “run as administrator” tip!
hans
Hi: just downloaded program lets see how it dos.. but again without trying it . Thank You
Genarrow
Thanks Genarrow!
hans
This worked perfectly as described. It took a few restarts of the Apple TV and iTunes to get things to coordinate, but now everything is pure Apple again.
My Apple TV 1 hack had become so far out of date that it was better just to go back to the original. I can convert any video file into iTunes using iVI so now any video can now be played. No need for the old hacks anymore.
Thank you so very much!
Bruce
Hi Bruce!
Glad to hear it worked well for you too! And … thanks for taking the effort to post a nice feed back – that’s always much appreciated!
hans
Thank you SOOOOOOOOO MUCH! I was literally about to shoot my self!!!
tking
Glad to hear you didn’t shoot yourself!
Thanks for leaving a nice comment! It’s much appreciated!
hans
Many thanks!
jkspinner
Thanks for the positive feedback – glad it worked for you too!
hans
Hello well i made the USB drive, but the problem I am having is that i dont have a paired remote i have a remote but i am unable to do the option that says menu + volume + , any help would be appreciated. I bought the apple tv 1 used and when i plug it in the orange light just flashes, thanks in advance for the help.Christopher.
Christopher
Hi Christopher,
Ouch, not having a paired remote can be a challenge. I honest do not know how to work around that problem.
Reading the Apple Knowledge Base Article on this: I’d say your AppleTV is having issues, possible the harddisk.
You could try taking the harddisk out and connecting to a regular computer (with an USB adapter for example) and check the disk or even wipe the disk. Or … even better … place a different 2.5″ ATA (not SATA) harddisk or SSD drive.
hans
hold the left forward button with the menu button for 10 seconds and will pair
kyriakos
Thanks Kyriakos for posting the tip!
hans
no prob Hans :)
kyriakos
hello, I have installed the openelec system on my apple tv 1, if I do this procedure it will bring me back the original OS of the apple tv?
kyriakos
Yes it will!
hans
thnx Hans :)
kyriakos
Hi, thanks for your tutorial. I currently find myself with a trusty 160gb ATV which I think is failing me, (gets stuck in menu items, light flashing when using remote, unresponsive). I’ve done a factory reset a few times. On occasion it just sticks at the language selection screen, other times it fully loads and then everything becomes unresponsive again. I did have ATV flash installed but this was wiped when I did a factory reset.
I’ll be straight. I’ve never ever changed a hard drive… in anything, or opened it up so please forgive my ignorance. I’ve done plenty of jailbreaking devices so am willing to give anything a try.
Assuming my hard drive is at fault, is it simply a case of buying a new PATA drive. Opening up the ATV. Taking the old one out. Putting the new drive in and booting it up with your USB stick method?
Do I need to do anything with new drive before I install it? or can I simply replace the old with new and boot up?
Sorry if anything I have asked is really obvious or stupid. Any help is greatly appreciated.
Regards
Paul
Paul Shackleton
Hi Paul!
In essence it’s a matter of opening the case (which is a little messy when removing the rubber bottom – let the AppleTV run for a while so the bottom gets warm so it comes off easier), locating the PATA drive and replacing it with another one.
I’m not 100% sure if just any PATA drive will work, but I had success with replacing it with a cheap PATA SSD – which makes it more quiet, faster en cooler.
This guide to upgrade the AppleTV drive might be helpful for you!
Restoring the AppleTV OS can be done as described here.
Hope this helps!
hans
Thanks for the reply Hans,
It looks like there’s more to do than just taking one out and putting one in, plus using your usb stick method.
I better get reading and buying the relevant adaptors etc..
Cheers
Paul
Paul Shackleton
Well, the drive you’d need should be a PATA IDE drive or SSD – they can be found!
If you’re looking for an SSD, than look for example at Amazon. The number of PATA IDE Harddisks available is a little tougher though, I found these (160Gb and 250Gb) at Amazon.
I would try to avoid getting an adapter (SATA to PATA) = you might run into space restrictions and incompatibility issues.
Like I said: I didn’t even think about checking compatibility and just bought an PATA IDE SSD, plugged it in, recovered as described in this article and I was good to go … no need to clone the drive.
hans
THANK YOU !
My Apple TV 1 is up and running again; I’d love to have a newer generation one, but my television system doesn’t support HDMI and my bank account doesn’t support replacing my system this year lol
The children can watch movies once more, the wife and I can watch the tv programmes we have downloaded and bought from apple, and music and photos play in the background.
We are one happy family, thanks to you guys, very much appreciated !
Martin Goddard
Awesome Martin!
Glad you’ve got it all up and running again!
hans
Hi, let me first say this tut was the first one I have found that explained everything in explicit detail and didn’t assume I was a programmer, so thank you for that!! However I have an interesting predicament, my remote quit working and no app I have installed to my iPhone 4s seems to work either, any suggestions on how I can accomplish the restore when the remote don’t work for my atv and iTunes don’t see the atv? I have tested both remotes on my macbook pro and they work so I know it’s not the battery :-)
Thanks much
Kohly
Hi Kohly,
thank you very much for the compliment!
As for your remote problem; Yes that can be quite tricky indeed.
Your remote needs to be synced with your AppleTV, which for the first generation AppleTV should be done by press and hold the Menu and Next/Fast-forward buttons for 6 seconds – AppleTV needs to be on of course, but I’m not 100% sure if it actually needs to “work” to accomplish this. A chainlink appear if syncing worked. Other websites (yes I had to look this up as well) claim that you should press and hold the Menu and the Previous/Rewind (<<) button for 6 seconds.
This should be done when the orange or white light is on.
However; I have yet to run into a situation like this. Or at least: I do not recall running into this problem.
hans
Had a few problems had modified the pata and installed a sata converter installed a SATA 500GB HGST drive
Came across a few little problems that might help other People
1 Could not see the drive complained about the sta1 drive
solution was installed drive into win 7 and prepared the drive in component management formatted then deleted the format
2 loaded the software all good this time but 30 minutes in still going (not right) checked disk in win 7 not partitioned or loaded
solution PATA/SATA controlled I had to jumper for select alternative drive
3 All good but at the end when rebooting video was scrambled and white screen reinstalled the image with a new one same results
solution burn version 2 image and reinstalled
All good at this point hope this helps others to get it running now I have 461 GB to play with internally
Ted
That’s awesome!
Especially with the PATA/SATA converter.
Thanks for posting these additional tips as well!
hans
Creating the USB drive worked no problems (OS X 10.11 El Capitan), but booting up the ATV from it goes from OpenElec log to “Init started: Busybox v1.18.4” and stays there.
It was an 8GB USB thumb drive, it that makes any difference.
James
Hi James,
Sorry to hear you’re running into an issue.
Which of the images did you use? Did you use v2, v3 or an OpenElec installation?
First thing I’d try, is re-flashing the USB drive.
If that still fails, re-download one of the images and try again.
If that still fails, consider using another USB stick.
Also: could it maybe be that the harddrive of your AppleTV is “dying”?
A few visitors had this happen, where the original hard drive had become very unreliable.
I apologize for the seemingly “dumb” solutions, but it has worked for some as you might be able to see in the comments here …
hans
Thanks for your reply Hans.
I tried v3 first, then v2.
I’ll try another USB stick.
I’ve taken the HD out and run SpinRite on it, so it should be OK. But it’s still a possibility.
James
Yep, tried another USB stick, and it worked!
Thanks a) for this great tutorial, b) for your help and c) for ApplePi-Baker!
James.
James
Awesome! I’m happy to hear that James!

and …you’re most welcome!
hans
Hi,
I’ve tried this on an Apple TV that may already be dead? I’ve put in a new Hard Disk and tried to follow the tutorial. But I’ll I get is this:
Image of TV
Any ideas?
Ta
Louis
Louis
Hi Louis,
seeing the screen of you AppleTV, I’d think you might have some other issues with your AppleTV.
It either boots weird (not necessarily OS related) or your graphics chip/memory has an issue. I have never seen this, only with damaged memory or video cards in the PC world.
hans
Hi
I should have said I got passed this atage “bail. After the 30 seconds, a few information messages will appear and finally your AppleTV will reboot” with the fuzzy lines. Now the box just boots shows apple logo then boots again after say 5 mins and keeps on in that cycle. I never got the language option etc.
Ive scanned the hard disk on mac and there are no issues.
Sometimes more fuzzy lines than photod.
Thanks for reply, I suspect as you say its a board issue.
Cheers
Louis
Louis
Hi I am having the same issue with it booting to the apple logo and just staying there. I was wondering if you needed up finding a fix for this. All I seam to be able to do it get it to the boot screen weather it be the penguin sitting on the box(installing other software) or just the apple logo. Thanks in advance
Jay
Hi Jay!
I recommend testing another USB stick, if you have one.
People have reported mixed results, and when switching to another USB stick, problems seem to disappear.
Another issue could be that the harddisk of your AppleTV isn’t all that good anymore … you’d need to swap it for another one to test.
hans
I’ve added your picture, hopefully someone recognizes this “noise” …
hans
Hi; My ATV, Gen 1 hard drive crashed. Can I obtain the OS somewhere and place on a USB stick? Will it boot from a stick? If not, what about an external HD?
Dougal
Hi Dougal,
I have not ever seen a ATV1 run from an external drive or USB stick – but considering that these sticks can boot and considering that it’s running on a slimmed down Mac OS X version (as far as I read online), booting might be possible, but would probably take a lot of work.
You could look around at the AwkwardTV Wiki for more details, for example this article.
It’s probably much easier to find an ATA hard disk or SSD drive. Finding an ATA SSD however appears to be quite a challenge.
hans
Hi Hans; Thank you so much for taking the time to try to help me. It is appreciated. I’ll take your advice and see if it helps. I’ll let you know how I make out.
Thanks
Dougal
Hi Dougal!
You’re welcome – please post what you ended up doing, I’ll be looking forward to that!
hans
Hans
Get Dougal to buy a 44pin 2.5″ IDE PATA Hard drive to SATA converter adapter connector make sure its a slimline it has IDE on one side and SATA on the other its no thicker than the 2.5 Sata Hard drive reposition the drive in the apple TV1 to allow to fit the converter on the apple IDE Cable you will have to carefully remove the other crimp connector (the cable connector will remain be careful not to remove this )fit a 500Gb or 1 TB hard drive (see my Post on the drive I used)
it all fits in neatly if you do this carefully
If you like I can send you Photoes of my conversion
Ted
Hi Ted; I am so amazed at the help being offered here. I presently already have a Seagate, 320 GB HD with connector setup shown in pictures sent in my email. Thank you and Hans so much for your help. It is more of a challenge to get my ATV 1 working as I already have a new ATV 3.
Thanks again.
Dougal
You’re most welcome!
I received your email, but only pics of the SATA connector.
You ATV needs ATA (aka PATA), so you will need a SATA->PATA adapter (as Ted suggested).
Make sure you find the smallest model you can find.
After adapter & drive have been installed, the ATV1 should “see” it as a regular drive.
hans
Thanks for the Tip and for offering to send pictures Ted
@Dougal: if you’d like to see pictures … just ask
hans
Hi Hans; As can be seen in my reply to Ted I am very grateful for the help here. Sure, I’d love to see your pictures and anything that will help.
Thank you, again
Dougal
Hans, Thanks much…. Confirmed that IMG (v3) and (v2) work for Apple TV, with Win32 Disk Imager. I initially used a differnt USB img builds, USB Image Tool, which caused the dreaded blinking “question mark”.
Rodolfo
Hi Rodolfo,
Awesome, glad to hear it worked for you .
.
And … thanks for taking the time to write a thank-you note … I very much appreciated it.
hans
Hi, everybody i did all the process and it worked immediately ,i put a 250 go sata hardrive with sata to ide adapter and now i have 232 go for my music collection .Thanks you so much for your job
Nabil
Hi Rodolfo; I’ve been trying the same exact thing and it only gets to the part where it is writing files to the HD, then @ RE-Boot it goes nowhere. Did you format your HD first? Any advice would be appreciated!
Doug
Dougal
Hi Nabil!
Great to hear this worked well for you and thank you for taking the time to write a “Thank you” note – it’s much appreciated!
Could you maybe post a link to what model SATA to IDE adapter and what model drive you used?
hans
Thank you for the information. I tied uploading the two files (Factory restore2/3) on two separate thumb drives. It seemed finicky to actually get it to work and took me many times. In the end it would go through the black screen about reinstalling and booting but after that nothing would happen. Still working on the issue… Anyone else getting this? Does this system boot with no Hard drive at all? Perhaps a bad hard drive is the issue.
– hooked directly into ethernet.
– tried 2 USBs (2.0 in both cases i think)
– Files made with Apple PiBaker on El Capitan
– signal seems to be coming out of component outs when it does – not the HDMI. (you can get a black and white signal out of the blue connector if you only have one port on your TV as most do)
ps. I like how you don’t have to set up an account to write in this post since, lets face it, I probably won’t be on here again.
Tim wilson
OK, made some progress. It turns out having the HDMI cord plugged in messed things up. It seems to have only connected to the screen initially by the component outs (red green blue connectors). I don’t have component on my screen so I had the GREEN connector connected to the only port on my projector that is the same as most Tvs have (yellow RCA jack). Sorry, I mentioned this was the blue cable above.
If you are doing this set up i suggest you use the component outs or try them if you had the same issue i had.
excuse the sloppy writing, its late.
Tim wilson
Hi Tim,
glad to hear you figured it out – I have to admit that I was not aware that HDMI could cause problems, especially since I used HDMI as well when I did this with my own AppleTV. Good to know thought that there are scenario’s where HDMI might not work.
Good call to use the Composite input of a projector/TV/monitor (yellow RCA) with one of the Composite connectors (green)!
Thanks for taking the time to post that here – others might benefit from this as well.
hans
Ey guys, you’ve made my day. My Atv didn’t get it at first run, got stuck at 5% at factory resetting. So I flashed the stick a second time and did the whole procedure once more. Worked. I’m happy to have my Atv again……
Frank
Awesome! Glad it worked for you Frank!
And,…. Thank you for taking the time to write a thank-you note – it’s much appreciated
hans
Works great! – Thanks!!!
Greetings from Germany
Marc
Thanks Marc! Great to hear it worked well for you as well!
Greetings from Die Niederlande (for now anyway) …
hans
Hello there Hans, I sent you a message from my iPad earlier, and I do not see it posted it, so I am sending it again.
Currently I am trying to replace the hdd on my Apple TV 1, and you mentioned that you had replaced your atv 1 hdd with a small 32Gb ssd and worked in conjunction with a Nas for your media access; my question is, how did you get the atv 1 to see the Nas drive and what brand are you using. Currently I have a Western Digital My book Live Nas where I keep all my media but it is only seen by computers an iOS devices only , no atv..
Your info on this subject will be much appreciated.
Bilesco
Bilesco
You’re most welcom,… but you comment actually did post, just under the other AppleTV recovery article (see this link).
You can read the details there, but short version: I installed OpenElec (an embedded Linux completely optimized for KODI/XBMC).
hans
Worked first time thank you, it’s made my paper weight usable again.
Alan
Awesome!
Thanks for posting Alan! It’s much appreciated!
hans
Hello Hans,
I replaced my diseased atv hdd with a pata 120G ssd hard drive and proceeded to install the atv os version 3.2 ; had a little delay
as the installation got stuck in the section where you chose language , so I decided to use a usb 3 instead and the installation was flawless. I originally was ,going to install a sata 1 tb, but desisted from that idea, due to space limitations when you follow that method.
In my case 120G is not enough for all my media, however since I have all my media in a nas I will try to connect it to the atv using Kodi,
Thanks an awful lot for your help for all you do.
Bilesco
Bilesco
Hi Bilesco!
Awesome, great to hear that you managed to place a 120Gb SSD in your 1st-gen ATV. I did the same with a 32Gb SSD, same setup as you: Media is stored on my NAS.
If you haven’t already;
consider installing a CrystalHD (replaces the WiFi card in your ATV), so the ATV supports 1080p better …
hans
Hello Hans,
As of matter of fat, I did get the Broadcom Crystal Hd card, now that you mentioned it, when I first got the the SSD HD, but held off installing it, since you loose the wifi,i if you make the switch, however you can regain it by installing a wifi bridge or usb dongle; nevertheless my current atv os is a Linux base, which lets you display 1080P ; are there any additional benefits to installing the CrystalHd ?
Thanks for help,
Bilesco
Bilesco
With mine (running OpenElec) 1080p h264 was problematic without the CrystalHD … granted, I have no clue how things have developed since. – much faster.
My ATV is in a guest bedroom, so it’s rarely used or updated …
As for loosing the Wifi – I really prefer wired networking for video playback
hans
Thanks Hans, I will experiment with it, once I install XBMC and get my NAS connected to it, I will post my results.
Once again thanks for your help
Bilesco
Thanks! And … You’re welcome Bilesco!
hans
hi i went through all the steps and i reached to english but its like the remote isnt responding to the box it after english the box eventually load to next screen but its asking me to click ok for screen resolution but i cant select ok do you have any suggestions .
christina
Hi Christina!
Well, as silly as it may sound, but … try using a different USB stick and try again.
For unclear reasons, the support for certain USB sticks seems unreliable. Trying the entire process again, seems to work at times. Using a different USB drive as well.
(I know that sounds horribly lame,… but as you can see in the other comments, this is not uncommon unfortunately)
hans
All I can say is thanks so much!! This page was a great help, easy step by step and everything I needed for resources was right in the document. My stuck in “failed to restore” recovery mode days are behind me and my Apple TV 1 is back up and running on vs 2.3.1(figured I would try older os and see if I liked it better as I can always update later.)
The only thing I at first stumbled with was because I tried just copying the unzipped .img file to my thumb drive, nothing was happening on powerup. Then went back and downloaded the win32 disk imager and FOLLOWED THE DIRECTIONS. Lol Voila, openelec message displayed and everything went smooth… Thank You Thank You Thank You!!!!! =)
Burke
Hi Burke!
Thank you for taking the time to post a thank-you! That’s awesome! Glad it worked for you as well!
hans
Dear author,
Thank you for enabling me to upgrade my loverly ATV1 old 32GB HDD with new Kingspec SSD 1.8″ PATA/IDE 128GB (for IBM ThinkPad X40 X41 X41T). Now I can enjoy my entire music collection streaming directly to analogue amplifier without any need to have Mac or anything to be on and streaming. I also enjoyed new SSD from eBay was a direct replacement to old HDD in ATV1 without any need to adapters and so.
Regards,
Nurlan
PS: having PayPal in your list would make me to Donate
Nurlan
Hi Nurlan,
I’m glad to hear you’ve managed to replace your drive, awesome!
As for a PayPal link; PayPal made me remove the link since my website (according to them) seems to be promoting activities they frown upon. I tried to explain it to them, but … well, no luck there.
If you’d like to donate, show at Amazon (use the link in the upper left corner) or by using PayPal (use my email address: hans at luijten dot net, subject: AppleTV Recovery) – it’s much appreciated!
hans
Hi there,
I downloaded the latest OSMC and lost my sound on my ATV1. I followed this exact process and it restored the ATV1 and I got my sound back. I then tried getting an older version of OSMC and lost my sound again. I’ve followed this exact restore process twice now, an am able to restore my ATV1 to factory settings but can’t seem to restore my sound. Help?
James
Hi James,
I have not encountered that problem …
What kind of Audio output do you use? And if optical or HDMI, what kind of device do you use for input?
hans
Hi Hans,
Audio output is just HDMI, and this is plugged in to the TV directly. Another weird turn of events last night, I then started using my ATV2 on the same HDMI cable and it worked, then once I plugged the ATV1 in again the sound was working.
Why could this be?
I’m a bit worried about installing OSMC on my ATV1 again, as twice now I haven’t had any sound when I’ve installed – and seem to still lose the sound once I fully restore, with the sound then returning randomly?
James
Well, one thing I can come up with, since it happens to me every now and then with my HTPC;
When I power up my TV after powering up my HTPC, audio can get goofy. If I power up the TV first and then my HTPC, it all works nicely.
It could of course also be a driver issue in OSCM … I never tried OSCM (for those unaware: OSMC is a Linux distro with KODI included, kind-a like OpenElec).
hans
Thanks for the response Hans. I would prefer to install OpenElec but I was struggling to do this on my ATV1. I used the instructions here http://wiki.openelec.tv/index.php/HOW-TO:AppleTV_Installation/Create_the_USB_Key#tab=Mac_OSX
but when I got to this line (below) I noticed that mine was saying disk2 in the identifier, so I didn’t know how to update the remaining lines of code, so that this would work for disk2 rather than disk1.
e.g.
Do I just update “disk1” to “disk2” or do I need to change “1m” to “2m” also?
Cheers
James
James
Oh yes, I can understand you being hesitant with that, I would be too …
Could indeed say /dev/disk2 for the USB drive, instead of /dev/disk1. It all depends on how many other drives/partitions are connected. A good thing to look for is the name of the drive.
For example, this is what my USB stick, named “LEXAR32GB”, looks like this in terminal (El Capitan 10.11.6 beta):
Which is “/dev/disk5”.
The steps for you (/dev/disk2) after “diskutil list” then should be:
Finally we use ‘dd’ to write the image file to the USB key. Notice we are using /dev/rdisk2 instead of /dev/disk2 (this is a little faster to write). You will need to enter the password for your user account when prompted:
the equivalent command for a USB install would be:
Uncompressing and writing the image to the USB key will take 1-2 minutes depending on the speed of the USB key. Once USB creation has completed you can ignore the error message about the disk being unreadable (OS X cannot read an AppleTV recovery partition) and you eject the USB:
How is OSCM running for you? Besides the potential Audio issue ….
hans
Hey guys , complete novice here ,please be gentle. I have a atv1 with only xbmc installed and no apple OS. , I’ve tried this to no joy, what am I doing wrong as it just keeps opening xbmc up. Help please.
Tony Ward
Hi Tony,
do all the steps described here execute correctly? Do you see any error messages?
Have you tried doing this with another USB stick?
hans
His Hans, can’t even seem to get it to boot off the usb , just restarts xbmc.
Tony Ward
No error messages either
Tony Ward
In that case: Try using a different USB stick. It seems that not all USB sticks are recognized properly by the ATV.
hans
Can anyone recommend a usb that works and cam it be used again if fomatted. Thanks
Tony Ward
I used, if I recall correctly, a Lexar 32Gb USB 3.0 stick. But it has been a long time ago that I needed to do this.
And yes, every stick can be wiped and reformatted for regular use.
hans
THANK YOU FOR THIS POST!!!! openELEC ain’t what it used to be… And I had to use my trusty Sandisk for the job as the other thumb disk was a bust!! :P
aydno1
Awesome!
As far as I know, OpenElec is no longer maintaining an AppleTV image for the newer KODI’s.
Which is a bummer in my opinion, but then again, I can imagine that maintaining many different hardware platforms can be a lot of work.
p.s. The OpenElec team has split in two now: OpenElec and LibreElec.
The latter seems more active, but on their forum I see that AppleTV is being pushed aside as well (see this thread).
At the moment I cannot say that LibreElec is “better”, but it runs smooth on my regular HTPC.
hans
I keep trying to download apple pi baker 1.9.4, but the version I download is labeled 1.9.0. ??
Guess I have to over-ride security as there is no sig on the file. :-(
john springer
Hi John,
Sorry to hear you’re running into a little snag there …
I just downloaded ApplePi-Baker 1.9.4, and it is labeled 1.9.4.
Maybe you have to empty the cache of your browser?
I’m not sure what you mean with the sig on the file?
hans
Getinfo from the app: (I downloaded the zip file 3 times from different links; always got the same)
https://drive.google.com/file/d/0B-QAeQMKWAaTUWUxcUpDY3pScmM/view?usp=sharing
Also when you try to run it you get this:
https://drive.google.com/file/d/0B-QAeQMKWAaTSjBmRHk0UXFKc1k/view?usp=sharing
(I know how to over-ride, but maybe not everyone does.)
john springer
Hi John,
The “GetInfo” is a mistake on my end, I had not updated the version number in the plist.
For the correct version number look at the window title of ApplePi-Baker (which at this time should say 1.9.4).
By the way: downloading ApplePi-Baker from different source is at your own risk. You should always get the latest version from Tweaking4All.
As for the “untrusted” message: Go to the Apple menu -> System Preferences -> Security and Privacy.
There you have to set “Allow Apps downloaded from” to “Anywhere”.
Maybe in the future I’ll sign up for a developers account with Apple. Unfortunately, they charge $99/year for that, and with the current advertising and donations, I can barely keep the website running, and at this time I’d rather not charge for the applications I create.
Let me know if there is anything else I can help you with, and thanks again for bringing the wrong version number in the plist to my attention!
hans
Ok on the version. I thought that might be what happened but wasn’t sure. I downloaded all from your site but trying different ways to get to the download to see if I got a different result.
For the security, you don’t have to turn it off. Try to open and fail; go to system>security and it will show you app failed to open. Click the padlock to unlock and enter password. Then click Open anyway. Then go to app and Command click and say it’s ok. Only have to do that once.
John
Yeah the version was boo-boo on my end ….
….
Thanks for the security tip!

After a while I got quite fed-up with it and just disabled it all the way. Maybe not the best advise for all users.
So … thanks again!
hans
Hi,
I have been trying to restore my ATV Gen 1 for the past few days (over and over again) without luck.
I go as far as the apple factory restore -> select language -> and then the progress bar stays static with just a small tip of white at the left site.
It then re-starts the process of asking to reste to factory settings -> select language….
I have even tries loading with openElec again but I get “Can’t load boot record”
Any hints?
Joe A
I have seen other struggle with the restore as well and found that using another USB stick sometimes provides the fix.
So my advise: try one or more different USB sticks.
hans
Hi, I have been trying the Mac process multiple times over the past two days now with multiple different branded USB sticks and have also now tried using V2 and V3, and each time I get to exactly the same point as Joe A above, namely I am able to see the Apple Logo appear, select Language, and then Restore to Apple Factory settings which then starts but the progress bar stays static after just a small tip of white shows at the beginning of the progress bar under the Apple logo. If I leave it long enough it will then re-cycle to the same point. It’s almost as if there is no Apple TV 1 Image to restore from the USB stick. Any ideas about what else I could try to restore the original Apple TV 1 image before I just end up binning the hardware? Thanks
Andy
Hi Andy,
since I have seen this with a few other users: could it be that the harddisk of your ATV is defective/malfunctioning? Just a thought. I replaced mine with an PATA SSD (Amazon) which speeds up the ATV. If you decide to go one of the Kodi routes, consider the CrystalHD chip (replaces the WiFi module).
Having said that: my ATV is catching dust mostly since I have replaced it with an Android device and a small PC both running Kodi.
hans
I have been able to update the 1 gen ATV. I continue to experience issues with the device freezing: whether making a selection from a menu, or navigating across the top menu selections, the device stops responding. This was occurring before the update, and is why I performed a reinstall of the system. After the reinstall, now when selecting to watch a movie trailer, about 21 seconds into watching any trailer the video freezes and does not play anymore. I can press the menu button to go back to the iTunes store, but cannot return to the top menu, at this point the device does not do anything.
Trying to understand if this may be a sign of a hard drive failure. Running the internal diagnostics, does not mention any problems with hardware. Not understanding how to correct the freezing problem, I have installed the refresh about four times with the same freezing taking place. Understanding that it potential could be a hard drive issue, would any of these work?https://www.amazon.com/s/ref=nb_sb_ss_c_1_10/168-7486596-6309867?url=search-alias%3Daps&field-keywords=crucial+mx300&sprefix=crucial+mx%2Caps%2C257&crid=2B5XKOKO0CETB
Also, if it does not sound to you like a drive problem, would you have a suggestion as to what to check next?
Thank you for your help. I enjoy using this device and hate to lose functionality. I have started to consider investing the money instead into a current Mac mini as opposed to repairing older technology. Any suggestions are appreciated.
Marvin
Hi Marvin,
the first thing I actually would look at is the network connectivity.
– If you’re using WiFi: Try using a wired ethernet instead. I have used WiFi in the past, and especially with older equipment (like the 1st gen ATV), found that wired networking is simply just faster and more reliable.
– If that doesn’t make a difference; check out your Internet speed (if you’re viewing online content). Take you ATV to a friend or family member and see how it performs there.
If this would be harddisk related, you could always:
1) Run a full harddisk scan, by connecting it to a PC (using for example a USB to ATA adapter).
2) The disks you list are SATA, which uses a different connector than the antique ATA or PATA connector found in the ATV. You might want to look for a 2.5″ PATA SSD (here an Amazon PATA SSD list). I’d choose a 64Gb model if available, I have no idea if the 32Gb would be offering enough space.
hans
Thank you Hans for the suggestion on trying another network.
I have found this at Amazon though trying to confirm that it is PATA. I would prefer to get drive with at least to replace the current drive if I go that way after the network testing: Western Digital 320 GB Scorpio Blue 100 Mb/s 5400 RPM 8 MB Cache Bulk/OEM Notebook Hard Drive – WD3200BEVE
Is your suggestion to get a 64gb and then connect an external drive to house all of my movies? Would this be connected using the USB port on the ATV?
As you mention, it could very well be a network issue, seems the provider service drops out intermittently as I found out last night. I have been connected to the home power line using ethernet power adaptors while I have been troubleshooting as the service port coming into the house resides in another room and I did not want to run a direct network cable.
I very much appreciate your troubleshooting this with me.
Marvin
Hi Marvin,
there is nothing wrong with picking a direct replacement for the drive.
A SSD drive would be faster, but if you’d like to store movies on it, then you’re probably better of (considering price and availability).
In all honesty; I don’t know if an external drive would be recognized by AppleTV OS (I kind-a doubt that it would work).
As for the network test: Even if it’s just for testing, try using a regular network cable. My experiences with Ethernet Power Adapters is mediocre at best, and it would be best to eliminate all possible sources of problems during a test. This way we can at least determine if the ATV is the problem, or not.
hans
Hans,
After reinstalling the v.3 and v.2 a total of four times on Sunday, I have reinstalled v.3 today. Connecting directly to the internet modem seems to have cleared up whatever issue with the playback of movie trailers. Though trying playback with wi-fi afterwards, I was able to get the same ability to view the trailers in the entirety. Cannot guess whatever was going on, though now the device is acting as if there was no issues with it, and I am syncing my movies library.
Previously before trying the updates this past weekend, the device would freeze and stop responding to input or selections of menus. Only one movie caused a freezing of playback, otherwise all my movies played with no issues. After all the effort this past weekend, I am wondering what is it that a direct connection via ethernet to the internet modem performs. Since it does not now appear to be an issue with the hard drive, it is a mystery to me, though both ethernet and wi-fi connections appear to work equally well now.
Thank you for your suggestions and the ability to create the usb sticks.
Marvin
Hi Marvin,
I’m glad to hear things are working well now.
As for the connection (wired vs wifi); wired is by definition just much more stable and, when done right, much faster. Even with the latest and greatest WiFi router hiccups can occur, and that’s why I always use wired. Much more reliable.
hans
Thank you for the very good and easy to follow instructions. Always nice to find the exact solution for your specific issue. I also can confirm that, after had trouble being stuck in a loop of language selection – factory reset – confirm reset – language selection – factory reset … it fixed it for me to use a different usb drive.
Thanks again!
NKN
Hi NKN!
Thanks for your compliment and confirmation! It’s much appreciated!
hans
Should the Apple TV be able to boot to recovery mode even if the HDD is faulty?
Or does a faulty HDD prevent accessing recovery mode?
I have also tried a USB boot and not been able to access recovery either (both with and without the HDD connected.)
Any thought appreciated.
Dels
Hi Dels,
If I recall correctly, accessing the recovery mode might be accessible even when the HDD is faulty. However – you will not get very far with that, since the HDD is faulty.
You could try a different USB stick – the supported brands/models of USB stick is a little iffy at times, and other users have experienced that using a different USB stick resolves the issue.
Hope this helps
hans
Thanks for the input.
I have taken the HDD out and connected it up to a Linux box, the HDD appears to be OK, and is reporting no issues. All the SMART stats are also good.
I am starting to head towards an issue with the ATV1 power supply, it is as if the power supply kick in for a short time and then switches off. You can hear a power on, power off hum from the power unit inside.
Tried 3 different USB sticks and a couple of SD cards in USB adapters all with no joy. Exactly the same thing happens either with or without the drive connected. I just cannot get into recovery mode.
Frustrating! Maybe i will try to puck up a cheap replacement on ebay and move my existing HDD into it.
Thanks for your reply
Dels
Hi Dels,
Power supply, hmm, definitely a possibility, even though I have never seen this to be an issue.
I’m not sure how attached you are to your ATV (I really liked mine), but I replaced it with an Android box. If you pick one with the Amlogic S905 (do NOT get the S912 models – they are not supported), on which you can run LibreElec (OpenElec spinoff, running a bare minimum embedded Linux with Kodi pre-installed). See als this LibreElec link. I got mine from Amazon, for $39 last December, the model I have is the “K1 Plus”, bet there are several models available. I tested mine first by booting from an SD card, and after having used it successfully for a while, I replaced the Android OS with LibreElec completely … works great!
hans
After many frustrating attempts to restore, this worked like a charm.
Thank you so much!
Tate Taylor
Hi Tate!
Very good to hear that it worked well for you as well!
Thanks for taking the time to post a thank-you note – it’s very much appreciated and motivating!
hans
Hi Hans, I tried the method described above but unfortunately my Apple TV 1 only shows a screen with an Apple logo for a few seconds and then goes black and after a few seconds shows the logo again. In parallel the LED on the ATV front is blinking orange. It seems as if the ATV tries to reboot from the USB stick (at least the LED of the USB stick lights up and shows activity) but then goes back again. Meanwhile I tried both Software versions a couple of times and also in total 4 different USB sticks but I don’t get any further.
Any ideas, what the issue could be and ideally how to solve it?
Thanks
Christoph
Christoph
Hi Christoph,
I would have suggested trying other USB sticks, but I guess you already did that
It does indeed sound like the ATV wants to boot, but fails. How did you create the USB sticks?
hans
Hi Hans, thx. for the fast response. I created the USB sticks as you described it above, i.e. I downloaded the ATV restore version 3. and version 2. respectively on my MAC-Book and then moved them to two different USB sticks; then downloaded the Apple-Pi Baker and used it on both USB sticks. The only difference to your description above I noticed was that I did not have to eject the USB sticks after I ran the Apple-Pi as they were already rejected and during the conversion process from the .zip to the .img file, I couldn’t really see any progress on the “progress bar”.
Could that be the issue, that the file on the USB stick is not in the correct format, so that the ATV can not read it, when it is restarting?
Christoph
Hi Christoph,
I’m not sure if that went OK then, APB should show some progress, so I’m guessing this didn’t work as expected.
I’m a little confused about your workflow though. You should download the file to your Mac, after that insert the USB stick, start APB and then “restore” the file with APB to your USB stick. Or maybe I misunderstood the “moved them to two different USB sticks” part?
hans
Hi Hans,
oh that could be the reason. With “move” I meant I physically transferred the downloaded files in “Finder” from my MAC-Book hard drive to the USB sticks (one USB stick per version obviously) and then I used the APB on the USB stick.
Now, as you describe it, it sound like I need to leave the file on my hard drive and “restore” it to the USB stick?
Christoph
Yep, that’s indeed how you should do it. Leave it on the harddrive and then use APB to flash it to the stick.
hans
Hi Hans, in addition to what I just wrote, I just recognized, that the files I downloaded via the links above are no .zip files but are already .img files. Can it be that my MAC-Book already “unzip’s” them during the downloading process and maybe that corrupts the files?
Christoph
That is interesting … I just downloaded it on my Mac and it really is a .zip file.
Could it be that your Mac is hiding extensions, or somehow extracts the zip automatically?
But .img and .img.zip can be handled by APB by the way.
hans
Hi Hans,
yes it looks like it was hiding the .zip. However, I used the APB now to restore the two respective versions to two different USB sticks.
Having inserted and restarted the ATV the OpenElec logo showed up and then disappeared after a while. Subsequently, the TV displayed some error messages (disk error ….), which didn’t show up long enough for me to take a picture or note of the exact wording. Afterwards, the LED on the ATV started blinking orange again.
Thus, I believe the USB stick is working as I get to the Open Elec logo but afterwards the ATV seems to hang up again and is then trying to restart from the hard disk. I already tried both software versions and multiple USB sticks, hence it looks like my ATV hard drive is damaged, or do you have any other idea what it could be?
Christoph
I’m sorry to hear that … Sounds like your harddrive in the ATV is not working properly.
If you happen to have an ATA 2.5″ harddisk laying around, then you could test with that – ut I’m sure most of us don’t have a spare like that.
I myself replaced mine with a PATA SSD (here is a list at Amazon). A regular PATA harddisk (2.5″) would work as well.
Just for the record; since those tiny Android boxes are the same price or sometimes even cheaper than a harddrive, then I suggest getting one of those instead. (see this list at Amazon, please stick to the S905 or S905X processor models, don’t take any other processor model – if you want to run LibreElec in the future, then the newer exotic processors will not work – I’ve tried the K1 Plus models with succes in the past).
Hope this is helpful!
hans
Hi Hans,
that’s a pity…I really liked my ATV. Anyhow, thanks a lot for your support and I will follow your recommendations and look around for alternative solutions.
Thanks again, Brgds. Christoph
Christoph
Couldn’t agree more … I still have my ATV and even installed the video acceleration board in it. …
…
Unfortunately, it can no longer keep up with modern codec like HVEC and such
hans
Thank You for this it worked like a charm.
Anyone have any ideas with what to do with about 8 Apple TV Gen 1’s?
Oscar B
Cool! Ehm, yeah honestly I already had trouble finding a purpose for one 1st gen ATV.
hans
Hi
Appear LOGO APPLE and the line charging but the line white doesnt charge never and only the ATV1 restart and then appear the Languages for choice
What can i do? please
Uri
Hi Uri,
The 2 most common issues I have seen here are:
– Internal harddisk of the ATV is not working correctly anymore (test by replacing it with another harddisk if you have one)
– The USB stick is not fully compatible with the ATV (try another USB stick/drive)
Hope this helps.
hans
I was having the same issue with the Apple Logo and the 5%-10% progress bar sticking. I tried several times and the same result. I used another USB and it worked flawlessy.
Bim
Hi Bim,
that seems to be the consensus, as if the ATV does not support all USB stick, just a sub-set.
Thanks for posting this though, it will be helpful for others!
hans
ATV continues to boot into XBMC/Kodi. I CANNOT get it to boot to the USB drive I have burned and reburned 5 times.
Denny
Hi Denny,
I’d try another USB stick/drive … ATV doesn’t seem to work with all USB sticks/drives equally well.
hans
which USB does it work with because I have tried four different ones .
mymslcr
I’ve done it way back in the day with a USB stick from Lexar.
Maybe try to find an older USB 2 stick?
Maybe other users here can chime in and let us know what they used.
hans
Like Christoph and Denny, I too have tried various sticks and different versions of the firmware. It just does not work anymore…could this be anything to do with itunes no longer supporting the gen1?? I have reburned so many times (I should mention, it takes about an hour for each burn for me) I am flabbergasted. Any help, or suggestions is greatly appreciated!!
Lenon Peachlum
Hi Lenon,
The images you can download here are not related to iTunes, so no worries about that, it should work.
However … (as you already mentioned) not all sticks seem to be compatible, and the other issue seen with others is when the internal harddisk of the ATV is defective. Also make sure the remote works (batteries), I’ve had issue with that myself a few times.
I’ve not used my ATV in the past 3 years, so it is a challenge for me to test this.
hans
Thank you so much for posting these remedies. Returning to ask for more help on my Apple TV. After using your solutions I have been able to get about two to three years more use from the device.
It has started acting rather strange, and I am wondering if it is now a hard drive issue. It begins to play, for a lack of being able to explain in person, all I can think to describe is that it stops for a second or two, then playback continues. It is not so much of a stuttering in that it just stops the movie and leaves the image on the tv screen as if loading more content, or thinking about what it is supposed to do next. When viewing the main menus screen of selections, the image seems to exhibit a noticeable refresh every two to three seconds.
I know there may be other solutions now, though I really like this device that I want to continue to use it. I don’t care for the idea of streaming content from my desktop computer. I prefer to have a device directly connected to my tv and loaded with my media.
Today, I did erase the Apple TV in an effort to get it working again with the onset of cold months, and restored using the files for the Mac that were posted, again. This has worked successfully in the past to have the device work properly. Now after syncing the media, performing a restore does nothing to clear up this stop/start action when I select a movie to play. The restore seems to go fine, so I rule out a usb stick issue.
I recognize that Apple has recently updated the Mac Mini for 2018 though don’t care to go spend $$ on a solution yet. While I have not used Plex, I did not want to exit the Apple ecosystem. This may be an alternative since Apple no longer provides Front Row on the Macs.
Thank you for your thoughts on how best to proceed.
Marvin
Hi Marvin,
glad this trick gave you 2-3 years more out of your old ATV.
It does sound like your hard disk is having issues – or the content you’re trying to playback is just “too much” for the old ATV to handle.
On my old ATV (which I no longer use), I actually replaced the disk with a SSD. But since the ATV uses the old PATA IDE bus, you may find it hard to find a replacement disk. With that of course, that the investment for such a disk may not be worth it anymore.
Personally, I dislike Plex. It’s far less responsive than ATV or something like KODI., even though Plex works as a streaming service.
I guess for a good answer, it would be useful to know how you store your media. Do you store it on the ATV? or a NAS or PC?
Do you want support for other file formats (like MKV and such) or special services (Apple, NetFlix, etc)?
For a good working setup, I’d use Kodi and store media on an external USB drive or a NAS. Kodi, depending on the hardware, plays pretty much anything prompt and fast. But it’s obviously not using the Apple TV interface. With the arrival of HEVC codecs like h265, the playback device needs to be reasonably powerful or have hardware support for codec playback. The nVidia Shield with Kodi installed works very well, but (as far as I know) would only playback directly from a shared network drive (ie. PC, Mac, NAS). Setup is easy on both ends (“server” just needs a Windows share, and Kodi on your media playback device). Since you already seem to have a Mac; you can play a little with Kodi on your Mac and see if you like it – no need to invest right away. Kodi also supports so called skins, one of them (as far as I recall) looks very much like the interface of ATV.
You’re not stuck with nVidia Shield (the cheapest version would suffice), but you could also use a small PC, an Android box, or even a Raspberry Pi (you’d install Kodi on an existing OS, or even better, use something like LibreElec,a complete minimalistic Linux install just for Kodi). I’ve used LibreElec in the past and am very impressed by it.
hans
Hans,
While I decide whether I want to take on the effort of updating the hard drive, here is one consideration: Super Talent 2.5-Inch 256GB 44-Pin IDE/PATA Internal SSD FE8256MD2D. Does this look like it would work from your previous experience? I’m not sure yet if I’m putting good money into replace something bad yet. The thought of buying a 2018 Mac Mini for $900.00 is not my preference when I could spend less than $200.00. But then again, I’m not guaranteed installing a new hd will work. As time to perform the task is a consideration, I have no problem with the technical aspect, rather finding the time. Like most, when the weekends come around, there are many things to do that are time consuming.
I use the ATV as it was originally intended, namely to sync with my desktop computer. The files are synced via iTunes and consist of ripped cds and dvds. I have used Handbrake to rip my owned DVDs, though don’t remember the file type that Hanbrake puts out. Though I would guess that it gets converted to a QuickTime file or something that iTunes can read. I try to keep things simple. .
The device was working fine, and then one day the stop/start began, so that is why I think it is the drive. So I don’t know that the content had changed from previous file types that I had used and watched to begin to overwhelm the device. The data is synced to the Apple TV via Ethernet without the use of NAS or external drives. I’m not doing anything fancy in my opinion, I just want it to work like it once did. I have also begun looking at eBay to see the ones available, as a potential replacement source. There is no need to support multiple streaming at one time. Looking over selections last night there were many choices of folks selling their old ATVs below $50.00, but then who is to say how long a used device would last.?
Thank you for your time and suggestions. Marvin
Marvin
Hi Marvin,
That one indeed looks like it would work – even though I’m a little shocked about the price, and you’re right: there is no 100% guarantee that it will work.
Getting an used ATV is something I’d avoid. One never knows how many hours they will keep working. The same goes for used hard disks.
I’d personally consider getting an Android based box. Pick a S905 based models, as it seems most reliable, but folks report that S912 models are fine as well, Amazon has quite a few listed – do not get misled by shady promises about free TV channels and such, these would be sketchy outfits and it would be against Kodi policy.
As for the media; I’d store on a network share (eg. on you Mac).
These Android boxes are dirt cheap and often have hardware acceleration for h264 and h265 build in. The first one listed is about $50,… beats $200 or $900 for that matter.
Setup would be easy: No iTunes needed, just a Windows share on your Mac where all files (most likely MP4 in h264) are stored. You can install Kodi through the Android (Google Play) store, and you’ll just have to tell Kodi where to find the network share and what type of content it is (Movies, TV Shows, Music, or Ignore).
I have played with several Android boxes like that, running LibreElec (Linux) and running Android.
I found that the nVidia Shield to perform best (stability, Google Play access, frequent updates, nice remote, compatibility with Google Home and Amazon Alexa, 4K video, speed, etc).
I’m using the cheapest version (which seems to be $139 at Amazon right now). You can expand on it if you like, but I didn’t find a need for it. The game controller, if you even have a use for it, is not needed if you have an XBox or PlayStation laying around either – since the nVidia Shield recognizes those as well.
I have read about the newer ATV generations, but considering price and the usual Apple limitation (I’m an Apple fan myself) made me choose the nVidia Shield.
hans
HI Hans,
Please help, I’ve tried you’re steps with no luck. i got some new life into my apple tv1 with osmc and it was working like a charm, until a window popped up in kodi saying it had downloaded an update and needed to restart… that restart was the end of it, it doesnt work , shows a sad smile emoji, I’ve tried the osmc install steps with the usb multiple times with no luck and then tried your steps to reset the OS but still got the same outcome… let me know if you need any more info ( it shows some code lines when its trying to boot) please help me out!!!!
Thank you!
vandasousa
Hi Vandasousa,
The steps described here are to restore ATV OS and I have the impression that OSMC would require you to make an image with the tools they provide here (for those interested: OSMC is an open source media player project based on Kodi and supports ATV1, Raspberry Pi, etc).
When installing a new (replacement) OS, you may run into compatibility issues with the USB stick you may be using.
Since the ATV appears to have limited support for USB sticks; consider testing a few different sticks, and my guess is that an old USB 2.0 stick may have the best chance to succeed.
hans
Thank you Hans!!! Unfortunately i have tried to boot my ATV1 with the same usb drive that worked fine when changing from the original OS to the OSMC, but now it doesn’t work, nor yours… Can you think of something else i can do?
thank you so much!
V
vandasousa
If that is the case, then the only thing I can think of is that the hard disk of the ATV is in need of replacement.
hans
question: why do you think that a hard drive replacement is necessary?
i also am interested in the wording “but now it doesn’t work”. what does vandasousa mean?
red
The 1st Gen AppleTV is quite old, and most folks have it on 24/7 (even if they do not watch TV), so the disk has a good chance of being worn down.
From comments here and elsewhere, I have noticed this to be a relatively common issue.
However, this doesn’t mean it has to be the case with your AppleTV.
If you have a “spare” 2.5″ ATA harddisk laying around, you could use that to test this, by replacing the ATV harddisk (temporary).
Seeing your previous post; this may or may not be the case with your ATV.
hans
Is anyone still responding to this thread? I am trying to use this method to reinstall ATV OS. Everything works fine until the Apple language menu appears. At this point the ATV unit reads my remote (light flashes on ATV…) but the on screen button doesn’t activate. I also tried with a keyboard and mouse.
Any ideas would be appreciated.
Jerry Mills
Hi Jerry,
Even thought this is a very old threat, I still look at the messages almost daily
The ATV will not recognize keyboard and mouse, as far as I recall – it’s been a while for me to have worked with an ATV.
Common problems are: incompatible USB stick, issues with the remote (battery and such) and failing harddisk.
I’d start with the remote and the USB stick (try a different one, preferably a USB 2.0 stick).
hans
Thanks, Hans, for your feedback.Oscar, too.I’ve been using Apple gear for 30 years so I know it’s not a remote issue. I’ve tried installing the factoryrestore3 and 2 files on several usb drives. Same result every time… apple screen comes to the language selection menu.English is highlighted as default. But the remore simply will not trigger the menu to take me to the restore screen.Is there any trick someone knows to trigger a menu item without using the remote. I know the ATV1 is old technology. However I have a severely disabled niece and am hoping to set up this ATV to play her favorite videos.
Thanks!
Jerry Mills
Hi Jerry, just posted; I think!; a big thank you to Hans for this article, the only problem I had was the same as yours and eventually when I re-read the article I swapped for another memory stick and all went as described.
Now all back to original and I am like a chipmunk with a mouth full of nuts!!
john.
john (brynorpheus)
I know it’s not a response to your problem, but after Kodi stopped supporting ATV1, I switch to Firestick. I now use Firsetick with the Plex App in different rooms and use my laptop (for now) as a media server. They’re affordable and super easy to program.
Oscar B
A good alternative can be indeed an Amazon Fire, or one of those Android boxes that can run Kodi (like these, I think they start around $30), or if you’re OK with spending more I’d recommend an nVidia Shield (the $139 model will work just fine).
hans
Hi Jerry,
in case you need to sync the remote again; press and hold the Menu and Next/Fast-forward buttons for 6 seconds.
However, I’m not sure if this works when it’s not running it’s OS.
I recall having had the same issue, just can’t remember how I fixed it at the time. I may have tried the resync several times before it worked. But no guarantees.
Worse case, you could try to write the IMG file (for example with ApplePi-Baker to the harddisk by connecting the disk to your Mac, or use Win32DiskImager if you have a Windows PC). An IMG file is in essence a direct image of the disk.
You’d need to find a ATA to USB adapter though.
I never had to do this, but it may just work.
hans
Try swapping the battery on the remote or using a new remote altogether. You may need to sync the new remote if you go that route.
Oscar B
Good point Oscar!
I totally forgot about that …
hans
Dear Hans, I really cannot thank you enough for this article! I am far from a “computer geek” in fact I would class myself as a bit of an ignoramus.
Follow the guide and it worked, even down to the fault finding when I used another memory stick and it booted up straight away.
I bought my imac and apple tv in 2008 when constant blue screens on my PC drove me to insanity. Credit Card in hand I drove to PC World and demanded a ‘mac please’.
I duly walked out with a box which I was assured would ‘just plug it in and I would be online! “Oh yes” I thought, but I had found that they were at least reliable so I was prepared for a bit; maybe a lot; of setting up procedures. I was used to that with the PC’s over the years, been online since the early days of dial-up! Remember those?
To my amazement in 5 minutes I was indeed online! My friend and I; Mr imac; have been working faithfully now for 8 years.
In recent times though, the giant, Mr Apple Mac no less, has decided to issue updates that take away some if not all of our toys by making them obsolete.
This was pushed down my throat when my imac automatically updated my O/S to El Capitan 10.11.6. No longer could i store music, pictures and films on my beloved apple tv, only streaming was allowed. I put up with this for a time but started to hear of ‘openelec and kodi’ so I decided to give it a go. Well it sort of worked but I was not technical enough to set it up correctly, they are strictly for computer buffs.
Now I was stuck with an almost useless apple tv and lots of redundant equipment. I decided I wanted my system back to the way it used to be. Found a few ideas that mostly failed, then I stumbled across your wonderful, easy to understand, fantastic, life saving site!
I have noticed the following; sound on openelec was delayed substantially from computer to apple tv with a lot of drop outs. All now cured.
I am now tempted to improve the apple tv with an ssd replacement for the HD, it must be nearly worn out after 8 years almost constant use, your thoughts would be much appreciated.
Keep up the excellent work for poor morons like myself to be able to beat the big corporations; Mr Apple Mac. (he needs us and we need better support from him)
Many thanks
John.
john (brynorpheus)
Hi John,
Thank you very much for the compliment, it’s very much appreciated.

Don’t sell yourself short, we all have been beginners, and we all have our talents and skills.
Purpose of my website is to make these tricks accessible for the less experienced as well and I’m glad it worked for you!
Haha, Oh yes I remember the dialup years when going from 9600 to 14K4 (and up) was still amazing.
Yeah Mr. Apple has changed things around a bit, and I’m not sure if I’m liking it. Since I develop small applications, I’ve encountered even more changes. Just writing a program has changed from 100% having fun to 50% fun and 50% working around limitations. Oh well. Not sure where Apple plans to go with all this. I sure hope they will not go all iOS (instead of MacOS).
One thing that may work well is “Plex” – I’m not a fan, but it’s allowed by Apple, so it may be of use. Your run a Plex server on your Mac, and on the ATV you install the Plex app (first check if it’s still available for your ATV).
I myself use Kodi to playback my videos and pictures. But I can see the challenges when it comes to the setup.
As for using an SSD; you’l need a 2.5″ ATA (aka Parallel ATA) SSD and I suspect they will be hard to find since pretty much everything uses the newer SATA connector (not compatible). You may need a PATA to SATA adapter like this one – but you’ll probably run out of space in your ATV. I did find a few on Amazon; list, this 256Gb model (expensive), this affordable 64Gb model.
But the storage capacity is limited compared to a regular disk, and you have to be aware that any drive you buy may, or may not be compatible. The ATV is picky.
Hope this helps!
hans
Hello once again, an update on the programs i am running successfully on my old imac and apple tv gen 1 that i forgot to put in my original dissertation.
I have had about 2 weeks now of faultless running with the following O/S and iTunes.
OS X EL Capitan and iTunes 12.5.5.5. and Apple tv gen 1 running original O/S.
All updates turned OFF! I am fed up with Mr apple mac fiddling around inside my computer and switching off my toys!
ALL NOW SWEET AS HONEY, thanks to Hans. you are my savior.
Many thanks, John.
john
So good to hear you got things working again!
Yeah, I’d love to have a conversation with Apple about their “changes” as well …
Makes me wonder how much time it will take before folks drop MacOS and Windows in favor for Linux.
Merry Christmas!
hans
Question about the firmware itself. Is it stored in the eeprom on the Apple TV 1st generation motherboard? If so, has anyone figured out how to read it? Is it the same as reading the eeprom on the original xbox?
dseodohr
I’m not sure if anyone read the EEPROM, but I suspect it’s a BIOS-like software in EEPROM. The EEPROM is located here on the mainboard – the orange block.
hans
hi guys.
so my attempts to factory reset my atv1 is not going well.
i created the usb drive with the applepi baker app. i tried 5 different usb sticks (2 gb sticks). the applepi baker app says, successfully created.
i plugged in the usb stick, connected the power cable, then i pressed the “plus” symbol (volume up) and the “menu” button.
here is question 1: how long do you have to keep pressing both buttons (the “plus” symbol (volume up) and the “menu” button)?
question 2: is there a way to find out if the applepi baker app really created a working usb stick (is there a list of files to check if everything is installed)?
anyway, the reset did not work. i still get back to the osmc interface. what am i doing wrong?
thanks.
red
Hi Red,
I’m sorry to hear that you’re running into issue here. I have to admit that I’ve gotten rid of my 1st Gen AppleTV about 3 years ago, but let me see if I can help in some way.
1) How long do you need to press the plus button.
I do not recall the exact time, it’s been a while .
.
I do recall that you’ll need to press it for a while, so maybe 10 seconds? But this is just a guess.
I guess the question is; what do you see on your screen? I remember my old HDMI screen needing quite a bit of time to “detect” the signal.
2) Creating the USB stick.
Are you by chance running macOS Catalina? Catalina has some issues when it comes to using tools like ApplePi-Baker.
I’d also stick to USB 2.0 USB sticks – but since you’re using 2Gb sticks, I assume they already are USB 2.0 (black connector vs blue connector).
In ApplePiBaker you can check the disk structure in the Advanced Disk Panel (harddisk icon on the far left, to the right of the word “Functions”, at the bottom of the ApplePi-Baker window).
There should be some sorts of structure visible, most likely 2 partitions (MBR legacy partition and a FAT32 partition).
hans
Hello All,
Message for Hans or anyone that knows. I accidentally Updated my Apple TV 1 from firmware version 1.1 to firmware 2.3.1. I would like to put the original firmware back on the Apple TV but have had no luck in finding the firmware image files.
If someone can point me in the correct direction to download the needed files I would really appreciate it. I know how to do the firmware updates as listed above.
Thanks much
Ben
Hi Ben,
I did a search attempt for you as well, and indeed finding the old 1.1 version is not easy – I couldn’t find anything useful either.
I did find this article https://marc.vos.net/howto/appletv/, which links to a shared OneDrive folder with some images, but I have no idea what version these may be. Not to mention that I can not vouch for these images to be legit or not.
aTV Flash may be an option as well – but I have no experience with that either.
Is there a particular reason why you’d want 1.1?
hans
Hi Hans,
Thank you for the quick reply and for your effort. Well, I have no special reason for wanting 1.1 other than I like to keep my antiques in their original configuration. My aTV originally came with 1.1 on it and later I mistakenly did an Apple upgrade to 2.0. Since then I’ve been looking for a way to return it to 1.1. I found ApplePi-Baker and the two firmware files (2.3.1 & 3.02). Working with ApplePi (Ive learned a lot) I flashed aTV with 3.0.2 then back to 2.3.1. So for now that is where it is at. Still looking for the 1.0 series.
Again thank you much for your effort.
Ben
I did see a large list of firmwares at iClarified, it does list 1.1 but the link is dead. Maybe if you place a comment there, one or the other user may still have that version laying around? I did also find this very old Reddit topic – not sure if you can still post there though. Maybe the torrent (that I could not find) mentioned in the Reddit article is still around.
It seems Apple removed the firmware on their own servers as well, but I’m sure you ran into that issue as well, and after going through about 3 pages with this Google Search, I gave up (2Z694-5248-45.dmg seems the name/version of the DMG you are looking for).
Sorry I couldn’t be more helpful.
hans
Hello,
The problem with my old apple TV happened once and I was successful to fix it with your help. It was great
Unfortunately, the same trouble came again recently and my apple tV is now unable to start. It turns in this never ending restart loop so I am trying to follow the same procedure .
I achieved a new bootable USB stick with the 1.9.5 version of your ApplePI-Baker but it doesn’t work with the Apple TV which stay in the same loop of reboot and reboot…. as this usb stick doesn’t have a led light, I can’t see if something runs on it.
So I tried to get a new USB Stick with a led light, but unfortunately, this Stick seems not to be recognized by APlle Pi-Baker, .Is there any problem depending on the kind of usb stick ? ( mine is a sandisk extreme USB 3.0 ).
My mac is an old one : Imac running on OS X El capitan).
thank you for your answer and this great job.
regards
Philippe MICHEL
fifibaroud
Hi Philippe!
Sorry to hear you’re running into issue with your AppleTV again.
I ended up giving mine away several years ago, so I won’t be able to do any testing.
You already considered using another USB stick, which is a good start.
I’d probably use a USB 2.x stick (instead of USB 3.x), assuming the older ATV hardware may not recognize the newer USB 3 sticks correctly (even though they should be backwards compatible). Worth a try anyway, if you have another stick laying around. If I recall correctly, the capacity should be 1 Gb or more.
As for ApplePi-Baker, considering your old macOS version, I’d stick to the old version (v1.5.1 or the newer 1.9.8 or 1.9.9 – link).
I would assume all versions work on your Mac, maybe with the exception of 1.9.9 (64 bit).
Probably the rule of thumb here: if it works, then don’t change anything
Hans
Hi Hans,
Thank you for your answer.
Eventually, I found a new stick and a tried again the procedure with the apple TV and guess what ? it works ( youhou ).
I am wondering if I didn’t made a mistake with the first stick by choosing the zip file of the factorystore file instead of the image file :=(.
I am not an expert with all this tinkerings, ;=).
I have now to resynchronize my apple TV with all my contents on itunes and hope that everything will be fine.
Thank you very much for your help.
Philippe
fifibaroud
Awesome!! That’s good news!
Hans
Hi! Thanks for your help. I tried all the procedures you described but I arrive at a certain point, after reboot, when I must choose my language and my remote controller seems useless, I can’t go on. I tried to connect a usb keyboard without any issue. I thought the hard drive must be damaged but it is not the case. I successfully installed OSMC which runs smoothly from the same hd. Have you got any suggestion? I think my Apple TV is a very nice objet and I would like to restore it to its original firmware. Thanks.
Clara
clarak
Hi Clara!
I’ve seen comments before where the remote doesn’t work during language selection (assuming the battery of the remote is OK).
See this post for example, where Kyriakos recommends: hold the left forward button with the menu button for 10 seconds and will pair.
Or maybe this comment works;
Your remote needs to be synced with your AppleTV, which for the first generation AppleTV should be done by press and hold the Menu and Next/Fast-forward buttons for 6 seconds – AppleTV needs to be on of course, but I’m not 100% sure if it actually needs to “work” to accomplish this. A chainlink appear if syncing worked. Other websites (yes I had to look this up as well) claim that you should press and hold the Menu and the Previous/Rewind (<<) button for 6 seconds.
Unfortunately, I haven’t used my 1st gen AppleTV in at least 5 years …
If either of these work to get the remote to become responsive again, please let us know, as this is a question that returns here every now and then
Hans
Hi Hans,
I know I’m struggling with a very old device for which there is very little support nowadays. It’s just a question of pride and stubbornness. Other people succeeded in this task without problems. I tried with “atvusb creator” but I could run the app on neither of my three Macs. My two remotes are perfectly working (I can see the orange light blinking) but I cannot choose language et proceed with restoring my ATV. No luck then but thank you for your help.
Clara
clarak
Hi Clara,
well, I always find it a shame that we (society) toss perfectly good working hardware, just to replace it with something we will toss 2 years from now as well.
So I’m in favor of trying to get it to work.
The orange light may only indicate that the remote transmits and the ATV receives, but I’m not 100% sure this means they are paired.
Assuming the remote works; try another USB stick, ideally a USB 2.x model (not 3.x).
At least one user here reported this to resolve this issue for him.
Hans
I did restore my apple TV, I was using OSMC it was working OK but I was curious how the original OS looked like, is working but seems nothing works, youtube, airplay and I tunes.
I will go back to OSMC I guess, but I was fun see the original apple TV OS working
Jorge
Hi Jorge,
Yeah, I would expect these apps to be very outdated and/or not even available anymore (like iTunes).

Cool moment of nostalgia though ….
Hans
Hi everybody!
In spite of all my efforts, I couldn’t restore my old APT first generation. I loved its startup movie so incredibly modern. Pure nostalgia. As for the rest, I’m quite happy with OSMC. I was able to send photos and films through ssh terminal and watch Italian television through the specific add-on. I kept the original WIFI card which still works after updating OSMC via ethernet. Just to experiment. In my daily life, to see Netflix, Youtube and the rest, I switch my 3rd gen ATV which I paid 69 euros years ago still works very well.
clarak
Hi Clarak,
I kept my ATV for quite a while as well, for nostalgia reasons. I ran OpenElec on it for a while, but eventually I ran into problems with h265 support.
Good to hear your ATV3 still works! Nice!
Hans
Thanks for keeping this available. I am getting rid of some of the toys I no longer play with and one is my 1G ATV. I am pretty sure that I hosed it up trying to install linux or something many years ago. It has sat ever since. I wanted to get it back working and put it up on eBay. It was booting to a bunch of linux command line silliness and then just stopping. I tried your method to restore it to original, but it continually booted in linux. I removed the drive, plugged it in to my mac, erased it and tried again, and again… I’ve made several USB drives, used both versions, tried several partitioning and formatting schemes, but the same thing happens. I end up with a flashing ATV and question mark on the screen and the light is flashing an alternating yellow and white. I also took a USB cable and plugged it in to my Mac Mini. One of the USB drives has a light and it flashes and goes solid as if the drive is being read. It was not recognized. Any advice is appreciated.
Ling
Hi Ling
It is users like yourself that keep this topic alive – I tossed my ATV about 2 or 3 years ago, as it couldn’t keep up anymore.
It seems like you have tried all possible options.
One thing I do recall: the ATV prefers USB 2.x USB sticks, and is not always happy with USB 3.x USB sticks.
I also assume your Mac didn’t complain about the disk when you cleared it – so the disk should be fine (it quite often happens that the disk is damaged/broken).
Is the ATV responding to your remote? (another issue I see with many users)
Hans
Thanks Hans. I continued working after I sent this. I found the instructions on AwkwardTV to recreate the partitions correctly. That seems to have worked. Previously, it went to the flashing question mark pretty quickly, this time it didn’t, the screen stayed black. I wasn’t sure what you meant by “a while” so I waited about 30 minutes without seeing the logo, etc. I had to go, so I assumed that if it worked, I should come back later to find it would have rebooted, etc. I left it all night, but no joy. When I rebooted it, it ended up at the flashing question mark.
You are correct that the drive works fine with plugged in to my Mac(s). The remote also seems to work correctly. While I can’t tell if the Menu + is working (it seems to as my SanDisk Cruzer light flashes then goes solid) but the Menu – definitely works to reboot the ATV. Both of the USB drives I tried are 2.0. Is it possible for me to plug the drive into my Mac and just write your image directly to the drive? I assume that what would happen normally is that the process would write your image to the recovery partition and then reboot to complete the recovery. Does it write to any other partitions, like EFI? Finally, when I erased it, I used GUID and I am pretty sure that is write, but I couldn’t find an answer whether to use Mac OS (Journaled) or APFS. Right now I used Mac OS (Journaled). I am still looking at a few sites, but if I can’t solve it today, it is probably going to Goodwill for recycling.
Rusty Lingenfelter
Hans, I found it. I finally used the right search terms and found a great guide and the dmg files still available. I restored them all to my HD and viola. I don’t want to post a link because some narc will take it down and obviously guys like me still need/use it. My ATV is up for sale on eBay. I will donate the proceeds to you and the other two sites I used when it sells. Cheers.
Rusty Lingenfelter
Hi Rusty!
Glad you managed to get it to work and it is very generous of you to donate proceeds!
Would you mind sending me the link in an email (webmaster at tweaking4all dot com), maybe I can add some of the info to this article and/or even make the DMG available for download here as well. Not a requirement, just thought it may be a good idea to have it available in multiple spots
Hans
Hello Rusty,
Only two days ago I discovered your internet page searching for an upgrade of my Apple TV 1st gen. 160 GB. I watched the video on YouTube but there are still a few questions which I would like to raise for me from Germany before I start.
I have also a device that can clone the IDE HD to a SATA SSD ordered from Amazon.
I would like to upgrade my 160 GB IDE HD (still working) and I have already downloaded the recommended software and put on an 2GB USB stick. That has worked so far. Thank you for this backup solution.
My Apple TV has the latest update from Apple – a few years ago. As I learned from other articles in the Internet when you replace the IDE hard disk with a (Samsung) SATA device (used 512 GB SSD from my iBook – 2012 or a new Samsung QVO 870 1TB SSD) you are to adjust the partition sizes (?) for this new storing devices, otherwise it will continue storing only the same storage amount than the old IDE hard (160 GB) disk?
In none of the YouTube videos – so far found – the articles did contain the hint that this is essential for an upgrading. there is one older article on MacWorld that gives the hint, which was very surprising to me. That is, why I ask.
https://www.macworld.com/article/185009/appletvharddrive.html
Here my questions:
1. Does the newer or latest version on the Apple TV overcome this partition issue or does your software have it integrated already if needed anyway?
2. Does this software download from you containing a part that overcomes this partition issue? I saw videos on YouTube where people exchanged the old hard disk to a new 1TB disk without mentioning this issue.
3. How should it be formatted before installing – HFS or Fat32?
4. What about trimming after replacement?
I would appreciate to hear about your opinion or advice on this question before I start to disassemble the Apple TV with all parts already being ordered or in place?
Thank you
Hans B.
Hans Bochmann
Hi Hans,
I’ll try to answer what I can.
As for resizing: I believe that the images listed here resize automatically on install.
However, when imaging an existing disk, this will not happen.
One option may be by resizing the partion with GPartEd – for that you’d need to use (for example) the GPartEd boot CD/USB stick and have the new disk (after restoring the image) connected to that same PC. I haven’t tested this, but GPartEd is quit powerful when it comes to tasks like this.
The article you mentioned should work as well, but it may be a little bit more cumbersome versus GPartEd.
Your questions:
1. Does the newer or latest version on the Apple TV overcome this partition issue or does your software have it integrated already if needed anyway?
A: Only fresh/new image install will have the partitions will resized. Copied images from another disk will not automatically resize and you’d be stuck with 160Gb (unless you resize it, for example with GPartEd, or follow the steps mentioned in the article you referred to).
2. Does this software download from you containing a part that overcomes this partition issue? I saw videos on YouTube where people exchanged the old hard disk to a new 1TB disk without mentioning this issue.
A: It has been 7 years since I last did this, but I do believe the image you can download here, will resize to utilize the max available disk space. If not, then this article shows the manual steps
3. How should it be formatted before installing – HFS or Fat32?
A: The disk does not need to be pre-formatted. The ATV will boot and run from the USB stick. Once booted it will prepare the disk for what it needs.
4. What about trimming after replacement?
A: You mean making the partition smaller (I’d try this with GPartED as well)?
Or using the TRIM command for SSD (my best guess: not supported by the ATV firmware)
Having said all that: The last time I worked on my ATV-1 is in 2014. About a year later I permanently replaced it with an nVidia Shield since I stopped using content from Apple, and I encoded my own content more and more with H265 (HEVC – save more space, better quality), which was just too much for the ATV to handle.
Maybe Rusty can chime in (I’m Hans, and this is my website haha) since he has played with his ATV more recently.
Hans
Hello Everyone, I got my atv 1st gen yesterday and the previous owner installed kodi on it but there was no wifi and active ethernet connection so it seemed to me useless and I decided to go back to tv OS and during my internet search I come up with this site. I tried to install version 3 several times with a 8gb usb 3.0 stick but it was stuck during apple logo and at the very beginning of the restore bar. So I tried version 2 installation with a usb 2.0 stick and voila! I worked like charm. I am so happy :) and thank everybody sharing their experience and knowledge here. I have another question I want to make use of this atv of mine as a mediacenter connected to my home theater system but I have no idea about how to do it. Can I use apple tv OS to do that by downloading and atv 1st gen compatible version of itunes to my pc? Or should I hack it with 3rd party software ? I want to make use of its 160gb hdd storage with my mp3 archive. Any help or recommendation is muchly appreciated.
Yahya Levent Çilingir
I haven’t used my 1st gen ATV in a very long time and I’m not sure the latest ATV software for 1st gen will even work properly with the current Apple stuff/software (like iTunes and such).
If I recall correctly, you may need to run an old iTunes version on your PC (or Mac) and connect your ATV to it (over network I believe).
All in all, even at that time, back in the day, I found it quite cumbersome and inconvenient.
This was probably the reason why the previous owner of your ATV switched to KODI.
Now, I’m surprised to hear that networking did not work before, since that typically works with KODI and the likes.
The WiFi, if it still doesn’t work, could be because he may have installed a HD video decoder board replacing the WiFI board, so the ATV can handle modern codecs better. I had this on mine as well, but I did forget wether this was for H264 or H265 (I think H264).
The ATV is not powerful enough when it comes to playback of certain newer video codecs – the main reason why I got rid of mine.
To use it as a media center, you could consider KODI. Maybe there is a Plex option as well?
I’m not a Plex fan, but there are plenty users out there that are very pleased with it. (JellyFin or Emby may be an option as well)
For KODI you would need KODI installed on your ATV, and you will need the video files on the ATV’s disk, external USB drive, or on a network share (SMB, NFS). The challenge will be to get KODI to run on your ATV. ATV never supported KODI app in their App Store, and I doubt the current Apple ATV app store will even support your 1st gen ATV for any apps.
How to install KODI:
Example (old!) how to install KODI on an AppleTV 1st gen and available here as well (howto). There used to be a LibreElec or OpenElec version as well, but those are no longer maintained.
For Plex you’ll need a server running the (I believe it is commercial these days) Plex server software, and Plex client software on your ATV. (Same goes for JellyFin and Emby)
Having said that, here you will again run into the issue to get Plex client software installed. I believe the store back in the day did offer a Plex client, but again … I doubt the current app store will even support your ATV.
I have never installed Plex on my ATV, and it may very well be that you cannot even get Plex installed.
Note that performance on a 1st gen ATV will be mediocre at best with Modern codecs (video and audio).
Maybe one of the other users here can chime in with suggestions
Happy New Year!
Hans
Dear Hans, thank you very much for your quick and kind response and explanations :) , yesterday I tried to operate an osmc installed on usb on my atv1 and added some add ons and opened a video from Arte +7 channel to view, it played a few seconds and frozen. Great probably I will keep it as a nostalgic apple product from the past :) By the way my atv1’s firmware was v2 and soon connected to the net it surprisingly got an v3 upgrade from I believe from “apple servers” .
Yahya Levent Çilingir
It will perform pretty slow when running KODI with addons … (depending on the addons).
Modern codecs will perform rather poorly as well unfortunately.
H265/HEVC will just not play, and H264 may perform poorly.
Cool to hear that the update fro v2 to v3 still worked though
Side note: I do recall people “hacking” the ATV to run MacOS X – an old version probably, and performance will not be mind blowing. Maybe just installing a Linux version on it and attach an external harddisk could make it a small NAS for at home? But with all that there are cheap and much faster alternatives (Raspberry Pi, cheap Android boxes, etc).
Hans
I have a 1st gen Apple TV with XBMC on it, and i’m trying to restore it. But I have the Apple TV aluminum remote, which came after and does not have the + button. What should I do in the case of this?
Aliabbas Momin
I would have to guess pressing “UP” on the ring shaped button.
Hope that works 😊
p.s. I’m not sure if that remote works with the 1st gen Apple TV – I think the first one to use an aluminium remote would be the second gen Apple TV.
Hans
Now that I got curious about this, I just had to see what I could find with Google.
Here ya go with a nice overview: https://support.apple.com/en-us/HT205329 (maybe it is helpful to someone).
Hans
Yea, that remote did come out with the 2nd gen ATV, but I guess I just have this remote. It still works with the 1st gen ATV though. But also, even though I wrote the image file to a USB, the ATV booted up as normal into XBMC, with no OpenElec screen or anything like that when I had already plugged the USB in. The USB is USB 3.0, so does that have to do with it?
Aliabbas Momin
I do recall the ATV 1st gen being picky about the USB sticks one may use.
I would recommend trying an USB 2.x stick if you have one, or if that’s not the case, just any other USB stick.
p.s. Good info on being able to use the 2nd Gen remote on a 1st Gen AppleTV. Thanks for sharing
Hans
Hello! I’m not sure if anyone is following this thread anymore (considering it is almost 10 years old), but I have had a problem restoring my Apple TV 1st generation with any of these images. The image itself restores fine, but when it boots into the language select screen, it refuses to accept any input except for the combo to unlink the remote, which prompts the remote with the broken chain to pop up, but still doesn’t fix input not working. I’ve tried both with my Logitech Harmony 880, and my actual Apple TV Gen 1 remote, it didn’t work with either. At this point, I’m kinda at a loss, and I would like to see if anyone else has any insight as to what may be happening.
Violet
Hi Violet,
10 years after placing this post, one may indeed wonder
On that note: I’ve gotten rid of mine quite a few years ago – mostly because it couldn’t handle newer video codecs properly, and it has been abandoned by most 3rd party OS providers (like LibreElec).
As I recall, the Logitech remote is quite nice when everything is up and running, but not so great when doing a setup or when restoring the OS.
A few posted tips on doing that (and Apple removed to old Knowledge Base page), which seems to be: hold the left forward button with the menu button for 10 seconds and will pair.
Not sure if this is what you tried or not.
Had to do some searching, and I’m just summarizing it here in case someone is looking for it:
1st Gen AppleTV pairing with 1st Gen AppleTV Remote:
Use a paper clip or similar item to press the battery tray release button on the bottom end of the remote.
Press and hold Menu and Next/Fast Forward for six seconds to pair it to your device.
Press and hold the Menu and Previous/Rewind buttons for six seconds to unpair it from your device.
Hans
Hi, thanks for this wonderful resource.
Was able to reach the language selection after rebooting. However, am unable to proceed.
Have lost the original remote, but have an aluminium remote. The Menu button causes the LED on the Apple TV to flash, but neither holding Menu + Left for 10 seconds, nor Menu + Right for 10 seconds appears to have an effect.
Grateful for any advice on how to go ahead.
Vinod Chandran
Unfortunately, its been a very long time since I had a 1st gen ATV … still a pretty nice piece of hardware.
I didn’t know the aluminium remote would work with a 1st gen though? Are you sure it works? if so: Cool! Good to know.
I do recall the ATV to be very finicky when it comes to pressing the key-combo.
Also: I’d try to get a different (preferably older – not USB3.x) USb stick – see if it makes a difference.
I remember having had to use an old one back in the day before it finally did something.
Hans
Hello, I’m wondering if this method is suitable for installing the ATV1 system into a Mac Mini I have laying around… I don’t have a use for it and instead of turning it into ewaste I wonder if it would work as an appleTV. Do you have any hints on this matter?
Juan T
Hi Juan,
interesting idea – I lack the tech knowledge to do this, but I do recall (it’s been a while) that 1st gen ATVs run a slimmed down macOS X version. So this may run on a mac Mini as well. But you’d really need to find users that have more in depth knowledge about AppleTV OS.
(note: I too do not like perfectly good stuff to turn to ewaste)
Hans
No such thing as a usb stick in this country. They are called thumb drives here or flash drives.
Until there is some way to put a bootable os on a thumb drive it is a lost cause. Mac osx won’t put a linux disk image on a thumb drive and even running q host or whatever its called can’t be done. If this apple pie thing is needed to make a bootable usb drive nobody has said that in all the youtube videos and internet articles I’ve read.
How do I get this apple pie thing to make a bootable disc image to check that the apple tv is working? It may be the internal drive has fried but there’s no way of knowing if it will boot at all. The remote allows me to reboot the apple tv when the flashing ? appears so that much is working.
I can get a sd to hard drive converter for $20 to use a memory card as a drive but that still leaves the original problem of getting a bootable disk. Remains to be seen whether the apple tv os I downloaded can even be made to boot on a memory card. Still at square one.
Dave
You can’t do anything with the disk image to install on usb because osx will only give errors. Thanks for nothing.
David
Hi! Thank you for this write up! I have the OG ATV 1 (relic!) here on my desk and i simply wish to jailbreak it so i can modify the systemfiles. I dont need kodi or such other software as i intend to use the normal OS but with some modifications. Is there a good way to achieve mac OS connection via ftp or such to an ATV 1? I am running Mac OS Mojave 10.14.6 if that matters. Any help or direction here would be much appreciated!
queasy
Not sure what we can accomplish with a jailbroken ATV1 … it’s been a very long time since I even had an ATV1 (did love it at the time, until it proved underpowered for newer stuff I wanted to playback on it).
I recall the ATV1 being able to run a very stripped down version of a very old macOS.
I never tried it, but it should have a share and SSH option for sure.
Finding the trick to do this may be difficult – as most ATV1 related topic/files/trick have become harder and harder to find online
Since back in the LibreElec was able to run on it (on a stripped down Linux version), I’d guess that running Linux may be an option as well – IF you find the right distro. Maybe an old LibreElec version can be used and stripped of all KODI related things.
Just some thoughts
Hans