You might have already seen the previous article I wrote on how to draw a sine of sound wave using Photoshop.
This trick resulted in a pretty nice sine wave, but it wasn’t quite what I was looking for when I was preparing for an article. I needed a fancier drawing of a sound wave.
In this article I’ll show you a neat little trick where we will use Adobe Illustrator to make a fancy sound wave.
Ad Blocking Detected Please consider disabling your ad blocker for our website.
We rely on these ads to be able to run our website.
You can of course support us in other ways (see Support Us on the left).
Sound waves with Adobe Illustrator
This trick is a little bit more difficult than the Adobe Photoshop trick, but still very do-able. A little bit of experience with Adobe Illustrator however will make things a little easier.
For this trick to make a nice sound wave, we will use the Illustrator ZigZag and Blend option.
The process I followed:
- Create a new document – I used the standard “web” size (960 pixels x 560 pixels) in landscape mode.
- Draw a straight and horizontal line.
- Select from the main menuL “Effect” “Distort & Transform” “Zig Zag …“. (Note: older Illustrator versions might need: “Filter” “Distort” “Zig Zag”)
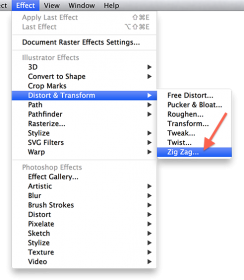
Illustrator – ZigZag Effect (or Filter)
- When the effect window opens, start by checking “Preview” – it will be very helpful when tweaking the settings.
- Check the option “Smooth” under “Points“, since we want smooth curves and not pointy zig zags.
- Now use the sliders “Size” to increase amplitude (height) of the waves, and “Ridges per segment” to change the number of waves.
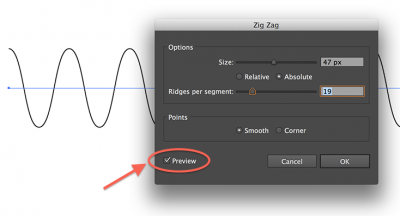
Illustrator – Zig Zag settings
- In the image above you can already see how nice the sine or sound wave is starting to look. Click “OK” when you’re done playing.
- From the main menu now select “Object” “Expand Appearance” which reveals the vector we want to modify.
- Next we copy our wave since we need 2 waves – simply use “Edit” “Copy” (or: CTRL/Command + C).
- Create a new layer (CTRL/Command + L).
- Use “Edit” “Paste” (CTRL/Command + V) to get the copy wave on that new layer.
- Use the “Selection Tool” (press “v” on your keyboard) to select and drag the copy of the wave directly on top of the other wave.
- Use the “Direct Selection Tool” (press the “a” on your keyboard), click a high or low point with the left mouse button, now press and hold the SHIFT key and use the pointer to drag the point up or down. These points should represent the extremes you have in mind.
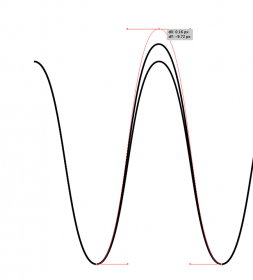
Drag highs and lows
- Release the SHIFT and mouse button and repeat the previous step (13) for all waves that you’d like to modify so you get something like the picture below.

Modified all lows and highs of the sound wave
Pretty neat so far right? And most of all: smooooth … 
Filling in the gaps
In this (optional) second step we are going to fill in the gaps with additional waves that fit nicely between the two waves.
For this we will use the “Blend” tool.
- Select both waves (CTRL/Command + A).
- Select from the main menu “Object” “Blend” “Blend Options“.
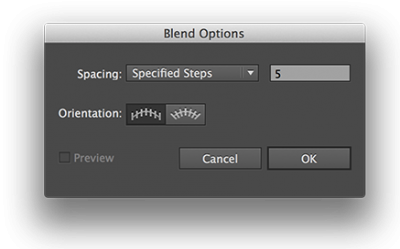
Illustrator Blend Options
- Try starting with the settings you see in the picture above and click “OK“. (preview does not appear to work)
- Next select from the main menu “Object” “Blend” “Make” (or ALT + CTRL/Command + B) which will add the waves “in between”:

Nice looking sound wave illustration
As you can see: a nice sound wave for illustration purposes is the result.
Now that you have gone through this exercise, you’ll probably want to do it again to fine tune your sound wave even more.
Copy it to Photoshop
If you’d like to use this drawing in Photoshop: simply select all (CTRL/Command + A), copy (CTRL/Command + C) and go to photoshop.
Create a new document there and use paste (CTRL/Command + V) to paste the drawing in Photoshop.
It will ask what type of paste you want. If you expect scaling of this drawing: choose “Smart Object”.
Your support is very much appreciated, and can be as easy as sharing a link to my website with others, or on social media.
Support can also be done by sponsoring me, and even that can be free (e.g. shop at Amazon).
Any funds received from your support will be used for web-hosting expenses, project hardware and software, coffee, etc.
Thank you very much for those that have shown support already!
It's truly amazing to see that folks like my articles and small applications.
Please note that clicking affiliate links, like the ones from Amazon, may result in a small commission for us - which we highly appreciate as well.


Comments
There are no comments yet.
You can post your own comments by using the form below, or reply to existing comments by using the "Reply" button.