In this article a quick and free trick to optimize PNGs on your Mac …
While developing and maintaining my website, I use several tools to optimize the size of my PNG image files.
So far I think that PNGOUT (for Windows see ardfry.com which also offers an Adobe Photoshop plugin) produces the best results. As a switcher between MacOS X and Windows I noticed the freely available PNGOUT port for MacOS … but unfortunately this is just a command line tool.
I started playing with the Automator included with MacOS X, dabbled with AppleScript and Shell scripts, but never got a really convenient and satisfying thing going … until I bumped into ImageOptim created by Kornel Lesinski.
Let’s get started with ImageOptim …
ImageOptim does not only support PNGOUT but also other image optimization tools like AdvPNG, OptiPNG, Pngcrush, JpegOptim, jpegtran, and Gifsicle allowing you to compress other image formats (JPG, GIF, and animated GIF) as well. Unfortunately, due to the license requirements, PNGOUT has to be installed separately.
ImageOptim also offers some nice drag-n-drop features (drop on icon, or drop on open application window), and even a system service (right click a file) for MacOS X … makes me want to have a Windows version as well … but no such luck. Then again, I’m mostly working in MacOS mode anyway.
Step 1: Download the file(s)
So let’s get started by first downloading the needed “parts” – they are all freely available:
For your convenience …
I packed all these 3 items into one zip file, with the files in their original form, I hope I’m not violating one or the other license while doing so. The files included are suitable for MacOS X 10.6 and newer.
Note: It is a always good idea to verify the earlier provided links to see if there are newer version available.
Download - ImageOptim Package
Step 2: Install ImageOptim
After unpacking the downloaded files first unpack the ImageOptim file (it’s a gzipped tar file; simply double click the file should extract the ImageOptim.app, depending on your settings, it might show ImageOptim) and drag the extracted application to your Applications or Utilities folder.
Step 3: Install PNGOUT (optional, but strongly recommended!)
If you’d like to use PNGOUT then you’d need to install this as well – I found PNGOUT to have the best results for optimization of PNGs.
PNGOUT is a command-line tool and you will need to give it a place somewhere on your drive, I placed mine in “/sbin“. I picked “/sbin” since it’s in the search path.
In the Finder (click the Finder, or your desktop) go to the menubar and click “Go” and then “Go to folder“.
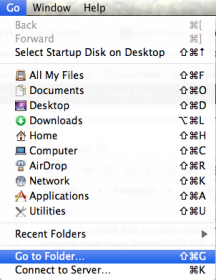
Finder – Go to Folder option
A window will popup asking you to enter the path of the folder you’d like to go to, enter “/sbin” without the quotes, and click the “Go” button:
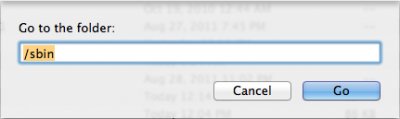
Finder – Enter the path of the folder you’d like to go to
The Finder will now open, drag-n-drop the file called “pngout” from the extracted archive to “/sbin” – your Mac will ask for your admin password. Enter your password to confirm.
To make sure this worked;
Open a Terminal window (Applications → Utilities → Terminal) and simply type “pngout” (without the quotes) and press the ENTER key. The output in the Terminal window should show something like this;
1
2
3
4
5
6
7
8
9
10
11
12
13
14
15
16
17
18
19
20
21
22
23
24
25
| PNGOUT [In:{PNG,JPG,GIF,TGA,PCX,BMP}] (Out: PNG) (options...) Jul 22 2011
by Ken Silverman (http://advsys.net/ken)
Mac port assistance by Jonathon Fowler (http://www.jonof.id.au/pngout)
PNGOUT optimizes PNG size losslessly using my own deflate algorithm (not Zlib)
With the right options, it can often beat other programs by 5-10%. Options:
-c# PNG output color: 0=Gray, 2=RGB, 3=Pal, 4=Gray+Alpha, 6=RGB+Alpha
-f# PNG output filter: 0=none, 1=x, 2=y, 3=x&y, 4=Paeth, 5=mixed, 6=reuse
-d# Override default bitdepth: 0(min),1,2,4,8 (valid only in /c0,/c3 modes)
-s# Select strategy. 0:Xtreme(default), 1:Intense, 2:Longest Match,
3:Huffman Only, 4:Uncompressed
-b# Block split threshold (lower=more blocks, 0=1 block/file, default=256)
Use trial&error! Suggested values to try are: 0,128,192,256,512,1024,..
-n# Exact number of Huffman blocks (overrides /b#)
-r Randomized initial tables (good for many trials with same options)
-k? 0=Remove optional chunks (default), 1=Keep all
p=Keep palette indices, s=Keep settings for /c,f,d,b
-k(Chunk,Chunk,..) Preserve only named chunk(s). Example: -kgAMA,bKGD,tEXt
-v,q,l Verbose,Quiet,List mode (use '-' as filename to specify stdin/stdout)
-y Assume Yes at the 'overwrite file?' prompt
-force Write file even if bigger.
-mincodes# Workaround for buggy decoders. 1:Zlib 1.2.1 bug, 2:buggy mobiles
The 1st filename is the input. If you omit the output
filename, PNGOUT will use the same filename with a .PNG extension. Examples:
$ pngout inlarge.bmp outsmall.png <- writes outsmall.png
$ pngout duke3d.png -c2 -f3 -b128 -kbKGD -v <- writes duke3d.png if smaller |
Next we need to make ImageOptim aware that PNGOUT can be used.
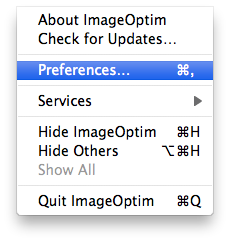
Start “ImageOptim“, go to the “ImageOptim” menu and select “Preferences“.
A window will popup where you have to select the “PNGOUT” tab and enter the path to the PNGOUT binary (which is “/sbin/pngout” without the quotes as shown below), make sure to check the “Enabled” check box. Once everything has been set you can close this window …
ImageOptim – Open Preferences
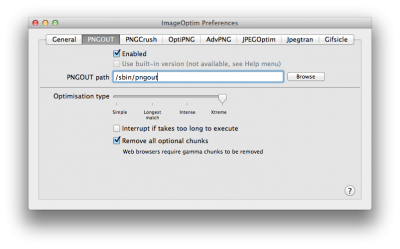
ImageOptim – Preferences – Enter “/sbin/pngout” as the location of pngout
TIP
ImageOptim will now use
PNGOUT and all other optimization tools to really find your best result. If you’d like you can enable/disable other optimization tools in this same screen (PNGCrush for example has become obsolete now).
Step 4: Install ImageOptim workflow (optional, but recommended)
Adding the workflow to this little recipe makes it a little easier to work with ImageOptim. It adds “ImageOptim” to the services menu of the Finder. Right click and choosing “Open with” works just a good as well though.
So when you right click one or more files, and go to “Services“, you will see “ImageOptim” right there. Clicking it will then open ImageOptim and add and process the selected files right away.
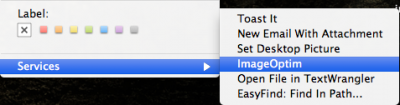
ImageOptim – Available in the Services menu
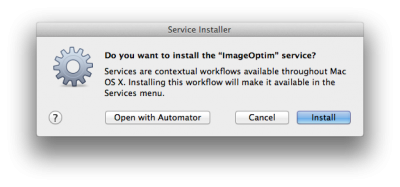
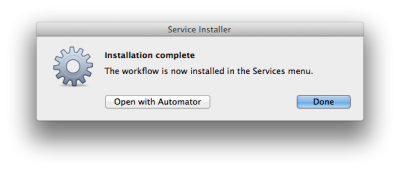
Installing the workflow is relatively simple,…
I notice on MacOS X Lion that simply double clicking the “ImageOptim.workflow” file will ask me if I want it installed – which handles all we need (your Mac might just show only the filename “ImageOptim“, leaving the “.workflow” extension off).
For older MacOS X version it might be needed to either copy this file to the “~/Library/Services/” folder (use the same method as described about for copying PNGOUT to “/sbin“) or by opening the file in Automator and using the “Save As” option.
Automator – Auto install the workflow
Automator – Auto install the workflow … done!
That’s all there is to it … you’re ready to optimize your images.


Comments
There are 2 comments. You can read them below.
You can post your own comments by using the form below, or reply to existing comments by using the "Reply" button.
Oh man! You posted this in 2013 and it’s STILL useful today. Nice!
Thanks man.
Andy
Awesome – thank you for posting a comment. Cool to see something this still being useful!
Hans