The last few months I’ve spend an absurd amount of time scanning family negatives. Over 12,000!
For this I used the excellent Nikon CoolScan LS-50, also known as the Nikon CoolScan V ED. These scanners perform superb, even though Nikon stopped producing them. Even support has been stopped or reduced. If you need one, eBay is the place to go.
In the process of scanning all these negatives, I ran into the problem that it had swallowed the film strip, and the entire scanner refused operation right after that.
This article shows you how you can remedy this with only a phillips screwdriver and some patience …
Please note that this article was written with the LS-50/V ED in mind, but it seems that other Nikon CoolScan models might be fixable in the same fashion (i.e. 4000 [IV] and 5000, and other models that look similar).
What makes your Film Strip get stuck in a Nikon CoolScan?
This problem occurs with other similar Nikon CoolScan models as well, that can handle the SA-21 film strip adapter.
Typically, the SA-21 film strip adapter of the Nikon CoolScan, looses “grip” on your film, and then you’re stuck. Well, the film is stuck inside the scanner. You’ll see the green light blinking, indicating an error, and the adapter can no longer be removed. The latter I’d call a serious design flaw, but oh well … the performance of these scanners more than compensate for this little inconvenience.
Your scan software, I use VueScan, will most likely indicate that there is “no film inserted”, or “film not properly inserted”. Using the film Eject function however fails, and the scanner appears dead …
Turning the scanner OFF and then ON again, fails as well. This is where the SA-21 usually ejects film strips that were still in the scanner when you turned it off. Like I said: that fails as well.
How to avoid film strips getting stuck …
I’ve noticed that the following will help minimizing film strips getting getting stuck:
- Film strips should at least be 2 full frames long, preferably even more.
- Some film strips have something taped at the end, do NOT insert those, remove the tape first.
- Some films strips have damaged peg holes, do these manually, do not rely on auto feed.
- Some strips have paper strips “glued” to the sides, after removing these make sure to remove residual glue.
- Some film strips are too much bend/curved, I recommend scanning those manually.
Adapters for manually scanning different film formats … ?
One of the limitations I’ve ran into was the fact that the Nikon adapters are only capable of handling:
- 35mm film, either by using a SA-21, or a MA-21 or MA-20 with FH-2 or FH-3 adapter,
- APS film (IA-20),
- Slides (MA-21 and MA-20).
Naturally, I had other film laying around like 110 and 126, which are not supported.
I did however find a company called FilmScanUSA (product link – unfortunately the link seems dead) that offers adapters which insert into a MA-20 or MA-21. These are much cheaper than used Nikon adapters (for example the FH-2 and FH-3) and support plenty other film sizes. At the time of this writing, they offer: 110, 126, 35mm, APS, Minox, and even 8mm film.
I’ve used a few of their adapters and they are of good quality and work as expected. I highly recommend it!
Ad Blocking Detected Please consider disabling your ad blocker for our website.
We rely on these ads to be able to run our website.
You can of course support us in other ways (see Support Us on the left).
How to remove the film strip and fix the Nikon CoolScan V ED/LS-50
Before we proceed, make sure you have a proper fitting Phillips Screwdriver, and some patience.
The process is quite easy, once you’ve seen how it’s done. So for the less brave, and I have to admit that I was nervous too, here a quick demonstration how it’s done …
Step 1: Disconnect all cables
Make sure to shutdown your Nikon CoolScan, unplug the power cord, and unplug the USB cable.
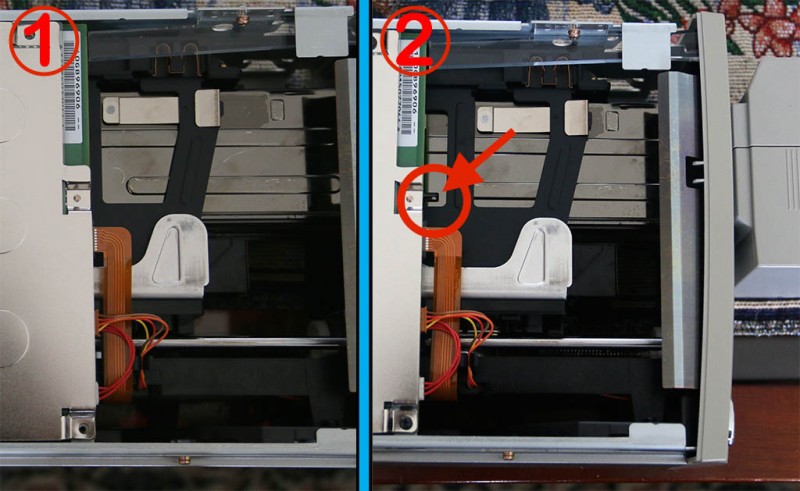
Step 2: Remove the 6 screws in the back
At the rear of the scanner, you’ll notice 12 screws, you only need to remove the 6 circled ones in the image below. Do not remove the other screws.
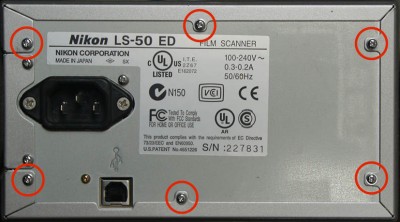
Nikon Coolscan V ED – Remove these 6 screws
Step 3: “Open” the 4 rubber feet at the bottom and remove screws
At the bottom, you’ll find 4 rubber feet under which we will find a total of 4 screws that we need to remove.
The rubber feet or covers cannot be completely removed as they are attached to the side/top rubber strips of the scanner. Thank goodness they are not glued, but it takes a little effort to open them by pulling one corner loose.
Once opened, remove the screw you found under the feet.
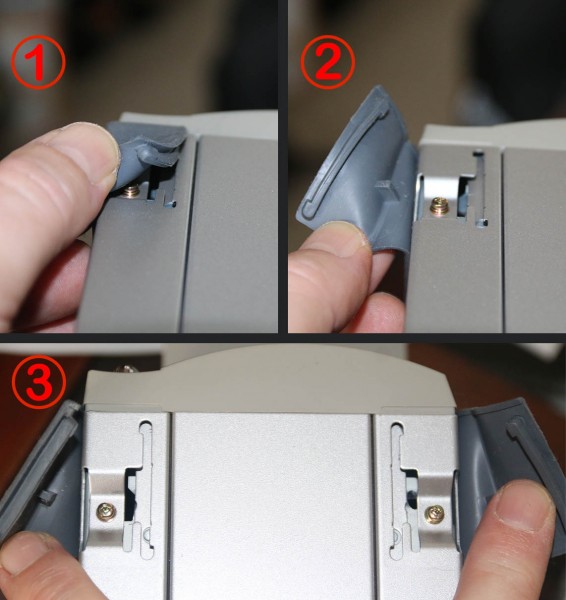
Nikon Coolscan V ED – Open the rubber feet
Ad Blocking Detected Please consider disabling your ad blocker for our website.
We rely on these ads to be able to run our website.
You can of course support us in other ways (see Support Us on the left).
Step 4: Slide the hood off.
To remove the hood/casing, I’ve found this to work the best by first placing the Nikon CoolScan upside down on a flat surface. With all 4 screws at the bottom and 6 in the back removed, you can now slide the scanner mechanism out of it’s hood/case.
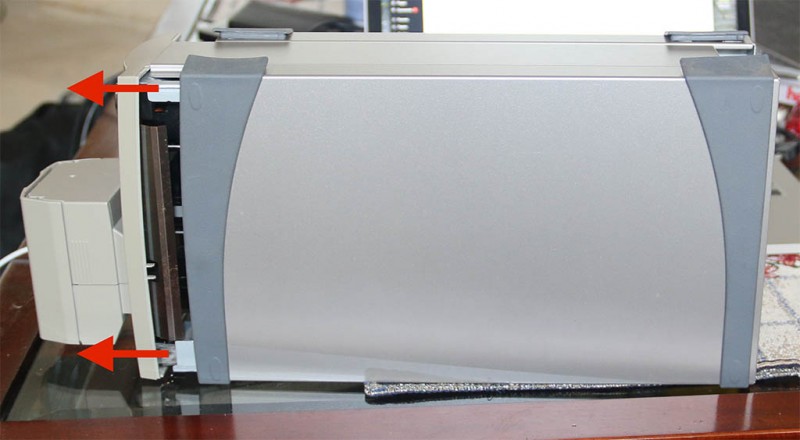
Nikon Coolscan V ED – Remove the “hood”
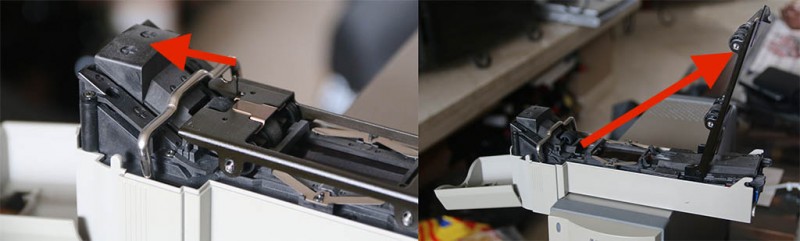
Step 5: Find what locks the film strip adapter (SA-21)
In this next step we will try to unlock the film strip adapter, in my example a Nikon CoolScan SA-21.
This adapter is mechanically locked, and that’s why we can’t remove it the usual way. I’d say this is a minor design flaw, in an otherwise well done device, as a small emergency eject button would have prevented the need for opening up the scanner all together.
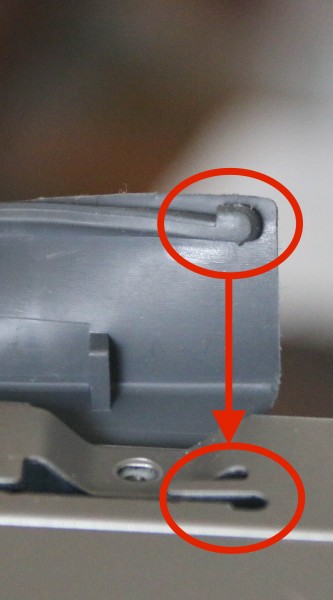
The locking mechanism is a simple small pin, which needs to be pressed for it to release the adapter. However, in most circumstances you cannot even see this pin as the mechanism is usually in it’s “back” position, which causes it to be covered by the control board of the scanner (hidden behind the large metal cover in the pictures).
Now we could of course remove the controller board, but thank goodness that’s not required.
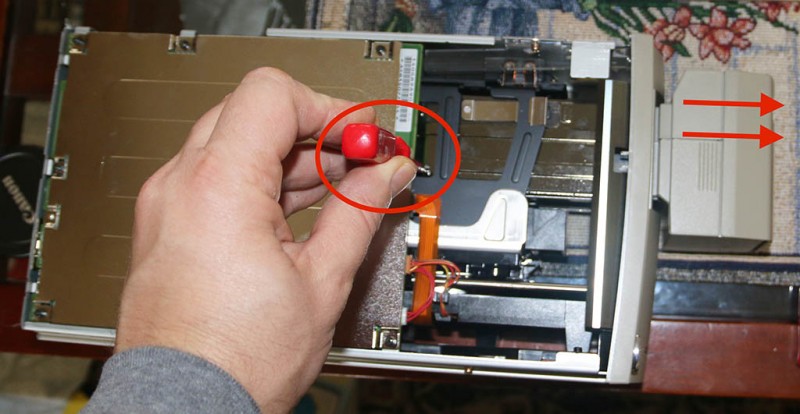
By turning the little white cog wheel in front we can move it to it’s “forward” position so we can access the locking pin.
This cog wheel (white in figure 4), can be found in the front of the scanner, near the bottom.
Turn it gently with your finger until you see the locking pin (part 2 in figure 5).
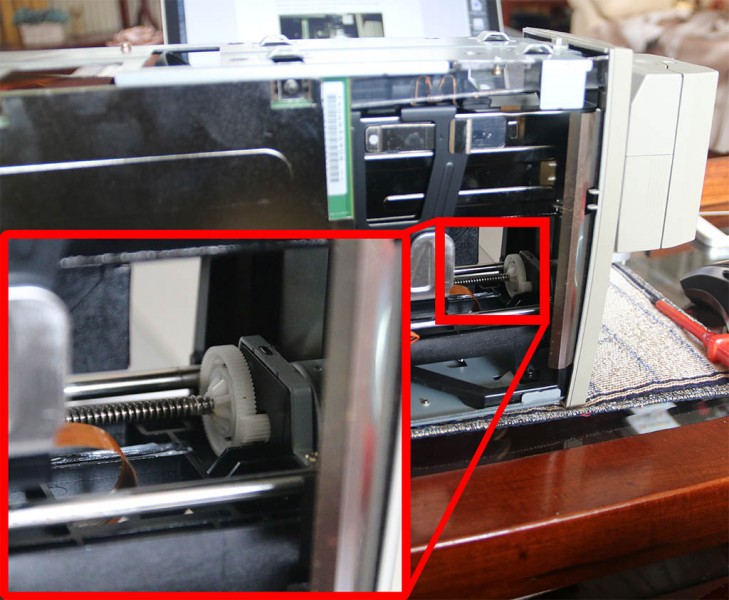
Nikon Coolscan – White cog wheel
Nikon Coolscan V ED – Reveal locking pin
Ad Blocking Detected Please consider disabling your ad blocker for our website.
We rely on these ads to be able to run our website.
You can of course support us in other ways (see Support Us on the left).
Step 6: Remove the film strip adapter (SA-21)
Now that we can reach for the locking pin, time to remove the film strip adapter.
This is done by gently pressing the pin (see part 2, figure 5) down, for example with a screwdriver.
Keep it pressed down while gently removing the film strip adapter from the scanner.
Nikon Coolscan – Unlock and remove adapter
Step 7: Clean up and reassemble the Nikon Coolscan
After we have removed the film strip adapter, check if there is any debris left in the scanner. In all the times I have taken my scanner apart, I did not find anything, but it’s better to be safe than sorry, right?
Next we can put the hood back on the scanner, and here again I’ve found it easiest to work with the scanner being upside down. Make sure the front is snug to the hood before doing anything else. I’ve found that on occasion the hood won’t slide on all that great.
Next, we place the 4 screws back under the rubber feet, and reattach the rubber feet.
I’ve found it easiest to insert on of the rubber pins first and then rubbing the rubber with your thumb, back and forth a few times, until everything feels like it’s back in place again.
After all rubbers are back in place, screw the 6 screws back into the back.
Nikon Coolscan – Reinsert the rubbers
Ad Blocking Detected Please consider disabling your ad blocker for our website.
We rely on these ads to be able to run our website.
You can of course support us in other ways (see Support Us on the left).
Step 8: Remove the film strip from the adapter
In this last step, we are going to remove the film strip that got stuck in the adapter, which is quite easy with the SA-21.
First we press the little “button” so the front part can open. After that we lift the top, which comes off the adapter entirely.
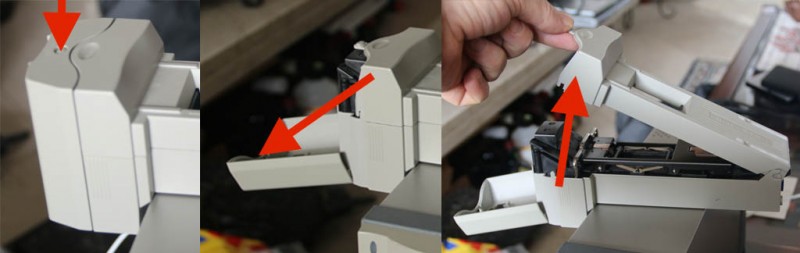
Nikon Coolscan – Open the SA-21 Film strip adapter
Next we open the metal film guide, by pulling back the shiny metal clamp and lifting the metal film frame.
Nikon Coolscan – Remove film strip from the SA-21
Once opened you can remove the film strip and/or debris you might find there.
After cleaning things up, reassemble the SA-21 and you’re good to go for scanning more film strips. To avoid this from happening again, read the suggestions at the beginning of this article. 


Comments
There are 117 comments. You can read them below.
You can post your own comments by using the form below, or reply to existing comments by using the "Reply" button.
Excellent guide! Just what I needed. I didn’t have the stones to open the scanner, but your guide gave me confidence to do it anyway!
John
Thanks John!
I was nervous the first time as well … but the scanner is very well build and once you know how to do it, it’s a piece of cake to do …
hans
Nice article. At least I now know, how to take it apart, should I need it. Especially the hidden ‘bonus’ screws.
Anyway, I’m using VueScan, too. And hadn’t bothered with Nikon Scan at all until I fooled around and tried a ‘what, if?’ to see, what happens, when you put a single frame negative strip into the scanner. Guess what, it stuck.
To make a long story short: Your step 8 is actually described in the manual and Nikon Scan will do the unlocking for you. When you get a stuck film, turn off the scanner, close VueScan and start Nikon Scan (NS). Turn the scanner on and it will try to eject the film, noting an error. If that isn’t recognized by NS, wait a moment and gently pull on the SA-21. The lock gives enough room to disconnect it. Push it in again and wait for NS to recognize the error that it cannot eject the film. Press “OK” on the dialog and you should hear a distinctive ‘clack’ noise, which is the lock unlocking. You now can safely remove the SA-21 and go to Step 8 (or follow the manual).
Oh, and many thanks for the hint where to find a 110 Pocketfilm adapter, I’ve been googling the prints of my fingertips for 3 weeks now trying to find something to help me.
Jens-Uwe Jansen
Hi Jens-Uwe!
Thank you for the nice compliment!
I did try the gentle pull of the SA-21, the short disconnect and reconnect trick did work as described, didn’t resolve the issue though. But I guess I’d need Nikon Scan for that – which is said not to run under Yosemite … Did you manage to get it to work under one of the recent MacOS X versions? I tried, but have not been lucky so far.
Thanks again fro the nice comment!
hans
I’ve been looking for something like this – I have boxes of old 35mm films that I need to digitise and there aren’t many affordable scanners that do it well, just stumbled upon it while chatting with you about Plex / Pi! Might be a bit of a problem with shipping cost to NZ though, but at least have some investigation to do now!
Thanks!
marshalleq
Hi Marshalleq!
Haha that’s funny to see that we both appear to be running into the same issues.
I have used the Nikon CoolScan LS-50 for more than 13,000 photo’s and together with VueScan I have to admit that I’m really impressed with the quality and ease of use. I can truly highly recommend this scanner (and their bigger brothers/sisters) for the job.
If you look on eBay, you’ll find some affordable ones – even though the price can seem rather high for a used item, they most certainly are worth it. Nikon did an excellent job with these scanners, and even today they still out-perform most modern scanners.
Note that I have 3 of these scanners now – one of them I had shipped to the Netherlands while I was staying there. Shipping didn’t seem to be a big deal. Might want to look for one with the original box though (for best protection when it’s being shipped).
hans
The film adapter is stuck and won’t come out. There is no film in it. I opened the Nikon LS-50 ED according to your beautiful instructions, but no release pin was found as in part 2 fig 5.
Can you help, I don’t want to give up.
Thank you
Odile
Odile Donis
Hi Odile,
I’m glad to see that you found my website, and I’m sorry to hear you could not find the latch.
If you look at step 5, then you’ll see that I’m turning the white cog you see in the front of the scanner. By turning it, the black “carrier” moves so that you can eventually see the latch. Do you see that latch or hole when you turn the white cog? Do you have a picture of what it looks like right now?
hans
Thank you for your answer. Yes I now found the pin and I pushed it down with a screw driver. Now the pin went in, it won’t come out and the carrier is still stuck in the scanner. I can see the pin but it is impossible to grab it.
I bought this scanner in 2008. Is it time to give up on it?
Thank you for your help.
Odile
Odile Donis
Hi Odile,
I would not give up yet. I have 3 of these scanners and I absolutely love them, even though the “film getting stuck” might happen.
Did you try gently wiggling the carrier? Possible making sure that the pin stays down?
The pin is [usually] the only thing holding the carrier back.
Can you see if there is film somehow holding it back?
hans
Hi Hans,
OK, I will try again in the morning in daylight. It is 3:30 AM here.
I do not see any film. I don’t think there film in there.
Thank for the encouragement.
Odile
Odile Donis
Hi Odile!
Yeah 3:30 AM sounds like a good time to be sleeping …
…
Like I said: don’t give up. The first time mine got stuck I felt quite desperate myself. But it’s fixable … don’t worry. We just need to find why yours does not come out.
hans
It’s almost daylight :)
Soon I’ll be at it.
Odile Donis
Hello Hans,
I have been at it now for a while. The pin is deep inside, I pushed on that pin with a dental instrument, but it will not move. I can’t take a picture because it is to small and dark. The pin is stuck inside it’s opening and will not move at all.
The carrier won’t move in any direction. There is no film stuck in it.
Odile Donis
Hi Hans,
Do you think that a drop of lubricating oil, DW40 or sewing machine oil, on that stuck release pin might help?
Odile Donis
Hi Odile!
Oh no, I would never use anything like that in my scanner! I’d be to nervous where that all might go.
Can you gently wiggle the pin with tweezers or something like that?
I’m actually surprised how stuck the carrier is. I know it doesn’t fall out automatically, but you should be able to slide it out.
I’d actually be happy that the pin stays down haha.
Can you see anything else that might be blocking the carrier? (I’m sure you looked numerous times for that)
hans
Good morning Hans,
I have tried everything. Nothing gives. Maybe it is time to take more screws out to see what is going on.
Have a nice day.
Odile Donis
Hi Odile!
I’m always nervous when taking devices like this apart – before you know it some weird spring pops out that we cannot put back haha.
I wish I could see what things look like, but like you said: it’s small and dark. Hard to take pictures of.
The carrier doesn’t even have a tiny bit of wiggle room?
Thanks! You have a nice day too!
hans
Good morning Hans,
You would not give up yet?
Yes the carrier does have a mm of wiggle up and down.
The pin is a little horizontal barre deep in the hole and does move in a little when I push on it with the dental instrument.
I’ll try again to take a picture again, maybe with the help of a strong flashlight.
Thanks
Odile Donis
I don’t give up that easily haha
Good morning to you too
hans
I don’t see the pictures I just sent. Let me know if you can see them. They are pretty OK.
Odile Donis
I reduced the size of the 4 pictures. Do you see them?
Odile Donis
I have not seen any of the pictures. Did you click reply in your email program, to reply to the notification email? That should arrive only in my mailbox, it would not appear here – but I have not received anything yet. Otherwise try emailing it to webmaster at tweaking4all dot com.
hans
Good morning Hans,
I sent a picture to
See if you can get it now.
Odile Donis
I received the picture!
It looks pretty good, can the pin go any deeper (don’t use too much force)?
With mine I’d actually have to hold the pin down when sliding the carrier out (to get started). Maybe it’s not in far enough and still holds the carrier back enough to prevent it from ejecting?
hans
The pin is stuck, it will not go in any deeper.
I had help: one of us pushed hard on the pin which is not giving at all, the other person tried to pull on the carrier.
Nothing works!
Time to take more screws out? What do I have to lose at this point.
Odile Donis
Man, that sucks …
I suppose that’s the only option left – but I’d be careful with removing screws. Any article I have found so far strongly recommends NOT doing that.
Maybe it’s better to look for a cleaning/repair service online. Last time I checked they were not all that expensive, and they [should] have more experience with situations like this and your scanner (mirror) will be nice and clean again. I think it’s worth it.
If however you figure out what the culprit was, then please let us know …
hans
Good morning,
Thank you for your patience with me and my scanner.
There are repairs shops around here. That would be the safest option of course.
I’ll keep you informed of any new development.
Odile Donis
You’re welcome Odile!
I just wish I could have been more helpful …
Let me know if and how they fixed the scanner?
hans
Hans,
I took the scanner to my local photo shop, Colonial Photo. The tech was able to unstuck that pin on site and remove the carrier at no charge.
When I got home, following your instructions and was able to remove the one frame negative that was stuck in the carrier. Now I know that in the future if I have a one frame neg I will put it in an old slide frame to scan it. The scanner works perfectly.
Thank you for all your help and good advice.
Odile Donis
Ho Odile!
Thanks for getting back, and great to hear you’re up and running again.
Don’t feel bad though; I too have made the “one negative” mistake.
Do you recall how he managed to the the pin unstuck?
hans
The attendant took the scanner in the back room to the repair department. When he came back I asked how the repairman got the pin unstuck, but he wouldn’t tell me, he said it was magic.
But the day before I had dripped an ever so tiny drop of DW40 on the pin. Maybe that was part of the magic ;)
Thanks for all your help.
Odile Donis
Oh that kind of magic haha …
Well, at least I’m glad your scanner is up and running again!
hans
Thank you. My scanner jammed on an unmounted slide film and I went to the internet and googled “jammed Nikon Coolscan”. Your instructions saved the day. Thank you again.
Stu G
Hi Stu G,
That’s great to hear! Thanks for taking the time to leave a comment. It’s so motivating to see messages like this.
Glad your scanner is up and running again!
Thanks!
hans
Thanks a lot, you saved my day!
Tzv
Awesome! Makes my day to read a comment like that!
Thanks
hans
What should I have done without this instruction??? Bring it to Nikon?
Thanks so much for putting this online! With your instruction and the pics the job was done in a few minutes!!
Thanks again, you really helped me out!
Hans Drost
Hi Hans!
Awesome! Glad the article helped you out … bringing it to Nikon is what I considered as well, but as far as I could find they no longer support these scanners … so I has to figure it out for myself as well.
Thank you very much for posting a “thank-you”, it so makes it worth writing more of these kind of articles.
hans
Thanks a lot for this great tutorial. That’s what i needed.
Saved much time!
greets,
Joerg
Joerg
Awesome! Glad to hear that Joerg!
hans
Hi There i have just bought a coolscan V ed
the problem i have is that the scanner does not recognise the MA-21 adaptor in place..
film adaptor works great.
I believe the slide has been removed without ejecting the slide as it does not lock in place even with slide in.
do you think this is the slide or machine fault ? is there a workaround ?
hope you can help thanks for your time.
Odge
Odge
Hi Odge,
unfortunately, I’m traveling for work at the moment, so I don’t have my scanner handy to take a look.
I have not ran into this issue, but it might be worth looking in the MA21. Off the top of my head, there might be a tiny latch inside that might need popping (the one that detects slides being inserted). You could of course try to insert a slide before inserting the MA21 into the scanner. I wish I had my scanner nearby so I could see what might be causing this.
Since the film adapter works, I’d assume the issue is in the MA-21 adapter.
hans
Tons of thanks. I had the exact problem you described with “Fix Film Strip Stuck inside Nikon Coolscan V ED (LS-50)”
Followed your steps to fix it and they worked perfectly. I have had excellent experience with the Nikon Coolscan V ED (LS-50) and was very concerned, when the film strip jammed.
You provided a real service.
Doug Sudduth
Thanks Doug for taking the time to post a Thank-You,…
it’s much appreciated and I’m happy to hear that the article was helpful!
hans
You’re my hero of all times!!!!
Thank you for this excellent tweak … you just saved my most loved Nikon-scanner!
Thx
Danny
Danny
Thank you Danny for taking the time to post a Thank-You!
It’s always fun to hear people enjoying the articles I write, very much puts a smile on my face!
Awesome to hear your Nikon is running again!
hans
Thank you so much ! You made my day ! Thanks for sharing.
VADC
Hi VADC!
You’re most welcome, and thank you for posting a thank you – it always makes my day when I see I was able to help!
hans
I found this thread and successfully extracted the SA-21 from the scanner. (Thanks!) I found a tiny (pinhead size) piece of ripped off film that fell out when I removed the SA-21 However, the problem still isn’t fixed. When I start up the scanner, the light blinks quickly after a few seconds, and then it won’t do anything more. I can’t make out anything else in the mechanism that could be causing a jam.
On the other hand, everything works fine with the slide adapter, so it would seem that the scanner itself is okay, but the SA-21, or the interface with it, is the problem. I tried blasting the SA-21 with compressed air to get any other pieces out, but nothing changes. It simply will not work. I guess the next step is to try taking it apart? (a bit daunting).
Anyway, have you heard of anybody having a situation like this, and what the solution could be?
Thanks
pmacfar
Hi Pmacfar!
First of all, thank you for the thank you post!
As for hte SA-21 not working properly; I cannot say that I have ran into this exact same issue, however, I have had it that an adapter was acting weird. Cleaning the contacts at the end of the SA-21 might help, cleaning the entire unit might help, but it could also be that one or the other sensor is either dirty or failing. I did find a very good article here on how to disassemble the SA-21 and locate (and even replace) the sensors.
As listed here, these are the symptoms of failing sensors:
Typical symptoms may be one of following:
– The adapter does not readily grab the film when you insert it.
– The scanner reports that it cannot detect the film after it was inserted.
– The scanner reports that it cannot eject the film
– The scanner seems to work scanned frames are not properly centered within their image files.
Hope this helps …
hans
Thanks for your reply. I’m going to have to work up some courage to take it apart and clean it. I don’t know that I’m up to the soldering necessary to replace to the sensors, and I’m not really on eBay at this point. But hopefully just some cleaning will do it. I’ll post back once I’ve tried it.
Thanks again.
pmacfar
Yeah I can imagine that the soldering is not something to look forward to. I’ll keep my fingers crossed!
Just a silly question; Do you, or anyone you know happen to have a IS-20(S) laying around (for APS films) – my IA-20 just died. And they are soooo hard to find. The ones on eBay are most of the time the IA-20 model (which is the model can not handle films with 40 exposures, the IA-20(S) however can).
Anyhoo — if anyone has a IS-20(S) for sale … please let me know!
hans
p.s. This guy also offers servicing Nikon scanners, it’s the same guy that made the description on the sensors. In case you’re in a pickle, consider contacting him.
hans
Thanks, that did the trick!
Dave
Awesome! Glad to hear that!
hans
Thanks so much you help me so much. I made a short video from the steps: https://youtu.be/j6LDs81zECs
Thanks!
pixelsophie
Hello Pixelsophie!
I’d respond in German but since English is the most common understood language here:
Thank you! Great video and thank you for referring to this article!
Well done!
(say Hi to your daughter haha)
hans
Thanks a bunch! My Nikon 5000 is once again operational and the neg has been saved. I owe you a beer!
Dick Brock
Hi Dick!
Awesome – glad to hear that this helped. I know it hurts to not be able to use such a nice scanner!
Thanks for taking the time and effort to write a thank-you note, it’s much appreciated.
hans
Thanks a lot for the very detailed tutorial !
Same prob with SA-21 (a bit too much of a curled film) on a Coolscan 5000 ED (exact same procedure)
Although some nervousness, i followed the steps one-by-one and now I’m back on track ! Great job you did ! Thanks again !
Claude M.
Hi Claude,
Awesome! Glad to hear this getting back on track again!
Thanks for posting a thank-you – it’s very much appreciated.
hans
Hey there, this is a very informative article. I have a question that doesn’t pertain to this model or issue, but is related and I am very desperate to find an answer so if you could shed light on it at all that would be very awesome.
I just got a Braun FS120 medium format film scanner and when I took the tray out, the negative had come loose and fell off inside of the scanner. This is super frustrating considering I just got it yesterday and didn’t even finish scanning my first roll!
Do you have any pro tips on how to get it out? The screws are on the bottom of the scanner instead of the back and don’t appear to be as removable as your Coolscan. Im tempted to just prop open the tray gate and shake it out, like you would a pick stuck in a guitar, but Im worried about what shaking it around would do to the insides.
Sorry again for being off topic here, any help you could offer would be very helpful.
-Kurtis
Kurtis Meyers
Hi Kurtis,
I’d be happy to help, but I do not have a Braun FS120 – and do not know what it looks like (side, back etc).
I’ve tried to find images, but couldn’t find any.
I did notice however that it might be the same device as a Reflecta 120, and the Pacific Image Primefilm 120 (PF120) – again couldn’t find any details.
One thing I do know about devices like this is that you should be willing to accept that the scanner might die permanently by opening it – which is what happened with my Nikon, since there is hardly any service to be expected from Nikon. I’d be happy to look at pictures if you have any (email me at webmaster at tweaking4all dot com), but please keep in mind that it will be guess work for me as well, and not being able to feel how things move or click make it quite a challenge.
If you just bought this scanner, I’d recommend seeing if Braun offers some sorts of support before trying to open it yourself.
hans
Oof. That’s a tough sentence to read, “be willing to accept that the scanner might die permanently.” I’m not trying anything now! Hahah, I’m far too high strung to try something if that’s a possibility. I just emailed B&H, who I purchased it from, for some advice. I bought the warranty and have only had it since Friday, so I’m hoping we can figure something out. I haven’t turned it on since it fell off in there, so I’m just going to leave it as is until I hear back from the company.
Thank you though for your immediate response, especially on a holiday weekend. It means a lot to me. Have a happy new year and I’ll let you know what B&H Photo says!
Kurtis Meyers
Yeah I know – taking things apart can be fun, but can come at a price as well … like I said: Nikon is no longer offering support. So my choices were pretty simple at the time: keep it useless and broken, break it, or get lucky and fix it. Either way – a chance to get it fixed would have been better than not being able to use it at all.
But with warranty – I’d most certainly go that route first.
You’re welcome! And a Happy New Year for you as well!
hans
Hello Hans,
Thank you for your very helpful article,
But I have one more problem. This problem has been around for some time.
The film negative will not feed properly. left is still a small border from the previous image. How can I correct this? This does not happen with the slides, but only with the film negatives.
My Filmstrip Adapter ist FA-21 and my hardware ist Nicon CoolScan 5000. The Software is Vuescan.
Best regards
Werner
Werner
Hi Werner,
This sounds like an initial misfeed or a too large scanner “window” (the area it scans).
Slides are not the best comparison, since there would not be a second negative.
I do not have a simple fix for this. My recommendation would be to test another adapter (I’m not familiar with the FA-21, did you mean SA-21?).
I have noticed similar issues with feeders where I have to manually slide in negatives (not 35mm film) – but I assume this is not the case in your setup.
Note: I did get lucky once finding an adapter at eBay. I actually made an offer to a guy that had a complete bundle for sale (scanner and 4 adapters). In the end he sold me the entire bundle for what one normally would pay for just the adapter
hans
Thank you Hans for your message,
but you were very lucky. Here in Germany costs a Nikon Coolscan 5000 with film negative adapter to 7000 euros.
You’re right I have the SA-21.
I’ll probably have to edit the photos with Photoshop and crop them
Werner
Hi Werner,
it’s worth a look – like I said; I found a seller of a bundle of scanner and adapters. I just contacted the seller and asked if he would be willing to sell just the adapter. It’s worth a try .
.
I do have several SA-21’s, but at the moment I’m not able to see how many, if I have a leftover and if they work properly.
hans
I have a LS 40 ED Is there any way to permanently disable the locking mechanism?
marcella
Hi Marcella,
I unfortunately have no experience with the LS 40 ED.
From what I can see on my own scanner; I’m not sure permanently disabling the locking mechanism is advisable. It has a purpose …
Sorry that I do not have a good answer.
hans
I knew in the back of my mind it probably wasn’t a good idea to feed in that short (less than 2 frames) negative strip.
But I had no idea the scanner would lock me out, so to speak.
Thanks to your article, I was back in business in no time! You saved me a lot of time and frustration.
BTW: One tip for those very short negative strips (can happen when bulk loading film). Cut them up, put them in slide mounts, and use the slide holder instead.
PS: Will try to send a small donation as a token of my appreciation.
Mitch
Hi Mitch,
don’t feel bad haha – believe me: I have done it as well

Glad this fixed it for you though and thanks for the tip!
Donations are not required, but always welcome (if you only have PayPal, then donate to this email address: hans @ luijten . net)
Thanks again for posting success! Have a good weekend!
Hans
This is really the kind of forum the Web was made for !!
Not the most read, but definitely one of the most usefuls (for thos stuck, of course !)
It also improves your self-esteem once you have completed the job after sweating like crazy when reading the words “screwdriver”, “open”, “dismantle”, etc … hahaha
Txs again for this wonderful trick ! It saved the bacon of many (including those who never stopped by again to post !)
Claude (BE)
Claude
Hi Claude!
Thanks for posting that this has been helpful for you
I agree, I think the general idea behind the Internet is to share knowledge and experiences, so we can not only help each other.
I can relate to the nervous moment when starting something like this, but it is also good to find out that we’re totally capable of doing things like these.
Thanks!
Hans
Hallo Claude
Thanks for posting that this very helpful and tricky instruction.
Best regards
Werner
Germany
Werner
Thanks Werner!

It’s always very much appreciated to hear folks finding my articles helpful.
Hans
Thanks for the specific directions. I have a Nikon 5000-ED and tried what you suggested. But even when I moved the scanning mechanism to the front, I cannot see the pin. So I did unscrew the circuit board holders, thinking I could move it out of the way. But that didn’t work, because there’s a power supply cable connected to the middle of the board, and it doesn’t seem to have much give to it. I’m looking at the corner that’s on the circuit board side of the scanner, along the bottom of the channel (is this correct?) but I cannot find anything that’s open to a push. I’ve tried starting and restarting the scanner. I use Hamrick driver software in my Windows 10 machine. Any other suggestions?
Richard
Hi Richard,
I use the same (excellent) software myself as well (VueScan)
As for the pin; I’m not familiar with all the different models, but a guy with an LS-4000/LS-5000 used my method as well (link – he based it on my method)
Now I do not know what the exact differences may be, but I carefully (based on pictures of the 5000-ED) assume your scanner is quite similar on the inside as mine.
So I’m not sure what to recommend.
Not sure if this is helpful, but I also found this short post for the 5000-ED (source) – but it sounds more like the film being stuck in the adapter;
If you switch off the scanner you should then be able to remove the grey film holder, even though the film strip will still be inside. Then, press the small button above the film entry slit to open the front of the holder. Pull up the top cover, ease the bright metal holder strip forward then lift the metal flap that holds down the film strip. At this point you should be able to remove the film strip. Reassemble and try again.
Not sure if this is helpful though …
Hans
Again, thanks. My wife has better eyes, and she was able to find the very small appearance of the pin and therefore got me out of my bind.
Richard
You’re welcome, and happy to hear you got it fixed (I sympathize with the eyesight limitations – I have to take my glasses off to be able to read or see fine details).
Hans
So I got this scanner working first time with VueScan. Great. on my OSX machine.
Then something happened with the software… it froze.
Not sure what (which is unlike me).
But it meant the 4 frame film was still in the cartridge. Could not eject with software.
So switched scanner off.. switched on.. nothing. Seemed dead.
I was able to pull it out the negative that is (before I found this). Maybe that was wrong.. but it didn’t take much force it came out pretty easily.
But still the cart remained inside.
Followed these instructions and bingo.. got the cart out no problem.
But.. Now I go to turn it on. Nothing. Still appears dead.
Yet when I switch off by the switch. I get one single flash of the Green LED, after about a second of switching off.
Is it possible the boot up of this is stuck somehow.. and i need to reset it.. is that possible ?
It does not appear in my list of USB devices.. nothing.
Is it dead. :(
Trev
Hi Trev,
It sounds like something else is wrong with your scanner.
Have you tried fully disconnecting all wires, wait a few seconds, and plug everything back in again (you probably have).
Maybe hook it up to another USB port, or another computer?
Since VueScan froze, I suspect something went pretty wrong.
Oh and if you want to test this on a Windows machine, I think your VueScan license will work there as well.
Hans
Yeah :( Tried multiple machines.
I assume that a USB connection is not actually required for it to start up with power.?
Odd that it worked once.
I have seen this post here about the IC needing replacing.
http://www.shtengel.com/gleb/Nikon_4000_5000_power_supply.htm
Unless you know of any other ‘switches’ in side that lock the scanner in a certain state which would normally be reset during a normal eject sequence?
Thanks for your responses though.
Trev
You’re right, the USB connection is not required to poweron.
I’m unfortunately not aware of any other tricks
I do not think there is a “reset everything” option on the scanner. My best guess is that it totally reset on power loss (eg. switch it off, or unplug power, for a couple seconds).
Maybe you can try to contact the writer of the article you found (contact info link). Maybe he can describe what he observed with either of the two scenarios he describes? Would be nice to know if it matches what you are seeing. If I’d have to guess then I’d guess the second issue he describes could potentially match your situation.
Hans
HI,
Can you tell me where I can buy the new kit as: FilmScanUSA (product link) that offers adapters which insert into a MA-20 or MA-21
because there is ni link at this address now or where I can buy this kit in USE product
Thanks a lot Marcel
MARCEL
Hi Marcel,
I see the link is dead and I wasn’t able to find them with Google either.
I was able to find a 110 adapter at Amazon (US), and on Etsy.
They seem to be 3D printed, like the one I have.
Other formats may be a challenge to find, but to find the 110’s I just Googled: nikon coolscan 110 adapters.
Sorry I cannot be more helpful
Hans
HI HANS,
Thanks a lot for your answer. Considering the technology at this time, and your knowledge in domain I suppose that it is easy with printer 3D to made exactly the same product may be for 126 film holder with exactly the size.
May be you and your contact/friend in USA it will be easy to made a copy for me. Here in Canada I do not know any person but my neighbourg have the 3D printer .. I have no exact dimension or model here.
Can you help me for the holder for film 126 as ( SCANFILMUSA)
Thanks a lot and may be together it will be possible..to made it.???
Marcel
MARCEL SAUVE
Unfortunately, I no longer have a 3D printer, and I do not know anyone that has one either
(it was too much of a pain to work with for me personally)
I also do not have any designs for these kind of adapters. Sorry …
While trying to find one (Thingiverse and such), I did run into
this companyoffering one for $15.Maybe that is helpful?
Hans
Hi HANS ,
I finnally order the product for Kodak 110 film strip with no modification need on feeder MA-21 for Nikon Coolscan LS-50ED.
With this product I suppose that for my friend it will easy to manufacturing the tray for Kodak 126 film …with 3D printer.
After my test , I will send to you my experience
Thanks a lot
Marcel
MARCEL
Hi Marcel,
that would be awesome – if your friend is willing to share the design, then I’d be happy to post it here as well, or link to wherever he makes the design available for download (or ordering). I’m sure other will be interested as well!
Thanks!
Hans
HI HANS,
Bad news for me……after place an order at this company as EGTSCON this company charge on my credit card different amount 4 time . A research on the WEB now indicate that this dealer is close. On google now it’s impossible to get this web site, Egtscons.com Review: [Oct-2020] Genuine seller or a scam?
I must contact my credit card bank this site is a SCAM dealer
Thanks
MARCEL
Thanks for the heads up – I removed the link right away after reading this.

I’m sorry to hear this
As far as I’m concerned the penalties for scammers is not enough to keep them from doing this kind if shit.
I did find a few more on ebay: link, link, link. As far as I can see there are even more listed than just these 3.
Through eBay is not my favorite way to buy things, but at least it offers a little more security.
Hans
Thanks for this.
I have a 4000 ED which is similar.
Just knowing where that little button in saved my scanner.
Jones
Hi Jones!
Happy to hear that this worked for the 4000ED as well!
Thank you for taking the time to post this
Hans
All goes wel till step 6. I can not see a pin.
Can I send you a photograph what it looks like in my machine?
Ped Verheus
Hi Ped,
I’m not sure if I can help, but please feel free to post a picture in the ‘Other hardware’ forum.
Note: while typing this I realize that you’ll have to have 5 approved posts in the forum before you can attach an image.
Start a topic there, upload your image(s) to imgur.com, and post the link(s) in the article (apologies for the inconvenience, this precaution is made to prevent spammers).
Hans
Great you saved my day!
Gerhard
Awesome!
Thanks for taking the time to post a thank-you note – it’s much appreciated.
Hans
Interesting. I had the same problem but my scanner doesn’t look like yours. It looks more like the one at http://www.shtengel.com/gleb/Nikon_5000_removing_stuck_SA21.htm. It says Coolscan V and IDs as an LS-50 in Vuescan.
I got it unstruck, but it doesn’t sound the same now as it winds in the film. I hope I didn’t mess anything rolling that carriage back and forth.
Paul
Hi Paul,
I’m a little confused – both devices look the same ? Just the front looks a little different (markings/color).
The link you included lists the Nikon Super Coolscan LS-4000 ED and LS-5000 ED — which again: look the same mechanically.
The only difference is that these seem to be able to feed an entire film through the scanner (SA-30 adapter).
As far as I know; the Nikon COOLSCAN V ED and a Nikon LS-50 are identical – and indeed get identified by VueScan as such.
I even have a USB and a Firewire version of one of them, and that one looks mechanically identical as well.
As for the sound difference: Did you check the SA21 (or whichever adapter you’re using) and the scanner to make sure there is no debris in it?
If you’re using an APS adapter (IA-20(S)); beware that the IA-20 model (the non-S) appears to break easily and make funky noises.
A great resource for certain Nikon scanners (info): ScanDig.
Hans
I know, I was as surprised as you are. The inside of mine looks like the image at the site you linked. That latch is not where you posts shows it, but where his does. It’s USB, not firewire, so it’s not a 4000 in disguise.
The sound cleared up, maybe something got out of whack from all the manual cranking of the carriage. It’s fine now. I wish I had a 4000 for the full roll capability. Sitting with those strips is maddening, Not a lot of choices though…the Nikon 4000 or a Pakon are the only ones I am aware of.
paul
I did look at this quite a while ago. What I did notice;
The SA-30 comes with a big plastic adapter for the back to catch the film – I suppose there are other methods to do this …
And … I found the link …. https://www.stockholmviews.com/coolscan-rollfeeder-mod.html
All my negatives are cut in small strips, of about 6 pictures per piece, so I would never have a use for it
Hans
I develop my own so I have the full roll if I want it. I can also get any other film returned uncut so this would e pretty useful for me. The link to the site with mod doesn’t work for me (too many redirects) but there are other places doing that.
paul
I used to develop my own as well, way back in the day.
But to store the negatives, I had to cut them nonetheless – which I obviously regret now that I have to scan a ton of them.
The link: oh wow, that’s weird. I just tried the link again and it work (tried a few browsers: Safari, Chrome, Opera, Brave) just fine.
If you’d like I can print it to a PDF and share it.
Hans
yeah, I have a lot of those sheets, already scanned…but I don’t have to keep doing it that way if I can get a working 4000. I tried that link and it opened, so thanks. The mod looks pretty simple after all.
paul
Cool – if you ever do this mod; let us know how that worked out. I’m sure others will be interested …
Hans
I am in the process of tweaking a Nikon SA-21 feeder to an SA-30 and if anyone else wants to try this, please use these instructions…
http://shtengel.com/gleb/converting_nikon_sa21_to_sa30.htm
Much clearer and easy to follow. I’ll update with results (turns out I need a couple of tools before I can get the case open…long screwdrivers are needed for a couple of recessed screws).
paul
I wish I could edit the earlier comment instead of filling the thread with smaller ones. NB: I followed the first directions posted and the feeder no longer works at all. Bummer.
When I re-read the directions I shared above (ones I had seen long ago and forgotten), I see he recommends crossing two different pins. That’s corroborated here —> http://www.helmut-stoepfgeshoff.de/sa21-sa30e.html So I am inclined to think they are correct. Not sure what the other ones were about. Pretty frustrating to confirm that the rule that half the info on the internet is wrong, the job is figuring out which half.
Reversing what I did (crossing two very small pins) might not undoable, at least not by me, so caveat hacker. I might have done better to send this off to be done professionally.
paul
I guess we should have started a forum topic after all
Hans
Hi Paul,
thanks for sharing your experience. Yep … I agree with the incompleteness of some info online. One of the reasons why I started this website.
Everything described on my website, I’de done myself while writing down and/or taking pictures to make sure other can follow the steps.
Sounds very much like a project I should do – just to get the fine details.
Did find some more reference, and from what I’ve gathered reading is that shorting pin 16 and 17 (shown here) is the same as connecting the little jumper pads.
This will set the SA-21 to present itself as an SA-30. Now there still is the mechanical issue of course, which are described in the other two articles (best pictures, more text).
A discussion on Google Groups confirms this (see image below).
Note: removing soldered pins can be done with a cheap Solder sucker/pump or desolder wick (oddly enough, the wick is almost as expensive as 3 of those suckers ).
).
Anything I can help with?
Hans
I am OK w sending this off to an expert. I didn’t dig as deeply to find those were equivalent and to be honest, I should have looked at how small the pins were and walked away. I tried to wick away the solder but my skills and tools are not up to this and I can accept that. I think it would be easier to bridge the other two large pins but still not my thing. Also the two sites I listed are much more clear on how to get inside the feeder. I have another good SA-21 I could try this with but I have learned my limitations. I didn’t find much info on this conversion beyond the sites discussed above: maybe that would have helped either get this done or steered me away.
The slowed down workflow of “strips of 6” is what I am trying to get away from. Maybe someday…
paul
Good post guys!
Alan Lee
Hi Alan!
Thank you very much for taking the time to post a motivating note! Much appreciated!
Hans
Thanks so much for the great directions to unjam film in my LS40 slide scanner. I tried to scan a single color negative and knew instantly it was a mistake. With your photos and instructions, it was a 10 minute fix. Cheers!
Bill
Bill
Hi Bill!
Glad to hear this worked for you! And … thank you for taking the time to post a thank you, it is very much appreciated!
Have a good rest of the weekend!
Hans