miniWOL is a small and efficient macOS application designed to send Wake-on-LAN (WoL) signals, allowing users to remotely power up their network devices over the local network. Tailored for both home and professional environments, miniWOL provides a reliable solution for managing and controlling networked devices with ease. Well … I guess ChatGPT nailed that one pretty good 😊
Some may already be familiar with miniWOL, as previous versions have been downloaded approximately 50,000 times by the time that I’m releasing this version.
This is now version 3 of miniWOL, which I’m making available only through the Apple App Store as a learning exercise for myself.
Obviously this means that this is a macOS only version, completely fine tuned tuned, modified, and sandboxed, for macOS users, and meeting Apple’s security rules.
As with pervious miniWOL versions, it boasts an intuitive and straightforward interface, making it easy for users of all technical levels, to setup and wake up their network devices with just a few clicks, straight from the menubar of your Mac.
These days where everything has become very expensive, most of us become more and more conscious about the amount of electricity we use. This is where Wake-on-LAN comes in play as quite a few devices that are network connected, can be woken up, or resumed, remotely with the so called “Wake-on-LAN” feature – think of some of the obvious devices like a NAS or server, or printer-servers, but do not forget devices like a regular computer, media players etc.
Content Overview
What is Wake-on-LAN ?
Wake-on-LAN, or WoL, is an Ethernet standard that allows you to “wake up” (or even power up) computers or network devices, and is originally intended for use in a local network. Please be aware that sending a WoL over the Internet typically does not work, and keep in mind that not all devices support Wake-on-LAN.
WoL is probably most commonly used to wake up a servers, just before access to these machines is needed – for example a media server, which can sleep all day long until you want to watch a movie, or a backup NAS that only needs to be awake when doing an actual backup.
There can be several motivations to do this; save on power, save on wear-and-tear of your equipment, keep things cool, etc.
WoL also requires the network card of this device to listen to traffic, even when the device is sleeping, in order to detect a “magic packet” being send to the device. While the NIC (network interface controller) is listening, a lot of traffic will pass that might not even be intended for this network connection, so just listening to network traffic would keep your network device awake even when you don’t want it to be awake.
Issues with devices that do or do not support WoL …
Not all devices or networks will support Wake-on-LAN, or support it in the same way.
Network devices where Wake-on-LAN may not work (not supported / not implemented):
- WiFi can support WoL, however most devices do not support WoL over WiF.
- Some switches may not support WoL and some only support WoL on port 1.
- 10Gbps SFP+ NICs may not support WoL (eg. Intel NICs)
- Some cards with multiple ports may support WoL on only one port
- Fiber connections may not support WoL
- WoL over Internet typically does not work, as the infrastructure will filter out the magic packets.
- Mac laptops quite often display issues when you try to wake them up (see also this forum topic).
Ad Blocking Detected Please consider disabling your ad blocker for our website.
We rely on these ads to be able to run our website.
You can of course support us in other ways (see Support Us on the left).
Enabling Wake-on-LAN on your Network Device(s)
Before we can wake up a network device with WoL, you will need setup this device to do so.
Quite often you’d need to do some settings in the “BIOS” of your computer, and.or do some settings in the operating system as well.
Certain devices, like most NAS devices, make it a little easier by offering a simple “WoL ON/OFF” function.
Since this will be different for most devices, you can start by consult the manual of your device, or take a peek at my Wake-on-LAN article showing a few common devices and operating systems.
Can’t get Wake-on-LAN to wake up your Mac laptop?
Check out my article (look for example 3) which explains how to login to SSH securely without a password, and wake up a MacBook Pro without even using a Wake-on-LAN application. To combine this with miniWOL, you can create a script, something like this:
1
| ssh username@ip-address-mac "caffeinate -u -t 1 || exit 1;" |
Naturally: replace “username” with the username for your Mac, and “ip-address-mac” with the IP address of your Mac.
Save this script for example as “myscript.sh” and make the script executable (with chmod +x myscript.sh ).
Next add the script to the device definition in miniWOL and check the option “Execute Script after Wake-on-LAN“.
After sending a WoL, this script will connect to your Mac with SSH and use caffeinate to turn the display on.
Don’t forget to enable WoL on your Mac (System Preferences Energy Saver (or: Battery) Wake for network access), and don’t forget to enable “Remote Login” (System Preferences Sharing).
Note: if you’re targeting a laptop: your MacBook needs to be powered by a power brick, just running on battery may not work, and the lid may need to be open – see also this forum topic.
Wake-On-LAN local vs over the Internet
miniWOL, and Wake-on-LAN in general, is intended to be used in a local network. Meaning: wake up a network device in the same network you are in (at home or in the office). To wake up a device at home, over the Internet (ie. you’re in the office or traveling), will require some trickery including, but not limited to, port forwarding. Not every modem/router can even do this. An example can be found here: DD-WRT.
So by default: use miniWOL for devices in your local network and do not expect it to work over the Interner!
For waking up devices over the Internet, you will need to do some extra leg work to get everything configured correctly.
Cannot ping Windows 10 or Windows 11?
Bij default it seems that Windows machines (Windows 10 and 11) cannot be pinged unless it is set to being discoverable.
You can set this like so if you like to use PING – which is optional of course. This should not affect Wake on LAN, but the ping command will not work and potentially result in a 30 second wait before miniWOL gives up pinging your Windows machine after sending a Wake on LAN packet.
Windows 10
- Control Panel
- Network and Internet
- Network and Sharing Center
- Advanced sharing settings
Check PC Discoverable.
Windows 11
- Control Panel
- Network and Sharing Center
- Change Advanced sharing settings
Check “File and Printer Sharing“.
miniWOL
The intend of miniWOL is to have a small icon in your Mac’s Menubar, so you’re just a click away from sending a Wake-on-LAN magic packet to a defined server. All this without dealing with all the in-depth details. So an easy few clicks and you should be up and running.
Download from the App Store
You can download miniWOL at the Apple App Store.

Please report issues here …!
In the Apple Store I have seen a handful of people reporting “it doesn’t work”, unfortunately without any details what isn’t working, what OS they are using, etc.
I’d very much like to help and figure out why something isn’t working, but pretty bad language and “it doesn’t work” is really not helpful, especially when already hundreds of users happily use the application.
So please: report issues here (even after you asked for a refund), this way I can try and see what I can do to resolve the issue and make miniWOL even better.
Note that this is the first time that I’m providing an application through the Apple App Store, and not as a download from Tweaking4All.
The main reason for this is that this is an exercise for myself to see how complicated it is to place a Lazarus Pascal developed applications in the Apple App Store, and what the implications are for doing so. After all, Apple does have some requirements when it comes to safety, including but not limited to signing applications, setting etitlements, sandboxing etc.
An additional reason is to see if this would help me out with my website expenses, since sending me a cup of coffee does not seem to work … at all.
Advertisements are kind-a disgusting if you ask me, and have reached an all-time low as well, and referrals isn’t doing much either.
Note that I am super grateful for the few folks who did sent me a cup of coffee 
As a little bonus for the small fee though; the often requested “auto update” is now fully automated (if you were to choose so) as well through the Apple App Store.
Versions
3.2.1 – Minor bug fix
- Bug fix: Bug fixed in MAC address detection (first character in ARP tables not read properly)
3.2.0 – Updated version with bug fixes and support for Dutch and German languages
- Update: Enhanced menubar icon (sharper for larger screens)
- Update: Better MAC address validation
- Bug fix: Bug fixed with MAC address detection blanking incorrectly
- Bug fix: When MAC address not found now a dialog will ask to replace the MAC address with a blank MAC address or not.
- Update: Implemented localization support (limited support due to my limited language skills – currently only English, German and Dutch)
- Bug fix: Bug fixed “Access Violation” when closing miniWOL with an empty device list
- Bug fix: Bug fixed “Access Violation” when deleteing last item in device list
- Update: Updated about box
3.1.1 – Updated version with major bug fixes
- Bug fix: Unable to add miniWOL to login items – moved to SMAppServices as the old method has been deprecated – requires macOS 13+ (!)
- Bug fix: Unexpected selection behavior (bouncing text) in the list of network devices (on the left)
- Bug fix: Unexpected changing of menu labels in the list of network devices (on the left)
- Bug fix: WOL Magic Packets being not broadcasted at times
- Bug fix: Last edited field not saved when clicking Quit right after editing
- Update: Changed appearance of the list of network devices, and did some minor cosmetic improvements
- Update: Improved IPv4 and MAC address validation
- Update: Replaced annoying popups, when entering invalid data, with small exclamation marks in front of the edit field(s)
- Update: Disabled auto sort, to avoid entries from jumping around when entering a new menu label
- Update: Ping button always visible (optional ping IP when MAC address cannot be determined)
- Update: New from scratch implementation of sending Wake On LAN packets
3.0.0 – Initial Apple App Store release
Features
miniWOL, as compact as it is, still packs a few neat features/options:
- Automatically start miniWOL when you login to your Mac
- At miniWOL startup, send WoL packets to devices that you configured as such
- When your Mac resumes from sleep, send WoL to the devices you’ve set to do so
- Execute a script or application once a network device successfully woke up through a WoL message
- Quit miniWOL right away after sending WoL to devices at startup (and running scripts or applications)
- Help find the MAC address of a network device based on its IP address, automatically or manually
- Test your WoL configuration before using it
- Do a PING to one of your devices to make sure the entered IP address can be reached
- Test a script before using it
- Use the default view with just a few options, or the more advanced view with more options
Ad Blocking Detected Please consider disabling your ad blocker for our website.
We rely on these ads to be able to run our website.
You can of course support us in other ways (see Support Us on the left).
Getting Started
Quick Start for the impatient (like myself)
Adding a network device usually starts with at least these steps:
- click the Add button,
- enter the “Menu label” you’d like to see in the drop down menu,
- Click the Known IPs button, and select the IP address of your device (or enter it manually).
Note:
The MAC address will be auto detected if you have not changed the default settings. This works when the IP address is in the so called ARP cache of your Mac – typically a device in your local network, that is powered on, and connected to the network.
Brief tour with some screenshots
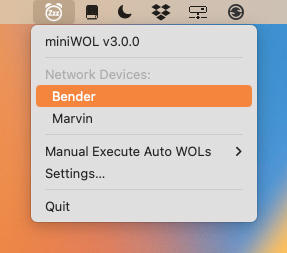
miniWOL – Dropdown menu
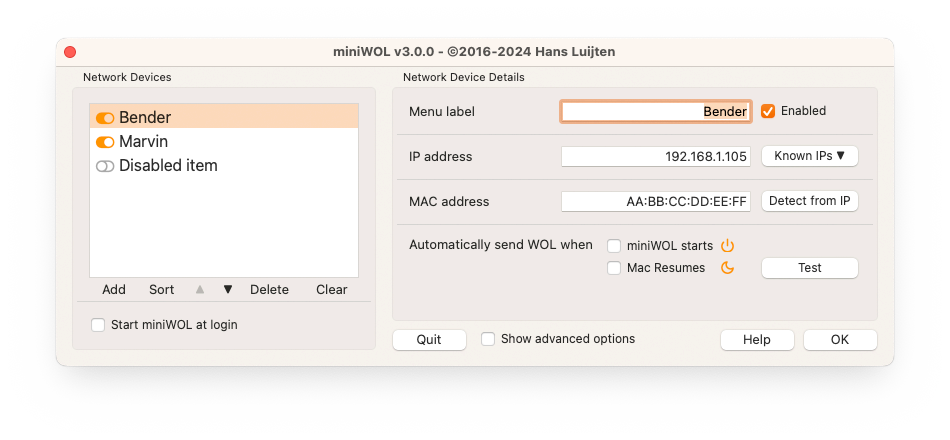
miniWOL – Standard view
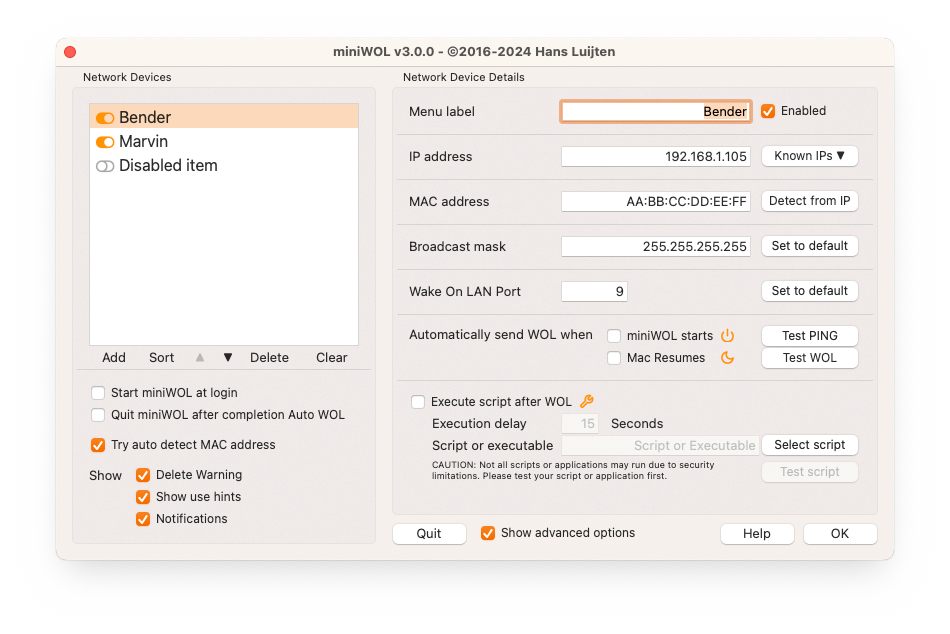
miniWOL – Advanced Options
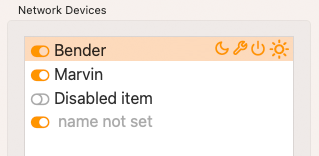
miniWOL – Indicators
Indicators miniWOL
| Indicator |
What does it indicate? |
 |
This Network Device is enabled |
 |
This Network Device is disabled |
 |
Send WoL when miniWOL starts
(for example when your Mac starts) |
 |
Send WoL when your Mac wakes up
(Your Mac resumes from sleep) |
 |
Run application of script after WoL |
 |
A WoL task is running for this device
(can include waiting for the device to be awake) |
Configuration
After having installed miniWOL through the Apple App Store, it is time to configure one or more network devices.
Note that miniWOL will never appear in the Dock – only in the menubar.
Add a Device
Adding a network device usually starts with at least these steps:
- click the Add button,
- enter the “Menu label” you’d like to see in the drop down menu,
- entering the “IP address” manually or with the Known IPs button, and
- entering the “MAC address” manually or do an attempt to detect with the Detect from IP button.
Note that Known IPs, Detect from IP and “Try auto detect MAC address” (advanced option, which is enabled by default) depend on information miniWOL found in the so called ARP cache of your Mac.
This does works quite often very well, but it is not guaranteed that miniWOL will find every IP address or MAC address in your network.
Obviously, the targeted device needs to be powered on, and connected to the network.
Even then your Mac may not know about it and a quick Test Ping may help (ping only works if you entered an IP address).
Automatically send WoL packets
Now in the default window (not the advanced view) you can see two additional options you can check:
- Automatically send WoL when miniWOL starts
As you already guessed, this will send a WoL magic packet to this device when you start miniWOL. This will of course also work when miniWOL starts automatically when you Mac starts.
- Automatically send WoL when Mac Resumes
This option, will automatically send a WoL magic packet to this device when your Mac wakes up or Resumes from sleep (assuming you have miniWOL running of course).
Advanced options
Next to the Quit button, you will see a checkbox where you can enable or disable “Show advanced options“.
Most user may not have a much use for the advanced options, or will set it only once, and hiding the advanced options will result in a much calmer window to look at.
Keep in mind though that advanced options remain active/functioning, even when hidden.
Network Device specific Advanced Options
The only network device specific advanced option is the option to “Execute script after WoL” which allows a script or applications to be executed after a network device woke up based on a WoL packet being sent by miniWOL.
This is how this works:
- miniWOL send a WoL magic packet to the device
- miniWOL will wait for a bit, max 30 seconds, to see if the device did wake up, based on pinging the device
- If the device is online, then miniWOL will wait a number of seconds (“Execution delay“) to run the script or application.
Keep in mind that usually, a network device has an active network connection reasonably quick after having received a WoL packet.
However, the operating system of that device may need more time to become responsive.
As an example:
My NAS replies to a ping in a matter of seconds after waking up from sleep, and about 10 seconds more when powering on.
The OS however takes a minutes or so when waking up from sleep, and when powering on it even takes several minutes.
So this can either be a shell (Terminal) script, or a regular application, which you can select with the Select Script button.
The Test Script button allows you to test the script or application, which I strongly do recommend you do.
macOS may not permit all possible applications or scripts to run due to sandbox and/or security limitations.
General Advanced Options
Advanced options does reveal a few advanced settings that affect miniWOL as a whole:
- “Try auto detect MAC address“, detect MAC address when an IP has been entered
- “Delete warnings“, show warnings when deleting device from the list
- “Show use hints“, show those little balloons explaining what certain items do
- “Notifications“, which makes miniWOL show notifications
Manage Devices
In the list of Network Devices (on the right), you can manage your device.
Either Add, Sort, Move them up or down , Delete a selected device or Clear the entire list.
Note that instead of removing a device, you can also simply disable them.
This way you have the info handy in case you need it in the future.
A device can be enabled/disabled using the toggle button, to the left of the device name in the list of Network Devices, or with the checkbox “Enabled” next to the Menu Label in the device details. A disabled device will be ignored in any automatic features, and will not be shown in the menu.
Copy Configuration files to other computers
To copy your settings from one Mac to another, we have to keep in mind that the application is distributed through the Apple App Store, and that the application is sandboxed. This means that the settings file can be found in a somewhat awkward location:
~/Library/Containers/com.Tweaking4All.miniWOL/Data/Library/Preferences/com.tweaking4all.miniWOL.ini
This location will have been created after you ran miniWOL at least one time on the Mac you’re looking at. So make sure to run miniWOL first.
Close the application on both computers and copy this file.
Make sure miniWOL is not running when copying the ini file.
Tip: Pinging a Windows 10/11 computer
By default the Windows Defender Firewall will block PING traffic.
To enable ping (ICMP Echo Requests) on a Windows machine, you need to adjust the Windows Defender Firewall settings to allow incoming ICMP traffic. This is typically done by enabling specific inbound rules related to “File and Printer Sharing (Echo Request – ICMPv4-In)”.
Steps to allow ping on Windows:
- Open Windows Defender Firewall with Advanced Security:
Press Windows key + R, type firewall.cpl, and press Enter.
(Alternatively, search for “Windows Defender Firewall with Advanced Security” in the Start menu)
- Navigate to Inbound Rules in the left-hand pane, click on “Inbound Rules“.
- Locate the rules named “File and Printer Sharing (Echo Request – ICMPv4-In)” (profile: private).
Right-click on these rules and select “Enable Rule“.
Uninstalling miniWOL
Since this is an Apple App Store application without any weird things, you can simply drag miniWOL to the trashcan.
If you want to make sure everything has been removed, make sure to see if this directory i gone as well:
1
| ~/Library/Containers/com.Tweaking4All.miniWOL |

Comments
There are 66 comments. You can read them below.
You can post your own comments by using the form below, or reply to existing comments by using the "Reply" button.
Hans, you’ve done it again!
Initially I was not too happy reading the news that I had to pay for it but then I realized that its just 2 bucks and for that I get a secure app that auto updates.
Thank you again.
John
Thanks John – always nice to see your appreciation!
Enjoy, and feel free to post comments (bugs, feature requests, etc).
Hans
Hi, I installed minWOL today on my Silicone Mac Mini with newest OSX 15.0.1 installed.
It does not work as it should work. The button “Start miniWOL at login” does not work and foremostly after a reboot the network device list is empty.
Will there be an update shortly or should I request my money back from Apple?
Thanks.
Enno
Hi Enno!
Thank you for reporting the issue – you’re the first one to report this.
If you’d like: feel free to ask for a refund from Apple. You can always repurchase it after I fixed the bug. Just to make sure you do not miss the window asking for a refund
In the meanwhile I’ll try to find what is causing this to fail – I’ll keep you posted here.
If you’d be willing to test, then I can send you a free copy and you can decide later if you’d like to re-purchase it.
Apologies for the inconvenience, and again: thank you for reporting!
Hans
Hi there! One year later, I wonder if the app on the App Store (3.2.1 as I type this) is now a Universal Binary?
The last I ever downloaded was 2.1.3 (from 2021) and still Intel-only (even though Universal Binaries have been supported by Apple’s compilation tools since 2020 — but I suppose that this didn’t extend to Lazarus Pascal…
Until 2028, Apple Silicon Mac users may have some luck running miniWOL under Rosetta 2, but, after that time, Rosetta 2 will be removed from macOS forever, as Apple considers that the “transition period” will be over by then. And can you blame them? It will be eight years since the transition started…
The only reason for asking is that I don’t really want to bother downloading something just to get a refund if it doesn’t work
Meanwhile, I’m more than happy to use a simple CLI version (e.g. https://sourceforge.net/projects/wake-on-lan/ for instance — it’s an oldie, but it can be easily compiled, or retrieved via MacPorts)…
Gwyneth Llewelyn
Hi Gwyneth,
Do note that 3.x is a little different than 2.x, so any feedback would be very welcome!
miniWOL is my first attempt to place something in the App Store to get my feet wet with the App Store.
It is my attempt to compensate a little bit for the costs to run a webserver and maybe compensate a little for the work I put into these apps.
Hans
Hi Hans,
thank you for your support. I read the same behaviour by a reviewer on the app store. Your app has great potential but it should work. I can imagine that is has something to do with Sequoia and its access rights. Please fell free to update me as I would like to use your nice little tool.
Enno
Enno
Hi Enno,
it’s interesting that you mention a comment from another user. For some reason Apple doesn’t relay those messages to me.
Are you seeing this in the App Store? I see zero comments when I look in the App Store – which makes it hard to respond to issues or questions 😞
I’ll keep you posted! I’ll ty to have it fixed a.s.a.p.!
Hans
Yes, see it in the app store on Mac OS Sequoia. It is posted by user EvilMM on 01/10/2024 in german language. I am looking forward to your fix. I will not refund my money.
Enno
Thank you Enno,
that is very generous of you – thank you !
Hans
Just a quick update:
Seems the trick I used to add login items, using AppleScript, is simply being blocked when an App is sandboxed (App Store requirement to have an app sandboxed).
The alternative (macOS 10.13 and earlier) method has been deprecated and the new method requires a launch daemon helper tool – which makes things a tad more complicted.
I’ll find a fix for sure, but it may take a bit of effort – just wanted to share the progress
Hans
Thanks for sharing your information. Looking foward to the fix. :-)
Enno
Just to keep you updated: Due to some family illness, I’ve not had enough time to fix the issue yet.
Been reading up on it a lot, but have not had enough time to do testing.
Just wanted to let you know I had not forgotten about it
Hans
Are there any updates on this issue?
Enno
Hi Enno,
apologies for the delay – I meant to respond earlier.
Unfortunately the last few weeks my mom was doing pretty badly (I took care of her 24/7) and she passed away this weekend after battling cancer for the third time. So the last days have been all about emotions and making arrangements for her.
All this made it rather hard to focus on fixing this problem.
I hope the upcoming week things will settle a little so I can focus on this some more.
Note: I’ve done some reading up on it already, it’s way more completed than expected, but I already have a few scenario’s in mind to test.
I really hope to be able to present an update next week.
Hans
My deepest condolences for your loss!
Everything else doesn’t matter now, take your time.
Enno
Thanks Enno!
I hope to find some time in the next few days to do some tests to see if I get this to work. Apple makes it rather complicated to even do this (a helper application is needed and will need certain requirements, which I may or may not understand 😉 ).
Happy New Year! 😊
Hans
Ridiculously late, but within the next few hours the new version should become available in the App Store
Thank you for your patience and apologies that it took that long.
Hans
Let me just chime in here for the same issue – and my deepest condolence as well.
For those who are looking for a workaround:
Do not get frustrated about the inoperative tick in the app’s GUI, just go into the macOS system settings > general > login items and add miniWOL manually.
Works for me on an M4 MacMini.
Stefan
…and an update to my previous comment from yesterday:
I can confirm that manually adding miniWOL as startup item works, BUT as it has also been mentioned by other comments the “network devices” do not survive a reboot.
At least not for an account with normal user privileges. For a user defined as administrator the stored settings seem to persist.
Stefan
Thanks for chiming in Stefan!
That makes sense since the application is sandboxed.
As mentioned in another comment, I’ll do my best to get this fixed as soon as possible. 😊
Thank you very much for the condolences – it is much appreciated.
Happy New Year!
Hans
Are there any updates on this issue?
I have the same problem.
Jan Clarisse
Hi Jan,
Working on it as we speak! Sincere apologies for the embarrassing delay. Family issues came with some life changing events hence the delay, and Apple isn’t making this easy for the dev environment that I’m using.
Feel free to ask again, and report issues if you find any. Unfortunately, some users report “it doesn’t work” without mention what is going on, so I very much appreciate you taking the effort
Hans
Thanks for your response and I understand you. My problem is with my MacBook Pro with sequoia 15.3.2 and miniWOL v3.0.2 is that after a reboot the network devices ar empty
Jan
Hi Jan!
Oh wow, that is really bad. I so sorry for that.
This has to do with the App Store sandboxing things and during my testing this never happend.
Thank you for reporting this specific issue, this is very helpful in fixing things!
Hans
Hi again Jan,
While researching this, I was wondering if you see if this file exists:
Hans
Hans,
No this file is not there. /Users/<username>/Library/Containers/ exists but all other folders are missing.
Jan
Oh wow, that’s a “interesting”. Thanks for checking.
Hans
Hi, miniWOL v3 stopped waking up my Synology NAS. MiniWOL is installed on my two MBP since long time and was working fine. With an other tool I was able to wake up the NAS so I think I depends on my MBP setup or miniWOL. I use lates macOS (15.3.2) on booth machines. Any idea? Kind regards, Thomas
Thomas Kais
Hi Thomas,
sorry to hear you’re running into issues with miniWOL.
Just for test purposes: does miniWOL v2 work OK on your setup? It uses the same method to send a WOL packet, however it is not sandboxed like the Apple App Store requires (which is quite a pain to develop for at times – been working on an update for v3, not related to your issue I think, but if it is another bug then I’d love to take that with in the new version).
Hans
Hi Hans,
thank you for your quick reply. Today I successfully tested it with iNet Network scanner (App Store app). So I think it’s not an issue with my environment but more and sadly to say an issue with miniWOL v3. Tomorrow I’ll test it with miniWOL v2.
How can I help you to reproduce the issue? Can I supply anything to you?
Regards, Thomas
Thomas
Hi Hans,
miniWOL 2.0 is also not working… I can wake up my NAS with this App Store App: https://apps.apple.com/de/app/inet-netzwerkscanner/id403304796?mt=12 but I need to do it manually.
Regards, Thomas
Thomas
Thank you very much for testing Thomas!
Unfortunately, I cannot reproduce the issue – miniWOL wakes up both my QNAPs without issue (macOS Sequoia 15.3.2).
The fact that you have the same issues with miniWOL2 is a little bit of a concern, especially when you get it to work with another application. – I would think if it commonly did not work with miniWOL2 I’d seen more reports of it failing.
I have seen issues with folks having the firewall on a Synology NAS enabled (I never use a firewall on my NAS, but I have to say that I never expose my NAS to the Internet seeing all the recent attacks on QNAP and Synology NAS devices). Can you check this, just to make sure? Still would not explain why other apps can wake up your NAS though.
Also odd that it used to work and now it doesn’t anymore. Something has changed and I’d love to find out what this may be.
miniWOL still works on the other Macbook’s? Could the OS be blocking this?
As I’m not familiar with iNet Network Scanner: can this tool sniff packets? (packet sniffing can be a pain, I’ve used Wireshark in the past, where you can filter on “wol” while it is sniffing for packets, which may not work over WiFi) — Just wondering if a packet leaves your Mac and if it is the same or differently formatted.
I also assume you use the same MAC address and port number (apologies if this is silly question)?
Common port numbers ar 7 and 9.
Lots of questions
p.s. working on a fix for another miniWOL bug, so before releasing that new version I just want to make sure I’m not missing any other bugs like yours.
Hans
To make things worse: t-online.de decided to block my mail server, so you may not get messages when a new comment is posted here. I contacted them (as they are the only one blocking me) what I should do. Their response what quick and full of info, but in the end way over my head to even look into. Just giving you a heads up.
Hans
Not sure if you have a Windows machine at your disposal, but I often use this little tool to see if a PC receives the Wake On LAN package.
I have done some testing with the latest version (not yet released) and it does send proper packets to my Windows machine.
Hans
Looks like I can now reproduce the issue!
For some crazy reason macOS blocks outgoing packets for WOL (but not for Ping, go figure) when running as an AppStore app. It took me quite some effort to even discover that since the Mac that I develop on, simply allows it. My second (super slow) 12″ Macbook however refuses to send packets.
For all: Working on a fix for this. Apple sure it taking the fun out of developing apps
Hans
I rewrote the procedure that sends WOL packet and made sure it passes the sandbox situation.
The new version (still waiting for approval) should be available soon if all goes well and should address the issue you ran into 😊
Hans
Hi Hans,
I just saw your new update on the App Store and directly tried it. On my old Intel MBP now it’s fixed but on my new M3 MBP not
  . I used your Windows tool to test it. On both MBP I receive the WOL package on the Windows machine. So there is something else on my infrastructure preventing it… I need to investigate.
Don’t know what’s the issue with my new MBP M3 because few weeks ago it was working fine…
Thank you for fixing the bug at least on my old MBP.
Regards, Thomas
Thomas
Hi Thomas,
Good to hear that the bugs have been resolved.
It is very odd that both your Mac’s send a magic packet (WOL) to your Windows machine, yet with your Intel Mac it wakes up your Windows machine, and with your M3 it doesn’t. That is odd indeed since both send the same package (the magic packet is made out of 6x $FF and 16x the MAC address of your Windows PC – reference) and your PC “sees” those when sleeping (not uncommon that PC’s even see the packet when they are off).
So both packets should wake up your Windows machine.
Unless … (trying to think outside of the box here) you have one packet send to the Ethernet connection of your PC and the other packet to the WiFi MAC address of your PC? Never tested this, but I do know that WiFi does not (or very poorly) support Wake On LAN.
During testing, with the test app, your Windows machine is already awake, so if data sent from your M3 would go to the PC’s WiFi (different MAC address), then this could explain something.
Both packets (Intel and M3) are identical in the test tool right (except for the port number displayed by the tool – as they seem to rotate)?
Hans
Hi Hans,
good news! Yesterday I installed 15.4 and today it worked with my M3 MBP
Regards, Thomas
Thomas
Hi Thomas!
Great to hear that! Thank you for taking the time to post feedback
Hans
Working on fixing the open issue, I was wondering how many users use old macOS versions from before macOS 13 (Ventura).
To add an application tot the login items, Apple deprecated the old method and instead they want developers to SMAppServices which will be included in the upcoming update.
Hans
Note to all, upcoming update:
First of all, apologies for so many bugs and issues. I’m embarrassed about how I missed so many issues on initial release, and that it took me this long to fix the issues. I’m very grateful for those who did report bugs here and had the patience to stick with me in these somewhat difficult days. Having bugs due to my own mistakes, the fact that sandbox mode is rather complicated and limited in what one can do, it is also quite a challenge to debug, did not help either.
The new version (3.1.1) has been submitted to the Apple App Store for review. Still waiting for approval … (it takes quite some time)
I have tested the new version on 3 Mac’s (Intel and ARM) and it is of course a universal binary (App Store requirement).
Please report issues here. I’ve seen 2 or 3 users only reporting “it doesn’t work” in the App Store and not responding to questions. Comments like that are not helpful in me trying to fix the bugs.
Implemented changes:
Bug fixes
Feel free to post feedback, suggestions, bug reports at any time.
Hans
Update is now available in the App Store (tested it myself just now to make everything works OK).
Hans
Hans,
Thanks it’s working fine now.
Jan
Awesome! Good to hear good news! And thank you for giving feedback!
Feel free to give a shout if you run into issues or have feature requests. I’d like to minimize the options, to keep things simple for less experienced users, but some features may be very useful.
Hans
Feature request:
Bugfix:
Thomas
Thanks Thomas!
– Icon blurry (menubar)
That kind-a surprises me.
What kind of screen do you use? I only have Retina available. Will look into this.
– Translation
I have been looking into that and it is a little bit of a challenge to implement and keep the translation strings updated and fitting (size).
Each time I change a string (hopefully not too often) I will have to verify and update these string(s).
It is on my wish list though!
– Mac address
Agree. Should be an easy fix.
Will add these to my to-do list!
Hans
After two weeks of testing… works fine! Regards Thomas
Thomas
Thank you Thomas for testing and feedback
Much appreciated! Have a good rest of the weekend!
Hans
Hmm.. Installed from Apple App Store and the application fails to launch. Does not show up in menu bar or the Dock or the Force quite applications menu. It does show the process in Activity Monitor but no GUI interface seems present anywhere. I am Running on MacBook Air M2 with MacOS 15.4.1.
I came way by this app via searching WOL for an UNRAID server. Seems to be just what I would need if I can get it to work.
Nothing seems to error in the console logs, but the log does mention “running-active-NotVisible”. Any thoughts on what I might be doing wrong?
Steve
Hi Steve!
Sounds like miniWOL is what you’re indeed looking for.
Quite odd it doesn’t show though – I will look into this right away (I’m running macOS 15.4.1 one an M1).
Hans
I’ve tried it on an M1 Mac (15.4.1) and Intel Mac (also 15.4.1), and in both cases miniWOL installs from the App Store just fine and runs right away.
Did you get a notification message?
I did verify it to be the universal file with Intel and ARM binaries, which shows the correct info as well (in Terminal):
Which results in: (you can try this yourself)
My first test is by removing miniWOL (drag to the Trashcan and empty the Trashcan) and reinstalling it through the App Store.
Of course this should never be needed, but it seems like one r the other request has not been dealt with.
If this does not work: feel free to email me (webmaster at tweaking4all dot com).
Hans
Yes, when I installed the pop-up appeared and I allowed all notifications.
results from terminal looks correct. :
I quite the application from activity monitor, moved the application to trash and re-installed from App Store. When opening it shows the application running in Activity monitor but still no GUI comes up. I made sure I only have one Desktop as I know applications may appear in separate desktops.
I have the console logs I can send you… let me know how to get them to you.
Steve Reed
Hi Steve,
first of all: thanks for not giving up and for not posting the log here
Sounds like you did everything I’d do as well. I’m not sure how helpful the log will be (Apple throws in tons and tons of messages in the Activity log – as you may have seen).
You can send it to me if you’d like: webmaster at tweakingl4all.com. I could even send you a test version.
Hans
Update:
Added a tip on how to enable PINGing a Windows computer (Windows 10/11).
Hans
UPDATE:
Version 3.2.1 fixes a minor bug (yet annoying when you run into it of course) with MAC address detection.
New version should be available in the Apple App Store any minute now.
Hans
hi hans
just bought the app a few mins ago. unfortunately I’m unable to add a host. as soon as I’m trying to add a MAC address and an IP, all I’m getting is the spinning wheel of death and I have to force quit your app. this is on a Mac mini M4 running macOS Sequoia 15.5.
cheers,
michael
michael
Hi Michael,
sorry to hear you’re running into an issue – thank you for supporting me though
I’m running on my Macbook Pro M1 Max, Sequoia 15.5 as well.
As I’m not home right now to test anything;
– is the target device powered on?
– Can miniWOL see the IP address of that device (Terminal can reveal this as well with “arp -a”)?
Hans
thanks for getting back this quick!
– when I first tried, the device was *not* powered on. now it is though. I first wanted to add the MAC and IP manually.
– miniWOL now sees the IP address. if I select the IP of the desired device from the menu, miniWOL stops responding (consumes 100% CPU and I’m getting the spinning wheel of death).
– miniWOL is allowed access to “Local Network” in System Settings (Privacy & Security).
– the macOS user account I’m running has administrative privileges.
michael
You’re welcome
Under normal circumstances one should be able to add the device without it being powered on. Was just guessing if miniWOL was trying to detect the MAC address automatically (you can disable this by unchecking “Try autodetect MAC address” after you checked “Show advanced options“).
You can still click the “Detect from IP” button after entering the IP address to try find the MAC address.
It should not freeze of course, but it would be helpful to see if this makes a difference, so I can see if I can debug or optimize the code.
Hans
– disable “Try auto detect MAC address” does *not* change the behavior, the app still hangs immediately after selecting an IP address from the menu.
some additional info
– the Mac mini is equipped with Apple’s optional 10 GbE NIC
– Network Ethernet IPv4 is configuread to “Manually”
– “Limit IP address tracking” is disabled
– IPv6 is set to “Link-Local Only”
– the resolver in my LAN (IPv4) is a VM (ESXi) running AdGuard Home
– wireless interface is enabled but *not* connected to any WiFi
– WoL works just fine with other tools (for example Network Radar)
https://apps.apple.com/ch/app/network-radar/id507659816
michael
Very well done on the info details and thank you for testing!
Just snooped through my code, and after entering an IP address it only validates and IP address (just formatting) and checks for a Mac address if that option was checked.
Just checking my privacy settings, just in case:
– Full Disk Access (miniWOL would not need this, maybe a leftover from my development tests)
– Automation (for System Events – so macOS reports network changes, and detects sleep/resume)
– Local Network (obviously)
Not sure why I couldn’t find a reference, but for auto detection of a Mac address “arp” (shell/Terminal) is being used as well. But we already eliminated that one by disabling the option. I did a test with an oddball IP address and am not seeing it freeze (it tries a ping as it cannot find the IP address).
Just checked the logs in “Console” (Applications -> Utilities -> Consoler, set filter to “miniwol” and click the play button) and am not seeing anything odd here either.
Do you have any tools installed that may interfere? Just a wild guess, but I wouldn’t expect anything to interfere. Eg firewall, antivirus?
Hans
Oh crap I misinterpreted your comment. Apologies!
So this happens when selecting an item in the menu and not when entering the IP address. My bad.
Checked the code again, and am not seeing anything odd there either. Just sending a WOL and a PING.
Two points where things could slow down (not expecting a freeze though):
– device fails a ping (although it bails after a certain timeout) – you can test that right away in the settings with “Test PING”
– script delay is set to “x” seconds
Please let me know if any of these may be the culprit. I’d love to solve this (thank you for your patience and help)
Hans
this is rather strange: I was away the whole afternoon, working for a customer. anyway: I did not restart my Mac mini since trying earlier today, system was not sleeping or anything. also, my user wasn’t logged out, I just locked the screen. now I again have tried to add the desired system in miniWOL with the same result (app hangs). tried it again a few minutes ago and now it works as expected. no idea as of why it’s working now, absolutely nothing has changed (AFAICT).
firewall on my Mac mini is/was disabled at all times. and, IMHO there’s a bigger chance of doing harm when installing an anti-virus software on macOS. so, no: I don’t have such software installed.
thnx anyway!
cheers,
michael
michael
Welcome to my world haha … it makes debugging super difficult.
I do tend to blame the not entirely perfect “security features” in macOS, as I have ran into actual problems related to these features more than once.
Glad to hear it now works, just wished we would have found the culprit.
Please feel free to contact me when you run into it again – in the meanwhile I will keep an eye on it as well, even though testing the store version on my development machine seems impossible as I cannot even install it from the store (probably because com.tweaking4all.miniwol is linked to my dev version).
Hans