Before we begin …
Verify your local laws!
This article is not intended to promote pirating Copyrighted Materials!
Laws, when it comes to copying Copyrighted materials, differ from country to country. It is your responsibility to be aware of these laws and comply to them. See also our Disclaimer!
The movie industry in general does not want you to copy a DVD for any reason. Fair use proponents however claim that the law leaves room for making a private backup (in the US: DMCA or Digital Millenium Copyright Act). But it’s all a matter of interpretation – so think for yourself before you act!
Other countries, like The Netherlands, are more liberal when it comes to this – Consumers pay a few cents extra for empty media, and for personal use you are allowed to make a copy (see Stichting Thuiskopie).
Now you that you know what your responsibilities are in this matter … let’s continue …
Note : None of the two methods will store album art (picture) in the MP3 files. Artist, title and album information (meta data) however will be stored in the MP3 files.
Note : If you’d rather not use iTunes or Windows Media Player, then consider AudioGrabber – it’s free as well.
Ripping an Audio CD with iTunes
First of all, we need iTunes, you can download it fro free from Apple. Once downloaded install it and start iTunes. If you’d rather not install iTunes, at the end of this article, I’ll show you two free alternatives as well.
You can do some presets so you don’t have to do this each time you make MP3’s out of your Audio CD’s.
Preset your MP3 preferences
Doing pre-settings for your MP3’s is optional – iTunes will ask for it when you’re ripping your Audio CD as well. But when you do the pre-settings as described here, it will each time when you want to rip, start with the settings you do here – which can be a time saver.
Click the “Edit” menu (just below the iTunes play control at the top) and select “Preferences“.
Click “General” “Import Settings“.
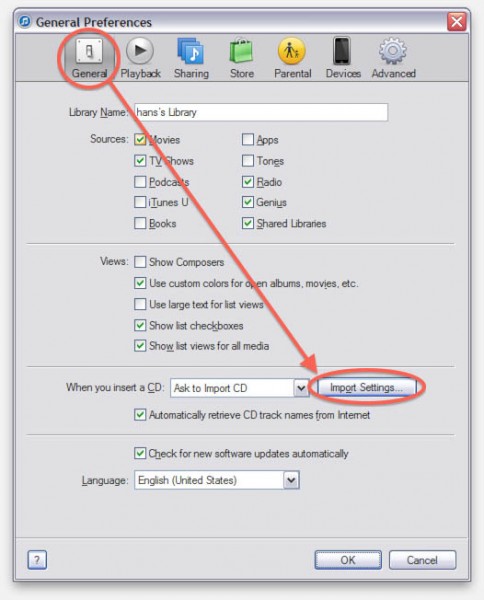
iTunes – Import Settings
- A window now opens where you can set the details you’d like to use (MP3 in our case) when copying your Audio CD.
Set “Import Using” to “MP3 Encoder“, and “Setting“to “Custom…”.
Note : You can of course take one of the predefined settings as well.

iTunes – Setting for MP3 import
In case you did click the “Custom…” option in the “Setting” field a new window will have opened.
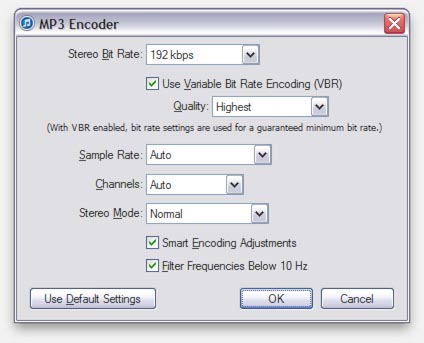
iTunes – Detailed MP3 settings
I typically use the displayed settings, which should be suitable for most cases.
- Use a higher bitrate if you need a higher quality, or a lower bitrate (128 kbps or higher) if you need the files to become smaller.
-
My default MP3 Settings
| Option |
Setting |
| Stereo Bit Rate |
192 Kbps (choose higher for higher quality) |
| Use Variable Bit Rate Encoding (VBR) |
check |
| Quality |
Highest |
| Sample Rate |
Auto |
| Channels |
Auto |
| Stereo Mode |
Normal |
| Smart Encoding Adjustments |
check (optional) |
| Filter Frequency below 10 Hz |
check (optional) |
When done click “OK” and “OK” again (you can skip the second “OK” if you still want to set the Album Artwork option in the next paragraph).
Album Artwork
iTunes is very capable of retrieving artwork and other so called meta-data (title, artists, album name, pictures, etc). You will have to enable this option though if you’d like to have iTunes do this for your MP3’s.
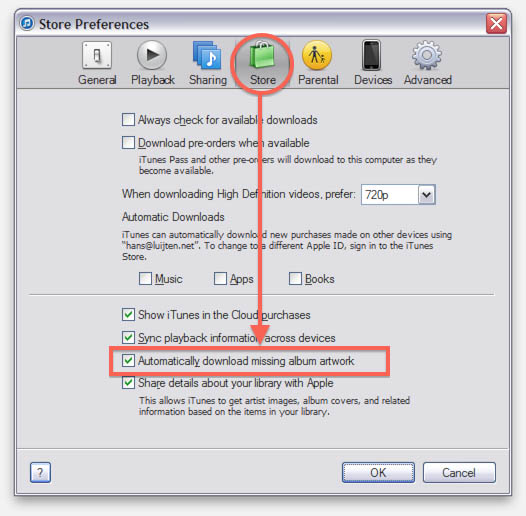
If you’re interested in Art work for your music: Click the “Edit” menu (the menubar below the iTunes play controls) and select “Preferences“, unless the window is still open from the previous paragraph.
Click the “Store” tab and check “Automatically download album artwork” and click “OK” when done.
Note :
– This option requires the “Share details about your library with Apple” to be checked – how else is iTunes going to get the details (meta-data) of your song(s)?
– This option will not be available if you’re not signed in with an Apple account. Such an account is free and harmless, so if you’d like this additional info, select “Sign In” under the “Store” menu (next to the menu you just used to open the preferences). A window will popup where you can either sign in with an existing Apple ID or create one.
Have iTunes grab Album Artwork
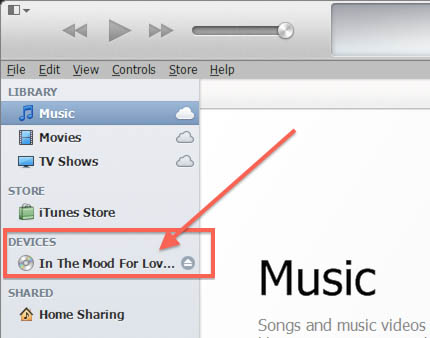
Step 1 – Insert Audio CD
After a few seconds your Audio CD should show up in iTunes, on the left hand side under “DEVICES” – it might be that iTunes asks you if it should add the CD to your library, in that case select “No“.
iTunes spotted your CD!
(Sorry – that’s the only CD I had at hand when I was writing this)
Step 2 – Select the desired tracks
Click on the CD Title (as indicated above), and on the right you’ll now see all tracks appear. As you will probably see, all tracks are checked. If needed: Uncheck the tracks you’re not interested in.
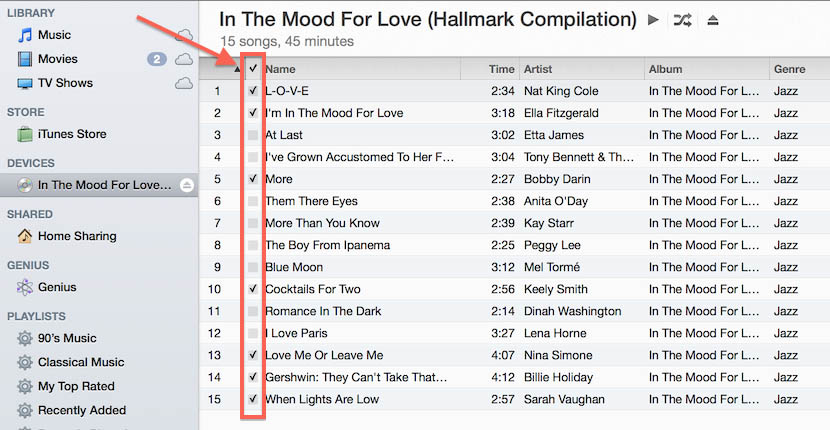
iTunes – Select the tracks you’d like to convert
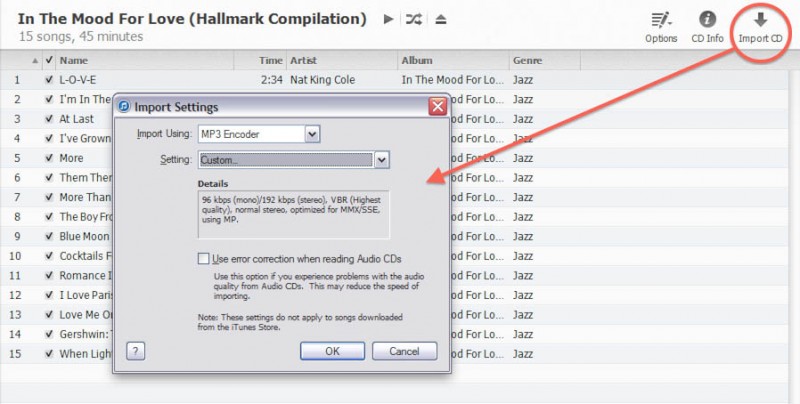
Step 3 – Start Copying your Audio CD to MP3’s
To start copying your Audio CD, or a selection of song(s) on the CD, to MP3, click the “Import CD” button in the upper right corner.
The import settings window will open, and if you followed the “Preset your MP3” paragraph you can simply click “OK” and the copying or ripping of your Audio CD starts with the settings you’ve made before. It will take a few minutes.
Note : iTunes might ask “Send audio information about this CD to Gracenote?” if you’ve set the option to retrieve album artwork – confirm if you’d like to have iTunes get the artwork. Gracenote is one of the largest music databases around and Apple utilizes it to retrieve music meta-data.
Note : If you did not follow the “Preset your MP3” paragraph, you can follow the instructions for this screen as well.
iTunes – Import your CD
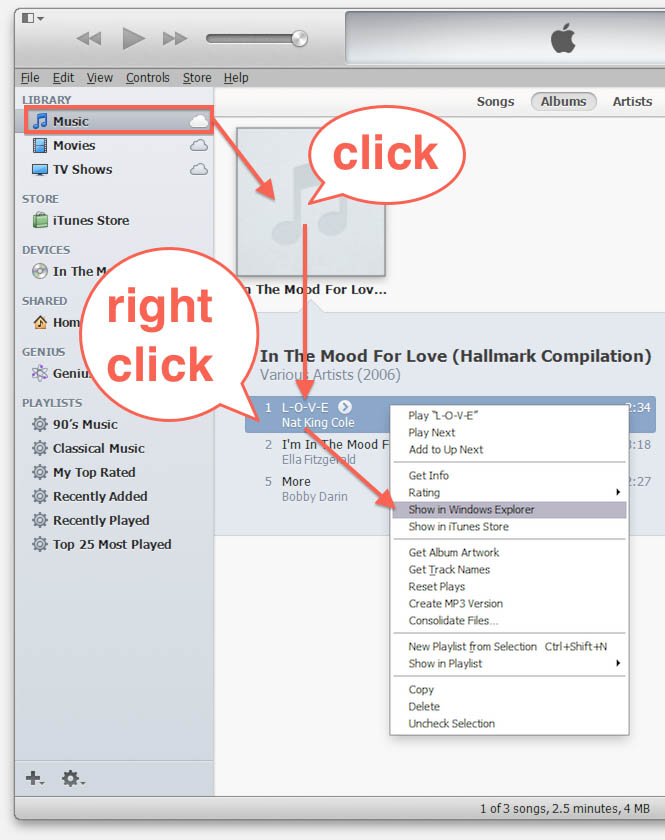
Step 4 – Where did my MP3’s go?
iTunes, infamous for their weird way of storing music on your iPod, iPad, iPhone, etc. actually stores your music nicely on your computer.
To find where the files are, once ripping is completed, do the following;
1. Click “Music” under “LIBRARY“,
2. Click your album,
3. Right click the song you’re looking for,
4. In the menu select “Show in Windows Explorer“.
The Windows Explorer will now open where the file can be found, typically it’s located in the Music folder of your iTunes.
Tip : The unfortunate thing though is that iTunes uses a weird file naming convention. iTunes uses “Track number – title”, where I prefer “artists – songtitle”. This can be fixed with a commercial add on like TuneUp (abuse the free trial if you’d like).
Note : The path displayed below is just an example for Windows XP, Windows Vista, 7 and 8 will have a slightly different path.
C:\Documents and Settings\<username>\My Documents\My Music\iTunes\iTunes Media\Music\Compilations\<album title>\
iTunes – Where did my MP3 go?
Rip Audio CD to MP3 with Windows Media Player
Windows Media Player comes with Windows, but it’s not a bad idea to make sure you have the latest version. You can download the latest version here.
Windows Media Player (WMP) is, like iTunes, pretty good at ripping Audio CD’s and retrieving so called meta data (data about the songs, artists, album, etc) – if you set the setting right.
After making sure you have the latest Windows Media Player, start it and click the “Rip” button.
On the left hand side you’ll see your Audio CD in case you already inserted it and on the right hand side you’ll see the details of your Audio CD as shown below. If you don’t see any song titles etc, don’t worry – we’ll address that next in the settings.
Windows Media Player recognized your Audio CD
Tweaking some settings
If you do not see the details of your Audio CD on the right hand side after clicking your Audio CD on the left hand side, then a few settings might need tweaking – you’ll have to do this only once.
Press the ALT key once and you’ll see a little menu appear in the upper left corner and select “Tools” “Options“.
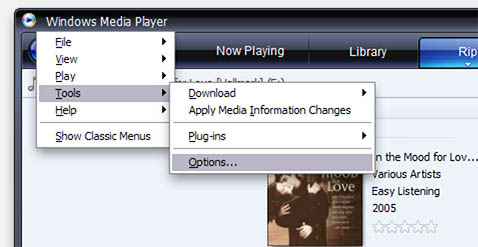
Press ALT to get to the options
In the window that just opened, click the “Player” tab and check “Connect to the Internet (overides other commands)” so the Windows Media Player is allowed to retrieve music information from the Internet.
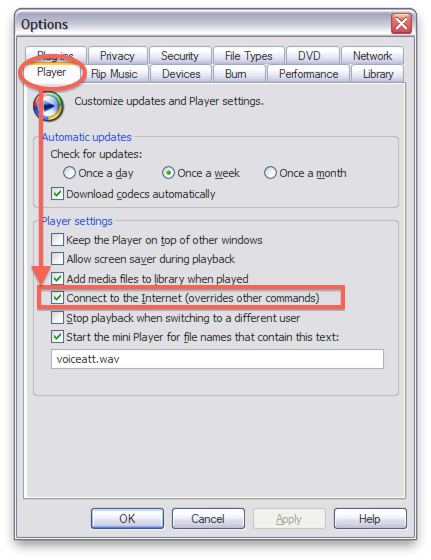
Allow Media Player to get data from the Internet
Next, click the tab “Library” and copy the settings as displayed below in the “Automatic media information updates for files” to ensure Windows Media Player get’s the meta data for your music.
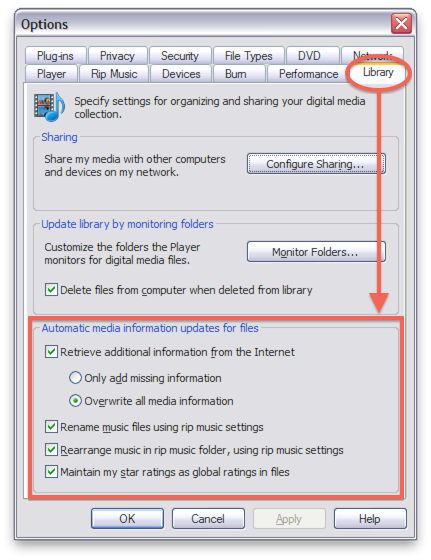
Make sure WMP retrieves meta data
Finally we will do some MP3 settings by clicking the “Rip Music” tab. Under “Format” choose “mp3” (even if WMP complains that this might not be the best format) and move the slider at “Audio quality” towards “Best Quality” until you see the desired bitrate. I typically choose 192 Kbps, but some might prefer even higher. A higher bitrate represents a higher audio quality, but for most cases 192 Kbps will be fine. Click “OK” when done.
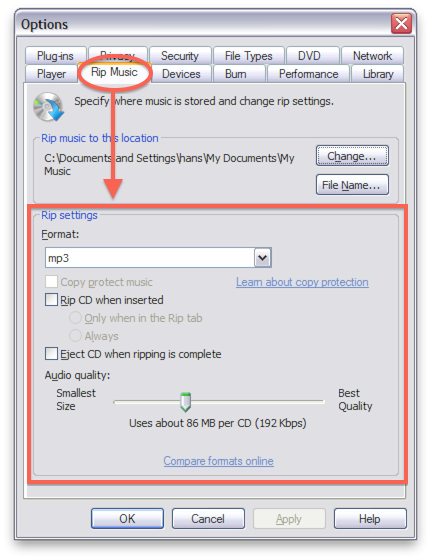
WMP – MP3 settings for ripping MP3’s
If you still do not see details of your Audio CD: close and restart Windows Media Player, if that doesn’t work eject and reinsert the CD, and if that doesn’t work either … well then you probably have an Audio CD that is not recognized by the online database WMP taps into.
Note : Self burned Audio CD’s are rarely recognized!
OK, now that we have all kinds of settings right, let’s get started with the “usual” procedure of ripping an Audio CD.
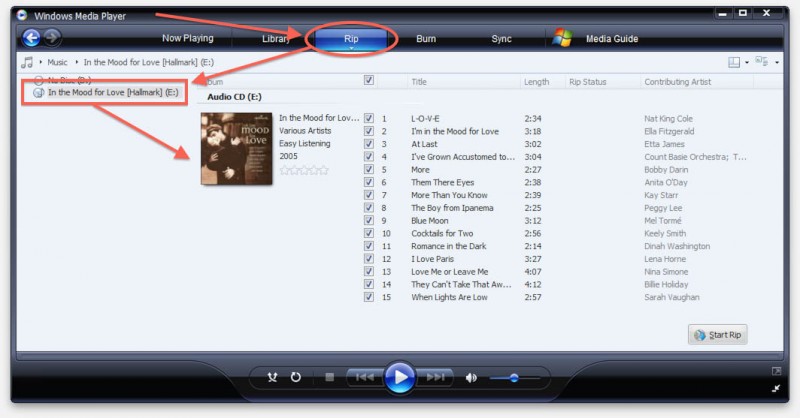
Step 1 – Insert Audio CD
When you insert an Audio CD, Windows Media Player will recognize the disc and will try to retrieve the meta data or media information from the Internet. Once retrieved, the details of your Audio CD will become visible (you might have to click the Audio CD on the left hand side).
Step 2 – Select the desired tracks
In Windows Media Player, you will see checkboxes in front of every song title. Check the songs that you want, and uncheck the ones you’d like to skip.
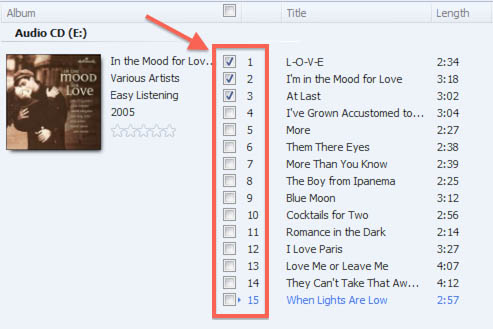
Select the songs you’d like to convert to MP3
Step 3 – Start ripping MP3’s
In the lower right corner, click the button “Start Rip” – Windows Media Player right away will start copying the audio tracks and storing them as MP3’s.
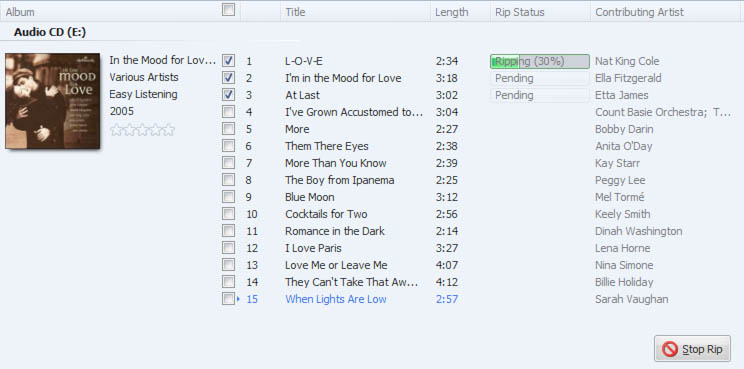
Windows Media Player is ripping MP3’s
Step 4 – Where did my MP3’s go?
By default, Windows Media Player stores you MP3’s in the “My Music” folder (found in “My Documents”). If you can’t find the files there, the let Windows Media Player help you.
Click the big “Library” button on the top, click “Recently Added” on the left hand side, right click the song you’re looking for and choose “Open File Location“.
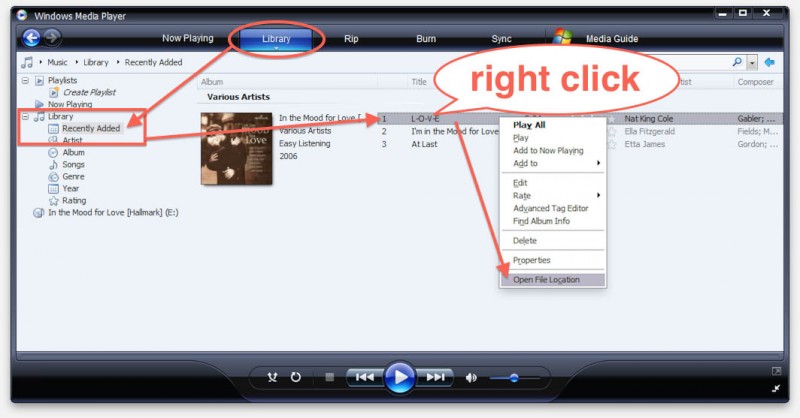
Where did my MP3’s go …?


Comments
There are no comments yet.
You can post your own comments by using the form below, or reply to existing comments by using the "Reply" button.