Goal: Boblight with OpenElec and WS2811/WS2812 LEDs
The goal of this little project is to create the Ambient TV lighting effect using XBMC, based on OpenElec, Boblight, an Arduino Uno (or other suitable Arduino) and one or more WS2811/WS2812 LED strands.
A video of the result can be seen at the end of this article, so if you’d like to see that first: Click here to scroll down.
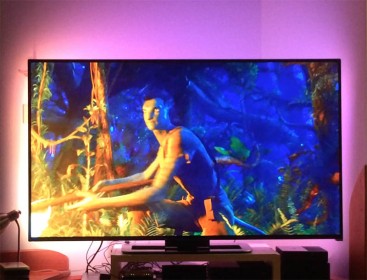
OpenElec, Boblight, Arduino and WS2812 LEDs in action
Before proceeding: This article has two main differences compared to other similar articles.
First of all, we’re running this on an Intel/AMD computer running OpenElec, my favorite XBMC distribution. Most of these instructions are applicable for a regular XBMC setup, but configuration for example is done slightly different.
Second, and most importantly:
We will be using WS2811/WS2812 LED strands, unlike most articles that write about WS2801 LEDs (or comparable).
These WS2811 or WS2812 LEDs are very different from the WS2801 LEDs.
If you have done so yet, I highly recommend reading our article “Controlling a WS2812 LED strand with NeoPixel or FastLED“. This article will not only give you an idea how to identify your LED strands, but it will also give you the means to test your LED strands – to make sure all LEDs work!
Ad Blocking Detected Please consider disabling your ad blocker for our website.
We rely on these ads to be able to run our website.
You can of course support us in other ways (see Support Us on the left).
How does Boblight work – the Basics …
Trying to build something like this myself, I’ve found it surprisingly hard to find the “complete” guide on how boblight based projects work. Once you get it, it’s easy … and understanding the process it will help you later on when you need to do troubleshooting.
If you look at the illustration below, then you’ll see your standard XBMC process of video playback:
A video file is taken (1) and displayed on your TV or monitor (2) by XBMC.
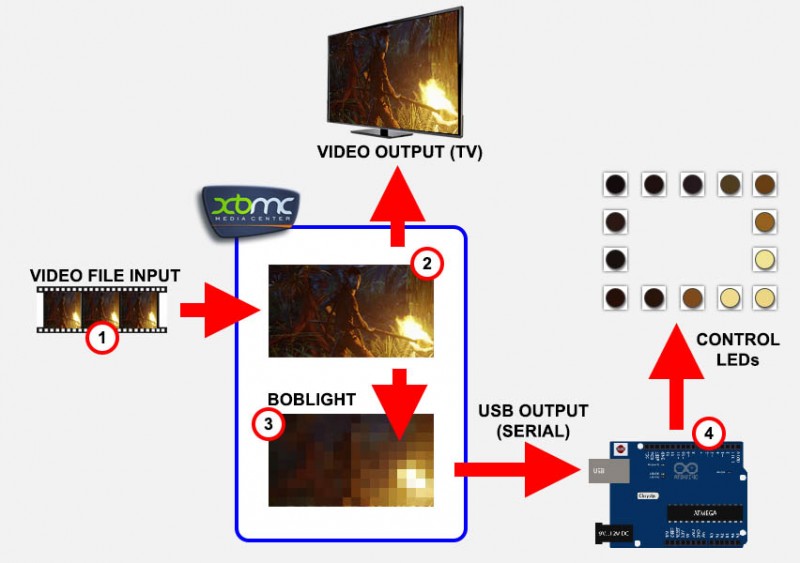
Boblight Process (simplified)
Boblight, a combination of a so called daemon (program that runs in the background) called “boblightd” and a configuarion tool called “XBMC Boblight“, very rapidly analyzes the image on your screen and “converts” it to a super low resolution image (3). This “image”, based on the boblight configuration file, is then sent over USB to your Arduino, which in turn uses this information to control the colors of your LEDs (4).
This USB connection is actually seen as a serial port on your XBMC box and has a dedicated device name.
Under OpenElec the device name is “/dev/ttyACM0” (for non-OpenElec XBMC this can be different!).
Finding the right device under Linux
If “/dev/ttyACM0” isn’t the device for your setup, then try the following, which lists the several devices: cat /proc/tty/drivers
In OpenElec it could show something like this:
1
2
3
4
5
6
7
8
9
10
11
12
| OpenELEC (official) Version: 6.0.3
OpenElecLivingRoom:~ # cat /proc/tty/drivers
/dev/tty /dev/tty 5 0 system:/dev/tty
/dev/console /dev/console 5 1 system:console
/dev/ptmx /dev/ptmx 5 2 system
/dev/vc/0 /dev/vc/0 4 0 system:vtmaster
acm /dev/ttyACM 166 0-31 serial
serial /dev/ttyS 4 64-67 serial
pty_slave /dev/pts 136 0-1048575 pty:slave
pty_master /dev/ptm 128 0-1048575 pty:master
unknown /dev/tty 4 1-63 console
OpenElecLivingRoom:~ # |
Look at the last column, and investigate/test the devices that end with “serial” in the last column. So in the example “/dev/ttyACM” or “/dev/ttyS”.
Before communication over this USB serial-port can be done, both XBMC and Arduino need to know what communcation speed (baudrate) needs to be used. This speed must be identical for both devices otherwise they will not understand each other.
As you can imagine, this process will happen in a blink of an eye video is displayed, analyzed, converted, send through the serial connection to the Arduino, where it’s then converted and sent to the LEDs which each have to be turned on as well.
To make sure your Arduino knows when to start with the color of the first LED, a “prefix” is being send. This prefix can be seen as a “code” to identify the “beginning” of data for all LEDs. This prefix needs to be defined in the boblight config file, so it know to send this, and it needs to be defined in your Arduino Sketch so it can recognize it.
More details on the configuration later on, just keep in the back of your head that these 3 items (device name, baudrate and prefix) are critical for your Ambient TV lighting to work!
Planning is everything in this project, so before we begin: I highly recommend reading this article all the way before going shopping for LEDs etc. I’ve noticed that others have started similar projects only to find out that they bought the wrong parts, or forgot to get parts that are needed.
- Proper soldering iron with a reasonably fine tip
- Wire cutter
- Wire stripper
- Scissors
- Screw driver (Philips)
- Exacto knife
- Drill (to make the screw holes in the frame)
Electronics / Parts
- Media Player that runs OpenElec. We will focus on “regular” PC’s, either AMD or Intel based.
- One or more long WS2811 or WS2812 LED strands (can be found at Amazon or eBay, for example: this one or this search at Amazon).
- One Arduino Uno or other suitable Arduino model (for example at Amazon).
- One USB cable A-Male to B-Male (see Amazon).
- Capable 5V power supply (see below for calculating Amp requirements).
Other
- Software:
- Frame material, to build a frame to hold the LEDs (optional).
- Wires and or connectors, depending on your LED strands and frame design.
Please read the rest of the article before purchasing anything.
This project should work on an AppleTV (1st gen) with OpenElec as well (untested).
Similar projects exist for OpenElec with Raspberry Pi, even ones where the Arduino is not needed (WS2801 based).
I recommend buying the LED strand as one piece, so if you need 5 Meter, then do not buy 5 individual 1 Meter strands.
Ad Blocking Detected Please consider disabling your ad blocker for our website.
We rely on these ads to be able to run our website.
You can of course support us in other ways (see Support Us on the left).
Building a Frame
I started by making a frame, since the size of the frame will determine how many LED strands I would need.
Size
Before “designing” a frame, it would be good to determine the size requirements.
For this I took the size of the back of my TV, keeping a distance of about 3½” (or app. 9 cm) around the TV edges. For smaller TV’s (mine is 80″) you might want to take something like 5cm instead. It’s up to you how “close” you’d like to go to the edge.
Some determining factors could be:
– Brightness of your LEDs (brighter LEDs, require less LEDs for the same effect)
– Desired “resolution” (you’ll need more LEDs if you prefer to see more detail)
– Distance from your TV to the wall
– Design of your TV (watch the TV stand/foot!)
– Visibility of mounted LED frame
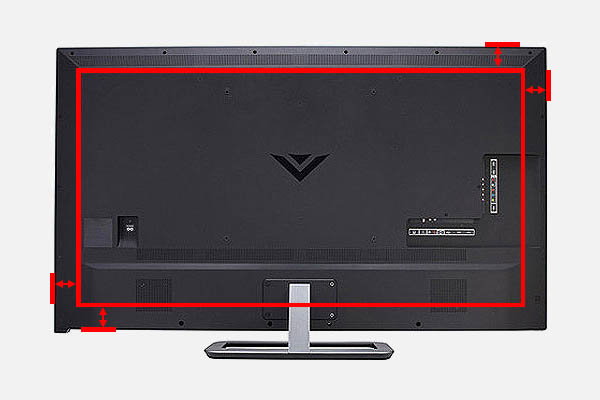
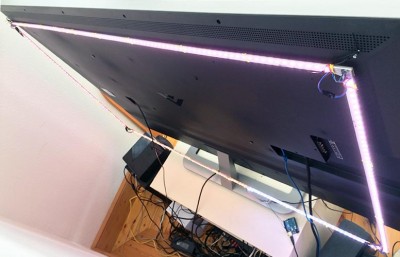
Ambient TV lighting frame – Keep a little distance from the edges
Mounting Considerations
Most LED strands I’ve seen have double sided tape on the back, which makes it easy to stick them to the back of your TV. My experiences with any double sided tape has been far from great … Keep in mind that TV’s can get pretty warm and the double sided tape could let go over time, not to mention the glue reside you might find at a later time on your TV after the LED strands fell off or after your removed the strands.
So I decided to create a lightweight frame. I have considered a few options, that might you get started building your own frame.
The frame should be light weight, not just so you can move it around without getting a hernia, but also because there is only so much weight you’d like to put on your TV. You’ll also find that mounting a lightweight frame is much easier …
Options I considered were using plexiglass strips, wood strips or aluminum strips. I have actually seen someone do it with cardboard but that was just too sloppy for my taste. I even considered a rectangle sheet of plexiglass, but that would have negatively impacted the ventilation (for cooling) of the TV.
I ended up using aluminum counter top edging strips, which ran me about $20 in total to get it at my local Ace Hardware store. They have a tiny corner which makes them a little less sensitive to bending compared to a simple flat strip.
Attaching the frame can be done in three ways:
– Use the VESA mount on the back of your TV (recommended)
– Make hooks over the TV edge (ugly)
– Hook into the venting grill on the top of your TV (dangerous)
Since I plan on using a VESA Wall-mount in the future, and I don’t like hooks hanging over the edge of my TV, I decided to go the dangerous route and put two tine screw in the venting holes on the top of my TV to hang the frame on. In the top left and right corner I did place a screw in a venting hole, only going a tiny bit, just enough to be a good “hanging” point.
I cannot recommend this method unless you’re very aware of what you’re doing.
How NOT to do it – Two screw in the top corners to hang your frame
CAUTION WHEN PLACING SCREWS IN YOUR TV!!!
When using the method I used, two tiny screws in the top venting holes of your TV:
Be VERY CAREFUL, and KNOW WHAT YOU’RE DOING!
Behind these venting holes electronics can be found and putting a screw in that might:
– DAMAGE YOUR TV PERMANENTLY
– ELECTROCUTE YOURSELF
In this article I will pretend I used the recommended VESA mounts instead, but the pictures might elude that I’ve used the dangerous method instead. The VESA mount option gives you 4 screws, that can be sued safely to mount your frame on.
Keeping it Movable (optional)
Another consideration I kept in mind was that I’d need to be able to disassemble my frame, just in case I need to move or store it.
For this reason I used a screw in each corner, and connectors between each sides, so I can complete disassemble the frame by using only a screwdriver. Still a big item to move or store (since it’s made for an 80″ TV), but at least it will fit in my car if needed.
Basic Design
The basic design (for the VESA mount approach) is build out of 6 strips; 2 horizontal and 4 vertical.
For each point where the strips meet you’ll need a screw to attach the parts – I used a 3mm screw. Using the Countertop Ediging strips, one screw per joint seemed enough, but if you’re using flat strips, two screws might be a better choice to keep the frame more rigid.
Notice in the illustration below the four holes for the VESA mount, you’ll have to measure out on your TV where those holes should go. This also goes of course for the two center strips that will have to line up with the VESA mount.
Tip: When working on the back of your TV, consider laying the TV flat on the floor, face down, on a blanket (to avoid scratching).
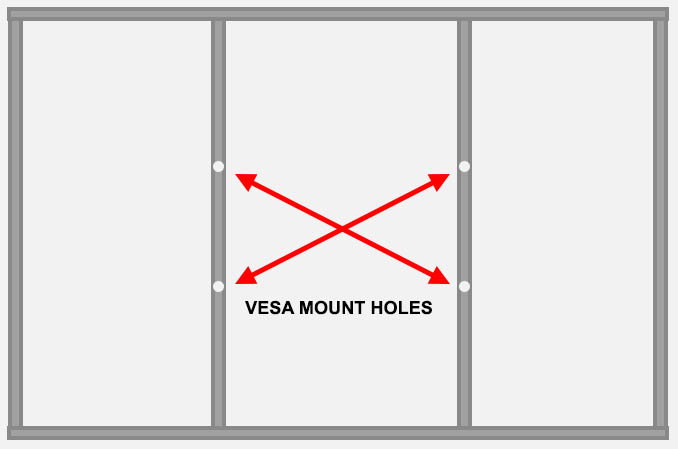
Ambient TV lighting Frame Design
Mounting the LEDs on the Frame
Once the frame is done, we can start mounting the LEDs. This, up to today, has been a confusing exercise for me, and this is what worked for me.
When looking at the rear of your TV, the LED’s should “start” at the center bottom and move around counter clockwise.
Or, when you’re standing in front of the TV, start at the center bottom and move around clockwise.
When you use “Boblight Config Maker“, you start at the bottom, either in the left corner, the middle or the right corner (all at the bottom).

Ambient TV lighting Frame Design – LED strand positions
Below some pictures of making my frame. As you can see, I made the mistake to not start exactly in the middle (at the bottom), a lesson learned that might benefit you and a reason why I created my Boblight Config Maker to be more flexible.
The reason why I ended up this way is because I made the mistake of buying 1 meter strands. A little too long for the sides, and a little too chort for the top. So I ended up with smaller pieces that I had to solder together and did not result in a “perfect” symmetrical setup.
Make sure that the arrows on your LED strands point in the same direction!!
Note that not starting the right way will not prevent boblight from working correctly. Creating a configuration file might become more of a challenge – as I had to find out the hard way, and that’s why I created a program for this called “Boblight Config Maker” (how creative right?) which is available for Windows, Linux and MacOS X.
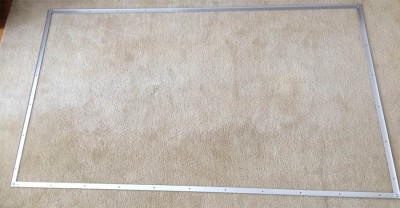
Clean frame assembled
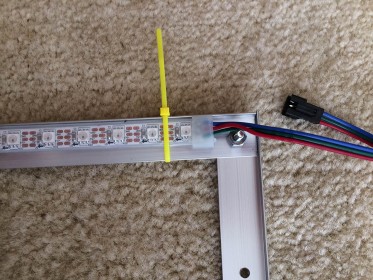
Mounting LED strands on the frame
Besides utilizing the double sided tape at the back of the LED strand, I used tiny straps to support the strip. Like I said before: my experience with double sided tape has not been good, and I’ve learned not to rely on it staying put forever.
Here you also see how I used the connectors at every “corner” so I only have to remove the screw and disconnect the connectors if I’d like to store or move the frame.
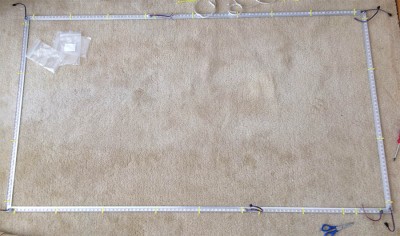
All LED starnds installed
In case you bought your LED strands in 1 Meter pieces (please avoid this if possible!), you will probably find that the 1 Meter pieces do not always fit perfectly, and that you will have to use less than a meter for the sides, yet more than a meter for the top and bottom part. In that case start with the longest sides first (top), and work your way down to the shorter pieces, so: top, left/right, and finally the bottom pieces.
Make sure the arrows on the strip all point in the same direction!
Splitting LED Strands
Making these strips shorter isn’t difficult. You can use regular scissors for that and cut the strand between two LEDs as indicated below. Make sure the copper islands remain in tact as we need them to solder wires on.
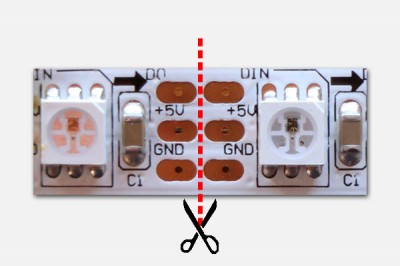
Cutting a LED strand
Combining LED Strands
Combining strips isn’t hard either, just a little bit more work. For this a good soldering iron/station is recommended.
Watch the Arrow!
The WS2811 and WS2812 LED Strands are direction sensitive. Make SURE that both strands have the arrows pointed in the same direction!
The easiest way, if cut off right, is by holding both end together and let the soldering tin do the work. Before doing that, it’s best to have some soldering tin on the copper pads. I found that with my Weller station, it works easiest to hold the tip of the soldering iron on the copper island and then add the soldering tin so it flows nicely over the copper pad. Make sure to look for shortcuts before proceeding.
Next hold the ends together so that the pads line up (GND to GND, +5V to +5V, Do to Din) and briefly heat up the tin so the tin of both island flow together. Once all 3 are connected, I usually add some insulation tape under the connection I just made.
In the example below (I didn’t have a better one, sorry) you’ll notice that the connection pads of the LED might not be connected. But they are. I just cut out a defective LED in this strand and instead of cutting it the usual way, I kept the pads of the failing LED to give myself al little more rome for error.

Attach two LED strands – Watch the arrows!
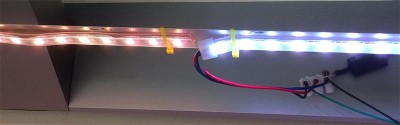
Attaching wires
In every corner you’ll need to attach wires, even if you don’t want to use connectors like I did. The wires you’ll be using should not be super thin! The LEDs use quite a bit of power, so we’d like to avoid that your thin wires get overloaded and start a glowing fest on their own.
Here we heat the individual pads again and apply some tin. The same should be done with the wire ends that we’d like to connect. Once done, heat up the tin on the pad again and slowly place the wire on the island.
Keep in mind though that these are still sensitive electronics, combined with plastic, so don’t over do the heating up!
Make sure to strap these wires down so that a yank on these wires will not rip your LED strand apart.
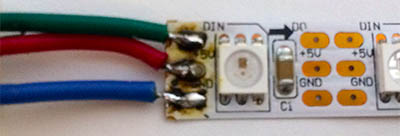
LED Strands – Attaching wires
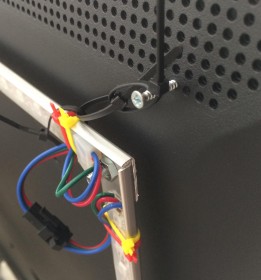
Below an example of one of the corners – this is how you could do it, I’m sure there are more elegant ways.
– The yellow straps hold the LED strands in lace.
– The red straps hold de wires in place, so that an accident pull on the wire won’t rip up your LED strands.
– The black straps hold the frame in place (which you wouldn’t do when using the VESA mount)…
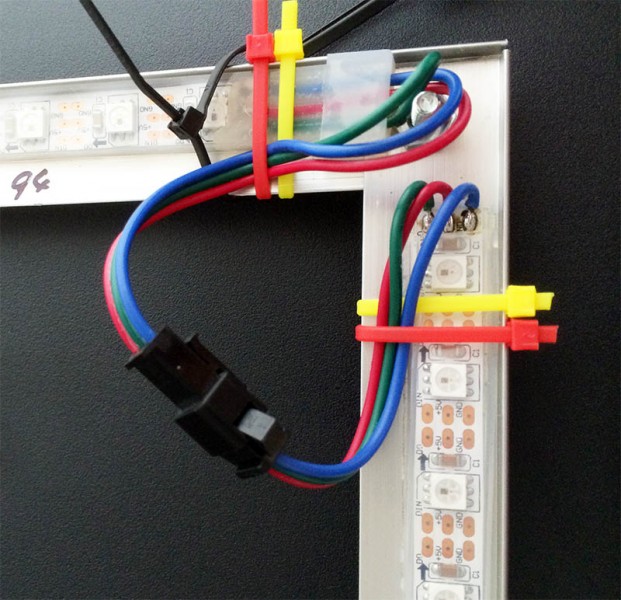
Boblight Frame – Example how to handle the corners
Testing your LED strands
During installation: Multimeter Testing
During installation of my LED strands on the frame, every time after I install a strand, I always use a multimeter (set to Diode) to test if a connection still flows. I do this with GND and +5 only. This test will not work for the Data wire though.
Hold one test-probe of your multimeter on the GND at the starting point, and the other test-probe on GND of your last LED – it should connect! Do the same for +5V.
After installation: Arduino Sketch Testing
Once you’ve build your entire frame and have installed all LED strands, connect your starting point as described in the “Controlling a WS2812 LED strand with NeoPixel or FastLED” article, and run one of the NeoPixel tests to makes sure that all LEDs work.
Don’t forget to set the number of LEDs properly in the code of the Arduino Sketch.
Ad Blocking Detected Please consider disabling your ad blocker for our website.
We rely on these ads to be able to run our website.
You can of course support us in other ways (see Support Us on the left).
Power Supply Considerations
According to the WS2811/WS2812 spec sheets (you can download them LED-Specification-sheets.zip (1.1 MB) ), each “LED” pulls 60 mA at most. Keep in mind that each “LED” actually consists out of three LEDs (red, green and blue), each pulling 20 mA.
Theoretically, in my example where I’m using 290 “LEDs”, I would need:
290 x 60mA = 17,400 mA = 17.4 Amps
Which is probably the “safe” amount of Amps, but in my opinion a little crazy. So I used the suggested method from Adafruit.
I suppose their method rests on the fact that not all LEDs will be running at maximum brightness all the time and that most powersupplies allow a little tolerance for short peak moments.
Formula: ( number of LED’s x 20 mA ) / 1,000 = needed Amps
So for my setup this means: 290 x 20 mA = 5,800 mA = 5.8 A
(1,000 mA = 1 A)
I picked a power-supply between this value and the max needed, so a power-supply between 5.8A and 17.4A.
I ended up with a 10A power-supply from eBay and it has been working great the past few weeks.
Connecting your Arduino
Before uploading a Sketch to your Arduino, let’s briefly look at how we’re going to connect things.
During normal operation of the Boblight, the USB port of your Arduino will be connected to your OpenElec/XBMC computer. The USB connection is seen as a serial port on this computer, but the USB port also provides power to the Arduino.
The LEDs are powered by the Power Supply we just discussed.
The beginning of the LED strand will be connected as follows;
– Din (the Data pin of the LED strand) will go to pin 13 of your Arduino.
– +5V will go to the power supply
– GND will go to a GND pin on your Arduino and to the power supply.
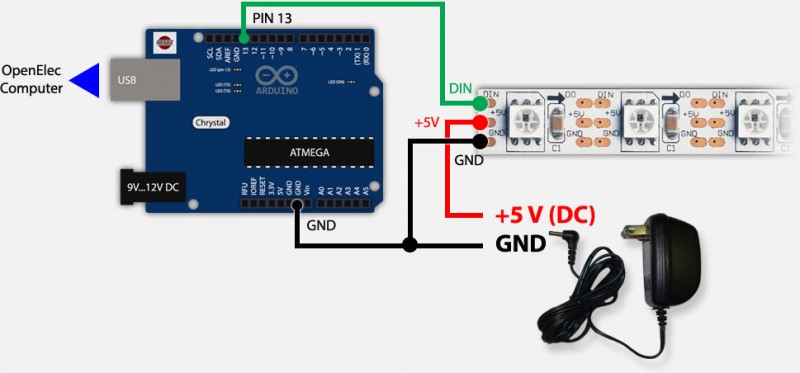
Boblight – Arduino, LED strand and Power Supply
Ad Blocking Detected Please consider disabling your ad blocker for our website.
We rely on these ads to be able to run our website.
You can of course support us in other ways (see Support Us on the left).
Uploading the Arduino Sketch
To upload a sketch to your Arduino, you will temporary need to connect the USB cable to your computer, instead of the XBMC PC, of course.
I tried a few sketches that I could find on the Internet and some worked and some didn’t work. In the end I created my own, derived from numerous sketches.
One of my main complaints, besides the one that didn’t work, was the lack of documentation of the code, so you might feel that I’ve overdone it a little in my code. I do hope though that it gives you an idea what is happening, which is important when troubleshooting.
Optimization tips are most welcome of course …
Setup()
In this function we wake up the LED strand and set initial brightness, set the LEDs to black and do a color swipe.
Next we activate the serial port (USB) and set the initial state to “waiting for a prefix”.
Loop()
This function, in Arduino world a function that keeps repeating, will do some things based on the state we are in.
- While waiting (STATE_WAITING) for a prefix, this function keeps looking until it finds the first character of the prefix.
- Once the the first prefix character has been found (STATE_DO_PREFIX), it will try to find the following characters of the prefix.
- After the complete prefix was found, then the state will go to processing LED colors (STATE_DO_DATA).
- Once all LEDs have been set, they will be shown and it will start waiting again (STATE_WAITING).
You can copy and paste the Sketch file, or download it.
You will also need to install the AdaFruit NeoPixel library in your Arduino IDE.
Download - Adafruit NeoPixel
Parameters you can set in the Sketch:
Parameters in Arduno Sketch
| Parameter |
Default |
Purpose |
| STARTCOLOR |
0xFFFFFF |
Initial color of LEDs (white) |
| DATAPIN |
13 |
Data pin on your Arduino |
| LEDCOUNT |
292 |
Number of LEDs you use |
| SHOWDELAY |
200 |
Delay in microseconds between color changes |
| BAUDRATE |
460800 |
Serial port speed |
| BRIGHTNESS |
90 |
Maximum brightness of the LEDs in percent |
| prefix |
{0x41, 0x64, 0x61, 0x00, 0x18, 0x4D} |
Prefix code in Hex numbers |
1
2
3
4
5
6
7
8
9
10
11
12
13
14
15
16
17
18
19
20
21
22
23
24
25
26
27
28
29
30
31
32
33
34
35
36
37
38
39
40
41
42
43
44
45
46
47
48
49
50
51
52
53
54
55
56
57
58
59
60
61
62
63
64
65
66
67
68
69
70
71
72
73
74
75
76
77
78
79
80
81
82
83
84
85
86
87
88
89
90
91
92
93
94
95
96
97
98
99
100
101
102
103
104
105
106
107
108
109
110
111
112
113
114
115
116
117
118
119
120
121
122
123
124
125
126
127
128
129
130
131
132
| /* t4a_boblight
* (C) 2014 Hans Luijten, www.tweaking4all.com
*
* t4a_boblight is free software and can be distributed and/or modified
* freely as long as the copyright notice remains in place.
* Nobody is allowed to charge you for this code.
* Use of this code is entirely at your own risk.
*/
#include "Adafruit_NeoPixel.h"
// DEFINITIONS
#define STARTCOLOR 0xFFFFFF // LED colors at start
#define BLACK 0x000000 // LED color BLACK
#define DATAPIN 13 // Datapin
#define LEDCOUNT 292 // Number of LEDs used for boblight
#define SHOWDELAY 200 // Delay in micro seconds before showing
#define BAUDRATE 460800 // Serial port speed, 460800 tested with Arduino Uno R3
#define BRIGHTNESS 90 // Max. brightness in %
const char prefix[] = {0x41, 0x64, 0x61, 0x00, 0x18, 0x4D}; // Start prefix
char buffer[sizeof(prefix)]; // Temp buffer for receiving prefix data
// Init LED strand, WS2811/WS2912 specific
// These might work for other configurations:
//   NEO_KHZ800  800 KHz bitstream (most NeoPixel products w/WS2812 LEDs)
//   NEO_KHZ400  400 KHz (classic 'v1' (not v2) FLORA pixels, WS2811 drivers)
//   NEO_GRB     Pixels are wired for GRB bitstream (most NeoPixel products)
//   NEO_RGB     Pixels are wired for RGB bitstream (v1 FLORA pixels, not v2)
Adafruit_NeoPixel strip = Adafruit_NeoPixel(LEDCOUNT, DATAPIN, NEO_GRB + NEO_KHZ800);
int state; // Define current state
#define STATE_WAITING 1 // - Waiting for prefix
#define STATE_DO_PREFIX 2 // - Processing prefix
#define STATE_DO_DATA 3 // - Receiving LED colors
int readSerial; // Read Serial data (1)
int currentLED; // Needed for assigning the color to the right LED
void setup()
{
strip.begin(); // Init LED strand, set all black, then all to startcolor
strip.setBrightness( (255 / 100) * BRIGHTNESS );
setAllLEDs(BLACK, 0);
setAllLEDs(STARTCOLOR, 5);
Serial.begin(BAUDRATE); // Init serial speed
state = STATE_WAITING; // Initial state: Waiting for prefix
}
void loop()
{
switch(state)
{
case STATE_WAITING: // *** Waiting for prefix ***
if( Serial.available()>0 )
{
readSerial = Serial.read(); // Read one character
if ( readSerial == prefix[0] ) // if this character is 1st prefix char
{ state = STATE_DO_PREFIX; } // then set state to handle prefix
}
break;
case STATE_DO_PREFIX: // *** Processing Prefix ***
if( Serial.available() > sizeof(prefix) - 2 )
{
Serial.readBytes(buffer, sizeof(prefix) - 1);
for( int Counter = 0; Counter < sizeof(prefix) - 1; Counter++)
{
if( buffer[Counter] == prefix[Counter+1] )
{
state = STATE_DO_DATA; // Received character is in prefix, continue
currentLED = 0; // Set current LED to the first one
}
else
{
state = STATE_WAITING; // Crap, one of the received chars is NOT in the prefix
break; // Exit, to go back to waiting for the prefix
} // end if buffer
} // end for Counter
} // end if Serial
break;
case STATE_DO_DATA: // *** Process incoming color data ***
if( Serial.available() > 2 ) // if we receive more than 2 chars
{
Serial.readBytes( buffer, 3 ); // Abuse buffer to temp store 3 charaters
strip.setPixelColor( currentLED++, buffer[0], buffer[1], buffer[2]); // and assing to LEDs
}
if( currentLED > LEDCOUNT ) // Reached the last LED? Display it!
{
strip.show(); // Make colors visible
delayMicroseconds(SHOWDELAY); // Wait a few micro seconds
state = STATE_WAITING; // Reset to waiting ...
currentLED = 0; // and go to LED one
break; // and exit ... and do it all over again
}
break;
} // switch(state)
} // loop
// Sets the color of all LEDs in the strand to 'color'
// If 'wait'>0 then it will show a swipe from start to end
void setAllLEDs(uint32_t color, int wait)
{
for ( int Counter=0; Counter < LEDCOUNT; Counter++ ) // For each LED
{
strip.setPixelColor( Counter, color ); // .. set the color
if( wait > 0 ) // if a wait time was set then
{
strip.show(); // Show the LED color
delay(wait); // and wait before we do the next LED
} // if wait
} // for Counter
strip.show(); // Show all LEDs
} // setAllLEDs |
Preparing OpenElec (XBMC) – Installing BobLight
For your newly assembled Ambient TV lighting/BobLight to work, you will need to install two components on your XBMC/OpenElec box.

XBMC BobLight
Boblightd
First we need “boblightd” (the daemon, or program that runs in the background), and there is a special version prepare for use with OpenElec (see also: Add-on Boblightd and OpenElec forum). Installation is easy, in XBMC from the home screen, go to: “System” “Settings” “Add-ons” “Get Addons” “All Add-ons” “Services” “boblightd“, and select “install“.
XBMC Boblight
Next we need to install the “XBMC BobLight” add-on (see also: XBMC BobLight Add-on and XBMC Official Forum Topic) which is used for configuration of when and how to use “boblightd”.
Repeating pretty much what we have done with “boblight”, as it’s in the same group as the “boblight” addon. Again in the XBMC home screen, go to “System” “Settings” “Add-ons” “Get Add-ons” “All Add-ons” “Services” “XBMC Boblight” and select “install“.
Ad Blocking Detected Please consider disabling your ad blocker for our website.
We rely on these ads to be able to run our website.
You can of course support us in other ways (see Support Us on the left).
Creating the Boblight Config file
Once you’ve installed the two needed plugins, it will be time to create a config file.
The config file for boblightd defines the way boblightd communicates with your Arduino. So we will define what kind of device it will be talking to and what the type of communication will be.
Additionally, in this config file, we can define color corrections and the LEDs that we use. For each LED a zone will have to be defined so that boblight can pass on the right color. Such a zone can be seen as a rectangle located somewhere on your TV screen (or better: video). A zone has a defined position and size.
To create all this, you could do everything by hand, but that would be tedious work, which s not only boring but also makes it that mistakes are made easier. So I create an application for that. It’s called Boblight Config Maker and it’s free and available for Windows, MacOS X and Linux.
I recommend going through the Boblight Config Maker page for more details, although the app should be pretty self explanatory.
Once done we should have a boblight.conf file which we need in the next step.
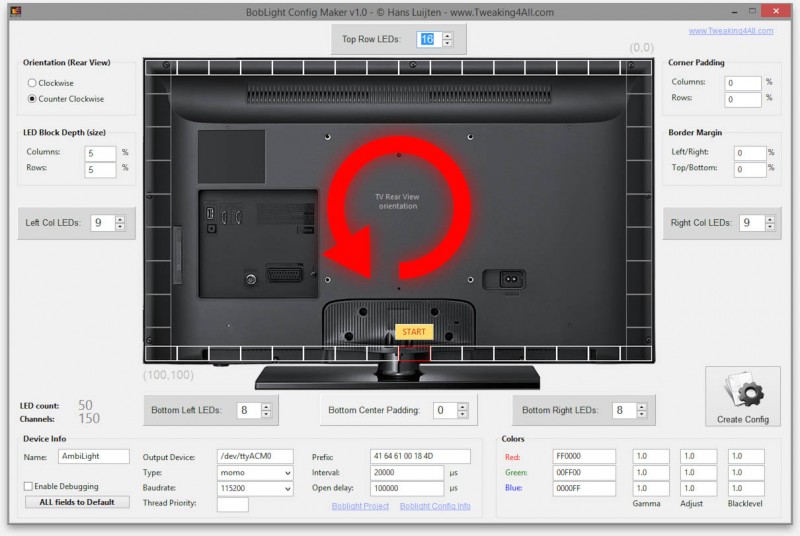
Boblight Config Maker for Windows
Installing the Boblight Config file
OpenElec has really a great way of working with configuration files. You can simply browse there with your computer and look for the file(s) you need or want to edit.
We basically will be looking for the directory “/Userdata/addon_data/service.multimedia.boblightd“.
Here you will find some files, one of them being “boblight.conf.sample”, and this is where we will copy the “boblight.conf” file we just generated. Make sure the file is called “boblight.conf“!
If you can’t find this directory, reboot your OpenElec box and try again.
MacOS X
Under MacOS X, you can see you OpenElec XBMC box in your network and simply browse there.
If you do not see your OpenElec box, then do the following:
In Finder, choose “Go” “Connect to Server” option from the menu and a window will open.
In the field “Server Address:” type: cifs://ipaddress/Userdata , where “ipaddress” should be replaced by the IP-address or network name of your OpenElec box.
Windows
Open a Windows Explorer window (not to be confused with Internet Explorer) and type in the address bar: \\ipaddress\Userdata , where “ipaddress” should be replaced by the IP-address or network name of your OpenElec box.
Linux
Based on Ubuntu (Files):
Open “Files” (the program) and select “Connect to server” from the “Files” menu. In the “Server Address” field, enter: smb://ipaddress/Userdata , where “ipaddress” should be replaced by the IP-address or network name of your OpenElec box.
Based on Xubuntu (Thunar):
Open “File System” (Thundar) and select “Go” “Open Location” and enter: smb://ipaddress/Userdata , where “ipaddress” should be replaced by the IP-address or network name of your OpenElec box.
Ad Blocking Detected Please consider disabling your ad blocker for our website.
We rely on these ads to be able to run our website.
You can of course support us in other ways (see Support Us on the left).
First Test Run
Now that we have uploaded our configuration file, time to see if things work. In the initial startup we will not tamper with the “XBMC Boblight” plugin, the standard settings are fine for a first run.
Make sure you did the following:
- Upload Sketch to Arduino
- Connect Power Supply for LEDs
- Install ‘boblightd’ and ‘XBMC Boblight’ on your XBMC/OpenElec computer
- Upload ‘boblight.conf’ to you XBMC/OpenElec computer
- Connect USB cable to Arduino and XBMC/OpenElec computer
Once you’ve done all that, switch on the LED powersupply (if needed) and after that switch on the XBMC/OpenElec computer.
If your XBMC computer was still on: reboot to make sure that boblightd uses the right config file.
Each time you upload a config file, you will need to reboot your OpenElec box!
Whenever I start my OpenElec box, the first message I will hear is that “XBMC Boblight” says “Failed to connect to boblightd“, and a few seconds later it will say that it “Connected to boblight“. So if you see the fail message, wait a few seconds and see if it connects anyway.

Boblight – Fails first and then connects
One thing to keep in mind is that with the standard settings, you will most likely see no LEDs light up, you will have to start a movie or TV Show to see something happen. I did add a initial color to the Arduino Sketch, to give you an idea if the LEDs even work.
If nothing happens during video playback, then please verify the information in the config file and make sure it matches the settings of the Arduino Sketch.
Test Video
I created a video for the purpose of testing – believe it or not, but I created this in Adobe Photoshop, which has some very nice, but well hidden, video features. You can view or download it here (it’s small, but 1080p!).
Download - T4A AmbiLightTest
Ad Blocking Detected Please consider disabling your ad blocker for our website.
We rely on these ads to be able to run our website.
You can of course support us in other ways (see Support Us on the left).
Menu Glow and Screensaver …
The “XBMC Boblight” plugin allows you to make some modifications, like for example if colors should respond fast or slow during movie playback or TV Show playback. Getting to the plugin however is less practical than expected. Any suggestions to create a short cut: please leave a comment below  …
…
To get to the configuration plugin, do the following from the XBMC “home” screen:
“System” “Settings” “Add-ons” “Enabled Add-ons” “Services” “XBMC Boblight” and select the “Configure” option.
Now that we’re in the configuration screen, finally, we can do settings for most media types. I leave it up to you to play with these settings, but I will mention two settings that I initially didn’t see, but have come to appreciate a lot.
LEDs OFF when screensaver is active
On the first tab, called “General“, I make sure the option “Disable when Screen Saver is on” was checked.
Now I don’t know about other boblight configurations, but in my case this works great.
When your XBMC setup dims it screen or has its screensaver kick in, the boblight LEDs will be turned OFF.
Which makes sense, after all it went to screensaver mode for a reason and there is no need to light up the room if nobody is paying attention anyway.
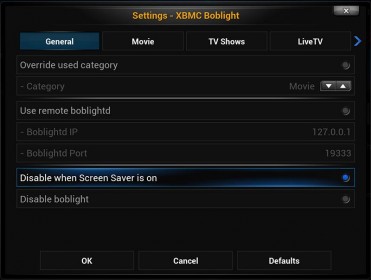
XBMC Boblight Setting – General tab
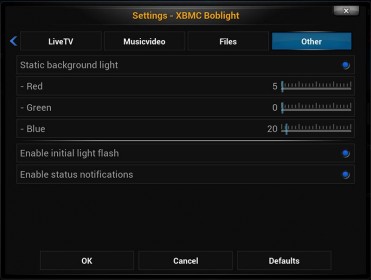
When the home screen is showing, Boblight will not be active. I really wanted a mild blue glow behind the TV – it just looks better. Initially I had no idea how to do this, until I realized that I had to go to the last tab in the configuration screen to find the “Other” tab.
On this tab you’ll find the option to enable “Static background light” which will make boblight show a defined color behind your TV when you’re in the regular XBMC screens when no video is being played.
For the purple/blue-ish default theme I used the following color (I’m sure this can be done better):
Red : 5
Green : 0
Blue : 20
XBMC Boblight Setting – Other tab
Troubleshooting
My initial attempts simply did not work … So here a short list of troubleshooting tips, from personal experience, that might help you:
Verify that settings in both Arduino Sketch and ‘boblight.conf’ use the same settings! Triple check ‘speed‘ (baudrate) and ‘prefix‘!
If not all LEDs light up in the initial white color swipe (you don’t even need to switch on your XBMC to see this), then check if the Power-Supply can keep up (reduce brightness in the Arduino Sketch, or use another Power-Supply), and make sure that you counted the right number of LEDs in the Arduino Sketch and in ‘boblight.conf’. Alternatively, try the previously discussed way of testing your LED strand!
If the initial color is white (as done in the Sketch above) and you see that not all LEDs are “white” then first check if your Power-Supply can keep up (reduce brightness) and verify that your strands are identical (if you used multiple). Different manufacturers seem to produce different “white” colors.
In scenario’s where boblight does not seem to connect: verify that you’ve used the right ‘device‘, ‘prefix‘ and ‘speed‘ in ‘boblight.conf’. And I hate to admit it … but err maker sure the USB cable is connected to Arduino and XBMC Computer.
Different brands – Left and Right are “white” …??
Ad Blocking Detected Please consider disabling your ad blocker for our website.
We rely on these ads to be able to run our website.
You can of course support us in other ways (see Support Us on the left).
Result
Well, after all this work, here a picture and two videos of my setup …
Boblight Frame Mounted and Working
Two demo video’s I’ve recorded (too bad the video camera didn’t stick to the “real” colors). The video might not be of the best quality, since I cropped them and tried to keep them as small as possible.
Avatar Demo
Note : Avatar is copyright 20th Century Fox (official website, IMDB, Wiki), I hope they don’t mind I used a tiny part of this movie for this demo.
LaserShow Demo
Never mind the music, the original video I got from YouTube and it’s called “Laser show RGB Melody“.


Comments
There are 851 comments. You can read them below.
You can post your own comments by using the form below, or reply to existing comments by using the "Reply" button.
Nice tutorial. Thanks
Quick Question:Does your guide also work with XBMC on Windows 8.1?
Nils
Thanks Nils!
Large parts of the guide will work for XBMC/Windows 8.1 as well.
Some differences:
– The “device” in the boblight.conf will be different (probably something like /dev/comx where comx is a USB comport)
– “Installing” the config file might work a little different, you’ll have to find the directory boblight uses under Windows (possible under Userdata as well)
The hardware, Arduino sketch, etc. will be the same (if you use WS2811 or WS2812 LED strands).
hans
If you look at the article “XBMC All rooms in sync“, and scroll to “Step 2: Create a file advancedsettings.xml”, you’ll find a list of different XBMC Operating System flavors. It shows you where “usually” the config files can be found (ie. the directory “Userdata”):
Windows XP: C:\Documents and Settings\<your_user_name>\Application Data\XBMC\userdata\
Windows Vista, 7, 8 and newer: “%APPDATA%\XBMC\userdata” (you can paste this in the Windows Explorer).
MacOS X: ~/Library/Application Support/XBMC/userdata
Linux: ~/.xbmc/userdata
OpenElec: network shared folder called “userdata” (any version)
Apple iOS (iPad, AppleTV2, etc): “/private/var/mobile/Library/Preferences/XBMC/userdata/“.
CrystalBuntu / CrystalHD: “/root/.xbmc/userdata“.
A great resource is also this topic in the XBMC forum and this topic as well.
Seems that in certain situations (under Windows) the directory “C:\boblightd\” is being used.
hans
Alright, thanks again. I don’t see there a problem
Nils
Thanks a lot for your effort!
in the beginning you have said that this guide is NOT for the WS2801 LEDs
in what points would the guide be different if i would use WS2801 LEDs ?
Florian
Hi Florian,
There are some fundamental differences between the WS2811/2812 and the WS2801.
You’ll need a sketch that supports the WS2801, unfortunately, I do not have these strips available, so I’m not sure if this would work with the NeoPixel library. Quite a few people however use WS2801’s, so it might not be hard to find a working sketch.
For example this one (LEDSTREAM).
hans
UPDATE:
I totally forgot to mention that the AdaFruit NeoPixel Library is needed as well.
I added the download link, just above the Sketch code.
hans
Very nice writeup, thanks a lot for your work!
George
Thanks George! I very much appreciate that.
hans
Great Job. Love the structure of the tutorial very organized and also very informative. I just wanted to point out that if someone doing this with some of the ws2811/ws2812 that are inverted is just a matter of reading the source code you provided and they’ll be able to figure out that NEO_GRB has to be replaced with NEO_RGB. Like i said you provided this information on the source code, i just didn’t read the source code as the part of the article. Again thank you very much for this Great guide as a result you are one of the websites i will be adding to my TT-RSS
willy
Thanks Willy for the compliment and contribution.
Always nice to hear that my work is appreciated. Good tip on the RGB vs GRB LEDs! I haven’t run in the RGB ones yet, but I recall reading about it.
I’m not sure what your TT-RSS is, but if you’d like I can add the link here as well.
Thanks again!
hans
I want to share an experience. As you know i use XBMC on Windows. So boblightd has to operate on windwos too. I use this HOW-TO http://forum.xbmc.org/showthread.php?tid=151559.
Please note that boblightd.exe can not handle comma. So it crashes at start with no error message. If you have created your boblight.conf with the (awesome) Boblight Config Maker you have to replace every comma in the [light] section with a dot. Now it works fine so far …
Puh . It took me a few hours to find the error
Nils
Thanks Nils!
That’s VERY good info, I didn’t know that boblightd under Windows would not be able to handle a comma.
I’ll try to release a new version of Boblight Config Maker, either today or tomorrow, where it defaults to a period, but users get the option to override it and choose a comma if they prefer.
Awesome!
hans
Another topic. How can i speed up the lights the best way? boblight.conf or xbmc boblight addon config or arduino sketch?? What do you think of the fast and slow presents in the xbmc boblight addon?
Nils
The “best” way to speed up the lights … I’ve been tinkering with that as well.
I found rate and interval to be most significant in boblight.conf.
My findings:
– XBMC: Disable ALL Add-ons
My XBMC computer is tiny and slow, so giving more resources available to the boblight plugin did make a difference.
Even disable the Add-ons that you think might not run during video playback.
– XBMC Boblight Config: Fast/Slow
I have only seen that the color refresh is better when using “Fast” (I use only fast). However, in some setups this might result in annoying color flickering, hence the option “Slow”. But that’s just my 2 cents.
– Sketch: #define SHOWDELAY 200
Delay in micro seconds before showing the next sequence of colors. I think this is already a very low value (the lower, the faster). I managed to get it to work with a value of 0 (zero) but it proved unstable with the large amount of LEDs that I have.
– Sketch: #define BRIGHTNESS 90
This sets the max brightness of your LEDs. Now this is just speculation, but maybe a lower brightness makes thinks faster as well. After all it take a few milliseconds for the LEDs to reach full brightness. Then again – this might also be a none-sense assumption.
– boblight.conf: interval
This is the “refresh” delay (as I understand). The higher the number, the slower the refresh. It did make a difference for me, but I’m not sure if a number lower than 20,000 will make a big impact (I couldn’t see any). 20,000 stands for 50x per second,
– bolight.conf: rate
I have tried low rates (9600) and high rates (460800). I did notice in my setup lag with 9600, but I think this also depends on how many LEDs you have. I have 290 LEDs (x3 channels), so the amount of data is pretty big. Others (Dave) reported no difference (he uses less LEDs).
– boblight.conf: delayafteropen
I have played with this and I’m not sure what it really does. The docs say that it’s the delay between Arduino boot and first data. I played with this as well and basically found two scenarios: it works or it doesn’t.
– boblight.conf: threadpriority
See this explanation at the boblight wiki.
It seems that you can set the thread priority for boblightd (1 to 99). I’ve tried 1 and 99 and didn’t notice a difference.
Most articles/discussion I see about bolightd do not even mention this variable (set in the [device] section).
As I understand, the “user” that runs boblightd needs certain access right to make a difference and that just went over my head.
– Power Supply
My initial power supply was only 3A, where as (see calculations above) that was definitely not enough and the LEDs had a hard time keeping up (not to mention the “glow-in-the-dark” power supply).
hans
Thanks for the detailed info.
Yesterday i finished my setup so far. Its realy great. I use the WS2812B strand with 185 LEDs. Now i want to tweak and try some things. For example i want to power my LEDs at the beginning and at the end, because at the end the LEDs are less whiter than at the beginning of the strand.
Nils
Edit: Maybe i will add a photoresistor as a lightsensor to the arduino setup. So Ambilight only works in a appropriate darkness
Nils
Interesting: I have the same problem, where the LEDs at the end are less white (more yellow). I thought this might have to do with the fact that the last few strands are from a different brand (it seems). Maybe this is why I have seen some folks have multiple data pins in use?
You could indeed use a lightsensor, poll it every so many seconds and make the “#define BRIGHTNESS 90” a variable instead, which you change based on existing ambient light. I’d guess you want to crank it up when it’s lighter in the room (to see the effect) and tone it down when the room is darker? A simple photoresister would do the trick. Not sure though if this would give you a refresh penalty or not.
hans
I had the same problem with the strand being off white near the end. Connect the + and – also to the end of the strand and all LED’s are the same color. I use 214 2812B LED’s and a 5V10A powersupply and it works fine.
George
I was having trouble connecting Boblightd to my Arduino, mainly because on every reboot my Arduino got a new ID. At boot it could be ttyACM0, next time it could be ttyACM1. I have multiple serial devices connected to my USB-ports, so that’s why. If you’re having the same problem you can write an UDev rule, like this one:
SUBSYSTEM=="tty" ATTRS{manufacturer}=="Arduino*" SYMLINK+="arduino"On my Ubuntu 13.10 I have this placed as 10-arduino.rule in /etc/udev/rules.d. If you change the boblight.conf file to /dev/arduino it’ll work fine.
Maybe this helps someone in the future.
George
Thanks George for the excellent info!
Most certainly helpful for other that run into this issue.
This seems Linux/Ubuntu specific, and I had never heard of UDev rules before, so here is a reference for who is interested “Writing UDev Rules” or “Hack-a-day: How to writ UDev rules“. I’ll add the device “arduino” to my Boblight Config Maker as well.
hans
Have you tried the present “custom” in the boblight addon settings.
My setting is:
speed: 65
autospeed: 0
saturation: 2.5
value: 4
thresthold: 10
Now dark scenes are more atmospheric and lighter scenes also look better. These are not my finale settings. Maybe you can try a little bit so we can share our settings. Here you can find the original settings for preset “slow” and “fast”: https://github.com/bobo1on1/script.xbmc.boblight/blob/master/script.xbmc.boblight/resources/lib/settings.py#L105
Nils
Thanks Nils – I’ll give it a try tonight!
(I always do my testing when it’s dark outside so I can see the differences better)
I’m curious how “exchangeable” these settings will be. I can image it depends on a lot of factors, like the conversion in the Arduino, the manufacturer of the LEDs, boblight.conf settings, and the LED model. But I’ll give it a try, shouldn’t be too hard to do right?
What kind of % did you use for the LED depth? I’m running at 5% now.
hans
Columns: 3%
Rows: 5%
I’m curious about your settings ;)
Nils
You’re right about your setting – seems to blend better with the actual video.
I’m playing a little with the settings now and boy do I have the clicking around to go from play back of a video, to changing a few settings – do you happen to know w “shortcut”?
hans
If you put this
https://raw.githubusercontent.com/bobo1on1/script.xbmc.boblight/master/script.xbmc.boblight.keymap.xml
in your “userdata/keymaps” folder (under the xbmc homefolder) you can press B of b on your keyboard to open the addon settings.
Me, I have mapped a key of my remote control to open the addon setings by changing the remote.xml in my “userdata/keymaps” folder to this, when I press the blue key on my remote it opens the addons settings dialog
George
Nice tip . Maybe you can share your settings too
Nils
Of course, but I doubt you can use the same settings :-) I have 2812B LED’s, before those I had 2801’s but I like the 2812B’s a lot more.
I’m not finished experimenting with these settings, but for now they’ll do.
George
Glad to hear that you like the WS2812’s better as well … I didn’t try the 2801’s yet, but after your feedback, I won’t try them – thanks!
hans
Thanks George! Great tip! I’ll try this for sure!
hans
Maybe it’s nice for future reference to state in your text that the prefix in your Arduino code is static. If you use your Boblight Config Maker you’ll have to calculate a new one like in this post. There was someone on the XBMC forums who needed a little help figuring that out and I don’t think he’ll be the last.
(or, if you’re up to a little challenge add an option to your tool )
)
George
Hi George!
I’m not sure what you mean, …
As far as I know, nothing is done with the prefix, so these calculations (to me) look pretty useless.
The only purpose of the prefix is to have a sequence of numbers that will hopefully be unique and distinguishable from the color data (so we can find a starting point). The Arduino sketches I have seen so far, do only one thing: wait for the prefix and when it arrives start repeating all incoming colors to the LED strip.
The length of the prefix doesn’t even matter, as long as the prefix in your Arduino Sketch is identical to the prefix in your boblight.conf.
Although: a too short a prefix of course has a higher chance to match color data by coincidence.
Or are there setups that require this and maybe to never have to reprogram the Arduino and pass the number of LEDs this way?
It is most certainly something I could add …
Note : After studying the AdaFruit Arduino Sketch, I noticed that this is indeed what they do. I’ll take note of it and will try to add it.
For my own reference, since I won’t get to it today, I’ll paste the example code here:
Thanks for this good suggestion!
hans
You’re very welcome. I like how you came to your conclusion, nice read
George
Just added this to v1.4
hans
George
Is it possible to get boblight running while the screen shows only a test image?
Nils
If you’re looking for a still image:
You could try the demo video (T4A AmbiLightTest – scroll up to download the tiny MP4 file, only 1.7 Mb).
Let it play to whatever you’d like to see and press pause on XBMC. This will stay for a bit until your screensaver kicks in (maybe adjust timing or even disable the screensaver).
Unless you mean: Start displaying something and then start Boblightd.
I suppose if that’s what you’re trying to do, that it would come with all kinds of initialization complications (Arduino and Bobolightd), so I’m not sure if that would be an option.
hans
I just made my own test video like yours . I try to calibrate my gamma settings.
My video shows two images. One with 100% white and one with 50% white (grey). The big problem is that the LEDs don’t change. They see both as 100% white. Can someone confirm ths issue?
Nils
Cool …
…
I’ve noticed as well that going “black” seems to be a hurdle at times, my guess is that the difference between 50% grey and 100% white is too little for boblight to pickup. Meaning: it’s all kind-a white-ish ….
….
I noticed the same issue with my own video (vert/horz bars). That needs some time to experiment with though. I thought Gamma or Threshold would do this for us, but since you’ve already been testing with it … maybe not. Or maybe we should look at the gamma in Boblight.conf?
hans
Boblight Config Maker v1.4 was released today …
Adding resizability and an optional “Magic Word” calculation (Adafruit).
hans
[…] http://www.sedu-board.de/sedu-ambilight/howto-boblightconfigtool/ (na ledky) //www.tweaking4all.com/home-theatre/xbmc/xbmc-boblight-openelec-ws2811-ws2812/ (diy) http://aeparker.com/zphoto/pages/boblight-config-generator (konfigurák, webový) […]
Hi!!
I have a RaspBerry with a OpenElec and I would like to run bobligth, the LEDs I have are these:
http://www.aliexpress.com/snapshot/293681677.html
I have followed all the steps in the tutorial but did not even come on.
It may be for the charger? 5V 2A –> http://www.dx.com/es/p/5v-2a-universal-power-adapter-charger-black-ac-100-240v-eu-plug-3-5-x-1-35mm-157728#.U1aBEPm2nJE
I have 50 LED., and Arduino Mega
I’m frustrated :p
Sorry if my english is bad, I’m Spanish
Ivn
Hey Ivn,
You’re English is fine …
First thing I did was test each strip based on the “Arduino and WS2811/WS2812 LEDs“, just to make sure there were no dead ones in the strands (of the 5 strands I eventually found 2 dead WS2812’s – which can stop the following LEDs from lighting up).
For this test you’ll only need your computer, Arduino and LED strands. No Raspberry Pi or OpenElec.
If you’re sure they all work (I tested with a 2A power supply for each individual strand of 60 LEDs, so I would think that yours should be OK when testing your LEDs), then start assembling them (I don’t know if you have just one strand or multiple).
If everything still works: With the Arduino code I’ve used, even when not controlled by BobLight, the LEDs should do a swipe at initial start, switching each LED one at a time on.
In any of these cases, if the LEDs do not switch on;
– Double check power connections,
– Double check that you’ve connected the right end for the Data pin (on strips it’s indicated with an arrow, pointing away from your Arduino),
– Test with another power supply if you have one, even if it’s just for a few seconds to see if it works or not,
– Bypass the 1st LED if needed, just to make sure.
As for controlling all this through a Raspberry Pi: I have seen people where this worked, sometimes a little slower than desired. But at least the LEDs should light up initially.
Hope this helps ….
hans
Unfortunately do not work… :(
I’m thinking of buying a new LED, what you recommend? WS2811 or WS2812?
http://www.aliexpress.com/item/Wholesale-DC5V-4M-Roll-240-leds-60-pixel-m-Black-PCB-WS2812B-WS2811-WS2812-Digital-5050/1807142036.html I don’t know if this works…
Or this one? http://www.aliexpress.com/item/5M-White-PCB-New-Version-WS2812B-WS2811-WS2812-Digital-5050-RGB-LED-Strip-DC5V/1670912637.html
Soryy my ignorance.
Thanks.
Ivn
That s*cks …
The LEDs you have, look very much like the ones they use at AdaFruit, would be nice if you still could use them.
Are you sure those are WS2811 or WS2812 and not WS2801? WS2801 will not work with this project, maybe test the AdaFruit project instead?
As for the other 2 LEDs you asked about:
They are (it seems) identical, just the spacing between the LEDs and the color of the “tape” is different. A WS2812 and WS2811 are “the same”, the links you gave both are WS2812, the white one is a WS2812B (according to their description). I guess both work equally fine and I’m sure some will recommend the WS2812B over the WS2812.
Hope this helps
hans
Please help.
I have led strip ws2812b 1meter 60 led.
I recorded a library Adafruit NeoPixel (If you run strandtest led strip working)
I recorded T4a Boblight (led strip shine white color)
In xbmc i installed boblight
I do not know how to “boblightd” ,i have windows 8. I tried in AmbiBox led shine white and nothing happens.
Boblight Config file I created.Where do I copy it?
Thank you for any advice.
Mark
Hi Mark,
“boblightd” should automatically come with the XBMC plugin, so I don’t think we need to worry about that, even under Windows.
There is a second addon I used for XBMC config. The plugin I installed was OpenElec specific, so I’m not sure if there is one with a regular XBMC setup (I would assume so though).
As for your LEDs not responding, I’d first check that your set the right “device” in your BobLight Config file, it will be different under Windows (when you run Boblight Config Maker, you’ll see a drop down with quite a few examples).
Next, for where to store the config file: Under Windows 8, the Userdata folder should be “%appdata%\XBMC\userdata\” (see this XBMC Wiki page) which is usually something like this:
(where <username> is of course your username. If not sure, then you can try in a DOS box: cd %appdata%)
The plugin(s) I used created a special folder for addon data (called “addon_data”), this might be different under Windows.
It can also be that boblight is installed in c:\boblight (see first article in list below), and the config file should be in that directory.
Additional info that I found:
hans
I do not really know what is wrong.Maybe not cooperate in T4a Boblight.
There is also a different code boblight.ino what works from ws2812b?
will react LED in program AmbiBox ?
Mark
Since everything work with the simple strand test and when you power the Arduino on, I’d say there are a few possibilities:
1) Location of Config file
2) Proper device name (often called something like “/dev/comx” where x is the number of the com port)
3) Proper prefix (for T4A you’ll need to use the same prefix in the config as defined in the sketch)
4) Matching speeds for the “serial” communication (Arduino and Conf file must match)
5) Boblight must be installed (see links in my previous response).
Unfortunately, I’m not familiar with the technical details of AmbiBox.
I’m sure there are other examples out there, and the few that I tried worked.
Note: With some sketches a calculated prefix is being used, so use Boblight Config Maker to calculate that magic number.
Bottom line with the prefix is that the one in the config must match the on in the Arduino sketch, even if you make up your own.
hans
So here it comes
Error was that I had a bad “/dev/comx”
Thank you for your help.
Mark
Awesome! Glad to hear it works!!
hans
So I got another problem:
Arduino after some time disconnect.Ambilightd report bugs:
(CClientsHandler::ParseSet) 127.0.0.1:49205 priority set to 128
(CClientsHandler::ParseSet) 127.0.0.1:49205 priority set to 255
(CClientsHandler::ParseSet) 127.0.0.1:49205 priority set to 128
(CDeviceRS232::WriteOutput) ERROR: AmbiLight: /dev/com4: write() Permission
denied
(CDevice::Process) AmbiLight: closed
Then I have to pull the USB cable and reconnect.But after some time again disconnect.
You do not know what could be wrong?
Thank you for your advice.
Mark
I do not have a Windows setup, but what could be the problem is timing, as the USB port (serial) might be “in use” when Boblight tries to write to it.
Some ideas:
– Increase the “interval” value in boblight.conf
– Decrease the baudrate (rate in boblight.conf and baudrate in the Arduino sketch)
– Increase “showdelay” in the Arduino sketch
I’d start with increasing “interval” though, start with something significant like twice the current value (you can always work your way down).
hans
I guess I found the error in the com.I played from the USB port settings and I changed the baud rate.After restoring factory settings already are not separated.
Thank you for your advice.
Mark
Awesome! Glad to hear it working now
hans
I have a stripe of 40 rgb leds WS2811 and the problem is that three of them allways stays red. Of course flashes the other colors when needs but i dont understand why are allways on….. I have a DC power supply 5V ,1000mA. is there any posibility i would need to connect any resistor?. Excuse my bad english! And thank you for any advice!
blacky
The first 3 always on, well, that can have several reason.
I’ve found that not all strips are perfect, in my strips a few LEDs simply didn’t work, or didn’t relay data to the next LED. I had to remove those. If you have more than one strip; connect another strip in stead and see if it happens with that one too. If not; your first 3 LEDs might be defective.
hans
Hi,
i tried to calibrate my WS2812b with a guide from a german forum (http://www.computerbase.de/forum/showthread.php?t=1030747&page=63 #1257). It realy looks a lot better than before. The colors are nearly the same as my TV. Here are my settings for the boblight.conf:
and for boblight addon
Nils
Thanks Nils – That’s actually a good article/post (and Windows application) in this German forum to calibrate Boblight colors.
I repost the direct link here one more time, so it jumps straight to the post that matters the most: link.
hans
Any chance there’s an english write-up anyone knows about? I finally got back to my RasPi project, have it overclocked to 900Mhz now and the lights are working but the colors are definitely not very accurate.
(running via Arduino Mega @ 115200kbps btw – couldn’t get any reliable connection at a higher baudrate)
Russ
Hi Russ,
From playing with my own setup: de connection speed doesn’t need to be all that high it seems, unless you have a LOT of LEDs … With 290 LEDs, I’ve had good experiences with lower speeds.
How inaccurate are the colors?
– I know, even with a faster computer, that the colors lag a little (a few milliseconds) and
– the base settings can be tunes with XBMC Boblight Config (see some of the comments here).
Of course, the color settings can also be adjusted in the boblight.config, but I’ve found that quite hard to do.
Are you running RaspBMC or OpenElec on your Raspberry Pi?
hans
OpenELEC on the pi for me. I’ll try messing around in the settings to see if I can speed it up some. The delay is fairly noticeable.
As for the colors, they seem a ways off, but I haven’t calibrated in any fashion yet. They’re not even mounted on my TV yet.
Russ
I haven’t run into this, but if the colors are WAY off, check weather your LEDs use RGB or GRB – some LEDs have a different color sequence.
Look at lines 31-34 of the Arduino sketch. (NEO_RGB vs NEO_GRB)
hans
Hey Hans,
That was actually one of the first things I had to fix. I set the static backlight to green and realized it wasn’t displaying correctly. re-programmed the arduino and it started working. The problem was more with the settings for saturation and such. I’m playing with them now.
I got the RasPi up to 1100Mhz with heat sinks and cooling, and it still can’t keep up and run the boblight application smoothly. So it looks like I’m going back to using my HTPC. I’ve switched the cabling over to my OpenELEC PC and it runs like a champion. Thanks for having a great write up on the setup as well as the software you created. It had made altering my setup as it developed much easier.
If anyone has a good write up for how to dial in the Gamma/Adjust/Blacklevel settings to get the most accurate coloring/smooth changes, I would love to give it a read… I just need it to be English please!
Russ
Hi Russ,
Yeah, I played with the Raspberry Pi for a bit, for OpenElec, an for regular use it works OK. I haven’t tried Boblight with this but I’d assume that it might be pushing it a little bit. I’m assuming you’ve already tested wit zero (other) plugins and Confluence skin … for Max resource availability.
As far a tuning Gamm etc: I’d have to guess that there will be no one-fits-all solution. Each TV and each LED will display colors slightly differently (for example: some of my LED strands are more yellow than others when displaying “white”).
If you run into an article (anyone for that matter), then please post the link here …
…
hans
I wish I would have stumbled on your page before I started my adalight project.
This is the best page on the net about Arduino and LED’s, not to talk about your software witch is so cool.
p.s Do you use your Mac for adalight and what software do you use for it?
Thank you very much :)
Guðjón Guðjónsson
Thanks Guðjón, I very much appreciate the great feedback!
I actually have my Boblight connected to a little AMD box that runs OpenElec (Linux).
I did test my other Arduino sketches with the LEDs on a Mac though, just never ran boblight on my Mac (I know it’s available for the Mac though).
Glad you like the app as well … I developed in Lazarus Pascal on my Mac and then recompiled under Windows and Linux. Love my Mac .
.
hans
Thanks for reply.
I tried to day Prismatik.app on my Mac mini and that works well with vlc and xbmc. It is however a bit resorce hungry for my 2010 Mac.
If you have time,what are the advances of using WS2812/WS2811 LEDs instead of 2801 in adalight.
Thanks.
Guðjón Guðjónsson
Hi Guðjón,…
Thanks for the tip! Did you ever try Boblight? (it’s available for MacOS X, Windows and Linux)
I think the biggest difference between the 2801 and the 2811/2812 can be found in the way timing works. The 2811/2812 has timing build-in, where as the 2801 requires you to handle timing. As I understand from others, the 2811/2812 is more reliable when it comes to addressing individual LEDs. The timing is the reason why the 2811/2812 can be more of a challenge, for example on a slower computer (if you’d skip the Arduino and use for example the GPIO of a Raspberry Pi).
The 2811/2812 also seems to use less power (but only a little bit less).
2801 uses 4 wires and the 2811/2812 use only 3.
Some claim the 2801 is more expensive, even though it’s an older model, although I cannot really confirm that.
Some people say that the 2811/2812 can be used for longer distance, again, can’t confirm that.
That’s about all I know – so if you would have 2801’s and they work for you: perfect.
Bottom line: I don’t think it matters much which one you pick …
hans
Thanks for that.
I have tried Boblight on my Enigma2 satellite receiver that I have (linux based) and it works well there ,if I do not go over 10 fps.
I am still trying to figure out if I need another dedicated computer to feed xbmc on the mac or if I need to find local server for it.
There is a difference if I look at the same test video. It seems much more accurate and more responsive from the Lightpack/Prismatik software.
I am using 2801.
Guðjón Guðjónsson
Sounds like Boblight is less resource hungry then?
hans
Yes it seem so.
I have only had this running for few days now (took me long time to get them to light up) so still tweaking and trying different things.
Guðjón Guðjónsson
What is my value data prefix for 60 led?Now im using 41 64 61 00 18 4D.
Mark
The default value depends on the Arduino sketch you’re using.
The T4A Sketch has a fixed prefix, no matter how many LEDs you use:
const char prefix[] = {0x41, 0x64, 0x61, 0x00, 0x18, 0x4D}; // Start prefixI have seen AdaFruit code that does expect a calculated code. For 60 LEDs it’s something like “41 64 61 00 3C 69”.
Boblight Config Maker (link) has the ability to automatically calculate that for you.
hans
I have a new problem. Maybe you can help me. If i set gamma values (e.g. 2.0) in the boblight.conf, the ambilight starts to flicker. It is seen clearly at the end of your test video.Is there something i can do?
Nils
Hi Nils,
I haven’t experimented with the gamma just yet. In my Boblight config, I leave everything “default” and tune the colors in the XBMC Config add-on instead. I would have to guess that too much Gamma Correction makes colors either way too dark or way to bright. If too much dark, then Boblight might calculate that to black more often than desired and the LEDs will flicker.
hans
Hi!!
Is compatible with the RaspBmc distribution??
Thanks!!
Ivn
Hi Ivn,
I have not tested this, but considering how Boblight works, I’d have to guess that it very likely will work just fine.
If you plan to test this, then please let us know
Hans
hans
Hello Hans (another time),
I received the leds (http://www.aliexpress.com/snapshot/6085107505.html), I have tryed with the demo and works fine, but with the application not. I have Arduino Mega connected by USB and I have followed the steps in the tutorial, what is the problem? Could you help me?
In this picture you can see that all LEDs are white, except the firsts one. https://pbs.twimg.com/media/Bo3rnoRIgAAbaOM.jpg:large
Part of the problem is that the message “can´t connect to boblight” displays every 5minutes, more o less, alternated with “connected to bobligth”
Ivn
Hi Ivn!
Can’t connect to Boblight indicates communication issues … typically:
– Device settings in the the boblight.conf file (device type, speed)
– Speed settings in the Arduino sketch
Maybe select a lower speed.
You also might want to verify the cable used between XBMC and the Arduino.
hans
Hi Hans (Yes, it’s me again… :p)
The problem could be the prefix??
This is my configuration, there is something wrong?
http://subefotos.com/ver/?48e0a9bb1b8f1f5092a734b58a57adb2o.png
Thanks another time!!
Ivn
Ahhh I forgot this is my .config:
[global]
interface 127.0.0.1
port 19333
[device]
name AmbiLight
type momo
output /dev/ttyACM0
channels 225
prefix 41 64 61 00 18 4D
interval 20000
rate 115200
debug on
delayafteropen 100000
Ivn
Hi Ivn …
…
If you’re using my Arduino sketch, then the prefix is correct in your config.
These parameters:
depend on the OS you’re using (the example works for OpenElec, which is Linux based).
Windows users and different distro’s might use different device “type” and/or “output”.
hans
Hi Hans,
Thanks for your response, I’m using Raspberry (Last OpenElec Release) + Arduino Mega.
I’m going back to check the tutorial in case I missed something.
Thanks!!
Ivn
Hi Hans,
I have seen the log file that boblight sends data to 0.
Example: 41 64 61 00 18 4D 00 00 00 00 00 00 00 [more]
I think this is the problem. It may be some component boblight?
Thanks!!
Ivn
Hi Ivn,
I’m not sure about all those “00” values … seems it’s all “black”.
Either your config file uses a margin that is too narrow, or something is wrong with your Boblight add-on.
Try reinstalling the Boblight add-ons (both).
If that doesn’t work: increase the margin % in Boblight Config Maker.
hans
Hi Hans,
I put the RaspBmc distribution and what is my surprise that is not the boblight addon.
Is possible to install from a zip? Or other possibility?
Thanks!
Ivn
I have the impression (which could be wrong) that OpenElec works just as well or even better than RaspBMC – the distribution uses a much slimmer Linux version. Did you try it?
I am however surprised there is no Boblight plugin for RaspBMC, maybe you need to use the default XBMC plugin?
You can download it for free at OpenElec.tv.
hans
Hi i have another problem.Some movies in the format 21:9 does not light up and down the strip of LED.They do it only for a few movies 21:9.You do not know what it is about problem?
Mark
Hi Mark,
I assume that with a 21:9 video, you might have black bars at the top and bottom.
I was under the impression that Boblight compensates for that when the black bars are not part of the video file. Now if those black bars are part of the video, then Boblight might not identify them as such and consider them real video. These are just assumptions of course, I could be wrong. But if this is the case, you may want to test a version of the video file without the black bars and see if it makes a difference?
I noticed that when the video does not have these bars that Boblight is not influenced by these black bars, even though you’ll see them on your TV ie. playing a 4:3 video on a 16:9 TV.
hans
They do it only for some video.Moreover, 21:9 and 4:3 video sulfide right.I guess the problem is in the actual video.
Mark
Hi
I’m using window 8.1 with Xbmc 12.3. I done every thing on the tutorial . I test the the led light working fine . the only problem i get with boblight.conf where i put it exactly
i need help on window 8.1 plz plz plz
Jeff
I hope there are some Windows users out there that can confirm this, but last time I looked it up I thought it was placed in a boblight folder that can be found in the root of your C: drive (ie. C:\Boblight). This directory should exist if you installed Boblight correctly.
Go through the other comments and (if I recall correctly) you should find some links to Windows related setups …
See for example these comments …
hans
# config file created with BobLight Config Maker v.1.0
# (C) Hans Luijten – //www.tweaking4all.com
# Orientation naming as seen from the REAR of the TV
# Date: 6/18/2014 15:33:14
[global]
interface 127.0.0.1
port 19333
[device]
name AmbiLight
type momo
output /dev/com3
channels 600
prefix 41 64 61 00 18 4D
interval 20000
rate 460800
debug off
delayafteropen 100000
[color]
name red
rgb FF0000
adjust 1.0
blacklevel 1.0
gamma 1.0
[color]
name green
rgb 00FF00
[color]
… code remove …
Jeff
Hi. I have another question out this. I built the system and checked it with my raspberry I think it works. when I checked with test video it seems okay. I think I need to make same tries to make config better. but because of my rasp its old one (256 ram) can’t play hd videos well. I want to port this system to Ouya XBMC. Is it possible ? I found the Boblight in addon but I couldn’t found the boblightd to give a command. Is there anyone send me to boblightd as a zip to install it manually. regards.
Seyhun
Hi Seyhun!
I’m not familiar with any of the Android systems that run XBMC, but I would imagine bolightd exists for those as well. Although, most of these systems are just not all that powerfull it seems, so maybe not … ?
If you’re investing in hardware, I’d consider an AMD or Intel based system. They’re in the same price range or a litle bit more expensive, but so much more flexible …
Running Boblight on a Raspberry Pi might indeed be pushing it … I have a few A models as well, but I thought they would do 1080p, a little over-clocking might help.
I bought this little Foxconn computer at Amazon for $175 at the time (Dec 2011).
You’ll need to add memory and a disk though, which I both had laying around.
And I’m sure there are comparable models available … for example from Zotac.
My second XBMC box is Intel Atom based which runs very stable as well (it’s even fan-less so super quiet) – but I can’t find it at Amazon anymore.
hans
Dear Hans
thanks for your prompt answer. It seems using intel or amd based pcs are better. also I have planto buy something zotac. by the way I forgot thanks to you for this great guide.reagrds
Seyhun
Hi,
great site great guide. But iam hanging with the sketch upload.
With the LedStream Sketch from adafruit, it works ok. That means when i upload it to the adurio the Led’s make a light wave ( red,green blue ).And in xbmc it works.
But if i upload your sketch the Leds keep black, and in xbmc they are without any funktion.
I have massive problems with the LedStream Sketch in some videos i lose Frames, the drop or the skip and i have jutter.
So i thought i will try your sketch… but i didnt find the mistake i make.
Niko
Thanks Niko!
I’m not familiar with the LedStream Sketch (got a link?), but a few things you could check
– Is your setup using the same pin on the Arduino? (line 17)
– Is the LedStream project using WS2812 as well? (line 34)
– First test: When you power on the Arduino – not connected to XBMC – does it do a white power up swirl? (this is controlled by the Sketch and independent of XBMC/Boblight)
hans
Hans,
Link to the sketch that works for me : https://github.com/adafruit/Adalight
– i testet pin 13 for Data and pin 11, because iam not sure in my setup. But nothing at both testings
– here the link wich LED’s iam using http://www.aliexpress.com/snapshot/310861220.html
– When iam power up adurio not connect to xbmc no lights up. ( with your sketch ) if i use the sketch above than it makes a power swirl ( 3 colors drive )
I know its hard to find out whats wrong, i tried 7 houres with so many options but i didnt come further
thanks niko
Niko
Hi Niko,
since your LEDs do not even light up when you start, we should look at just the Arduino and LEDs.
Looking at the LEDs you have, then I think that’s the problem … you’re using WS2801 LEDs (according to the link you provided), where as this project is aimed at the WS2811 or WS2812 LEDs.
I have zero experience with the WS2801’s … but I do know that the entire interfacing works different than the WS2811/WS2812.
I’m not even sure that the NeoPixel library supports WS2801’s …
hans
Hi Hans,
I’ve revisited my installation and cleaned up up nicely. Ordered some quick-disconnect style connectors so I can break apart the strips if I need to do repairs (I installed right to the TV, no frame). Wanted to say thanks again for the good help you gave me earlier this year with the setup. I never did get the RasPi to run smoothly. even at 1100MHz overclocked. So sad. anyway…
I’ve got a 3D TV and I’ve discovered that 3D content doesn’t work properly with the config setup. I’ve been doing some quick reading on how to manually configure the config file to only use the left half of the screen (or right I suppose) to properly process the side by side video.
In OpenELEC there are settings for movies / tv / files so you can have different settings for different modes – I’m curious if you’re aware of a way I could run a setting that will work with 3d video?
Also – Looking at your arduino code, I’d like to add a function to use an I/O pin to control a relay that powers the LED power supply on/off with the video stream. I don’t want to have to power it on/off manually each time. Wondered if you could help me out with that…
Russ
Hi Russ!
Glad to hear things worked out for you. But a 1100Mhz overclock, wow! … are you using a heatsink with that?
3D is indeed a little weird, I have not tested it yet (not a big 3D TV fan – but my TV does support 3D).
As far as I understand, Boblight looks at the video file, and would see the whole width as the video feed.
I think XBMC Gotham has some 3D option, but I never tested any of it.
Being able to switch on/off could probably be done in the Arduino code.
Something like checking if a pin is high, and if so, set all colors to black.
If not high do the usual thing.
Something like this when pin 2 would be used to switch off leds.
Note that this is untested code …. and for more info on using switches with your Arduino read “Arduino -Switch” on the Arduino website.
Some more info on the color switching can also be found in this article I wrote.
With an IR receiver “led”, you could even consider toggling on/off with your remote. But that would take a little bit more effort to figure out. …
…
Interesting to think about though
Hope this helps …
…
hans
So I have modified your code to include an event timer that monitors the data stream – if the serial stream is active, Pin 10 goes HIGH. After 5 seconds of inactivity on the serial stream, I have the arduino change all the LEDs to black, and Pin 10 goes LOW. Pin 10 is connected to a solid state relay that switches my 110V Mains AC Power to the LED power supply so I’m not wasting excessive energy, and now I don’t have to manually unplug or switch off anything – 5s after I power off my HTPC via the IR Remote, the system switches itself off.
I modified my original setup a little as well – rather than use an expensive/bulky Arduino Mega, I’m using a 16Mhz ProMini 5V, and a cheap USB-RS232 adapter board ($8 total). Now its small enough to stick in a small project case on the shelf in the closet behind the TV (with the rest of my AV gear).
I have been reading about the hscan and vscan, and believe I can make a config file that will allow me to only use the left half of the video stream for my 3d movie playback so the visuals will match what my shutter glasses are presenting to my eyes… But I’d really like to know if there’s a way to have boblight switch config files if I am playing from the “movie” collection vs the “TV” collection.
Russ
I should add to my previous post that the arduino code I added forces the “state” variable back to “STATE_WAITING” (in case the HTPC power off left it in an unfinished working state) and when the serial stream resumes, it switches Pin 10 HIGH again, powering up the power supply, and immediately begins processing the color data again. I’ve powered my system on/off several times now and it seems to be working perfectly.
Next I’ll be looking into adding a “sleep” function (or sort of anyway) so that if I pause/stop a video, or turn the TV off but fail to actually power off my HTPC, the LEDs will detect that the color stream hasn’t changed values in 5 minutes and power off the system as well. This seems a might bit more complicated, and might present some challenges given the limited memory I have to work with on the ProMini….
As for the 3D – since the video files I play are SBS (Side by side), the 1920 pixels width is split in half (minus a few pixels in the center for black bar) with the left eye’s image getting the left ~960 pixels and the right eye getting the right ~960 pixels. So it looks to me like I can create a custom boblightd.conf file where the hscan values only go from 0-50 (0% width to 50% of the width of the video stream). Since the TV stretches the image back to a full 1920 pixels wide and shutters back and forth between the left/right eye, and since the LEDs haven’t physically moved, the alignment should be good enough to look like the system is processing the video correctly… at least that’s my theory. Since there isn’t a handy tool to create a config file for only one HALF the screen, I will have to custom make my 3d one to test out…. I will report back if it works, and then it’ll be on to finding a way to automate the switch of the config files so that when i go into a menu that is all my 3D content, the lights will automatically start processing the modified image correctly, and return to standard when I’m done… Seems like a tall task, but hopefully I can figure it out. Maybe there’s some linux gurus out there that can help me with a script that renames the config file and restarts boblight or something….
Side Note – YES, I did have auxiliary cooling for the RasPi. It seemed to run pretty stable, and I didn’t experience the memory card corruption problems that some people seem to report when overclocking more than 800Mhz. But I only ran it for a week or so since I couldn’t get the results I wanted… I’ll likely revisit the attempt at some time down the road.
Russ
I seem to have hit an interesting turn of events with my 3D & Boblight goals.
I spent a couple hours manually editing the boblight.conf file to only use 0-49.5% of the hscan range in the various LED assignments (25-49.5% on the “start” objects, and 0-25% on the “end” objects – goal of only processing the left eye image). I fired up one of the 3D files I have and began seeking back and forth looking to see if it lined up – it looked close but not right most of the time.
In my pursuit of having the 3d stuff sorted out, I had also undertaken the task of getting OpenELEC to recognize the 3D files and automatically start them in stereographic SBS mode. When I did this, apparently to my surprise, it corrected the alignment/dual-image issue I was experiencing with the standard boblight output, and therefor caused my “corrected” conf file to actually be processed wrong.
Sooooo – it looks like by adding the “.3D” to the filename (ie “Pacific Rim 1080p HSBS.3D.mkv) alerted the OS to the fact it was a 3D movie, and solved my problems. It now auto-starts in 3D mode, and the boblight stream appears to be processing correct using the standard conf file created with your awesome software tool.
Figured I’d share since I know there appears to be lots of us playing with the system now… :)
Russ
Thanks for sharing Russ – now you’ve peaked my interest, and I’ll go try this myself!
So you’re saying that with OpenElec 4.x (XBMC Gotham), we only need to rename our files so it has “.3D” in it? Awesome!
hans
Pretty much yes. I did have to fiddle with a few of the files, seems it likes to only see the “.3D” or maybe it has to be before a resolution tag like “1080p” as I noticed the menus would identify the file as “HD” and not “3D” (yes there is a logo for it that shows up beside it) if i didn’t remove the other numbers.
Remember you may have to clean and reload your library, or refresh the individual media files to show the updated info. When you press play, it will pop up and ask what mode you’d like the stereographic image to be run in, and the OpenELEC OSD will adapt to show correctly through the glasses.
Russ
My 3D movies are stored separate from the regular movies and XBMC is not index them … it became way to confusing.
But with your findings I can actually do some testing! Thanks!
hans
@Hans i have one question left.
ambilight didnt work top and down under the cinemascope blocks… right and left it works. Wich setting i make wrong ?
thx 4 help
Niko
Hi Niko …
Well, I’ve read somewhere that only SBS and full TAB formats are supported correctly in XBMC Gotham (link). Not sure if your TAB movies are full resolution or not. Not 100% sure what “full” and “not full” means, but I assume that full TAB means that the video file actually has a vertical resolution twice that of the actual movie. Then again, I did see conflicting info as well.
As for filenames (can be upper- or lowercase):
For all 3D files always seem to need “.3D.”, “_3D_”, “.3D-“, “.3D”, “3D.” or “3D”
For Side-By-Side add: “.SBS.”, “.HSBS.”, “_SBS_”, “SBS”, “-SBS”
For Top-and-Bottom add: “.TAB.”, “.HTAB.”, “_TAB_”, “TAB”, “-TAB”
I noticed that just adding “3D”, and either “SBS” or “TAB” is already enough, no matter what characters before and after,…
Filename examples:
moviename (year).3d.hsbs.mkv
moviename 3d sbs.mkv
moviename.3D-HTAB.mkv
moviename-3D.sbs-720p.mkv
hans
Thanks for the great article! I think I may need to invest in some of those LEDs :)
Ollie Chalk
Thanks Ollie!
Yeah those LEDs are fun!
hans
First, sorry for my english.
After several days looking for a valid code to ambibox and windows i found it. If you want that this strip works successful whit Ambibox and Windows 8 or other windows you have to put this code in the arduino (need fast spi library):
fflynt
Thanks!
And dont worry about your English: It’s perfect …
…
AmbiBox/Windows users will enjoy your sketch!
hans
Have you do eny extra configs in AmbiBox? Because your sketch is working fine with boblight, but in AmbiBox i see only start sequence.
FaUst
Hi Hans,
All this afternoon, I tried to going ambilight work but I did not succeed.
I use OpenElec on Intel NUC, WS2812B and Arduino MEGA.
When I turn on the Arduino the initial color appear but when a movie is launch through XBMC the color doesn’t change.
I think that Arduino part is correct because when I change initial color in sketch, real color change.
Have you got an idea ?
Log file seems to be ok :
Matt
I find the mistake !!
I try with an arduino uno and now it work great !!
Thanks for this wonderful DIY guide
Matt
HI!!
I have the same problem!! I have Arduino Mega, I will try with arduino uno.
Thanks!!
Ivn
Just so there’s no confusion, the Arduino Mega DOES work with the system. I ran the software on a mega, and now I’m running it on a ProMini 5v.
If you’re running boblight on a Linux platform, you probably had the wrong output device selected in the configurator
Russ
Hi!!
I think I found the problem:
http://labby.co.uk/2012/02/setting-up-processing-under-ubuntu-devttyacm0-devttyusb0-fix/
Ivn
Very cool – and more complicated then I had expected.
Thank you for sharing!
hans
[…] выводах GPIO). Начал искать методы подключения и нашел вот такую статью. В ней предлагалось использовать arduino в […]
Can you advise on the cables that you are using to connect the strips together (in figures 8, 12 and 13)?
What gauge would you recommend?
Can you also tell me what the white wiring block that you are using to connect wires together is called?
I am trying to put together a shopping list of all the items I need
Great guide by the way. I am looking forward to following it when I have everything I need.
K B
Thanks KB …
…
I used the cables that came with my LED strips. Looking at this article, 6 gauge should be enough.
My connectors came with my LED strips, and I did find them at eBay where the called them “3-pin JST SM connectors” (link). I’m sure there are smaller bundles available than 50 pieces …
…
Hope this helps.
hans
Hi,
thanks for your great tut. Here is my problem: I have a flickering every 1 or 2 seconds (see video). I even tried to do it with FastLED, but that didn’t change anything. (I append the FastLED Sketch, maybe anyone has any use of it.)
Video of flickering – If anyone knows what to do I’d be happy. I am running on 30% Brightness, with 76 Pixels and a 5V/2A Power Supply. Flickering stays also when I reduce to 30 pixels.
Additionally, it seems to be very slow. In the sample video it takes almost a second for the lights to snych. Is that normal?
(Raspberry Pi + OpenElec + Arduino Nano (tested with mega aswell) + WS2812B (GRB) )
FastLED Sketch:
#include “FastLED.h”
/* t4a_boblight * (C) 2014 Hans Luijten, http://www.tweaking4all.com * * t4a_boblight is free software and can be distributed and/or modified * freely as long as the copyright notice remains in place. * Nobody is allowed to charge you for this code. * Use of this code is entirely at your own risk. */
//#include “Adafruit_NeoPixel.h”
// DEFINITIONS
#define STARTCOLOR 0xFFFFFF // LED colors at start#define BLACK 0x000000 // LED color BLACK
#define DATAPIN 9 // Datapin#define LEDCOUNT 76 // Number of LEDs used for boblight#define SHOWDELAY 0 // Delay in micro seconds before showing#define BAUDRATE 115200 // Serial port speed, 460800 tested with Arduino Uno R3#define BRIGHTNESS 90 // Max. brightness in %
const char prefix[] = {0x41, 0x64, 0x61, 0x00, 0x18, 0x4D}; // Start prefixchar buffer[sizeof(prefix)]; // Temp buffer for receiving prefix data
// Init LED strand, WS2811/WS2912 specific
// These might work for other configurations:// NEO_KHZ800 800 KHz bitstream (most NeoPixel products w/WS2812 LEDs)// NEO_KHZ400 400 KHz (classic ‘v1’ (not v2) FLORA pixels, WS2811 drivers)// NEO_GRB Pixels are wired for GRB bitstream (most NeoPixel products)// NEO_RGB Pixels are wired for RGB bitstream (v1 FLORA pixels, not v2)
//Adafruit_NeoPixel strip = Adafruit_NeoPixel(LEDCOUNT, DATAPIN, NEO_GRB + NEO_KHZ800);
CRGB leds[LEDCOUNT];
int state; // Define current state#define STATE_WAITING 1 // – Waiting for prefix#define STATE_DO_PREFIX 2 // – Processing prefix#define STATE_DO_DATA 3 // – Handling incoming LED colors
int readSerial; // Read Serial data (1)int currentLED; // Needed for assigning the color to the right LED
void setup(){ //strip.begin(); // Init LED strand, set all black, then all to startcolor FastLED.addLeds<WS2812, DATAPIN, RGB>(leds, LEDCOUNT); //FastLED.showColor(CRGB::Red); //setAllLEDs(BLACK, 0); setAllLEDs(STARTCOLOR, 5); Serial.begin(BAUDRATE); // Init serial speed state = STATE_WAITING; // Initial state: Waiting for prefix}
void loop(){ switch(state) { case STATE_WAITING: // *** Waiting for prefix *** if( Serial.available()>0 ) { readSerial = Serial.read(); // Read one character if ( readSerial == prefix[0] ) // if this character is 1st prefix char { state = STATE_DO_PREFIX; } // then set state to handle prefix } break; case STATE_DO_PREFIX: // *** Processing Prefix *** if( Serial.available() > sizeof(prefix) – 2 ) { Serial.readBytes(buffer, sizeof(prefix) – 1); for( int Counter = 0; Counter < sizeof(prefix) – 1; Counter++) { if( buffer[Counter] == prefix[Counter+1] ) { state = STATE_DO_DATA; // Received character is in prefix, continue currentLED = 0; // Set current LED to the first one } else { state = STATE_WAITING; // Crap, one of the received chars is NOT in the prefix break; // Exit, to go back to waiting for the prefix } // end if buffer } // end for Counter } // end if Serial break; case STATE_DO_DATA: // *** Process incoming color data *** if( Serial.available() > 2 ) // if we receive more than 2 chars { Serial.readBytes( buffer, 3 ); // Abuse buffer to temp store 3 charaters leds[currentLED++].setRGB(buffer[1], buffer[0] , buffer[2]); // and assing to LEDs } if( currentLED > LEDCOUNT ) // Reached the last LED? Display it! { FastLED.show(); // Make colors visible //delayMicroseconds(SHOWDELAY); // Wait a few micro seconds state = STATE_WAITING; // Reset to waiting … currentLED = 0; // and go to LED one break; // and exit … and do it all over again } break; } // switch(state) } // loop
// Sets the color of all LEDs in the strand to ‘color’// If ‘wait’>0 then it will show a swipe from start to endvoid setAllLEDs(uint32_t color, int wait){ for ( int Counter=0; Counter < LEDCOUNT; Counter++ ) // For each LED { //strip.setPixelColor( Counter, color ); // .. set the color leds[Counter].setRGB(0, 255 , 0); if( wait > 0 ) // if a wait time was set then { FastLED.show(); // Show the LED color delay(wait); // and wait before we do the next LED } // if wait } // for Counter FastLED.show(); // Show all LEDs} // setAllLEDs
Teamo
Hi Teamo,
Yep, that flicker doesn’t lock right … I’ve never seen this though.
My first guess: Your Raspberry Pi is not keeping up.
Some things I’d try:
– Disable all plugins (except Boblight of course)
– Over-clock the Raspberry Pi (without burning it to a crisp)
– Test the Arduino/LEDs on a normal PC/Laptop
hans
Hi Hans,
thanks for your quick reply. Odd fact: I removed the external power supply and attached it directly to the arduino. The flickering is gone now. (Perviously I tried 5V/1A and 5V/2A) The Arduino gets its power from the 5V/1A Power supply that is attached to the raspberry pi (Just in case you hear that again).
But I’m still far away from the performance you have in your videos. I did not install any plugins at all yet, since I just installed it yesterday (was using raspbmc before, but it didn’t work at all)
Do you think overclocking will help with the speed issue? I changed showdelay to 0. The baudrate can’t be changed to anything above 115200, but as I’ve read, that isn’t a problem for the performance. I am really wondering why it’s so laggy…
Teamo
5V/1A for the Raspberry Pi seems a little low? I always use at least 5V/2A for my Pi’s.
Pi + Arduino + LEDs on 5V/1A seems super low …?!
Lights will lag a few microseconds, not noticeable during video playback, but noticeable with the demo video – although I have seen plenty people who have a hard time seeing the lag.
I too have noticed that serial speed doesn’t really make much of a difference.
You could try to play with the “interval” value of your config file …
Overclocking is recommended for a Raspberry Pi.
hans
Hi Hans,
big thx for the tip with the Overclocking. That speeded it up a lot. But still there is a noticeable delay. I activated the “High” setting (but did not overvolt). That means i have settings 950/450/450. Additionally I got the external power supply attached correctly, so it works like it should.
Do you think I should lower or higher the interval? It doesn’t send 50 refreshes/second. It’s like the backlight changes 2-3 times per second. So in theory lowering might be the better choice, but did not work out (changed to 2000). If it worked like in the laser-show demo you posted above, everything would be fine. I think its just a small step to reach that. Just a few settings :)
Teamo
You could try a higher value for “interval”, serial speed of 9600 or 16840 should be good enough. For the interval I’d normally aim for half the refreshrate of my video. If 20,000 = 50x per second, then 40,000 should match 25x per second. 2 or 3 times per second would indeed be very visible delay wise …
I have played only with the Raspberry Pi A model, might be that the B model performs better (more memory). Might also be that a faster class SD card performs better, or running at 720p instead of 1080p.
With a heat-sink you might also be able to achieve better overclocking values.
You might find more tricks in the OpenElec or Raspberry Pi forum as well … other folks in the OpenElec forum play with Boblight as well. I recall a special Boblight version for that purpose, but I could be mixing that up with Enigma version (sat box).
hans
Dear Hans,
Hi. My system is working well except that everytime I have to re-upload sketch to arduino. Have any idea to solve this problem ?
Regards,
Seyhun
Hi Seyhun!
Ehm, how do you mean re-upload the sketch?
After you power down the Arduino? (which would point to some problem on your Arduino)
Or after you modify the amount of LEDs?
hans
Hi again :)
Well I think I need to start over because I did’t give any info about my project :) I have Zotac Mini with Win7. I applied all steps except boblightd. I downloaded boblight for windows and applied what
it needs. When I first upload skecth then I run server for boblight windows. Everything had worked well. After couple days I want to use it again. when I turn on the computer Arduino takes power and make the leds on with initial led colour (white). After that I stated server it worked with some warnings and then XBMC. LEDs didn’t take any effect. After all I re-upload skecth to Arduino then I started server it worked well. Every time I want to use I need to do same process. (re-upload sketch). Do you have any idea for solution ?
Regards,
Seyhun
Hi Again to you too …
…
Does the Arduino remain powered when you shut down your computer?
Just curious, since either the Arduino is not picking up the right data or the server can’t seem to find the Arduino.
hans
Yes Arduino remains with power because of Zotac I think.
I’ll post server’s message at night I can’t remember well now. Ambillight works fine out of this problem :)
Seyhun
If you use the setup above, the Arduino should shutdown when unplugging the power supply (the one in this schematic that is), even when the Zotac stays on …
hans
Hi Hans,
I’ve followed all of your articles for getting this ambilight working….and it works!!!
I have 195 WS2812 LEDs powered by a 5V/10A supply that also powers the arduino. All of it’s connected to the PI (overclocked by turbomode) using Openelec & boblight with your config file.
My problem is that I have a ~4second delay for the LEDs to switch color (after the TV scene switches), and I am out of ideas.
Did you run into this issue? How did you set up your x3 channels?
I just tried a higher than 460800 baudrate on the arduino and pi boblight config, and now all USB ports on the PI dont work when the arduino is plugged in. They do work when i unplug the arduino usb. This still happens after switching back to 460800 baudrate!
Cole
Hi Cole,
seems you might be running into a similar issue Teamo has (above) – maybe he has made progress. A 4 second delay seems a bit rough though …
The OpenElect setup I’ve used was not on a Raspberry Pi, but by the time I get home again (about a month from now) I will most certainly try it with a Pi.
Higher baudrates do not seem to matter much (dito experience with a regular PC).
– Playing with the “Interval” might help.
– Disable all plugins,
– Pick the faster UI (Confluence I think),
– Try 720p playback to possibly gain some more speed.
hans
Hi Cole,
i did make a huge progess with overclocking the pi to high, but i only use 63 LEDs. Since you are using 195 it makes sense that you have a huge delay. The baudrate is not the problem. As it seems boblight uses 3 bytes per led and with a refresh rate of 25 times/s the formula would be refreshes_per_second*3 bytes*num_of_leds=required bytes per second (baudrate). So for me it would be 25*3*63=4725 so it works equally well with a baudrate of 9600 for me. When using a refresh rate of 50 and 195 LEDs a baudrate above 29250 should be sufficient anyways. The problem seems to be the speed of the rapberry and the large amount of LEDs you are using. I set the refresh rate to 25 refreshes per second, overclocked to high, used 63 LEDs and set the maximum brightness to 30% (which is perfectly sufficient for me). I will try to find out even better settings. If I get to a solution I will post it.
Teamo
Well, I’m not running OpenElec on a RPi, rather on a regular small PC, which gives Boblight more computing power to determine the colors for the LEDs.
Raspberry Pi settings and suggestions are most welcome here, since some of the visitors use the Raspberry Pi with OpenElec. Would be a great addition to the current info!
Thanks again Teamo!
hans
bravo!
humsat
Thanks
hans
I was wondering – have you have ever considered using Hyperion instead of Boblight? It’s supposed to be much more efficient and use less CPU.
Mitch
Hyperion is for Raspberry Pi only (as far as I understand) and the setup in this article is a regular PC (HTPC) …
Do you have any experience with it?
I would assume that the hardware does not need to be different, just the installed software on the Raspberry Pi and possibly the config file?
hans
No, I’m still waiting for my strip and Arduino to arrive. But I’m exploring the options. It looks like, unfortunately, you are right – Hyperion seems to be made for Raspberry Pi only. :(
The reason I like Hyperion is also that it can be controlled from a phone (Android). There is some mention how to get Hyperion working in tandem with boblight-x11 here: https://github.com/tvdzwan/hyperion/issues/62 (last comment)
Mitch
You might want to read this post in the XBMC Forum, which is a small “tutorial how to compile it on Linux and use it” …
Maybe I’ll look into this when I get back home (on vacation right now), I wouldn’t mind low CPU load and higher speed even on my HTPC, maybe it reduces the tiny lag (hardly noticeable though). Does not seem all that complicated …
Note: For OpenElec this might require some extra work since it’s an embedded Linux version.
Copy from the forum post:
Guide supports effect engine and Hyperion on Android to v1.3.
On Raspberry Pi it is very popular. So here is the tutorial how to compile it on Linux and use it. It is uses almost no CPU usage like 1% for 100 LEDs compared to Boblight which was using around 30-35% of cpu usage on AppleTV with CB2. On my Atom D2550 it is not worth a mention.
I am using it also on regular HTPC based on Linux.
First install pre-requirements and then compile:
Now you have compiled Hyperion and the binaries are now in place.
In next step we will make it autostart. In Rpi it uses upstart script but in Linux HTPC the best way to start it is using autoexec.py under userdata folder of XBMC.
If the file is not there then just create it and put this inside:
So now lets create the script under /media/scripts/hyperion_startup.sh
The content of the script should be:
And also do not forget to make it executable.
Maybe you can put the line (/usr/bin/hyperiond /etc/hyperion.config.json >/dev/null 2>&1 &) directly into autoexec.py, but i did not try.
Now we need to create config file for Hyperion. Just download the file HyperCon from their page https://github.com/tvdzwan/hyperion/wiki/configuration and do a little reading.
With the tool create a config file. Make sure that you will set the right type like “adaligh,…”, the right bound rate (very important!!!). adalight is using 115200 boundrate, the right type of LEDs (2801,…). For non RPi devices you can disable XBMC checker under the tab “External”.
After you have created hyperion.config.json file, copy them under /etc/
Now you need to download the addon for Hyperion. It is similar like the one from Boblight. You can get it here https://github.com/tvdzwan/hyperion/wiki…for-RPi%29
This was the first step of compiling and basic installation of Hyperion.
Note: Boblight and Hyperion can not run at the same time since they are using the same port and the same device. So disable the boblight first.
If you would like to use the Hyperion with the light on all the time, also on visualizations and also on menus then you can use the boblight-x11 daemon. You will need to compile boblight and use just the binaries boblight-x11 (boblightd and boblight-constant you can delete).
With this command you can call Hyperion with X11:
For easy finding of perfect light configuration use Android app Hyperion from the google market. With this app you can see in realtime how the parameters effects the ambilight. When you will find the perfect spot just enter it into HyperConf.
hans
Thanks for this. It doesn’t seem that hard at all. But we would probably need to modify your sketch to some extent. I’m pretty sure Hyperion won’t send start prefix to Arduino for starters.
Mitch
I have not done any “deep” research on Hyperion yet, but the WS2801 seems to be favorite.
Second thing I notice is that several setups use the GPIO of the Raspberry Pi directly, so no Arduino.
However the Hyperion Wiki suggests that this setup could very well work just fine (USB-Arduino-LEDs). Read this section of the Wiki.
hans
Hans, one more question. For now I’ve ordered 2m of LED strap. 1m (30 leds) for top and 1m (15+15 leds) for left and right side. For now I’m not planning on having any leds at the bottom of TV. But your configuration tool doesn’t seem to like that as it alerts me about division by zero and it won’t compile the configuration file. Any ideas?
Mitch
I’m preparing a new release which allows this. Actually the error message is a mistake on my end where I forgot to not calculate the average LED width when zero LEDs is being entered.
What you could do, for the time being, is configure it with 1 or 2 LEDs at the bottom, remove that part from the config file and reduce the channel count by the number of LEDs you had at the bottom times 3. Zo using 2 leds at the bottom mean reduce the cahnel count by 2 x 3 = 6 … (not pretty but at least you can work with it)
hans
Hans,
Thanks for the reply. That’s exactly what I though and I did. But I still haven’t received my strip to test it out so I rather asked in advance. :)
Mitch
Hi, great tutorial!
Don’t know If this has been asked before, how many pixels/m (or leds/m) should be the strip? I see various types, would more be better?
zeremefico
Hi Zeremefico,
Thanks for the compliment!
I’ve had great results with 60 LEDs per Meter. However, nothing stops you from using less or more.
I guess it all depends how accurate (small) you want the “blocks” of light to be, but with 60/m I’d say you have an as good a resolution for [indirect] light as you can get. The indirect light that bounces of your wall will blur the colors anyway.
Another reasons to use more LEDs is if you’d want a more intense light effect – I personally think 60/m is doing more than I need and I actually tone it down a bit to now be too overwhelming.
I suspect that less than 60 LEDs/m will work just fine too (considering other designs I have seen).
Also consider: more LEDs means stronger power supply (more Amps).
hans
Amazing work and a great tutorial!
I have an AMD-powered HTPC and a RPi, and I have just one question: could it be possible to follow your tutorial, replacing the arduino for the RPi? I mean, what changes should be done for using the RPi just as a led controller receiving the image data through the usb ports.
I’ve seen other tutorials where the RPi is used also for running XBMC, and also some other “already-packed-thing” that charges 60€ just to be able to connect a HDMI device to the RPi, and I don’t like any of them.
Alikindoy
Thanks Alikindoy!
Theoretically the RPi should be able to control those LEDs, however, you’d need (from what I have read) a realtime operating system, which Linux is not. It is being said that timing can be unreliable.
Since you have found guides/products for this: I’m wondering how “bad” the timing problem really is, or if they have a modified Linux version to support realtime controlling of the I/O ports …
As for now: I wouldn’t know how.
Not to mention that an Arduino Nano for example can be found dirt cheap in eBay.
Why would you want to use a RPi for this? Or do you just have one laying around …?
hans
Hi Hans!
thanks for your prompt response. And yes, I have a RPi laying around and I just wanted to give it a try with the ambilight-clone thing. Anyway, you’re right about the realtime control in Linux (I didn’t think about it, I was focusing just in the hardware part), so maybe it’s easier (and cheaper) to use an Arduino as you suggest.
Thanks again for you’re help!
PD: Maybe I’ll have a look to some realtime options with RPi in the near future.
Alikindoy
Hi Alikindoy,
no problem – I actually had the same thought before I decided to buy an Arduino – definitely worth looking at eBay for that stuff. The Chinese clones work just as well, just a lot cheaper
hans
Hi Hans,
just reporting the good news: I followed your amazing tutorial using an Arduino Nano with WS2811 leds and it all works perfectly fine. I’m just a bit annoyed about a small problem, probably caused by the leds and maybe the power supply, I’m not sure: when boblight is not working (I mean, just the daemon boblightd is running in the background) some leds randomly flash in different colors every now and then. Apart from that, everything works fine.
My next step will be to learn how to load sketches in arduino from the command line, in order to be able to control the leds with different sketches depending on things like the application that I’m using each time or something similar. It could be nice… Anyway, thanks a lot for your fantastic work.
Regards!
Alikindoy
Hi Alikindoy,
thank you for the compliment!
The random flashing, when Boblight is idle, is definitely not normal.
If this only happens when Boblight is idle, then I’m curious to see what is causing this.
Does this also happen when you disconnect the Arduino from your HTPC (PC, RPI)? It should do the startup swirl and then remain stable. If not then I’d suspect that there is something wrong with one or more of the LEDs (they each have a “driver” chip, one of those might be defective).
If your LEDs work normal when Boblight is active, then I would think your Power Supply is OK, and if the initial swirl looks good too then I would think the LEDs are OK as well.
Did you set in the Boblight AddOn for XBMC/Kodi, that it should use a static background color for when there is no video?
hans
Hi,
great tutorial and thanks for the code example! I’ve modified it and added IRremote to enable/disable and adjust the brightness during runtime with an TSOP4838 IR Reciever and an remote control.
simplyray
Excellent mod Simplyray!
I never thought about this, mostly because I watch TV at night, but I can see the benefits for sure!
Thanks for sharing your sketch here, it’s very much appreciated!
hans
You’re welcome! Live video demo: https://www.youtube.com/watch?v=8MEX-0ChHcg
Oh, btw:
Could you modify my post to format the code correctly I don’t see any option to do it on my own? Might be a bit hard to read…
Cheers from Hamburg, Germany
simplyray
Very well done! Love it!
I did modify the post
hans
Hello Hans,
Thanks for an incredible write-up, on what has been a fun, yet challenging project. The challenge I’m facing is getting XBMC to change the LED’s while playing a video, and after reading through the entire article multiple times, and the comments section, I’m still at a loss as to what might be the issue.
Here’s my setup:
HTPC – iMac bootcamped with Windows 8.1_x64, SSD for local disk, which is running XBMC/Kodi 13.2 (Aug 2014).
LED’s – WS2811’s, 5v10a PS – 60/meter at 4 meters = 240 LED’s
Interface – Arduino OSEPP Uno R3 Plus
The sketch seems to work fine, as it lights up with the swipe (love that), and I can modify the start color with no problems.
‘Installing’ boblightd took some time, as it’s not an available option within XBMC as described – I had to find the zip online, and extracted to c:/boblightd/. I assume this is the appropriate location on Windows 8, and that process is the same as ‘installing’? I am unsure how XBMC knows to find the ‘boblight.conf’ (that I created with your config builder application) file that I’ve dropped in this directory.
Config file – Did not adjust any settings other than Output device, and total led’s on each side or top/bottom:
Set LED count to 240, which returns a channel count of 720 (is this correct with a 240 LED strand?). Adjusted top, sides and bottom counts.
Output device – /dev/com3
Type – momo (Unsure what else to try here, other options don’t seem to make sense)=
Baudrate – 460800
Prefix – 41 64 61 00 18 4D
Decimal separator set to Force Period.
I’ve installed the XBMC Boblight add-on within XBMC, and when launching XBMC it says ‘Connected’. When opening a movie, or your test file within XBMC, the LED’s stay on the start color, and do not change, almost as if i’m not playing a video.
I’ve also changed the Bits per second setting in -> Port Settings on the Windows USB Serial Port (COM3) properties, from the default 9600 baud to 460800 – matching the baud in the sketch and the config file.
I tried adjusting the baud rate in the ‘Start.bat’ file from ( MODE COM3:9600,N,8,1 >NUL ) to ( MODE COM3:460800,N,8,1 >NUL ) as well.
I’ve also tried copying the boblight.conf file to my C:\Users\%username%\AppData\Roaming\XBMC\ directory.
In looking through XBMC logs, it appears to talk to the config file, as it knows how many LED’s, and I do not see any apparent errors..
Does OpenELEC need to be used in combination with XBMC, or can I choose to just use XBMC? OpenELEC doesn’t seem to fit my HTPC needs very well, as I’d like to USE XBMC within Windows, not boot to a partition with OpenELEC.
Any help that can be provided is greatly appreciated! If you need me to run any specific scenarios and post a log file, just let me know.
Thank you!
Jason Olliff
Hi Jason,
thanks for the nice compliment!
The article was written with OpenElec in mind, but with minor modifications it can most certainly be used under Windows.
I have not tried running this under Windows, so the details concerning Boblight are only guess work on my end, and it seems you’ve done most of the work, the way I’d done it.
I would consider using a lower baudrate, start (in conf and sketch) with 9600, 19200 or 38400. Much higher is not needed it seems. It might be that 460800 is too fast. Assuming the prefix matches the sketch.
Everything else looks good (240 RGB LEDs = 3 colors * 240 = 720 channels).
OpenElec is basically an embedded Linux distro optimized for XBMC use only. In essence running XBMC under Windows just has a few minor software config and install differences. The only difference is that for OpenElec a specific plugin is to be used.
Give the lower baudrate a try and let me know your findings …
…
hans
Thanks for the response and tip re: baudrate (same to you simpleray). I’ll give that a shot tonight and report back. ::fingers crossed:: :-)
Jason
Have you tried setting the baudrate to “115200”? That is the highest “legal” value. I’ve been unable to get my ambilight working under windows (7) with baudrates higher than that value.
simplyray
Thanks SimplyRay! Good to know, didn’t know that either!
hans
Well, I got it working by lowering the baudrate! A HUGE thank you to SimpleRay and Hans for the tip! I was going a bit crazy… :-)
115200 is the highest rate that I could get Windows 8 to talk over, and in testing, it’s apparent, especially with the test video Hans provided, that there’s a slight delay in the changing of colors (1-2 seconds). Will look through the article again to see what other options I have to speed this up when I can’t adjust the baud rate further. Perhaps I need to move to OpenELEC for better performance?
Jason
You could try my FastLED implementation (modified + found in the ardunino forums) which is working without delay or shuttering under OpenELEC. Downside: I’m currently unable to set the LED count to the correct amount (192 not 180). If i set a amount above 180, my LED strip starts to flicker irregular while processing data … i really have no idea why.
BTW FastLED ist quite cool … some great features are implemented (color correction on the fly, blacklevel theshold, and so on)
My Sketch (running with 460800 bauds under OpenELEC – you might want to initially set it to 115200 and try to set higher steps: 250000, 460600, etc.)
Make sure you download the latest fastled version on github: https://github.com/FastLED/FastLED
simplyray
@Jason:
115200 could be a limitation in the Windows version or in Windows itself. Seems that OpenElec (embedded Linux) allows higher speeds.
I’m glad you got it to work !!
@SimplyRay:
Nice work on the sketch! There will always be room for improvements on my sketch, and suggestions like yours are more than welcome! Thanks for posting your code!
hans
Update: I’ve managed to get my FastLED implementation working under Windows 7 + 8 with an baudrate of 460800!
Downside: It currently only do work until the next reboot. So i have to recompile + upload my sketch to the arduino after every reboot. Currently not quite sure what is causing this … guess something happens when the system reboots.
simplyray
Does this problem also occur when just powering down the Arduino (when rebooting Windows)?
This should have the same effect as re-uploading the sketch to the Arduino.
hans
Hi again, I managed to finish the project but I face 2 problems:
1. 4 leds in a raw in the same side of frame, flicker changing colours, in both idle & playing situation. Have you seen that, is this a led strip problem?
2. When playing a video, I see some irregular flickering from various points of the strip.
I use a genuine arduino, a 10amps power suply and I have raised config’s rate to match sketch’s rate.
zeremefico
The flickering could be caused by several things:
– Baudrate too high for the serial port to keep up … (try a value lower or equal to 115200)
– Power supply can’t keep up (see calculation about for proper Amps)
– LED strand connections aren’t too great (although I’d guess that to be the least likely)
– One or more LEDs are faulty and relay the data unreliably (have not seen this yet)
hans
Hi again, fixed & matched the baudrate.
Now I have a new problem, the only leds that light and work with boblight are the first line. The other are dead. Some times when I reconnect the power suply, they light but not work with boblight.
Do you believe I need another power suply?
zeremefico
I’d check 3 things;
hans
As i search on ebay.co.uk, it seems to only give me ws2812B, is this gonna work just as good as the ws2812?
And BTW nice tutorials you’ve got here.
oyvind
Hi Oyvind!
Yes the WS2812B will work just as fine as the WS2812. The “B” version is actually an improved version.
hans
Ok thanks for clarifying that, been searching and I couldn’t really find the exact difference exept for what you mentioned, and just wanted to be sure it actually would work the same way as ws2812(and not needing different sw uploaded etc).
There is also the question wether to go with 30 led’s/m or 60 led’s/m, do you have any opinion about that, I mean would one actually notice the difference in ‘resolution’ on a normal TV like my now old 50″ plasma?
I wonder if anyone have tried this in a homecinema, with let’s say 120″ screen, but then the led’s would have to be discretely hidden/masked, and also maybe the led’s would be too bright?!
Unfortunately were I live now I don’t have room for my projector or any screen at all, but just something that came into my mind.
oyvind
No problem – things can be confusing (for me as well) with all those silly type numbers …
…
I have not tested 30 LEDs/m yet. I’d assume the total brightness will be less, but then again, I’m never running mine at 100% brightness.
I would however be concerned about the potential gaps between LEDs, but I suppose that also depends on how close to the wall you are with the TV. A little further away from the wall would give a better diffuse effect, where the colors seem like one piece.
But again: I have not tested this, I’m just speculating. Seeing others that did similar projects, I’d say 30/m might work just fine.
In the end, I’d pick 60/m,… Keep in mind that if 60/m is too bright, then you can control that in the sketch by toning down brightness. I’d rather find myself with too many LEDs and having to go back to say 70% brightness than finding myself with 30/m LEDs and having to toss them because it didn’t work.
With a projectors things do indeed get more complicated and I would not know if it would give the desired effect. Maybe if you can match the brightness with the projection brightness … but I’m guessing that matching the colors will be a pain.
I actually prefer my 80″ TV over a projector, but that’s a matter of personal taste, and one can’t argue about taste …
hans
Hi Hans. Great article! I have my setup running but I notice some delays like others. I have tried a few things (aka everything) but nothing seems to work. Do you think using a teensy 2.0 would perform better since it doesn’t use slower USB to serial? I’m running 196 LEDs on a Cubox i4 pro. I have some videos on youtube if you’d like to see the delay.
taytos
Thanks for the nice compliment.
As for the delay, I think a tiny delay might be unavoidable, since Boblight has to dissect the “screen” (played back at a pretty high speed, ie. 11.5, 15, 23, 25 or 30 screens per second). The speed of the XBMC/Kobi machine therefor will be the most critical point.
I do not have the impression that a Teensy will be “better”, but then again: I have not tested this, so if you do, please let us know your findings.
It might be an idea to test this with a beefy PC running OpenElec. Just for testing of course, to see if that improves things.
I’ve noticed on my small PC (tiny AMD based box), that disabling all plugins significantly influenced the delay – but I never managed to get rid of the entire delay.
During movie playback though, I hardly notice it, and I really have to pay attention to see it. The test video reveals the delay a lot better though.
This gives me the idea that the HTPC is the most critical part causing delays.
Feel free to post the links to your YouTube video’s, I’d be curious te see how it performs on your setup.
hans
I like the chain going on below me. I tried to use the FastLED sketch from a few posts up and like they said only able to use 180 LEDs (196 is extremely buggy). But even 180 was pretty bad delay wise. I think for starts I will try to use the FastLED posted below if not then I will try a teensy out for fun :). By the way, I read on another forum yesterday there is an attempt to bring Hyperion to more than just RPi!!! So that is something to look forward to testing out. Below is my video. 196 LEDs on 47″ TV. Brightness is 50%, baudrate is 115200 (460800 doesn’t appear to work. Not sure if its because cubox or what), Interval in this video was 100,000. Its now back to 20,000. I honestly don’t see any difference when changing that. I think boblight is 75% speed. When I run top on my cubox my cpu reaches 20% max so I don’t think the cubox is my bottle neck. I just see other peoples videos where it looks spot on. Even with a pi. But the number of channels plays a massive role in it because I think most of those setups are ws2801 30/meter. I have a decent PC laying around so I might try OpenElec for testing. Delay doesn’t look bad when you focus on the movie and not the lights.
https://www.youtube.com/watch?v=6TiZaOWw8xk
taytos
Hi Taytos!
I watched you YouTube video and you indeed have quite a delay. On my setup (290 LEDs, 60 LEDs/m, Arduino Uno, AMD Fusion 3500 PC) I do not see such delays.
My guess too is that the majority of the speed is “done” by Boblight, a Hyperion port would be great.
I’m not very familiar with the CuBox, but as far as I can see these are Android based – not what I’d call speed monsters. Seeing that CPU load is only 20%, it makes me indeed wonder what the deal is there. Looking at a post in the XBMC/Kobi forums, the config parameter “threadpriority” is being mentioned (set threadpriority to 99). As I understand, this parameter is not always implemented, but worth a try.
I have not seen any effect when I tested this way back when I build my setup, but I didn’t really try very hard either at the time to get this to work.
Add this to the [device] section:
Reference: Boblightconf Wiki
When this is set, it sets the scheduler of the device thread to SCHED_FIFO, and the number after it specifies the priority of the thread. The minimum and maximum values are determined by sched_get_priority_min() and sched_get_priority_max(), usual values for linux are 1 and 99. Setting this value will improve timing of the device thread.
It is highly recommended that you set this to 99 when using a ws2801 device, because the ws2801 latches in data when the clock pin has been low for more than 500 microseconds, which might cause flicker when the boblightd device thread gets preempted during an spi write.
In order to use this, the user you run boblightd as must have permissions to use SCHED_FIFO priority, the easiest way to accomplish this is to run boblightd as root, but this is not recommended (however it’s convenient for testing).
If you want to give just your user SCHED_FIFO permissions, you can add this line to /etc/security/limits.conf:
user – rtprio 99
However this only works for PAM login shells, it will not work in a boot script.
If you want to use SCHED_FIFO in boblightd, and run boblightd as a regular user, you can use this in your boot script:
ulimit -r 99
sudo -u user /usr/local/bin/boblightd
For this to work the boot script has to run as root.
hans
I have been struggling with the settings and different Arduino sketches for awhile and finally I think I got a working setup for Boblight with FastLED. I used this sketch at first but it caused this kind of flickering:
https://www.youtube.com/watch?v=lB7RLaVdyOk
I posted an issue to github and focalintent noticed that there’s a problem with the serial read and he provided a fix. So, here’s the fixed sketch I’m now using:
And the boblight settings (in boblight config maker I left the color settings to default, colors might still need a bit of fine tuning):
– Speed: 80- Autospeed: 0- Interpolation: off- Saturation: 1.6- Value: 2.0- Threshold: 10.0
My setup is latest KodiBuntu + Arduino Nano.
Here’s a video (sorry for the low audio volume): https://www.youtube.com/watch?v=2Uqdy2w59z8
RanzQ
Awesome! Thanks RanzQ!
As soon as I get home (late this week), I’ll give it a try! …
…
Always great to see improvements even on my own dabbling
hans
Thanks for this aweome tutorial too. :) I used your neopixel sketch for a while but it didn’t work so well when I tried to put more speed from boblight. With fastled the delay is now quite minimal. Have to try with a few movies to see if that speed is too fast for eyes. :)
Also could try to adjust the saturation / value in boblight and different color temperatures for fastled. Do you know btw what does the ‘value’ mean? Cause I didn’t find what it is for.
RanzQ
Thanks …
…
I will most certainly start playing with NeoPixel! Specially if it reduces the delay! Good find!
As for the Saturation in the Boblight plugin: I honestly can only guess. It might be a multiplication factor, ie. 1 = normal, 0.5 is lower saturation, 1.5 is higher saturation. But I have no evidence to support that …
I can imagine that individual LEDs have a higher saturation than the LEDs in a TV screen.
hans
I realized that the value means HSV value. And they both must be multipliers, actually they were explained somewhere in boblight related forum if I remember right. So, basically, according to that picture, lowering the saturation makes the colors closer to white and lowering the value makes them closer to black. If calibration is correct at Fastled (it has built in color correction), the colors should look as seen on TV if both are set to 1.0. I watched a movie and dark scenes often cast too bluish light when I had the value at 2.0. Trying with both at 1.0 for now.
RanzQ
Thanks RanzQ, also thanks for posting the HSV link!
The more info we collect here, the better educated we all become – good info!
hans
Thanks for posting this! I’m going to try it out later today. I tried a different FastLED sketch posted earlier in the comments and it was no good. That one didn’t work well with any LEDs over 180. I’m going to test with 196 and see. I will report my findings.
taytos
Looking forward to your findings,… I’m using 290 LEDs successfully with the sketch in this article, but I’d be pleased with any improvements we can come up with.
hans
I’m planning to make a test using hyperion. First I thought it was for RPi only but it can be used with arduino too. People have commented that it’s better than boblight so going to give it a try. Here are the instructions if someone else is interested: http://forum.kodi.tv/showthread.php?tid=180472
RanzQ
Thanks again RnazQ!
Please let us know your findings, would be very interesting to find something faster than Boblight …
hans
Seems it is more of a challenge when using OpenElec (instructions here – seems for RPi, but might work on others as well) – With a nice warning that updating OpenElec might brake it again.
hans
Ok, got it working finally. Here’s my config (I can post the json if someone needs it):
http://i.imgur.com/DOi9CbJ.png
http://i.imgur.com/CSq4fq2.png
http://i.imgur.com/ZZB44vY.png
Notice the RGB Byte order, it must be RGB since Fastled handles the GRB if needed. Also the helper picture is from front of the screen, so the rotation is clockwise, when in boblight I had counter-clockwise. There’s still a small delay but I think it’s a bit faster than with boblight. You can play with the interval and smoothing. The prefix isn’t adjustable, so I found a processing code to calculate it: http://forum.kodi.tv/showthread.php?tid=132023&pid=1115381#pid1115381
I just modified the prefix from the sketch and it works with hyperion now. Gotta try the android app for color calibration.
RanzQ
I’m curious to see your progress on this. Here is the post I was referring to earlier about hyperion running on something other than a RPi Right here. I’m going to see how this goes. I’m very hopeful.
Also, your FastLED sketch works well for me. I tried it out last night. I first used 115200 as baud then upped it to 500000 and I could see the difference. Before I couldn’t get it to go past 460800. So thanks for that.
taytos
Thanks RanzQ and Taytos! Excellent find!
I know what I’m going to be doing as soon as I get home!
hans
I found an improvement to the arduino sketch: https://code.google.com/p/adalight-ws2812/
It had a checksum check so the prefix doesn’t have to be calculated manually. Modified my sketch to be similar. Also this seemed to work without the drain fix that I had before:
RanzQ
Awesome RanzQ!
I very much appreciate you digging in deeper and sharing your experiences here!
hans
I’ve put the sketch also to github so it doesn’t get lost.
https://github.com/RanzQ/adalight-fastled
I’m still wondering why some of the baud rates work and some don’t. I ended up to 500000 after checking this:
http://www.wormfood.net/avrbaudcalc.php?postbitrate=500000&postclock=16&bit_rate_table=1&hidetables=1
See the color table at bottom, it tells that error rate is zero with 500000 but not with 115200. My Nano specs say 16 MHz so I used it in that calculator. I’m quite newbie with the low-level stuff.
RanzQ
Nice find!
I can only image why certain speeds work very well, were other [lower] speeds fail.
hans
I also found the “official” hyperion sketch: https://gist.github.com/tvdzwan/9008833
I don’t know why it was so hard to find it, was linked in github issues. Anyway, it seems to be written for older FastLED, so maybe my version is better.
RanzQ
Hello tweak4all,
I have the following issue, I uploaded the sketch with the 154 leds i use and it only lights up 48 leds and then another 40 are blinking, this is also the case with a test sketch.
The psu i use is 5 volt 7amp could it be that i need 9.24 amp and there for not all leds are working?
Thanks in advance!
Mr Bic
mrBic
Hi Mr. Bic!
Two possible causes;
1. Your powersupply might not keep up … as always, some power supplies exaggerate about their potential “power” … which could mean that a pull of too many amps will cause a drop in voltage or worse. Considering that you’re using only half the number of LEDs I do, I’d say that 7A should be sufficient (I use 10A for 290 LEDs).
2. The connections between strips might not be conducting all that great. Only applicable of course if you use individual strips. Check and see if the issues occur specifically after a specific connection.
3. An issue I ran into myself was that one or two LEDs in the strand were defective and caused following LEDs not to work or behave oddly. To test this, if you have access, is by bypassing the LED as of which point “problems” occur.
Hope this helps you “debugging” this issue …
hans
Hello Hans,
Thanks for the response, I RMA the psu and got a 5volt 16 amps one, now all leds are one but they blink from led 48 till the end, if I dc the arduino from the pc/openelec left and right lit up in the configured color the top strip lit up in red and blue.
Should I try option 3 that you suggest? or could this be software related?
Regards,
Mr Bic
mrBic
Option 3 is relatively easy to test, if you can reach the 3 connectors between the LEDs. Meaning: if you don’t have a cover over it.
You can short “Di” of LED-1 to “Do” of LED-1 to “skip” this LED. I’d take the LED just before the issue begin (so LED 47 in your case), and the one where it actually begins (LED 48).
So, since as of LED 48 things start flickering, first test:
Connect “Di” of LED47 to “Do” of LED 47.
If that doesn’t improve things, do the same for LED 48.
You can use a simple copper wire for this, holding them on “Di” and “Do”.
The “proper” way of doing this, is by making this connection before switching everything on.
I personally, with my own stuff (!), wouldn’t mind doing this while everything is on, but you have to be very careful that the wire will not tought +5 and/or GND, which will cause an undesired short, potentially damaging the LED and/or your Arduino.
hans
Hello Hans,
So I have bin fiddling around and now I have everything hooked up and semi working. When everything starts the led strand (all of them) lights up white as configured.
But if openelec shows the main screen i have 3 to 4 blinking leds at the start of my third led strand at the right side while they should be out. I tried setting the data signal from the second to the third strand with no succes.
I run the test sketch again and that works good, swirls rainbows and that kinda things from beginning to the end all good, so iam a little confused now it its software or hardware.
I meassured the voltage comming trough the strand and upped/adjusted the psu so the third led strand also has 5 volt instead of 4.9.
when I start a movie it all works but when the screen goes black in between scenes leds go black and the same 3 blink.
Last comment I have is that when i hook everything up to a raspberry with openelec the the led blinking starts from led 6 to 9 on the third led strand.
Thanks in advance for your time!
Mr Bic
mrBic
Hi MrBic,
My first guess would be that your 3rd strands has some defective LEDs that do not seem to reset properly to “off”. Can you, temporary, disable strand 3 (bypass it completely) to see if the oddities occur in strand 4? (if you have a 4th strand). Or swap the strand, temporary, with another one?
Seems your voltage/PSU is fine now,…
hans
Hello Hans,
You where right! third strand had defected leds, I swapped it for another strand and everything is working as it should now!
Thanks for the awesome guide as you made it really easy for me to understand and build!
Regards,
Mr Bic
mrBic
Awesome!
Glad to hear things work now!
hans
Hi,
Firstly, very nice project ;)
I would like to know if it’s better to use a Raspberry Pi or an Arduino Uno ?
And is it possible to use it with XBMC for Windows ?
Thanks !
Nicolas
I’ve not yet used “just” a Raspberry Pi for this kind of project.
Commonly you’ll see a computer handling XBMC/Kobi.
This can be a regular Windows PC, a Linux (recommend OpenElec!) or Mac, or a Raspberry Pi (running OpenElec, RaspBMC). I prefer to have some good power, so I always use an [OpenElec] PC (not RPi).
For controlling the LEDs, the Arduino is used as a USB device for the XBMC player.
For Windows, you’ll find some good tips in these comments, since Boblight and the XBMC plugin work slightly different. But people have successfully used this combo.
Technically one could use the PIO pins of the Raspberry Pi, but due to the nature of the operating system (not being realtime) and the available resource (CPU) being limited, I suspect this might be difficult to run smoothly.
Hope this helps
hans
Many thanks, so I can start to search all hardware to made it myself :)
A last question : could you tell me what is the name / type / other of blue-red-green wires with connector ? I can’t find it.
Thanks !
Nicolas
Hi Nicolas!
Not very obvious to find, but the info on those connectors can be found in this post (above).
So called 3-pin JST SM connectors” (example link to eBay ). Pretty cheap, $10/20 connectors.
I have to admit that the name can be hard to figure out (took me a while as well).
hans
Hi Hans,
Thank you ! I’ll try to find but I’m French ans it seems to be more difficult to find LEDs stripes ans components.
Thank you again !
Nicolas
Hi Nicolas,
I’m sure when you order through ebay that it will be delivered in France,… Not sure if customs in France is such a pain as the one from Holland, … I hear others ordering from Amazon, and from AliExpress/Alibaba (the latter wouldn’t be my first choice).
hans
Thanks again, I’ve said it was the last question but I’ve another : do you use 30 leds/meter or 60 leds/meter ? And have you tried diffference between both ?
Thanks !
Nicolas
No Problem …
…
hans
Thanks Hans, it’s a pleasure to talk with you :)
A little advice : do you think it’s better to install LEDs “in front of a wall” or each side of the TV (with 90° angle compared to TV) ? I’ve seen both, but 90° angle seems to be often used with “classic” LED, not SMD.
Thanks !
Nicolas
Hi Nicolas,
You’re most welcome!
Honestly haven’t tried the “pointing the LEDs to the outside” (vs pointing to the wall).
I think pointing towards the wall will be the best, since the wall reflects the light best this way.
But that’s just my opinion … the larger loose LEDs also “radiate” light sideways much better than the tiny flat SMD LEDs on strips, so they would probably work fine either way.
hans
Hi,
Is it necessary to add a power supply to Arduino or USB power is sufficient ? I will add of course a power supply to LEDs ;)
Thanks !
David
Hi David!
The Arduino can be powered through the USB, no separate powersupply needed.
Obviously, because of the high Amps needed, you’d need one for the LEDs.
The above shown connections do exactly that. Power Arduino through USB and power LEDs separately.
hans
Hi Hans,
Thank you :)
David
I finally got it working, but I might be needing a fine tune.
I have 112 LEDs (36+20+36+20). When I run the test video I see that when the vertical stripes come in, it does not disable my leds on these positions. It does on the wider stripes.
I want boblight to turn of the LED if there is black at that particular spot.
Can you advice?
Dennis
Hi Dennis,
glad to hear you’ve got it to work!
As for the vertical stripes: I think this might have to do with the “resolution” and “position” of your LEDs. To get this perfect might be challenging, but I don’t think it’s impossible. I’d start playing with the size and position of the LED “blocks” in the config file. If it were me, then I’d probably first look were roughly the thinner black lines are on the screen and then try to match it to a specific LED.
The problem you’re most likely running into is that the black thinner line is not 100% matching the LED “block”, so Boblight will take an average, which might include some white as well.
hans
I’d like to introduce my project for hyperion: https://github.com/RanzQ/hyperion-audio-effects
It’s working for Linux (on Windows a bit laggy), but my goal is to get it running via the hyperion effects engine.
RanzQ
Nice! Thanks for sharing you “Hyperion audio effects” project RanzQ! Awesome!
hans
Guys,
Maybe this will help anybody. Just want to tell you how I fixed flickering problem (arduino nano + win8 + ambibox 2.1.6)
I took the sketch from this site and updated fastled library from here
Now the flickering is gone.
Tidehunter
Thanks TideHunter for posting the tip – I’m sure others will benefit from it!
hans
HELLO
First thanks alot of this grate guide.
I have 2 questions about the config file I need to create using the config maker.
picture
I add a picture show that in the creator the device menu is upside down (so I don’t know if the perfix is right like this).
what’t do you think ? is it a probleam or to leave like this ?
second question, I undestand that the Baudrate need to be the same as in the skatch, so why in the sketch the value is 460800 and in the config make is 115200 ? what to do ?
thanks
tzahi
Hi Tzahi,
I’m not sure what you mean with the picture upside down?
As for the baudrate: the application defaults to 115200 since this can be a limit for Windows machines. It should match the speed in the sketch. So if you choose 115200, then set it to 115200 in the sketch as well. I actually had good results with lower speeds as well (even 9600). Try a low speed first (ie. 9600) and go to higher speeds later when you see that things seem to work OK.
hans
Thanks
I think I can Increase the baudrate to 460800 in the config creator, will it be better than changing the sketch ?
about the first question, my mistake, I didn’t meant upside down, I meant that the square near perfix is writen from right to left at my computer, and in picture in the guide and in the sketch is writen left to right (please se the picture I add before).
I don’t know why it happen like this.
tzahi
I’d start with 115200 in the sketch and the config file.
I think you meant the checkbox near prefix that’s displayed on the left of the text but on the right on your screenshot?
I suspect it might have to do with the language settings of your PC, I wouldn’t worry about it …
hans
Hi :)
I’m back :D I’ve received all elements to make my own Ambilight (WS2812B, power supply 5V 10A, Arduino Uno and I’ve even bought a RPi but it’s only to test).
I’ll build my frame today or tomorrow then I’ll setup LEDs and Arduino Uno.
I’ve read some informations about Hyperion but it’s not very clear : is it possible to use Arduino Uno and Hyperion on Windows OS now ? Or Hyperion must work with a RPi ?
Thanks !
Nicolas
Hi Nicolas,
Welcome back!
As far as I know is Hyperion created with RPi in mind. Some users however seem to have managed to get Hyperion to run on other hardware running Linux and/or Windows. You’d have to Google that, a first attempt by myself didn’t bring up any very clear info … but others did experiment with that.
hans
Thanks :)
I’ve contacted RanzQ to ask him how to use his project, I’m waiting for him ;)
I would like to use Hyperion because it can be controled with an Android app, so when I don’t use Ambilight for a movie I would like to use it for “decoration”…
Nicolas
As soon as I can work with my equipment again (traveling right now), maybe we can start a new article based on RanQ’s findings.
Would be awesome to run a lightweight Boblight like Hyperion on Windows, Linux, Max and Android,…
hans
Since a few users (also in the Dutch version of this article) are interested in playing with Hyperion (instead of Boblight), here a link to an article on the Kodi/XBMC forums, explaining Hyperion installation for Linux and Android. I hope this is helpful.
For those unfamiliar with Hyperion:
Hyperion is a lightweight Boblight alternative, originally developed for Raspberry Pi. It’s not only small but also very efficient with CPU resources, promising a more responsive alternative to Boblight.
I have not tested this [yet], as I do not have access to my hardware at the moment.
For those who tried: please let us know your findings!
Content of the article: (source – by illiac4 at the Kodi forum)
On Raspberry Pi Hyperion is very popular. So here is the tutorial how to compile it on Linux (and Android) and use it. It is uses almost no CPU usage like 1% for 100LEDs compared to boblight which was using around 30-35% of cpu usage on AppleTV with CB2. On my Atom D2550 it is not worth a mention.
I am using it also on regular HTPC based on Linux.
First install pre-requirements and then compile:
Now you have compiled Hyperion and the binaries are now in place.
In next step we will make it autostart. In Rpi it uses upstart script but in Linux HTPC the best way to start it is using autoexec.py under userdata folder of XBMC.
If the file is not there then just create it and put this inside:
So now lets create the script under /media/scripts/hyperion_startup.sh
The content of the script should be:
And also do not forget to make it executable.
Maybe you can put the line (/usr/bin/hyperiond /etc/hyperion.config.json >/dev/null 2>&1 &) directly into autoexec.py, but i did not try.
Now we need to create config file for Hyperion. Just download the file HyperCon from their page https://github.com/tvdzwan/hyperion/wiki/configuration and do a little reading.
With the tool create a config file. Make sure that you will set the right type like “adaligh,…”, the right bound rate (very important!!!). adalight is using 115200 boundrate, the right type of LEDs (2801,…). For non RPi devices you can disable XBMC checker under the tab “External”.
After you have created hyperion.config.json file, copy them under /etc/
Now you need to download the addon for Hyperion. It is similar like the one from Boblight. You can get it here https://github.com/tvdzwan/hyperion/wiki…for-RPi%29
This was the first step of compiling and basic installation of Hyperion.
Note: Boblight and Hyperion can not run at the same time since they are using the same port and the same device. So disable the boblight first.
If you would like to use the Hyperion with the light on all the time, also on visualizations and also on menus then you can use the boblight-x11 daemon. You will need to compile boblight and use just the binaries boblight-x11 (boblightd and boblight-constant you can delete).
With this command you can call Hyperion with X11:
For easy finding of perfect light configuration use Android app Hyperion from the google market. With this app you can see in realtime how the parameters effects the ambilight. When you will find the perfect spot just enter it into HyperConf.
hans
Hi,
Very interesting !
I have build my Ambilight yesterday, I have a little (hardware ?) problem but I’ll look at this.
About this article, how can we connect Ambilight to Linux HTPC ? With Arduino ? If yes, do ou have informations about sketch to use ?
Thanks !
Nicolas
Hi Nicolas!
This article is based on OpenElec, which in essence is Linux. So everything will be the same.
So:
1) HTPC -> Arduino -> LED strands.
2) Install Boblight and get the Boblight addon (assuming you’re using XBMC/Kodi).
The sketch should be the same, the device in the Boblight config files is most likely called “momo” (see als Boblight Config Maker article).
Ehm …. Unless you’re referring to the Hyperion Article …?
In that case we’d still used the same hardware, however we replace Boblight with Hyperion and Hyperion’s config file seems very similar to the one used by Boblight. In theory anyway … I have not been able to test all of this.
hans
Yes pardon me if I expressed myself poorly, I was talking about Kodi article. I think sketch is different, like RanzQ said in another comment.
Nicolas
No problem … I wasn’t 100% awake either … and just realized at the end that you might actually be talking about something else .
.
hans
So, I have made a new test with Arduino Uno and Raspberry Pi and now all is OK with Hyperion ! (except a hardware bug, I think, because in a corner a LED seems to not work all the time and so next LEDs don’t work anymore so I’ll try to replace this LED and I hope it will be OK).
My RPi is running OpenElec, so I could think it will be OK with OpenElec ? If I can I will install OpenElec on my HTPC and run with Arduino Uno
Nicolas
So due to the LED delays (too slow of a baudrate) I’ve been experiencing with XBMC in Windows + Arduino, I decided it was time to go the RPi + Hyperion route. Unfortunately, from what I’ve found so far, it looks like Hyperion is almost strictly meant to work with WS2801 LED’s (four wires, the extra acting as a clock for additional timing), and does not appear to support WS2811/2812 strands (3 wires)….
If anyone has seen evidence to support 2811/2812’s over Hyperion, PLEASE post here, as I’m really not wanting to purchase another set of LED’s just to get Hyperion working. Unfortunately, I’m already invested with all the other needed hardware. Nicolas – it sounds like you have it working with a 2812 strand, right? If so, can you share your config file settings?
I’m also considering this method , and pray that it will work with 2811’s, as it would be great to play any content from an HDMI source. Still need to find the time to test.. and will gladly report my findings.
Jason Olliff
Yes I’m using RPi + Arduino Uno + Hyperion + WS2812B LEDs strip ;)
On Arduino Uno, I use this sketch : http://pastebin.com/zhQCRFhd
But I have made few modifications like this :
– define NUM_LEDS 240 : replace by LEDs number
– define DATA_PIN 6 : replace by PIN number
– define COLOR_ORDER RGB : replace RGB by GRB
– FastLED.addLeds<WS2812B, DATA_PIN, RGB>(leds, NUM_LEDS); : replace RGB by COLOR_ORDER and if you use WS2811, replace WS2812B also
I use Arduino 1.0.6 and I have also change buffer size on the Arduino Uno from 64 to 256 : http://www.hobbytronics.co.uk/arduino-serial-buffer-size
Thanks to rick164 from MediaPortal forum for all informations ;)
Nicolas
@Nicolas; …
…
If you have a link to the relevant posts at the MediaPortal, then please feel free to post those here
hans
@Hans : When I add the link, my reply doesn’t seem to appear :(
Nicolas
@Nicolas:
Oh that’s … different …
Are you using the link button? You can post it as plain text as well (even though it will not become clickable) …
hans
@Hans : Yes I’ve tried with or without link button, same result…
Nicolas
@Niclos:
What browser and OS are you using (so I might be able t debug the editor).
The link you’re talking about, is it this one at MediaPortal?
hans
@Hans : I’ve tried with Chrome on Win 7 and Chrom on Win 8. And no the good link is the same until threads/ but there is diy-in-progress-amblight-project-guide-hyperion-ws2801-ws2812b.128526/ after
Nicolas
Let me try if I can post the link:
http://forum.team-mediaportal.com/threads/diy-in-progress-amblight-project-guide-hyperion-ws2801-ws2812b.128526/
hans
Yes the link is OK with you, I don’t know why not for me
Nicolas
Might be a security setting of my server and/or WordPress setup … (I’m an Admin so I won’t run into many limitations)
Sorry for the inconvenience and thank you for the helpful info!
hans
Any chance anyone has code to get WS2812 working in Windows without using Xbmc/Kodi?
Ive followed various tutorials online and attempted to modify the code to get it working with my 92 LED setup but it just wont work. Ive asked on a few forums as well but nobody seems willing to help. I want to be able to use the lighting I made with Media Player Classic and Netflix.
-Zack
Zack
Hi Zack,
well that’s a tricky one indeed …
After some searching I did find something called “MoMo” light, where the state the following for use with Boblight.
I carefully assume that MoMo uses Boblight as well, just the hardware might be different, which should not be a problem.
Windows Media Player (WMP) Classic (with Boblight):
Start WMP Classic, go to view and select options. In the options menu go to playback and select output. In the output screen select under DirectShow Video VMR9 (renderless)**! Now restart WMP Classic and open a video (either DVD, avi, divx or something else). The Momolight system should now work with WMP Classic using the Boblight software!
Windows Media Player (WMP): The only way to get Momolight working with standard WMP is by turning of overlay (for example by turning of Hardware Acceleration with your video device). This also only works together with the Boblight software.
VLAN player (with Boblight): Setting the video output in the video options menu to OpenGL will enable AmbX lighting effects with playback of video’s (DVD, divx, etc) with the VLAN player.
I hope this is helpful – please let us know …
…
hans
Hi, you can try ambibox 2.1.6. and adalight-ws2812 arduino sketch.
Tidehunter
Ended up getting Ambibox mostly working. Playclaw does not fully work for apps like MPCHC – it only works in windowed mode for some reason. I am running Windows 7 with the latest versions of both. Here is what I used:
Zack
I think I figured out the problem… I am using MadvR with MPCHC to get the maximum image quality out of my videos. I think when it goes full screen it is rendered different or something because it works after I changed it.
Zack
Fixed it.
I went into MadVR settings and disabled exclusive full screen mode.
Just to recap:
You can use the sketch I posted and it is fully compatible with Ambibox using WS2812b leds. I have tried using both a genuine Arduino Uno and a generic Arduino Uno “compatible” device. After messing around with Ambibox and half a dozen other similar programs I cannot fathom why anyone would use anything but Ambibox.
Zack
Thanks Zack,
I guess most of us do not use AmbiBox because we are simply not familiar enough with it, and because it’s Windows only, where as most people use Linux (either x86 based or Raspberry Pi based) … (correct me if I’m wrong please! )
)
For those that are interested:
– AmbiBox Homepage
– AmbiBox Downloads
hans
I use Windows because MadVR is not available in Linux. The difference in image quality when using properly set up hardware assisted rendering is borderline mind blowing. The worse quality the original source is (480p for example) the more of a difference you will see when using MadVR. Artifacts, fuzz and other visual garbage is non-existent with my ripped and compressed TV seasons.
Zack
As soon as I can access my equipment again, I’ll give MadVR a try.

Most of us do not like to have to purchase a Windows license or prefer to use cheap hardware not capable of running Windows properly combined with a media player …
But since I do have a Windows laptop laying around, I will give it a try!
hans
Thanks Tidehunter!
hans
Awesome. Im going to look into both options and try them out. I will report back if it works out.
Zack
HeyI got the LED strip (ws2812b, I add a picture) but have a very basic question,I didn’t understand the connection well (figure 14)the side with the female connection (without the wings at the side) is the side with the arrows direction (like in figure 14).I need to connect only this side ? the othe side of the strip in not in use ?and how do I splitt the GND connection to the DC and to the arduino ?led strip
thanks
tzahi
Hi Tzahi!
Well, if I understand you correctly;
If you use (for example) only one strand of LEDs, then yes: you’d use only one side of the strip, and the other end stays unconnected.
If you use 2 strands, then the end of strand 1 will be connected to the beginning of strand 2, but the end of strand 2 will not be connected.
So basically: Arduino -> beginning strand 1 — end strand 1 -> beginning strand 2 — end strand 2 (not connected)
It is critical to follow the arrows on the strand! The arrow has to point AWAY from the Arduino.
Splitting the GND connection: what I did was one GND wire from the LED strand twisted together with a wire that goes to the Arduino and one that goes to the power supply. You could use a screw terminal for that (Wiki), or solder the wires together.
hans
Hope someone is interested in this.
I finally found some use of my Raspberry Pi. Reading here about Hyperion I tested it on the pi. Installed Raspmc and Hyperion.
The problem I had before with my setup is that I was using a Dreambox with Boblight and Arduino,and if I wanted to use my Mac I had to unplug the usb and hook it to my Mac. Now however all is connected to lan and I can easily use the lights without any problem.
On the Mac I use XBMC with Hyperon add on and on the Dreambox Boblight in network mode. Bob light on the Dreambox was recourse hungry so this setup seem to work much better.
Guðjón Guðjónsson
Hi Guðjón,
How did you connect your LEDs through LAN?
I know Boblight (for example) has the ability to work over LAN, just never looked into it.
Or am I misunderstanding your message?
hans
Yes led are connected to the Raspberry and and is acting as server for Ma,Dreambox ans so on.
Fantastic :)
Gudjon Gudjonsson
Awesome!
That sounds like a little follow up project I should look into …
…
hans
Yes definitely this set up seems the way to go :)
Guðjón Guðjónsson
Forgot, there is an app for iOS available called hyperion to control the lights as well.
Guðjón Guðjónsson
Awesome tip! I’ll go look for that app right away! Just wish I had my hardware here to play with that …
…
For those interested, the Hyperion Remote App for iOS can be found in the App Store.
There is Hyperion Remote for Android as well which can be found in Google Play.
hans
Hello Hans,
Thank you for the guide, and all the work you have put into this site in general its quite wonderful. But as many folks here I am in need of help getting this set up to run.
My setup is 161 leds ws2812b (43 per side, 75 on top, 0 below I had to cheat the config to avoid divide by zero issues)
Windows 7
Kodi 14 (formerly xbmc)
Boblight Add-on from the repository
boblightd.exe from the thread on the kodi forums (located at c:\boblight\)
My issue is that as a few here have stated, everything appears to work up to the point when you play a video. So I get the light strip when I power the arduino. The when I start Kodi the boblight add says it connects to boblightd. But the background colour I set does not apply and if I play a video nothing changes.
I suspect that boblight and boblightd are indeed speaking to each other but the arduino and boblightd are not. I have tried 9600, 115200, and 460800. I tried changing the com port in windows from com2,3,10 just cause I had no idea what else to try. Also FYI no caps when specifying device in the conf file. /dev/com3 works /dev/COM3 does not.
Thanks in advance for the help!
Here is my conf
Jonathan C
Hi Jonathan!
Sounds like you’re right. The test light after firing up the Arduino is fully initiated by the Arduino Sketch (if you use mine).
Commonly problems occur in:
The prefix is either a fixed code (like in my sketch) or a code calculated based on a string and/or the number of LEDs (Boblight Config Maker offers both).
hans
I am using both your sketch and config maker. not sure how boblight handles the conf file but the prefix matches and I tried spaces and no spaces and still nothing.
Jonathan C
So in an effort to learn more about where specifically the communication is not working I downloaded real term and attempted to use it to debug the situation. I had your adruino sketch reply with whatever it put into readSerial variable. It seems my mega does not like 115200 as the replies were all garbled. I reduced speed to 9600 and voila clear messages were being exchanged. Next I tried making my own message to “manually” change the colour. Mostly nothing happened, but if I repeatedly sent the same message eventually some lights changed but only a few would be correct and often they would all change to a repeat of blue, red, white, green. So this leads me to believe my mega is done for or windows has issues I cannot solve.
My next move is to borrow an UNO from someone and or build my dual boot laptop into an open elec machine to try that
I’ll post if anything new emerges.
Cheers
Jonathan C
Hi Jonathan,
Garbled text sure indicates a mismatch in baudrate / serial speed. Also good to know is that for most Windows machines 115200 seems to be their top limit for serial port (which in essence is what your Arduino/USB is). Also keep in mind that long wires could contribute to it as well (although I assume your wires are not all that long).
Testing with another Arduino Uno is a good step …
I assume that the initial LED sweep (one after another LED is switched on [white] during initialization of the Arduino) works fine. If this is not the case, then trouble should be located in the LED strip.
If colors are weird or odd then consider looking at the part of the code where either RGB or GRB is being selected (NEO_RGB, NEO_GRB) or the bitstream speed of the LEDs (NEO_KHZ400 vs NEO_KHZ800), although I doubt this is an issue, just double check anyway.
hans
So I tried the UNO with no change and then used open elec on an old laptop and it worked. So not being attached to windows on my old HTPC I migrated it to open elec. But now what was working on the laptop is not working there. When the htpc starts up it says “Failed to connect to boblightd” but never connects after which is what you describe in the article and also how the laptop behaved.
Any thoughts? I am not certain how to trouble shoot this branch of the system. As in LEDs and UNO’s and serial baud rates are one thing but xbmc add ons and daemons are another thing all together.
Jonathan C
Failing to connect to Boblight is typically caused by the points mentioned earlier.
Since everything seems to work under OpenElec, I’d assume your problem lies in the device type/name. Under Windows this should be something like “output /dev/com3” – you can check the Windows device manager to verify that the com-port hasn’t changed …?
hans
hello again
I still trying to understand somthing about the GND.
in my ws 2812 in the input side (which connect to the arduino) I have a connector with 3 wires connect to it (red, black, green) and another 2 single wires black and RED).
my input connector
are those 2 same GND ?
I can connect the GREEN PIN AND BLACK GND from the connector to the arduino ?
and the 2 single wires black and red to the AC plug ?
so I don’t need to split the GND
like in this picture : picture ?
tzahi
Hi Tzahi,
it appears that the two loose wires are for providing power – you’ll have to use a multi-meter (set to diode) to test if these wires are indeed the same as in the connector. In that case you’d indeed do not need to split the wires. Like I just said: double check this with a multi-meter or physically follow the wires if you can see that they connect to the same points.
hans
Hey, firstly great guide. Followed it to the letter and my stuff is working ALMOST perfectly. I’ve changed the prefix based on having 150 lights, however any LED after number 50, just flashes through the 3 colours wildly!
I have tested the strip with the NeoPixel test and it works perfectly, but when trying to use boblight/your sketch it doesnt work past LED 50. Do you hvae any idea what this may be? I’d love to get it fixed being so close is torture!
Kris
Does the strip (if you use my sketch) show the initialization swirl (one led after the other is switched on, until all are on)?
– Make sure all strands work properly (swirl test should show all)
hans
Does Everything it work on KODI ?
Boblightd and XBMC BobLight are the same ? or diffrent names ?
tzahi
Kodi is the new name for XBMC (see announcement), so yes they are the same, just different names …
hans
Hi Hans and other guys. Is there any exact solution with XBMC Android ? I have barebone pc but it is not practical as media players. I holding my pc just because of Boblight system.
Seyhun
I do not have an Android box available to test with, but others (in the comments) appear to have a setup with Android running, either directly or via a master/slave setup.
I personally use a small PC (app $160, AMD Fusion based). It’s about the size of a small cigar box, fast enough, quiet,… and running OpenElec.
Maybe I should look for a sponsor to drop off one of these Android boxes … or maybe someone can point me in the right direction to find an affordable model?
hans
Dear everyone,
I have a serious problem and I’d like to kindly ask you for help.
I have KODIbuntu (KODI 14.0, based on Ubuntu 14.04 LTS). I cannot install boblightd service, the Boblight Add-on can be installed the standard way. But boblightd isn’t present in the addons. When I search files in the computer, there is nothing like boblightd. Please, point me into some direction how to solve this. Maybe add repo of open elec some way, but I have no idea how.
Thank you very much for any helpful replies.
Mike
Mike
Hi Mike,
I have no experience with installing Boblight under Ubuntu, but I did find this guide: Adalight, Arduino, Boblight, Ubuntu and XBMC
Quoted from that guide (slightly modified):
First off; open a terminal and install the prerequisites for Boblight:
Next, ensure that G++ compiler is installed:
Once done you’ll need to install Subversion to get the Boblight codebase:
Now your environment is all set; you can checkout Boblight and build it:
Once it’s downloaded, you should have a folder in your ‘Home’ directory called ‘boblight-read-only’; Change into this folder:
Once in there issue the ./configure command:
Once it’s run; you can then get on with make and install Boblight:
and
Optional step: update ldconfig – I had an issue where one part of boblights install wasn’t referenced in another location (reported by boblight-X11: ERROR: libboblight.so: cannot open shared object file: No such file or directory); so I had to run
to update my links.
Boblight needs a .conf file to initialize the lights.
It needs to be placed in your /etc folder; unzip the file and copy it to the right location; you’ll need to be sudo to do this:
If you’re still with me; fire up a new terminal and type:
If your config file is correct; this will start the Boblight daemon and you should see the LEDs cycle through RGB once more, and the terminal will state that boblight has successfully connected. Open a second terminal window and type:
Your LEDs should now all be red! To kill this command simply press ctrl+C (Don’t shutdown the boblight terminal or you’ll lose the connection and will have to issue ‘sudo boblight’ again!
Install XBMC boblight addon
To install this add-on you must do so from the Add-on Manager from within XBMC by going to:
Settings – Add-ons – Get add-ons – XBMC.org Add-ons – Services – XBMC Boblight – Install
Once installed you should see a notification on screen that it has connected to boblight! Then choose a film, sit back in a dark room and marvel at your creation!
Hope this gets you started …
hans
Damnit you’re fast.
Thank you very much for the reply, I am obviously incompetent googler. I tried the guide, boblightd runs after startup and XBMC reports successfull connection. I could check that on virtual serial port the messages work when using boblight-constant. I don’t know how to create virtual serial port on startup to check if it works with video, too. And I don’t have a scope at home to see what happens on actual serial port.
But soon I will try to connect it to an MCU and see what it does.
Unless you are planning to visit Prague to let me invite you for a beer, can I donate somehow so you can get the beer yourself?
Mike
Hi Mike,
Don’t worry about the Google thing: I actually like figuring it out as well, and I think posting the answer here serves others as well …
…
I did find this blog post on how to work with virtual com ports under Ubuntu … I hope it’s helpful .
.
When I visit Prague, I’ll most certainly let you … I wouldn’t mind a beer.
Donating can be done through PayPal (hans at luijten dot net), but it’s not required,…
hans
Woops, forgot to post the link to that blogpost:
http://www.xappsoftware.com/wordpress/2013/10/07/using-virtual-serial-ports-on-linux-ubuntu/
hans
Hi,
I tried some of sketch – only that works, but only in boblight – ambibox and prismatik dont. Does abyone had the same problem?
FaUst
Hi Faust,
unfortunately, I haven’t tried the sketch with either AmbiBox or Prismatik … Do they use the same config file? It could be related to the prefix code maybe?
hans
In AmbiBox i can only set baudrate and port, besides prefix code is Ada – it seems OK
FaUst
Hi Hans.
I was wondering do you know anything about TM1803 strips?
Are they the same or similar software wise as WS2812/2811
Thanks.
Guðjón Guðjónsson
Hi Guðjón,
I did find this article at Sprakfun which suggests the TM1803 might be a WS2811/WS2812 clone. Spec sheet can be found here.
At the Github page of FastLED, they claim TM1803 support as well. FastLED works slightly different than NeoPixel (see this article for a comparison).
An article in the Arduino forum might give more insight into the specifics as well, but when using FastLED you might not need any of this.
I do not have these LEDs at hand so I can’t test anything .
.
If you find out how to do it, would you mind posting it here?
hans
Hi Hans,thanks for replay.
I bought them by mistake a year ago and have been in closed since. But reading here about 2812 they seem to be almost identical.
If I find something out I will post here.
Guðjón Guðjónsson
Thanks Guðjón!
I understand the mistake, I almost made a similar mistake (that’s why I wrote the Arduino/WS2812 article to present my findings, and even with the WS2811/2811 I almost feared having bought the wrong ones as well).
Thank you for willing to share your findings when you’ve got things working!
hans
hello
why after I upload the T4a Boblight sketch the leds stays on ?
tzahi
Hi Tzahi,
the LEDs should first make a swirl/loop and then go OFF if Boblight takes over control … So in this case I suspect that Boblight is not sending any data, or the data is not properly recognized (check prefix/baudrate/device type).
Hope this helps
hans
Thanks
the probleam was the baudrate, I change it to 9600 like you advice befor and it work fine, but it too slow.
460800 dose’t work so I will try to rise to 115200, is this the max I can get ?
tzahi
Specially Windows seems to dislike speeds above 115200, so yes, I’d give 115200 a try … or maybe a step lower like 57600 …
FYI: Standard baud rates supported by most serial ports (read: old and Windows):
Standard baud rates supported by some serial ports:
hans
Hey
thanks, I upgrade the speed to115200, it’s better but still slow.
in fast scenes the led light don’t compatible with the picture light, I mean the light is a little slower then the picture.
is there anything I can do to improve the light speed ?
tzahi
Hi Tzahi,
When running my test videos, a minor lag might be visible. If you see a serious lag during movies, then please read this post for suggestions.
I realize that searching through the comments might not always be that easy …
hans
Hi Hans!
Exellent guide! finally got my setup working, had some trouble with the “prefix” and “momo” parts in my config file.
So it is up and running, but im not to happy about my blackness.
for example when the picture is very dark, i see blueish/white colors instead, this seems pretty random, can also be red. Bu when the scene goes completly dark my leds turn black(off). Bu not in dark scenes.
I am using ws2801 leds with the “ledstream” sketch.
is it possible to use your sketch by “simply” modifi it to work with the 2801?
here is my sketch anyway:
Martin
Hi Martin,
Great to hear you’ve got your setup going …
I have no WS2801’s available for testing, and in this AdaFruit Forum Post you can read that WS2801’s are maxing out at 90 LED … if NeoPixel supports WS2801, then it would just be a matter of changing this line:
Adafruit_NeoPixel strip = Adafruit_NeoPixel(LEDCOUNT, DATAPIN, NEO_GRB + NEO_KHZ800);
What the proper settings will be, I honestly do not know …
As for the proper “black” goes, I’d play with the settings in the Boblight plugin of XBMC. You can change it darker, or adjust the gamma to get a proper black. Read the comments made by others above (link).
hans
Wow, that post came out really long ^^
I did some searches last night and it looks like the fastLED are supporting ws2801. Not sure about neopixel yet.
i also found a supposed fastled sketch that should work. But havent tried it out just yet. Will be back with results
Martin
Haha, no problem ….
….
Yes, please let us know what you’ve figured out to get it to work with WS2801’s …
hans
Hi,
I just installed my Ambilight with succes and have a correct configuration now, yay! I had a lightpack before and OpenElec 4.x just recently updated to Kodi. 3D content used to play on my lightpack quite well, top/bottom and sides where playing (not totally correct, but it didn’t bother me). Now I only get lights on both sides, top and bottom stay off :-( any idea how this happened? Does it have something to do with the fact that the LED block depth size is set a lot smaller now. I went from a 30 channel kit to a 810 channel kit, so I had some performance issues, I set it to 5% right now.
Justin
Hi Justin,
congrats on a working setup!
As for 3D: I honestly never tried it, I’m not much of a 3D movie watcher.
You could try to increase to 10% of the height, even if it can’t keep up, you’d at least have an idea if it’s related to that.
270 LEDs (810 channels) should work just fine though unless your HTPC is not keeping up (disable all other plugins when testing). My setup uses more LEDs and my AMD Fusion box keeps up just fine. Some additional plugins may slow down Boblight significantly though. One plugin I had, which checked for new files frequently, did bring Boblight to a freeze …
hans
Hi Hans,
Thanks so much for your advice!
I tried using Boblight X11 for my visuals when playing music, super fast and fluid. However, when I play a music framerate is just a lot slower :-( Would it help if I purchase a different HTPC faster CPU and better GPU?
Apparently the guys from AmbiledHD use a specific firmware for the kit, they do provided a adalight firmware which I have installed. I asked them if I can speed up the process. They provided the following instruction:
No, Adalight firmware is refreshing all 512 LEDs. If you have an Arduino IDE, you can download the adalight firmware source from our repository (https://code.google.com/p/ambiled-hd/source/browse/#svn%2Ftrunk%2FAmbiLED_Firmware%2FAmbiLED_Adalight%253Fstate%253Dclosed) and change the LED count from 512 to real one. It increases the speed a bit.
I did download the Arduino IDE but I get all kinds of errors when i’m compiling. Any suggestions?
Justin
Hi Justin,
I can imagine that the the resources need to play music is significantly lower than movie playback. I’m not sure what your current hardware specifications are? I’m using a tiny AMD Fusion HTPC and Boblight works great, unless I add additional plugins, then performance tanks …
You could try a regular PC, just for testing purposes, to see if it’s worth the investment.
When I look at the code (your link), then it only steers 200 LEDs (int LED_Count = 200) – setting it to the real number might make a difference but I wouldn’t expect too much of it.
The AdaFruit example should not produce errors, unless you did not install NeoPixel (see this post how to install under the chapter “AdaFruit NeoPixel“).
I’ll post the code for reference for others as well below (source).
hans
Hi Hans,
I use a HP MicroServer AMD Turion II Neo N54L + 2GB RAM equiped with a Zotac GeForce GT 630 ZONE Edition 2GB. Don’t think a SSD will make a huge difference. I do have plugins installed, its my HTPC and download machine combined. So it’s running SabNZB, Sickbeard and Couchpotato.
Greets Justin
Justin
Hi Justin,
form what I could quickly Google, the Turion and the Fusion could perform comparable … the video of the Fusion should be faster, but I just have this info from I could quickly find. Links: AMD E-Series E-350 vs Turion II Neo N54L and Fusion vs Turion X2 (if I picked the right CPU’s). It seems the Turion could be a smidge faster when it comes to CPU power. Not sure how this will pan out in reality though …
I’d recommend doing some tests with your download tools all disabled/removed, as they are pretty file intense, and could give a good slowdown while downloading (SABNzbd) or while looking/storing (Sickbeard/Couchpotato).
As for the SSD: I’ve noticed significant speed improvements over a regular HDD, specially when there is a lot of file activity.
hans
Typo: ….when I play a MOVIE…
Justin
Hi :)
I’m back to the project, I was very busy but now I think I could find time to test !
Does anyone use Arduino / WS2812B / Hyperion on Windows now ? Or definitively not ? If not, does anyone use Aduino / WS2812B / Hyperion with a standard PC and OpenElec/Kodibuntu ?
Thanks ;)
Nicolas
I’d be very interested as well … once I get back home (still traveling) I’d love to start experimenting with Hyperion.
hans
I’m going to convert my HTPC to dual boot Windows / Ubuntu so I could try Hyperion ASAP :)
Nicolas
Awesome! Keeps us posted
hans
Ok so I have installed Ubuntu and hyperion with the link you have provided in an other comment, and hyperion service is OK on Ubuntu. I can connect to it with Android app, server is synchronized but now I have a problem : there is no LEDs activity… I think it’s a problem with my Arduino Uno and HTPC communication, so perhaps my sketch is not the good. I’m going to try with RanzQ sketch.
Nicolas
Hi Nicolas – try testing with low baudrates first, for example 9600.
Also triple check the com-port/device and the “prefix” code you’re using.
With most users those are the points where it most frequently fails.
Please let us know if you found a working solution or what the problem might have been …
hans
Thanks for informations :)
So I’ve made several changes and now Hyperion is OK (but not with Kodi, I’ll try later but I think to know what is the problem).
So I’ve used sketch made by RanzQ but I have modified baudrates 500000 to 460800 (same modification to Hyperion JSON) and change PIN and LED number but it’s normal.
And the most important : when you use an Arduino with Ubuntu, you must add user to 2 local groups :
usermod -a -G tty user_name
usermod -a -G dialout user_name
Or (like I have do) install Arduino package (apt-get install arduino) and at first launch it will ask you if you want to add user to groups.
I’m following my tests and I’ll tell you when all will be OK ;)
Nicolas
Thanks for posting Nicolas!
In the near future I’ll see if I can modify Boblight Config Maker to generate Hyperion config files as well.
Not sure if such high baudrates are needed, I’d try something like 115200 as well, even if it’s just to see that such high speeds really make a difference.
Anyhow; when I get back home, I most certainly will give Hyperion a try as well.
hans
You’re welcome, thanks to you to give me a way to start this project ;-)
I have installed Hyperion service with Kodi (you need to download a zip and unzip it into addons folder) and it works ! I’ll try later with a complete movie to see because I think I have a buffer problem with my Arduino but I’m not sure. I have already talk about this buffer problem in a previous comment.
Nicolas
Looking forward to your findings Nicolas!
hans
Hi ;)
I’ve tried with the same config than RanzQ (baudrate 500000, same settings than his Hyperion config file) and it seems to be better and less laggy. I must follow my tests.
Nicolas
I’m happy to report I decided to use my NAS/HTPC as a NAS only, I bought a Raspberry PI 2 now for the HTPC part with Hyperion, and refresh rate is much much better then with Boblight!
Justin
Oh Nice! A RPI 2 is on my wish-list as well …
What XBMC/Kodi distro are you running? OpenElec? RaspBMC?
I’m considering getting one myself, and even though OpenElec for example is not yet optimized for the new CPU, it should already work faster. What are you findings in general?
hans
I use Openelec, havent tried RaspBMC. I like the fast boottimes from Openelec.
It’s quite fast, no lags, I’ll report back later, just installed it yesterday :D
Justin
Awesome! I’m jealous haha!
hans
HelloI have 2 questions :1. some times the led just start working alone, and stay’s on till I turn the computer and it connect to boblight server and just then they turn back off.why is that ? and how Prevent it ?2. I undestand some people use resistor in the connection, what for ?
THANKS
tzahi
Hi Tzahi!
1) I have no idea why the LEDs would do that, but you can set your Arduino Sketch to set all LEDs to black – just remove line 51 (setAllLEDs(STARTCOLOR, 5);) from the sketch and it should set all LEDs to black.
2) The resist is optionally used to “dampen” – see the excellent explanation of Grumpy Mike.
hans
Hi
I got little promblem. At first everything was working fine. I decided to make some fine tuning on led positions and made new boblight.conf . After that boblightd start.bat does not work? It says boblight system cannot find batch file labeled -running ? and it closes… any idea whats is problem?
I instaled XMBC boblight again and boblightd = did’t help
I am running Windows 8 and Kodi with Arduino mega 2560 + WS2812B
Jack
Screenshot
Jack
I hope one of the other Windows users can help you with this.
As far as I can see in this kodi forum post, your start.bat matches that one – they also provide a start.exe as an executable replacement for the .bat file. Did you try that one?
hans
It’s working again .. Don’t sure what i did exactly but basically i just tried different boblight deamons software with administrator rights. Here’s link to the daemon that works for me.. And thanks for great tutorial about lights and software

Btw Ambilight is awesome
Jack
Awesome!
hans
Excellent work here that really helped me getting my RaspBMC/Boblight set up working. I’m trying to fine tune the config file and what would really help would being able to set a single LED “on” to confirm it’s position IRL.
Does anyone know the boblight-constant command to make a specific LED turn on? e.g. “sudo boblight-constant [lightname] FF0000”
culprit
Thank you Culprit!
I like your question – it would most certainly help when finetuning colors and positions.

At the moment I wouldn’t know how, but I’ll look into it!
Maybe I can incorporate that into my Boblight Config Maker …
hans
I found two posts in Google Groups:
Now I’ll be the first one to admit that I have no clue how to get started with that, and any tests I’d like to do cannot be done, since I’m nowhere near my Boblight setup …
Another idea, yet very cumbersome, is to modify the config file and setting certain LEDs to zero, ie.
For example, for each 5 LEDs, set 4 to zero like this – in the hope that they won’t produce any lights.
This might be a lot of work … specially when you have 290 LEDs like I do …
hans
If you call boblight-costant from the CLI without specifying any options the following outputs:
@raspbmc:~$ boblight-constant
ERROR: no color given
Usage: boblight-constant [OPTION] color
color is in RRGGBB hex notation
options:
-p priority, from 0 to 255, default is 128
-s address[:port], set the address and optional port to connect to
-o add libboblight option, syntax: [light:]option=value
-l list libboblight options
-f fork
so it must be something like: “boblight-constant -o T15 color=red”
culprit
Interesting! This worked for you? Or it didn’t work?
If it didn’t work … maybe something like this:
Not sure where you got “T15”, I’m guessing the name of the light (below: “start1“)?
Or maybe it has to be “Ambilight 1” (less likely though), or just “1” (more likely).
I read somewhere that this should set all LEDs to red (for example):
I unfortunately cannot access my Boblight to test it myself …
…
hans
T15 is the name of one of my lights yes. I’ve tried different versions of the syntax but the daemon just complains that the option=value part is wrong.
Maybe the easiest thing to do would be to make a video file with a black background and one white square in each corner. Boblight would turn on the LEDs it thinks corresponds to those corners. I’ll give it a try.
culprit
Did you try something like:
No idea if that would work … just an idea – we should probably study the Boblight source to see what might work.
As for a video:
I created the T4A test video for testing – I’m sure it can be improved up, but it might be a good start.
hans
Hi
Can anyone give me an idea ,why 2 last leds are light blue the time? I have calculaced number of leds two times now and it should be right.. Those leds aren’t broken because they change color when using adafruit “rainbow” code..
Win8,Arduino mega ,WS2812B (using 359leds) / 20A power source
Jack
Hi Jack,
kind-a difficult to debug from a distance of course … but you could try adding 2 LEDs to the config file, just to see what happens?
Maybe you’ve already tried that … ?
hans
When i add 2 leds on arduino code and boblight.conf. boblightd says “ERROR boblight.conf line 2586 : Channel 1369 wanted but device ambilight has 1368 channels” It says same when trying to add 1led except channel’s number is different
Jack
One other thing is that right side leds are bit off sync(position) and also bottom leds… i think its something to do with those 2 all the time blue leds on bottom left…
Here is a LINK to picture to showing what i am trying to say
Any thoughts about that?
Jack
I see what you mean … although it’s a little hard to see, since your wall isn’t white.
What is the starting point and in what direction do the LEDs go?
(ie. bottom middle, clockwise as seen from the front of the TV)
You said these are the last 2 LEDs, so seen from the front of the TV, counter clockwise (bottom->right->top->left)?
I would say that these 2 LEDs are not of influence … since the position and size of LED are set in hscan and vscan, ad I would assume that Boblight analyzes only that part of the screen for that given LED.
hans
start of leds is left bottom corner and clockwise direction.
Jack
So it’s the first 2 LEDs that remain blue-ish?
I see a little shift in the top, right and bottom middle … almost like the LEDs aren’t positioned exactly right.
Also, seems that 20A should be sufficient for your LEDs, I’m curious if connecting +5 and GNG at the end (and maybe in the middle) will help …
hans
Maybe this picture soon as i can. I allready connect ground wire to the end , because purple/pink did’t go through to end .I will connect also 5v soon as i can. Here is link to boblight config file .. maybe it would help some?
Jack
Your config file looks fine to me …
I’m keeping my fingers crossed for the +5V … specially now that you mention that you needed it for GND as well .
.
Did you create the config with Boblight Config Maker?
hans
me too because white color is more yellow than white end of strip, when usign 90% brightness. No in some reason i haven’t been able to make working config with boblight config maker It’s connecting and driving the white light test but after that it just stay white. I’ll been using some other confing maker can’t remember what something like boblightconfigmaker.jar
Jack
Once I get home, I’ll try +5V and GND at the end of the strip as well; the end of my strip is also more yellow when it is supposed to be white. I’m curious why Boblight Config Maker didn’t work – I’m creating a new version at the moment. Given your config, I’ll give it a try and see if I can make it generate one that works for your setup.
hans
Yeah . let’s try with that :) .So you are going to make config file and send it to me ? I soldered +5volts on end , now light flickering stopped and white is pure white:) but still that one leds stays blue :S
Jack
I’m still working hard on a v2 for Boblight Config Maker. I’ll have it generate a config file, and will see if it matches your config file. For one, to see why the current config of BCM would fail …
I’ll let you know once I get to that point, since I’m rewriting BCM from scratch.
+5V: Awesome, I’ll test that with my setup as well!
Can you find the hscan and vscan for that annoying blue LED?
Maybe there is something wrong with it’s “location”, or we could toy with it, to see if making it wider (without changing other LEDs) will make a difference.
hans
New information about the problem. So those “blue” leds aren’t the last leds they are 3 and 4th last , and third one is light blue/greenish and fourth is white/blue. Only thing that i can think of is that those leds some reason don’t get (data in) command to turn. So => problem could be on configfile.. but ..
First i tested leds with strand test and they work as it supposed. But still when i start boblight deamon it starts running white light “test” and open up and those 3,4th leds go on and stay on all the time. Until i upload new sketch or take power cord out. Here’s link to picture
So i decided to change those “broken leds” replace last 6 leds and still same problem. I even tried to change
vscan/hscan it did’t make any difference
Jack
One thing that I wonder is. If i have understand correctly 1 led is 3 channels RGB , so 10 leds have 30 channels and so on. But i am using 359 leds so i should have 1377 channels. Why boblight config file it says 1365 channels? maybe configmaker.jar has some promblems counting led, cos i have entered right number of leds…
Jack
Hi Jack,
You’re right,…
# of channels = 3 x # of LEDs
so in your case 3 * 359 = 1077.
Or do you have 459 LEDs? (typo?)
hans
Typo , 459 is right amout
Jack
Maybe Boblight can handle only 455 LEDs (ie. 1365 channels)?
I doubt this would be the case, but 1365 is definitely wrong for 459 LEDs.
I’ve looked around and could not see such a limitation (let alone that 455 would be a “weird” number for that) …
hans
OK, took a better look at your boblight.conf.
The config file you posted, says:
LEFT: 83
TOP: 145
RIGHT: 82
BOTTOM RIGHT: 45
BOTTOM CENTER: 49 (not real LEDs!)
BOTTOM LEFT: 50
So that would not match the picture you’ve posted.
The config file suggest 405 LEDs (or 1215 channels).
Also note that the bottom center LEDs are not real LEDs, just fake place holders.
If this would not be the case, and they are real LEDs, then your count is 455 (or 1356 channels).
The “center” strip at the bottom is only intended to keep some space for the TV foot.
If you have LEDs at the bottom, for the full width of the TV (as it’s hanging on the wall), then you’d only need 1 of the “bottom” parts, for example BottomLeft = 144, BottomCenter = 0 , BottomRight = 0.
All this of course according to the conf file you posted.
Maybe we should do a re-count for all the LEDs, to see what’s really there …?
hans
I must have mistakenly sent you the wrong config file . I did the many test with different settings and variations. But i going to count leds again and then get back to you.
Jack
I’m still getting 359 leds. So decided to test yout config maker again . Here’s setting pic. So channel number looks great :) changing settings on the arduino sketch and double checking baudrate and prefix , so they are okey. Next upload to arduino works nicely , after uploding leds turns white one by one as usually. Starting deamon no problems everything working as it suppose. But when i start Kodi nothing happens (expect leds all burn white still) RGB light’s did’t flash on start up. When i start watching movie white stays white, and even with bobdroid i can’t change color of leds
Jack
typo again :D 84+146+83+146=459leds
Jack
Haha, yeah counting can be a pain …
(same for me)
And the generated config from BCM does NOT work, right?
Can you send me the working and not working config?
Right now I’m not seeing anything unusual.
hans
it sure is Here is link to working and not working config i included skecth also. Happy hunting
Jack
Today is a busy day – I’ll see if I can make time to look at it though!
hans
So communication seems to work … but they stay light blue. Weird.
Does this happen with the demo video as well?
Did you experiment with the depth of a LED (ie. increased hscan or vscan – depending on where the LED is located).
For example
to
I’ll admit that I’m guessing now as well … the LEDs do work with the color swirl, so I assume it can make red, green and blue.
hans
yeah i can make red,green and blue.. but some reason it’s stuck on blue.. I was wondering would it help if i solder +5v input to the end side as well
Jack
You have a lot of LEDs, so soldering +5V and GND to the ends as well will probably not hurt. I’ve seen suggestions like that elsewhere (might have been on AdaFruit).
hans
Hi,
thank you for the oppurtinity to have boblight on my TV. But I have some problems with it and I do not know what to do next…
I am using openelec on my raspberry B 2
I have neopixel strand from Adafruit connected to Arduino Mega
The initial white(or any other color which I set up in sketch) will light
The RX LED on Arduino is glowing, so I assume the output device in config file is correct
I have checked, that the prefix in config file and in sketch is the same
I have tried several baudrates from 9600 to 460800
I can see the “boblight connected” message
But when I play the video, the LEDs are still white…
Do you know where could be the problem?
owar
Here is settings from the Arduino sketch:
And here is my config file:
And here is service.log:
owar
Hi Owar,
First thing, your brightness is rather low (only 10%), but I guess it works since the start swirl is visible.
Not sure how that affects less bright colors though …
Boblight Connected is a good thing (always make sure that prefix and baudrate match in config file and Ardiuno Sketch).
The XBMC/Kodi Boblight plugin has brightness settings as well – check those out. The plugin for OpenElec also allows a LED color when there is no video playing – you could use that for testing.
I hope this is helpful …
…
hans
I cut down the brightness just because when I was teting it at night it was killing my eyes :D I set the “menu color” to something blueish and that does not help me too… I will try it with Arduino Uno as somebody said, it does not work on another type, but that is just a shot into darkness :D
owar
Oh gee, I totally overlooked that you’re using an Arduino Mega … but I’m not sure that would the problem, since the init swirl worked and Boblight confirmed that it connected … hmm,… let me know what you find out – I’m curious!
hans
So, I have to confirm, that on Arduino Uno it works just fine and on Mega it does not work at all.. I do not know why, but I am happy that it works! :D
owar
Awesome …!
Then we’d have to find out why the Mega refuses to cooperate …
hans
It could be the USB driver…my UNO is rev 1 and Mega rev3 which both have differnet USB chips..
owar
Interesting … good to know this might be an issue.
I have a few Mega’s laying around …
hans
Apologies if this question has already been answered (I didn’t see it anywhere) but when it is said that software requires an LED light in each corner, is that for the purposes of calculating luminosity of pixels, or for resolution purposes, or what, and is there a way around it? I ask because I was intending on using a strip of LEDs for each side of the TV, and then using a solderless connector at each corner. The LEDs I intend using are 5050 10mm, which I assume would be OK? Thanks – great article (and very helpful diagrams)
David Counter
Hi David!
Thanks for the compliment!
As for your question: I’m not 100% sure what you mean?
LEDs can be positioned anywhere, even if you’d use only one or two LEDs.
So a strip Left and one Right would work just fine.
It’s just a matter of setting the config file properly. Boblight Config Maker v1.4 supports this.
Is that what you meant?
hans
I think your answer cleared things up – re-reading my question, it was worded really badly! :(
What would you recommend regarding the strip of LEDs? From what I have read, 5050 10mm would be OK, but I could well be wrong, and I want to make sure I source the parts correctly before beginning the project
Thanks again
David
David Counter
Don’t worry about the wording – it happens …
…
However, this is just the LED. You’d need to choose the right strand type.
The WS2801 could work as well, however controlling them works differently. So you’ll have to watch that part.
I recommend to just spend the few extra $ and get the real deal (white back, and has “made in Italy” on it) – it might save you a lot of headaches.
hans
Thanks –
You’ve been really helpful. One last question – I know there are 4 pin solderless connectors out there, but I’ve not seen any 3 pin. I recently broke my right wrist and I don’t really want to tackle any soldering left-handed. Do you know if the necessary connectors are available in 3 pin versions? Also (OK, so that wasn’t the last question, but this one is), would you recommend 30 LED strips or 60 LED strips for a 55″ TV? I tend to think that when people say they prefer 30 LED strips, and that 60 LED strips spoil the effect, it is because their LEDs are too close to the edge of the screen…
Many thanks
David
David Counter
Hi David!
You’re most welcome …
…
Connectors:
The 3 pin connectors I use are called “3-pin JST SM connectors” (eBay link), those are the ones that were connected to the strands I bought and they do the job just fine.
LEDs/meter:
Well, I think 30/m would be sufficient, but if you’re in a room with a lot of light or light sources, you could consider 60/m. If they turn out to be too bright, then you can still turn down brightness (defined in the Arduino sketch). I’ve been very satisfied with 30/m so far.
Hope this is helpful …
…
hans
Hi Hans! Your posts were fantastic! But after making Boblight setup I noticed that the lag is almost 1000ms even though I am using Raspberry Pi 2. Also I had many problems setting up serial port parameters (115200 was maximum). Then I decided to setup Hyperion, also using OpenElec, and it was very good decision because it works fantastic (no lag at all!) and you can use your phone as remote.
There were many traps but your posts and config utility were helpful (I included links to them) so I made online guide for Raspberry Pi2, Hyperion on OpenElec : http://ai.rs/reviews/rgb-delight-raspberry-pi2-arduino-nano-ws2812b-using-hyperion-on-openelec/
PS now remains to setup ambilight for Netflix (using DNS) for external player (apple tv in my case)
Marini
Thanks Marini!
Just looked at your guide, and that one looks pretty extensive, well done!
Thank you for sharing the link!
I am planning on writing an article using Hyperion as well, possible one with EnigmaLight. But first I want to finish a new version of Boblight Config Maker (add features, and support EnigmaLight, LightPack, Ambioder, and Hyperion). After that: Hyperion!!
Mostly because I have a Raspberry Pi 2 and … I have a HDMI splitter that (by accident?) strips HDCP … the idea being to split the HDMI feed to my TV and grab video on the 2nd splitter output so Ambient Lighting works on all video sources.
I’ll try LightBerry with that.
And Netflix and Amazon through DNS still works like a charm!
hans
This is a nice guide.
Im running a bit different system. using ws2801 leds with audrino and htpc (asrock ION 330) with openelec. i had to fiddle some with the audrino program to get it working (using Hans guide). Im pretty pleased with my result. only the endless color/light tweaking in boblight is getting on my nerves :-D
My question is.
Is it any different installing it to openelec on a different platform than raspberry. does it work fine just run the scripts and make the hypercon setup etc?
Martin
Hi Martin,
I’m not sure what you mean with “the script” – do you mean the Arduino sketch.
This article is written with an x86 HTPC in mind (ie. a “regular” PC).
It should work on Raspberry Pi and Android devices as well – although for those I’d recommend using Hyperion instead of Boblight.
As for the sketch;
For WS2801’s (untested) you might need to adapt line 34 … if NeoPixel even supports WS2801 LED strips.
For other systems, you’ll only need to make sure you do the proper device settings in the boblight.conf file, where baudrate and prefix should match the values used in the Arduino sketch.
Does this answer your question?
hans
Hi
Sorry i made that unclear. i was refering to Marinis guide. Of installing Hyperion, but that guide was for a raspberry. “installguide“
My question was will the repository files (scripts?) work on an x86 system. (like my htpc)
I do not use NeoPixel on my arduino. I use Adalights LEDstream. that one worked fine with the ws2801 together with boblight, on a openelec system. But i want to see if Hyperion performs better =)
Cheers
Martin
First ws2801 and ws2812 are totally different. Your diodes use 4 pins and different way of communication.
Second, I do not know whether install_hyperion.sh script will work on non openelec OS (hardware is there less problem, OS and installed binaries / libraries could make problem if they are missing). Why don’t you just try?
Marini
Hyperion is really much better and it would be easier for you to write Config Maker update if you can test it properly
or just mail me if you need beta testing
I read about your splitter, and planing but I am planing to order EasyCap HDMI grabber… what do you think about that?
I do not yet know for sure if Hyperion can support external video source (grabber) but it looks like it is possible?
Ha! you managed to setup DNS for Netflix?
Marini
I’m hearing very good things of Hyperion – so I will go test that for sure! )
)
(I’m still traveling, so I don’t have my 80″ TV with my Boblight setup with me, for testing
I looked at the HDMI grabber briefly, but I’m not sure it handles HDCP (hence the splitter), and I’m not sure if there is support for it, in for example OpenElec? I have the stuff for LightBerry ready. It uses a HDMI splitter, a HDMI->Composite converter and a Composite->USB grabber. I did play an Elgato Game Capture HD, a very good HDMI grabber. But no support for it in OpenElec. No Linux support, period.
I’m wondering how “low” the resolution for the HDMI grabbing can go with the grabber you’re thinking of.
I’m not sure one would really need 1080p as it will come with a load of data to process.
I can imagine that a lower resolution might be quicker in proecssing, and offer just as good an end result, but I’m not sure if EasyCap HDMI can do this?
However, straight HDMI to USB would most certainly be “cleaner” …
I’m very curious now …
Well, I’ll admit, I’ve been lazy and I’m still using UnoTelly …
hans
I will research HMDI grabber
If you have static IP I can add it to my server and save you some money for LEDs
Marini
I’m curious about the HDMI grabber!

I wished the Elgato would do the trick … works super fast and smooth – I’m actually impressed how well that thing works. Just no Linux support …
And as soon as I’m home again, I’ll take you up on the DNS …
…
hans
This Hyperion thing has a great guide here: GreatScott
i ordered the easycap, but got a wrong one “easiercap” witch has a different chipset, i now ordered 2more and one of them was the “easycap” but i have not tried to setup my build again after that.
Martin
Martin, that is composite grabber? not hdmi?
Marini
I am thinking about EzCap 280 or EzCap 282 but yet do not know will they will work on linux/raspberry and what about HDCP… Any idea?
Marini
Ooh, that one looks nice.
In the video he is using a hdmi2av converter, and a hdmi splitter before that. a lot of electronics, but it seems to work fine.
I would love to have a single device such the one above to do the work.
Martin
If I recall correctly, LightBerry offers a all-in-one device (HDMI splitter, HDMI2AV Convert and USB Grabber in one device). But I doubt it will handle HDCP …
hans
Thans for the link!
I was recommended the “UTV007 Fushicai grabber” by the owner of LightBerry.eu.
OpenElec appears to support this one natively.
Some additional info links:
OpenELEC does support Utv007 grabber (so called Fushicai) already, but the chip is no longer available on the market and even Fushicai factory is producing now only stk1160 and it looks like it’s gonna stay like this for a while.
hans
Hi!
First of all thank you for the guide, it has been really helpful. Before I’m going to buy anything I want to be sure I understand everything. So I have a few questions. First of all how do you connect you DC adapter. Looking at your picture you would connect it directly to the strip and the Arduino? Second what are the green-red-blue connector cables called you use between the stands. And finally how big is the difference in detail between 60 leds/m and 30led/m
Thank you in advance!
Dennis
Hi Dennis!
No problem … better ask than ending up with the wrong stuff …
…
The DC adapter is connected to the LED strip (+5 and GND) and the Arduino (only GND) – see figure 14.
The connectors is called “3-pin JST SM connectors” (eBay link).
Theoretically the 60 LEDs/m should offer more detail, but practically I think it will only add more brightness.
The detail would fade since the colors mix on the wall behind your TV.
The brightness increase might be useful in rooms where you have multiple or bright light sources.
I used 30 LEDs/meter
Hope this helps get you started.
hans
Hi Hans!
Thank you for the fast and clear answer!
I just ordered the 3-pin JST SM connectors you linked me to and the led strip (http://www.aliexpress.com/item/5M-30Pixel-M-150-5050-RGB-SMD-WS2811-IC-Built-in-WS2812B-WS2812-white-PCB-Addressable/1998194636.html).
There is still something I don’t understand. How do you connect the +5 and the GND to the strip. Can you just plug the DC adapter into the JST SM connector or do I need to fabricate something myself like in figure 20?
I hope my question aren’t that obvious. This is the first time I’m building something myself.
Thanks again!
Dennis
Hi Dennis … You’re welcome …
…
I used Screw Terminals (second picture on the right on this Wiki page) – meaning: I have cut the 2 wires (for GND and +5V) from the leads that come from the strip and placed a screw terminal in between so that I can connect the GND of the power supply and the Arduino, and the +5V of the power supply, to the LED strip without needing to solder anything.
Feel free to ask if I didn’t explain that too clear … (absolutely no pun intended – I’m just re-reading y response and I’m not sure if I explained it clear).
hans
hello
is there a way to control on witch addons the leds work on ?
I want that the led will only work on movies, I disable on the boblight setting all the options but the movies, but still some addons starts the leds.
tzahi
Hmm, interesting. The OpenElec Boblight plugin should allow you to disable the LEDs for pretty much everything.
Could it be that the other plugins use video as well and therefor cause the plugin to see it as such?
For example, the plugin Genesis (streaming video) would probably activate the LEDs as well … which is what I’d expect it to do.
Which plugins activate the LEDs in your case?
hans
when I play a series from gensis it dosen’t active the leds because I disable this serias on boblight settings, somthing wird is when I add seirias to library on gensis it does activate the leds.
the leds also play on kids addon that I have install and dont want them to activate the leds.
tzahi
Interesting … and a little weird yes …
…
So TV series in the Library are marked series or maybe (internally) as movies?
Are you using the official XBMC Boblight add-on or the OpenElec version? I’m not even sure if there are differences between the 2 – but it might be worthwhile asking your question in the OpenElec or XBMC/Lodi forums …? (I’d start at the XBMC/Kodi link)
It seems to me that making the distinction between series and movies appears problematic for the plugin – either because video/plugins are not assigned the correct “type” or because the plugin can’t see where it comes from in some way …? I unfortunately do not have access to my hardware at the moment (traveling) to test any of this – maybe other users have similar experiences?
hans
hi,my pixels wired are GBR,how can i change that?i try to change this line Adafruit_NeoPixel strip = Adafruit_NeoPixel(LEDCOUNT, DATAPIN, NEO_BGR + NEO_KHZ800); in t4a_boblight but i get error compilling (error NEO_BGR was not declared in this scope)
leo06
Hi Leo06 …
If I see things right in the NeoPixel code, then NEO_RGB, NEO_GRB and NEO_BRG should be supported. The .h include confirms this in line 32 of the code. Maybe your NeoPixel library is incomplete, corrupt or outdated? (check the Adafruit_NeoPixel.h file)
Oh and the value for NEO_BRG seems to be “4”, maybe if you type that instead of NEO_BRG?
Or did you mean GBR (which I didn’t find)?
hans
i have this http://www.ebay.com/itm/261726366207?_trksid=p2059210.m2749.l2649&var=560596601979&ssPageName=STRK%3AMEBIDX%3AIT and is BGR
leo06
OK, then this would not be supported by the color calculation function.
Assuming the schematics in the ad are the correct way of reading then you’d indeed be working with BGR, which seems a little odd to me, but that could be because I simply never saw these before.
You could try changing the bytes in line 97:
to
I did not test this … just something I’d try without too much thinking … and use NEO_RGB.
hans
thanks,i use 2 0 1 instead of 2 1 0 and works
leo06
Awesome!
hans
i have another problem https://www.dropbox.com/s/yf7og3l8pq1vok1/20150405_164539.jpg?dl=0 do you know where is the problem?i use boblight config maker
Image of the DropBox link:
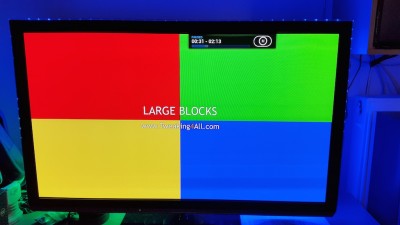
leo06
Leo, it looks like your grabber is not working (if you are using hyperion) or that for boblight you have not enabled boblight xbc plugin or have not activated boblight for that type (e.g. video)…
Marini
i use boblight,boblightd and xbmc boblight is enabled,in xbmc boblight is all enabled video,movies,tv shows,live tv
leo06
Leo06, Do I see this right:
with the 4 blocks of the video demo, every LED is blue, except behind the yellow block where it’s green?
Is that what you mean?
hans
yes
leo06
Have you tried setting 500.000 bps in config and in sketch like I discovered and suggested on my Hyperion tutorial http://ai.rs/reviews/rgb-delight-raspberry-pi2-arduino-nano-ws2812b-using-hyperion-on-openelec/
erratic blinking could be a simptom of bad serial connection (e.g. dropping data)
Marini
i try and 500.000 with same result
leo06
How did you test if
was the correct way to do it? (just making sure this trick didn’t screw up things – I have no means to test)
hans
I test it with the video,the first 3 pictures red,green,blue and it was correct
leo06
Excellent – that sounds like a good test to me – so I assume our little trick didn’t cause this.
(I hope you don’t mind I’ve added your picture to your post for future reference)
Maybe there is an issue with your config file – could you sent it to me?
(I prefer to keep the discussion here, but feel free to reply to the notification email with the config attached)
hans
no problem with the picture
https://www.dropbox.com/s/ne441incsmtqydq/boblight.conf?dl=0
leo06
Thanks ….
….
Well, I’ve looked through the config and can’t find any reason why you’d see this effect. Bummer. I really hoped to see something odd there …
One thing I would start with is lowing the baudrate to say 115200 (in the config and the sketch), just to eliminate this could contribute to this effect. I have seen systems work great at this speed, but some (mostly Windows machines) fail miserably at speeds above 115200.
hans
i use openelec,i will try and 115200 tomorow,thanks for reply
leo06
I try 115200 and nothing
leo06
Bummer …
It’s really weird that the initial colors work well, but with the blocks it seems to go nuts.
I honestly have no idea why this would happen.
Led strands seem OK (colors worked), baudrate isn’t the issue, power supply seems OK (initial colors), config seems OK,… and you’re sure those are WS2811 or WS2812’s right, not some exotic model.
Did you do the strand tests? (see the “Arduino – Controlling a WS2812 LED strand with NeoPixel or FastLED article“)
hans
yes it is WS2811,i will try and strand test
leo06
Are you sure that communication with arudino is ok? Check boblight logs? Try to change baud rate?
Marini
I change baud rate,where boblight logs is stored?
leo06
when i run strandtest https://www.dropbox.com/s/fbghe3sqxdejdd6/20150406_133058.mp4?dl=0
leo06
That’s pretty erratic flickering of the LEDs.
Since the strandtest is causing issues as well, I doubt you’ll have to look at Boblight very much. I’d have to guess that this indeed is a communication issue of some sorts.
Can you try (I know it sounds “stupid”) a very low baudrate, for example 9600. My strand actually works pretty good at 9600.
Can you see (when looking directly at the LEDs on the back) if this behavior starts at a particular LED – maybe you’re dealing with a malfunctioning LED that is not passing the data correctly.
When I had issues with a strand, I simply shorted Din and Dout of a LED that I suspected that could be causing the problem.
If you have several “pieces” of LED strands, test them individually and/or try changing the order of strands, in a test setup, to make sure it’s not the first LED or strand.
I would do these test with the strand tests, to keep things simply while testing. Can you record a video when seeing the LEDs directly (ie from the back of your TV)?
hans
i try 9600 to but same result,i think is hardware problem to,the led strip or even the arduino (is not original arduino uno)the led strip is one 3m 90 leds piece
leo06
Bummer that it’s one piece … (nicer for building though)
Can you access the pins of the individual LEDs? (the soldering pads between LEDs)
Some strips are casted into silicone, or are in a plastic housing, making it harder to reach those pads.
If you can reach the pads without destroying the strand, then try connecting the wire that comes from the Arduino to the Din pin of a different LED. For example, the 2nd one, test the strand, and if it fails, go to the next strand.
Or … and this is harder I guess: see if you can get your hands on a different strand of LEDs or a different Arduino.
Clone Arduino’s typically function just fine. So I’d suspect issues with the strand.
hans
it is waterproof,so i can’t access but i order another 1m 60 leds ws2812b just for testing
leo06
Sorry to hear that you’ll have to spend more money on parts …
Are you getting the strand from another supplier? Just to make sure you get a “real” WS2811/WS2812?
Or how about returning the strand?
hans
yes this one http://www.ebay.com/itm/181684019869?_trksid=p2059210.m2749.l2649&ssPageName=STRK%3AMEBIDX%3AIT
with what excuse to return?the strand is working,not like i want but is working
leo06
Good point … and even if it was broken, you’ll always have to hope that the seller is co-operative.
I can’t find the ones I bought, but the seller is noolec, and I think this listing is the same as the one I have:
5m 60 LED/m RGB LED Light Strip 5V WS2811 (WS2801) Waterproof Addressable Color
I had 2 LEDs that failed.
hans
update,i send a message to seller and he told me that 1 ws2811 controller is for 3 leds,so it can’t control each led individual
leo06
I’m just starting a new block here, the other list of comments is getting a bit long …
…
I’m not sure what the seller is talking about …
A “LED” on a WS2811 or WS2812 strand is in reality a “module” with a tiny controller chip and individual 3 LEDs (one for each color – red, green and blue). There for each “module” controls only 3 LEDs, if they mean to mention each individual LED in the module.
Each module has +5V and GND and a Din (Data IN) and a Dout (Data OUT which goes to the next “module”).
I think that’s what he means. Which means that the strand should function just like any other strand.
Data is sent to Din of the first LED, which reads the first data chunk and then passes the remaining data on (over Dout) to the next module which repeats this step and passes the remaining data on to the next module, etc etc.
I know … confusing because of the word LED that’s being used to indicate the individual LEDs in the module, and commonly also used to indicate the entire module (the white blocks on the strand). Maybe reading the beginning of this article explains it a little better.
hans
no,its 1 chip for 3 leds (ws2811 not 2812) https://www.dropbox.com/s/mt6oeuy9azc53ju/20150407_182656.jpg?dl=0
leo06
You’re right!
The WS2811 has a separate chip per 3 LEDs – so chip + 3 LEDs in a module.
The WS2812 has the chip integrated in the module, but in the end works the same – just a module with all in it.
But what was the point the seller was trying to make?
hans
can control 1 chip 3 leds individual?i mean led1 green,led2 red,led3 blue.another thing can i power them up from a molex conector?red +5v and black ground?
leo06
Yes you can “control” them individually, but only by sending the right data to the chip for those LEDs. I guess you technically could skip the chip and connect directly to the LED module. It most likely has one common pin and 3 pins (one for each LED). To control one LED in the module, you’d use the common one and the additional one. But you’d have to be careful how you connect and not blow up the LED.
Trying to control them like that is kind-a cumbersome and I’m not sure why one would want to do that.
I found that when I connect +5V and GND only (to the strand) that the LEDs might light up. Even if it’s just briefly. But I’m not sure it’s a good test for anything.
Since your stands are casted in silicone, maybe you can try pushing a pin through the silicon.
The idea being: connect everything as usual. With the exception of the Din wire (that comes from the Arduino Pin 13). Now push the metal pin through the silicon so it touches the “Din” pin of the pads. This way you can bypass the first LED, then the 2nd and so on. See what happens. Or better said: when the strand starts acting normal.
You could also bypass one LED at a time this way. If you manage to short Din and Dout of a given LED and see when things work normal. I guess the key is to get through the silicon.
hans
IS WORKING,the led strand has 90 leds but only 30 chips,so in the sketch i put 30 leds not 90 and it works
leo06
Oh man!! That’s Awesome!!!
hans
and it makes sense,each 1 chip (3leds) is acting like one
leo06
Indeed – that’s why the config files talks about channels rather than LEDs. Number of Channels = 3 x number of “LEDs” (modules) ….
I’m happy to hear that you’ve finally got it to work!
hans
is there any setting for the black bars?all my movies is 1920×1080 and most of them have black bars top and bottom
leo06
Just go in Boblight Config (great app! ) for LED Block Depth (size) Rows 10% instead of 5%. Similar setting is available in Hyperion
Marini
thanks,it worked with 15%
leo06
good to hear that
Marini
hans
Hi Hans,
It works perfectly!! But I have small problem, the first led is always flashing in green, even when the others led are off. What would be the problem?
Thanks!!
Ivn
Hi Ivn!
It could be that the first LED is faulty (since red and blue do not seem to light up). It’s just a guess of course.
You could try to by-pass the first LED and see if the 2nd LED shows the same issue. If it does then the 1st LED was not faulty. If it doesn’t then the first LED was faulty.
Bypassing can be done relatively easy which depends a little on the type of strand you have of course. In essence you’d like to connect the Din wire (disconnect it from LED1) to the Din of LED2. If you have one of those very nice strands, casted in silicone, then this might be a bit tricky, maybe you can poke a pin through the silicon and hold it there for test purposes.
Hope this helps …
hans
do a colorswirl or use the smartphone app to set all leds to specific colors.
i had one only flashing blue, and it would not show any other color than that =broken ^^
Martin
Hey
I still can’t disable the leds on diffrent addons.
I thought since I only want to use the led for movies from time to time maybe I turn it off till I want to use it.
what is the simle way to turn off the boblight without need to upload a new sketch evreytime, and without changing any config I made.
should I add an on/off button somewhere ?
or should I disable it from the kodi ?
tzahi
I’m sorry to hear that you’re still stuck with the same problem …
Option 1 (probably only Linux)
I found this forum post at KodiNerds.net: Boblight Addon per keymap aktivieren deaktivieren (it’s in German for “Boblight Addon Activate and Deactivate by keymap). It says it starts/stops Boblight with your remote by doing a keymap.
First they assign a script to a button on your remote by adapting the keymap (see also Kodi Wiki):
Next they create a little Python script that starts/stops Boblight.
That last file is saved (in this example) as boblight.toggle.py in the directory /storage/.kodi/userdata/addon_data/service.multimedia.boblightd/.
It is said to be cross platform but I kind-a doubt that (seeing that “systemctl” does not exist in either MacOS X or Windows).
Option 2 (Probably only Linux and MacOS X)
For other platforms you could create a script to start and to stop Boblight and assign each function to an individual remote button. I have to admit that I do not know how that would work under Windows.
One script could do something like this (this would work under Linux and MacOS X – no idea how to do that under Windows):
And the other one could be something like this:
Here you’d have to enter the correct Boblight path and path to the config file of course.
Option 3 (Only when you have an Android phone)
Use Bobdroid on your phone to enable/disable Boblight. See Android – Bobdroid in the Kodi forum.
Option 4 (OpenElec)
You could use the script presented in the OpenElec forum to enable/disable Boblight with your remote.
Option 5 (Based on KarateLight but works with Boblight)
You could look at the scripts this post on the Kodi forum mentions: KARATELIGHT with boblight and XBMC.
(don’t get confused with the KarateLight phrase, read the last part of the first post)
You could also snoop the Official Boblight Thread at the Kodi forum, I noticed that some guys are discussing this option there as well.
Hope this proves helpful – please let us know if you find something that worked for you …
hans
I did find an App for iOS as well, but I’m not sure if it allows enable/disable Boblight:
https://itunes.apple.com/app/boblight/id709737895?mt=8&ign-mpt=uo%3D4
hans
thanks for the detailed answare.
to disable the leds from kodi do I need to disable “XBMC Boblight” or “boblightd” or both ?
tzahi
Disabling boblightd would be the way I’d try first.
It seems that other kill the deamon as well.
Let us know how you’ve done it …
hans
what you mean “kill the deamons” ?
by disable boblightd I won’t need to upload the sketch again, right ?
tzahi
Hi Tzahi!
Correct! Stopping or killing the boblight process does not require to reload the sketch.
hans
Greetings…I am running an RPi2/OpenElec Kodi system and am looking for the latest April 2015 tutorial for adding Ambi Lights/RGB’s/LightBerry or what ever the current name is. I am looking for something that uses RGB strips as I have worked with them before and my 72 nova dash and interior lights are all RGB’s on a remote control. I have seen lots of tutorials out there but with some of the rapidly changing technology, I am sure some are better/simpler than others Any advise would be greatly appreciated…Regards.
RStephen
Hi Stephen,
this tutorial is mainly aimed at OpenElec on a PC/HTPC, so not a Raspberry Pi or Android device.
Some users here however do use RPI/OpenElec and seem to be successful with using Hyperion instead of Boblight. I do plan writing a guide for that in the near future.
Marini did write a very good guide on this though, so you might want to take a look at that one.
hans
Thank you for your reply…
Where can I find Marini’s guide?
Regards,
RStephen
The words “very good guide” in my reply is a link …
…
hans
Good morning,
First
I want to apologize for my English, because I am using a translator to not
master the language.
I
often want to thank you for the guide, is the only one I’ve found across the
network to operate this type of leeds, as all others rely on the strips 2801.
Although I can not get me work.
You see, my OS is
Windows 7 64 bit. The
strips are of 2812 (96 leeds, 16 vertical and 31 horizontal), my Arduino is
mega (connected to com 8) and want to use with Kodi. To
find your guide not even getting the Arduino board lit than the first led the
entire strip.
Once
your sketch loaded, I get that all the LEDs illuminate me strip. Even
changing the color start putting sketch, the LEDs are lit with the color you
get. Therefore,
I understand that there is communication between the Arduino board and the
strip of LEDs. A stride I got
to thank you.
And here come the problems. Then
install the boblight in C and XBMC addon Boblight in Kodi. I
think the boblight configuration file and place it in its appropriate folder. But
once executed Kodi, leeds turn solid color home and change. Neither
the menus Kodi, or playing a movie.
Both
the sketch, as in the config boblight, change the values you had for which I
have as number of LEDs, clockwise; I put on output device / dev /
arduino; in type I put momo; the
baudrate left it on the same principle but then I’ve been changing it and has
not worked for me; the
prefix’ve left that came in your sketch (41 64 61 00 18 4D) ….
You
see that’s guide to OpenELEC, there is a problem because I’m running under
Windows? You
could try instead Ambibox boolight? Would
be very grateful if you could lend me the slightest help, for I am totally
blocked.
Thank you. A greeting !!!!
pekindi
Hi Pekini!
Thank you for your kind words – you’re right; the translator makes a little bit of a mess of it , but I think I understand what you’re saying.
Maybe your Boblight is not communicating with the Arduino.
The baudrate should be the same in sketch and the Boblight config file (which wasn’t clear from your comment).
I understand that the prefix already are identical in both files.
Next step is to check the xbmc.log – if you found yours, then please post it through http://pastebin.com/.
I do not use Boblight under Windows, but it seems the log file can be found here:
or here:
(Windows users that read this: can anyone confirm this?)
With one user I have noticed that the config files used a comma as a decimal separator – and Boblight didn’t like that. It should be a period in certain cases. But the log file would tell us.
Hope this helps you get started debugging .
.
hans
Hans thank you very much, for so prompt reply and for
your cooperation.
Indeed the baudrate
is the same in both the sketch and in the configuration
file boblight, and port properties (115200).
Likewise, the prefix is identical in both (0x41, 0x64, 0x61, 0x00,
0x18, 0x4D).
As for what he says of the decimal point … If I put the config
Boblight comma as decimal separator, to
jump start me
error Kodi failure
in connection with Boblight.
If I put the point as decimal separator,
to start Kodi
says “connected to boblight“.
I step kodi.log,
as you asked me: http://pastebin.com/NbipNati
Thank you very much again. Greetings !!!!
Pekindi
Hi Pekindi,
I do not consider myself an expert on the log files, but I do not seen anything exceptional – that’s a pitty …
…
Seems you should use the decimal point .. so that’s OK too.
The guide was written with OpenElec on a x86, and the plugin for XBMC/Kodi will of course not be the one for OpenElec, rather the “original” one. But it seems that’s what you have done.
Did you check the plugin settings (in Kodi)? Just to make sure boblight is ON for movies and TV shows?
(I’m guessing now as well, since everything seems fine)
hans
Hello Hans!
Yes, the Boblight Kodi configuration is correct, with the parameters indicabas you in this guide, and indeed is ON for both movies and series. The fact is that the LEDs are in the same color they had before opening Kodi, and so still, and I move through menus, and put movies or series.
Thank you very much again.
Greetings!
pekindi
Hi Pekindi,
Could you post you boblight.config and arduino sketch in PasteBin as well please?
I might have to take a look at that.
hans
Hi Hans,
thank you very
much for continuing there and try to find the solution.
You step what you
ask me. Arduino sketch first. It’s like yours but modifying what I said in my
first post.
http://pastebin.com/f9b2pwzk
And now the config
file Boblight.
http://pastebin.com/inwpbCHA
I hope to find the
solution ….
Greetings!
Pekindi
Well, I’ve look at the Sketch and your config.
They both look correct.
The log does say that the Boblight plugin is started, but I do not see any other confirmation that it get’s connected.
You could try (I’ve never done this – just found it somewhere online):
Which should show something like this (or in the log file in the boblight directory? – Sorry I have never used Boblight under Windows):
In the XBMC/Kodi log I’d expect to see something like this as well …
I apologize for not being able to verify this myself – I’m traveling so I do not have my gear nearby.
This make me suspect that either the connection from CBMV/Kodi -> Boblight is not working properly, or that Boblight can’t connect to the Arduino.
If you’re not using an Arduino Uno, please verify that you’re using the right pins.
hans
Hi Hans,
I do not quite understand what you say you try to cd c: \ boblight, boblighthd … try to find when I get home and can tinker with the team.
I guess with you indicate that I might know if boblight are connecting with Arduino …
The lines you sent me, there are two, which I think should change, not out of where you are these:
(CClientsHandler :: Process) opening listening socket on 127.0.0.1:19333
(CDevice :: Process) ambilight: starting with output “/ dev / ttyACM0”
The first of these lines do not have to change it if, as it seems that refers to an IP address or port, and if I have to, do not really know where to get the correct information from my computer.
In the second case if you have to change it, because in my Boblight config is set as device / dev / Arduino.
As for what he says to me the type of plate … I am using an Arduino Mega, but I connected the pins as you say in your guide, on pin 13 and GND.
Thank you very much, again.
A greeting!
pekindi
Hi Pedinki,
the “/ dev / ttyACM0” was just an example output.
I think under windows it’s common to use “/dev/com1” or which ever com port you’re using of course.
I have no experience with the MEGA, but I recall reading somewhere that the for one or the other Arduino model might be different.
hans
Hi Hans,
about the line
(CClientsHandler :: Process) opening listening socket on 127.0.0.1:19333
That address or port also have to change it? Where would you get that information?
Greetings!
pekindi
Hi Pekindi,
this information should be in the Boblight log file.
I suspect it’s located in the C:\boblight directory (where you have Boblight installed).
It could also be in the XBMC/Kodi log. See for example this comment.
The IP address and IP Port number are only examples, but typically it would say 127.0.0.1 (localhost a.k.a. you computer that’s running Bobolight and Kodi/XBMC).
hans
Hi Hans,
I keep
tinkering to see if I can make this work before it gains me discouragement.
You see,
I’ve tried to change the output port, switch between comma and decimal point
… Nothing works, still not changing the LEDs with no film.
The last
thing I tried was to run the daemon boblight directly from the MS-DOS screen
…. So I could see that there were times that the daemon is not running
because it gave errors.
At the end
I saw that the only way to run boblight is putting comma as decimal separator
and to discard the device output options.
Anyway, I
have not gotten it to work with Kodi. When I run Kodi I see on the screen of
MS-DOS that indeed the boblight is exchanging data with it. But LEDs do not
move. I see that if in the first line, after running MS-DOS boblight me an
error message, that while the program appears not stop, I wonder if there will
be the problem with Kodi. The line reads:
ERROR:
unable to make directory /home/Pekindi/.boblight/:
No such
file or directory
Another
thing to note is that, although the direction the config boblight and put in
shaping the addon in Kodi, who is 127.0.0.1:19333, booting Kodi in the MS-DOS
window with the boblight running the following appears:
<CClientsHandler
:: Process> opening listening socket on 127.0.0.1:19333
<CClientsHandler
:: Process> 127.0.0.1:52237 connected
<CClientsHandler
:: ParseMessage> 127.0.0.1:52237 Said hello
Do you see
anything unusual around here or I can do you guess where I have the problem?
Thank you
very much again and sorry for the mess.
Greetings !!!!!
Pekindi
Hi Pekindi,
I’m sorry to hear that things are not going the way you’d like.
The messages from Boblight look perfectly normal, so it seems that communication between Boblight and Arduino are fine.
We’ve already excluded config file issues, and Kodi errors. The sketch seems to work fine too (assuming the initial swipe of LEDs turning ON from beginning to end of the strands, worked fine).
If the swipe did NOT work fine: then I’d look at the PIN on the Arduino used to connect to the LEDs.
If the swipe did work fine: then I’d start looking for a cheap Arduino Uno and test it with that.
I hope this helps a little bit …
hans
Hans Hello again,
When I upload the code to the Arduino board, the LEDs all properly light, but do not go through a series of colors (red-green-blue), but light in color start that I put in the Arduino sketch ( blue).
Then I run boblight and the LEDs remain the same. Entering Kodi, the LEDs not make any movement.
If I turn off boblight, the LEDs turn off and on again in the same blue color.
I read that it may be that the mega arduino card is not enough to play freely these LED strips we use …. Thus, if that were the problem, with the Arduino one it would be worse.
Better would work replacing the system by a teensy arduino mega? Or directly buy a pull model leds WS2801? Any significant difference between the model and we use WS2801 us?
Thank you very much for your help, I am plunged into despair not get it to work the damn system ….
pekindi
Hi again Pekindi!
I’m sorry to hear that you’re still struggling with this.
The MEGA should be capable enough, however the pins will be different (as mentioned before, also by others in the comments).
As for the LEDs, the WS2811 or WS2812 will work very well. I highly doubt the LEDs are a problem in this case, as you mention that they do light up.
I suspect a config issue between Kodi <-> Boblight <-> Arduino.
hans
Hi Hans,
Thank you very much for answering.
The truth is it’s a little frustrating not knowing that
touching or to change to work.
I’ll gather some information to see if someone can lend a
hand before jumping out the window.
Reviewing communication between Arduino and LEDs. Well here
I tested now one of the libraries and example of Adafruit Neopixel LEDs do
perfectly well games. They are passed from one color to another, there are
effects, etc …
Then I try to load the sketch of yours Arudino, the
t4a_boblight. Well, here also I change the parameters of my own and I’m trying
to LEDs change the color start. When loading the sketch the LEDs light up in
that color I start I put him.
It therefore appears that communication between the LEDs and
Arduino is correct and the error would have to look good on the boblight or in
Kodi.
Anyway, there is something in the sketch have to change and
that differs from that you have because we are from different countries or
something? Type grb put in place rgb … No … Any clues?
The boblight not remember where I downloaded it. You could
spend a link from somewhere where I could get by if I have that wrong?
As for the addon Kodi, the next downloaded the program,
following the route that makes up services and there Boblight XBMC. By which I
guess is correct. Anyway you, in your guide you talk about two addons installed
in XBMC (XBMC boblightd and boblight). I guess the boblightd OpenELEC addon is
only because I run Windows in Kodi, I have not found any addon that boblightd
is called, only the xbmc boblight).
As I said in another post, the boblight running MS-DOS
screen seems to work (although the LEDs do not change color, are put in the
same home in the sketch). And I open kodi and tells me boblight is connected.
The configuration of the addon reviewed and, for example, active static color
screen and put the red cap, blue and green down the parameters to zero. With
this, by giving OK and launch the addon, I guess I should change the LEDs to
red, true color? Nothing, do not move. Continue with the blue color loaded at
the beginning of the sketch.
I wish you could tell me a step closer to achieving that
make the system work. Thank you very much again. A greeting!
Pekindi
i think the problem is windows,i suggest to try openelec,download and install it in a usb stick,the windows remains intact
leo06
Great suggestion!
hans
Thanks for
the suggestion, but it is able to use with the operating system I use, not to
change the operating system, already’re only telling me to try not to change.
Besides that I do not control OpenELEC, and I would find more problems.
Sorry for
the inconvenience caused. A greeting.
Pekindi
i don’t say to use openelec,just to test,if is working with openelec then the problem is in windows
leo06
Hi all,
thank you for the great tutorial. I managed to build a test enviroment for my media center. Boblightd connects, static background light works, but when I start a video the playback is so laggy. CPU usage is around 40%.
Have somebody already experienced this problem? What is the cause?
If I disable the boblight addon the videos play fine.
My build:
Kodi 14.2 Win 7
ws2812b 60led/m
Sainsmart UNO R3 config made by boblight config maker
Thanks,
mind12
mind12
Hi Mind12!
Thank you very much for the compliment – it’s much appreciated.
As for the lag;
Technically there will always be a tiny lag, but during normal video playback you should not notice it. When you play the demo video you’ll have to do some effort to see it (at least it takes effort for me to see it).
A few things could increase the lag to the point of annoying;
hans
What is you CPU? How many LEDs do you have?
For your comparison Raspberry Pi2 + Hyperion uses 10% of one core (out of 4) ;)
Marini
Thank you guys for the fast replies.
Some additional information about my setup:
– Kodi PC is a virtual machine running under VMware infrastructure, an ASUS R5 230 Video card is passthroughed to the VM so it is available directly to Kodi. Hardware accelaration is set.
– I use a 300 LED strip for testing right now, it has not yet attached to the TV. I will need ~190 of them for the TV.
– I use the Neopixel library
– Here is my boblight config, it was made by the config maker:
[device]
name AmbiLight
type momo
output /dev/com3
channels 900
prefix 41 64 61 00 BE EB
interval 20000
rate 9600
delayafteropen 100000
debug off
I added 2 more vCPU to the virtual machine, in my server there is a Xeon E3-1265L V2 so I’m pretty sure it can handle the load.
Today I realized at first I tested the configuration with an 1440p video. Kodi can’t play it smoothly even without boblight (I really dont understand why, CPU usage with 4 CPU-s is only 20% and 1080p videos run fine).
During 720p video playback there is no continous lag but the video and the sound get stuck for a second randomly.
CPU is normal, maximum 10% is used.
How should I tune the open delay and interval parameters? During the test video playback the leds can’t keep up. Should I raise interval and lower delay?
Cheers,
mind12
Hi Mind12,
sounds like you have a pretty advanced setup!
First of; I have no idea how “fast” a virtual machine will perform with Kodi.
Seeing you conf file, I’d up the “rate” to something like 115200 for starters and see how well that performs.
I’ll be the first to admit that I have never tried 1440p, maybe the VM can’t keep up or maybe Kodi tries to scale it to your screen resolution?
hans
Hi,
yep not a normal HTPC for sure.
Yesterday I tested with 115200 baudrate and I’m glad that now the strip keeps up the changes as expected. Also changed interval to 40000 and halfed the default delay in the boblight config.
Regarding the 1440p problem, I will check scaleing.
So the only problem I need to solve is the “mini” lags (~0,5 sec distortion of sound and picture randomly) during video playback.
Any ideas how to proceed?
If I enable boblight debug feature, where will be the logs placed?
I’m close to a working solution…
Cheers
mind12
Hi Mind12!
The sound/picture interference; could that be because it’s a VM?
hans
I digged further to this problem and tested a lot.
I tweaked some video and audio settings and after that I could play the 1440p video without any stuttering.
But after I started boblightd with the start.bat problems arised again. The kodi and boblightd startup order doesn’t change anything. Even I lost my audio device completely in windows and I had to restore the VM from backup to got it working again. It will be something between the VM and boblightd server.
I’m really angry and disappointed right now, cost me 2 hours to restore audio to my Kodi VM. I’m afraid my ambient setup won’t work with this virtual setup.
Thank you, your help was much appreciated.
I will check back later if there is any improvement.
mind12
I was already curious how you managed to get Kodi in a VM.
But wait … can’t you install OpenElec in the VM, instead of Windows and such?
Wouldn’t that be more lightweight? (assume drivers and such work)
hans
I found some OpenElec appliances here and I’m sure there are more out there.
hans
I used a Windows VM because video card passthrough (means Vmware assigns the video card directly to the VM) doesn’t work with Linux OS. So I can’t use Openelec.
So far this is the first issue with my setup so I can’t say it doesn’t worth setting up a HTPC virtually. I can use the remaining resources for other purposes like virtual Firewall, Windows Server for Backup and Domain Controller, Wireless Lan Controller etc.
mind12
I never tried Kodi as a VM, what made you decide to do that?
p.s. Wouldn’t these OpenElec appliances work just fine? Even though it will not access the videocard directly.
hans
I decided to go this way because I wanted a solution that provides me the possibility to have a NAS, a Media Server and place for a Lab environment where I can test and study.
The “cheapest” way was to build a virtual environment. Now I have a HP Microserver Gen8 with ESXi and 7 running VMs.
The Openelec appliance would work but because of the lack of a video card only software accelerated encoding would be available. This would lead to poor performance during playback.
mind12
Mind, by any chance, have you recently sold your old HP microscerver with discs and raid controller? :)
BTW I think boblight is very slow compared to hyperion and that you virtualization layer brings additional problems, so you should avoid at least one (boblight or virtualization)
Marini
I hadn’t got an old Microserver, this Gen 8 is the first one :)
I would try hyperion, could you tell me how to set it up with Kodi?
mind12
I have no experience (yet) with Hyperion – I have been traveling a lot the past 6 months …
You could look at these guides: Hyperion with OpenElec (great guide) or this one Amblight project/guide – Hyperion – WS2801/ WS2812B.
If you look through the comments you might find some more Windows specific things as Hyperion was originally made for Raspberry Pi use (if I’m not mistaken). For Windows/Linux it would take a few extra steps to get it installed.
hans
Extra tweaking is not a problem, I’ll check the sites.
I’ll check back if there is any progress.
I really appreciate your help. Good site, enthusiastic people.
Keep it up!
Cheers,
mind12
Thanks!
Very much appreciate you saying that!
Let’s us know how things go/went!
hans
No way, how is this possible that nobody including me got the idea to install the boblightd server daemon to another virtual machine? I did that now, changed the Kodi addon to connect over the network to the new VM running the daemon.
You must change the global parameter “interface” to 0.0.0.0 in the boblight.conf to get this work. Kodi VM works as expected, boblight connected, no sound problems. I have to tweak some boblight settings only because there is some delay between the picture and the LED strip.
I tried to find out how to set up Hyperion on Windows. I need more time to understand it deeper.
But if this workaround works I will pick boblight instead.
Conclusion: Kodi with boblight can work in a virtual environment with some workarounds.
Cheers,
mind12
Awesome that you’ve got this running … who would have thought this would actually work with a virtual machine, no TWO virtual machines haha. Very cool!
Thank you very much for posting how you’ve got it to run – hopefully others will benefit from it.
hans
UPDATE
Hi,
after testing with boblight i decided to try hyperion. I installed an Ubuntu virtual machine and compiled, made the source code using this guide. Pretty straight forward, if you have a correct hyperion configuration it will work at first time. About the arduino sketch: the setup only works with the Neopixel library, no success with FASTLED.
Do you have any experience with FASTLED, could you help me out with a working Arduino sketch?
Thanks
My FASTLED code:
include "FastLED.h" // Number of RGB LEDs #define NUM_LEDS 300 // define array for the LEDs CRGB leds[NUM_LEDS]; // Data connected to this Arduino pin #define PIN 6 // specified under `rate` in the `[device]` section of /etc/hyperion.conf.json #define serialRate 115200 //prefix for 300 LEDs uint8_t prefix[] = {0x41, 0x64, 0x61, 0x01, 0x2B, 0x7F}; void setup() { delay(2000); FastLED.addLeds<NEOPIXEL, PIN>(leds, NUM_LEDS); clearLeds(); Serial.begin(serialRate); } void clearLeds() { for(int tmpChannel=0; tmpChannel<NUM_LEDS; tmpChannel++){ leds[tmpChannel].r = 0; leds[tmpChannel].b = 0; leds[tmpChannel].g = 0; }; FastLED.show(); } void loop() { // wait until we see the prefix for(byte i = 0; i < sizeof prefix; ++i) { waitLoop: while (!Serial.available()) ;; // look for the next byte in the sequence if we see the one we want if(prefix[i] == Serial.read()) continue; // otherwise, start over i = 0; goto waitLoop; } // read the transmitted data for (uint8_t i = 0; i < NUM_LEDS; i++) { byte r, g, b; while(!Serial.available()); r = Serial.read(); while(!Serial.available()); g = Serial.read(); while(!Serial.available()); b = Serial.read();leds[i].r = r; leds[i].b = b; leds[i].g = g; } FastLED.show(); }
mind12
Cool! Thanks for posting the link as well!
As for the Sketch … well, I have not played with Hyperion yet (but it’s on the To-Do list!).
What does the [working] NeoPixel sketch look like? And what are you seeing (or not seeing) with the FastLED sketch?
My experience with FastLed is limited to what I did in this article.
I do not have access to my hardware at the moment – it’s on a boat on it’s way to Europe … but I can look and see what comes to mind when I see both sketches to compare.
hans
Hey,
you can find my working Neopixel sketch below. I read in this sketch that hyperion calculates the prefix this way:
” keep in mind if you are using boblight config to calculate prefix that Boblight counts diodes from 1 and Hyperion from 0″. That’s why the prefix is different in the two sketch.
Thank you for your time Hans.
mind12
Mind12, I am glad that my comments help you solve your problem. :)
Is the performance better in your virtualized enviroment with Hyperion? What about cpu usage?
Marini
If I recall correctly; Hyperion calculates the prefix automatically – if you had not done already, peak in the Hyperion docs. (but it sounds like you’ve already done that)
Your FastLED code looks good otherwise. Unfortunately I’m in the middle of moving from the US to Europe, so I’m a little short on time to look at the details, and can’t test anything right now.
hans
Hi,
much better, almost zero CPU usage max 100-200 Mhz.
If i can run my setup with a FASTLED sketch, the LEDs will be ready to be mounted to my TV :)
Indeed a long project, however the result will compensate the invested hours.
mind12
FINAL UPDATE:
My configuration is now complete and working. I really enjoyed the project. We can state that the virtual way is not a lost case. My final setup consist of a Windows 7 VM running Kodi with Hyperion addon connected to my TV through the passthroughed video card, an Ubuntu VM running Hyperion server with a connected Arduino Uno clone (Saintsmart Uno R3) to it. I found a working Fastled sketch for the Arduino on this site.
If somebody has any question about my setup feel free to ask on this site.
Thanks for sharing your experience and for your help.
mind12
Hi Mind12,
well, you’ve most certainly have a quite unique setup, and I’m happy to see you’ve got it working and that you’re willing to share your findings here!
Very cool! Thanks again!
For others, I’ve just copied the sketch you’ve used below, just for reference:
hans
Hi Hans, great article and very easy to follow steps, thanks for taking the time to document it. I have followed all the steps and managed to get it all working, but when I turn off the htpc running kodi the leds all stay on the start colour (white). Is there a code line to turn them all to black please when the power goes off and where would it go in the sketch?
Thanks in advance
Andy
Thanks Andy!
Well that’s a good one … in one of the previous comments I’ve outlined (if I recall correctly) how that could be done. The only problem might be that switching “off” the HTPC might go to fast and the Arduino might power down before it can turn the LEDs black.
The general idea is to maintain a global counter, which we up each time the Arduino goes through the “case STATE_WAITING:” loop. If the counter reaches a certain value we then (in that same loop) set all LEDs to black. In the loop “case STATE_DO_DATE:” we set this counter back to zero.
The tricky part would be finding the right threshold for the counter, so the LEDs do no flicker, but do go off when you powerdown the HTPC.
Now what I do is using a smart (home theatre) power strip. One outlet is connected to the TV, which is the “master” outlet. The HTPC and LED power supply are plugged into the “slave” outlets. When the power drawn from the “master” outlet drops below a certain level, the “slave” outlets will be switched OFF. When it goes above a certain level the “slave” outlets are turned ON.
I have used these 2 models. This one I like best, but it’s a little more expensive. This one works just fine as well and is a little cheaper.
I also use that strip to shutdown my home theatre sound system.
hans
Hi Hans, thanks for the fast reply. The smart power strips sound like a great idea and I may invest in one of those anyway. I originally had the arduino mega and the htpc running the old ws2801 leds and that seemed to shut down and turn off the lights if I remember correctly with No problem. I did see the previous post you mention about line 51 and the colour line, I had already deleted that and the define start colour but then the leds light up ok for the static background light for kodi but when the movie plays the lights all go off and don’t work as supposed to so I am doing something wrong still. I am hoping I didn’t fry the USB port on htpc as I forgot to remove the power line from the arduino after testing (something definitely happened as the led on htpc glowed red constantly until I removed the power lead)
Andy
If you’re powering the LEDs as described in this article, you should not have to fear for a fried USB port ….
….
I completely forgot about the “non video” moments under Kodi – argh, that would indeed be an issue.
Maybe a trick (solid state or relay) could do it. In essence what you’d want is to switch the power to the LEDs OFF when the Arduino looses power (from the USB port since the HTPC is shutting down). I’m not too good in the solid state approach, but I’m sure there is one. The relay approach might be easier, since a small relay can switch 110V or 220V without any issues. As soon as the Arduino powers up: power the relay so it switches the power to the LEDs on, in such a way that when the Arduino looses power, it disconnects.
hans
@Hans
Guide work for ws2812b strips? I picked up 5 meters today. Also an Ardino R3+ which I hope is fine. Not sure what PSU to get. I am going to be running on 65″ Samsung 4k TV
Ray
Hi Ray,
See the power supply calculation above. I’m using a 10A power supply from eBay (or AliExpress) for my 5 strands as well.
(also see my reply to your comment under the other article)
Rough calculation for max required PSU: ( 3 x number of LEDs x 20 mA ) / 1,000 (to get Amps instead of mA’s).
(each “LED” contains actually 3 LEDs, one for red, green and blue)
For my own LEDs, I kind-a ball parked it by taking a 10A powersupply instead of the calculated 17.5A.
Keep in mind that the previous calculation is for MAX load, but for short moments you would be OK with a smaller PSU, as the average load will be lower. Your LEDs will rarely be on at max brightness.
hans
@Hans
I am planning on building a frame for my 65″ TV today. It’s wall mounted so thinking about building something that will use the VESA mounts also. I picked up 4m of ws2812B LEDS. Tested them and all working.
My question is since out TV is about 7-8 inches from the wall what way think LEDS will be best? Light going to back wall or away from TV sides?
Ray
I’m not 100% sure what you’re asking, so here is what I’d do (if I understood your question right – sorry, early in the morning, need more coffee ).
).
Based on your earlier question, I assume you have something like a silk screen, I’d mount the LEDs pretty much on the screen, with the LEDs facing the wall. Kind-a the same way as done with the TV example in this article. You could of course consider putting them in a slight outward angle since your wall is black. But I’d try the plain (not angled) method first.
I’m curious what it will look like – I hope you can send me a picture later so I can add it to the comments.
hans
Well got built and test file. When running OpenELEC on my Asus Chromebox using:
Output /dev/ttyACM0 I am getting this error:
(CDeviceRS232::OpenSerialPort) ERROR: AmbiLight: /dev/ttyACM0: open () No such file or directory
(CDevice::Process) ERROR: AmbiLight: setting up failed, retrying in 10 seconds
I verified baud and all settings.
Ray
That looks like you’re using the wrong output device.
hans
I looks like my device is /dev/ttyUSB0
Changed it and now not getting error. Shows setting up but color stays white when Ardiuno boots up and doesn’t change when play anything.
Getting this:
/dev/ttyUSB0 write: 41 64 61 00 18 4d 00 00 00 00 and so on and so on. tell get same message in log
Ray
So much messing around I got it kinda working. It looks like a padding margin issue. However now only works with Baud 115200. If got higher it doesn’t work. At 115200 the light delay is pretty bad! Any ideas?
Ray
Some Windows based HTPC’s can have issues with speeds above 115200.
You however are running OpenElec, so the higher speeds should not really be a problem – but then again, I’m not familiar with the possible limitations of an Asus Chromebox.
I did see folks play with 500,000, which seems a “magic” number for optimal speed. Maybe you’d want to try that value.
When playing with my setup, I never had issues with lower speeds (i.e. even 9600 worked, all-be-it not perfect).
How are the values for interval and open delay (conf) and showdelay (sketch)?
hans
So using 115200 baud rate cause this 1/4 to 1/2 sec delay of color changing? When watching your test video you can see the lag switching colors.
As for interval, open delay and showdelay I haven’t messed with them yet as to not sure what really do.
You have a forum where posting code and logs is easier?
Ray Milyard
FYI that Asus Chromebox USB ports are 3.0. Not sure matters.
Ray Milyard
Hello Ray,
I have experienced the same lag using boblight and the Neopixel library.
If you are on Openelec you can easily switch to Hyperion instead of boblight, here is a guide how to set it up: Hyperion for Openelec
And if you use the FastLED library you will not experience any lag. I used this one: FASTLED Sketch
You can further read about my problems and solutions during setting up my system above, just look for my nickname in the posts.
Cheers,
mind12
Hi Ray,
first of all: thanks for asking for the forum, … and yes there is: link to our Arduino Forum.
Second point; there will always be a minimal lag, but like Mind12 states, Hyperion and FastLED will help improving speed. At some point I’ve gotten mine (Boblight/NeoPixel) fast enough that while watching a movie, most observers will not even notice the tiny lag.
hans
How about switching to Windows OS? Trying to keep simple. Looked at Hyperion but doesn’t seem as simple. However the lag is really bad. Switching from lght to dark scenes is shocking on the eyes. In that Hyperion guide talks about Rpi. Since running OpenELEC just do the same?
Ray Milyard
I’m using Windows OS right now. I had the same lag as you with boblight and Neopixel.
I didn’t read the guide entirely beacuse I’m using Hyperion with Ubuntu. The hardest part was compiling the program for it. But for Openelec you can find the needed files in one of the comment of that topic. You just have to copy, paste, setup the config on Windows with the Hyperion configurator and copy it back to Openelec. Setup your Arduino with the Fastled sketch I proposed. That’s it, good luck.
mind12
Little worried about messing with it. I have to Windows 8.1 Intel NUC’s. One 4th Gen and one 5th. I have the Asus Chromebox running OpenELEC. I am not sure if have the knowledge to go messing with it.
rmilyard
@Mind12
If willing maybe can help me out install it to test? I am not a Linux person at all and worried about messing something up.
rmilyard
Alright some interesting finding!
First Arduino I had was Uno R3+ with Mini USB connector. My OpenELEC computer would find it as /dev/ttyUSB0 so had to change config and code. Max baud I could get was 115200
For the heck of it I got another Uno R3 with USB-B connector. Well it shows up as /dev/ttyACM0 like your code shows. I can get the 460800 baud with it.
Still have some lag but seems to be about half as bad as it was. So any ideas or tricks to try to reduce it more? Mind12 might be helping me later try Hyperion for the heck of it also. Just busy with work and we have different time zones.
rmilyard
Hi RMilyard,
Interesting – seems both Arduino’s use a different USB controller. I have learned the hard way that it’s best to start with a genuine Arduino. Once you’re familiar with those, you can play with cheap clones since you’d know a little bit more of what to expect.
Lag can be caused by many things.
I’ve found that some Kodi/XBMC plugins can have a negative impact on Boblight.
Certain hardware (HTPC) can be insufficient to keep up properly.
A faster alternative to Boblight would be Hyperion – slightly more tricky to install, but much faster and uses a lot less resources.
Of course there is also the tweaking of speed (some claim that 500,000 is the best value), open en show delays, etc.
hans
Hi there. I have the same arduino and I couldn’t get higher than 115200 either. 460800 wouldn’t work at all so I tried 500000 and it works great.
john
Thanks John for the confirmation!
As far as I remember, the value has to do with how “ideal” a baudrate is, and it seems that 500,000 is a magical number where the serial communication works optimal. I remember reading something about clock division and actual radio interference … but I don’t recall where I read that … glad to see a confirmation!
hans
Hi Hans,
500,000 baud rate doesn’t have anything to do with interference, as I have explained in my Hyperion tutorial (http://ai.rs/reviews/rgb-delight-raspberry-pi2-arduino-nano-ws2812b-using-hyperion-on-openelec/)
it is related to Arduino clock frequency. Lets say my nano is running at 16Mhz, and baudrate is 0.5Mhz, each 32. time it will send data.. if baudrate is 115200, it becomes difficult to precisely send and sometimes WS2812b signal goes out of sync
Marini
That makes perfect sense. Thanks for the info Marini!

Hey – I was pretty close with what I remembered … well at least half of it …
hans
Hi hans
Any progress on new version of boblight config maker windows?
Jack
Hi Jack,
a lot of work has been done, but I’m not thrilled with the results yet. I’ll try to do some testing next week, and maybe I’ll post the test version in the forum for those who’d like to test the application, at least if people are interested of course in testing …
hans
Hello,
Just got up and running this weekend and its working great so far. I’m working on trying to control boblight with a button on my remote but I have run into a problem. I found a script that will enable/disable boblight, however the LEDs still stay on. They no longer update based on the screen so I know the script is partially working. I found some tutorials via Google, but a lot of them are designed to work with XBMC, not Kodi. Anyone able to help? Below is the script I have so far ( found) Thanks !
boblight.toggle.py
import subprocess import xbmcgui pid = subprocess.Popen('pidof boblightd', shell=True, close_fds=True, stdout=subprocess.PIPE) dialog = xbmcgui.Dialog() try: if pid.stdout.readlines(): subprocess.Popen('systemctl stop service.multimedia.boblightd.service', shell=True) dialog.notification('Boblightd', 'Boblight Disabled (OFF)', xbmcgui.NOTIFICATION_INFO, 5000) else: subprocess.Popen('systemctl start service.multimedia.boblightd.service', shell=True) dialog.notification('Boblightd', 'Boblight Enabled (ON)', xbmcgui.NOTIFICATION_INFO, 5000) except Exception, e: passjohn
Hi John,
I’m not a Python expert, but I think we’d need to send Boblight something to turn the lights black before shutting Boblight down. Or … we need to add some code to the sketch to turn all LEDs off after a certain idle time.
Something like adding a global variable, say “idle_counter”, and in the loop increase it with one each time it goes through the “loop()”. There we should also check if it reached a certain value and based on that set all LEDs to black. (in the “STATE_WAITING” part)
In the “STATE_DO_PREFIX and “STATE_DO_DATA” we should set the global variable “idle_counter” to zero so the process starts again without flickering LEDs.
I have not been able to test this code, but you could give it a try (and tweak where needed – for example the cut off value for idle_counter):
hans
Thank you for your work Hans. I will try out the sketch tonight along with mind12’s speeling correction. Thanks.
John
although, would setting an ‘idle’ command mess with the static color I have set for browsing menu’s? I still like to have the color on while browsing and the lights fade out nicely when I switch to tv ( i disabled lights for tv), but some movies I would like to disable the lights for ( not in the mood to be wowed haha). Thats why I wanted the option to control with remote.
There seems to be info on the subject, unfortunately a lot of it is pre kodi ( still XBMC), so the structure doesn’t work well. Here is the link I found ( http://openelec.tv/forum/85-boblightd/66387-start-stop-boblight-from-remote ) with the code to kill boblight with a pbutton press. You can see there are a lot of references to /.xbmc, which is no longer present in kodi. Adapting that script to kodi is way out of my league. Maybe someone can chime in.
John
You make a valid point. I don’t know if Boblight keeps feeding that same color in a static mode, or not.
As far as I recall, the ADAFruit sketch has an idle function as well.
Having code in XBMC/Kodi would be nice as well of course.
Doesn’t the Boblight AddOn offer a function to disable (or set to Black) for certain modes?
hans
I just noticed that folks in the Kodi Forum are looking for the same or a similar solution as well.
Here is the link to the Kodi Forum Post.
All findings are most welcome here of course!
hans
Hi Hans,
I have noticed the same problem on Hyperion, eg if openelec is in svreen saver mode, Hyperion plugin feeds (send data) to Arduino. that blinks like crazy even if all LEDs are off (black)… any idea how to prevent that? I think it must be done on Kodi side not in Arduino sketch
Marini
Wow that’s annoying …
I’m just guessing here, since I have nothing to work with right now, even Internet is a disaster for the next few weeks (typing this on my iPhone);
I would guess that a script has to disable the plugin at the desired moments, after sending “all LEDs Black” to Hyperion or Bobolight – but that sounds easier than it might be, specially when we need to consider that it needs to kick in again.
I thought there was an option in the Boblight plugin to disable Boblight under certain conditions.
Maybe it would be good to make an inventory in what scenario’s we’d want the LEDs to be OFF?
hans
Yap thinking about that:
check issue request here: https://github.com/tvdzwan/hyperion/issues/318
Marini
Hello,
there is a misspell in Hans’s config: “in idle_counter” –> int idle_counter
I’m working on the same problem but with Hyperion. If I get some progress I will post the code, so you can modify it for Boblight.
mind12
Good catch!
I’ll correct the typo!
hans
Hi Hans,
There has to be something built into the addon already to blank the LEDS on start. When I restart ( enable ) the addon with the remote the lights blank first then come on. So something when the addon is initially enabled tells the leds to ‘reset’. I would think the same reset or blank code could be added to the addons coding when it receives a ‘stop’ command from the user.
John
Hi,
I made some progress with Hyperion. I have a working python code that opens the OSD and disable or enable the Kodi Hyperion addon during fullscreen video playback when I push the configured button on my keyboard.
I tested it last night, the lights had gone down and up correctly and the notification had been also working. I will post the code tonight or tomorrow for your reference.
However take into consideration that I run the hyperion server on Ubuntu and Kodi runs on Windows 7. The code will be almost the same for Boblight, but you have to gather the parameters for your own setup.
mind12
Hi Mind, please post it I would gladly test it… I am looking for solution that will stop communication between RSP and Arduino while in screensaver on Openelec+Hyperion
Marini
Hey,
let’s see my config, but before that if you have any idea how to do all of this below with the IOS remote please tell me. This only works with a physical remote if you modify keyboard.xml accordingly or with a physical keyboard with my keyboard.xml.
– my keyboard.xml for Win7 Kodi, put it to AppData\Roaming\Kodi\userdata\keymaps\
While fullscreen video plays pushing ‘m’ button on the keyboard runs the python script in the specified folder.
– my python script hyperion.toggle.py:
Modify these parameters:
* ADDONID: get it from the addon folder by viewing the addon.xml for the corresponding addon (hyperion) and look for the addon id line, copy it. i.e.: on Win 7 AppData\Roaming\Kodi\addons\script.service.hyperion-master\addon.xml
* xbmc.executebuiltin(‘Action(OSD)’): I would like to disable hyperion by pressing the OSD button on my remote so I toogle OSD and disable hyperion after on the same time. Look for other built-in actions: HERE
* dialog.notification(‘HYPERION’, ‘LEDs OFF!’, xbmcgui.NOTIFICATION_INFO, 3000): custom notification by the enable and disable action. Parameters: (Notification title, Notification text, Notification image path (I used a built in image variable), Notification time) Customize it as you wish.
mind12
What IOS remote are you using? Maybe add your python script as .py effect?
Marini
I’m pretty sure that with (most?) iOS/Android remote’s, that the “codes” are actually send by the App and might not be controllable with a Python script.
hans
I have placed you “m key” keyboard .xml here : /storage/.kodi/userdata/keymaps/keyboard.xml
an it works when pressing “m” on remote
and python script here: /storage/.kodi/addons/script.service.hyperion-master/hyperion.toggle.py
rebooted my raspberry with openelec and
started hyperion with: /storage/hyperion/bin/hyperiond.sh /storage/.config/hyperion.config.json &
when I press “m” python reports an error.. Any idea?
Marini
Please post your exact .py code here, there is a syntax error in line 4.
I use Sybu for Kodi on IOS, and Hyperion Remote to control the LEDs independent from Kodi. I can make a script for Hyperion and use it as an effect to toggle my LEDs but I would like to use one remote for all the tasks. However Sybu doesn’t send any keystroke to Kodi. I have been still struggling how to solve this.
mind12
Hi Mind,
I use just Hyperion Remote…
Here is my python code (essentially I have copy pasted your code)
***
***
Marini
Please use this code to avoid any formatting issue: My hyperion.py
Test and reply back whether it’s working or not.
mind12
Hyperion effect for disabling LEDs, put it to your effect folder and restart hyperion.
Use your IOS,Android Hyperion remote for testing.
I added my effect folder for your reference:
/media/scripts/hyperion/effects/disable-LEDs.py
/media/scripts/hyperion/effects/disable-LEDs.json
{"name" : "Disable LEDs",
"script" : "disable-LEDs.py",
"args" :
{
"color" : [ 0, 0, 0 ]
}
}
mind12
Mind,
thanks for link, it was formatting issue… it now “works” but except message LED ON doesn’t turn off leds…
here is error log:
23:30:13 T:1726202944 NOTICE: –>Python Interpreter Initialized<–
23:30:13 T:1726202944 WARNING: CPythonInvoker(29): Script invoked without an addon. Adding all addon modules installed to python path as fallback. This behaviour will be removed in future version.
23:30:18 T:1726202944 ERROR: CPythonInvoker(28, /storage/.kodi/addons/script.service.hyperion-master/addon.py): script didn’t stop in 5 seconds – let’s kill it
23:30:18 T:1590686784 WARNING: CPythonInvoker(28, /storage/.kodi/addons/script.service.hyperion-master/addon.py): the python script “/storage/.kodi/addons/script.service.hyperion-master/addon.py” has left several classes in memory that we couldn’t clean up. The classes include: N14PythonBindings31XBMCAddon_xbmc_Monitor_DirectorE,N9XBMCAddon4xbmc6PlayerE
Marini
I think I have the same issue but I have enough resources to move further. Because when I push the M button there is a 2-3 sec lagg before the LED ON message. I will try to investigate the problem tomorrow and post if I can solve the lag.
mind12
Mind,
can you post link to download hyperion json and .py because it gives me an error now as it is:
Marini
My public shared folder: HERE
mind12
Thnx, but after pasting both hyperion effect files, same error:
analyzing your code, it execute loop of (0,0,0)… my screensaver already disables LEDs, but arduino RX,TX keeps blinkng crazy… even if all LEDs are off… that’s why I think loop is not what we need?
Marini
I modified the code, download again. However I couldn’t test it.
mind12
Hi John,
I’m guessing the AddOn sends a “all LEDs black” sequence to Boblight, which then sends it to the Arduino, as there is no “all LEDs OFF” sequence that the Arduino knows of.
I see that Mind12 and Marini are actively pursuing the same goal – I wish I had my gear here so I could do some testing as well.
hans
[…] Credits: RanzQ […]
Hi fellow Ambilight clone fans :)
I have solved problem with my setup, to be more precise, Raspberry couldn’t detect Arduino Nano after reboot.
/dev/ttyUSB0 was missing so I had to replug USB cable all the time…
here is how I did it, it is very simple… http://ai.rs/reviews/rgb-delight-raspberry-pi2-arduino-nano-ws2812b-using-hyperion-on-openelec/arduino-with-raspberry-pi-boot-detection-problem-solved/
Marini
Hi Marini!
That is a really awesome find!
For those interested, I do recommend looking at the pictures and details in the article provided by Marini.
The “short” version: The IC Test pin should be connected to GND for normal operation, which is not the case on the Arduino Nano (it seems). You can correct this by shorting pin 25 (GND) and pin 26 (TEST) of the FTDI chip (FT232RL) by soldering. It seems you can leave these pins connected permanently.
Image source: http://ai.rs
FTDI Chip diagram, the circled pins need to be connected to each other:
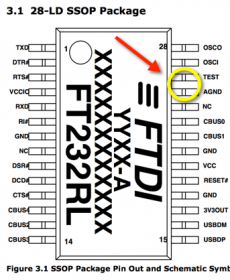
Photo of what that could look like (look for the small solder dot on the left of the chip):
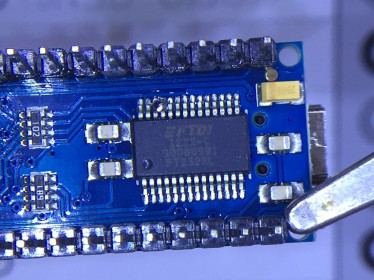
hans
Glad that you like it works like a charm
that’s what engineers are for…
Marini
hans
Hi!
I have a Asus Chromebox running KodiUbuntu,what would be the right procedure to complete this task.
I know i need the Arduino Uno R3
Not sure of the LED light (WS2812B)?
And how do i config my KodiUbuntu to run.
Any Help?
Mike
Hi Mike,
I have no experience with a ChromeBox – but I’d suspect that the steps are very similar as those for OpenElec (runs Linux too – albeit embedded Linux).
Yes you’d need a Uno R3 and the LEDs I prefer are the WS2812 ro WS2812B (in essence the same).
As for the config, you’d need to take a peek at what other Linux users use for the USB port, otherwise I’d suspect things are the same.
Maybe one of the other visitors here might have experience with that and can chime in?
hans
I have a 120′ projector screen,so i going to purchase 10M of the Ws2812 ,already order the Arduino UNO R3.(Am i missing anything else?)
I am going to preliminaries installation on a Windows machine,when done,i will plug it into my Chromebox running KodiBuntu.
I couldn’t find boblightd anywhere to install on Linux(KodiBuntu)
In Window i can use SSH install all the necessary items needed in the KodiBuntu.
Do you have a link to anyone that has successfully done this on Linux kodi box,it doesn’t have to be ChromeBox.
Thanks!
Mike
120″ …? Nice!
Ehm USB cable for the Arduino, Power-supply for the LEDs, frame to hold the LED strands … ehm,… that’s what comes to mind. Especially the power-supply might need your attention,… (see calculation above)
I did see at the OpenElec forums that there are attempts to install (for example) OpenElec on a ChromeBox (link to the forum posts).
Note that quite a lot of folks have switched to Hyperion as a replacement of Boblight (no hardware changes needed for that – just software). You’ll see quite a few posts in the comments here related to that.
Hyperion uses significantly less resources, which might be helpful in your setup.
You can also have your ChromeBox Kodi control the LEDs remotely (over network) … but that’s something to play with if you’d like to have a separate computer for the LEDs and one for Kodi.
hans
Hi Hans,
Just a quick note to say excellent guide, really well written and easy to understand. I got it working first time!
Now to play with the settings :)
Thanks once again.
Ed Darby
Hi Ed!
Thanks for the nice feedback – glad to hear you’re enjoying your setup as well.
hans
Hi,
I have trouble with heat, i have soldered the ground on every place now but now instead i get heat in the usb cable between the arduino and my HTPC.
Please give me a suggestion what i should do?
George
Hi George,
Getting heat from the USB cable?
That sounds like you might have connected power wrong? Maybe?
I’m just guessing here, but could it be that you’ve connected the +5V of the Arduino to the power brick as well?
hans
Nope i have just connected ground from my power brick to arduino.
George
try to change usb cable? what it means. “soldered ground on every place”?
Marini
Have not tried exchanging usb cable.
Soldering the ground even on the arduino instead of having jumper cables. Before my jumper cables on ground got hot after the soldering my USB was cable got hot so i turned off the system to not damage it.
How do i upload images, wanted to show which joints where getting hot before?
George
Changing usb cable did not do it either =(
George
Hi George,
I assume that you did the wiring exactly as described above?
The USB getting hot sure sounds very wrong to me, are you sure you didn’t wire something wrong?
You said you’ve grounded the power brick to the Arduino, and did you connect the +5V or the power brick to ONLY the LED strands?
A Picture would most certainly be helpful.
However, thanks to spammers and script-kiddies, I had to disable picture uploading under the comments, for that purpose one would be better in using the Forum. Or use one of the image posting websites like PostImage.org or TinyPic. If I notice that the pic is valuable to other users, I occasionally add them to the comments.
hans
Yeah the only difference now is that i have bridge the two ground pins on Arduino.
No i run the setup on my system for a couple of months until my Power brick failed after that i replaced it with a new one and this problem appeared.
The system runs now but after like 10 minutes because of the hot USB the led’s start blinking and i turn it off to not fry anything.
George
The connection diagram
George
Hi George,
I’ve been staring at your connection diagram for a bit now … but I’m a little confused …
For example on J1 you have pins 2, 3, 4, and 5 connected to +5V …?
Granted that I have never seen a connection diagram for the Arduino like that before (which doesn’t mean that it’s wrong).
But it suggests that you have IOREF, RESET, 3.3V and 5V shorted to 5V, which seems wrong and unlikely to work.
Shorting pins 6, 7, 8 would probably kill something like your Power Supply or USB port, since it shorts GND to Vin.
What model Arduino are you using? I assumed an Arduino Uno R3 (see this pinout diagram).
So I’m pretty sure I’m misinterpreting your diagram as it doesn’t look like the connections used in figure 14 (in the article above).
Not to mention that you use pin 8 instead of the suggested pin 13 (which doesn’t mean it’s wrong – just different).
hans
I’m sorry the diagram was from a template that was part of ni multisim and those part you mention was in the template, and the only two points that are short is 6 and 7 and NOT 8, see the little point on that connection, that means it is connected together.
I’m using the different data pin but that is made a change in my program so that should not do nothing with the wiring, the odd thing is that it worked for a month before i needed to replace the PSU and now it only works for 10 min before it start blinking.
I probably need to go through all the old soldering so they have not become a cold soldering because of the failing PSU, i have not checked those who connect every edge of the rectangle.
George
Hi George,
no problem …
…
The USB wire getting hot is a weird thing, and really makes me believe that there is something wrong with how you’ve hooked it up. A dying PSU kind-a confirms that. But … I could be wrong.
So I’d go through all the wiring just to make sure not all power is drawn from the computer, or that there is some loopback of power to the computer.
Does the test swirl work when you have the Arduino NOT connected to the computer?
hans
Hi,
I was working on my setup again today and found the problem, haven’t touch this since we last spoke but now when I looked at it i found a POP Rivet that was pricing a bit up.
I think that one when the led got a bit warm was able to priced into the lines making the led blink and making the short circuit to USB.
SO my lesson learned today;
– If you are using POP Rivet use some sandpaper or even glue some shrink tube on those to be sure that you don’t get short circuit.
/George
George
Thanks George for posting the solution!
I’m glad to hear you’ve got it resolved, excellent!
hans
Excellent tutorial, this is leaps and bounds above other guidelines I have tried prior to this set up. It works great with XBMC/ KODI! One last question/inquiry is there any way to get the LEDs to illuminate with the visualizations while playing music full-screen in XBMC? It works great for full-screen video but it does not seem to pick up on the visualizations =[[
Here are some side notes to anyone having some trouble getting everything to work properly based on my experience with this tutorial:
Now if I could only get the LEDs working with the music visualizations that would complete my project!
Adam
Thanks Adam for the great compliment and additional tips!
As far as I know, since I’m not really using Kodi for music, the LEDs can work with the visuals. You’d have to do the proper settings in the XBMC Boblight addon. I recall seeing something about that there.
Dots and comma’s have been quite the headache when developing BCM haha … thanks for the Windows obeservation!
I was not aware of the baudrate settings in Windows, so again: thanks!!
hans
There does not seem to be any setting to support this under the plugin settings. AS far as i know it ONLY works with video
Adam
You could be right … I never use Kodi for music, so …
After checking the Add-on, I’ve seen “Musicvideo” where “video” is probably the operative word …
Just tried it with an MP3 and it fails … static light works though …
hans
I have a problem with the launch of Ambilight. I checked ten times rPI and Arduino value of baud rate, prefix, and output. All are the same for both. Arduino is plugged into / dev / ttyUSB0 (checked by SSH), but I checked all other possibilities. Baud rate was set to all values in the list of Boblight Config Maker. Prefix set at 41 64 61 00 18 4D. When I run rPI LED strip swirl three times and then I have only white backlight. Boblight is run by openELEC and is detected in the command line. I can not change the static backlight settings in Boblight. It looks like it was an error in communication Arduino-rPI but all settings are both the same. LEDs tested using Neo Pixel skech and everything works.
I have no idea what might be a problem.
My configuration:
58 LEDs
Led receive 2 amps
Raspberry pi b + (connected to the Arduino Uno R3 clone)
OpenELEC
I would be grateful for any help.
WooCash
Hi WooCash,
AFAIK Ambilight uses the calculated prefix, that’s the first thing I’d look at. I’m nowhere near my stuff so I have not verified your prefix code yet.
Not 100% sure if you’re using the sketch above, but that one would do only one swirl. Test what the Arduino does when it’s not connected to your RPi.
As for AmbiLight; I apologize that my experience is pretty much zero for now … I do plan to start working on it though, but time flies because of other projects as well …
hans
Hi, i have the same problem, cant find why its not working, after start boblight connected …swirl one time and then static white and nothing change …
check everything and havent any idea why its not working …
Milanko
and in log nothing …
(InitLog) start of log /storage/.boblight/boblightd.log
(PrintFlags) starting boblightd -c /storage/.kodi/userdata/addon_data/service.multimedia.boblightd/boblight.conf
(CConfig::LoadConfigFromFile) opening /storage/.kodi/userdata/addon_data/service.multimedia.boblightd/boblight.conf
(CConfig::CheckConfig) checking config lines
(CConfig::CheckConfig) config lines valid
(CConfig::BuildConfig) building config
(CConfig::BuildConfig) built config successfully
(main) starting devices
(CClientsHandler::Process) opening listening socket on 127.0.0.1:19333
(CDevice::Process) AmbiLight_Milanko_KODI: starting with output “/dev/ttyUSB0”
(CDevice::Process) AmbiLight_Milanko_KODI: setting up
(CDevice::Process) AmbiLight_Milanko_KODI: setup succeeded
(CClientsHandler::Process) 127.0.0.1:48270 connected
(CClientsHandler::ParseMessage) 127.0.0.1:48270 said hello
(CClientsHandler::ParseSet) 127.0.0.1:48270 priority set to 128
(CClientsHandler::ParseSet) 127.0.0.1:48270 priority set to 255
Milanko
solved, find out correct rate :D
Milanko
Hi Milanko,
apologies for the late response, but I’m glad you found the issue
hans
So i found out that my not original arduino uno and nano doesnt work more then 9600 – its work but getting delays …2-3s and its sloooow …dont work more then 10000 …
with arduino original mega its showed its connected …in log nothing more then i mention above …but its not working :D
Milanko
Mianko, communication speed should be related to Mhz od the cpu. Avoid multiply of 9600bps (I understand that this is common mistake of modem owners/bbs users) try something like 500.000 Mhz ;) your arduiono cpu will not miss clock and LEDs will not desynchronize. If noticable delays on Boblight are bothering you, check my Hyperion tutorial (search comments). Pozdrav
Marini
@Marini
i try 500000 also 460800 and others, and it just dont work on mega …
on uno maximum is 9600 baudrate …and i dont know why also when o setup it for 10 leds it still late about 2-3s …i dont think its correct delay and it doesnt matter how much led i setup …
i gonna try the hyperion one setup …
Milanko
Milanko, for your info, my Arduino Nano supports 500.000, non stop, (stable) for few years already…
Marini
yeah, i think i will try to rent it from someone who is not using it …becouse i dont know if its in arduino or raspberry :D
let know how i figured it out
thanks for help :)
Milanko
Hi mazani, if yoy can help via mail (milankomoravcik@gmail.com) i would be glad
i am testing hyperion on openelec …installed hypercon, via ssh installed hyperion on openelec, sent config, when i turn on open elec it strobe blue for 10s all as in config file, then it turn of …and from that moment nothing …when i start playing video …nothing …i also setup kodichecker for video menu and screensaver …but nothing …just strobe blue for 10s …i have no idea what to do …i cant also change color via hypercon …
its on nano with 500000baudrate, but i think there should be no problem while it strobe blue at start …
thanks
Milanko
right now i get it already run :D on libreelec also …hyperion hasnt any delay, working on uno clone and nano clone …
on original mega i still cant run it :D
Milanko
Hello everybody, can I use a Apple TV (only first generation?) for Boblight?`
The idea is to stream Kodi from the office into the living room and connect the Adalight at the Apple TV (or something else… do you have an idea, for a good cheap (^^) solution?)
Sincerely,
AppleTV-User
I haven’t tried this yet, but I would have to guess: Yes. If you mean: run Kodi (OpenElec) on an AppleTV (1st gen), connect a Arduino+LEDs to it’s USB port, and use the Boblight addon.
hans
Hello,
I bumped into a strange problem and I would be grateful for an advice.
I have KODI with MSI J1900 (Intel Celeron) board. I connected boblight to virtual serial port to see if the data is correct since when I connected it directly to my MCU, I saw nonsense. cat’ing at virtual serial port shows the same nonsense. I set constant ambient lighting to test, I made some notes. When I constant lighting at 70,66,68, boblightd sends 70,54,62 to serial (more: 69,67,68->69,61,65; 71,65,68->71,47,59). In some cases, the first value is correct, in some it’s not. Prefix gets sent exactly how specified, therefore, I rule out baudrate/parity/stopbit mismatch. Is there a bug in boblightd?
Thank you. Best regards,
Mike
Mike
Hi Mike,
could it be that Boblight considers the gamma etc from both the boblight.conf file and possibly settings in the Boblight Addon for Kodi?
(just a thought, since I never even looked at the “real” data stream)
hans
Hi everybody
I´m a newbee in programming and I have tryed to follow this very fine instructon, but with no luck.
I´m using an old Raspberry Pi and Sparkfun Pro Micro (Same as Arduino Pro Micro – I belive). LEDs are WS1228B, 60 leds.
I have installed OpenElec version 5.0.8 and enabled Boblight add on and used the Arduino sketch from this instruction.
My problem is – I think – that there is no communication between RPi and Arduino.
When I power up the Arduino, it initialize the leds so I belive that the Arduino can control the leds.
Playing a video in RPi do not work!
What am I doing wrong here – or have missed !? :-/
Hope somebody would take som time to help me out. Btw sorry for my bad english.
Jens
jeor
Hi Jens,
Well, the LEDs doing their startup swirl is a good sign: LEDs and Arduino are OK.
You’re probably right that communication settings are an issue.
Check the following, both in the boblight.conf file and your Arduino sketch, they should match:
– Baudrate
– Port (only in Boblight.conf)
– Prefix code (my sketch uses a fixed prefix, others might use the magic word prefix)
If still no joy, try a low baudrate to start with, like 9600.
Since you’re using an RPi, better remove as many plugins as possible, and consider using Hyperion instead of Boblight (much more efficient with resources). Unfortunately, I have not gotten around to test Hyperion myself, so I have no good instructions for that. Look through the comments, as others have written instructions for that.
hans
Hi Hans
Thanks for your reply!
Well, I have tryed your suggestion many times now and I think I´m going in a circle now.
I have also tryed to start all over and even tryed to use my PRI B+
Next step is to try it on an Arduino Uno, when I receive it from the dealer.
I have just one question left. In the XBMC Boblight add-an there is a disclaimer that says, that I need to have the correst binary addon installed.
Is there something I’ve missed here?
Thanks
jeor
I´m wondering if I can send an test string from the serial monitor in the Arduino sketch software.
Do you know if that is possible – and what string I have to type in to the serial monitor?
I apologize for my ignorance and maybe dumb questions
jeor
Hi Jeor,
Well, first of all: there are no dumb questions …. we all had to start at one point with limited info as well.
If you’re using my sketch then the prefix in boblight.conf and the sketch should match. Same for the baudrate.
Make sure to select the correct output device and set the right number of channels (#LEDs x 3).
Outputting through the serial port while hooked up to your RPI or HTPC isn’t possible. You’re using that “serial” port to connect your USB.
As for installing the right binaries: as far as I know, the OpenElec Boblight AddOn should do that already.
Maybe you should try the entire setup on a Linux PC first. Just to make sure that the Arduino/LEDs/sketch/conf are not the issue. You could get OpenElec as the “Linux” part, possibly boot from CD or USB stick … or maybe you have an old PC laying around that you can temporary install OpenElec on?
I truly think you’re looking at a communication issue here.
hans
You might want to look at this article as well. It talks about installing and testing Boblight on a Raspberry Pi.
hans
Thank you for the link, Hans!
As I see it, it refers to the old Raspbmc version.
I´m using Openelec, version 5.0.8 on Rpi. I can´t find the Raspbmc version anywhere…
And as mentioned earlier, I´m using Arduino Pro Micro and WS2812B LED strib connected to pin 9. I can change the LED counts and the start up swirl will only light up the numbers of leds i defined in the Arduino sketch. So, that part is definitely working as it should.
I have two Arduino Pro Micro and two Rpi – it´s the same scenario with both.
I have matched up the Arduino sketch with boblight.conf – also with a lower baud rates.
Now I´m waiting for my new Arduino Uno R3 to arrive.
If this also fails – then I think, that I will dig a big hole and…
I will post an update, when I have tryed the Arduino Uno.
jeor
Cool! You’re welcome!
AFAIK, OpenElec does a great job supporting Boblight, but a lot of folks prefer Hyperion.
As for the Arduino type … well, it wouldn’t be the first time that a different models causes problems (see this earlier comment concerning the Nano).
Keep us posted! I’d love to see the problem resolved.
hans
Hi Hans
After replacing the Arduino Pro Micro with an clone Arduino Uno R3, I finally managed to get it to work.
My new issue is the delay.
Do you think, that it would help to replace my RPi version B to the new RPi 2?
I have tryed to tweak with the settings in boblight.conf and the Arduino sketch, but that didn´t give me any improvements.
Boblight.conf:
Thanks :-)
jeor
Hi Jeor!
Well, that’s good news!
As for optimizing …
Option 1 is to use Hyperion instead of Boblight.
It is said to be smaller, faster and less resource hungry than Boblight – so an ideal candidate for Raspberry Pi.
I’d probably start with this – so you don’t need to buy anything new yet.
Option 2 is to indeed consider a Raspberry Pi 2.
I’ve seen OpenElec run fine on a A or B model, but it really shines on a Raspberry Pi 2.
Just for that I’d already switch to the 2. So you could consider this purely from a Kodi perspective already.
Option 3 … combine Raspberry Pi 2 with Hyperion.
That would probably be the ultimate at this point. You might have to search through the comments here – quite a few users switched to Hyperion successfully. This is probably what you’d end up with …
And as an added bonus:
I’m a big OpenElec fan, but there seems to be a fork called DarkElec which is optimized for Raspberry Pi.
See DarkElec homepage, RaspberryPo Forum Post, and this RPI Distributions page at eLinux.
I have not tested this and the dates related to DarkElec are a little confusing to me. But … it seems to be very good.
hans
Hi Hans
Thank you very much for your help and always quick replies!!
First, I will try to dig into why the Pro Micro didn’t work and if i got any luck with it, I will let you know what I hopefully finds out.
Next, I will go for the Hyperion – maybe with the Rpi 2.
jeor
That sounds like a good plan, why throw away the “Pro Micro” if you can still use it.
If you find out what the problem is/was, then please let us know!
p.s. Maybe it’s a comparable problem as folks have seen with the Arduino Nano? See this comment.
p.s2. If you’d like to try Hyperion, see this link, even though it was written for a RPI2.
hans
Hi Jeor, whats the problem with Arduino Pro Micro? Is the OS detecting it? (do you see the serial port at all?) I had problem with Arduino Nano that had to be re-inserted to be detecting… After some research I solved that but it was low level hardware issue (link)
Marini
Hi Marini
Sorry for the late repley.
Yes, the system is detecting the device. When I use the Arduino Uno R3, it works fine – except for the delay.
I have instead started all over and installed this: Hyperion
It´s working for both Arduinos and there is no delay.
jeor
Good to hear that! I hade delay with boblight, so thats why I wrote hyperion guide…
Marini
great turorial!
i had my ubuntu / yavdr system with an arduino nano up and running in about an hour.
i now ordered 5m 60led/m for my 60″ and a 10A power supply.
those leds are very bright especially at night. is there a way to use a light sensor to adjust brightness based on room light?
i ordered that one http://www.aliexpress.com/item/Light-Sensor-Module-Photoresistor-Module-Seek-Light-Module-For-Arduino-Smart-Car/32414864057.html but i can order any other that may work.
unfortunately i have NO idea of programming the arduino. i can just modify some code a little bit.
anyone tried that before? can’t find it anywhere.
thanks!
izeman
I have yet to play with light sensors (LDR, light sensitive transistor etc).
I guess the first step would be to change the line
to
This way we can modify it’s value at run time.
The next step would depend a little how you’d like to approach this.
One would be to determine “brightness” at start, so one time only.
In that case we need to read and convert the LDR value.
Like I said, I have yet to play with LDR or Photo transistors.
Assuming an LDR, you might read this, their code explains a lot already:
So the (untested) “// —>>>> Add LDR part here !!!” part could be replaced with the following, assuming a 10K resistor:
Don’t forget to define “lightPin” somewhere in the beginning (ie. where you defined BRIGHTNESS for example).
Well, this is under the assumption that the value remains between 0 and 100. You might test and play with the sketch above to see what kind of values to expect and what brightness setting you’d like to use based on the LDR reading. I suspect the LDR will not be linear in it’s values. Like I said … untested.
If you’d like to do this continuously, then that would take some more trying, as the brightness needs to be read in the loop().
So just before the “case WAITING” statement. In that case (if it can keep up), you’d need to add something like:
I’m not sure if this would cause an undesired delay or flickering though.
Hope this helps you get started.
hans
i received my parts. installed the led strip and all was workting OOTB.
the light sensor is another story. i should have read before ordering. the one i ordered is a digital ON/OFF switch giving 0/1 depending on the set light level with the little blue poti.
http://www.aliexpress.com/item/Light-Sensor-Module-Photoresistor-Module-Seek-Light-Module-For-Arduino-Smart-Car/32414864057.html
but i found the analog level output of the light sensor, cut the traces to the pin header and connected the analog output (3.7V for full darkness, 0V for full light) to analog pin 11 of the arduino.
code looks like this as i want continous brightness change (only the relevant changed parts)
….
unfortunately brightness doesn’t change a bit ;)
as said: i’m a total arduino noob. the first “error” i had to fix, i hope this was ok, was to add “=” between “BRIGHTNESS” and “90”. i hope this was ok?!
ooopps. now that i read that, i need to connect sensor output to Pin 0 and not Pin 11 ;) let’s test again.
izeman
ok. this IS stupid., i should think a bit more :) this is ANALOGUE VOLTAGE READING, so i should use an ANALOGUE port and not a DIGITAL one. the value read by A0 would be 0-5V corresponding to 0-1023. so i change the code:
int BRIGHTNESS = 90; // make sure this stays within 0…100
//int lightPin = 11; //define a pin for Photo resistor
int lightPin = analogRead(A0); //define a pin for Photo resistor
void setup()
{
strip.begin(); // Init LED strand, set all black, then all to startcolor
BRIGHTNESS = analogRead(lightPin/1023);
strip.setBrightness(90 * BRIGHTNESS);
not that i works now, but it should be “more correct” than before. :) any input welcome.
izeman
i moved a bit forward:
void loop()
{
int lightPin = analogRead(A0); //define a pin for Photo resistor
// BRIGHTNESS = (lightPin/1023);
strip.setBrightness(lightPin/3);
but i think the whole system is overloaded now. it stalls and just updates every minute or so :(
izeman
Sounds like you’ve done a lot of work already.
The “stalling” effect, yeah, that’s kind-a what I was afraid of that might happen.
It might be more efficient if it probes the “amount of light” every 10 of 15 minutes only to correct.
Now then we’d need timing somehow and that might be a bit too complex.
Maybe easier:
Make a global variable, say “CurrentLightBracket”.
In the setup() assign it the current Bracket value for the “amount of light” and use setBrightness() to initially set the brightness.
In the loop(), read the “amount of light” and if it falls in a different bracket, then and only then adjust brightness with setBrightness().
We could make that maybe better/easier by using for example 4 brackets, say you’d be able to read up to 1024 as a value for the light sensor and if it falls in another bracket, then only change brightness. But you could make more brackets and use different values of course.
In this approach, say you define way in the beginning, before loop() (3 values = 4 “brackets”):
int LightInterval[] = {256,512,768}; // can be more, could need different values
int CurrentLightBracket = 0;
To determine the bracket we could make a function, something like this (rough and untested):
Now in setup() we call “AdjustBrightnesIfNeeded()” instead of setBrightness();
In the loop() we call it in the beginning of the loop.
That’s all under the assumption that setBrightness() is slowing things down too much.
If it’s caused by reading the analog pin, then this will of course not work or add only very little benefit.
Worth a try though.
I hope this makes sense haha … I wrote this during breakfast haha …
hans
i’m afraid it is cause by reading the analogue pin several thousand times a second. making the simple calculation (division by 3) can’t slow the program down a lot ;)
if you read that sensor only once a minute or every 10s this would probably solve this issue. but i have no idea how this is done.
izeman
Time functions are rather limited on the Arduino,… so you might have to resort to a counter, which you increase by 1 with each time going through the loop. This is most certainly not the most correct method, and the counter will probably grow to a huge number.
If in the loop you see that it passes a certain count, reset the counter to zero, do the light amount check and adjust brightness if needed.
I would probably check every 15 minutes or so. Especially when probing the Analog port takes that much time.
An alternative worth looking into is getting faster Analog reads, see this Arduino Forum thread.
Example code that I found there (not sure if it will be fast enough though):
As it stands above, with FASTADC defined as 1, the 1000 calls to analogRead() take 16 microseconds per call.
With FASTADC defined as 0, the default prescale gives 111 microseconds per call.
So this should increase the analog read significantly. Not sure if it will be enough though.
hans
Another good read on the topic of faster Analog reading: Advanced Arduino ADC – Faster analogRead()
hans
i have another idea: what if i use another arduino nano to determine ambient light, and then feed it to an input that can be read faster?
izeman
hi hans
unfortunately this comment system is a PITA to follow and find latest replies. is this the only way to communicate? i’d like to discuss the ambient light sensor feature further, but this is not doable this way (at least for me).
i have the idea to add a second arduino with the senor attached and maybe feed it’s signal to the controlling arduino in a much fast way?!
izeman
izeman
Hi Izeman,
I completly agree, the comment system is not really intended for lengthy conversations/discussions – for that purpose we actually have a forum … Best is to start a topic in our Arduino Forum.
I took the liberty to starting a topic there, here is the link.
hans
p.s. Forum topics are moderated constantly. Whenever you’d post something there, I’d get a notification …
hans
hi hans
great! i will try. it will take some time though, as part are on it’s way from china. so i expect 3 weeks lead time, but i will try it as soon as i have the hardware ready, and update the thread!
thanks
izeman
Cool, I’ll try to make some time available to do some LDR experiments.
hans
going through your sketch it looks not too hard to do it. and i hope once we get it up and running (the light sensor is only 98c) we can adjust the brightness during runtime as well. lights change all the time, and even if i only experimented with 1m of leds they gave a lot of light.
izeman
Just thought of this: keep the LDR (or other light sensor) away from the LEDs and away from the TV front .
.
Didn’t think of that myself until just now …
hans
you’re clever :) lol
no. of course the sensor has to be somewhere where it’s not affected by the TV or the LED STRIPES. in my case it will be installed below the tv rack, which is “floating 30cm from the ground. so it’s a good place to catch ambient light and nothing else.
another question: have you noticed any issues with using arduinos w/o FTDI chips but CH340? i read on the vdrportal that only FTDI allows fast communication and update of some hundred leds.
izeman
Haha, yeah questions like these keep me thinking for a bit, especially when I like the idea.
I have heard of the CH340 debacle yes, but didn’t know it would affect serial port speed. Good info!
I’ve tried a few cheap china clones in the past, lucky me without any issues.
But after that I kind-a started using original Arduino boards, so I have not ran into that issue yet.
A friend of mine used one of those though and he too ran into problems – he just wasn’t very specific about it.
hans
Hey nice tutorial you got here ! I`ve been able to make it almost work perfectly. If I may give a suggestion : an interesting thing to add would be how to run boblightd as a service that starts automatically when xbmc starts. I have seen a couple on the internet but I believe that it’s the only thing missing here. Also I don’t know if you encountered this problem but there seem to be an offset in the positions of the lights on my strips. For example if I play the test video you gave us here when I get the blocks the colors seems to be off in the back of the tv and when the bottom black bar and upper white bar appear on video the leds on the back of the tv a lit on the side instead of up or down… I have used the boblight config maker but something is off somewhere. I’m currently using 54 LEDs but i’m thinking of going to a strip of 144 led per meter.
I have bought this led strip on ebay :http://www.ebay.ca/itm/111697917769?_trksid=p2057872.m2749.l2649&ssPageName=STRK%3AMEBIDX%3AIT
I’m not sure if it is proper for the setup although it’s 12V. Any help would be appreciated. thanks.
Hyrules
Hi Hyrules!
Thanks for the compliment!
As for starting Boblight as a service when XBMC starts; with the steps I’ve laid out here, boblight should start automatically. AFAIK the Boblight Addon starts it.
As for the LED’s being a little “off”; it can be hard to align them perfectly. You’ll have to keep in mind that the spacing between leds remains consistent, and that margins/padding play a role as well. This can only be fixed by tinkering with the config, and if you want it 100% perfect, you might need to play with it a lot.
By the sound of it, you have an issue with the configuration. Also keep in mind that with the black and white lines, you’ll loose “resolution” at some point, where the LEDs can’t distinguish anymore of they should be all white or all black, especially when the lines become thin.
Best thing to do is to align first when there are 4 blocks on the screen (2 rows of 2 blocks).
hans
ah great ! Thanks for your input i’ll take a look at the spacing because it seems as the spacing between lights is off. Otherwise I watched some tv series yesterday and colors seems appropriate not perfect but I can live with that. Just the fact that they change to get an ambiance similar to the tv is fantastic.
Hyrules
Yeah, to get it absolutely 100% perfect will take time.
But I agree – I LOVE the ambient colors …!
hans
Still can figure out what is wrong. I’m not even close of having the proper colors on the back. Maybe you can find something wrong in the config or sketch. Otherwise I have ordered a new led strip ws2812 this one is 5m 300 led ( 60 led per meter ) the one i have is only 30.
Boblight config
Sketch
thanks.
Hyrules
Eureka ! I finally found out what was causing the problem. It’s the led strip. In your led strip 1 led = 1 led in my led strip i ordered 1 led = 3 led so i had to devide by 3 the number of led I had to have it work properly. Anyway I ordered a proper light strip which are really induvidually addressable so I will really have a ration of 1 : 1. Every thing is now working properly.
Hyrules
Awesome!!!
Seems you’re facing an issue because of the 12V model you’re using?
hans
Mostlikely. The way the strand is build is that there is one WS2811 controller for 3s led and you can only split led ( actually cut the strand ) every 3 leds and the leds in this short piece of led strand are numbered L1 -> L3 so they are part of the same controller. Those leds are always the same color as the 2 others so instead of having the possibility of changing every led I can only change them in pack of 3 thus the number of led I have on the back must be devided by 3 in order to have the proper led count in boblight config. Now the video is properly aligned with the leds and every color matches. The only difference is that it’s in pack of 3. Instead of 54 leds I only have 18 even if there are physically 54 leds. It’s probably the way the 30 leds per meter are working because the strand I have is a 30 leds per meter. I have ordered a 60 leds per meter led strip on ebay which is individually addressable at 5V so I will get a better resolution back there and It will use less electricity than a 12v.
Hyrules
Sounds like you’ve got that under control! Awesome!
hans
Hello,
So I suspect my ambilight system is some how interfering with my TVs back light. Ever since I installed the system Ive noticed the back light acting like an old, flickering neon blub (pulsating every few seconds or so). I thought it was maybe the TV since it was getting a bit old, so I have ignored it till today. I unhooked the entire system to service the TV and so far its been running for about 10 hrs flicker free. Has anyone else experienced this with their set ups? My left hand side of LEDs pass over all my TVs inputs. Could the LEDs be interfering with them? My HDMI cables are shielded though. I am also using one of those Smart outlet systems so when I turn of my TV, it turns off the LEDs power supply. Maybe having the TV in the control outlet has something to do with it?
Krebstar
Could it be that your TV has a sensor to adjust to the ambient light?
Mine has one, which I have switched off in the TV settings. Otherwise it would pick up the LED light and change brightness and constantly adjust the backlight brightness.
I have not (yet) heard of the LEDs (etc) interfering with HDMI.
hans
Yea seems as though I jumped to conclusions a bit ( shouldn’t have bough that mat). I think the problem was with my TV. Short story is I believe its overheating slightly. Running the TV without the back case and ambilight hooked up and its been working fine. Guess I need to cut some speed holes in the back of my TV. Thanks !
Krebstar
Oh wow, an overheating TV! That would have not be on my guess list … but I guess even my TV does get relatively warm on the back.
If you’re going to be adding cooling holes, make sure to make plenty at the top and bottom so the warm air can get out on the top and new cooler air gets sucked in at the bottom. Just my 2 cents …
Glad you found what was causing the issue though.
hans
Completely unrelated note. I have had boblight ruining great for about 6 months but one thing still bothers me. If Im watching shows via the Pseudo TV plugin, boblight will only address the lights every other show. Ie one show it will activate the lights, the next the lights are static ( which ever color I set as my main menu) and so on. If I manual reset boblight ( mapped to a button on my remote) it works fine. Is anyone else experiencing this? Any solutions?
Krebstar
I have not had this problem with any plugin – but I have never used or tested Pseudo TV.
Sounds like this might be a plugin issue?
Or could it be that one or the other thing you’re watching is for example an FLV? (not sure if this can be detected)
hans
It could be that, but its consistently 1 on 1 ‘off’ . Could it be a timing issue? Perhaps pseudo tv is sending the ‘next show’ signal to boblight faster than boblight can process it? Hard to pin point.
Krebstar
That’s indeed weird, sound like a bug in detecting video somehow (a bug in Pseudo TV I mean).
I have tested Genesis before, and that one works just fine – I know it’s not the same, but it does use streams as well.
hans
I have everything working great and waiting to resolve one issue before mounting my lights. The problem is with scenes that are black. If there’s a 100% black screen or even the black bars in your sample (i.e. 2×2 blocks) all of the LEDs are white. There seems to be no black state. Using WS2812b strip.
I’ve done tons of searching and there doesn’t seem to be any resolution anywhere. Ideas?
Sean
First thing you can play with is adjusting the “Blacklevel” for each color.
If I recall correctly, this is (definitely in older Boblight Config Maker versions) set to 1, but should be 0. In the boblight.conf file:
In this section you will also find “gamma”.
If “Blacklevel” didn’t work, you could test a few lower numbers for gamma. For example 0.8. Just to try it out.
hans
Thank you! That was it.
Do you know how to detect encoded blackbars?
Sean
Awesome!
I’m not sure what you mean with detecting encoded black bars …?
p.s. the XBMC Boblight Addon has options to play with gamma and such as well – so when playing with that, it might just be a little easier than constantly having to change the config file.
hans
Hi Hans,
First of all great guide, got my lights working after a small hiccup with config file, decimal comma thingy. I would just like to mention a small problem i had with my ws2812b leds when mounting them on the aluminium frame. When taking the backing off to stick them down i also took off a clear plastic backing that’s supposed to insulate the led copper pads, it came off with the paper backing. Not
knowing i stuck them down and created a short across the pads after checking with a meter. A strip of insulation tape on aluminium frame first did the trick. Just something to be aware of. Thanks for a fantastic project.
Cheers
Malky
Hi Malky,
Thanks for the compliment, and great to hear that you’ve got things to work.
Wow, your LED strips must nog have been of the best quality if you can rip of the clear plastic like that, but … good to see this tip here, in case others run into it.
hans
Hi folks,
I followed all the details from this awesome page and was able to connect my Rpi 2 with xbmc loaded to an Arduino Uno R3 and get my ambilight running with Boblight. However now I just want to know how to configure the boblight config file to accept USB video source from a grabber like Fushicai (I use easycap). This will allow me to connect xbox 360 or a blu ray player to the Rpi 2. There are detailed instructions for hyperion everywhere on the net but not for boblight :-(
Thanks in advance !
Apt
Hi Apt,
there are one or two projects that do just that.
You might want to checkout LightBerry. They work with a Fushicai as well.
It’s on my list of future projects, as I’d like to do this as well.
The needed driver and such should be available on their website. ….
….
Please keep us posted what you find – might save me some work when I start with that particular project
hans
For those interested in playing with Ambient Light – so the LEDs are less bright at night for example:
I have just posted an article concerning the use of Arduino and LDR’s, with the use of Analog pins (slow) and Digital pins (fast).
The latter could be useful to incorporate in the Boblight (and others) sketch.
Arduino – Playing with LDR’s
hans
Hi guys I am new at this. Just wanted to know can I set this awesome guide to work with my laptop connected to a TV? I have read as lot of different settings but not sure. Sorry for the noon question
Ruben
Hi Ruben,
never feel bad for asking a question …
You can actually do this with a laptop as well yes.
The Arduino connects to a USB port, and the video output goes to your TV or monitor (depends on your video output and the input capabilities of your TV). Modern laptops and TV’s work fine with HDMI.
For older equipment you might need an adapter or converter.
hans
Thank you very much !
I am a bit confused, I have a arduino uno should I buy the raspberry pi for best configuration? Or does the arduino uno works just fine?
Ruben
No problem …
No you do not need a Raspberry Pi.
The article is mainly intended for a regular PC running OpenElec, meaning: Windows hardware running OpenElec/Linux.
It will work on other configurations as well for example a Raspberry Pi running OpenElec, or any Windows or Mac computer running Kodi with the Boblight addon.
So with your laptop: The USB of the Arduino will be connected to the USB of your laptop.
hans
Thanks!is there a beginners guide?
I am very new to all of this. I don’t know some terminologies. I am trying to learn as much as I can. Thanks a lot!
Ruben
I have written a few articles that relate to this one, but I’m not sure if that should be considered “beginners guide”.
Feel free to ask though … maybe this could be a start of a new article …
…
Maybe I can get you started with some of the terminology.
KODI, used to be called XBMC, is a multi media center like application, which can be run on multiple systems (Windows, Linux, Mac, Raspberry Pi, Android, etc.). The easiest start is to download it from http://kodi.tv/ for your computer (for example Windows, or Mac OS X).
KODI can play media (video, audio, pictures) from your local harddisk, from a network share or network streams.
Place a few files on your computer and try playback with KODI.
Fir this you need to tell KODI (Files -> Add Files) where to find them.
KODI will use so called scrapers to find related information of the movie or music you’re trying to play, and keeps track of what you have watched or not. It can even continue where you left off last time.
Now there are plenty of addons for KODI. Boblight is such an addon.
Boblight analyzes the video feed and determines (based on a config file) what “blocks” it should look at. Based on that it will send information through the USB port to an Arduino which in turn controls the LEDs so the colors become visible.
hans
Thanks for all the info!
Could I uses this power supply350W 12V 30A Small Volume Single Output Switching power supply for LED Strip CNC 3D Print
http://www.aliexpress.com/item/350W-12V-Small-Volume-Single-Output-Switching-power-supply-for-LED-Strip-light/628585980.html
(from AliExpress Android)It is a 30amp,I want to make sure if I would like add more LEDs would it be enough current to power my projects
Ruben
For LED strips, if you picked the right one, you’d need 5V.
Better avoid 12V LED strips. They are either the wrong type of LEDs or come with additional complications.
Look for WS2811 or WS2812 (A or B) LED strips, I have used these in the past.
As for the power supply, there are plenty 5V power supplies out there.
I have had good experience with this 5V 10A power supply.
hans
Hello, im ordered WS2812B for my raspberrypi2+hyperion project. Now im reading on some german site that WS2801 are better for ambilight project as they should be faster for using 2 data lines. Im asking Author what you think about it? I know you are professional about this WS2801/WS2812 leds so i trust in your opinion :) im just curious if i do good ordering WS2812B for my ambilight project.
Thank you!
Michal
Hi Michal,
well, I do not quite agree with that statement.
The WS2801 and WS2811/WS2812 are two very different animals when it comes to controlling them.
The WS2811/WS2812 is kind-a like a next generation of the WS2801.
A WS2801 needs an extra clock connection, whereas the WS2811/12 has the clock build in.
Both come with their own “problems” – one needs careful timing (ie. realtime) and the other needs external timing provided (finicky).
Bottom line: both work equally well, and I actually have a preference for the WS2811/WS2812. So no worries; you’ve got the right strip ordered.
hans
[…] Da wollte ich natürlich auch ein (leicht transportables) Projekt zeigen. Vor einigen Tagen trudelte hier ein LED Streifen 5V ink1003 (kompatibel zu ws2811/ws2812/ ink1002) mit 120 Einzelstrips (sprich 360 LEDs) für knapp 30 Euro bei uns ein. Daraus und aus einem Arduino habe ich ein Ambilight nach dieser Anleitung gebaut: //www.tweaking4all.com/home-theatre/xbmc/xbmc-boblight-openelec-ws2811-ws2812/ […]
Hello, I cannot seem to get this to work on OpenElec 6.0
I have checked and rechecked my sketch and boblight.conf and everything lines up with your guide. My Arduino is detected and all needed items are installed in kodi.
My LEDs will not light up. Kodi says boblight connected, and I see ttyACM0 being detected.
I tested my lights with another sketch and they are lighting up, just not with boblight. Can you tell me what I’m doing wrong?
heres my sketch
Heres my boblight config
Thanks
Tim
Hi Tim,
I’m running OpenElec 6.0 and it works just fine on my setup.
First thing I’d do it look for the OpenElec/Boblight log files and see what you can find there.
You could also try a lower baudrate, even if it’s just for testing. I see you’re using “460800”, just for testing try something lower like 9600.
If that doesn’t work, and you didn’t find anything obvious in the log files, test a different USB port name (output device).
hans
Hello;
first of all i would like to thank you for creating such a nice,informative and noob friendly tutorial, i am completely noob and doing my best to make it work.
i have some basic questions, hope you would mind answering.
What is XBMC and Openelec? why have you used the term XBMC PC, is it a software or hardware (like media player)?
Can i make it work for my 32 inch samsung led tv?
Adnan
Hi Adnan,
Thank you for the compliment!
OpenElec is a Linux distribution specifically geared and optimized towards using Kodi (XMBC).
It can be run on PC hardware (which I did, with a tiny AMD computer), Raspberry Pi, and a 1st Gen AppleTV.
So the tiny PC is running just Linux and Kodi (= the OpenElec distribution).
In short: one downloads OpenElec, and installs this on a PC or Raspberry Pi. It’s the only thing you need. So no need for a separate Linux or Windows operating system, since it’s all included (which is what makes OpenElec so great). And Kodi (XBMC) is installed as well.
Kodi (the new name for XBMC) is a Media Center like application, in my opinion the best you can get.
Kodi on itself, if you do not want to use OpenElec, can also be used on a Windows, Mac, or Linux PC, and on most Android based devices.
Since most TV’s, even the so called Smart TV’s, cannot run Kodi, with the exception of certain Philips TV’s that are Android based.
So to run Kodi or OpenElec, you’d need a dedicated device that handles networking and playback.
Hope this answers your question, feel free to ask if you have more questions …
hans
Thank you so much for your response.
Now i got it, so it means this setup requires raspberry pi instead of arduino uno?
i have successfully run the my ambilight with arduino uno, ws2812b led strip, kodi on my pc and boblightd which runs in the background, also installed boblight addon in kodi, but i am not satisfied with the result although it looks awesome but leds do not exactly reflect the colors that are shown on the edges on the led tv screen, is that bcoz i am using arduino uno? will this be better if i use raspberry pi? here is the video that uses raspberry pi and its colors are exactly reflected as you can see, i wish i could make mine like this.
Adnan
i forgot to paste video link, here it is
https://www.youtube.com/watch?v=cxEZsWa_xbE
Adnan
The setup with the Arduino is fine, as far as I know, running the LEDs with just a Raspberry Pi comes with it’s won challenges.
First thing to know is that the video feed is analyzed by your HTPC, which can be a regular PC running KODI. This PC can run Windows, Linux or MacOS X, with Kodi on it. This is where OpenElec is handy to get started: it bundles KODI and a Linux operating system, tuned to using it for KODI.
The PC has to do a lot of calculations very fast to analyze the video. The newer Raspberry Pi 2 Model B can keep up, with proper tuning, but it can be a bit of work. So I’d start with a regular PC that is powerful enough.
The PC is then connected to the Arduino, like you already have. If there is a significant delay, then try a more potent PC, or disable all non-Boblight add-ons and see if it work better.
Also keep in mind: there will probably be always a minor lag, but it’s hard to notice.
If the LEDs do not line up with the displayed picture, then maybe check the config file and tweak the “positions” of the LEDs.
hans
thank you once again for quick response.
I got your point.
But i didnt understand what OpenElec is? i have downloaded it from its official website, there is no any .exe file to run this app, so how to run it? or is it only for arduino/raspberry pi?
Secondly i want to replace my pc in this scenario where it runs kodi and sends video information to arduino. so is it possible to send the led tv video information via its hdmi cable to arduino and bypassing pc having kodi installed? Do i need raspberry pi for this kind of scenario?
I am sorry for all such stupid questions, but believe me i am totally new to this area, i have just created it by following your guide, before this i am not aware of anything like arduino, its software, led strips etc. But i am learning now.
Adnan
Hi Adnan,
first off; there are no stupid question!

Feel free to ask, we all had to learn at some point, and to be honest I don’t always get the things being asked right away either, and I have to learn new things daily as well.
As for OpenElec: it depends which device you use. See this OpenElec Installation link.
As a device for OpenElec, one either uses a PC or Raspberry Pi – which then will run standalone. So it’s not like OpenElec is an application for Windows, instead it wipes your harddrive and installs a full OS with Kodi included.
Which ever you use, dedicated PC or Raspberry Pi, they both can send information to the Arduino to steer the LEDs.
In short: you use a dedicated device for video playback (PC or Raspberry Pi), which runs OpenElec and is connected directly to your TV’s HDMI input. The Arduino is connected to this dedicated device and handles the LED’s based on info send from that dedicated device. (hope I clarified that, but feel free to ask if it was confusing)
hans
i would like to say thanks a million times for taking time and answering all noob questions, as it almost irritate everyone to respond to such questions but i really appreciate (I don’t know why there is no reply button on your last comment, perhaps may be its getting larger..).
Now i got your point, i really want to make this system pc less but dont want to expend for Rpi, so this is good idea to look for older computer or laptop and install OpenElec on it.
I would like to suggest you do divide this guide (or make another) in two portions, one for ambilight system with only pc having kodi installed and arduino, and second part to make it work with pc less system like Rpi and also the idea to instal OpenElec on any pc and reserve it for ambilight.
Also update the post with the name KODI instead of XBMC, as i am a ambilight lover, so i came to this topic having no any backgroud knowledge of the parts and software, so this irritated me that there is no any XBMC exhist now but it is renamed to KODI.
In the end what about pc less system with any hdmi source using Rpi and arduino with hdmi splitter, hdmi to avi and usb grabber? don’t you consider this idea in near future and write a detailed tutorial/guide like this one?
Looking forward.
Adnan
Hi Adnan,
you’re most welcome, we all had to start at some point as well …
As for the Reply button; since these comments are more intended for the incidental comments, comments can only be nested 5 levels. Besides that, beyond the 5 level deep, the boxes might become way too small. So what I usually do, is pick the reply button of the comment one level up. It’s not perfect, but it works … longer discussions should probably move to the forum, but for now this is OK as well.
An older computer or laptop would indeed be good for OpenElec. Don’t go too old though … my tiny AMD box is about 4 years old and still runs just fine. I’m using this little guy, but it no longer seems to be produced and prices have gone up. I paid $170 for a new one, and right now the prices for the new ones have gone to a ridiculous $388. But I’m sure other small computers, or old computers can be found.
I appreciate your suggestions, like the one to split the article.
However, this article been written with a PC running OpenElec in mind. I’m considering writing a new article covering the Raspberry Pi with OpenElec. If I get to it, this new article will cover Raspberry Pi, OpenElec and Hyperion (instead of Boblight). Possible making a clear separation to describe Hyperion for a PC as well. Hyperion is much more resource friendly than Boblight, but can be more challenging to setup. I just have to find time for it … (wish this could be my fulltime job!)
At the time I wrote this article, XBMC was still called XBMC … unfortunately, having to update all my articles (200+ in 2 languages) is pretty cumbersome and time consuming. However, in newer articles I do mention both XBMC and KODI so folks know KODI is the new name for XBMC.
As for your HDMI splitter idea; I have some equipment laying ready to be used for that exact idea. I’d love the ambient lights to work for my XBox, BluRay and regular TV (cable box) as well. Just due to some life changes and a lot of traveling, haven’t gotten to it yet.
Thanks for the suggestions! They are always most welcome …
hans
I’m running into an issue and not sure if anyone can help me out. I had this running fine on a cubox i4 with geexbox. I updated to openelec 5.0.8 and boblight seems to be fine when I put on a static color but as soon as I start a video I get two different issues: 1. The screen goes black and the cubox reboots or 2. I can hear the audio but video is gone and can’t escape out of it so I have to pull the plug. If i disable boblight everything works fine minus that I don’t get lights :/ . I went through the sketch and the boblight configuration and everything seems fine. Any thoughts?
Taytos
Hi Taytos,
I have no experience with Cubox i4, but it sounds to me like there is something going wrong with the Boblight addon.
I’m not sure what OS these Cubox devices run, is that Android maybe?
Either way; I’d remove the addons and reinstall them, making sure it’s the proper version.
hans
Thank you for that great tutorial. I’m planning to build such as system as well.
Looking over at ebay I did find also RGBW stripes with WS2811 compatible layout / controller: eBay Listing
Any idea if these would work too with this setup and arduino sketch?
Thomas
Hi Thomas,
Thank you for the compliment!
As for the eBay listing you mentioned, I’ve never heard of that LED type. Google tells me that it should be compatible, but I cannot guarantee that. It looks like a Chinese clone … not sure if I would pick that one. The original WS2811/WS2812 uses a 5050 LED type.
hans
Those would probably work but like Hans says they look like clones. I got mine from aliexpress. A 5 meter roll was right under $40 USD.
Taytos
Thanks for chiming in Taytos!
I got some at AliExpress as well … link
I choose the 5 meter, 60 LEDs/m, black, IP65 (their code: “Black 5m 60 IP65“) for $29.33.
I picked IP65 since it’s casted in nice silicone which makes it looks nice and protects it.
My previous strand was IP67 which (se this article) is in a plastic “tube” of some sorts, which looks lees “pretty”.
And since I do not usually have water near my TV anyway … haha
Note on the IP rating:
IP30 means not water proof. Quite often you can touch the electronics with your hands. Zero protection.
IP65 means it can handle splash water, like rain and snow. I think the spec even says: spraying water on it from any direction should not cause a short. This is often cast in silicon, looks and feels very nice.
IP67 means that you can submerge the strand up to 1 meter deep into water without causing a short, which is often in plastic tubing, which doesn’t look all that great.
(source)
hans
By choosing the RGBW version I hope to get a “better white” on the wall. Plus the power drain should be a bit lower, because to get a white color only the white LED has to be powered where on the RGB strips all there colors need to be powered to get white. I will have around 300 LEDs for my setup.
What do you mean by “it’s a clone”? Which version is the original one? I think the one that adafruit is selling is the original one so your’s would be a clone too, or did I miss something?
BTW: did you all mount the LED strips in a 90° angle to the wall (facing the wall straight away from TV backside)? I am thinking of putting the stripes in a 45° angle so it will lit a more of the area around the TV. What do you think?
Thomas
Clone because of the model type (SK6812) but doing some looking it seems like those strips are similar to WS2811/2/b strips. “The outer type is the same with a 5050LED chip, each element is a pixel.” Not really clone based on who sells it because in the end I’m sure they are all made at some factory in China. And I just mounted mine flat on the back of my TV with no angle and it works well. I had seen some people angle their set ups but I really don’t see a noticeable difference.
Taytos
I mounted mine facing the wall as well, like Taytos: flat on the back on the TV. Works very well.
hans
See figure 13 above …
hans
Hello,
I have successfully configured boblightd on windows to connect with the kodi plugin and the arduino for the leds. The kodi plugin seems to handle all videos smoothly with soft interpolation for color changes.
I am now trying to replicate the same for my tv. Unfortunately, kodi doesnt seem to support my usb capture card(http://www.ebay.in/itm/like/181973587692)
So I build a simple python script to get frames from the usb capture card, generate most dominant color and send the values to boblightd via libboblight-win32.0.dll using (https://github.com/bobo1on1/script.xbmc.boblight/blob/master/script.xbmc.boblight/resources/lib/boblight.py)
Now the colors seem to be working fine, (I use addpixel(rgb) then sendrgb() for every frame). However I want to add soft transitions on colors, like the xbmc plugin.
Any help would be appreciated.
Thanks.
Saurabh
Hi Saurabh,
I see you’re working already on a project I wanted to start in the near future as well.
So far, the support for capture devices has held me back in actually doing so.
As for the transitions, you might want to see if the source of Boblight gives any clues on how they did it.
Do you mean transition of colors of LED next to each other, or transition of colors from frame to the next frame?
My Python knowledge is rather poor, so I’m impressed you got something already running.
Another idea is looking at what the LightBerry project does and what they use for drivers and such – although they use a Linux based OpenElec setup (OpenElec if I’m not mistaken) …
hans
So I have had this running on my Intel NUC OpenELEC box for sometime now. I just got a Nvidia Shield and thinking about using this now as my box in our bedroom. I have a Samsung 65″ 4K tv and can’t remember how many LEDs. I know it’s 200+.
So has anyone gotten this or something like it running on the Shield? If so please let me know. If can’t get running not sure if going to use the Shield. Wife and I both like having the LEDs m
Ray
Hi Ray,
as far as I know, the nVidia Shield is an Android device?
I’m not sure if Boblight (or any other LED daemon like Hyperion) even supports Android?
So far I have only seen Android Apps that control the “settings” of Boblight, but nothing that actually runs Boblight on Android itself.
Maybe someone else has experience with this?
hans
[…] such as dimming and brightening your rooms lights when a video begins and ends, or to control your Boblight which illuminates a set of coloured LED lights around your TV to enhance your entertainment. There […]
Hi,
I’m having some problems setting up Boblight with Openelec on an Intel NUC – Model D54250WYK (all USB 3.0 ports, no USB 2.0 – I’ve a feeling this may be my issue).
I have uploaded my Sketch to my Arduino Uno Rev.3 board. I used your config supplied on this page adjusting for number of LEDs and PIN 13. I’ve installed both boblightd and Kodi-boblight on my NUC running the latest version of Openelec. I’ve made sure the baudrates match.
I have used the Boblight config maker and uploaded the config to /storage/.kodi/userdata/addon_data/service.multimedia.boblightd.
When Kodi boots I get the error message that it cannot connect to boblightd.
I have the Pulselight internal HDMI-CEC adapter which Kodi sees on /dev/ttyACM1.
The service.log file in /storage/.kodi/userdata/addon_data/service.multimedia.boblightd shows the following:
(CConfig::CheckDeviceConfig) ERROR: /storage/.kodi/userdata/addon_data/service.multimedia.boblightd/boblight.conf line 31 section [device]: wrong value # for key prefix
(CConfig::CheckDeviceConfig) ERROR: /storage/.kodi/userdata/addon_data/service.multimedia.boblightd/boblight.conf line 31 section [device]: wrong value PREFIX for key prefix
The Kodi log reads:
### [Kodi Boblight] – connecting to local boblightd
00:15:33 T:140098880403200 DEBUG: ### [Kodi Boblight] – connection to boblightd failed: SO_ERROR 127.0.0.1:19333 Connection refused
The strange thing is that if I used the sample config that gets installed on openelec with boblight, it connects to boblightd. The sample reads:
[global]
interface 127.0.0.1
port 19333
[device]
name device1
type momo
output /dev/ttyACM0
channels 75
prefix 41 64 61 00 18 4D
interval 20000
rate 115200
debug off #turn this on to see what it’s doing with the serial port
delayafteropen 1000000
So I’m at a loss, I’ve tried changing the /dev/ttyACM0 to various others including it’s USB counterparts. Nothing seems to work, all I have is all the LEDS in white (which is pretty but not the intended outcome of this weekend’s work!)
If anyone could help me out and point me in the right direction, I’d be very grateful.
Callahan
Hi Callahan!
Sorry to hear you’re running in to some problems.
The log suggest issues with the prefix code, at least that’s what Boblight seems to claim.
It does look like you’ve used the right code though.
By the way – this is the first time I see Boblight complaining about a wrong prefix. According to the code that generates that message (in BoblightD): “this is in hex from 00 to FF, separated by spaces, like: prefix FF 7F A0 22” – which is what you have done.
I’m also a little confused about the “Pulselight internal HDMI-CEC adapter” you mention. As far as I can find, this is used to send consumer electronic control signal over HDMI, which is not USB related as far as I know. You could try (SSH or commandline) using “lsusb” (not sure if it is supported in OpenElec – never tried it. Other tips to find the USB port in the Find Linux System Specs article).
On Reddit I found an old post, almost suggesting that OpenElec might not fully support the NUC USB devices, but the post is old, so this might be outdated info.
hans
Hi Hans,
Thanks for replying. The only reason I mentioned the Pulselight is because I was concerned that as it sits on ttyACM1, it may be interfering with the boblight setup on ACM0. It plugs into the internal USB header. It allows the TV remote to be used with the NUC as well as offering some other features built into Kodi. I suppose I was at a point at 3am this morning of trying everything!
I did find some articles last night (albeit old ones), suggesting that the prefix was directly tied to the number of LEDs you have and I saw some varying posts with different hex’s in them. I couldn’t find any articles on how those hex’s are created based on number of LEDs.
I also (if this makes any difference) used the latest Adafruit_NeoPixel library built into the Arduino IDE rather than the one you supplied with your article. In desperation last night, I then reverted and re-flashed the board with your Sketch and the library you supplied but to no avail.
I’m getting to a point where I’m thinking to wipe the Openelec box and start again but I’m 100% sure that won’t help as I can get the boblightd to connect with a config file that isn’t created from the boblight config maker. The only real difference between the 2 is that the number of LEDs is different in the sample conf file (75) which makes me think that the prefix number actually does matter.
I’m going to test again this morning and change the number of LEDs to 75 in the config made by your config maker and see if boblightd connects. If it does then it (to me at least( points firmly at the prefix being wrong for the number of LEDs I have.
Will post back within the hour!
Thanks again for your time writing this article and continuing to help those stuck on this project!
callahan
Gah! I’ve just seen your reply in the forum, please ignore my comment above and I’ll continue this in the proper place!
Apologies!
callahan
No need to apologize …
…
Your post was actually pretty well cleaned up.
hans
You’re most welcome – helping each other, especially in a friendly way, makes the Internet and projects like this fun!
hans
For others: please look at Callahan’s Forum post as well!
hans
Just wanted to say thanks for this. I used it about a year ago to build an ambilight for our media center in the lounge, and it’s worked without a hitch day in and day out.
Yesterday I hauled out the left over LED strip really just to play with, and soldered some wires on. Ended up making another ambilight for our bedroom. It only has a strip along the top edge, so it took some fiddling to make the bob light config file work, and because of the USB extension I used, the volt drop was a bit high to power off the USB port, but a reducing the brightness in your sketch sorted that.
Also used the neopixel tests trip sketch, edited to use only the rainbow portion, to make a night light for my kids, gutted an old lamp and dumped it in, they love it!
Peter
Hi Peter!
Thank you so much for posting a thank-you!
I’m really glad to hear you’ve had so much use and fun with this, awesome!
Mine is still up and running as well – I hope to find time soon to make it work for any video input, so I can watch TV, play video games, watch BluRays etc, enjoying the same effect.
hans
OK, so quick wiring question. As far as wire gauge goes, what is recommended or what are people using. I saw 6 gauge some where above but that seems extremely excessive. I have 4 independently powered zones on my set up. Top is 75 leds, sides are 40 each, and the bottom is also 75 leds ( wall hanging). So the max amps I’m pulling from say a strand of 75 would be 4.5A. Wouldn’t I then only need to by wire rated high enough to allow for those loads on each individual strand? its not like the entire 13A ( entire calculated load of the setup) load is going through the entire setup at once. Is this thinking correct? I found some 22Ga wire rated for 10A and 20Ga rated for 13A. would either of those work OK? The longest length of wire I’m estimating at around 6-7 feet. Thanks !
John
I’m not sure what others use, but I’ll be honest … I looked at the wires attached on the LED strands and they looked pretty good to me, so I just stuck with that and didn’t even look any further. For the record, I have a total of 4 strands, counting app.300 LEDs, and the wires do not even change temperature (ie. stay at room temperature), which is good enough for me.
Unfortunately, I do not have the means to measure the gauge … sorry
Since you power your strips independently (good idea by the way!), I would not expect that you need any excessive wiring, and you’d indeed need the rating for power pulled by an individual strand.
hans
Hi All,
Ive had this running for about a year now and Ive finally decided to try and calibrate the colors. It seems like a pretty non user friendly task. Is there a way to simplify the color match process? Could someone give a brief tutorial on the subject? Do you have to reboot the system every time you make a change to the gamma or adjust of the color? I tired this past weekend and every time I edited the .conf file ( using .txt), and upload i back to my system, the colors respond very slowly and didn’t seem to change much ( with and without reboots). Nothing else was changed except for the gamma and adjust. Thoughts?
john
Hi John,
I agree, it’s definitely a lot of work and most certainly not intuitive. I’ll admit that this is a reason why I at some point gave up on calibrating.
As far as I recall, the Boblight Addon for KODI has options to calibrate as well – this will save you the endless process of modifying, uploading, rebooting etc when using the conf file.
hans
Thanks so much for your response Hans. I’ll check some more tonight, but I don’t think I saw those options in the addon, unless its not what I am expecting to see.
John
Hi John,
if you go to the XBMC – Boblight Addon, you’ll find settings where you can toy with red, green and blue and such.
That should help … I hope
hans
[…] Lightberry社のものは既製品ですが、自作でするぜって方は、Hyperionを使うとよさそうです(github、チュートリアル) Hyperionは安く済みそうですが中々難易度が高そうです また、メディアサーバーとしてKodi系のシステムを利用する場合、アドオンにBoblightってのがあるのでこちらでも自作できそうです どの自作もハードル高そうなので使うとしたらLightberryが現実的な気がします […]
Hi,
I love your project, my only question is can I use Raspberry Pi 3 as OpenElec Kodi “computer” in your setup?
Adam
OpenElec runs on a Pi3 just fine (see: Get OpenElec).
Since Boblight even worked with Pi 1 (but not very well), I would assume it works on a Pi3 as well.
However, for a Raspberry Pi I’d recommend using Hyperion instead of Boblight – much more elegant and less resource hungry.
hans
Hello Hans,
i am trying to get my ambilight work, but i am facing great difficulties. Openelec is able to provide a connection to boblight but the strip isn´t working. My motherboard provides only usb3 ports is that a problem ? Futhermore i am using a CEC adapter on the interal usb port. Could you take a look to my log file ? Where can i post the log file ?
Thanks in advance
Regards
goofy
goofy84
Hi Goofy84,
Posting logs can be best done in the Forum, for example under the Arduino section (recommended), or the Home Theatre section.
Make sure to post the link to the topic you started here, so others can pick up on it as well.
Now USB 3 might be a problem, but maybe we should go one step back first.
1) Does the test “swipe” run when the Arduino starts? (one LED after the other is turned on until all LEDs are on)
2) Check the KODI log to see if a connection is being mentioned (post in the forum if you’d like so others can take a look for you).
hans
Hello,
can anybody provide help ? My boblight is connected but the strip isn´t working.
Regards
goofy84
goofy84
Dear Hans,
thanks for the reply. I think it is definitly a usb problem. This is a part of the boblight.log:
(CDeviceRS232::WriteOutput) ERROR: AmbiLight: /dev/ttyACM0: write() Resource temporarily unavailable.
My motherboard has only usb3 ports. The swipe run doesn´t start. I tested my stripes with adafruits strand test and only the right part is lighting up to the point where i soldered the bottom strand. The powersupply is with 10A and 5V sufficient. Is this string in the arduino sketch const char prefix[] = {0x41, 0x64, 0x61, 0x00, 0x18, 0x4D} corresponding to this string in your boblightconfigmaker programm 41 64 61 00 18 4D ?
Thanks
goofy84
Hi Goofy84,
Well, let’s first make sure the initial swipe works.
In the Arduino code, even when not connected to a Kodi box, line 51 (setAllLEDs(STARTCOLOR, 5);) will do a color swipe for all LEDs. If that doesn’t work, then we’re already looking at an initial problem. Since your power supply seems beefy enough, I’d wonder if there is something wrong with the LED strip. Since you indicated the soldering point as a potential issue; check the connections, and make sure the Data pin of both strips are pointing in the same direction.
It is not uncommon that LED strips have faulty LED blocks in them. I had one in mine as well, and I bypassed that one by taking the Data pin input of that LED and connected it to the Data pin input of the next LED in line. But first make sure the arrows point in the same direction at your soldering point.
If that works, eventually, then it’s time to look at your USB device. Now, my old HTPC has both USB 2 and 3, and I only use it with the USB 2 ports. Either USB 3 is not supported by the operating system you’re using (Linux variant probably, possibly OpenElec?), or you’re using the wrong device name. If you have shell access, you could try “usb -l” (L) to list USB devices and maybe see what the correct name might be.
As for the string; yes they should match (not using the AdaFruit “magic” code).
hans
Dear Hans,
i managed to get the initial swipe to work. The gauge of my wires were to small, i resoldered anything now it works.
lsusb or lsusb -v worked to show me the device list
For the moment i am facing the usb problem. Here is a usb device list:
usb device list
Which output device should i use in your Boblight config maker program ?
Thanks
goofy84
goofy84
Hi Goofy84,
my bad, seems lsusb is not giving us the right answer – Linux is NOT very convenient when it comes to finding your device.
You could tty the following which lists the several devices:
Which should produce something like this (tested with OpenElec):
I’d have to guess that it’s one of the “serial” devices (last column), so in my case “/dev/ttyACM” or “/dev/ttyS”.
I’m afraid you’ll have to test all of those to find out which one is which.
(if others know a better method, then please post it here!)
hans
this is my screenshot
goofy84
I managed (with http://www.freeformatter.com/base64-encoder.html) to decode the image you posted and placed it here manually.
Seems like the same kind of output I have, so I’d assume the device is “/dev/ttyACM” ….
hans
The screenshot didn’t work ….
….
hans
Sorry but what didn´t work ?
goofy84
You uploaded/pasted an image in your comment (screenshot), that did not work. Instead raw base64 code was posted.
So I copied the base64 code and managed to retrieve the picture you tried to post, and posted it here from the admin pages, so other can see it.
Pasting pictures in comments here does not work …
hans
i tried ttyUSB0 – ttyUSB5 nothing worked. When i changed the setting i restarted openelec every time. :-(
goofy84
finaly:
type momo
output /dev/ttyUSB0
worked !!!!
Last question, could you tell me the modification to the sketch to switch of the strand when openelec is shut down. Currently the LEDS are shining white :-)
goofy84
Awesome! (I really wished this would have worked a little better under Linux)
There are several things you can do as far as the state of the LEDs when OpenElec/KODI is shutdown.
– Use a smart power strip
With these strips, one connector of the strip is the master, and the other outlets switch on/off based on that.
So in my situation, I connected the TV to the master and all my other equipment (Arduino etc included) to the “slaves”.
Once I power on the TV all the other devices get power on as well, ditto when I shutdown the TV, all equipment goes off.
The good thing: your Arduino Power supply is switched off and does not consume power when you’re not using it.
– Add additional code to switch the LEDs off after a certain time.
I’ll have to make some time to put that kind of code in place, and I’m running it a little low on time this morning.
I’ll give it a try this afternoon.
– Switch Arduino Off with Remote
Someone started a forum topic about that one: link.
hans
Hi Hans,
could you tell me if it is possibile to change the start point in your configmaker v1.4 ? Is setting the start point important ?
With your newer version of the configmaker it is possible to set the start point where you want, but the config file i am producing doesn´t work. The only version that suits for me is 1.4, i don´t know why !?! Thanks for your support
goofy84
Hi Goofy84!
v1.4 only supports a fixed starting point at the bottom, in the middle. This is one reason why I started working on v2.
Unfortunately, society kind-a wants me to have an income to live from, so I had to stop developing ConfigMaker.
Can you tell me where the config of v2 goes wrong for you?
I know it has it’s issues, but maybe it’s a quick fix.
hans
i don´t know why the version 2 doesn´t work. Everytime i use the config file from v2 the boblight plugin doesn´t work. Changing the file the lights show up. The settings are the same.
goofy84
Maybe it’s a small thing, would you mind starting an Arduino Forum topic, so you can post both configs – this way I can compare and see what might be going wrong.
If you do, please post the link here of that new topic so others can find it as well …
hans
Hi!
First of all thanks for Your great tutarial!
I´m using the windows boblight daemon. Nearly everything is working perfect. But when the screen on my tv is black the leds are white. Pretty annoying…
Do you have an advice for me?
THX!!
Cheers
C
Christoph
Hi Christoph,
do you mean, when the TV is OFF? (see comments here)
Or when KODI/XBMC is not running? In that case, checkout the Boblight KODI add-on and see if there is a setting for the menu background (forgot what it’s called), and set that to black. That might do the trick.
If none of this suits your needs, one could add something to the code, that if after a certain time no data appears from the USB port, that the LEDs will be set to black.
Another interesting forum topic might be: Boblight add ambient light detection, although not exactly what you’re looking for.
Maybe one of these days I’ll update the code to add something to switch the LEDs to black when idle.
hans
What I meant was, that while watching dark scenes (= tv is black) in movies, the leds dont turn off. They glow white
christoph
Sorry Christoph, for misunderstanding – my bad …
…
Well, that is annoying for sure and definitely not what it’s supposed to do.
I honestly wouldn’t know what would cause that, unless there is some set wrong in the Boblight Add-on (for example gamma correction) or the boblight.conf file (maybe in the [color] section). But I’ll admit that these are just guesses.
This is what my color section looks like:
I’m not sure if others have experienced this issue … if so: please chime in!
hans
Tried your settings,still the same effect
Tried to change the blacklevel and other settings, still the same :-(
Christoph
Ah crap, just noticed that it might be like below (the blacklevel values to zero) – my bad!
hans
Also tried setting blacklevel to zero, still all leds are white.
Obviously my problem is, that when the color black has to be displayed by the leds, all chanels are turned on instead of off!
I laso tried to define a new color (black 000000) and redefined one Led for testing like this
[light]
name start1
color red AmbiLight 1
color green AmbiLight 2
color blue AmbiLight 3
color black AmbiLight 270
hscan 37.5 40.6
vscan 91 100
My idea was: when the color black (Hex 000000) has to be put out by he leds the chanel 270 (chanel of the last led, just for testing) is activated, and the chanel 1, 2 and 3 not so the led turns black. No success, the led glows white :-(
I read abeut the setCorrection argument in the Fastled library, but I dont know how to use it…
Christoph
It’s very strange that black video causes all LEDs to jump to white.
Did you try replacing the [color] sections with this (it should then revert to it’s defaults):
I’ve tried looking for folks with similar issues, but strangely enough … hardly anything out there pointing to the same issue. I have seen that an old bug in Hyperion (not Boblight) caused this, but that would not be relevant for your scenario.
I’ve read that some folks use the threshold value, never used it myself, but it might be worth a try. I have seen values between 15 and 40 (it’s in the [global] section, but AFAIK you can also set this in the Boblight Addon.
hans
Hi Hans !
I cant reply to your message dated 28.08.2016 7:11 AM.
Changing the color section as you wrote didnt change anything…
I read about the threshold value but never saw a boblight.config using it. According to the boblight wiki in the global settings the only two parameters are interface and port. If I add threshold in the global section the daemon doesnt start. So i ithink ints not possible to add a threshold value to the global settings.
I tried to change the threshold level in the boblight kodi addon. Changing to another value as 0 causes that the leds stay dark all the time…
Christoph
Hmm, that’s interesting. So even setting it to 1 in the addon would result in dark all the time?
I had read somewhere about the threshold value, then again, a lot of people mix up Hyperion, Boblight, and a bunch of similar tools.
What happens if the gamma is set to 1 for each color when setting the threshold in the addon?
And what happens if the gamma is set to 0.5 for each color?
I’m clueless what the problem might be, so I’m just posting things I’d try if I’d be in your situation, hopefully getting somewhere
hans
Yes. Setting the threshold Level to more than Zero causes the leds to stay black.
I Played around with the Gamma value (values between 0.0 and 200) and the threshold value in the addon. No matter what gamma value is set in the config (0.5, 1, 10, 50, 100, 200), setting the threshold to more than Zero causes the leds to stay black.
I also tried the neopixels library instead of the fastled library. The effect is the same: when the leds should be off they glow White.
I tried this testing sketch:
http://pastebin.com/hQDe9Dnq
the Colors of the leds Show the right Colors.
I also tried prismatik and ambibox. With this Software the Colors are displayed correctly.
So:
Because the testing sketch is working I dont think ist a Problem with the library.
Because prismatik and ambibox is working properly i dont think that its a Hardware Problem.
Because the Problem is also when using the neopixel library with boblight i assume my Problem is within the boblight.conf, within the addon or within the daemon.
At the weekend i will try to connect the leds to a raspi or openelec pc to exclude the daemon as the Problem…
christoph
Hi Christoph!
That’s a good way to narrow down the issue!
I’m confident the issue most be somewhere in either Boblight, the add-on or the config file – all assuming that your LED strip does not by default switches to white when there is no data. You could try that by uploading an empty sketch and see what happens – but I doubt that will be the problem.
A simple sketch that tests a few colors will definitely exclude this as an issue, ie. Red, Green, Blue, White, Black,…
However, since Boblight and the Addon works just fine for others (as far as I know), I’d think the config would be the only thing left where there might be a problem, but I’ll admit right away that I would not have a clue what might be wrong.
(all under the assumption that the add-on is configured correctly, ie.the default settings)
hans
Quick question if you don’t mind. Trying to learn how this led strip stuff works, and if I understood correctly, the digital led strips are very different from analog RGB ones. I can see that several Chinese dealers sell touch remote controllers (wheel pad for adjusting the color output and brightness) that allow to control the analog strips.
I understand Boblight has been created for video display in mind, but I don’t see why these attached strips couldn’t be used for general ambient lighting as well. With that in mind, is there an addon for Kodi that would allow to adjust the current color settings (provide static colors) as you would with an analog remote? For instance, some Kodi remote control apps can be downloaded from the Android store and then used to control Kodi. Wouldn’t it be cool if there was a similar smartphone app that could be used to control the led strips that are connected to your Kodi HTPC?
Jay
Hi Jay,
Questions are always welcome …
…
I’d carefully like to say that the RGB strips are the “digital” ones, where as the “other ones” are the analog ones. And yes they are controlled in a very different way. The digital ones are the ones we like …
As far as I know, there is no KODI addon that would allow you to use the LED strips for ambient lighting. But … from a technical point of view, this would most certainly be possible. Just needs code to send to the strips (Arduino) so the color is set, and if you want remote control with that, then you’d need a remote, a remote receiver, and code to interpret what your remote is sending so it get’s converted into your desired ambient color.
Having a smartphone app for this would indeed be cool. I’ve done a few experiments with writing my own smartphone apps and found it to be less “easy” than expected. For example; for iOS one needs to pay for a developer account, and is almost forced to work with XCode. Android is a little easier to work with, but still it forces you to use tools that you normally might not use to develop applications. For example; I like to use Lazarus, of Delphi. Both support Android and iOS, but (Lazarus) things can be quite cumbersome, or horribly expensive (Delphi).
An idea might be to contact the developers of the Boblight KODI addon, see if they are willing to help.
You could also experiment with the Boblight KODI addon and disable movie/shows support, and set an ambient color there (still wouldn’t offer remote control of course, but it might be a start).
hans
Hello, Awesome project! I have some questions please help me!
I will buy arduino uno and WS2801 led strips. (I’d like waterproof one). Also I will buy some jumper cables to connection. So, it’s ok.
Now, I am using my Tv only satallite mode (internal satallite receiver). Which is I don’t have any cable network or something like media center or what ever.
Does it work this ambilight system while I am watching CNN, or Fox or maybe cartoon network? lol.
Also I am still don’t get it does it need power adapter? Which one’s need power arduino or led strips?
Please help me! Thanks in advance!
Simply as a CaveMan my project in my mind here it is : http://i.imgur.com/aE3xQx6.png
CaveMan
Hi Caveman,
Thanks for the compliment!
I’m afraid that the ambient light will not work in your setup. The video feed needs to be analyzed so the LEDs can be set to the proper colors. This project would not do that, unfortunately, I hope to do this in one of my future projects.
For what you’d like to do, I’d recommend something like LightBerry (http://lightberry.eu/).
In essence it uses a Raspberry Pi, a video grabber, and Arduino and a LED strip.
hans
I’ve used this on a number of displays at home very successfully, the first one has been running every day for almost two years now, and survived two moves just unplugging and connecting at the new houses.
Trying to set it up on a new device, but the boblightd addon seems to be missing from the Kodi repo, any idea where I can get it?
Peter
Hi Peter,
I’ve just moved as well, for a second time, and hope mine survives as well
The KODI Boblight addon should be available under the standard repo, under “services” (according to the KODI Wiki and the Addon Pages).
Let me know if you still have trouble finding it.
hans
I did install the kodi no light add on, but there is no boblightd add on anymore.
Is it now baked in to Kodi?
Peter
Oh wow, I did not know that.
Seems OpenElec has removed it. As far as I can see in the Kodi Forum topic, both should still be available – but in all fairness, I do not have the means to verify this (my stuff is being shipped from Europe to the US, so it’s all in a big container somewhere on the ocean haha).
hans
I just rebooted, and it got the connected to boblight notification, so I wonder if it’s baked into Kodi now? I’ll solder some LEDs and check this evening
Peter
Phew, you got me nervous there for a minute hahah
hans
hi hans
after some time, and with a bigger 75″ screen i tried to install boblight again on my linux machine.
it’s really strange. i install t4a_boblight on the nano. connect pin13 to the data pin of the ledstrip. plug in the nano the the pc, and the led strips are powered by the pc as well – so one common ground. the led strip initializes, running led light from first to last led in the color i chose as initial color in the arduino sketch.
but after that: NOTHING. i can access the led strip. and it must be something totally trivial, and i can’t find the problem.
boblightd is running:
root@yavdr:~# boblightd
(InitLog) start of log /root/.boblight/boblightd.log
(PrintFlags) starting boblightd
(CConfig::LoadConfigFromFile) opening /etc/boblight.conf
(CConfig::CheckConfig) checking config lines
(CConfig::CheckConfig) config lines valid
(CConfig::BuildConfig) building config
(CConfig::BuildConfig) built config successfully
(main) starting devices
(CClientsHandler::Process) opening listening socket on 127.0.0.1:19333
(CDevice::Process) AmbiLight: starting with output “/dev/ttyUSB0”
(CDevice::Process) AmbiLight: setting up
(CDevice::Process) AmbiLight: setup succeeded
by setting boblight to ONE color:
root@yavdr:~# boblight-constant FFFFFF
Connecting to boblightd
Connection to boblightd opened
i receive that:
(CClientsHandler::Process) 127.0.0.1:35624 connected
(CClientsHandler::ParseMessage) 127.0.0.1:35624 said hello
(CClientsHandler::ParseSet) 127.0.0.1:35624 priority set to 128
but nothing happens. the led’s color doesn’t change.
please help me find the issue. i spent the whole weekend finding the problem :(
hannes
Hi Hannes,
I’m a little unsure how you powered the LED strip – did you just say that the PC powers the LED strip?
I’m not sure your USB port can pull that off …?!
hans
lol. sure it can’t. the 5v leds are connected to the pc’s power supply to the 5v rail. :)
hannes
Hahah, OK … I was confused for a second there
hans
hi hans.
maybe another approach: first of all i need to program the arduino nano. there is need to set the number of leds (channels = led *3).
.) what happens if the number doesn’t match the number of leds in boblight.conf?
.) what happens if the string is interrupted? it seems that one led in the middle of the string is not working properly.
.) what’s the best minimum config to do testing?
.) there is this prefix: does this change with the number of leds connected? i guess it should. how to determine the correct value?
thanks hannes
hannes
Hi Hannes,
If the number of LEDs do no match, then one of two things might happen:
– Not all LEDs light up (Boblight config < actual LEDs)
– LED position might be wrong (behind TV)
– Things might act weird (Boblight config > actual LEDs)
If a LED in a string is failing, then it either might not light up, or even block data to the following LEDs.
One trick is to take the Din pin of that LED en loop it to the Din of the next LED, so you effectively skip the defective LED.
I don’t think there is an idea “minimum” config for testing. I just used all the LEDs that I had .
.
The prefix; if you use my Arduino sketch, then no it remains static.
If you use the AdaFruit sketch, then yes the number of LEDs determine the outcome of the prefix. Boblight Config Maker can be of help for that.
hans
LOOK ALSUM want to make it
I have made a Juke running openelec with a HP desktop mother board inside it
Its only Plays Music on 21″ wide screen I using the ProjectM as the Visualisation
are you still a live (playing with this) if I need can I contact you
Merry Xmas
stephan Mckillen
Hi Stephan!
Yes, I’m still alive and I’m actually still using it … I’m considering doing a newer version though. But finding time to actually do such a project is the hard part … feel free to ask question!
hans
I Built this a number year ago
https://learn.adafruit.com/wifi-controlled-led-christmahanukwanzaa-tree/hardware
NO kids at home know :(
So the Light came I going to use these
StePhan Mckillen
Dump Question
Im trying to use my YUN have Uploaded the Sketch with NO Error :)
BOB can’t see it :(
Where would the Output be
/dev/??
stephan Mckillen
Hi Stephan,
the device depends on your HTPC/Computer. Could you provide more information?
For example; are you running OpenElec on a PC? Or on a Raspberry Pi? Or Kodi under Windows? etc.
hans
Just just an old PC
HP Compaq dc7700p 2048mb
with openelec latest verson
did the cat /proc/tty/drivers
I beater go and start the XMAS thing Have a 4 hour drive to mother place Trying to load the CAR
Merry XMAS to you and Yours
stephan Mckillen
Hi Stephan,
first off: Merry Christmas to you and your family as well … and good luck with your “road trip” hahah …
By default, running OpenElec on a PC, the device name is “/dev/ttyACM0”.
hans
Hello and thanks for all the great articles. I am setting up an ambilight on an Android box running Kodi. I have tried prismatik (which I run on my linux media pc) but it does not seem to detect any devices other than lightpacks on android (I may be wrong). I then decided to try boblight and your configuration tool but I am stuck at one point, which output device to select. I am not sure what to select or how to figure it out. If it was a normal linux install I would be done but Android is a complete mystery to me.
Sublime
Hi Sublime,
thank you for the compliments
Well, I’ll admit that I’m not an Android expert either. It has it’s similarities to Linux, especially when the device is rooted, but not everything is the same. On top of that, I have not tried Boblight (or anything else for that matter) with an Android device either.
It is on my list of things to do … but I have not gotten to it yet.
One thing that might be problematic is the Boblight Daemon – I’m not sure if there is a Android compatible version for this.
Anyone here that might have experimented with Android devices that is willing to chime in?
hans
Thanks for the quick reply. I am glad to see its not just me being stupid.
Here is what I have figured out.
1) To figure out the usb port being used on android you can use ( https://play.google.com/store/apps/details?id=aws.apps.usbDeviceEnumerator&hl=en ). It gave me the usb port as /dev/bus/usb/001/009 (the last number changes each time its plugged in to the same port).
2) Boblight daemon does not run on Android but it does run on rpi so its not an overhead issue. I’m not sure but it does appear there is a way to run boblight daemon remotely over the network ( https://github.com/bobo1on1/script.xbmc.boblight/issues/32 ). I am trying to figure this out now.
3) Looks like people with Android TV boxes use a rpi and run Hyperion. Although this may be wrong as documentation for their successes are non-existent. https://youtu.be/3otxXST1d50
4) Prismatik runs on Android and does screen capturing, moodlight and static light but does not give any option to set up your own lights. It just says no lightpack detected. If I knew more about android I would attempt to change the config manually to be like the desktop version but I can not find any config files for it on Android (may just be my inexperience with android).
I hope this helps you in some way and if you have any suggestions for me that would be awesome.
Thanks again for all the great articles.
Sublime
Hi Sublime,
great find on the Android USB device enumeration. Having a changing number each time you unplug it seems unpractical though.
I did a little Google search and was not able to fins a clear answer on this either. To me it seems you have to stick with either a “remote” Boblight, or use something like LightBerry.
I did check out Hyperion as well, but it seems static only.
Time for me to start a project like LightBerry
hans
Well after further research I have found that although boblight daemon does not have to be on the same machine as the kodi client. But the machine running the daemon does have to be where the lights are located so I am not sure why anyone would have a computer capable of running the daemon next to their tv and not use it to also run their media through. But instead have a separate machine to play their media, seems like a strange arrangement too me.
The solutions I can come up with so far are.
1) Get a pi zero (unfortunately the $5 computer costs about $50 to actually get)
2) a C.H.I.P. http://getchip.com/ as it has wifi (also hard to get currently but at least when you can get them you can buy more than one at a time so shipping is reasonable)
3) Figure out lightpacks protocol and make the arduino emulate it so it works with Prismatik for Android.
Sublime
why do you need c.h.i.p.? stick with arduinonor use esp8266
zero is just $5 on pimoroni (prices on ali are crazy)
what does the prismatik do? I need an app for android that will grab frame pixel colors and send commands to raspberry that drives LEDs over arduino. My idea is to watch video on android tv and have ambilight (via hyperion)
Marini
Thanks for the reply.
Yes the Zero is $5 at many places but you can only buy one and shipping is like $25+ to Canada so it is more like $30 each which is more than I want to spend on a light setup that has only cost $10 so far (Nano plus WS2812Bs). My first setup cost a fortune many years ago for my media room but this one is just for my kids playroom tv running an Android box.
Prismatik is a screen grabber for Linux, Mac and Windows that works really well for my Linux media server (entire system not just videos). When I saw they had a version for Android I threw together a light setup from parts I had lying around, installed the app only to find it did not recognize the diy light.
Sublime
I forgot to say. I was suggesting C.H.I.P to replace the rpi in a setup like yours. It runs Debian and so could run Hyperion or Boblightd and connect it to the Arduino.
Also great tutorial. Very thorough and one of the most complete I have seen. Well done.
Sublime
I have not worked with or even heard of the CHIP until your post …
The CHIP does look very interesting for sure considering it’s $9 price tag,… but (as I have seen with other cheaper solutions) you might run into some compatibility issues – which is not to say that it wouldn’t work! Just a lesson I’ve learned trying to find cheaper Raspberry Pi’s, or Arduino’s … cheaper is not always better, and quite often come with unexpected issues.
If you decide to go the CHIP router; please keeps us posted!
For all we know this is a great little computer to work with.
hans
Hi Sublime & Marini,
Running Boblight over network is definitely a good option, but it all depends on your budget – I’d probably grab a Raspberry Pi for that. Granted, that would take a $35 extra to get that going (+ power supply + network cable).
Boblight would be running on this extra “computer”, and KODI would be “talking” to it over TCP/IP.
One of the options that I’d like to explore is LightBerry … which makes ambilight completely independent of the video source.
Personally I prefer that, so I can watch regular TV, KODI, BluRay/DVD, Sat or Cable Box, and have the ambient effects with XBox/Playstation etc.
Using a setup like LightBerry (I’m sure you do not need to buy their stuff) would still require an extra computer (Raspberry Pi), a HDMI splitter that strips HDCP and a video grabber. So this would not be the most affordable approach, but it would work for any video source if setup right.
hans
you will enjoy Raspberry (and it will be worth it :)) I have made nice tutorial if you decide going Hyperion way.
Keep in mind, if android TV (or Android box / player) grabs frame pixels, and then transmits via UDP we will have additional latency (that was the reason I have switched to Hyperion).
My idea is to have some app on Android that will grab color info and then speak to Arduino (or ESP which is much faster) on USB port. I have tried some apps on Android TV (Sony) that can record video to file – so there are enough privileges for software to “grab frame pixels”… Idea is to have some background app so that Ambilight works even with external HDMI inputs (read PS4 Pro 4K ;))
PS I have compared my existing setup with latest philips tv and it is much better (pixels are more dense, and control via mobile app is more flexible)
Marini
As you will have read in my reply to Marini this one is a budget project so most of those options are out. Thats why I am thinking of running the C.H.I.P in place of a rpi in a setup like Marini’s It should only add about $15 to the project especially since I wanted a reason to pick up a couple to have around.
Can’t wait to see what you come up with.
Sublime
Has anyone gotten this all working on a Shield TV? I had running fine on my OpenELEC box but I switched to the Shield TV.
rmilyard
Hi Rmilyard!
As far as I know, Shield TV (I assume you mean nVidia) does not support this, unless someone figured out a way to do this – it would not surprise me if for example Hyperion might be an alternative, or consider getting LightBerry or LightPack2 (neither are cheap though, but work with any HDMI source).
As an alternative, you can use Boblight “remotely” – meaning you’ll need (for example) a Raspberry Pi + Arduino and set it’s IP address to the address to be used in the boblight.conf file.
hans
Hi,
i use this ambilight instructions to build my own ambilight. In my setup i use the apa102 led strips with the adalight dotstar arduino library. All works fine but with a black screen, the leds don’t go off. They glow white. I don’t know how to fix this. Does somebody has any idea or experience with apa102?
xdast
Hi Xdast!
I have not yet tried the APA102 LED strips – how do you like them? Did you need to do anything different (versus using WS2811 or WS2812 strips)?
As for the white glow with a black screen, a few things I’d check (as I have not encountered this myself):
– In the config file make sure the basic sure the 3 basic colors and gamma are set properly – you might want to tweak the gamma a little.
– check the Boblight Add-on, there might be an option to fine tune it there as well
hans
[…] printed 24 L.E.D. Amblight clone using WS2812B L.E.D.s and running Hans at tweaking4all.com’s modified version of Adafruits Adalight Arduino sketch which he modified to use the FastLed.io […]
I need a little help. The main video source is the htpc. I have a PlayStation and we use the smart TV Netflix feature on occasion. I don’t think I want to bother with making the PlayStation and Netflix support the ambient lighting. Leaning towards Hyperion. I have the following:
-Htpc running Ubuntu -ubuntu, x86, jodi 16.1, nvidia graphics.
–ws8212b led strip 300leds
-55” tv
-1st gen raspberry pi
-5v 10a supply
Do I need an arduino? Anything else. I’m somewhat confused about how Hyperion interfaces.
Is it basically htpc w/ kodi add-on sends info to rpi over the network? Rpi sends led lighting commands through the strip.
Does this make the most sense for my setup?
Nasp
Hi Nasp,
Well,… I guess you have 3 options;
1) Ambient light only for HTPC; run Boblight or Hyperion on the HTPC and have the HTPC talk to an Arduino.
2) Run your HTPC on the Raspberry Pi and have it talk to an Arduino. (but then I’d prefer option 1)
3) Build something like LightBerry, which allows video from other sources like your PS4. This would not work with your NetFlix on your SmartTV unless you have HDMI output on your TV, and for this project you’d need the Raspberry Pi, a HDMI HDCP stripper/splitter and a video grabber (not super expensive).
For a 55″ TV, 300 LEDs should be sufficient and a 5V 10A power supply are sufficient.
So to me it looks like option 1 is your best fit.
Personally, if I’d start building something right now (another article for the future) then I’d go for option 3 – but then again, all my HDMI (NetFlix included) goes through my home theatre system.
If you’re using option 1 then Boblight (as used in this article) will work great. If you get that to work, and are familiar with the details, then you could experiment with Hyperion.
hans
hi hans
maybe you got an idea. i tried everything for the last two days, but can’t make it work (again).
i flashed my nano with your initial .ino. i set the # of led channels to 28*3 (this is for testing only). i can set the initial colors, and they are shown when the nano (re)boots.
but when i connect it to my ubuntu machine with “debug on” i can see that there are commands sent, but the initial color does not change. same for boblight-static. i can send a color, i can see debug changing from all zero to hex codes, but nothing changes.
any idea what i could try? prefix is the same, baudrate was tried 128k to 480k on nano and in boblight.conf, but nothing did help. i changed type from atmo (which i am sure worked before) to momo, but it didn’t change. the leds should be 2812b, so what would i choose?
btw: the led test program in the other thread (where is shows different colors, and then blinking sequences) works fine. this is w/o the PC of course. so i guess it must be somewhere in between boblight daemon and nano. it seems the nano doesn’t understand the commands sent by the PC.
Hannes
Hi Hannes,
this sounds like a communication issue. You might to add a few debug lines in your sketch to see if it gets anywhere (ie. serial.Writeln(‘…’);).
Also triple check the prefix so it remains fixed (on the Ubuntu side), verify the right port is being used (see the top blue hint aout cat /proc/tty/drivers), pick a low speed (ie. 9600, just for testing), make sure the right kind of USB cable is being used, check the Kodi log to see what you can find there.
Sounds like your Nano and LEDs are functioning fine otherwise.
hans
thanks hans
i was really weird. i had to change “type to momo” and “rate to 115200”. it seems it doesn’t work with higher baudrate with the nano. and ATMO is wrong. unfortunately i didn’t find anywhere what to use, and atmo DID worked for me once (maybe with other leds?)
so all is working now. thank you
Hannes
Hi Hannes!
Glad to hear you’re up and running again …
…
As for speed – I have seen a lot of scenarios where 115200 is the max, but usually this is with Windows machines. After your comment, I did some searching with Google and found that certain Arduino models will not exceed 115200, but I could not determine if this is the case for the Nano as well. But … good to have your findings here, in case other Nano users run into the same issue.
As for the output device; this depends completely on your operating system. In case ATM0 worked at some point with your current setup, then your setup might have had it as an alias for ttyUSB0, or something like that, but I guess that is hard to trace in hind sight …
Just glad it is working again
hans
TYPE is “atmo”, not the output. output is (and was) always /dev/ttyUSB0 as this is a linux machine.
i assume that “atmo” or “momo” are used for different type of LEDs?! didn’t find any information what to use for what, but i guess “momo” is correct for ws2812b.
Hannes
Hi Hannes,
you’re right, never answer comments unless you’ve had enough coffee hahah
I confused it with ttyACM0 …
Per the Boblight Github Wiki :
So yes, the type will depends on the device that is being talked to.
I have only used momo … never had a use for a different type.
hans
any idea how to calibrate colors? my red is a bit to pinky and my blue is not dark blue, but a little cyan, green is to light/yellowish etc …
i know that i can setup LED’s color settings seperately:
but HOW to find the correct values? show a static RED picture and then stop boblightd, play around with adjust, blacklevel, and gamma, restart bolblightd and then see what changed? try&error? seems like a nightmare pita job …
unfortunately i didn’t find a proper way to do it. what makes things even more complicated, is the fact that those three variables influence each other.
please help me :)
Hannes
I’m afraid I’m not aware of any easy way to calibrate …
I know the KODI Boblight plugin has quite a lot of options to fine tune the color though … and yes, it can be a PITA …
hans
it was amazing
i really surprised, but i wanna know can it be done with LDR?
arvand tabatabaie
I have not used an LDR myself, but Izeman has – see this forum post.
Hope this helps
hans
can I do this project in my 55” android(lollipop) tv?
dynamic
Hi Dynamic,
I guess it depends on how you want to setup things.
The project is based on being able to run Kodi and having a USB interface to “talk” to the Arduino.
Video is analyzed by means of Boblight, a Kodi addon, so it only analyzes the video “generated” through Kodi.
hans
Please are there any people how knows how to configure Boblight to works with Dmx output?
DMX output to OLA or directly to fixtures, both with an usb dongle like Enttect DMX USB Pro, or DmXKing (much cheaper), neither ArtNet or VirtualMidi sliders to remap it with QLC+…..
Boblight is a great program but without a GUI, a web interface, a terminal wizard or some examples, or at last more documentation… result near imposible to use with DMX output.
:-(
Help!!
Carlos
Hi Carlos,
I’m not familiar with DMC, OLA, QLC etc.
Could you share any links?
Oh and yes; Boblight is maybe a little outdated by now. Hyperion for example is much cleaner and lighter when it comes to resources.
hans
Hi!
The names of the addons have changed. Previously the client was boblight and the daemon was boblightd. Now the addons are boblight and kodi boblight. Might be helpful for somebody
christoph
Hi Christoph!
Thanks for the tip! I am sure others will benefit from this. It’s much appreciated!
hans
Hy, i followed this tutorial but when i power up my raspberry Pi with my arduino uno connected it shows me only the “failed to connect to boblightd” popup and not the second. I’m running openelec and i have installed the boblightd and kodi boblight addons. What should I do to make it works?
Alessandro
Hi Alessandro!
First off, did you install the OpenElec Boblight addon? I’m not 100% sure but I think there might be a specific version for OpenElec.
Seems either boblight daemon is not running or not installed.
Also; check the communication settings in the boblight ini file.
hans
Hy, how can I check If boblight daemon is running?
Alessandro
[…] the leds from the Arduino I would use Adafruit NeoPixel library, I used it before building a DIY ambilight for my HTPC. But what about the ethernet part? I want to control all the individual leds and […]
first of all: really nice and comprehensive tutorial. thanks a lot! Also, Boblight Config Maker is a big relief.
The system now works for me on a pi with kodi on top of a raspian jessie and an arduino nano with ws2812b leds.
I had some issues because of other things (systemd) with setting this up, so I analysed the code of the arduino part and noticed an error.
after the code got through the prefix checking, incoming data is written to the strip by line 97:
the strips leds are indexed from 0 to LEDCOUNT-1, so when the last triplet is handled, currentLED is then equal to LEDCOUNT and the if in line 100
won’t catch that.
would be correct (if I’m not wrong :).
greetings, martin
martin
Hi Martin,
thanks for the compliment and the correction.
When reading the code, you actually might be very right about that. It will reach it, but only once cycle later as we’d like it to be.
In line 97 we set the currentLED pixel and after that we increase currentLED by 1.
So with a 100 LEDs (LEDCOUNT), we indeed have LEDS 0, 1, 2 …, 98, 99.
So if in line 97 LED 99 is set, the currentLED would become 100, which is still not “>” LEDCOUNT.
In the next cycle LED 100 would be set (which doesn’t exist) and currentLED would become 101 and therefor fire off the if loop.
So your correction (haven’t tested it) should be better (not wasting a cycle).
I’m currently unable to test this – is this how you have your setup running and it works correctly?
If so, please confirm, so I can change the code in the article appropriately.
Happy New Year and thanks again!
hans
[…] first Ambilight clone served me quite well. I started with a system like the one described here. It worked like this: Kodi > boblight > Arduino > WS2812 LED […]
[…] vais suivre les explications provenant de ce tutoriel [En] mais aussi regarder ceci [En], ou encore cela […]
Worked great until I upgraded to LibreElec 9. Reinstalled addons, copied over boblight.conf. Nothing. Any ideas?
Warren
Hi Warren,
I haven’t worked with boblight in quite a while.
I assume you covered most of it;
– Install boblightd
– Install the addon
– Copy the config file
– Verify correct device for boblight (I screwed that up a few times myself)
hans
Btw – you were completely right last time. I must have had the wrong device configured. I actually solved it by rebooting with everything disconnected but the boblight (Arduino) and the system mapped it back as setup in my config file and all worked correctly. I should have asked last time though… how do I know the device number at the end of the “/dev/ttyACM0” I.e. the zero?
Warren
Hi Warren,
very cool to see a response even in 2022 – I mean this seriously!
As for identifying the device number … it has been a while, and I honestly had to look it up.
You could try:
Which should show something like this (very much depending on your hardware, Linux version, etc):
Obviously, my example output isn’t showing anything Boblight related, since I just tried this on a virtual machine to see what the output could look like.
I’d assume a Raspberry Pi would show the correct devices though
Hans
i Just made it and its really looking awesome but i have a problem!
Some leds (combination of two leds, three times) wont respond according to color pixels in screen, i looked closely at them they do turn on but have very low brightness and wont change color correctly. So what could be the reason??
I am using 104 Leds setup and 6A external power adapter.
Katper
Hi Katper,
it sounds like your LED strip may have some faulty LEDs – this can happen. Your Power Supply seems potent enough and if it would have been de power supply, then you’d see less brightness for all LEDs.
I’d recommend contacting the seller and ask for a replacement. I know it is a hassle
hans
bonjour ,
super sympa votre tuto , j’ai juste un petit soucis je retrouve pas “ADDON BOBLIGHTD . Avez vous un lien vers un fichier ZIP ?
ricardo
Hi Ricardo,
please post comments in English, as most of us do not speak French.
Google translate;
super nice your tutorial, I just have a little problem I can’t find “ADDON BOBLIGHTD. Do you have a link to a ZIP file
Thanks for the compliment and … unfortunately, I did not have this (Boblight Daemon) laying around.
The daemon seems to no longer be supported (reference and some minimal tips for using Hyperion).
One thing to keep in mind:
BobLight development has stopped more than 3 years ago, and the last time I worked with this was around 2015.
There are better options out there now (eg. Hyperion).
Hans