Overview
Taking Screenshots and Add Annotations
Most users, that I have encountered anyway, use screenshots to illustrate an error message, or to show “proof” of something odd happening, for example an error message with a program. Others would like to incorporate pictures in to documents, manuals, or emails, to explain how something works or not.
But with most of them, I’ve noticed a few things:
- Most users do not know how to take screenshots,
- Most users do not realize that you can also take a screenshot of part of the screen or just the active window,
- Printing a screenshot is great, but it’s not easy to email a hardcopy,
- Very few seem to know how to add annotations, like arrows, boxes or numbers and text,
- And … it’s just hard to remember those darn keyboard shortcuts …
So in this article, for Mac OS X, we will go through the options we have to take screenshots and how to annotate them later.
Ad Blocking Detected Please consider disabling your ad blocker for our website.
We rely on these ads to be able to run our website.
You can of course support us in other ways (see Support Us on the left).
Mac OS X Screenshots
Your Mac, when it’s running Mac OS X, has some great tools already build in to take screenshots.
Of course, you’re free to use 3rd party applications for that, but why load more on your system, or even pay for something that is already there?
The trick however, is knowing what tools are available, where to find them and … to remember those darn keyboard shortcuts.
The short version:
Default Screenshot Schortcuts
| Type of screenshot |
Step 1 |
Step 2 |
| Fullscreen to File |
SHIFT COMMAND 3 |
|
| Fullscreen to Clipboard |
CONTROL SHIFT COMMAND 3 |
|
| Selection of the Screen to File |
SHIFT COMMAND 4 |
Select with Left Mouse button |
| Selection of the Screen to Clipboard |
CONTROL COMMAND 4 |
Select with Left Mouse button |
| Specific Window to File |
SHIFT COMMAND 4 |
SPACE and Select with Left Mouse click |
| Specific Window to Clipboard |
CONTRL COMMAND 4 |
SPACE and Select with Left Mouse click |
Screenshots as a Photoshop PSD file – with an individual layer for each item on your screen!
There is one exception to the list of 3rd party tools, which is great for Photoshop users: Screenshot PSD by TXTLabs.
At the moment that I’m writing this article, it’s free, so get it while you can!
This little application takes a screenshot of your screen, but separates every single item out on individual layers. From menubar, to windows and icons – all separated out to their individual layers while maintaining shadow drop etc.
Note that this tool also offers a timer, and can even take screenshots while you’re taking screenshots!
Truly a magnificent tool, and I highly recommend it if you’d like to take more advanced screenshot and are a Photoshop user.
Obviously, the screenshots are stored in a PSD file.
Overview of Keyboard Shortcuts for taking Screenshots
Your Mac knows, by default anyway, 4 shortcuts to take screenshots.
You can find the in the -menu in “System Preferences” “Keyboard” “Shortcuts” “Screenshots“, which would like this for a default US English Mac OS X:
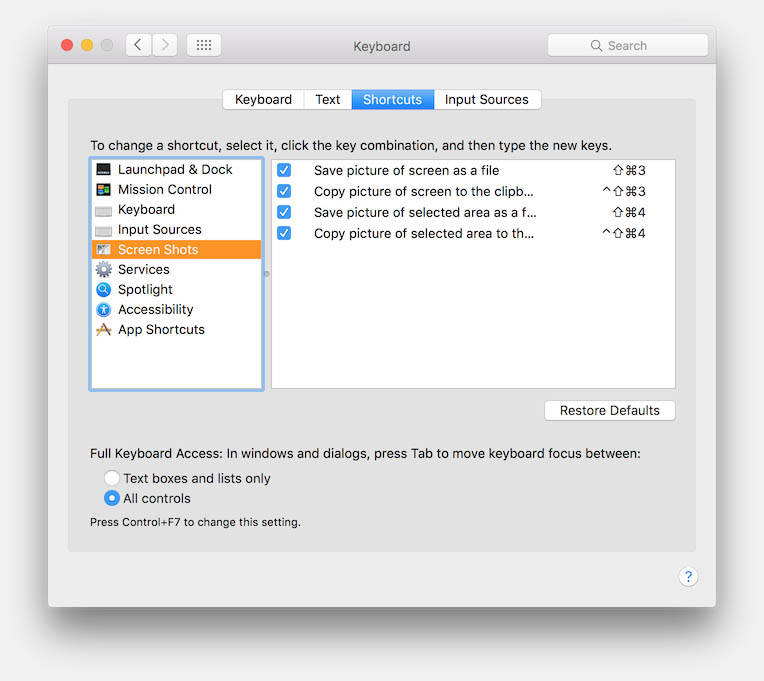
MacOS X – Default Screenshot Keyboard Shortcuts
Full Screen Screenshots
If you didn’t change anything here, then 3 (SHIFT + COMMAND + “3”) will take a screenshot of the entire screen and automatically save it as a PNG file. This file, on my Mac anyway, will be stored on your Desktop – which is convenient for quick access. See the tips below if you’d like to change this location on your Mac and how you can select a different file format.
You can also copy the screenshot just to your clipboard, so you can paste it, for example in your word-processor or graphics program. For this we just need to press the CONTROL key as well, so: CONTROL + 3 (CONTROL + SHIFT + COMMAND + “3”).
The easiest way to test this, is by pressing that key combination, after releasing the keys open “Preview” (can be found in the “Applications” directory) and selecting the menu “File” “New from clipboard” after which your screenshot will be revealed.
Just remember: press CONTROL as well, when you just want the screenshot on your clipboard and not as a file.
An example:
MacOS X – Example Full Screen Screenshot
Both file location and file format can be changed, see the tips at the end of this article for details!
Partial Screen Screenshots
Again, if you didn’t change anything, then 4 (SHIFT + COMMAND + “4”) will take a screenshot of a selected section of your screen and save it as a file in the same location as we have seen with a fullscreen screenshot. The tips in the previous paragraph, about file location and file format, apply here as well. So either the file can be found on your desktop, or in the location you’ve set for the fullscreen screenshots.
As we have seen with fullscreen screenshots, we can also copy the screenshot to our clipboard by pressing the CONTROL key additionally.
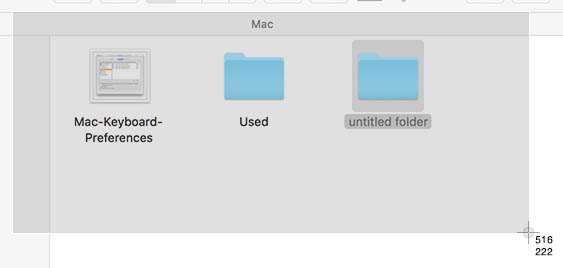
So: CONTROL + 4 (CONTROL + SHIFT + COMMAND + “4”) will take a screenshot of the area you select on your desktop.
After pressing the key combination, a cursor will appear on your screen (you can press the Esc key to abort if you’d like) allowing you to select an area on your screen.
For example:
MacOS X – Example Selection Screenshot
I’ll zoom that in for you so you can see the details better – do you see the cursor in the lower left corner with the numbers 516 and 222? These numbers indicate the width and height of your selection.
After releasing the mouse button, a screenshot of that section will be taken.
MacOS X – Example Selection Screenshot Closeup
In one of the tips at the end of this article, I’ve described how I took this screenshot of taking screenshots – in case you’re interested.
Specific Window Screenshots
Taking a screenshot of just a part of the screen is all nice, but you Mac has another little trick if you’d like to take a picture of a specific Window.
For this trick you need to start with the steps of taking a screenshot of a selection of your screen (this can be used with file and clipboard screenshots). However, we will NOT select a section of the screen and instead we press the SPACEBAR.
You will notice that your cursor became a little camera, and that the screen or a window will get a selection color, depending on where your mouse cursor is. Once the window you’re looking for is highlighted, click the left mouse button and you’ve go a screenshot of your window. The screenshot will include the shadow drop of your window.
Note: it does not matter if the window, of which you’d like to take a screenshot from, is partially covered by another window – the screenshot will only be made of the selected window! So no worries there.
An example:
MacOS X – Example Window Screenshot
Here a close up of the selection – notice the little camera cursor?
MacOS X – Example Window Screenshot Closeup
Taking Screenshots of other screen elements
The method shown for taking a screenshot of a specific window, can also be used to take screenshots of most “elements” you can find on your screen.
You can take screenshots like this even from the Dock, or individual items (not the standard Mac menu) in the menu-bar on top, or even drop down menu’s (you’ll have to open the menu first of course).
Printing your Screenshot
The “easiest” way to actually print a hardcopy of your screen – and I sure wished this would have been easier – is by using one of the methods mentioned before to take a screenshot, where we copy a full screen, part of the screen or a window to the clipboard.
Next open the “Preview” application (found in your “Application” folder),
next press + N (menu: “File” “New from Clipboard“), to start a new document based on Clipboard content,
and finally press + P (menu: “File” “Print“) to start the printing part.
Adding Annotations under Mac OS X
We’ve mentioned the application “Preview” (found in “Applications”) already a few times in this article – it’s a pretty powerful tool, especially for something that comes for free with your Mac OS X. “Preview” not only resize images, or even rotate them, and save them in different formats,… it also allows you to change colors and … create annotations!
Some of the annotations you can make with “Preview” are:
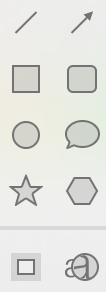
- Add Lines, Arrows, Boxes, Ovals, Circles, Polygons, Stars
- Text, your Signature and even Speech Bubbles
- Masks and magnifying glass
We will go through them one at a time, just briefly, but before we do that though, you need to know where to find these annotation options.
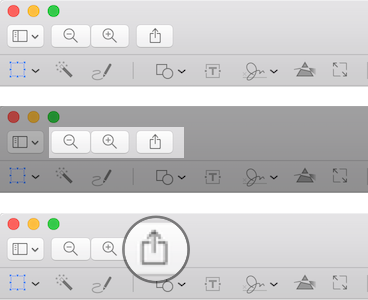
We can either access these options through the menu (“Tools” “Annotate”) or by making the “toolbox” visible for which we simply need to click the toolbox icon.
Note : The following screenshots have been taken and annotated on Mac OS X El Capitan (10.11.4) – so your “Preview” version, could look a little different, but in the end the available functionality is the same.

Preview – The Toolbox Icon
After clicking that icon, the Toolbox will become visible:

Preview – The Toolbox opened
Basic Annotation Functions
We will first go through some of the basic functions of Preview …
Just a few quick tips:
Each newly added item will be placed in the center of your image – don’t worry: you can still move and resize (older Preview version work slightly different).
Each individual annotation can be reselected, they are object on your image, and not yet merged with the image.
You can still move and resize them as you see fit and you can still change line width, color, etc. Just select the item and make the changes you prefer. You can even move them to front or back by clicking them with the right mouse button.
Cut, Copy and Paste of these annotation objects works as well!
So if you want the exact same annotation copied multiple times: you can.
Holding SHIFT pressed while moving or resizing a shape will makes the shape snap into one of the 45 degree angles (when that makes sense of course), which makes it easier to “aim” and get items to be straight or under a perfect angle. When resizing this helps getting a perfect circle or box as well. Try it with some of the shapes to see what SHIFT does for a given shape.
Some shapes have a green little dot which helps changing the shape, for example with an arrow, to make it curve, or to zoom the magnifying glass in our out.
Certain shapes, like a rectangle, speech bubble or oval, can contain text. Double click the object after adding it to your image, and you can enter text will be automatically fitted to your shape, unless you have too much text in the shape. In that case, a little square with a “+” will appear to indicate that not all text fitted the shape.
When multiple shapes are placed, moving a shape might snap it, with a thin orange vertical or horizontal line, so it’s perfectly center aligned with another shape. Place 2 shapes and move one around to see this in action.
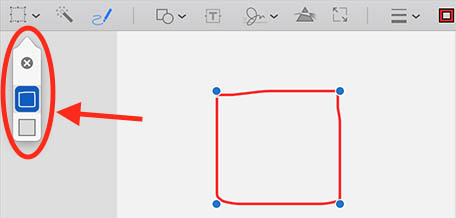
Setting Line Width, Line Color, Fill Color and Font

Before we annotate anything, let’s first look at the section where we can set line width, line color, fill color and fonts.
I assume these icons already show what they do. From left to right: The width of lines used in boxes, circles, lines and arrows, the color of said lines, the fill color of circles and boxes and such, and last but not least the option to set font type, size, bold, italic, etc.
Note that changes in these settings apply on the selected shape on your image, unless you have not placed a shape yet. Text is an exception; it will either apply to selected text, or the entire text object when the entire object has been selected.
Adding Boxes, Circles, Lines, Arrows, Shapes, Masks and a Loupe
Regular Shapes

This little icon has a lot hidden underneath it, and it’s the one I use most often. When clicking on this icon, a dropdown list will appear allowing you to select which type of shape you’d like to add:
Preview – Shapes Dropdown
When you click an item, it will be placed on your image immediately (unlike older versions of preview where you were free to draw the shape in the size you wanted it).
But, no worries, you can select the newly placed shape and change it as you see fit.
Some examples can be seen in the next screenshot – as you can see; rectangles, rectangles with curved corners, circles, speech bubble with text (double click the ship after adding it), line, straight arrow and a curved arrow …
Preview – Annotation Examples
Applying Masks and Loupes
Two interesting ones are the ones at the bottom of this list: Applying a Mask and Creating a Loupe (magnifying glass).
Both can be very helpful to set focus on what is important in a given image.
In the examples below, first the “original”, then the “mask” and then the “loupe“.
When applying the “loupe”, you will see a green dot on the rim of the circle – this allows you to change the zoom level of the detail in the loupe.
Preview – Example: Original, Mask, Loupe
Adding Text

Text does not have to be placed in a shape, it can also be added on it’s own.
While typing text, the text box will resize as needed.
Returns, Tabs and emoji symbols are supported as well
Advanced Annotation and Graphics Functions
“Preview” is really much more powerful than what I originally expected, and it’s most certainly not limited to those basic annotations.
Some are useful for screenshots, others are more for working with photo’s or PDF files.
Making a Selection

The first icon, allows you to set the selection of a given image or document. This can be Rectangle, Elliptical, Lasso or “Smart Lasso”.
Smart Lasso
I just assume tat Rectangle and Elliptical make sense, and when I say that “Lasso” is like hand drawing a selection, then that would make sense as well, right?
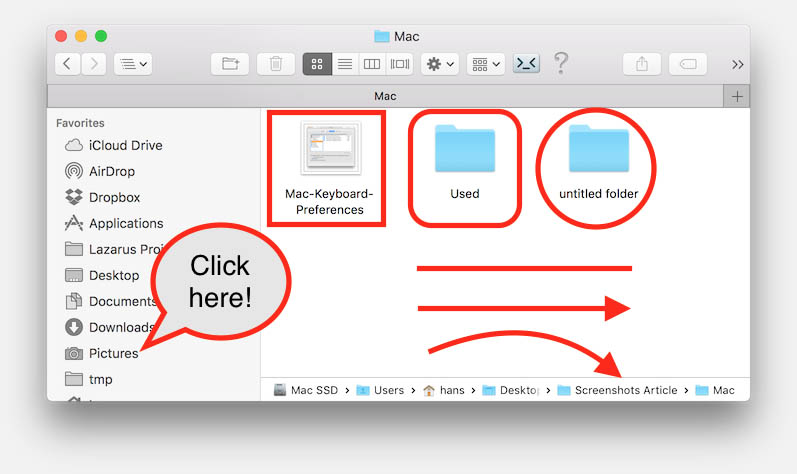
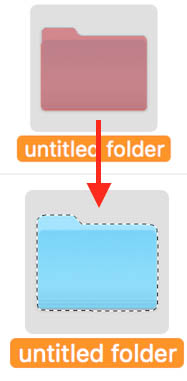
However, one of the most underestimated option here is probably the Smart Lasso option, which is actually pretty good, and allows you to select a piece of your image with help from your computer. As an example, I’ve kind-a sloppy selected the blue folder icon by drawing this pinkish markings around it, and Smart Lasso made the selection based on that as follows – neat right?
Note that this is mostly based on color differences, so more contrast will make the selection better.
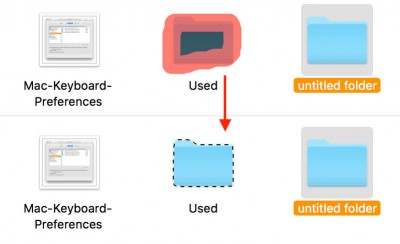
Preview – Smart Lasso Example
Instant Alpha

The second icon, which looks like a wand, is called “Instant Alpha”. With Instant Alpha, you can extract an object from it’s background. It’s not always perfect, but fun toplay with … Simply click the icon, and click on what you’d like to select (either to copy or to remove). Once you press the left mouse button down, move the mouse a little an you see some magic happening.
Preview – Simple Instant Alpha Example
But we can do more advanced tricks with this as well – you’ll have to play with that one a little bit more, and this function works best when there is a good color difference / contrast between the object you want to select and the background you’d like to remove (or vice versa).
Hand-drawn shapes and shapes that automatically get converted

The fourth icon, is the sketch icon. With this option you can freely draw what ever you like, but there is a “catch”.
Sketch will convert something that looks like say an arrow (open or close), to a nice looking arrow. This seems to work for example for a box, a circle/oval, a heart, a triangle, a circle with a line, a star, etc. There are probably more symbols that get converted like that – go ahead and give it a try. When this happens, you might notice a selection box on the left which allows you to pick your sketch or the “nice” shape .
Preview – Sketch or Nice Shape
Some examples of hand drawn symbols that got converted automatically (not everything you draw will be converted!):

Preview – Examples of converted hand drawings
Adding Signatures

Of course adding a signature is not something we’d use in screenshot, but it is possible.
I would say a signature is more commonly used in for example PDF documents as described in our How to put your signature on PDF documents … article.
Changing Color or Dimensions

Of an image you can change colors, contrast, brightness etc, with the “prism” icon.
The second icon allows you to resize or change the dimensions of the image.
Both functions apply to the entire image!
Ad Blocking Detected Please consider disabling your ad blocker for our website.
We rely on these ads to be able to run our website.
You can of course support us in other ways (see Support Us on the left).
Other Tricks
Since I use taking screenshots frequently, I’d like to share some tips based on my own experiences.
Taking Screenshots without Keyboard Shortcuts
If you do not like to use keyboard shortcuts, then you can most certainly use other means to take screenshots. One of them is by using “Preview”, which has this feature build in.
Open “Preview” (found in your “Applications” directory) and choose from the menu “File” “Take Screenshot“.
There you can choose either “From Selection…“, “From Window…” or “From Entire Screen“.

You can take screenshot through Preview
Taking Screenshots via the command line
You can actually take screenshots through the command line (use “Terminal” which can be found in “Applications” “Utilities“) as well. Not something I’d do on a daily basis, but it does offer for example the use of a timer, capturing your mouse cursor, and saving it in different formats.
I’d recommend consulting the man page for this: man screencapture
For example, to use the timer set to 5 seconds, and save the PNG on your desktop use: screencapture -T 5 ~/Desktop/MyScreenshot.png
Change the default location for Screenshots
As you have seen or noticed; your Mac saves screenshots by default on your Desktop.
You can however change this location with a little command-line trickery (use “Terminal”, found in the “Applications” “Utilities” directory).
The basic format is:
defaults write com.apple.screencapture location /new/path/to/screenshot/location; killall SystemUIServer
Here “/new/path/to/screenshot/location” is the path to the new location, where new screenshot files will be saved.
As an example, if you’d like to change this to your “Pictures” directory, use:
defaults write com.apple.screencapture location ~/Pictures; killall SystemUIServer
Or like I did, in a dedicated “Screenshots” directory in your “Documents” directory (make sure you create the directory if it does not exist yet):
defaults write com.apple.screencapture location ~/Documents/Screenshots; killall SystemUIServer
To go back to default settings:
defaults write com.apple.screencapture location ~/Desktop; killall SystemUIServer
Your Mac by default uses the PNG file format, which definitely is the best quality.
But you can set it to a different format if you’d like, again through “Terminal” (found in the “Applications” “Utilities” directory).
Note : None of these formats will be using layers, unlike the “Screenshot PSD” application mentioned earlier.
Some supported formats:
JPEG (JPG): defaults write com.apple.screencapture type jpg; killall SystemUIServer
PDF (Adobe Acrobat): defaults write com.apple.screencapture type pdf; killall SystemUIServer
PSD (Photoshop): defaults write com.apple.screencapture type pdf; killall SystemUIServer
TIFF: defaults write com.apple.screencapture type tiff; killall SystemUIServer
To go back to the default PNG format: defaults write com.apple.screencapture type png; killall SystemUIServer
Taking screenshots of taking screenshots
If you’re wondering, how I took some of these screenshots of me taking screenshots:
I used the earlier mentioned tip of the “Screenshot PSD”, which has a timer function in it.
For example, for the taking a screenshot of a part or selection of the screen by setting the timer of Screenshot PSD and making and holding my selection until it was Screenshot PSD has taken a screenshot.
However, it didn’t include the crosshair cursor, so I grabbed the icon file from my Mac.
Your Mac cursor images can be found here:
/System/Library/Frameworks/ApplicationServices.framework/Versions/A/Frameworks/HIServices.framework/Versions/A/Resources/cursors
Next step was to paste the cursor in Photoshop on the screenshot made by “Screenshot PSD” and after that I manually added the numbers.
Retina Screenshots
Those who use a Mac with a Retina screen, will notice that their screenshots can be huge. This is because your Retina screen uses a much higher resolution.
Resize to non-Retina screens – quick and easy with “Preview”
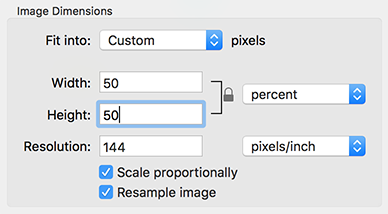
Normally, you’d resize it to the size fitting computers that do not have Retina screen. Which would result in a reduction in size (50% vertical, 50% horizontal), which can be done quickly in “Preview” (found in your “Applications” directory).
Open the file with “Preview“, and from the menu choose “Tools” “Adjust Size“.
In the dialog that now opens, you will see a field “Width” and “Height” and next to it a dropdown that either shows “pixels”, “percent”, “inches”, “cm”, “mm” or “points” – you’ll have to set it to “percent” (Preview will remember this for the next time).
Now enter the value “50” in the “Width” and (if needed) “Height” fields and click “OK” (or press the ENTER key).
Mac – Easy resize Retina Screenshots
Your image is now downsized to non-Retina “format” and you can save it as such.
Websites that can use Retina and non-Retina images at the same time
When done right, your website can actually support images in 2 formats.
You’d save the file as a regular formatted image (non-Retina), for example screenshot.png.
For your Retina enabled visitors, you save the image in Retina format as screenshot@2x.png.
See how I added “@2x” just before the file extension?
Your website would need a little JavaScript trickery, for example the well known Retina.js or the WP Retina 2x plugin for WordPress, to make this work of course. The WordPress plugin is be able to generate your non-Retina images automatically (see the Tutorial).
By the way, the “@2x” part of the filename is not just randomly made up and actually based on Apple’s filename recommendation.
Optimize your Screenshots
Especially for websites, it’s important to optimize your JPG or PNG file. This way, visitors need to download less and see your page quicker.
I’ve already written a guide for that, so please read the ImageOptim – PNG Optimalization for MacOS X for more details (it’s quick and free!).
But this is not just great for webpage uses. I use it often in documents that I write, place images in emails, or when I use a JPG or PNG as a resource for my applications. It just saves space and we all benefit from that.
Before pasting Clipboadr Screenshots into Photoshop …
Now, I have to admit that I use an older Photoshop (CS6) – I just cannot afford to update each version of Photoshop that comes out and I most certainly would not want to pay for it on a monthly basis. So if anyone would like to donate me the latest and great Photoshop version: awesome! Until that time, I’ll just stick with CS6.
Anyhoo … when you take a screenshot to Clipboard, and want to paste it into Photoshop, you’ll run into a little snag when transparency is important.
Here you will see two examples. The first one is when I pasted a screenshot of a window in Preview … you see how the background is blending in (and transparent)? The second image is when I paste the screenshot directly into Photoshop …
Whoops! It has a white background and lost its transparency.
So in my workflow, I paste my screenshot first in “Preview”, save the file, and then open the file with Photoshop to keep transparency.
Mac – Screenshot pasted into Preview
Mac – Screenshot pasted into Photoshop
Webpage Screenshot – full length and as shown in your browser!
Now we can all guess that your average browser has a print function build in, and we all might have experienced the pain that comes with using this function on pretty much all browsers. Pages get distorted, stuff disappears or becomes unreadable, background go missing, etc. or you’re forced to print in landscape mode to get it all to work in a readable way.
For some reason most browsers seems to be unable to actually print what was displayed on the webpage you are trying to print.
As far as I know, this is because the browser tries to use CSS styles which often are missing or not done properly – which I tried to do the right way on Tweaking4All, so feel free to comment below if you experience issues here as well, as I’m unable to test all browsers out there …
Anyhoo – this is not helping the user … and strangely enough I have not seen a browser yet that can do it right …
There are however several plugins for several browsers that can actually do this right …
Note : Most of the extension come with the option to add annotations as well.
Note : Most of the now following browser extensions/tools, scroll through the webpage and take screenshot after screenshot, which you should probably not interrupt. After taking all those screenshot, they get merged into one [very] large picture. An example of such an image/screenshot can be found at the end of this article.
Google Chrome
I’ve tried a few extensions, and my favorite used to be Awesome Screenshot. For some reason it disappeared for a while, but it’s back and it feels a little bloated, so I took the effort to look for other extensions and I did find two (there are many more) that I do like:
FireShot and Open Screenshot.
Note that all these extensions are free and all of these can take a screenshot of the entire page, from top-to-bottom, as an image.
Yo can find many more in the Chrome Web Store.
Safari
I do not really use Safari, but there are tools out there that do the same thing:
Paparazzi and Voila Web Screenshot appear to support Safari.
I have not tested either of these, so you milage may vary.
FireFox
FireFox is one of those browsers that I used to love, until Google Chrome came along …
There are plenty of extensions for FireFox that do this type of screenshots as well, like:
Nimbus, ScreenGrab, Awesome Screenshot Plus, and FireShot – but there are more.
Opera
Even though Opera used to be the fastest browser around, I only use it for testing compatibility.
Extensions that take screenshot like this are:
Nimbus, FireShot, and qSnap.
Again: there are probably plenty more.
Example Web Screenshot
I took this one in Google Chrome with the FireShot extension from the Tweaking4All homepage. Now the original file became huge (about 12,000 pixels in height, and about 8 Mb in file size), so I had to reduce it’s size significantly, but I’m sure you get the gist of it …
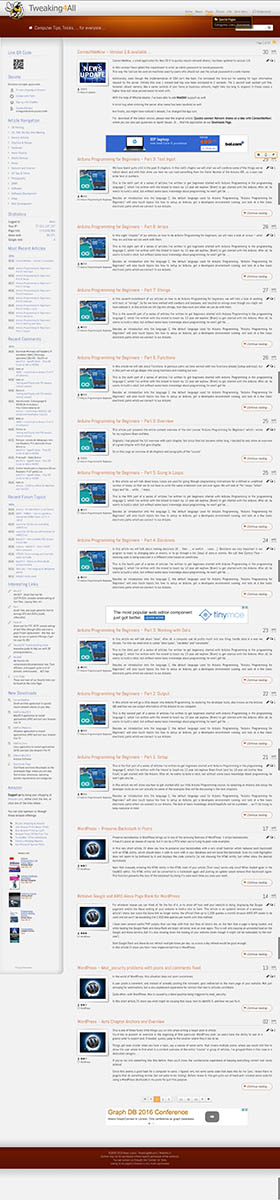
FireShot – Web Screenshot of Tweaking4Allv


Comments
There are 4 comments. You can read them below.
You can post your own comments by using the form below, or reply to existing comments by using the "Reply" button.
This article is great! Having read this it changed completely my life with OSX. thank you !
ScreenshotPaster
Hi ScreenshotPaster!
Thanks for taking the effort to post a compliment!
It’s much appreciated!
hans
The annoying thing with apple is their arrogance. Apple designers patronize users to perform tasks only the way they think they should be performed.
I’m a product owner and I work a lot with screenshots, cutting and moving bits, adding annotiations etc. Like must of us I mostly I do not share the result as files but use them in web applications in a browser and not some stupid apple applications like Preview. Which is crap. When it comes to simplicity and speed there is no tool superior to MS paint. Also on a linux system I’m way faster to perform every-day tasks than it can be done on a mac because I can customize the system to behave the way I want.
Totally failing over a minor issue like ‘I want to make a screenshot and copy-paste it from the clipboard into a browser app where it looks exactly the way I see it on my screen’ is just another example for apple struggling over their own hybris. Follow web standards, jerks. It’s 72 dpi.
I wasted two hours of my life to find a practicable solution for this problem. If I had been successful this would be well invested and saved me much more in the future. But there is none. There are workarrounds but none is able to let me make a screenshot of a section of my screen and copy it to the clipboard in the actual visible size. Thanks for nothing…
Martin
Hi Martin,
I hear you on the frustrations with certain applications and companies … I too run into certain things like this as well.
I do love the flexibility of Linux, the stability of macOS and the compatibility of Windows.
However, in the end the all suck in some way.
As for pasting a screenshot in a web application: Shouldn’t be too hard though …
The forum that I use on this websites allows me to paste screenshot straight of the clipboard into the forum …?
No need to use Preview or anything like it. (this may be a working example, in case you’re looking to implement this – I haven’t tested it)
Hans