Since I’m always looking for the “best” and “easiest” way to develop applications cross platform (so far Lazarus Pascal is the winner), I decided to give Delphi 10 Seattle a try. After I recovered from a heart-attack from seeing the price, I decided to give AppMethod a try. Mind you that AppMethod is cheaper but still very expensive.
AppMethod is pretty slick (as is Delphi 10), and supports Windows (32/64 bit), Mac OS X (I’m guessing 32 bit), Android, and iOS (32 bit and 64 bit). Development is pretty easy and deployment of your app is also very easy.
The first test I did was reading a webpage (NZBGet), which worked great on all platforms, except on iOS 9, which threw a “The resource could not be loaded because the App Transport Security policy requires the use of a secure connection” exception.
I did some research on what caused this and finally found the answer and a few work-arounds – which might be practical for other development environments as well.
What is the App Transport Security Exception ..?
I create a little test program to retrieve the content of a webpage, in this case from my own NAS, which threw this error:
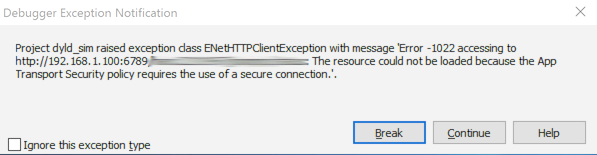
AppMethod – iOS 9 App Transport Security exception
The key being: ENetHTTPClientException and ‘Error -1022 accessing to http://192.168.1.100:6789/hans:22101967/jsonprpc/status:
The resource could not be loaded because the App Transport Security policy requires the use of a secure connection.‘
After some web searching it show that this is actually based on new iOS 9 rules that retrieving web data should be done over a security connection, so “https” and not “http” (in this example). See the Apple Developer Technote about this change:
App Transport Security (ATS) is a feature that improves the security of connections between an app and web services. The feature consists of default connection requirements that conform to best practices for secure connections. Apps can override this default behavior and turn off transport security.
In other words: thank you Apple for pushing for a better security of our data, and thank you cyber-criminals for making the live of a developer more complicated … as of late I spend about more time to comply to new security rules, than actually developing the base of the application’s function … it’s slowly but surely taking away the fun of developing applications. Then again; in the future these features will probably become easier to implement, and will be replaced with new and bigger problems … 
So how do we “fix” this?
The described methods should work for iOS and Mac OS X …
The most obvious solution is to make your connection secure (recommended!).
In this case, for example, I would have to get a SSL certificate for my QNAP, which is unfortunately not an option since you can’t get a SSL certificate for a private IP address. Not to mention that your server needs to be public to get a certificate (as I understand – please correct me if I’m wrong).
The other option is to disable this safety feature.
Not recommended: Disable Safety Feature
Now, the safety feature is there for a very good reason! So disabling it is definitely not something I’d recommend.
The App Transport Security is a good thing for you and your app users, to protect their data and privacy.
So don’t just disable it because it is easier …!!
Sometimes however, an exception can be made, for example for local servers (not available on the Internet / in public).
Up to you to decide what is critical and what is not critical to protect.
Either way: avoid doing this if you can!
IP Addresses not supported
These tricks do not appear to work for an IP address, so 192.168.1.1 will be blocked by ATS, no matter what.
A bug has been reported, but since Apple (and others) are moving strongly towards IP.
To get IP’s to work with HTTP, the only option that seems to work is to completely disable ATS (see below).
How to bypass App Transport Security
Again: I cannot recommend this as a general practice!
The suggested approach works of iOS 9 and newer, and possibly Mac OS X 10.11 and newer.
However, for iOS 9 beta (you should not be using that anymore anyway) the keywords for the Info.plist are slightly different.
There are however scenario’s where it is not a bad thing.
For example, I wanted to read some data from an application on my NAS, called NZBGet.
NZBGet is a great a download manager for Usenet, which by default has no SSL enabled, and … installing an SSL can be a little complicated. This in the end results in the fact that most users do not use HTTPS with their default setup of NZBGet. And since most users will probably only access their NZBGet from their own private network, encryption might not be a big deal.
So in my app, I’d like to support those users as well – obviously I will add SSL (HTTPS) support in my app, and recommend it to the user. However, not every user is capable or willing to do all the effort to get and install a SSL certificate and I do not want to leave them out in the cold either, as it probably (at this time) is the majority of users.
We can either disable this safety feature or define one or more exceptions, and this is done in the so called info.plist of your application.
More options and details concerning App Transport Security
I’m only showing a few of the options of working with the Info.plist to bypass ATS.
Please read the Apple Developer Technote for more details and more options.
Disable Apt Transport Security Completely (not recommended)
Now, I can imagine only one scenario where this would be something I could tolerate.
The situation where you have an application that will access an unknown web service. Unknown, at the time of your application development. For example a web-browser. The user will enter any URL you can come up with, so it’s impossible to define all those as exceptions.
After toying with it, one other exception would be if you try to access IP addresses with HTTP in a local network.
The Info.plist file will look something like this:
1
2
3
4
5
| <key>NSAppTransportSecurity</key>
<dict>
<key>NSAllowsArbitraryLoads</key>
<true/>
</dict> |
This little piece of code will effectively disable the entire Apt Transport Security feature in iOS 9 (and OS X 10.11 and up, as far as I understand).
Define Exceptions to the Apt Transport Security rules (better)
If you really need to disable this safety feature (again: it’s better to fix the problem by enabling HTTPS), then I’d prefer to narrow it down to those one or two exceptions.
Keep in mind though: data retrieved this way is NOT secure. So please make sure it does not involve any data that is private or sensitive. For example: the weather forecast.
In the example below, we define “example.com” as a domain that can be accessed with the insecure HTPP protocol.
We also define in this example that this also applies to sub domains (www.example.com, mail.example.com, info.example.com, etc).
1
2
3
4
5
6
7
8
9
10
11
12
13
14
15
| <key>NSAppTransportSecurity</key>
<dict>
<key>NSExceptionDomains</key>
<dict>
<key>example.com</key>
<dict>
<!-- this line allows insecure http requests for this server -->
<key>NSExceptionAllowsInsecureHTTPLoads</key>
<true/>
<!-- you'll need this to allow subdomains -->
<key>NSIncludesSubdomains</key>
<true/>
</dict>
</dict>
</dict> |
The other way around: Disable for all except a few
The Info.plist also allows you to disable App Transport Security for all, with the exception of one or more servers.
This could look something like this the plist below.
Here we allow insecure HTTP for everything, with “example.com” (and it’s subdomains) as an exception.
So connecting the “example.com” must always be secure.
1
2
3
4
5
6
7
8
9
10
11
12
13
14
15
16
17
| <key>NSAppTransportSecurity</key>
<dict>
<key>NSAllowsArbitraryLoads</key>
<true>
<key>NSExceptionDomains</key>
<dict>
<key>example.com</key>
<dict>
<!-- do not allow insecure http requests for this server -->
<key>NSExceptionAllowsInsecureHTTPLoads</key>
<false/>
<!-- you'll need this to apply it to subdomains as well -->
<key>NSIncludesSubdomains</key>
<true/>
</dict>
</dict>
</dict> |
Practical tips for Embarcadero products …
Now that we know what needs to be done, time to see how and where to apply this.
I’m taking AppMethod as an example, but it also applies to other Embarcadero products.
The first point is that you Mac OS X, iOS 32 bit and iOS 64 bit applications each have their own Info.plist file, and the Embarcadero product generate these based on the settings in the “Project” “Options” “Version Info“.
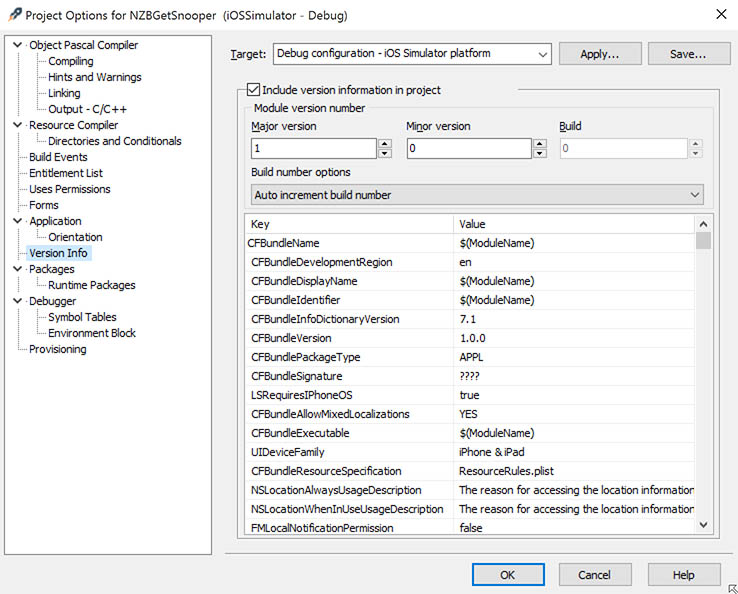
AppMethod – Version Info reveals Info.plist
The problem we run into here, is that this is a really limited plist editor. And that is a bad thing in this scenario.
We have no option to add the structure we have discussed just now.
Manual Editing of Info.plist
Since RAD Studio or AppMethod will generate a new Info.plist each time you want to deploy your app, manual editing is not an option either. It would be overwritten each time, and in my case, I most certainly would forget to do that when needed.
If you decide to go the manual route (not recommended, but might be useful in other developer environments):
Open the Info.plist file with a text editor and add the code we have discussed just now, just before the last “</dict>” tag, and save the file.
Automated Editing of Info.plist
Pieter Scheldeman, from TMS Software, developed a small application to make our life easier.
Please download it from the TMS Software Blog, or alternatively from Tweaking4All:
Using this utility is relatively simple after the first setup for your project.
First copy the files iOS9Fix.exe and iOS9Fix_config.txt files to the project directory.
Next add the following post-build command to your project options call “$(PROJECTDIR)\iOS9Fix.exe” “$(OUTPUTPATH).info.plist“.
To do this, go to “Project” “Options“, select “Build Events” and find the row “Command” under “Post-build events“.
There you paste:
"$(PROJECTDIR)\iOS9Fix.exe" "$(OUTPUTPATH).info.plist" .
Now iOS9Fix will grab whatever keys you’ve put in the iOS9Fix_config.txt file, you can add your own keys in this file if you’d like and iOS9Fix will add those to the Info.plist file automatically as well.
The content of the iOS9Fix_config.txt could be something like this:
1
2
3
4
5
| <key>NSAppTransportSecurity</key>
<dict>
<key>NSAllowsArbitraryLoads</key>
<true/>
</dict> |
And when iOS9Fix.exe is executed, it will add these to the Info.plist of your project.
Kudo’s and many thanks to Pieter and TSM Software!
Additional Resources:


Comments
There is only one comment, you can read it below.
You can post your own comments by using the form below, or reply to existing comments by using the "Reply" button.
UPDATE:
Added better details for AppMethod and RAD Studio, and added more info concerning IP Addresses.
hans