I’m always up for playing with new toys, and this time I did build a firewall using pfSense. I wanted to play with OpenVPN and my NetGear R7000 Nighthawk (running Asus xWRT) capped out at 5Mbps. So I migrated to pfSense.
However, doing so, my XBox One decided to not like this and detected STRICT NAT – which results in limitations with online gaming.
In this article I’ll show you how I fixed this with pfSense so NAT now shows as OPEN (keep in mind that I’m NOT an expert).
Note: This may apply to PlayStation 3, PlayStation 4, XBox 360 and other consoles as well.
What is pfSense?
Well, if you are unfamiliar with pfSense, then this article may not be for you … unless you want to go build your own firewall as well of course.
OPNSense is a great pfSense alternative!
OPNSense is just as good (IMO) as pfSense – after years of using pfSense, OPNSense has now become my favorite though.
Both are great firewalls though and in my case I initially only switched to OPNSense because of its WireGuard support (by the time you read this, pfSense will probably support WireGuard just as well, I think).
In shot : Everything described here works just as well with OpenSense. (they do have history together  ).
).
pfSense is one of the most used open source firewalls which runs on it’s own dedicated hardware. Having played with it, and using it right now: it’s awesome!
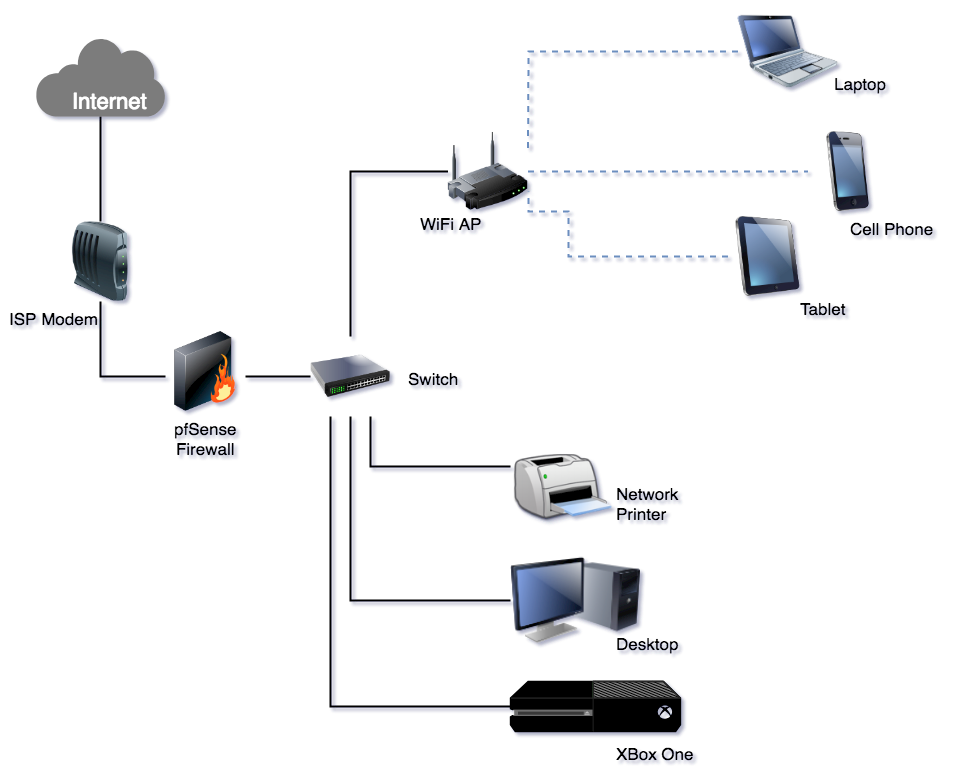
The common “at home” setup for pfSense is shown below, I even included the XBox One – which initially showed STRICT NAT … (drawn with Draw.io)
In this diagram you’ll see the pfSense firewall as a separate box, which indeed the case in my setup. I’ve used a small computer for this.
The ISP Modem is set in bridge mode, so it’s basically a dumb device translating the signals from the ISP (cable, fiber, ISDN, etc) to network signals. So no DHCP, no Firewall, etc. – pfSense handles it all.
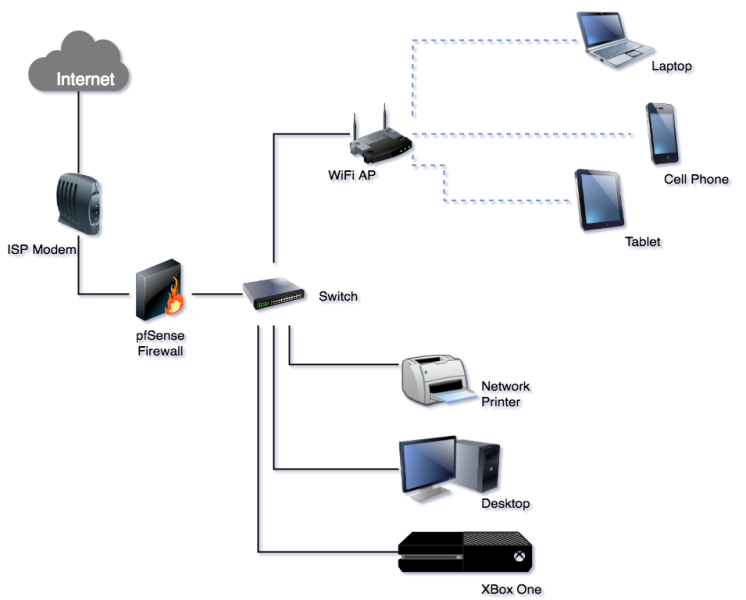
pfSense – Network Diagram
Off the bat, pfSense is configured pretty good. Just one problem I ran into … my XBox One was very limited when it comes to online gaming due to a STRICT NAT. This implies that you can join a multiplayer game and that you can chat … but you cannot host a multiplayer game. Not to mention all kinds of unexpected errors making live miserable.
Ad Blocking Detected Please consider disabling your ad blocker for our website.
We rely on these ads to be able to run our website.
You can of course support us in other ways (see Support Us on the left).
pfSense – How to fix STRICT NAT
There are several ways to fix the STRICT NAT situation.
Placing the XBox One in a DMZ (DeMilitarized Zone), means that your XBox will be exposed to the Internet without any protection – which actually may be fine. I used a small computer with 4 Ethernet port (network) ports. One port used for WAN (Internet) and one for LAN (my devices). I could use one of the remaining ports specifically for DMZ purposes. If you’re interested in this approach then consider reading this article: How to create a DMZ with pfSense 2.4.2.
Personally I try to avoid using the DMZ approach if I can. Just feels like I’m opening more than I should to make things work. But … it most certainly is an option.
My preferred method is by setting the appropriate rules and only allow and open what is really needed – there is no need to leave the door wide open.
pfSense – OPEN NAT for your XBox One
The following method should work for the XBox One to get rid of STRICT NAT and end up with an OPEN NAT, and can be applied for multiple XBox One devices.
Unfortunately, I do not have other consoles like the Play Station 4 or the Nintendo Switch (nasty thing with money – you can spend only once).
From what I have seen; this most likely works with other consoles as well. Your milage may vary.
Not a Firewall Expert
Just a warning: I’m most certainly not a firewall or a pfSense expert.
Everything presented here is from what I have read and tested on my own setup.
Suggestions, and improvements are most welcome.
Ad Blocking Detected Please consider disabling your ad blocker for our website.
We rely on these ads to be able to run our website.
You can of course support us in other ways (see Support Us on the left).
Step 1: Give your XBox One a fixed IP address in pfSense
We are going to be adding some rules to the pfSense firewall. To make sure these rules apply to the right devices, we must have a known IP address for our XBox One device(s).
This can be done it two ways: either you assign a static IP address to your XBox One or you reserver the IP address for you XBox One in the DHCP of your pfSense setup.
Since I use DHCP for my network, I decided to use the most obvious: tell my DHCP to use a fixed IP address for my XBox One. You can apply this to all your XBox One devices in case you have multiple.
Determine an IP Address for your XBox One
Note: I assume that your LAN connection is called “LAN” in your pfSense enviroment.
In pfSense go to Services DHCP Server LAN.
Go to the “General Options” and take note of the range used by your DHCP – we will need this to pick an IP address.
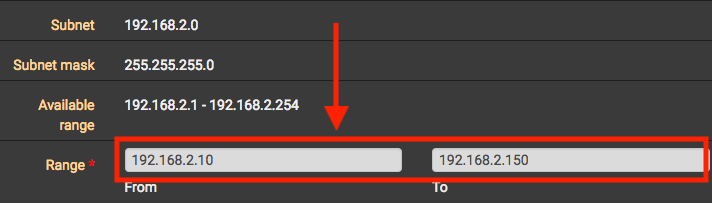
pfSense – IP range used by your DHCP
You will have to determine what the fixed IP address of your XBox One should be.
Make sure you pick an IP address that does not fall in the range used by your DHCP!
As example:
The example DHCP uses the range 192.168.2.10 – 192.168.2.150.
So for our XBox we should pick an IP address lower than 192.168.2.10, greater than 192.168.2.150, and not yet in use by another device.
In my example I picked 192.168.2.239.
Note: If you have more than one XBox One, pick a unique IP address for those as well.
Note: If the range prevents you from picking one outside of the range, then please change your DHCP range to make some room.
Define a fixed IP Address for your XBox One
Next; scroll all the way to the bottom (under “DHCP Static Mappings for this Interface“) and click the “Add” button. A new page will load.
Here we will need the MAC address of your XBox One – you can find this in the network details of your XBox One, or in the DHCP log of pfSense (menu: Status DHCP Leases).
Fill in the form as shown below, and make sure you pick the IP address you selected for your XBox One.
- The MAC address of your XBox One,
- A name or Client identifier for your XBox One (avoid using single or double quotes!!),
- The IP address you picked for your XBox One (192.168.2.239 in my example),
- A Hostname for your XBox One (this can be anything, just do not use special characters or spaces, and keep it short),
- Optional: description so you can recognize the device in pfSense lists and log. For example “XBox One X Livingroom”.
- Click the “Save” button.
Note:
Since it seems no longer is checked by default: Do not forget to check “Arp Table Static Entry“.
(thanks Andrew for pointing that out!)
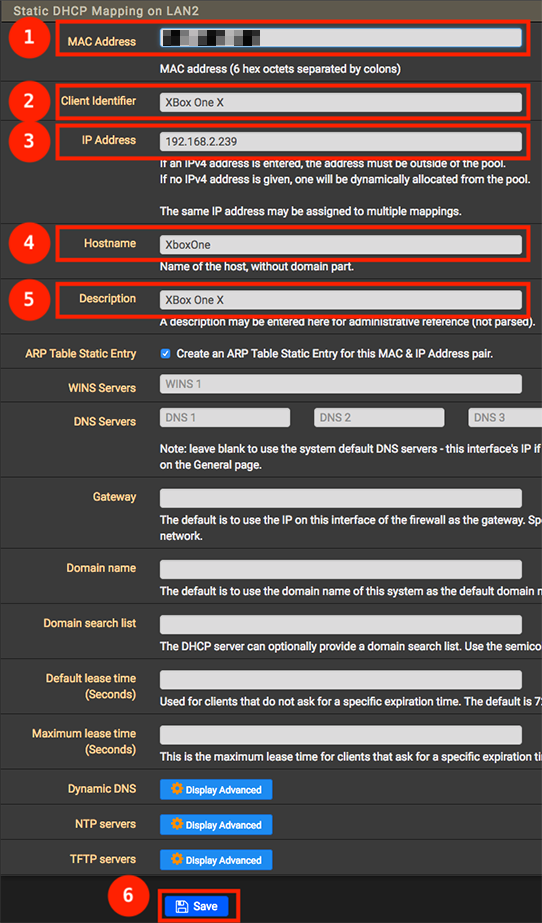
pfSense – Define Fixed IP Address for your XBox One
After click the “Save” button you will get a message, stating that static mapping has changed. Click the “Apply Changes” button.

pfSense – Apply Changes
Repeat these steps for additional consoles devices.
Step 2: Enable UPnP & NAT-PMP in pfSense
The next step is to enable UPnP in your pfSense setup, to do this, go to: Services UPnP & NAT-PMP.
In the image below, we did the following settings:
- Check “Enable UPnP & NAT-PMP“,
- Check “Allow UPnP Port Mapping“,
- Check “Allow NAT-PMP Port Mapping“,
- Select your WAN at the “External Interface“,
- Select your LAN at the “Interfaces” list,
- Check “Deny access to UPnP & NAT-PMP by default“
- At “ACL Entries” we will need to add an entry for each of your XBox Device in the following format, where a.b.c.d should be replaced with the IP address we just set for our XBox One:
allow 53-65535 a.b.c.d/32 53-65535.
So in my example this is:
allow 53-65535 192.168.2.239/32 53-65535.
This says:
for the specific IP address 192.168.2.239, UPnP can be used for any target (/32) and for the external ports “53-65535” and internal ports “53-65535”.
- Click the “Add” button,
- Click “Save” when done.
Note: repeat steps 7 and 8 for each additional XBox One you have.
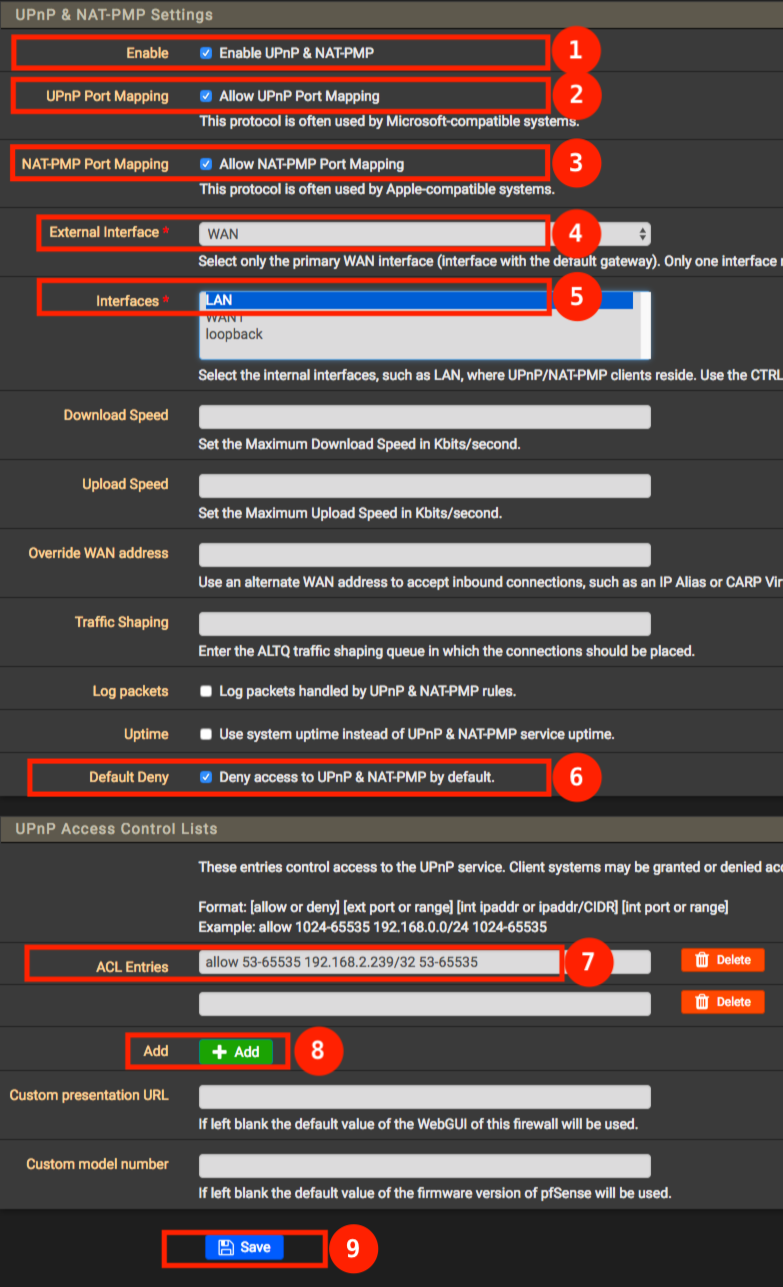
pfSense – Enable UPnP for your XBox One
Ad Blocking Detected Please consider disabling your ad blocker for our website.
We rely on these ads to be able to run our website.
You can of course support us in other ways (see Support Us on the left).
We’re almost done, we just need to modify our NAT settings a little bit.
In pfSense go to Firewall NAT Outbound. Don’t forget to click “Outbound”!
First we need to set our outbound NAT to Hybrid:
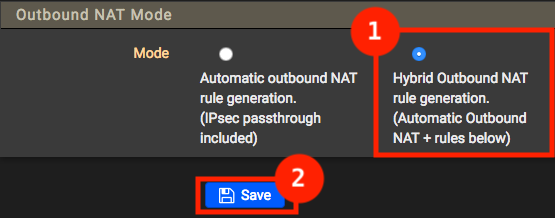
pfSense – Set NAT to Hybrid
We additionally need to add a so called mapping rule: click under “Mappings” the “Add” button that points up.
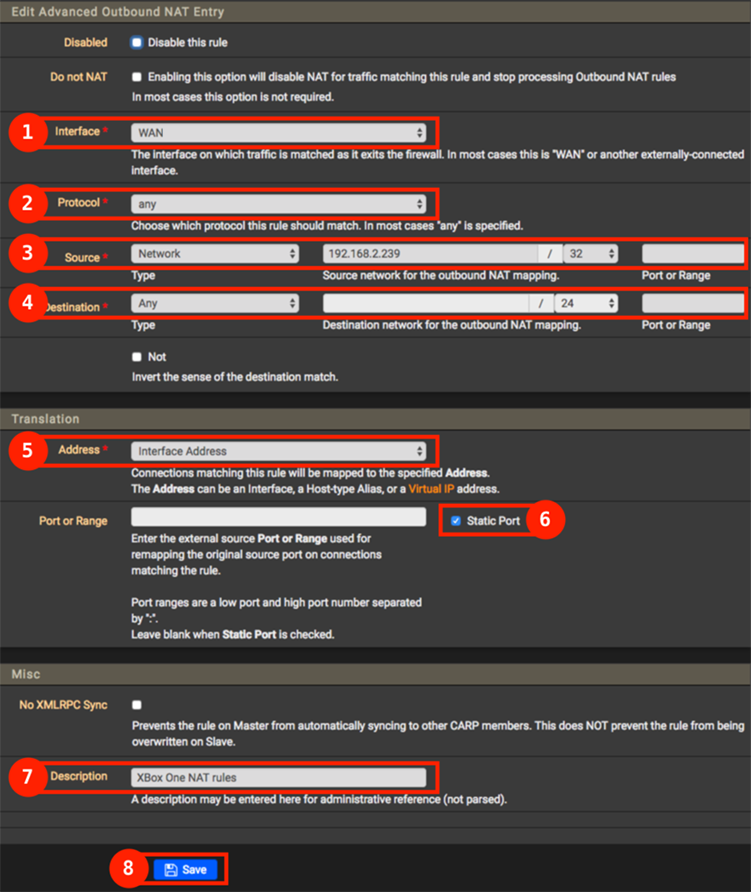
Note: Make sure you did NOT check “Disable this rule”.
- Select WAN at the “Interface” field,
- Set “Protocol” to “any“.
- Set “Source” to “Network” and enter the IP address of your Xbox One, and the following field to “/32“,
- Set “Destination” to “any” and leave the other fields as they are,
- Set “Address” to “Interface Address“,
- Check “Static Port” (so the pfSense NAT will not use a different port number),
- Enter some kind of description (so you can find it again later, and recall why you’ve added this rule),
- and finally click the “Save” button.
Note: For additional XBox One devices, rinse an repeat these 8 steps for each console you’d like to add.
pfSense – Outbound NAT rule for XBox One
Step 4: Reboot your devices
Now this may or may not be required, but I did it anyway.
- Shutdown your XBox One – completely so remove the power cord after doing a console shutdown.
- Reboot your pfSense Firewall – this may not be required.
- After reboot verify your XBox One Network details – You should have an OPEN NAT now and STRICT NAT should be an issue of the past.
Tip: Alternative to rebooting …
A great tip from Charles (below) as an alternative to rebooting your Firewall:
You can just flush the active connections: Firewall Diagnostics States Reset.
I did get another tip on this, related to Universal PnP: you can restart the service.
Personally, I’m a little paranoid when it comes to things like that and choose to reboot – it takes only a few seconds on my setup.
Ad Blocking Detected Please consider disabling your ad blocker for our website.
We rely on these ads to be able to run our website.
You can of course support us in other ways (see Support Us on the left).
Useful resources
A few links that provide useful information related to this topic:

Comments
There are 41 comments. You can read them below.
You can post your own comments by using the form below, or reply to existing comments by using the "Reply" button.
thanks to you so much
seranrakan1995
Thanks Seranrakan1995 for taking the time to post a “Thank you” – it’s much appreciated
hans
Thank you, great article.
I made my life a bit easier, and allowed NAT from my whole non-DHCP portion of the subnet using this tool to generate CIDR masks for the range (coz I’m lazy): https://ipaddressguide.com/cidr.
Now to enable open NAT for a device I simply need to assign it a static IP outside the DHCP range.
Joseph
Hi Joseph,
thank you for posting this useful link
hans
Many thanks for taking the time to post this guide.
Worked wonderfully.
James
Hi James,
glad to hear this worked well for you as well – and thank for taking the effort to post a thank-you note, it’s very much appreciated.
hans
thanks much for the help, fixed the NAT issues. My gamer is now happy again.
Ken
Hi Ken!
Awesome! Glad to hear this was useful, and thanks for taking the time to post a thank-you note. It is very much appreciated.
p.s. I actually did some testing with 2x XBox One and that worked great as well.
hans
Sadly this did not work for me. My Xbox One X NAT type is still set to strict.
IdleWanderlust
Hi IdleWanderlust!
Well, there are a few reasons why this could happen.
So, I assign a fixed IP address to the wired ethernet connection of my XBox.
After doing that you’d need to renew the DHCP lease on the XBox, and sometimes this may not work right away. Rebooting XBox and pfSense may be needed.
Another “problem” I ran into, while playing with the pfSense settings, was that I had overlooked that my XBox was using WiFi instead of ethernet. So all my settings were for ethernet, while it connected through WiFi (different MAC address, which results in different IP address).
So lesson learned (on my end): make sure the XBox gets the IP address you’ve set in the firewall.
On that note: it worked for several visitors here, and I’m running 2 XBox One’s this way with OPEN NAT. So you may be overlooking something.
hans
Awesome guide.
Instead of rebooting devices, you can just flush the active connections: Firewall > Diagnostics > States Reset
Charles
Thanks Charles
And thanks for the tip – I learn something new everyday
hans
To force the Xbox Ones to use a different port (which helps achieve Open NAT in a multi-console environment), you can block port 3074 by adding this to the top of your UPnP rules::
deny 3074 192.168.70.0/24 0-65535 (change accordingly to match your subnet)
Under Status > UPnP & NAT-PMP, you should see something such as this when using multiple consoles:
55671 udp 192.168.70.2 55671 Teredo 192.168.70.2:55671->55671 UDP
56123 udp 192.168.70.6 56123 Teredo 192.168.70.6:56123->56123 UDP
Also, there’s no need need to unplug the console when making changes; just hold the power button until it shuts completely off.
Gene Montgomery
Hi Gene!
Thanks for the tip!
I’m running 2x XBox’es right now, and both say NAT is OPEN with the settings I’ve used in this article, and quite often both at the same time.
But forcing to different ports can be beneficial, so I’ll try your suggestion and see what happens.
As for unplugging, you’re right: shutting down the XBox would work as well.
hans
Thank you for sharing this solution. I now have a happy Xbox gamer again!
Jim
Hi Jim!
Awesome! Great to hear that it worked for you as well.
Thanks for taking the time to write a thank-you note and confirm it works!
hans
Thank you for the guide! I applied these steps for my pc gammer and it worked perfectly first try!
David
Awesome! That’s great to hear!
Thanks for taking the time to post a thank-you note – it is much appreciated!
hans
Thank you very much for the excellent guide! Worked like a champ and made our house gamer very happy :-)
Greg
Awesome, glad to hear this helped!
Thanks Greg for taking the time to post a thank-you – it is very much appreciated
Hans
Thank you! Following the steps produced exactly that outcome! Can’t wait to try it. You rock!
Siggy
Awesome! Thanks Siggy!
Hans
Thank you so much for taking the time to write this easy to follow and detailed guide!
Worked great and my daughter is so happy to play with friends again!
Mike
Hi Mike!
Nice to hear this was helpful for you (and your daughter) and thank you for taking the time to post a Thank-you, it is much appreciated!
Hans
I followed the step and when I go to check NAT status now it has gone from “Strict” to “Cannot get a Teredo IP address”. Any ideas?
Darren
Hi Darren,
I’ve never seen this error on an XBox before.
Teredo is a method to tunnel IPv6 IP addresses through an IPv4 network (I had to Google it).
From what I could read, this is used when your network only supports IPv4.
* The IPv6 standard is slowly upcoming (for many years already), since IPv4 addresses are limit to 32 bits (eg. 192.168.1.1), whereas IPv6 allows for 128 bit addresses (see this Wiki page where it shows a graphical representation of an IPv4 vs IPv6 IP address)
* The XBox uses IPv6 for certain multiplayer games (online), next to IPv4 for regular use, and IPv6 cannot be disabled (reference).
Now this is a little unfamiliar territory for me, so I’m only guessing here … and I’m assuming you’re using pfSense as well.
I have IPv6 enabled (next to IPv4) on my pfSense – maybe you’ll need that as well.
Note that IPv6 is enabled by default in pfSense, and you should have both IPv4 and IPv6 enabled.
In pfSense under Services -> DHCPv6 Server & RA -> LANx -> DHCPv6 Server, check if the following option is checked:
DHCPv6 Server [ X ] Enable DHCPv6 server on interface LANx
Where LANx is your LAN, the number can be different per setup, mine says LAN2 for example.
If you’re NOT using pfSense as your DHCP, then check your router if it has IPv6 checked in the DHCP settings.
* Note: The rules described in this article depend on IPv4 use. Now, if your XBox only uses an IPv6 IP address, the rules described in this article may not work, since these rules are based on IPv4 addresses.
Hope this helps.
Hans
Doing some more searching, I found one other additional trick you can try:
Set a manual port on your XBox
Go to Settings – Network – Advanced settings – Alternate port selection – Manual
Now select a different port – do not use port 3074, use one of the higher numbers, the ones >50,000.
Restart XBox if needed.
Note though: if you followed the steps here, then port 3074 should have been open for your XBox already.
Not sure why it would fail. (the rules allow ports 53-65535)
Please let us know if either of these tricks works.
Hans
Thanks for sharing this!
This made things a lot easier to get my gamers here to play multiplayer games again.
Johnny5
Thanks Johnny5 for taking the time to post a Thank-You note – it is much appreciated!
Hans
Man
BIG BIG BIG thanks from Brazil!!
The Outbound NAT for pfSense with “Static Port” option saved me! Now is 7AM. I Woke up 3AM, play a game and the “Strict port” make me crazy, started checking upnpd daemon at pfsense, checked firewall, ran TCPDUMP, until I found your blog.
You saved my gamer life hahaha :)
I also have a wiki where I post some things related to network/vmware/pfsense … you are welcome to visit me!
Renato frederick
Hi Renato,
That’s awesome to hear! Glad this worked for you as well
Nice collection of tips and trick on your Wiki (note: dark background makes the titles hard to read)!
For others: This is the Wiki Renato is talking about – go give him a visit!
Hans
HI!
Thanks for the tip, I’ll improve the layout to make the wiki easier to read!
Also, I’ll try to write in English, but the main idea is to help non-English speakers, that’s why the primary language is Portuguese.
I’ll create a session of links, to save a good source of Unix info, like your site.
I appreciate your comment, thanks again for helping the community! My PNP was working perfectly, the Utorrent works, I spend hours and hours running pfctl commands, tcpdump, NEVER think about the static port.. One question: Why in 2022 XBOX S insists on using IPv4? This is OK in 2001 using the original XBOX.. but.. the XBOX S was released when? 2019? IPv6 is not a new tech… I really hate V4 NAT implications like this one.
Renato frederick
Very cool that you’re sharing the knowledge in you native language!
As for IPv6: I do think the XBox will work just fine with just IPv6 – you may have to change the rules a little to accommodate. But I really think your XBox can run on “just” IPv6.
You’re right: IPv6 has been around for a very long time already. Just wished they had defined a different way to write an address
Hans
Instead of rebooting, you can go to the dhcp lease status pages (IPv4 and the IPv6 one if you also configured IPv6) and find the leases automatically provided addresses that the XBox is currently using (if it isn’t using the static ones you assigned earlier in the steps) and click the trash can on the right to delete the lease. This will cause the xbox to request a new address and then have everything set to the new configuration. My Xbox even retested the NAT settings (I had the Network settings page open so I could confirm the IP addresses, etc). As it’s in the other room, I’m unsure if there is a delay involved, but it should happen relatively quickly automatically. This way you don’t have to reboot anything and by deleting the previous automatically provided IP address lease(s) manually from pfsense, you are ensuring it’s not used again for some unknown reason. I didn’t even have to clear any states.
Additionally clearing states is no big deal, it basically makes all connected devices have to re-establish their connections which forces them to use new rules, configurations, traffic shapers, etc. and saves time if that’s all you’re looking to accomplish. Rebooting may still be needed with some devices to clear some caching, etc. but in general I don’t find that necessary (on Windows PC’s you can open a command prompt and run the command ‘ipconfig /flushdns’ to clear the computers stored DNS records may help avoid a full reboot).
JBxxx
Always cool to learn something new – thanks for sharing JBxxx!
Hans
Thank you! You are awesome!
Joe
Thanks Joe! And so are you for taking the effort to post a thank-you. So very much appreciated!
Hans
Thanks for this! I kept trying to find a way to do this for COD Warzone as the external destination port used is dynamic and constantly changing. This worked perfectly to set the port to a static port. But was only getting me a Moderate NAT. The UPNP did not seem to be working for me but all I had to do was add a manual port forward rule that would forward external traffic destined for 3074 to my PC on port 3074. Thanks again!
Travis
Hi Travis!
Good to hear this was helpful for COD as well! Nice!
Thank you for taking the time to post a Thank-You – its much appreciated!
Hans
I was stuck in NAT: Moderate, UPnP not working for a long time following this guide until I realized that I did not have “ARP Table Static Entry” under “DHCP Static Mappings for this Interface.” It’s not explicitly called out in the guide, but it’s not checked by default when you are mapping the static IP for the Xbox.
After fixing this in my settings, I reboot the my router and the Xbox. I still had NAS Moderate in this case, but using the Test NAT option in the Xbox settings resolved the issue and gave me NAT: OPEN and fix my UPnP problems.
Andrew
The XBox can be a pain indeed – good to hear this helped for you situation.
I’ll emphasize that some more.
Hans