Arduino and ENC28J60 Ethernet Shield
This article is based on using an Arduino ENC28J60 Ethernet shield, as discussed in our “How to web-enable your Arduino“, which we will use with one or more DS18B20 digital temperature sensors (you can consider using other sensors as well of course). The goal is to READ the data of these sensors from our Arduino over a network connection.
We use the exact same hardware setup as in out Pull Data article. So you don’t need to change anything if you followed that article first.
The “UIPEthernet” Library can be downloaded from the Github website or from Tweaking4All, but as usual we recommend you check out the Github page first so you have the most recent version.
Since we will be using the DS18B20 sensors, we will will also need the “OneWire” library, which can be found at OneWire Project Website (recommended) or can be download straight from Tweaking4All.
Using the demo with the standard Arduino Ethernet Shield
For the examples we use “UIPEthernet” which is a fully compatible drop-in library for the standard “Ethernet” library that comes with the Arduino IDE. So you should be able to use it with the standard, W5100 based, Arduino Ethernet controller and standard Ethernet library as well. Just replace the include line (#include <UIPEthernet.h> ) with these two lines:
1
2
| #include <SPI.h>
#include <Ethernet.h> |
Wiring your Ethernet Shield
The wiring of the Ethernet shield is pretty straight forward, for more details read the “How to web-enable your Arduino” article.
Any Ethernet Module uses the GND and +3.3V or +5V pin, after all: we do need power.
For my eBay module I used the +5V (it has a voltage regulator onboard to handle that).
Below a table, based on a Arduino Uno, Arduino Nano and my eBay Ethernet module, with the additionally needed pins …
ENC28J60 Pins
| Pin name |
UIPEthernet |
My eBay Module |
| SS |
10 |
10 |
| MOSI (SI) |
11 |
11 |
| MISO (SO) |
12 |
12 |
| SCK |
13 |
13 |
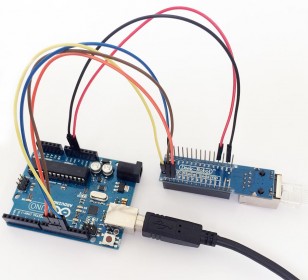
My Arduino with ENC28J60 – A wiring example
Wiring your Temperature sensor
The temperature sensor is connected pretty simple. We will use pin 2 as the data pin of our sensor, and in my test setup I used two sensors, but you’re free to use one or more sensors.
For more details on how to wire a digital temperature sensor please read “How to measure temperature with Arduino and DS18B20“.
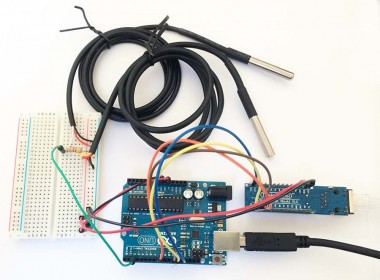
My Arduino with ENC28J60 and 2x DS18B20 – A wiring example
Everything wired
Depending on your Arduino board and the model of your ENC28J60 Ethernet shield, wiring could look like the illustration below. Keep in mind that I used my “Deek Robot – Nano Ethernet Shield” (from eBay) connected to my Arduino Uno, just as an example (I did not use the supplied Arduino Nano).
Follow the pins as illustrated in the table earlier on.
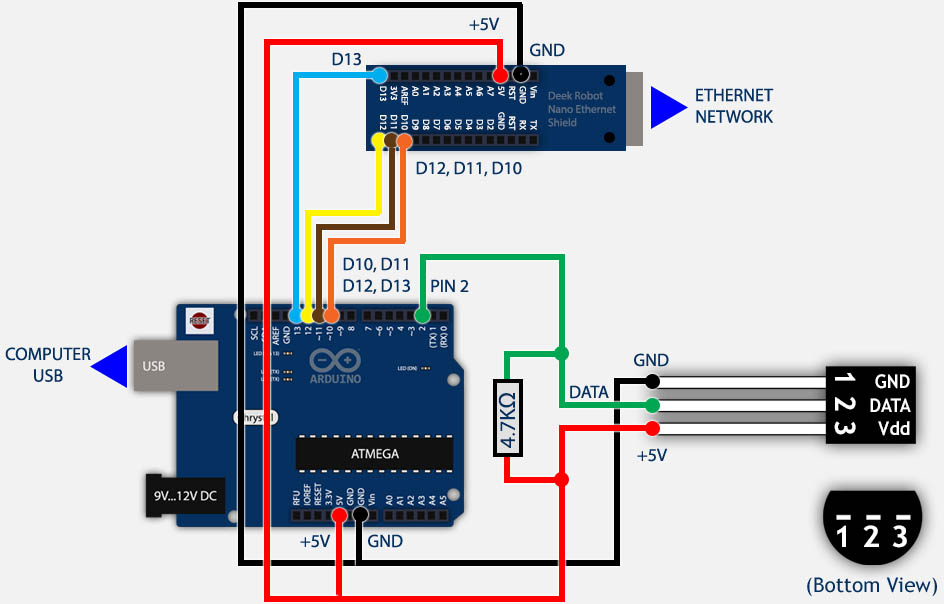
Arduino, ENC28j60 and DS18B20 wiring example
Ad Blocking Detected Please consider disabling your ad blocker for our website.
We rely on these ads to be able to run our website.
You can of course support us in other ways (see Support Us on the left).
Retrieving Data remotely
In this example, I’ll take the temperature sensor of my DS18B20 article and I’d like to be able to log the temperature data in a database, for which we will use an Apache, MySQL and PHP setup – so called AMP setups (Linux: LAMP, Windows: WAMP, MacOS X: MAMP).
If you have a capable NAS, for example a QNAP, then please read our “QNAP – Installing MySQL and phpMyAdmin” article on how to install Apache, MySQL and PHP.
A real, full-size, web-server will work as well … if you have access to one of course …
Installation of such an AMP setup on your desktop or laptop PC is relatively simple (especially for MacOS X and Windows):
Pulling or Pushing Data
We have two options to get our Arduino data, and the best option depends on your purpose:
– Pull: An application on our computer (or server) that is going to ask the Arduino for the data.
– Push: The Arduino will connect to a server application to push the data to.
In this article we will focus on PUSHING DATA to our computer/server.
The alternative, pulling data, is much easier to implement, since we do not need a “server”. In this article however we will use the more complex Data Push approach. In essence we are going to have the Arduino fill out a web-page form and submit the data to our server. For this we will use MySQL and PHP.
Pushing Data
Pushing data can be a little trickier so I will present some possible approaches to do just this.
First we would need a “receiving” party, a server like application that is ready and capable of receiving data.
The receiving party would need to listen at a certain IP address and IP port. Such an application can be for example MySQL (free database server that can also run on your desktop with setups like WAMPServer).
Since the Arduino is small and loading full-size MySQL (or other) libraries is not an option. There is however an Arduino MySQL library that can directly access MySQL over Ethernet. The library however is not small, and the memory space limitations of your Arduino could become a problem when realizing that (in our example) OneWire is needed for the sensors, and UIPEthernet is needed for the network as well.
In my case this didn’t work as I was already running low on memory with my example sketch, for those interested, feel free to explore this option. It looks very promising! You can also look at this article I found on Chuck’s Blog.
Pushing Data through PHP
As already hinted before .. we could utilize is using HTML forms and PHP, and why not?
Each AMP setup comes with the required elements.
Some basic web-server, PHP, HTML and MySQL understanding and experience is going to be very helpful for the next steps!
In HTML we can use <FORM> to create a form which can be submitted through POST or GET.
Now POST makes things a little more secure I suppose, but also much more complicated, so we will stick with the GET option.
A problem with a form, is that we are a little limited when thinking about an x (unknown) number of temperature sensors. With some PHP trickery we could read more than one sensor at once of course, but we’d like to start this article “simple” under the assumption that we will send just one set of sensor data at a time. the PHP trickery can be found in the final Sketch.
The basic format for such a “submit” of data would be something like this:
http://yourphpserver/add_data.php?variable1=value1&variable2=value2&variable3=value3...
Data is send as variable pairs (variable1=value1) separated with an ampersand (&) and this is the trick we will (ab)use for submitting data.
You will however need, on your PHP server (this can be WAMPServer), a PHP file to receive and process this information and of course a table in MySQL to hold the data. In the example line, this would be the “add_data.php” file. This file will post the received data into an MySQL table, which of course needs to exits, so let’s start with that.
This “add_data.php” file is in this example stored in the “root” of your “WWW” directory. Under for example “WAMPServer”, this directory is called “www”.
MySQL Table:
Let’s assume we want to store the following values (you can add and modify at a later time):
- Unique ID (int),
- Event date and time (timestamp) so we know when this was submitted,
- Sensor serial number (varchar) so we know which of the sensors reported the temperature,
- Temperature in Celsius (varchar) to keep it simple.
The SQL statement to create this “temperature” table (you can do this in phpMyAdmin for example):
1
2
3
4
5
6
7
8
| CREATE TABLE `test`.`temperature` (
`id` INT NOT NULL AUTO_INCREMENT PRIMARY KEY COMMENT 'unique ID',
`event` TIMESTAMP NOT NULL DEFAULT CURRENT_TIMESTAMP COMMENT 'Event Date and Time',
`sensor` VARCHAR( 30 ) NOT NULL COMMENT 'Unique ID of the sensor',
`celsius` VARCHAR( 10 ) NOT NULL COMMENT 'Measured Temperature in Celsius',
INDEX ( `event` , `sensor` )
) ENGINE = InnoDB; |
Whenever we do an INSERT into this table, we only need to provide the sensor serial number and the temperature in Celsius.
Values for the ID and date/time will be automatically populated by MySQL.
An INSERT example:
INSERT INTO test.temperature (sensor ,celsius) VALUES ('288884820500006a', '21.65');
The database I’m using here is called “test”, which can be found in any freshly installed MySQL – yours might be called differently of course.
The same goes for the table name. Just make sure that you’re using both consistently.
Now that we have a table for our data, on to the PHP files.
We will create 3 PHP files, one to submit data and one to retrieve data so we can see what’s going on.
Both will be connected to the database, so we will make a third file, that the other 2 files will share, to connect to MySQL.
PHP: MySQL Connection
This file has only one purpose: setup a connection from PHP to MySQL which will be used for both submitting and retrieving data.
Save it as “dbconnect.php” in the www directory you’d like to use.
1
2
3
4
5
6
7
8
| <?php
$MyUsername = "your username"; // enter your username for mysql
$MyPassword = "your password"; // enter your password for mysql
$MyHostname = "localhost"; // this is usually "localhost" unless your database resides on a different server
$dbh = mysql_pconnect($MyHostname , $MyUsername, $MyPassword);
$selected = mysql_select_db("test",$dbh);
?> |
PHP: Show current table content
I’ll keep this file very simple, it’s just to illustrate that it works, although I could not help myself adding some CSS to make a simple table still look nice.
Save this file as “review_data.php” in your www directory, and if you’d like you can already test it by entering the address of your web-server followed by “review_data.php” (the table will be empty of course, unless you did a few INSERTs to add some dummy data, like the example displayed earlier).
For example : http://yourserver/review_data.php
(replace “yourserver” with the name or IP address of our server, or with “localhost” if the AMP setup is running on the same computer)
1
2
3
4
5
6
7
8
9
10
11
12
13
14
15
16
17
18
19
20
21
22
23
24
25
26
27
28
29
30
31
32
33
34
35
36
37
38
39
40
41
42
43
44
45
46
47
48
49
50
51
52
53
54
55
56
57
58
59
60
61
62
63
64
65
66
67
68
69
70
71
72
| <?php
// Start MySQL Connection
include('dbconnect.php');
?>
<html>
<head>
<title>Arduino Temperature Log</title>
<style type="text/css">
.table_titles, .table_cells_odd, .table_cells_even {
padding-right: 20px;
padding-left: 20px;
color: #000;
}
.table_titles {
color: #FFF;
background-color: #666;
}
.table_cells_odd {
background-color: #CCC;
}
.table_cells_even {
background-color: #FAFAFA;
}
table {
border: 2px solid #333;
}
body { font-family: "Trebuchet MS", Arial; }
</style>
</head>
<body>
<h1>Arduino Temperature Log</h1>
<table border="0" cellspacing="0" cellpadding="4">
<tr>
<td class="table_titles">ID</td>
<td class="table_titles">Date and Time</td>
<td class="table_titles">Sensor Serial</td>
<td class="table_titles">Temperature in Celsius</td>
</tr>
<?php
// Retrieve all records and display them
$result = mysql_query("SELECT * FROM temperature ORDER BY id ASC");
// Used for row color toggle
$oddrow = true;
// process every record
while( $row = mysql_fetch_array($result) )
{
if ($oddrow)
{
$css_class=' class="table_cells_odd"';
}
else
{
$css_class=' class="table_cells_even"';
}
$oddrow = !$oddrow;
echo '<tr>';
echo ' <td'.$css_class.'>'.$row["id"].'</td>';
echo ' <td'.$css_class.'>'.$row["event"].'</td>';
echo ' <td'.$css_class.'>'.$row["sensor"].'</td>';
echo ' <td'.$css_class.'>'.$row["celsius"].'</td>';
echo '</tr>';
}
?>
</table>
</body>
</html> |
PHP: Upload Data
In this file we will (ab)use the mechanism of the HTML <FORM> with GET.
The GET values will be inserted into the database and the “review.data.php” will be loaded right after that, which is optional, and not needed for the Arduino, but practical when you try to submit data from your browser for testing purposes. During normal operation of your “end product” you could remove line 12.
Save this file as “add_data.php” in your www directory.
1
2
3
4
5
6
7
8
9
10
11
12
13
| <?php
// Connect to MySQL
include("dbconnect.php");
// Prepare the SQL statement
$SQL = "INSERT INTO test.temperature (sensor ,celsius) VALUES ('".$_GET["serial"]."', '".$_GET["temperature"]."')";
// Execute SQL statement
mysql_query($SQL);
// Go to the review_data.php (optional)
header("Location: review_data.php");
?> |
You can test submitting data as well. Enter the address of your server in your web-browser, followed by “add_data.php”, followed by some values, for example:
http://yourserver/add_data.php?serial=288884820500006b&temperature=20.79
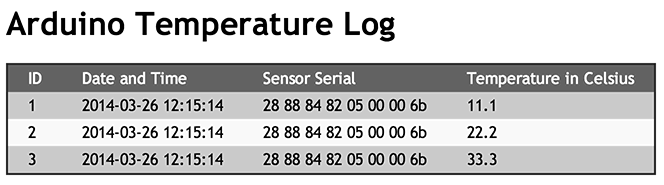
After pressing ENTER, the add_data.php file will be opened, data will be read and submitted to the database, and the review_data.php file will appear with a table with your new data in it. The result will look something like this:
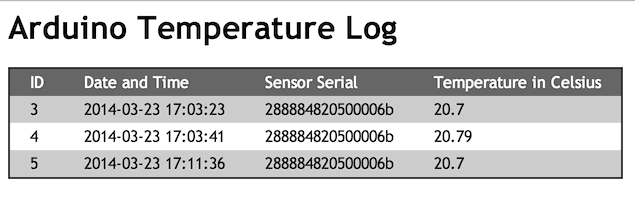
Arduino to MySQL with PHP – Example Table
Keep in mind that this example is far from secure, you should add your own security if needed!
Now that we’ve dealt with the “server” side of things, on to the Arduino side.
Testing the Arduino Ethernet Code
So we have assembled our Arduino-Ethernet-Sensor combo and created the needed PHP documents and MySQL table.
Let’s first look at a simple Sketch that will test our setup and give us a better understanding of how this works – we will not yet read the sensor data, but you can leave the sensors connected.
In the example sketch below, we will connect to our “web-server” and submit some dummy data every 5 seconds. You can open/refresh the “retrieve_data.php” file in your browser to follow the progress, the same way we did before. The output of “retrieve_data.php” should look something like this, refresh the page every 5 seconds to monitor progress (see “Date and Time” column to observe the every 5 seconds update):
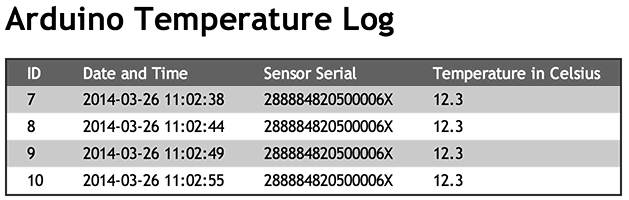
Monitoring the MySQL table being filled by your Arduino
Walking through the code
Network basics:
Line 1: Include the needed Ethernet Library (UIPEthernet).
Line 6: Define the MAC address of your Ethernet shield, which must be unique in your network (take the given value, I’m pretty sure it will be unique).
Line 9: Define the variable “client” for holding our connection.
Line 10: The name or IP address or hostname of the web-server which we use for dumping our data. So the server where we find add_data.php. This should just be the server name, so no extra info like path and filename! We will handle that part later. Do NOT use “localhost” – it won’t work.
Keep in mind that the IP address or hostname (for example “www.google.com”) is to be entered without the “http://” prefix!!!
Line 11: For this test we want to dump our data every 5 seconds (5000).
Setup():
We’re setting up the serial port so we can see debug info in the Arduino IDE (menu “Tools“ “Serial Monitor” and make sure it’s set to “9600 baud“).
Next we’re initializing our Ethernet Shield with something we might not have done before: We’re using DHCP!
See how easy this works in UIPEthernet? Just provide the Mac Address and everything will be taken care of.
The reason why we can use DHCP in this example is simple: we really don’t care for the IP Address, we will be pushing the data to the server, so nobody needs to know the IP Address, as long as it’s a good IP address in your network. DHCP will handle this just fine and automatically.
After that we will dump a welcome message and some network info to the serial port so we can see in the Arduino IDE that we did get connected.
Loop()
Line 33 will try to open a connection and if it succeeds lines 36 to 47 will do a HTTP request. This is where a little explanation might be welcome.
In line 36, we will start a GET request. The basic format of the URL to the add_data.php file in this example is:
http://192.168.1.100/testserver/arduino_temperatures/add_data.php?serial=288884820500006X&temperature=12.3
Keep in mind that this is just an example, adapt the URL to your setup.
Keep in mind that if you’re using WAMPServer (or other local AMP variant) and you used to type “http://localhost” in your browser, that “localhost” will not work for the Arduino. Localhost is the dummy hostname for your computer, when accessed from your computer! For the Arduino “localhost” would mean itself, the Arduino, and not the needed web-server.
The first part of the URL http://192.168.1.100 is something we already defined (line 10) and used (line 33), so we do not need that part anymore.
The second part is the requested “add_data.php” file and it’s path ( /testserver/arduino_temperatures/add_data.php ) followed by a question mark.
The question mark is needed to indicate the start of the GET variables we discussed earlier.
Lines 37 to 41 will now add the variables “serial” and “temperature” separated by an ampersand. So these lines build serial=288884820500006X&temperature=12.3 and add it to the output.
Lines 42 to 48 complete the HTTP GET request and finally closes the request.
1
2
3
4
5
6
7
8
9
10
11
12
13
14
15
16
17
18
19
20
21
22
23
24
25
26
27
28
29
30
31
32
33
34
35
36
37
38
39
40
41
42
43
44
45
46
47
48
49
50
51
52
53
54
55
| #include <UIPEthernet.h> // Used for Ethernet
// **** ETHERNET SETTING ****
// Arduino Uno pins: 10 = CS, 11 = MOSI, 12 = MISO, 13 = SCK
// Ethernet MAC address - must be unique on your network - MAC Reads T4A001 in hex (unique in your network)
byte mac[] = { 0x54, 0x34, 0x41, 0x30, 0x30, 0x31 };
// For the rest we use DHCP (IP address and such)
EthernetClient client;
char server[] = "192.168.1.100"; // IP Adres (or name) of server to dump data to
int interval = 5000; // Wait between dumps
void setup() {
Serial.begin(9600);
Ethernet.begin(mac);
Serial.println("Tweaking4All.com - Temperature Drone - v2.0");
Serial.println("-=-=-=-=-=-=-=-=-=-=-=-=-=-=-=-=-=-=-=-=-=-\n");
Serial.print("IP Address : ");
Serial.println(Ethernet.localIP());
Serial.print("Subnet Mask : ");
Serial.println(Ethernet.subnetMask());
Serial.print("Default Gateway IP: ");
Serial.println(Ethernet.gatewayIP());
Serial.print("DNS Server IP : ");
Serial.println(Ethernet.dnsServerIP());
}
void loop() {

  // if you get a connection, report back via serial:

  if (client.connect(server, 80)) {

    Serial.println("-> Connected");

    // Make a HTTP request:

    client.print( "GET /testserver/arduino_temperatures/add_data.php?");

    client.print("serial=");

    client.print( "288884820500006X" );

    client.print("&&");
client.print("temperature=");
client.print( "12.3" );
client.println( " HTTP/1.1");
client.print( "Host: " );
client.println(server)
client.println( "Connection: close" );
client.println();
client.println();
client.stop();
}
else {
// you didn't get a connection to the server:
Serial.println("--> connection failed/n");
}
delay(interval);
} |
Ad Blocking Detected Please consider disabling your ad blocker for our website.
We rely on these ads to be able to run our website.
You can of course support us in other ways (see Support Us on the left).
Adding Sensor Reading to the Arduino Ethernet Code
If you reached this point, then I’ll carefully assume that you’ve gotten things to work in our test Sketch.
In this paragraph we will add the sensor reading code and we will make sure it handles more than just one sensor.
PHP Trick to Receive Multiple Sensor Data
To be able to read an unknown number of sensors, some PHP magic will be used and for this we will assume that the add_data.php URL will look something like this example:
1
| http://testserver/arduino_temperatures/add_data.php?serial1=28%2088%2084%2082%2005%2000%2000%206b&temperature1=11.1&serial2=28%2088%2084%2082%2005%2000%2000%206b&temperature2=22.2&serial3=28%2088%2084%2082%2005%2000%2000%206b&temperature3=33.3 |
As you can see, for each sensor we will pass a “serialx=1234567890&temperaturex=12.3″ variable pair, where “x” is a number { 1, 2, …. n }.
So 1 for sensor 1, 2 for sensor 2, etc.
Calling the URL in this format will result in something like the tabel below (code will adapt automatically to the number of sensors you use).
Note:
– the ID number is not the same as the “x” value, that they match is coincidence.
– and I used spaces (%20) in the serial number.
Testing “add_data.php” AFTER the modifications
To make this work will need to make a minor modification to the PHP code of “add_data.php“:
1
2
3
4
5
6
7
8
9
10
11
12
13
14
15
16
17
18
19
20
21
| <?php
// Connect to MySQL
include("dbconnect.php");
$counter=1;
while ( isset( $_GET["serial".$counter] ) )
{
// Prepare the SQL statement
$SQL = "INSERT INTO test.temperature (sensor ,celsius) VALUES ('".$_GET["serial".$counter]."', '".$_GET["temperature".$counter]."')";
// Execute SQL statement
mysql_query($SQL);
// Increase counter
$counter++;
}
// Go to the review_data.php
header("Location: review_data.php");
?> |
In the lines 7 to 17 you will see that we now added a loop which keeps inserting data until “serialx” is not found (x being a number). Compare it to the previous “add_data.php” file to see the differences.
Maximum number of variables we can pass …
The URL of our “add_data.php” PHP script has limitations. Please note that PHP setups will have a default limit of 512 characters for GET parameters. Although bad practice, most browsers (including IE) supports URLs up to around 2000 characters, while Apache has a default of 8000. (source)
This brings us to a max of about 8 sensors for which data can be passed this way – but your milage may vary, depending on your PHP setup.
Now that we have prepared our PHP code to handle multiple sensors, time to add the actual sensor reading code and making it work for multiple sensors.
Below and example of code that worked just fine for me, you’ll recognize the example code we used just now and I’ve added the sensor readings to it.
If you’ve played with the temperature sensors before then the “TemperaturesToGetVariables” will look familiar. It basically wraps the code used in our “Measuring temperatures with your Arduino” article, I just removed some of the unused tasks like printing Fahrenheit etc.
I also changed the interval to 10 seconds (10,000) and in a real world scenario 60 seconds or even more might not be a bad idea unless you’re interested in filling your database in no-time  …
…
The code below is an updated version with some modifications as suggested by Norbert Truchsess (developer of UIPEthernet – thank you Norbert!!), which makes sure that other Ethernet traffic is handles as well (Ethernet.maintain()).
I did also make the debug serial output optional – simply define DEBUG (#define DEBUG) to enable it, or remove that line to disable it. Mostly because in a production environment we’d never really use serial output anyway.
With the help of Frank, I’ve also added some code to make sure that during long term use, failing network connections get reset.
The final code and PHP files can be downloaded or just use copy and paste:
Download - T4A Temperature Drone (Push)
All About Timing …
Please keep in mind that reading a sensor takes time … app. 750 ms in 12 bit (default) mode.
The more sensors you add, the slower this process will become, so you might need to do some testing if you decide to go nuts on the amount of sensors.
Also keep in mind that the length of the GET variables in the URL is limited, I’m guessing that 8 sensors will work, but I haven’t been able to test that (only have 2 sensors). Feel free to donate more sensors and I’ll give it a try.
1
2
3
4
5
6
7
8
9
10
11
12
13
14
15
16
17
18
19
20
21
22
23
24
25
26
27
28
29
30
31
32
33
34
35
36
37
38
39
40
41
42
43
44
45
46
47
48
49
50
51
52
53
54
55
56
57
58
59
60
61
62
63
64
65
66
67
68
69
70
71
72
73
74
75
76
77
78
79
80
81
82
83
84
85
86
87
88
89
90
91
92
93
94
95
96
97
98
99
100
101
102
103
104
105
106
107
108
109
110
111
112
113
114
115
116
117
118
119
120
121
122
123
124
125
126
127
128
129
130
131
132
133
134
135
136
137
138
139
140
141
142
143
144
145
146
147
148
149
150
151
152
153
154
155
156
157
158
159
160
161
162
163
164
165
166
167
168
169
170
171
172
173
174
175
176
177
178
179
180
181
182
183
184
185
186
187
188
189
190
191
192
193
194
195
196
197
198
199
200
201
202
| #include <UIPEthernet.h> // Used for Ethernet
#include <OneWire.h> // Used for temperature sensor(s)
// #define DEBUG
// **** ETHERNET SETTING ****
// Arduino Uno pins: 10 = CS, 11 = MOSI, 12 = MISO, 13 = SCK
// Ethernet MAC address - must be unique on your network - MAC Reads T4A001 in hex (unique in your network)
byte mac[] = { 0x54, 0x34, 0x41, 0x30, 0x30, 0x31 };
// For the rest we use DHCP (IP address and such)
EthernetClient client;
char server[] = "192.168.1.100"; // IP Adres (or name) of server to dump data to
unsigned long PreviousMillis = 0;// For when millis goes past app 49 days.
//unsigned long interval = 10000; // Wait between dumps (10000 = 10 seconds)
unsigned long interval = 300000; // Wait between dumps (1 min)
unsigned long intervalTime; // Global var tracking Interval Time
// **** TEMPERATURE SETTINGS ****
// Sensor(s) data pin is connected to Arduino pin 2 in non-parasite mode!
OneWire ds(2);
void setup() {
#ifdef DEBUG
Serial.begin(9600); // only use serial when debugging
#endif
Ethernet.begin(mac);
intervalTime = millis(); // Set initial target trigger time (right NOW!)
#ifdef DEBUG
Serial.println("Tweaking4All.com - Temperature Drone - v2.3");
Serial.println("-=-=-=-=-=-=-=-=-=-=-=-=-=-=-=-=-=-=-=-=-=-\n");
Serial.print("IP Address : ");
Serial.println(Ethernet.localIP());
Serial.print("Subnet Mask : ");
Serial.println(Ethernet.subnetMask());
Serial.print("Default Gateway IP: ");
Serial.println(Ethernet.gatewayIP());
Serial.print("DNS Server IP : ");
Serial.println(Ethernet.dnsServerIP());
#endif
}
void loop() {
unsigned long CurrentMillis = millis();
if ( CurrentMillis < PreviousMillis ) // millis reset to zero?
{
intervalTime = CurrentMillis+interval;
}
if ( CurrentMillis > intervalTime ) // Did we reach the target time yet?
{
intervalTime = CurrentMillis + interval;
if (!client.connect(server, 80)) {
#ifdef DEBUG
Serial.println("-> Connection failure detected: Resetting ENC!"); // only use serial when debugging
#endif
Enc28J60.init(mac);
} else {
client.stop();
}
// if you get a connection, report back via serial:
if (client.connect(server, 80))
{
#ifdef DEBUG
Serial.println("-> Connected"); // only use serial when debugging
#endif
// Make a HTTP request:
client.print( "GET /testserver/arduino_temperatures/add_data.php?");
TemperaturesToGetVariables(); // send serial and temperature readings
client.println( " HTTP/1.1");
client.println( "Host: 192.168.1.100" );
client.print(" Host: ");
client.println(server);
client.println( "Connection: close" );
client.println();
client.println();
client.stop();
}
else
{
// you didn't get a connection to the server:
#ifdef DEBUG
Serial.println("--> connection failed !!"); // only use serial when debugging
#endif
//Enc28J60.init(mac);
}
}
else
{
Ethernet.maintain();
}
}
void TemperaturesToGetVariables(void)
{
byte counter;
byte present = 0;
byte sensor_type;
byte data[12];
byte addr[8];
float celsius;
byte sensorcounter;
ds.reset_search();
sensorcounter = 1; // we start counting with sensor number 1
while ( ds.search(addr) )
{
if (sensorcounter>1) client.print("&"); // add ampersand if not first sensor
client.print("serial"); // print: sensorx=
client.print(sensorcounter);
client.print("=");
#ifdef DEBUG
// Print Serial number
Serial.print(" Sensor : ");
Serial.println(sensorcounter);
Serial.print(" Serial : ");
#endif
for( counter = 0; counter < 8; counter++)
{
if (addr[counter]<0x10) client.print("0");
client.print(String(addr[counter], HEX));
if (counter<7) client.print("%20");
#ifdef DEBUG
if (addr[counter]<0x10) Serial.print("0");
Serial.print(String(addr[counter], HEX));
if (counter<7) Serial.print(" ");
#endif
}
#ifdef DEBUG
Serial.println(); // only use serial when debugging
#endif
client.print("&temperature"); // print: &temperaturex=
client.print(sensorcounter);
client.print("=");
// Check CRC
if (OneWire::crc8(addr, 7) != addr[7]) // print ERROR if CRC error
{
client.println("ERROR");
}
else // CRC is OK
{
// Removed sensor type detection and assumed DS18B20 sensor
ds.reset();
ds.select(addr);
ds.write(0x44); // start conversion, with regular (non-parasite!) power
delay(750); // maybe 750ms is enough, maybe not
present = ds.reset();
ds.select(addr);
ds.write(0xBE); // Read Scratchpad
// Get Raw Temp Data
for ( counter = 0; counter < 9; counter++)
{ // we need 9 bytes
data[counter] = ds.read();
}
// Convert the data to actual temperature
int16_t raw = (data[1] << 8) | data[0];
// at lower res, the low bits are undefined, so let's zero them
byte cfg = (data[4] & 0x60);
//// default is 12 bit resolution, 750 ms conversion time
if (cfg == 0x00) raw = raw & ~7; // 9 bit resolution, 93.75 ms
else if (cfg == 0x20) raw = raw & ~3; // 10 bit res, 187.5 ms
else if (cfg == 0x40) raw = raw & ~1; // 11 bit res, 375 ms
celsius = (float)raw / 16.0;
client.print(celsius);
#ifdef DEBUG
Serial.print(" Temperature: ");
Serial.print(celsius);
Serial.println(" C");
#endif
}
sensorcounter++;
}
return;
} |
If you let this code run for a while, your “retrieve_data.php” will produce something like this:
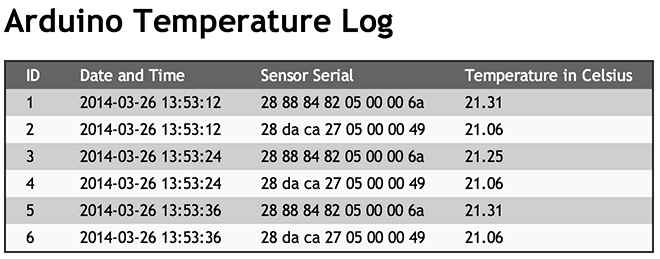
“retrieve_data.php” output with multiple sensors
Please note that, when observing the times in the “Date and Time” column, the delay between two readings is the sum of the “interval” value (10,000 = 10 seconds) and the sum of all the time it took to read the sensors and send the data to the server.
In our example, with 2 sensors: 10 second delay + 2x (750ms) ≈ 12 seconds.
Keep this in mind if you’d like to have a perfect 10 seconds interval. You might even need a more advanced timing mechanism if you prefer exact timing – the Arduino does not have a realtime clock so either you have to register a starting time and/or add additional hardware to get a real clock (see also: Arduino time).


Comments
There are 462 comments. You can read them below.
You can post your own comments by using the form below, or reply to existing comments by using the "Reply" button.
so while UIPEthernets API is the same as stock Ethernet-library, there’s a subtle (but important) difference: As the enc28j60 is just the physical interface having no brainpower like WIZ5100-based shields, UIPEthernet does no background-processing of ethernet-packets while you don’t call into the library. (It’s a design-decision in UIPEthernet not to use a Timer-interupt within the library as this would allocate this resource not being available for the user any more).
So you’d rather want replace the ‘delay(interval) with some active waiting like ‘if (millis()-until > 0) { <do_temperture_and update> } else { Ethernet.maintain()};
As an alternative use a Timer-interrupt that calls Ethernet.maintain() every 100ms.
This ensures the arduino does respond to e.g. arp or ping-requests during the wait-time and also does a propper close of the tcp-connection.
Norbert Truchsess
Hi Norbert,
Thank you for the tip!
I’m relatively new to Arduino myself, specially when it comes to Ethernet specifics, and very much appreciate the tip to do things correct.
For who didn’t notice: Norbert is the one maintaining UIPEthernet at Github – excellent work!
So the loop() would be better this way?
(I suppose it would give a close hit to the actual total delay time as well)
I’d define in the global variable (right after line 16):
and in setup() add this line to get an initial value
and modify loop() to
void loop() {if (millis - intervalTime > 0) // Did we reach the target time yet? { // if you get a connection, report back via serial:
if (client.connect(server, 80)) {
Serial.println("-> Connected");
// Make a HTTP request:
client.print( "GET /testserver/arduino_temperatures/add_data.php?");
TemperaturesToGetVariables(); // send serial and temperature readings
client.println( " HTTP/1.1");
client.println( "Host: 192.168.1.100" );
client.print(" Host: ");
client.println(server);
client.println( "Connection: close" );
client.println();
client.println();
client.stop();
}
else
{
// you didn't get a connection to the server:
Serial.println("--> connection failed!");
} } else { Ethernet.maintain(); intervalTime = millis + interval; }
}
hans
if you put the ‘intervalTime = millis + interval into the ‘if’-block, that should work ok ;-)
void loop() {
if (millis – intervalTime > 0) // Did we reach the target time yet?
{
intervalTime = millis + interval;
// if you get a connection, report back via serial:
….
}
else
{
Ethernet.maintain();
}
}
Norbert Truchsess
Thanks Norbert!
hans
Im getting this:
Tweaking4All.com – Temperature Drone – v2.0
-=-=-=-=-=-=-=-=-=-=-=-=-=-=-=-=-=-=-=-=-=-
IP Address : 0.0.0.0
Subnet Mask : 0.0.0.0
Default Gateway IP: 0.0.0.0
DNS Server IP : 0.0.0.0
-> Connected
Sensor : 1
Serial : 28 20 d7 cb 04 00 00 94
Temperature: 23.75 C
And it will not update the values on my webserver.
http://www.tylerasmith.com/review_data.php
Any tips would be appreciated.
Tyler Smith
Seems to me that your DHCP is not working?
None of the network items (IP, subnet, def. Gatewat, DNS) are filled in … if you don’t have DHCP, then look at this example code where a fixed IP address is being set and usd.
hans
Hello Tyler, I have recently been dealing with this problem, and i’ve looked up your website. Seems you solved your problem, in this case could you send me your sketch if you don’t mind?
marvingave
You seem to have a typo when building the GET request, only 1x & needed:
Craig
Many thanks for this great tutorial. I was already looking a long time for this. Have tried multiple tutorials & sketches, but yours was spot on!
Only thing ‘missing’ is creating graphs from the database data. Maybe write something about Highchart or something? I think i saw somewhere that you can easily create graphs with that package.
Frank
Thanks Frank!
If you’re looking at graphing the data: I used Flot, a free jQuery plugin.
Look at the Flot page for some very nice looking examples or take a peek at the stats page of Tweaking4All.
I’ll keep it in mind though as an idea for future articles!
hans
Oh, and how did you work out the interval with millis instead of delay() in the end? I tried editing the sketch by changing it to the way in these comments, but it would not work (error: pointer to a function used in arithmetic). Maybe you can update the code?
I think millis is indeed better, because with delay(), the whole system is freezed. You can notice that because the Arduino won’t respond to pings.
Also delay() cannot be used directly for longer delays (minutes instead of msecs). The max. value that the ‘int interval’ can hold is something like 32k, which translates to 30 seconds. I searched a while for this, and found a workaround, by using: delay(5UL * 60UL * 1000UL). That is translated to 5Min. The ‘UL’ stands for ‘usigned long’. But as i said, this is a workaround, because working with millis would be better.
Frank
Thanks Frank for the reminder … I had forgotten about updating the code
  ….
….
I’ll post a comment here after updating the code, either today or tomorrow. (kind-a swamped in a project right now, but I hope to be able to do it today)
hans
Have you found time to look at it already maybe? Thanks!
Frank
Sorry Frank – things didn’t pan out as hoped.
I’m working on my ApplePi project and this takes much more time than expected.
Right after finishing that, I’ll modify and test the code. Hopefully this week.
I apologize for the delay …
…
hans
Oh and don’t be afraid to ask me again – reminders are always good.
If the ApplePi project takes too long, then I’ll try to squeeze this in between …
hans
In the past few days it occured 2 times that the Arduino froze after a while. This night it happened again, it didn’t wrote any temperature readings to my MySQL DB after 01:00… After disconnecting the Arduino from power (USB 5V adapter) and connecting it again the readings are working for a few hours, but most of the times it will freeze again. Did this ever happen to you?
I am measuring with an interval of 5Min ( with: “delay(5UL * 60UL * 1000UL)” ).
:(
Frank
I’m planning on running the code modifications today, I’ll let it run for a while and see if this happens here as well.
I have not had this happen, but have to admit that I haven’t had it running for a week in a row either …
This is possibly the reason why Norbert Truchsess suggested the code change?!? (first post here and author of UIPEthernet)
hans
Hi Frank,
Well, I’ve modified the code (and uploaded the new version as well) which includes Norbert’s suggestions (Thanks again Norbert! ).
).
So far it seems to be working very well. However; I haven’t had it running very long. So far it works very well for the past 4 hours. I have set the interval to 300,000 (5 minutes) in line 13 the code that I use.
I left the code in the example (line 13) at 10000 (10 seconds) to stay consistent with the explanation.
Give it a try and please let me know if you run into any issues.
hans
Thanks!!!!!
I will let it run this night, we will see what happens with the improved code :)
Frank
So far it has been working perfect! The benefit of using millis() instead of delay() is that it also responds to ping now, so it is easier to check if the Arduino is still alive. Great! Let’s hope it stays working.
Frank
Mine crashed last night … running another test as we speak.
Being able to ping is definitely great – had not thought about that before (until you and Norbert mentioned it)!
Running our test long term, I suddenly got this un-good feeling about possible limitations of the unsigned long (max of 4,294,967,295 milliseconds), what happens if we hit the magic ±50 day marker (if I did the math right)?
hans
I did some research and found a way to fix that problem (not related to the Arduino getting “stuck”). I’ll add the modifications for the app. 49-50 day limit as soon as I find the current code to be stable enough.
Please let me know what your findings are. During my testing I have a lot of unrelated network traffic running (downloads), not sure if that influences things or not … I’ll also make sure I’m running the latest version of UIPEthernet.
hans
It is also dead here right now. Booted the Arduino with your updated code yesterday at 21:37, and now, a day later at 19:26 it has frozen. No measurements are added anymore, and the Arduino doesn’t respond to pings either.
Frank
However, i must say that i am using the DS18B20’s in parasitic power mode… Changed the 4K7 resistor to 2K2, otherwise it would not work.
But i can’t imagine that is the problem, if it has worked for 22h without a problem.
Frank
On the UIPethernet it says: Only 400-600 Bytes of Arduinos RAM are used (depending on the number of concurrently open connections). Maybe the problem lies in the code, are the connections correctly closed after updating the database? Maybe the RAM is filling up, to a point where the Arduino freezes?
Frank
I’m running a memory leak test right now using (found at GitHub):
I then dump the free memory to de database, instead of the serialnumber, to see if anything changes over time with:
I’ll let it run for a while and see what happens.
hans
Norbert commented at GitHub that sending data to Serial, when nothing is monitoring the serial port, could cause issues as well.
So I ran a version with all the serial statements removed, but it froze in less than an hour …
hans
So the test ran for a while, and froze again … FreeRam indicated that there was no change in memory usage.
After that test (freeRam), I did run a test with :
if (client.connected()) { client.stop(); }Just before calling
(another suggestion I found in the GitHub suggestions by Norbert)
However, after 3 hours the Arduino froze again …
I have even considered a software reset of the Arduino every 5 minutes (or which ever time works best) – obviously not a good approach.
Then I started digging in the UIPEthernet files and noticed that the README file still indicates 1.01, where as posts on GitHub refer to 1.5x so I’ll be digging a little and see if I can download a dev version which might address the issue. Since I’m not too familiar with the ins-and-outs of GitHub, this might take a few extra minutes .
.
hans
OK, finding 1.5.5 was easier than expected (GitHub link).
After downloading it, the files for the library can be found in the UIPEthernet/src folder, which I used to overwrite the existing ones.
I just started the test with the new library, see how well that goes. I disabled the “if (client.connected()) { client.stop(); }” line for this test, since the posts suggest that this is now included in the library to be done automatically. Let’s see how that goes …
hans
Maybe implementing an Arduino watchdog is a solution? http://tushev.org/articles/arduino/item/46-arduino-and-watchdog-timer
Frank
I don’t understand why it crashes so fast in your situation. In my situation this occurs after 22h or so…
Frank
Maybe traffic on my network is higher? I’m doing some heavy duty downloads at night?
I also use my laptop as a power source (changed that with the current test to a separate power supply) – My laptop does not sleep when not used, just the screen blanks, so I don’t expect that to be an issue. I used it mostly to log serial dumps.
As for the Watchdog implementation:
I’ve read some complaints about an alternative method, but had not seen this one yet.
Not sure how much memory it would take to include this AVR function. I’ll give it a try in my next test (if needed).
Resetting the Arduino is for me a method that might work, but kind-a feels like a work around for a problem that could be solved in a cleaner way – wouldn’t want to generate extra network traffic each time it restarts to get an IP address from the DHCP for example. Not to mention other applications where we’d like the Arduino to stay on all the time and resetting in between is not an option.
Let’s see how UIPEthernet 1.5.5 performs before resorting to this.
hans
Well, that last test didn’t last long … froze within the hour … I’ll look into other alternatives this afternoon I hope … I’ll run the reset test first, even though I don’t believe this to be the technically correct way … I’ll also try to contact Norbert and see what his opinion is.
hans
Not sure how I screwed up, but when using the AVR reset, nothing works … maybe my lack of understanding how it works (tried several ways).
I’ll post a question on GitHub, maybe Norbert is willing to assist in debugging.
hans
Since I’m not sure what Norbert’s preferred way of contacting is, I figured posting an “Issue” at GitHub (#75) would be the best way, since answers might benefit other users as well.
We also have to keep in mind, and respect, that for Norbert this is just a hobby as well, so I’d rather not bombard his email with question, so he can answer when it suits him best.
Please let me know if you made any progress, I’ll post updates here as they occur.
hans
For some reason after a while the Arduino can no longer setup a connection. …
…
I wonder if this is server or client based? I’ll keep looking
I’ve noticed that “Arduino freezes” is maybe not the proper wording to describe this issue.
The Arduino keeps chugging along, but seems to be unable to setup a connection.
`client.connect(server, 80)` seems to fail after a while.
I’m trying to see if I can find any server log files which might suggest connection issues (refuse) or not … I’ll also enable logging on my router, just to see if I can notice anything there.
hans
But if the problem resides at the server, the Arduino should respond back to ping, and that is not happening. If there are no readings added anymore, the Arduino is also not responding to pings anymore.
Frank
Just confirming that I’ve observed the same:
Pinging the Arduino fails indeed 100% after it stops sending data.
hans
Excellent point!
“Feels” like the Arduino get’s congested or something like that. I found two functions that I will test later on – see if that “resets” the ethernet stuff.
hans
As a workaround i now have a mechanical 230V timeclock that switches off the powersupply of the Arduino around 01:00. The minimum interval for the timeclock is 5min, so i am not missing/only 1 reading missing because my measuring interval is also 5min. However this is not a permanent solution, and i hope you can find something. I think it has something to do with the networkcard. Maybe using the EtherCard library instead of the UIPEthernet is a solution?
Frank
I agree: not a permanent solution.
I still have to do some work with the PowerOff and PowerOn statements, maybe that works. Not entirely to my satisfaction I might add.
You could most certainly try another library – I think the main issue is that the EtherShield vs the ENC28J60. The Ethershield (according from what I understand from Norberts comments) is more “intelligent” … and more expensive. The lacking intelligence is something a library needs to compensate for, and I can only imagine the increased complexity,…
hans
OK, I’m not getting anything working using the PowerOn and PowerOff functions … except for powering off the ENC.
Bummer!
I’ll look around and see if I can find a good AVR reset function.
hans
I tried the following as a reset function. Unfortunately it does not reset peripherals, and it shows … it doesn’t work after the first push of data.
void softReset() {asm volatile (" jmp 0");
}
hans
So far I have narrowed it down to:
The last “successful” data that was sent does make a connection to the server, but the submitted data never get’s stored in the database (I use a very simple PHP script). After that all connections fail.
Almost like something got congested … or data never really arrived to begin with, or lack of confirmation of the server?
For example (in case my choice of wording wasn’t the best) – each line is an attempt to sent data:
1. Connect OK, Data Sent, Data appears in the database.
2. Connect OK, Data Sent, Data appears in the database.
3. Connect OK, Data Sent, Data appears in the database.
4. Connect OK, Data Sent, Data does NOT appear in the database.
5. Connect failed
6. Connect failed
etc.
However!!!!
When adding the following statement right after the failed connecting, the next data WILL continue working again.
Serial output sniplet:
Code:
...
    else
    {
      // you didn't get a connection to the server:
      Serial.println("--> connection failed!");

      Enc28J60.init(mac); // <-- add here!
    }
In this case you might miss up to 2 readings at the most.
I found the code when digging through the UIPEthernet code and just figured: heck let’s give that a try!
(I has a soft reset function in it, which I failed to call on it’s own)
However: Since it detects it too late, I decided to modified the code a little to detect issues right before trying to submit data.
This has been running pretty good so far, but I’ll let it run for a day/night or so to see if it remains consistent.
This looks like progress … I’ll keep you posted …
hans
So far running great! I’m now adding some extra network traffic by downloading some huge files at the same time … just to see how that influences things …
I also added a serial notification to the code for when a connection fails, just to see if it even ever fires the init().
hans
Cool, so the issue looks like the ENC28J60 freezes (because you command it to initiate again)?
Can you post the whole code? So i can write it to my Arduino and let it run for a day or two…
You can use pastebin.com if you don’t want to fill up this with long blocks of code
Frank
So far I have noticed that it indeed looses a connection from time to time, but it “restores” very well … updating every minute, the restore seems to shift things by app. 1.5 minute (which in a 5 minute interval might be not even happen).
As you might see in the code, I optimized it a little so I can work in de debug mode if I want to by adding the line “#define DEBUG” (line 4), remove it to avoid serial output.
Find the code that I’m testing right now below. It might need a little cleaning up, but in my currently running test, I had 4x a “freeze” and it recovered just fine.
I don’t mind posting code here – I always like to keep things “together”, so I actually prefer posting it here.
Maybe next time we should start a topic in the forum haha …
…
Let me know how this code works for you … I’ll post my findings after it has run for say a day or so …
hans
I have burned the code on my Arduino. Will let it run. Previous time it crashed after 22h. I am curious how long it will ‘survive’ this time.
Frank
My test is still humming along here – so I’m pretty confident that it will run way beyond 22 hours …
I did see a few corrections (where it did neet the Init()), but it didn’t stop it from working … looking very good so far, and I’m sure I can optimize the code a little later on …
hans
After running for 18 hrs now and everything still works as hoped …
hans
Same here. Next checkpoint: 50 days :p ?
Frank
Let’s see … how about we report when it fails? … might be quite a while … I’ll just keep mine chugging away and I’ll check once a day to see how well things go …
If I only had a reason to monitor the temperature of something ….
(I only build this to see it work)
hans
Agreed, let’s see when it fails.
I use it to monitor my central heating system. For a efficiënt working heating device it is important to have a difference of 15-20 degrees between the outgoing hot water, and the returning colder water. You want the returning water to be <50 degrees Celsius so the heater can condense (High Efficiency heating system, ‘HR-ketel’ in Dutch). You can achieve this by ‘waterzijdig inregelen’ (adjusting each radiator so it also has this 15-20 degree Celsius difference between the ingoing and outgoing pipe). This way your heating system is optimally balanced, so each room gets warm just as fast as the other ones. And your kettle is working as efficient as possible.
Further i am planning on putting some extra sensors in the house (the DS18B20 is dirt cheap on eBay, less than 2 euros for a insulated waterproof version) to monitor different temperatures like outside temperature, room temperature
Frank
Haha …. So are we both Dutch? And there is a Dutch version of this page (upper right corner, you’ll find a link to the same page in Dutch) and here we are speaking English? That’s actually funny …
However; I do suppose the larger audience can be found with the English speaking visitors.
(you’ll see that Tweaking4all.com has a much higher rating that Tweaking4all.nl)
Anyhow, thanks for the info. I didn’t know that about the HR-ketels, one learns something new every day.
Here people use hot-air to heat the house, no radiators … not sure which is more efficient, but I do miss radiators …
I have been thinking about some sensors throughout the house as well, and some to monitor the temperature of my fridge and freezer.
Groetjes uit Amerika (ik woon hier nu al zo’n 10 jaar) …!
hans
Hello, I am testing the codes php and mysql database and all correct. But I would like to create and update a single record by add_data.php, what would have to change in add_data.php to update a single line and not create me new?
New Online:
“INSERT INTO test.temperature (sensor, celsius) VALUES (‘” $ _GET [“serial“].. “‘, ‘” $ _GET [“Temperature.”]. “‘)”;
Update same line?
“UPDATE INTO test.temperature (sensor, celsius) VALUES (‘” $ _GET [“serial“].. “‘, ‘” $ _GET [“Temperature.”]. “‘)”;
It does not work.
Thank you very much and best regards.
Jose
Your query is incorrect. Have a look at this: http://www.w3schools.com/sql/sql_update.asp
Frank
Frank is right …
I just noticed that my reply was nuked because of the SQL statement I had put in there.
You will also need to remove the “ID” field from the table, otherwise MySQL cannot update the record – it would need to know the unique ID, which you would not know.
1) Remove the field ID from the table
2) Rewrite your query
This will result in only one record in the table for each sensor!
Query should look something like:
UPDATE test.temperature SET celsius=‘” $ _GET [“Temperature.”]. “‘ WHERE sensor=‘” $ _GET [“serial”]. “‘;
hans
It throws an error when running http://localhost/add_data.php?serial=288884820500006b&temperature=20.79
Parse error: syntax error, unexpected ‘test’ (T_STRING) in C: \ xampp \ htdocs \ add_data.php on line 6
Any idea?
Than you very much.
Jose
What is the name of your database? Is it ‘test’ or is it named something else? If it has a different name you should change the ‘test’ to the name of your database.
Frank
Hi, I eventually update the record using this command:
$ SQL = “UPDATE SET test.temperature celsius = ‘” $ _GET [“temperature.”]. “‘ WHERE sensor = ‘” $ _GET [“serial“].. “‘”;
Works fine.
Thank you very much to all.
Jose
Hi.
How to send multiple GET streams on the same page?
I need to send one value with one variable at different addresses. (same website).
Thanks.
sid
Good question – I haven’t tried this … but my guess would be (do not have 2 MySQL servers running):
In the loop:
Add this before the ” if (!client.connect(server, 80))” part, but for the second server?
  if (!client.connect(server2, 80)) {
      #ifdef DEBUG
        Serial.println("-> Connection failure detected: Resetting ENC!");
      #endif
      Enc28J60.init(mac);
    } else {
      client.stop();
    }

    // if you get a connected
    if (client.connect(server, 80))
    {
      #ifdef DEBUG
        Serial.println("-> Connected");  // only use serial when debugging
      #endif

      // Make a HTTP request:
      client.print( "GET /testserver/arduino_temperatures/add_data.php?");

      TemperaturesToGetVariables(); // send serial and temperature readings

      client.println( " HTTP/1.1");
      client.println( "Host: 192.168.1.100" );
      client.print(" Host: ");
      client.println(server);
      client.println( "Connection: close" );
      client.println();
      client.println();
      client.stop();
    }
hans
my code cannot send the data to mysqul, please kindly help. Serial monitor is working well. PHP is ok, but the problem here is pushing data from Auduino to localhost. Kindly help!
Sovatna
Hi Sovatna,
did you try the URL from another computer?
Depending on your setup, the webserver might not be reachable from another computer – for example WAMPServer needs to be explicitly set to “online”.
hans
Hi Hans,
I am using parts of this sketch for posting stuff from Arduino to MySQL (i am now busy editing this sketch: http://juerd.nl/site.plp/kwh so it puts the number it displays on the screen in my MySQL database).
However i noticed something in your sketch (the one belonging to this article). On line #58 you check for a connection (with ‘!client’), and on line #68 again, this time with ‘client’. Shouldn’t one check be enough? I think some optimalisation can be done here ;)
!client = TRUE = no connection
!client = FALSE = there is a connection
client = TRUE = there is a connection
client = FALSE = there is no connection.
I think maybe the init.enc28j60 can be put in the ‘if’ case when there is no connection, and so one of the checks can be removed perhaps?
Also, about the stability of the sketches (where we discussed about earlier), i read that someone had a problem with a different sketch, which eventually turned out to be the buffer of the ENC28J60 being over filled. He said something like: “The solution is that after you do a request, wait some time (i use 100ms) so the response of the server is in the buffer. And after that do a ‘client.flush’ so the buffer is being emptied again.”
Could be worth a try, because you don’t have anything like that in your code right now…
I think i will buy a W5100 board from eBay, they can be found for ~$7 and i think is easier to use, and more stable.
Frank
I did that on purpose, but I’m sure some optimizing would be possible – I have to admit that I didn’t spend an awful lot of time to optimize the code.
The idea was to check if the connection works, if not reset the ENC and try again.
I did post the problem on Github, but haven’t seen a response yet.
You found one for $7?? Nice!!!
Can you send me the link? I’d be interested as well … or is this just a one-time deal?
hans
Never mind, looked at eBay and found a couple of them … I might give that a try as well – even if it’s just to compare.
hans
I just ordered one of these … $6.99 + $1.99 shipping … should arrive here on Wednesday.
hans
Norbert just posted a reply at GitHub, seems others see similar problem and he is considering to add one or the other function to address or assist in this issue.
So far my work around runs fine …
I received my W5100’s but got stuck in some other projects, so din’t get to playing with it yet.
hans
Nice.
I found something else today (unexpected, i came by a webpage and saw this mentioned). Someone (i can’t find the page anymore where i read it).
The ENC28j60 uses quite some power (it also gets quite warm). In my case i power it with 3.3V, because my ENC28j60 module has no converter onboard.
The person mentioned that the onboard 3.3V is supplied by the FTDI chip, which can only supply a limited amount of mA. The case he was describing was that the current drawn by the ENC28j60 was too high for the FTDI chip to supply, and therefore the sketch would sometimes freeze because of the ethernet module stalling because a lack of power.
He adviced to power the ENC28j60 with 3.3V generated by an external DC-DC converter that creates 3.3V out of 5V or 12V.
You were powering it by 5V i thought? So it is not the issue in your case i think…. But it’s worth mentioning!
Sources: http://arduino.cc/en/Main/arduinoBoardUno (mentions 50mA @ 3.3V)
http://dlnmh9ip6v2uc.cloudfront.net/datasheets/BreakoutBoards/39662b.pdf (ENC28j60 datasheet, mentions 160mA as typical current, 180mA max).
Frank
Excellent info!
I have yet to experience any heat issues. But I feel that the ENC is more for hobby stuff and playing around, or only very simple tasks.
Curious what the W5100 will offer … just got to find some time to get around to it …
hans
Nice :) Mine is coming from China, so it will take some time. For now the ENC28j60 seems comfortable with this sketch. The logger is now working for 10days straight (without failure) since i plugged it in.
In the meantime i have been working on some nice graphing. You have created a great sketch, without your time and effort i wouldn’t be able to create something like this myself. In favour of this, as a sign of appreciation i have decided to share my code for the graphs.
You can find it here: http://pastebin.com/3SdcwbHA It is based on the shiny Highcharts graphing API.
Change the MySQL username/password, the sensor ID’s, and save it to a .php file. You also need the jquery library
Folder structure should look like this:
/
add_data.php (the file from your sketch)
graph.php (my code from the link above)
/js/highcharts.js (folder with jquery stuff, download the package from http://jquery.com/download/ )
I hope you can use the code. I find it very useful because of the zooming functionality, and the ability to hide/show sensors from the graph.
Frank
I guess for you it would not matter if it came out of the US or China … shipping wise I mean. In the end they all come from China.
Thanks for the graphing – I love using jQuery and I’m curious about Highcharts (I’ve used Flot before).
hans
[…] wäre es, den Sketch von pull auf push umzustellen, d.h. nicht einen Server auf dem Arduino laufen zu lassen, der durchgängig laufen und connected […]
SUccess
( ! ) Deprecated: mysql_pconnect(): The mysql extension is deprecated and will be removed in the future: use mysqli or PDO instead in C:\wamp\www\dbconnect.php on line 6
Call Stack
# Time Memory Function Location
1 0.0016 244400 {main}( ) ..\review_data.php:0
2 0.0025 246856 include( ‘C:\wamp\www\dbconnect.php’ ) ..\review_data.php:3
3 0.0025 247432 mysql_pconnect ( ) ..\dbconnect.php:6
Arduino Temperature Log
ID Date and Time Sensor Serial Temperature in Celsius
1 2014-07-30 23:14:56 288884820500006a 21.65
…
61 2014-07-31 00:23:40 288884820500006X 12.3
62 2014-07-31 00:23:51
…
96 2014-07-31 00:27:25
97 2014-07-31 00:27:35 TempSensor 27.64
…
352 2014-07-31 00:50:04 TempSensor 27.64
Omkar Dokur
Congrats!
p.s. the mysql_pconnect depreciated warning, is because as of PHP 5.5.0 this function seems to be replaced by mysqli_connect.
Some example can be found on the PHP website: http://php.net/manual/en/mysqli.construct.php.
This new method is more object oriented.
hans
Hans, sketch is running for a while now. No problems so far. However it is not a fair comparison, as i had to power off the Arduino a few times (turned everything off because i went on vacation, and i hate idle power consumption) and also because my power company came to install a so called ‘Smart Meter’. I have written a blog about reading the data from this meter in my blog: http://thinkpad.tweakblogs.net/blog/10673/slimme-meter-p1-poort-uitlezen-met-arduino-en-waarden-opslaan-in-mysql-database.html with a little bit of help from the forum users i was able to readout the meter with my self made Arduino sketch. Quite proud of myself haha. Setup uses a W5100, works fine. Much more stable than those ENC28J60 thingies.
But back to this temperature measuring sketch…. What is in your eyes the most simple way to get a temperature in the database that is the result of sensor1 MINUS sensor2 ? I would like to know this subtracted value to monitor the efficiency of my centralheating-kettle. (sensor1 = outgoing temperature, sensor 2 = water returning to kettle, higher difference = better). I am now showing it on a PHP page by just subtracting two variables that contain the newest values for sensor1 & 2, but plotting some historical data would be nice. Maybe you have some good idea of doing this ;)
Frank
Excellent work on the “Smart Meter” (and in Dutch too! haha!).
Out here in one of the rural areas of the US, “smart meters” are not used yet … but I’ll keep you’re work in mind in case we get them here too.
Idle power consumption when on vacation is something that irritates me too, so I can relate!
The simplest way to get the difference in the database,… hmm. If both values would have been submitted at the same time in one single record then that would be easy to do with a trigger on the table. But that’s not what we’re looking at.
Option 1:
I suppose a global variable, something like “Prev_Temp”, where you store the temperature after reading it, and when writing the next value store the difference in a separate table?
I guess the difficulty would be to determine which sensor is IN and which one is OUT.
Option 2:
I assume that at some point you know which serial number goes with what, and that the submit time of both sensors are very close (ie. only a few seconds apart in the time field).
In that case you might be able to use an approach where everything runs on the database (the subtraction).
A trigger on your received temperatures table (after_insert) could:
– see if there is a record of the other sensor, with a similar time stamp (say with a maximum of 2 minutes difference)
– if so: calculate the difference and store it in a different table …
Working with triggers at first can be a little daunting, and the tool you use for your MySQL database needs proper support for that (I know phpMyAdmin isn’t the greatest when it comes to triggers).
Of course: you PHP code for the graph or table display could calculate this on the fly as well.
hans
Thanks, i will have a look at it one of these days.
Frank
Hi,
It is the most comprehensive and detailed tutorial i have ever seen
I am getting some problems. In my code when I use
client.print( “GET /testserver/arduino_temperatures/add_data.php?”);
I am not able to send data to my site, but when i use
client.print( ” http://yourphpserver/add_data.php?variable1=value1&variable2=value2&variable3=value3“);
I am able to post data to my site.
Second issue is,
in my database I am getting value like this 12.3HTTP/1.1
http 1.1 is getting appended in my data field.
If i delete http/1.1 command, Host: is appended to my data.
If I dont use following lines, again i am not able to post data.
I dont know php so my friend is helping me out. I think we are doing something wrong.
client.println( ” HTTP/1.1″);
client.print( “Host: ” );
client.println(server)
client.println( “Connection: close” );
Thank you
Suyog
Hello!
First I’d like to thank you for all the great posts. You have been a great help for my project. I followed your instructions to post some data to my database. For some reason after running the code I get connection failed right away. I’ve been working on this for almost three days and I haven’t had luck to get it working. I have tried several codes and still not luck. I would really appreciate it if you give me some hints/feedback. This is what I get from serial data:
IP Address : 192.168.0.100
Subnet Mask : 255.255.255.0
Default Gateway IP: 192.168.0.1
DNS Server IP : 192.168.0.1
–> connection failed/n
–> connection failed/n
Under my router settings I have DHCP Server enabled and the starting IP address is 192.168.0.100. Also ENC28J100025 appears under Host Name list with the IP address of 192.168.0.100 and the MAC address of 54-55-58-10-00-25. When I type in 127.0.0.1 into my browser localhost loads so I know this is the IP address of my server. Also when I type in http://localhost/test/index.php?name=James, James adds to my database. Here is the code I am using:
byte mac[] = { 0x54, 0x55, 0x58, 0x10, 0x00, 0x25 };void setup() {Serial.print("IP Address : ");Serial.print("Subnet Mask : ");Serial.print("Default Gateway IP: ");Serial.print("DNS Server IP : ");void loop() {if (client.connect(server, 80)) {Serial.println("-> Connected");else {Serial.println("--> connection failed/n");Ali
If you look at this comment, then you’ll see that me (and others) occasionally run into to connection issues with teh ENC28J60 which is not necessarily caused by UIPEthernet, but rather by the limitations of the ENC28J60.
In that post you’ll see a work-around which seems to work for several users. Basically it adds a little check where the controller gets a full reset when a connection does not exist).
hans
Hi,
I try to get this work, but when i try to compiling code (i have standard w5100 ethernet shield and i need to use SPI.h and Ethernet.h because UIPEthernet.h not found ip ) I get this error code “Enc28J60 was not declared in this scope”…
Can somebody help me to get this code to work in standard ethernet shield….(Demo code work just fine, but final code not work because i don’t have Enc28J60 ethernet shield) or is the only option to buy the right shield????
Regards, Topi
Topi
As far as I can see (can’t test it unfortunately): the enc28j60 is a standard object declared in the UIPEthernet.h. For the W5100 one would use the Ethernet.h and I suspect that you can replace the enc28j60 object with “ethernet” as a name. You might want to look at some of the demo code’s on the Arduino website.
p.s. In a month or two I’ll be able to do experiments again and testing the W5100 (since prices are coming down so much) will be one of those projects.
hans
thanks for your reply,
I went to buy the right enc28j60 ethernet shield and demo code works just fine and send data to my mysql, but when i upload final code and php files then serial monitor show right info
Tweaking4All.com – Temperature Drone – v2.3
-=-=-=-=-=-=-=-=-=-=-=-=-=-=-=-=-=-=-=-=-=-
IP Address : 192.168.1.30
Subnet Mask : 255.255.255.0
Default Gateway IP: 192.168.1.1
DNS Server IP : 192.168.1.1
-> Connected
Sensor : 1
Serial : 28 9f 67 3c 05 00 00 a4
Temperature: 21.56 C
-> Connected
Sensor : 1
Serial : 28 9f 67 3c 05 00 00 a4
Temperature: 21.62 C
But it does not send any information to database????
my web server runs ip 192.168.1.18 and use port 8000, could this be the problem??? (in the code i have changed the port to 8000).
Please look my code, is everything correct :)
#include <UIPEthernet.h> // Used for Ethernet
#include <OneWire.h>     // Used for temperature sensor(s)

#define DEBUG

// **** ETHERNET SETTING ****
// Arduino Uno pins: 10 = CS, 11 = MOSI, 12 = MISO, 13 = SCK
// Ethernet MAC address - must be unique on your network - MAC Reads T4A001 in hex (unique in your network)
byte mac[] = { 0x54, 0x34, 0x41, 0x30, 0x30, 0x31 };
// For the rest we use DHCP (IP address and such)

EthernetClient client;
char server[] = "192.168.1.18"; // IP Adres (or name) of server to dump data to
unsigned long PreviousMillis = 0;// For when millis goes past app 49 days.
//unsigned long interval = 10000;  // Wait between dumps (10000 = 10 seconds)
unsigned long interval = 300000;  // Wait between dumps (1 min)
unsigned long intervalTime;      // Global var tracking Interval Time

// **** TEMPERATURE SETTINGS ****
// Sensor(s) data pin is connected to Arduino pin 2 in non-parasite mode!
OneWire  ds(2);

void setup() {
  #ifdef DEBUG
    Serial.begin(9600); // only use serial when debugging
  #endif

  Ethernet.begin(mac);

  intervalTime = millis();  // Set initial target trigger time (right NOW!)

  #ifdef DEBUG
    Serial.println("Tweaking4All.com - Temperature Drone - v2.3");
    Serial.println("-=-=-=-=-=-=-=-=-=-=-=-=-=-=-=-=-=-=-=-=-=-\n");
    Serial.print("IP Address        : ");
    Serial.println(Ethernet.localIP());
    Serial.print("Subnet Mask       : ");
    Serial.println(Ethernet.subnetMask());
    Serial.print("Default Gateway IP: ");
    Serial.println(Ethernet.gatewayIP());
    Serial.print("DNS Server IP     : ");
    Serial.println(Ethernet.dnsServerIP());
  #endif
}

void loop() {
  unsigned long CurrentMillis = millis();

  if ( CurrentMillis < PreviousMillis ) // millis reset to zero?
  {
    intervalTime = CurrentMillis+interval;
  }

  if ( CurrentMillis > intervalTime )  // Did we reach the target time yet?
  {
    intervalTime = CurrentMillis + interval;

    if (!client.connect(server, 8000)) {
      #ifdef DEBUG
        Serial.println("-> Connection failure detected: Resetting ENC!");  // only use serial when debugging
      #endif
      Enc28J60.init(mac);
    } else {
      client.stop();
    }

    // if you get a connection, report back via serial:
    if (client.connect(server, 8000))
    {
      #ifdef DEBUG
        Serial.println("-> Connected");  // only use serial when debugging
      #endif

      // Make a HTTP request:
      client.print( "GET /add_data.php?");

      TemperaturesToGetVariables(); // send serial and temperature readings

      client.println( " HTTP/1.1");
      client.println( "Host: 192.168.1.18" );
      client.print(" Host: ");
      client.println(server);
      client.println( "Connection: close" );
      client.println();
      client.println();
      client.stop();
    }
    else
    {
      // you didn't get a connection to the server:
      #ifdef DEBUG
        Serial.println("--> connection failed !!");  // only use serial when debugging
      #endif

      //Enc28J60.init(mac);
    }
  }
  else
  {
    Ethernet.maintain();
  }
}

void TemperaturesToGetVariables(void)
{
  byte counter;
  byte present = 0;
  byte sensor_type;
  byte data[12];
  byte addr[8];
  float celsius;
  byte sensorcounter;

  ds.reset_search();
  sensorcounter = 1; // we start counting with sensor number 1

  while ( ds.search(addr) )
  {
    if (sensorcounter>1) client.print("&"); // add ampersand if not first sensor

    client.print("serial"); // print: sensorx=
    client.print(sensorcounter);
    client.print("=");

    #ifdef DEBUG
      // Print Serial number
      Serial.print("   Sensor     : ");
      Serial.println(sensorcounter);
      Serial.print("   Serial     : ");
    #endif

    for( counter = 0; counter < 8; counter++)
    {
      if (addr[counter]<10) client.print("0");
      client.print(String(addr[counter], HEX));
      if (counter<7) client.print("%20");

      #ifdef DEBUG
        if (addr[counter]<10) Serial.print("0");
        Serial.print(String(addr[counter], HEX));
        if (counter<7) Serial.print(" ");
      #endif
    }

    #ifdef DEBUG
      Serial.println();   // only use serial when debugging
    #endif

    client.print("&temperature");  // print: &temperaturex=
    client.print(sensorcounter);
    client.print("=");

    // Check CRC
    if (OneWire::crc8(addr, 7) != addr[7]) // print ERROR if CRC error
    {
        client.println("ERROR");
    }
    else // CRC is OK
    {
        // Removed sensor type detection and assumed DS18B20 sensor
        ds.reset();
        ds.select(addr);
        ds.write(0x44);  // start conversion, with regular (non-parasite!) power

        delay(750);     // maybe 750ms is enough, maybe not

        present = ds.reset();
        ds.select(addr);
        ds.write(0xBE);  // Read Scratchpad

        // Get Raw Temp Data
        for ( counter = 0; counter < 9; counter++)
        {           // we need 9 bytes
          data[counter] = ds.read();
        }

        // Convert the data to actual temperature
        int16_t raw = (data[1] << 8) | data[0];

        // at lower res, the low bits are undefined, so let's zero them
        byte cfg = (data[4] & 0x60);

        //// default is 12 bit resolution, 750 ms conversion time
        if (cfg == 0x00) raw = raw & ~7;  // 9 bit resolution, 93.75 ms
        else if (cfg == 0x20) raw = raw & ~3; // 10 bit res, 187.5 ms
        else if (cfg == 0x40) raw = raw & ~1; // 11 bit res, 375 ms


        celsius = (float)raw / 16.0;
        client.print(celsius);

        #ifdef DEBUG
          Serial.print("   Temperature: ");
          Serial.print(celsius);
          Serial.println(" C");
        #endif
     }

     sensorcounter++;
  }
  return;
}
Topi
Did you try the trick manually, ie entering something like this in your browser:
Port 8000 should work if set correctly in the code (which seems you have done correctly), even though I used port 80 for my testing.
hans
Yes the trick works just fine
1
2014-09-10 17:03:53
28 88 84 82 05 00 00 6b
11.1 2
2014-09-10 17:03:53
28 88 84 82 05 00 00 6b 22.2 3
2014-09-10 17:03:53 28 88 84 82 05 00 00 6b 33.3
Topi
Is it possible to temporary use port 80 on your MySQL/PHP/Apache box?
(just to eliminate that port 8000 could be the problem)
hans
Hans, would it be possible to put fixed columns in the table (id, event, celsius1, celsius2, celsius3, celsius4 etc…)? I plan on measuring some things, therefore i need the big amount of 10 sensors…. By creating a new row for every sensor this means a LOT of data. Also the GET request would get very long. Therefore i want to only send temperature, and not the sensorID.
What do i need to change in the Arduino & PHP code to make it work that way?
Frank
Nevermind, already found this sketch which does that: https://www.jfkreuter.com/?p=9
It needs some improvement though… “delay(599400);” is painful to see once you understand how millis work ;) Will try some with that sketch
Frank
Tweaking4All.com – Temperature Drone – v2.3
-=-=-=-=-=-=-=-=-=-=-=-=-=-=-=-=-=-=-=-=-=-
IP Address : 0.0.0.0
Subnet Mask : 0.0.0.0
Default Gateway IP: 0.0.0.0
DNS Server IP : 0.0.0.0
-> Connection failure detected: Resetting ENC!
–> connection failed !!
Hello! Can I ask you some questions about this.
I can’t connect.
This is my results.Please to help me.
ERIC
Hi Eric,
Seems that the network adapter (Ethernet shield) is not receiving an IP address from your network (all values 0.0.0.0).
– Check proper connection to the network (ie. correct ethernet cable, connect to a router and not directly to your computer, etc)
– Make sure your modem/router has DHCP enabled
Hope this helps.
hans
I just wantet to let you know I just fixed a bug in UIPEthernet that could hang the ENC28J60 chip (some used a call to Ethernet.begin(mac) to reinitialize the enc28j60 as a workaround – this should be obsolete with this fix). New Version 1.09 runs very stable here (Webserver-sketch with > 1000000 Requests and running…):
https://github.com/ntruchsess/arduino_uip/releases
– Norbert
Norbert Truchsess
Thanks Norbert!
Awesome, that’s great news!
I’ll update my code in the example as soon as I can (I’m traveling until mid December).
hans
Thanks you for your instruction on ENC28J60,
I have the problem that still can not found reason. Please advise,
The test was run on localhost, using Apserv , it works. But when I am testing with real http://www.xxx.com internet site, the database has not put inside MySQL even the connection to server is connected. And testing with communication with server is fine.
I also tested the GET php script, it works fine by below manual entry and DATA has been in the database.
http://www.xxx.com/codebot/putvalsarduino.php?t_num=0&t_val=73&s_val=25&leveled=1
I have change chmod of php and its directories script to 755 already.
Attawit
Could it be that the domain (http://www.xxx.com) does not get resolved properly?
With “localhost” I assume you mean a webserver in your local network, which you approach through it’s IP address?
hans
It have been solved, GET HTTP request in full URL path eg..
// Make a HTTP request:
client.print( “GET /testserver/arduino_temperatures/add_data.php?”);
…..
change to
// Make a HTTP request:
client.print( “GET http://www.xxx.com/testserver/arduino_temperatures/add_data.php?”);
Attawit
Thanks Attawit for sharing your findings!
Awesome!
hans
This acticle and all the comments has been a massive help for me. I’m using it as a basis to display the windspeed, rather than the temperature, for a windsurfing club. I’m using the W5100 shield but I’m still having issues with the setup hanging. : sometimes after 40 or so readings, sometimes after 300. I haven’t found where the problem lies as yet but when I do, I’ll post again. I wouldn’t have made as much progress without this article. Thanks again. Ian
ian
Thanks Ian!
I’ve found with the ENC28J60, even though it’s a different Ethernet shield, that fully resetting the device seems to “clear” congestion. It took me a little bit to find the proper statement for that in the library, but I’m sure the W5100 library has a similar statement. You migth want to look into the code of the library to find it, as it might not be documented.
Hope this helps as well, and I’m glad to hear that this article helped you as well …
…
hans
Yippee! Finally got it going. The problem was not with the W5100 but the way in which I’d configured the website: It’s a hosted website with address wpx2.yyy.co.uk and I’d configured it as that rather than http://www.wpx2.xxx.co.uk. Finding that was the breakthrough as well as a few other silly mistakes such as not configuring the DNS server and default gateway addresses in the Arduino. Anyway, that’s water under the bridge now. Again, that’s for the article Hans, much appreciated. – Ian
ian
Hi Ian!
Awesome! Glad to hear you’ve got things going. … me included
Hey, we all make these kind of tiny mistakes
hans
Did you get my message?
Pablo
What message?
I guess that means: Nope.
hans
Hello! Great examples and library!
I m using arduino nano
connected to the ethernet module, as a slave unit connected to a master
Arduino Mega which sends the parameters for the GET request via I2C,
using wire.h . As soon as i receive the parameters, i send them with the
GET request and echo serial.print for debug.
It shows ok in debug, but in my webserver I dont receive the first GET request. So no action in the mysql database.
After
receiving a second parameter from Mega Master arduino, the first GET
request is gotten in my apache webserver, and although serial print
shows ok the second parameter is not received, only the previous, the
first.
So, it seems that data is being kept in a sort of buffer?
Surely i am making a mistake, thanks for the help!
Pablo
The ENC Ethernet shield has proven to be not exactly the greatest, and what seems like congestion has been seen before. Make sure you get the latest library.
Another thing I have noticed is conflicting gear connected to the Arduino (an example before: an LCD screen and SD-Card reader).
I don’t know you exact setup, but these are the 2 things I’d look at first.
If that doesn’t resolve things, I’ve found a “wrong” way of doing it by resetting the ethernet shield. Norbert has updated his excellent library to make that unnecessary though. Worth to toy with …
hans
dear admin,
i want to build a data logger system using arduino due with MySql database. the amount of sensor is 12 sensor.
Cant you help me arrangement the programming with real time?.
Regards
Mansur. H
Mansur
Hi Mansur,
The current sketch should be able to do 12 sensors (connect them in parallel if I recall correctly).
For each sensor “serialX=<number>&temperatureX=<number>” will be added to the URL string. Where X = { 1, … , number of sensors }.
The PHP code will catch every occurrence of such a group of values and create a record for it in the database.
This might not be 100% realtime, but pretty close.
Hope this helps
hans
This has been VERY helpful in setting up my whole house sensor network. I am using Wifly and it works great. Thanks. I would like to add a little security so have added a user name and password with .htaccess file in my sites folder. I wonder if you could tell me how to change the arduino code to handle sending these items to the access form.
Regards,
Phil
Phil
Hi Phil,
According to a post I found at StackOverflow, you can write the link as follows:
So we’d get something like:
I have not tested this yet, but it should get you going in the right direction.
hans
Hans
Thanks. I’ll try that after Thanksgiving.
Phil
Hope you had a great Thanksgiving … completely forgot bout even though I have been living in the US for 12 years now … haha, things you forget when you’re on holiday in Europe …
hans
Hoi, Thanks for the tutorial!
After installing XAMP and PHP5 I had to make some changes to your code to avoid following error:
Now the PHP files look like the following code.
dbconnect.php is completely rewritten. Some modifications to add_data.php and review_data.php.
add_data.php:
review_data.php
Must say i don’t “speak” mysql code or PHP. Found these solutions on this page:
Just wanted to share this code with you all. If the code is not correct, please tell me what’s wrong and correct, so i can learn from it. :)
Thanks again.
Regards, Robert
(Heb deze reactie alleen op je engelse versie geplaatst…)
Robert
Hi Robert!
Thanks you very much for posting your code …
…
Your code looks like a good way of using the mysqli_* variants and is very much appreciated! Well done!
(geen probleem hoor, de meeste bezoekers kijken toch stiekum het meeste naar de Engelse versie)
hans
Hi, no problem. Let’s make it better together.
I’am not really sure if in the add_data.php file, there should be a “close connection” code as well.
Maybe not really necessary, because i read somewhere, that if a script closes, the connection is closed as well. But if we want it nice and according the rules, this line of code should be placed in the add_data.php as well..
Next stop for me is,
– Graphing, Frank shared a peace of code for Highcharts (Jul 26, 2014 – 5:30 AM), but can’t get it to work yet
– Security, don’t know where to start here hahaha. First some basic access security.
If someone has some good advice where to start, let me know.
Merry Christmas!
Robert
Hi Robert,
for all correctness, a proper Close would be better indeed. I have to admit though, that in such short scripts, I always rely on the end-of scrip = closes connection.
I have not done anything with the graph yet, but it’s definitely worth looking into (Frank did some great leg work there already indeed).
As for security,… well, you could work with a few options:
hans
Hi Hans,
Thanks for the suggestions. Much appreciated!
First i’ll try the &secrectcode option, which must be in the PHP file? Is it a simple IF statement?
I will add the close connection code to the add_data.php file as well.
For the graphing part, for now it’s still a bit difficult. PHP file has to collect data, put it to an array, then the graphing
“engine” and settings, have to produce something.
And in the future i would like to get the data through AJAX, so the page does not need to be refreshed all the time for realtime graphing.
I have set the bar at a high level for me..
Robert
Hi Robert,
sorry for the late reply – and a happy new year!
The “… &secretcode=12345 …” would be implementable with an IF statement indeed, something like:
Be aware though that people in the network might be able to “listen” to your URL requests and actually see the ‘secretcode’ – which does not need to be a problem in a private setting.
For the Graph you could also consider Flot, like I did in the Statistics Page of Tweaking4All. Flot is a free jQuery JavaScript plugin.
Some examples can be found on the Flot Website, including AJAX examples. One of these days I’ll write an extension to this article for using graphs.
Setting the bar is never a bad thing … you’ll surprise yourself how far you can get …
…
hans
Hi Hans, happy new year!
No need to be sorry, thanks for the replys!
I’ll try the secretcode option first, i know it’s not that secure, but you have to start somewhere. That code is going to be send from an Android app via 3G to my server. So not much listening from others i suppose.
This is my bar:
I’am making a logging device, Arduino Mega, to be put in a racing motorcycle sidecar. This device logs\makes lap times with the onboard GPS, Gyro for some forces, RTC-clock, to the onboard SD-card. But in addition it sends the data to my webserver every second.
When viewing this data on a webpage on the smartphone along the track, it needs to be realtime updated. So when i implement a graph, I want this graph to update itself without refreshing to whole page. This graph needs to update/add new data points to the existing graph.
This realtime updating thing bites me, and is at the moment the most difficult part. I’ve seen a lot of tutorials but they don’t really work, or are to complicated for me to adjust to my needs/DB. Or they have random generated data in the script, HighCharts realtime demo, but i use a mySQL DB.
Found a very similar or the same code Frank uses, here. But it refreshes the whole page every 5min. I’ve used Flot and take a look at it again.
So the quest continues hahaha.
Robert
Hi Robert,
wow that’s indeed a high bar – but never give up …
…
A few things that come to mind:
– If you like a realtime update, isn’t the track you’re racing to big for WiFi to remain connected?
– AJAX in essence (when using some jQuery stuff) can load a “webpage” in the background and have your JavaScript refresh the chart.
– I’m not familiar with Highcharts, but I would assume that it takes JavaScript based data. Through PHP you could generate the JavaScript data array, so using MySQL would not be a problem (I do this for my statistics page as well). I just looked at their demo, and yes it uses a JavaScript array.
hans
Never mind the WiFI comment,… totally overlooked your 3G comment …
…
hans
With no programming experience, it’s a big plunch into the unknown. Now i have to learn different languages. C, http, php, java, ajax, mysql. For android using App inventor 2.
I’ll have a look at Flot again, it’s much better documented.
Wifi was not really an option indeed, therefore I’am using 3G.
But your page here got me on the right “track” ! So a big Thanks!!
Robert
Hi Robert!
Yeah, you’re taking a challenge serious, or is it serious challenge?
Let us know how things go, I’m always interested in seeing what other build!
If I can be of any more help: feel free to ask. Optionally you could use the forum as well, or just here …
hans
Thanks Hans!
Well it’s a big challenge overall. But getting there. I’am very pleased with what i have accomplished so far.
Main reason for Highcharts was that it is smartphone/touchscreen friendly. Especially when you want to be able to zoom in charts on a smartphone. That’s were Flot is not that usable. On pc’s it’s no problem.
But for the time being i think i’ll use Flot and your column style on 2 separate pages on my webserver. Than i have something working.
After that, next biggy, is that i want to see where the vehicle is on a track/street. Maybe using Google maps. Haven’t seen much examples of this nice option on the internet though..
Robert
Haha you keep upping the bar … but I like it!
I know Google Maps has an API to position yourself based on GPS coordinates, I’ve done something similar on the IP Addres / Location page of Tweaking4all. See also the Google Maps API documentation. It’s been a while that I’ve played with it …
hans
i need to know if there is a libbrary like these one but for pic, i know this is for arduino but some help will be really appreciated, thanks
Pedro
I’m not sure what you mean with “pic”? Picture? PIC IC/Chip? And if the latter what type/model?
(I don’t know any libraries like this for other PIC controllers but maybe one of the readers does)
hans
sorry i mean whatever pic18 or pic32 family from microchip, jeje sorry, if someone know please shared whit us, thanks in advance
Pedro
No problem …
…
Unfortunately I’m not familiar with such libraries …
…
hans
Dear Sir;
I modify your pushing data program to push 4 analog data to WAMP php text file.
it works great thanks.
How ever, When I setup My Arduino/ENJ28J60 as web server to control some lights and relay.
And every 10 sec to pushing data to WAMP. by just copy your pushing program as function saendData();
It did go through that function with no error. But just did not store to that php file.
Do you have any idea? Thank very much in advance if you can help.
Best Regards and Merry X’mas and New Year.
Felix Wong
Hi Felix!
Thank you for your holiday wishes: Marry XMas and a happy New Year to you and your family as well!
I’m a little confused about what you’re trying to do. To control lights and/or relays, you’d need a different function. I assume you mean that the webserver is sending data to the Arduino to switch lights/relays on/off? Or did I miss understand that?
hans
Hello. Ive downloaded your code, but nothing happens. My browser responds
mysql_fetch_array() expects parameter 1 to be resource, boolean given in mysite/review_data.php on line 49
please help me
Pavel
My code is not intercepting issues when the query fails ($result = mysql_query(“SELECT * FROM temperature ORDER BY id ASC”);).
In your case the query fails and $result appears to be having a “false” result, which means the results cannot be parsed, causing this error.
I’d double check the query line and make sure table and field names are correctly entered and matching your table and fields.
hans
Excellent posting Hans.
I’m working my way through what you have taught. I have a 12 sensor network and I’m looking to expand it to 24. Also, I’m looking to add other information collected and managed by the Arduino. I’m concerned because you mention the character limit and for what I’m planning, I’m certain I will go over. Are there any ideas as to how to get around this potential problem? Possibly building different loops that would build and post to maybe different tables? I’m thinking temperature bank 1, temperature bank 2, Tachometer data, gps data and other things. (All this is for my boat).
Any thoughts would be appreciated
Michael
Hi Michael,
Thank you for the compliment!
I can image a few ways to upload large amounts of sensor data, for example:
If you’re using an Arduino MEGA, you could consider trying MySQL Connector for Arduino, which requires more memory (Uno will run out of memory very fast).
Another method would be using POST instead of GET. This does take a little more effort to program though, but you’d get rid of the link length limitation. Here you can use multiple fields or for example data in a JSON format. Some example code can be found at Arduino Playground, Instructables, StackOverflow and GitHub HTTP Client.
hans
thank you, thank you, thank you, thank you, thank you, thank you, thank you, thank you,
a lot
Jose
Thanks Jose!
It’s very much appreciated that you left a positive feedback, and: You’re most welcome! Glad to hear this article was of use to you!
hans
hi there, i’m trying to get this working, and i’m able to send the data from my temp sensor to the mysql database, but when i make the delay longer than 5seconds (5000ms) for example 1800000 (for 30minutes) there is no data that is added to the database.
when i set the interval back to 5000, it works again very well,…
what can be the problem?
kristofmx
Hi Kristofmx,
That’s an interesting problem … weird actually, since I’d expect it to work more reliable with a longer delay. Have you looked through the comments to see how to reset the connecting if a connection fails?
hans
maybe it is also the problem i’m sending the data to a website and database on the web, and not on a local one…
when i’m using the link with the get function this works always…
regards
kristofmx
Theoretically it should matter if the web-server is local or on the Internet. Worse case scenario speed would be more critical if you try to post updates very fast in sequence.
Does your webserver log show any messages indicating why things do not work?
And: did you try the reset function (mentioned in these comments)?
hans
I just wanted to say thank you very much for this concise and informative tutorial. I had gotten an ftp client working from a mega2560 and now you have provided the other key piece that I needed to monitor my well houses, septic pumping stations and hot water boiler systems.
If more people would selfless share functional work like you have done, this would be a much better world to live in.
Amitofo!
Thank you again,
Murrah Boswell
Murrah
Hi Murrah!
Thank you very much for your kind compliments … and you’re right, if more people would share the knowledge, then we all can use these kind of tools for our projects .
.
Thank you, thank you, thank you – such a comment makes it worthwhile do write these tutorials!
hans
[…] I’m using: HTTP: //www.tweaking4all.com/hardware/arduino/arduino-ethernet-data-push/ Agentuino (SNMP): https://code.google.com/p/agentuino/source/browse/#svn%2Ftrunk%2FAgentuino Yes, […]
HI
Thanks for all the good work and hints here. I’m working on a sensordata applikation who will send data to a mysql server. Now when trying to verify the code its to large!? I have a Leonardi board with 32kB. I don’t see that you all have any problem with that?? Do you have the bigger boards?
Sketch uses 29 494 bytes (102%) of program storage space. Maximum is 28 672 bytes.
Global variables use 1 376 bytes (53%) of dynamic memory, leaving 1 184 bytes for local variables. Maximum is 2 560 bytes.
Olle
Hmm, nope I’m not running into memory issues here, but with other I did come close.
As far as I can see in the comparison matrix at Arduino, both Leonardo and Uno should have 32KB.
Only MEGA and DUE models have more – be careful with the Mega models, since some shady eBay/Amazon sellers advertise a Mega but in the fine print you’ll see that they are only selling a Uno clone.
How many sensors are you reading?
hans
p.s. Thank you for the compliment …
…
hans
Hi Hans
I have only one to start with. Planning to use more later on but right now I’m concentrating at getting it to work.
Olle
The Sketch above worked fine on my Uno, so I’m carefully assuming that you have more code added?
hans
No, not yet. I’m planing to have many different sensors in my applikation but at the moment its your code without even changing the ip address. Just want it to work the first time before I start do any changes.
I dont understand why less than 30 KB would do this? 32KB in me and 2KB reserved for the loader and still it’s full already at 29 494 bytes?? Do you have any idea about that? I tried to se if there is a way to clean the memory but no. And I restart the IDE every time….
Sketch uses 29 494 bytes (102%) of program storage space. Maximum is 28 672 bytes.
Olle
I have a different ethernet shield. I don’t know the name of it so I guess that could be it.
Olle
I think I found what the potential culprit be in this “First Look – the Arduino Leonardo” article:
“Less flash memory – the bootloader uses 4 kB of the 32 kB flash (the Uno used 0.5 kB)“
So you’re “loosing” an additional 3.5 kB. Maybe this is needed to support the build-in USB support in the ATmega32u4 microprocessor?
To save memory, try removing all serial related statements, or by removing the quotes in front of line #4 (// #define DEBUG) so that DEBUG is defined and all serial stuff is disabled. The compiler should then ignore anything serial related.
If you still want to see something, then just remove the Serial.Print lines that you don’t deem needed, and reduce the text for the Serial.Print statements. For example, modify these lines:
Serial.println("Tweaking4All.com - Temperature Drone - v2.3");Serial.println("-=-=-=-=-=-=-=-=-=-=-=-=-=-=-=-=-=-=-=-=-=-\n");
Serial.print("IP Address : ");
Serial.println(Ethernet.localIP());
Serial.print("Subnet Mask : ");
Serial.println(Ethernet.subnetMask());
Serial.print("Default Gateway IP: ");
Serial.println(Ethernet.gatewayIP());
Serial.print("DNS Server IP : ");
Serial.println(Ethernet.dnsServerIP());
to (it will not save a ton of memory, but it might just push it far enough if you do this with all lines):
Serial.print("IP:");Serial.println(Ethernet.localIP());
Serial.print("SM:");
Serial.println(Ethernet.subnetMask());
Serial.print("GW:");
Serial.println(Ethernet.gatewayIP());
Serial.print("DNS:");
Serial.println(Ethernet.dnsServerIP());
hans
Thanks for the hints!! Great ;o) Really appreciate your help! I need to attend my work now. Will test this later tonight!
Again, big thanks!
Olle
Olle
Hi Hans
I bought a Arduino DUE (512KByte ;o)
It compiles fine but I do not get any data into my db. I don’t get any hints in the serial monitor ???? Shouldn’t I get a lot of serial prints there? Its hard to get any further with no input to whats happening? Any suggestion?
I should take away the // before #define DEBUG, correct?
Olle
Olle
This is what the compiler say’s
Sketch uses 34 080 bytes (6%) of program storage space. Maximum is 524 288 bytes.
Erase flash
Write 36284 bytes to flash
[ ] 0% (0/142 pages)
[== ] 7% (10/142 pages)
[==== ] 14% (20/142 pages)
[====== ] 21% (30/142 pages)
[======== ] 28% (40/142 pages)
[========== ] 35% (50/142 pages)
[============ ] 42% (60/142 pages)
[============== ] 49% (70/142 pages)
[================ ] 56% (80/142 pages)
[=================== ] 63% (90/142 pages)
[===================== ] 70% (100/142 pages)
[======================= ] 77% (110/142 pages)
[========================= ] 84% (120/142 pages)
[=========================== ] 91% (130/142 pages)
[============================= ] 98% (140/142 pages)
[==============================] 100% (142/142 pages)
Verify 36284 bytes of flash
[ ] 0% (0/142 pages)
[== ] 7% (10/142 pages)
[==== ] 14% (20/142 pages)
[====== ] 21% (30/142 pages)
[======== ] 28% (40/142 pages)
[========== ] 35% (50/142 pages)
[============ ] 42% (60/142 pages)
[============== ] 49% (70/142 pages)
[================ ] 56% (80/142 pages)
[=================== ] 63% (90/142 pages)
[===================== ] 70% (100/142 pages)
[======================= ] 77% (110/142 pages)
[========================= ] 84% (120/142 pages)
[=========================== ] 91% (130/142 pages)
[============================= ] 98% (140/142 pages)
[==============================] 100% (142/142 pages)
Verify successful
Set boot flash true
CPU reset.
Olle
Hi Olle!
My bad … actually “//” needs to remain in front of the “DEFINE DEBUG”, so that “DEBUG” is not defined and the DEBUG lines are not being compiled … sorry about that …
…
As for the Arduino Due: I think it has a different microprocessor, but I guess the code should compile just fine yes.
I have never done anything with the Due though … so I honestly cannot say much about what might have gone wrong …
hans
[…] //www.tweaking4all.com/hardware/arduino/arduino-ethernet-data-push/ […]
HI
quuant jai tester cette exemple
jtrouver cetta erreur
Arduino Température Connexion
ID date et Heure de série Capteur température en degrés Celsuis
Déconseillé (!): Mysql_query (): L’extension mysql est obsolète et sera supprimée dans l’avenir: utiliser mysqli ou AOP place dans
C: \ wamp \ www \ review_data.php sur la ligne 43
Pile d’appels
# Temps Fonction emplacement mémoire
1 137 392 0,0004 {main} () .. \ review_data.php: 0
2 137 696 0,0006 mysql_query () .. \ review_data.php: 43
Avertissement (!): Mysql_fetch_array () attend paramètre 1 pour être ressources, booléen donnée dans C: \ wamp \ www \ review_data.php sur la ligne 49
Pile d’appels
# Temps Fonction emplacement mémoire
1 137 392 0,0004 {main} () .. \ review_data.php: 0
2 144 560 1,1177 mysql_fetch_array () .. \ review_data.php: 49
<? Php // Lancer MySQL Connection include ('dbconnect.php'); ?> <Html> <Head> <Title> Arduino Température Connexion </ title> <Style type = "text / css"> .table_titles, .table_cells_odd, .table_cells_even { padding-right: 20px; padding-left: 20px; color: # 000; } .table_titles { couleur: #FFF; background-color: # 666; } .table_cells_odd { background-color: #ccc; } .table_cells_even { background-color: #FAFAFA; } la table { border: 2px solid # 333; } body {font-family: "Trebuchet MS", Arial; } </ Style> </ Head><Body> <H1> Arduino Température Connexion </ h1> <Table border = "0" cellspacing = "0" cellpadding = "4"> <Tr> <td class = ""> ID table_titles </ td> <Td class = "table_titles"> Date et heure </ td> <td class = ""> table_titles série du capteur </ td> <Td class = "de table_titles"> Température en degrés Celsius </ td> </ Tr> <? Php // Récupérer tous les enregistrements et les afficher $ Result = mysql_query ("SELECT * FROM ORDER BY id température ASC"); // INSERT INTO test.temperature (événement, celsius) VALUES ('288884820500006a', '21 .65 '); // Utilisé pour la ligne couleur bascule Oddrow $ = true;
// Processus tous les records while ($ row = mysql_fetch_array ($ result)) // While ($ row = mysql_fetch_array ($ INSERT INTO))
{ if ($ oddrow) { $ Css_class = 'class = "table_cells_odd"'; } autre { $ Css_class = 'class = "table_cells_even"'; }
$ Oddrow = oddrow $!;
echo '<tr>'; echo '<td' $ css_class.. '>' $ row ["id"] </ td> '..; echo '<td' $ css_class.. '>' $ row ["événement"] </ td> '..; echo '<td' $ css_class.. '>' $ row ["capteur"] </ td> '..; echo '<td' $ css_class.. '>' $ row ["Celsius"] </ td> '..; echo '</ tr>'; } ?> </ Table> </ Body> </ Html>
tayech najeh
Hi Tayech Najeh,
unfortunately my French is really bad, and Google Translate makes a mess of it, so maybe you’d want to post in English next time.
As far as I can decipher, your WAMP setup is complaining about the old mysql_query method, which is considered depreciated in the PHP version you are using. Thought this should not prevent it from working …
Unfortunately the PHP team has decided to work in a more object oriented way … too bad if you ask me, but my opinion doesn’t seem to matter. I’m sure plenty of old school developers prefer the old way over the “new” way. More users complain about this, but this seems to be the way it is. See also PHP Quickguide for MySQL migration to the “new” method, and this discussion at StackOverflow.
Bottom line is that the mysql_* functions need to be replaced by the mysqli_* functions, but mysqlu_* functions are not a simple drop in for the old mysql_* functions. They can however be used procedural and object oriented.
Alternatively you can use PDO, but I haven’t done anything with that either.
And finally there seems to be a way to suppress these warnings by typing a “@” in front of every mysql_* function. So for example mysql_query becomes @mysql_query. Not the best way if you ask me.
Untested, but it should become something like this …
dbconnect.php:
review_data.php:
Again: I have not tested this and I’m sure there is room for improvements – I haven’t really used mysqli_* functions in the past.
Hope this helps you get started.
hans
Hello,
I could make this example work, however I still have some concerns: The temperature table, while hanging from the “test” data base works ok. It is possible to add records either by running the php script (add_data) from the browser or through the client connections performed by Arduino.
However, if the table belongs to another (let´s say a new) data base, records can still be inserted as php in-line from the php-myadmin, but not from the browser anymore (of course after making the corresponding tweak to the dbconnect and add_data scripts.
What am I missing?…a privilege to write other than the test database?.
Any clue will be very much appreciated.
Regards
Mauricio
Mauricio
Hi Mauricio,
I can only guess … first thing I’d verify is if the user you’re using in dbconnect.php has actual write permissions to the table.
Next thing I’d do is check the PHP error log, these two StackOverFlow discussions might assist in finding the log file (Where does PHP store the error log? and How to log errors and warnings into a file?). Hopefully it will tell you what is going wrong.
My guess would be access rights though. Each database and table has it’s own privileges.
hans
[…] are some of the helpful links that helped me created this build. Arduino Ethernet – Pushing data to a (PHP) server How to measure temperature with your Arduino and a DS18B20 Brick-Temperature-DS18B20 Arduino […]
Cool Project!
hans
Hi Hans, his French is not too good also :-) logical google won’t understand it, I hope his english is better. (Tayech Najeh)
I like to thank you for the article, it saved a lot off time to sort everything out.
I’m monitoring already several months the temperature in- and outside and also the temperature of the heating-side of the c.v. to monitor the behaving of the heater, it’s working perfectly on a Arduino Nano with a ethernetboard pluggen on to it and the data on a qnap server.
Also I’ve build with other Nano’s a database to monitor swimming-pools which is working also fine but because not all are on the same network I have to push the data over internet.
So I’ve tested with the dyndns-address with and without http:// in front (I don’t have a fixed IP-address) and I’ve also opened the SQL port but nothing works.
When I’m on the same network I have to set the SQL-address at localhost:PORT The IP-ADDRESS:PORT won’t work eather.
I do hope someone can give me a clue.
Many thanks, Robert.
Robert_S
Hi Robert!
I use DynDNS myself and have had very good experiences with it, even with exotic port.
First I would try working just with HTTP, I’m not sure how wel the Arduino would handle HTTPS.
I assume you have this scenario:
– Several Arduino’s at home for the C.V. (ie. at home)
– MySQL / Webserver in the same location (ie. at home)
– One or more Arduino’s outside for the pools (have to connect to “home” through the Internet)
There are 2 ways to connect to MySQL, but I assume you’re using the method used in this article (first option).
The second option is very unlikely to be used, but I’m mentioning it anyway to be complete.
If you’re sending data to a PHP page (as in this article):
You might have some port forwarding issues. The port needed for regular HTTP would be port 80 and you would need to forward that to your webserver (at home) in your modem/router (at home).
Now I would not use port 80, rather pick something else like port 8080 or 81 (which you have to use in the URL used in the Arduino’s at the pool). Just to avoid confusion with regular HTTP traffic.
Most modems/routers allow you to map an incoming port (8080 or 81 for example) to a port used internally (port 80).
So in your modem you’d see something like this:
Port forwarding: incoming port 81 TCP -> local port 80 TCP (if you can only choose from a list of Apps: HTTP Server or Webserver).
No special things have to be set with your MySQL, since the webserver (PHP) is talking to it as a “localhost”.
(modify line 68 of the sketch accordingly, so if you use port 8080, then line 68 would be if (client.connect(server, 8080)) )
If you’re sending data to MySQL directly (VERY unlikely):
Assuming your MySQL server is at home, and your Arduino is connected to the Internet, then you’ll have to do Port Forwarding on your Internet modem/router for Port 3306 (assuming you’re using the default port for MySQL and you allow MySQL remote access),
So assume that remote access has not been set in your MySQL database – more details in this StackOverflow Question.
Short version:
“mydb.*” refers to all tables in the “mydb” named database.
“‘user’@’yourremotehost’” refers to the user that has access to the table and yourremotehost.
The latter would be an IP address for example. You could also use ‘%’ if all remote connections are allowed. So “user@’%’” should work no matter what the IP address of the Internet connection of your Arduino is.
‘newpassword’ should be the password you’d like to use.
hans
Thanks for your extended explication Hans, for me not all necessaire, I know my way with port-forwarding.
A second forward to the same internal port won’t work but your idea to separate the traffic could be practical so I’ve created a second virtual host on another port i.e. a second internet-host with a different portnumber and from a different map on the server.
And a miracle happened, this one worked, now I can use the arduino’s on every network on the world and get the data on any SQL-server on the world.
Second advantage is that I can separate the file who’s putting the data on the SQL-server from the rest.
Thanks again, two are knowing more than one.
Robert_S
Hi Robert!
Awesome! Glad to hear it’s working now. .
.
You’re right; 2 know more
hans
hi,
Can u please help me with the ip address problem..i am not able to view anything when i type the ip address.i tried using the backsoon.ino program.please help me.
minu
Hi Minu,
When looking at backsoon.ino then you have 2 options in line 6:
1) is using DHCP, your modem/router should have this enabled, otherwise this will not work. STATIC should be 0.
2) using a fixed IP address, and in that case you should define a suitable IP address etc., STATIC should be 1.
Another problem I have seen is when users connect their Ethernet straight to their computer – this I cannot recommend, as it would only work with a crossed Ethernet cable and a fixed IP address. Tricky at times even for the best of us.
So the Ethernet should be connected to your modem/router.
Does your serial output show an IP address that is in the range of your network?
For example, your computer has 192.168.1.x and the serial output show 192.168.1.y (typically the first 3 numbers should match).
hans
Hi
Thank you for all the great posts. You have been a great help for my project in radiation sensor.
the connection between my pc and the ethernet shield is ok. I can ping in both directions. I am also able to connect with google.com and send some requests. BUT when connecting to the wamp server (server ip 192.168.1.5, which is the same as of my machine), arduino fails. in other words
(client.connect(server, 80)) = FALSE
byte mac[] = { 0xDE, 0xAD, 0xBE, 0xEF, 0xFE, 0xED };void setup() {while (!Serial) { }if (Ethernet.begin(mac) == 0) {Serial.println("Failed to configure Ethernet using DHCP");Ethernet.begin(mac, ip); }Serial.println("connecting...");Serial.println("Tweaking4All.com - Radiation Drone - v2.0");Serial.println("-=-=-=-=-=-=-=-=-=-=-=-=-=-=-=-=-=-=-=-=-=-\n");Serial.print("IP Address : ");Serial.print("Subnet Mask : ");Serial.print("Default Gateway IP: ");Serial.print("DNS Server IP : ");if (client.connect(server, 8080)) {Serial.println("-> Connected");else { // you didn't get a connection to the server:Serial.println("--> connection failed/n");} }This is what I get from serial data :connecting...Tweaking4All.com - Radiation Drone - v2.0-=-=-=-=-=-=-=-=-=-=-=-=-=-=-=-=-=-=-=-=-=-IP Address : 192.168.1.6Subnet Mask : 255.255.255.0Default Gateway IP: 192.168.1.1DNS Server IP : 192.168.1.1--> connection failed/nsawsen
Hi Sawsen,
I see you’re trying to connect to port “8080” (in the code: “if (client.connect(server, 8080))”.
Could this be the problem?
hans
yet it is not succeful(connection failed)
sawsen
Can you reach 192.168.1.5 from another computer (or tablet/cellphone in the same wireless network)?
hans
I reach this adress in tablet but the web page is not accessible
sawsen
Seems your WAMP setup might be set to use another port than 80?
Often 8080 and 8100 are being used, can you try those?
Also, if these do not work, look in the config files of your WAMP setup.
If you’re using WAMPserver, go to httpd.conf file, for example at:
(number might be different – depending on the Apache version with your WAMPserver)
go to line where is says “Listen 80” (or another number) and change it to the number you’d like to use (if needed). Ideally you’d use “80” but yours could be set to a different number. Either take note of it or change it.
Next go to the line where it says “ServerName localhost:80” (Servername might be different) accordingly.
Next restart WAMP.
hans
Hans, can you contact me on email (sawsen dot benn at gm*** dot com) or TeamViewer?
sawsen
Ho Sawsen,
Unfortunately, I’m traveling and won’t be near a computer in the next 24 hours.
I’m getting ready to move from the US to Europe, so I will not have much time in the next 2 weeks either.
What’s the problem you’re running into?
hans
ok ,my problem is between the server (wamp sever) and the client(arduino)
I tried to do all step but not always connection failed result
sawsen
Hello,
Does anyone know how to get the “socketio arduino client“ runnable with the UIPEthernet-Lib. My project run´s well with a python-flask webserver, but i want to make it faster.
Thank you for the great work at all.
Enrico
Hi Enrico!
Unfortunately I’m not able to test anything for next few weeks and I have zero experience with “SocketIO Arduino Client”.
Maybe one of the visitors here might know?
hans
Hi all…i have followed this post keenly and have been able to create all the PHP files. when i post data manually using http://vintagegreens.byethost7.com/add_data.php?humidity=50&temperature=13 , the data is posted. However, my arduino cant post data despite there being no error in the code below. Someone kindly help me out -:)
#include <dht.h> #include <SPI.h> #include <Ethernet.h> EthernetClient client; byte mac[] = { 0xDE, 0xAD, 0xBE, 0xEF, 0xFE, 0xED }; char server[] = "http://vintagegreens.byethost7.com"; dht DHT; int interval = 5000; // Wait between dumps#define DHT11_PIN 40
void setup() { Ethernet.begin(mac); Serial.begin(115200); Serial.println("Humidity (%),\tTemperature (C)"); }
void loop() { // READ DATA //Serial.print("DHT11, \t"); int chk = DHT.read11(DHT11_PIN); // DISPLAY DATA Serial.print(DHT.humidity, 1); Serial.print(",\t"); Serial.println(DHT.temperature, 1); if (client.connect(server, 80)) { Serial.println("-> Connected"); // Make a HTTP request: client.print( "GET /add_data.php?"); client.print("humidity="); client.print( DHT.humidity ); client.print("&&"); client.print("temperature="); client.print( DHT.temperature ); client.println( " HTTP/1.1"); client.print( "Host: " ); client.println(server); client.println( "Connection: close" ); client.println(); client.println(); client.stop(); } else { // you didn't get a connection to the server: Serial.println("--> connection failed/n"); }
delay(interval); }
iam able to see the readings on the serial monitor but my database has nothing, meaning the data is not being sent
joel
Hi Joel!
I’m in the middle of moving from the US to the Netherlands, so I’m a little limited in offering help.
This shouldn’t cause this problem, but try a single ampersand in the client.print(“&&”); line, so client.print(“&”);.
I doubt this would cause a problem though.
hans
thanks for responding to my post despite being in the middle of your journey….i already tried that and it still does not send…i assume the client.print part is not posting, or the arduino cant locate the add_data.php file…….as you may notice, i am using free web hosting site therefore i may not have much knowledge of the directory structure…….when you do get time, i will be grateful if you help me troubleshoot. Regards.
joel
To avoid a total hernia, I take little brakes in between, like now … see what I can do for you …
First thing I’d do, to debug, is:
change this part:
so it dumps each line to serial as well – so we can see the URL being build properly.
So for each line:
Just to make sure this all looks good. It should look similar to your manual URL.
hans
Good for you to take breaks between continents -:) ….. i have done that and this is what i see on my serial monitor…
GET /add_data.php?humidity=0.00&&temperature=0.00 HTTP/1.1
Host: http://vintagegreens.byethost7.com
connection: close
GET /add_data.php?humidity=0.00&&temperature=0.00 HTTP/1.1
Host: http://vintagegreens.byethost7.com
connection: close
i wish i could paste the image here….i have not connected the sensor in case you are wondering why its all zero
joel
Seems to work alright … hmm weird.
The same link manual works and the Arduino actually connects to the server as well.
I think I found the problem. Can you try:
instead of:
p.s. You might want to add a secret code to the URL so people will not start toying with your database, ie. add “&secretcode=1234567890” and in PHP catch if “secretcode” exists and matches (use $_GET[“secretcode”]) … and only then submit data to your database.
hans
you are a genius!!! its working like magic……i am only using this database for test purposes…..its on a free hosting site and the real database will be on another webserver (which is also free-:)) ..i hope no one messes with this one though -:)
joel
i will add some more security though….let me infact research on the secret code now……i hope i can be able to write codes that will draw graphs with the data as well and eventually create an android app that can be used to monitor and take remedial action such as turning on fans when temperatures are high..thanks a lot sir
joel
Awesome!!!
Well, maybe not a genious,.. sometimes it just takes a fresh look or another pair of eyes to see what one keeps overlooking over and over again. I’m really glad it works!
You’re most welcome and have fun with your new project!!
hans
[…] Arduino Ethernet – Pushing data to a (PHP) server […]
joel
Hi,
I need some help. I can’t make records in MySQL. I use sensor DHT11. This is my code:
i am able to see the readings on the serial monitor but my database is empty :(
This is the serial monitor output:
Thanks
Supreme
Hi Supreme,
I’m sorry to hear you’re running into a little snag there.
Did you try the link manually? (see also the comments above by Joel, where we added some additional output to test the link)
Would be good to know if the link already works even without Arduino.
hans
this is mu output:
GET /diplomna/add_data.php?temperature=21&humidity=78 HTTP/1.1 -> Connected
when i add record manually, everything is ok.
this is my php code:
add_data.php
db.connect.php
review_data.php
without arduino the php works. I have ID and Date, temperature and humidity are empty.
Thank you for your attention :)
Supreme
Hi supreme, i think you need to change localhost on the line $MyHostname = “localhost”; in dbconnect file to the IP address of the computer where the mysql database is installed. ‘Localhost’ in this context means the arduino, rather than the server.
change $MyHostname = “localhost”; to read something like $MyHostname = “192.168.0.24”; where this is the actual IP of the computer. If the database is on a web server, enter the domain name of the web server like in my case above.
all the best….
joel
Thank Joel!
Actually, “$MyHostname = “localhost”;” is correct in most cases. It’s pretty common dat MySQL and Apache are running on the same machine, therefor “localhost” is often correct.
Now, doing the link manually in browser works just fine, so that would confirm that there is nothing wrong with the PHP code, so the problem is to be found elsewhere.
Just to make sure, the following link would actually add a record to your MySQL database, right?
hans
Again, I want to thank you for helping me :)
when i use this link manually:
In MySQL i have ID, DATE and Tempreture, but don’t have humidity :D
Supreme
Hmm,… so there is something not right in your PHP, as it skips humidity.
The SQL seems to look OK. Does the “humidity” fieldname match with your table field?
hans
ooooh yea you are right…kindly post the arduino code as well….the error could be from that end.
joel
Thats my all arduino code:
Supreme
i see you are using port 3306, which is the default for mysql database, have you tried port 80 for HTTP?
joel
again nothing happens :(
This is serial monitor output:
but don’t have record in mysql again :(
Supreme
whooh! this is tough …..its connecting so its not a firewall issue….can you change this line client.print( “GET http://192.168.0.101/diplomna/add_data.php?”); to read
client.print( “GET /diplomna/add_data.php?”);
not sure if it will work…but try it
joel
same thing here :(
Supreme
try to put serial. print after every client.print we see how the syntax appears on the serial monitor…..the idea is, if we can get the arduino to print something likehttp://192.168.0.101/diplomna/add_data.php?temperature=21&humidity=78
then it will work….also, try and change the line IPAddress server(192,168,0,101); to char server[] = “192.168.0.101”;maintain port 80 instead of 3306 and lets see what we get…i honestly cant find any fault in your code
joel
GET /diplomna/add_data.php?temperature=23&humidity=78 HTTP/1.1-> Connected
This is the output :)
No difference after second change :(
Supreme
This code worked for me….i have edited it to suit your settings…can you try it?you can remove the sensor first if you are not using arduino mega which has pin 40..
#include <dht.h>
#include <SPI.h>
#include <Ethernet.h>
EthernetClient client;
byte mac[] = { 0xDE, 0xAD, 0xBE, 0xEF, 0xFE, 0xED };
char server[] = “192.168.0.101”;
dht DHT;
int interval = 5000; // Wait between dumps
#define DHT11_PIN 40
void setup()
{
Ethernet.begin(mac);
Serial.begin(115200);
//Serial.println(“Humidity (%),\tTemperature (C)”);
}
void loop()
{
// READ DATA
//Serial.print(“DHT11, \t”);
int chk = DHT.read11(DHT11_PIN);
if (client.connect(server, 80)) {
//Serial.println(“-> Connected”);
// Make a HTTP request:
client.print( “GET /diplomna/add_data.php?”);
Serial.print( “GET /diplomna/add_data.php?”);
client.print(“humidity=”);
Serial.print(“humidity=”);
client.print( DHT.humidity );
Serial.print( DHT.humidity );
client.print(“&&”);
Serial.print(“&&”);
client.print(“temperature=”);
Serial.print(“temperature=”);
client.print( DHT.temperature );
Serial.print( DHT.temperature );
client.println( ” HTTP/1.1″);
Serial.println( ” HTTP/1.1″);
client.print( “Host: ” );
Serial.print( “Host: ” );
client.println(server);
Serial.println(server);
client.println( “Connection: close” );
Serial.println( “Connection: close” );
client.println();
Serial.println();
client.println();
Serial.println();
client.stop();
}
else {
// you didn’t get a connection to the server:
Serial.println(“–> connection failed/n”);
}
delay(interval);
}
joel
i’ve got too much errors.. When i fixed one, errors are becoming more and more. Can you sent me your library. This is the first of the errors.
Supreme
apologies for that..i am using arduino 1.0.6 …download the DHTlib library from
https://arduino-info.wikispaces.com/DHT11-Humidity-TempSensor?responseToken=d143c4888d4f53d1b2042275151a0f62
joel
amazing. It works. But there is one more problem :D I make records only in the tempreture field.
this is serial monitor output:
in my server i have:
ID DATE Temeprature Humidity
56 20.05.2015 23
and my humidity is empty. Am I doing something wrong?
Supreme
Great!!….as for the humidity problem, would you mind showing the sql statement you used to create the database? the PHP files are ok as far as i can tell….you should use something like :
CREATE TABLE `test`.`temperature` (
`id` INT NOT NULL AUTO_INCREMENT PRIMARY KEY COMMENT ‘unique ID’,
`event` TIMESTAMP NOT NULL DEFAULT CURRENT_TIMESTAMP COMMENT ‘Event Date and Time’,
`Humidity` VARCHAR( 30 ) NOT NULL COMMENT ‘humidity in %’,
`Temperature` VARCHAR( 10 ) NOT NULL COMMENT ‘Measured Temperature in Celsius’,
INDEX ( `event` )
) ENGINE = InnoDB;
make sure you get the spelling right in the PHP files…
joel
OMG OMG :D it was my php – $_GET[“humidity=”] instead of $_GET[“humidity”]. Many thanks for the help (bow) . Now i can start my project. Soon i will add BMP180 and maybe i need more help :D.
Supreme
ooops!! how i didn’t see that is unbelievable….anyways, congratulations on making it work….let us know how it works. Cheerz
joel
I can not understand why my previous code does not work.. but at this stage it does not matter – your code works perfectly. Maybe when I have more time I will try to fix my code. Thanks again :)
Supreme
Woohoo! Cool to hear that it’s working!
Thanks Joel for the great help!
hans
joel
Haha
hans
i dont understand either….dont know if its the 2 ‘if’ statements or not…but i am sure you can fix it from here..
joel
why my code just looping in “connected!” ? :) thanks for answer :)
Galuh
Hi Galuh!
The connect between your Arduino and your webserver will each time only be temporary. After sending the data, the connection will be closed. So in the next round of submitting data, we need to connect again. Hence the “Connected!” keeps appearing each time that happens.
hans
hye..there,
i am using Mega+Ethernet shield(wiznet) that need to connect and updating the readings to mysql database. I’m able to get the output from serial monitor which is
***i’m using arduino IDE 1.0.5 r2 with Wampserver Apache 2.4.4 , PHP 5.4.16 , and mySQL 5.6.12
the data are able to save in my database manually as below;
But Nothing in my database when i upload Arduino sketch.
Mia
All the 3 php file that im using same with above examples
dbconnect.php
review_data.php
add_data.php
Mia
Hi Mia,
since submitting manually works, I’d assume that your PHP code is OK.
As for your sketch: I see that you’re including mysql.h (not sure if that causes a conflict).
Second thing I notice is that your code is a little all over the place.
For example lines:
Ehm, I have not used it in this way:
Localhost would be your Arduino in this line and we’d need the host we connect to, not localhost.
hans
hye Hans, thnks for the reply
i got it..thanks.., i change the ip for the arduino and change the “localhost” to the same ip..and its working..now i need to obtain a graph from this readings..highchart maybe. have any idea? or link that i can try? :)
thnks again
Mia
Cool!
As for graphing, you’ll probably want to look at something using the jQuery framework. Something like Flot (which I’ve used on the statistics page of my website).
Some other users have been doing some graphing as well, for example in this comment.
Hope this helps you with the graphing.
hans
[…] programming PHP so I found a webpage wich got me started to log to my MYSQL server. Take a look at this page to get you started. The author is still active and seems to know a lot about […]
Hello,
Again, I need your help :)
Once I started to write to the database, I added another sensor (BMP080). The sensor works great. Then I wanted to sent information from both sensor, wirelessly, using RF transmitter and receiver. After that i want to record information in a database and show it on display (using I2C interface). The final step is my problem :)
This is my code (receiver)
Serial monitor output:
Temperature = 23 *C
Pressure = -3350 Pa
humidity = 76 %
-> connection failed/n
When i use my old code to make records in database. Everything is ok.
old code:
I can’t understand what i’m missing and why it is not works.
I have one more problem. When I displayed information of pressure in serial monitor of transmitter, the pressure is 111 000Pa, but the value that the second arduino received is negative (-3350 Pa).
This is the code of transsmiter:
Thanks in advance for your help and attention.
Supreme
Hi Supreme!
Wow, interesting project.
I will try to find time to look at your code. I’m in the middle of a big move from the US to Europe and my stuff is scattered all over the globe haha … not to mention all the things I have to take care of like power, etc.
hans
Whenever you get a chance to review the code will be grateful :)
Supreme
Could it be that there is an SPI (pin) conflict?
The LCD I had used in the past would simply not work together with the Ethernet unless I started using the LCD in “slow” mode (non-SPI).
As for the odd negative value:
You’re using an “int” for this, which goes only from -32768 to 32768 (see Arduino Int Documentation).
An “unsigned int” wouldn’t be good enough either, as it only goes to 65535 (see Arduino Unsigned Int Documentation).
You should probably change that to “unsigned long” (see Arduino Unsigned Long Documentation).
Hope this helps …
…
hans
I changed the declaration of pressure:
and added this code :
Serial.print("Pressure = ");the output is:
Pressure = 110 000
I changed also the declaration in reciever file and the output is:
Pressure = 33500
convert Pa to hPa and now output is ok.
i have 1110. hPa
I removed the lcd display and tried to make a record in the database, but failed. I changed the transmitter pin to pin 5
This is my new code without lcd display:
Thanks again for the help “_*
Supreme
You’re welcome!
Ehm, can I assume everything works now that you changed pin 5 and removed the LCD?
Also; I’m not familiar with “VirtualWire.h” …
As for converting; is the sensor giving you different data, or is the database storing it wrong? (check the size of the field in the table, to make sure it can hold 110000).
hans
LCD Displey works fine with ethernet shield :) My problem is somewhere in #include <VirtualWire.h> and rf function :(
Supreme
Awesome!
What does “VirtualWire” do?
hans
VirtualWire.h provides features to send short messages, without addressing, retransmit or acknowledgment, a bit like UDP over wireless
Supreme
Cool – I’ll have to look into that once I get some spare time available .
.
hans
I really appreciate your help
Supreme
You’re most welcome!
hans
Hi,
I found where is the problem. It is function of virtualwire.h – rx_setup. It use a timer and there is conflict with any of the libraries. Can anybody tell me how tо change the timer, that is used by the function.
Supreme
That code is a little over my head …
But when looking for Virtualwire info, I did notice that it is no longer being developed. (see: this link)
It seems recommended to use RadioHead instead … again, I have no experience with VirtualWire, so I cannot even say if RadioHead is going to solve the issue at hand.
hans
hye..
i try to fetch mysql data and display in graph..just blank webpage i obtained.when i click view page source , its display this;
the data are able to fetch into the dataset1(if im not wrong) but no plotting data display in localhost page.
the code is
Mia
Hi Mia!
It’s been a very long time ago that I’ve played with flot. Must have been a few years ago when I created that Tweaking4All Statistics page (feel free to snoop in the source there).
How I started: grab one of the examples that come with Flot, and tweak it to your needs. After some toying around you’ll get a better understanding of what does what and what does or does not work.
When looking at your code, it feels like I’m missing some things. As an example, my (simplified) code for the statistics page:
hans
I am in need of some assistance. At first I was getting 0.0.0.0 in serial monitor at all fields, so I added an IP line.
byte mac[] = { 0x00, 0xAA, 0xBB, 0xCC, 0xDE, 0x02 };
IPAddress ip(192, 168, 1, 202);
(not sure if anything else is needed)
Now I’m getting this in serial monitor:
IP Address : 192.168.1.202
Subnet Mask : 255.255.255.0
Default Gateway IP: 192.168.1.1
DNS Server IP : 192.168.1.1
–> connection failed
PHP code should be fine, because I can add data manually, but for some reason arduino can’t connect to the wampserver. Everything else in the code is roughly the same.
Egert
Hi Egert!
It seems like you have a network issue. I assume you’ve used a regular ethernet cable, connected to your router or modem.
With the code in this article, DHCP (of your router/modem) should give your Arduino an IP address … which it doesn’t seem to do.
Please verify the cable, verify that DHCP is enabled in your modem/router – which by default, under normal conditions, should be enabled.
You could try the cable by connecting your computer and see if it connects and that you have Internet access (don’t forget to disable WiFi in case your computer has WiFi).
Using a fixed IP address is not bad, but in your case it does not seem to work and this strongly suggests network issues.
hans
Thank you very much for replying so soon, The cable works, with my computer and also gives the arduino IP as well (tested through DHCPAdressPrinter), although it’s an A-B standard cable, don’t know if it would make a difference though. DHCP is enabled, also I tried adding the MAC to a static IP list. What network issue could it be? I’m using an asus wireless router which shares a 4g mobile connection through usb. Could it be, that the service provider has DHCP off, so it wouldn’t matter if it’s turned on, in my router settings? What could be the workaround?
Egert
Hi Egert,…
I’m a little confused about your current setup. I’m not sure what an A-B cable is when it comes to network cables … did you mean USB? (which would not be related to this) Or did you mean a cross-cable? (versus a normal cable – which would be no good either)
Under normal circumstances you’d have the Arduino only connected to a power supply and ethernet.
Alternatively you can connect the Arduino to the USB of your computer, but that would only be used to supply power.
The ethernet connection should be straight to the router.
Is this what you have?
hans
Yes, by A-B cable I mean cross-cable (sorry i’m not a native speaker and we only use a-b here). Do I understand correctly that the cross-cable would be no good? Do I need the standard straight? cable then? The arduino is connected to the computer with USB as a power supply, also to make it easier to make changes to the code (to make the uploading process faster, not having to switch between the standard PS or USB) The network cable goes directly to the router, yes.
Egert
No problem Egbert …
…
A cross cable would be not suitable for this. You’ll need a regular Ethernet cable, straight from Arduino to Router.
The Arduino connected to your PC is not a problem, great power supply and easy for changing code indeed. It will however not handle the network traffic of course.
hans
I still can’t get it to work, I changed the cable, double checked that it works. Also the arduino gets an IP when testing with DHCPAddressprinter in examples.
When I upload your code and don’t change anything but the IP of my server, that has a static IP, the serial monitor shows:
IP Address : 0.0.0.0
Subnet Mask : 0.0.0.0
Default Gateway IP: 0.0.0.0
DNS Server IP : 0.0.0.0
–> connection failed
When I add a line for IP in the code( IPAddress ip(192, 168, 1, 9); and add ip to this line: Ethernet.begin(mac, ip)) I get
IP Address : 192.168.1.9
Subnet Mask : 255.255.255.0
Default Gateway IP: 192.168.1.1
DNS Server IP : 192.168.1.1
–> connection failed
If you think the problem could be somewhere else, I can send all the files to your e-mail or something. Sorry for bothring you, but I just can’t seem to find the solution to this problem
Egert
Don’t worry Egbert – I’d be happy to help.
It remains weird that you’re not getting an IP address – specially when you’re using a straight Ethernet cable, and you already tested that DHCP works.
The fact that you assign an IP address doesn’t mean it works, as you’ve found out already.
Did you modify DHCPAddressPrinter for your Ethernet Shield? And did you match the same Ethernet libraries for both sketches? “Ethernet.h” is specific for the “original” Ethernet-Shield by Arduino, which is not the same as the Ethernet Shield used in this article.
Make sure both sketches use the same library …
hans
Hai, can this project continuance with sending an email alert when the temperature and humidity reach the threshold value?
D_N
Hi D_N,
of course it can, you’d just had to add a little code to send messages with certain conditions.
Sending an email however will be the tricky part. I have yet to try do that. Most libraries are big and chew a lot of memory.
I did however found some useful info at StackEchange that might help you get started.
For example, there are a few libraries that support this,…
Maybe better, would be using the Temboo service (main page).
As far as I can see, this service is free, Arduino oriented, and super lightweight.
hans
can i change the ENC28J60 with Ethernet Shield V2.0?
D_N
I would assume so, however you will need to change the library to “Ethernet.h”.
Theoretically that should work – some very minor changes might be needed, but unfortunately I do not have such a shield laying around to test.
hans
Can’t reply anymore… I think you’ve found the source of my problem, I’m using what i’d say is the “original” ethernet shield (http://www.sivava.com/image/cache/data/products/arduino/k02-arduino/950-k02-arduino-1-600×600.jpg). And I didn’t add the arduino_uip library to the DHCPaddressprinter, that’s probably the reason, it works. Is it possible to make the code work without arduino_uip? I don’t know how I overlooked the fact you’re using a different ethernet shield:(
Egert
I did some google’ing and found something that worked, i mixed it with your code and got it to write to the database every 5 seconds. Now all I need is to get the final code to work, although I don’t have any time left to work on this for today, I’ll post the code I used below and try to get the final step working tomorrow. Thank you very much for your help so far, I’ll be sure to ask again if I were to run into more problems.
Egert
No worries …
It could be possible to simply replace “UIPEthernet.h” with “Ethernet.h” (in the sketch in this article) as it is almost a 100% drop-in replacement for ‘Ethernet.h”. So the should mostly be compatible.
hans
Hi, my name is george, Im not getting any change in my localhost when i tried to send dump information from my arduino UNO, but when i did it manually it actually change well… this is my sketch
All my php are the same as the examples except no password on dbconnect… this is what i get on serial terminal
IP Address : 192.168.1.76
Subnet Mask : 255.255.255.0
Default Gateway IP: 192.168.1.254
DNS Server IP : 192.168.1.254
-> Connected
GET /add_data.php?serial=288884820500006C&&temperature=12.3 HTTP/1.1
Host: 192.168.1.66
Connection: close
and it keeps conecting on and on… but nothing change on the localhost unless i do it manually
any help me please? :(
George
Hi George!
Let’s see if we can get you started then …
…
First of all,… do you mean your Apache/MySQL/PHP (AMP) server (192.168.1.66) when you say “localhost”?
Now for your problem, and bare with me on this one since I do not have my equipment anywhere near to test, and it’s still early in the morning for me ;
;
– Try a single “&” in this section – I don’t think it will make a difference, but worth a try:
client.print("&&");Serial.print("&&");
– I assume your AMP server works with port 80.
What does the “manual” link look like?
hans
first, thanks for the fast reply, it means a lot for me
and yes, im using wamp and my localhost belong to that IP
i’ve change the && to & already and nothing…
the server works just fine by itself, i already check the port and its 80, i deactivated the firewall too (just in case) but nothing
when i change the database manually the link is:
http://192.168.1.66/add_data.php?serial=288884820500006C&&temperature=12.3
and it works
also using just one “&”
but using arduino nothing happend…
George
Hi George,
no problem, you just go lucky with your timing haha .
.
Did you check out the log files of WampServer (I believe they are in C:\wamp\logs) ?
In case you don’t see anything in the log files, check if error logging is enabled (see this StackOverflow message).
Since another user ran into this issue:
Are you using the ENC28J60 shield? Or the “original” Arduino Ethernet shield? They both require a different library.
This is probably not the issue as you seem to get a connection – just checking anyway.
We must be overlooking something simple, as usual, especially since you’re using the most basic way of connecting and the manual link seems to work just fine.
When trying the manual link: did you do this with copy and paste? Meaning: Copy the serial output and pasting it in your browser after “http://192.168.1.66”. Just to make 100000% sure we didn’t overlook a typo.
hans
i’m using ENC28J60, using latest UIPethernet library
alright… im checking the error log but… i don’t understand all this sentences, i found something specially weird in the apache error log
[Tue Jun 23 04:55:28.421628 2015] [authz_core:error] [pid 5180:tid 820] [client 192.168.1.76:1050] AH01630: client denied by server configuration: C:/wamp/www/add_data.php
could that be the problem?
i copy and paste the serial output and it change the values, but not with arduino
George
That most certainly would be a problem yes.
Seems WAMP is only allowing connections from itself (the computer it’s installed on).
There can be several reason why this could be the case.
One thing I recall with WampServer is that the menu has a “Put online” option. I’d try that one first.
The following options are manual, so I’m not sure how well they work:
Check the Apache config file (httpd.conf) and find the line that says:
or
and change it to
I think you can access the httpd.conf from the WampServer menu -> Apache -> httpd.conf.
There might be a section there as well that says
change it to
or a section that says
and change it to (assuming your computer has a fixed IP address):
hans
OMG! it finally works! i don’t actually change the listen but your suggestion about the log drive me to the right answer!
i changed the phpmyadmin.conf like this:
and the httpd.config like this (find this snippet):
that’s all the changes!
here is the details to find the directories:
https://www.hieule.info/web/solve-the-denied-access-problem-when-using-wamp-server-2-on-windows-8/
HANS thank you! I was stuck in this for weeks
god bless you!
George
Awesome George!
Glad to hear you’ve got it to work – and thank you very much for posting the solution!
hans
Hello everyone , I know that now this post is dated , but they are really desperate . In practice one year ago I followed this clear guidance and I managed to do my project . Unfortunately for my distraction I deleted from the server the 3 files add_data.php – dbconnect.php – review_data.php . I thought no problem , but following the guidance I can no longer do the work project . All parameters have them checked a hundred times , everything looks good .
When I type in the browser http : //mywebserver/add_data.php ? Serial = 288884820500006b & temperature = 20.79 adds nothing .
In any case, I inform you that the project worked from January until mid-July and 24 hours on 24 without any problem . The fault was mine that I mistakenly deleted the 3 files that I created . Some idea?
joseph
Hi Joseph!
I would check a few things;
1) Depending on your server, make sure you get access from “outside” the server.
For example: WAMP Server (Windows) by default only allows access when you’re working on the server itself and you’ll have to set it to “online” to be able to access the webserver from another computer (or Arduino).
2) You already checked the obvious ones …
– Username and password to access the DB (in dbconnect.php).
– Errors in your webserver log.
– Proper SQL statement matching your table structure.
Just a few first guesses without knowing too much about your setup. Feel free to get back with more info/questions.
hans
hello everyone, sorry for my bad english. i have a problem. in my access log of apache
192.168.1.100 – – [14/Aug/2015:20:26:40 -0500] “GET /add_data.php/search?serial=288884820500006C&&temperature=12.3 HTTP/1.1” 403 310
but in my browser put
192.168.1.100/add_data.php
but no show nothing i try of change values of wamp in the directory but no work. im tired jajaja
josue
Hi Josue!
So if I understand you right; you can add data but when calling “192.168.1.100/add_data.php” it will not show anything.
Which is expected behavior.
Maybe I’m wrong (it’s early in the morning here), but to review data you’d need to call “review_data.php”.
hans
Hi hans.
I am using the example, but I have not the sensor, so he put default values, the program sends data correctly, check the file for Apache access log and appears “192.168.1.100 – – [14/Aug/2015:20:26:40 -0500] “GET /add_data.php/serial=288884820500006C&&temperature=12.3 HTTP/1.1″ 403 310” but by placing in browser It 192.168.1.100/add_data.PHP not show me the variables, which are sent with Arduino. Use wampserver
Josue
Hi Josue,
It’s hard to make head-or-tales from what you’re writing … sorry for the language barrier …
If you enter http://192.168.1.100/add_data.PHP something like this:
http://192.168.1.100/add_data.php/serial=288884820500006C&&temperature=12.3
Then data should be added, however your Apache is saying “403” which means that it’s forbidden to call that URL.
Could it be that you have not set Wamp to “online” (see this comment as well)?
hans
Hi Hans.
thanks for the help , but still I can not receive data , but changed the status of packages sent ,
192.168.1.68 – – [ 17 / Aug / 2015 : 20: 35: 34 -0500 ] “GET /add_data.php?serial=288&&temperature=1 HTTP / 1.1 ” 200 2472
This is the code
byte mac[] = { 0x54, 0x34, 0x41, 0x30, 0x30, 0x31 };void setup() {Serial.println("Tweaking4All.com - Temperature Drone - v2.0");Serial.println("-=-=-=-=-=-=-=-=-=-=-=-=-=-=-=-=-=-=-=-=-=-\n");Serial.print("IP Address : ");Serial.print("Subnet Mask : ");Serial.print("Default Gateway IP: ");Serial.print("DNS Server IP : ");void loop() {if (client.connect(server, 80)) {Serial.println("-> Connected");client.print("GET /add_data.php?");Serial.print("GET /add_data.php?");client.print("serial=");Serial.print("serial=");client.print("288");Serial.print("288");client.print("&&");Serial.print("&&");client.print("temperature=");Serial.print("temperature=");client.print("1");Serial.print("13");client.println(" HTTP/1.1");Serial.println(" HTTP/1.1");client.println("Host: 192.168.1.115");Serial.println("Host: 192.168.1.115");client.println("Connection: close");Serial.println("Connection: close");else {Serial.println("--> connection failed/n");and the code PHP is this
<?php
$serial=$_GET[“serial=”];
$tem=$_GET[“temperature=”];
echo “datos “.$tem.”<br>”;
echo “datos “.$serial;
?>
http://192.168.1.115/add_data.php ? put this in the browser? but shows nothing
Josué
Hi Josue!
Well, at least Apache now reports that the link did work (code: 200 = OK).
add_data.php should indeed be on the server. Is your browser displaying anything when you do it manually? (ie. enter http://192.168.1.115/add_data.php?serial=288&&temperature=1)
You write it shows nothing, maybe modify it a little bit to:
hans
Hi Hans.
displays data if I put everything manually
so I have no idea what it does .
and turn off the firewall, change the apache port but nothing works
Josué
Did you check the database to see if the record is being added?
hans
Hi Hans.
data is added if I put the url so http://192.168.1.115/add_data.php?serial=288&&temperature=1 , but if I put the url http://192.168.1.115/add_data.php , inserts nothing
Josué
Hi Hans, finally works, thks for all, the firewall was a problem i think. Saludos desde México.
Josue
Hi Josue!
http://192.168.1.115/add_data.php should actually not insert data if nothing is added (like “?serial=288&&temperature=1”), as there is no data.
But it seems your problem was related to something else … glad you’ve got it working now …
Greeting from the Netherlands
hans
[…] is part of my little ongoing project of learning with the Arduino. I want to give a mention to Tweaking4all’s guide to PHP, SQL and Arduino, because I started out using it as a base for this section of the project, though I altered a few […]
Thanks for mentioning Tweaking4All :-)
hans
Admin moved this question to the Arduino Forum due to it’s size.
Tanja
Hi Tanja,
sorry that I had to move your question to the Forum. Unfortunately, all the code made this a rather large comment.
It seemed better to put this in the Forum.
hans
Dear Norbert,
I am new to Ethernet. I bought the ENC28J60, and works fine for what you are doing.
But I want to consult a registry in a mysql database and I did not find anything. Would you mind helping me? What do I have to write?
Greetings from Spain
Arnau
Hi Arnau,
Norbert is the guy that created the library for the ENC28J60, you can find him at GitHub.
As for consulting a MySQL database, I assume you mean retrieving data from the database (?), you would need to either include a MySQL library (huge) or prepare a PHP page that provides the data with for example a GET. So a PHP page that would generate the needed data with something like http://mywebsite.com/getdata.php?some=this&anotherthing=that.
This is quite the opposite of what we’re doing here.
hans
Hi Hans,
I am sorry for the confusion. Yes, I meant retrieving data from the database, I am going to expain you what I am doing:
I am using an NFC reader to open a door, so I have to check if the NFC card has access or not. Do you have any example of a GET PHP? As you can see I am a bit noob with PHP.
I know it is quite opposite, but it is the best tutorial I found on the net.
Arnau
I see … well thanks for the compliment …
…
So … ehm, I probably would need a little bit more of what you’re trying to do.
So you have an Arduino with NFC reader, and you want the Arduino to consult a MySQL database to see if it’s OK to open the door?
So you have the NFC code, which we need to send to MySQL, and then wait for a positive or negative reply?
Sending the code would be the same as above (instead of the Temperature), with or without logging access attempts in the MySQL database. Just catching the “answer” would be trickier on the Arduino end (I have yet to test something like that).
In PHP we could do a query with the provided code:
This will result in a number. If it is zero then there are no valid NFC codes.
I’m just assuming a simple table: table_with_valid_nfcs, with 2 fields, “nfc_key” and “nfc_user“.
PHP could look something like this, lets call this file verify_nfc.php:
The link would then look something like this:
And the result should be a file only containing a single number, and zero if it didn’t work or no valid “user” could be found.
Next step is to capture the output in the Arduino. If the resulting number >0 then you know it’s OK to open the door.
First of all: I did throw this code together rather quickly and it has not been tested.
Second of all: I have yet to test reading data with the Arduino from a server.
hans
Hi Hans,
I tried the code and works! Thank you!
Do you know how can I send or capture the number and receive it in my Arduino?
Thank you a lot. If you prefer, we can contact by email and explain you widely.
Arnau
First of all: I just noticed I gave you the wrong link for Norbert …
He created UIPEthernet, a almost perfect replacement for the official Ethernet Library for Arduino.
As for receiving data: I have not used/tested that.
You might have to start looking in the examples that came with UIPEthernet or Google something like “Arduino Ethernet read data from web page“. This Arduino Forum Topic seems useful.
I unfortunately do not have my Arduino gear nearby, otherwise I’d do a few tests.
If you find something; please let me know. I’d be interested as well.
hans
Ok, got it. I will try and see what I find. Thanks
Arnau
If I am going to push the RFID data from arduino to Wampserver, which part of the source code should I change? I really need some advises here.
TSX
Hi TSX,
If you scroll a few comments back, then you’ll see some basic info to get started. (Arnau is basically having the same question).
It might be an idea to start a forum topic for this too though (leaving a link to the topic here, in case others are interested as well of course).
hans
Thanks for replying, I think I’ll consider about making a new topic since this is my first time of using arduino.
TSX
Feel free to post the link here as well.
hans
Okay, I’m back again!
I get error in compiling when combining the web client library and rfid library. This is the one that I have done. I need some advises here.
TSX
Hi TSX,
what is the error message you’re getting?
hans
This is what I get. I’m trying to make the arduino to read the RFID tag and send it to my database in Wampserver.
tsx111
Ah now I see what’s going wrong!
You did not define a function called loop().
Each Arduino sketch must have a
and a
function.
hans
I have done some editing but it couldn’t read the RFID tag.
(code moved to the forum topic Arduino and RFID).
tsx111
I think it might be a good idea to start a forum topic on this one. It’s getting a bit out of hand with the sources, and they are not all that relevant for this topic.
I started a topic in the forum for that: link.
hans
I am not able to receive the data from temperature sensors into my table
the column is blank.Its just not getting filled.Please help
yash
Hi Yash,
I’d love to help, but without any further information I can’t really do anything.
Please start a new topic on out Arduino Forum, and post you sketch and PHP code (to avoid that the comment section gets out of hand).
hans
Ok so, manualy pasting link from browser (e.g. “192.168.x.x/add_data.php?serial=288884820500006b&temperature=20.79
work just fine and add data to chart which i can view by 192.168.x.x/review_data.php, but when request for adding data to chart is sent by arduino wamp server is returning message https://ctrlv.cz/LmyR
Krczk
Hi Krczk,
you forgot to set the WAMP Server to “online”.
Right now you can only access the “webserver” from the computer it’s running on. Access from other computers is not allow, unless you switch it to “online” (if I recall correctly).
See also this comment in case that didn’t work: link.
hans
Oh, very nice, now it´s working. Thank you
Krczk
Awesome!
hans
Hi, first of all I would like to thank you for putting on this tutorial, it got the ball rolling for a project I am doing.
I am trying to adapt your tutorial for a simple project I’m doing which consists in, having Arduino sending an LDR value to a simple web-page I created.
Arduino is connecting to the website through MAMP server but, I don’t know how (I didn’t quite understand) how to make a php script on the web-server to receive, understand and display the results on the web-site in the HTML class below instead of the dummy value ‘999’ in the paragraph.
Also, storing the data is not needed, so, a SQL database is not needed (I assume). Below is the setup I am using, I didn’t include the CSS here, I guess it’s not important for this purpose, but if you ask I will be happy to share :)
HTML Script:
Arduino sketch:
kcardona
Hi Kcardona,
In this article we use a PUSH method, which means that this would not work for your setup.
Instead you’d be better off using the PULL method as described here: Arduino Ethernet – Pulling data from your Arduino.
See, you can place your web “page” on the Arduino and retrieve the data this way.
Or … you could modify the code so it just returns a number and with JavaScript (or PHP) embed it into your webpage.
I have not done much with this, but Google showed me an example:
file_get_contents('http://<IP Address Arduino>');I have not tested this, but it could be something like this (assuming you run the PULL version on your Arduino, and removed all XML from the sketch – so it ONLY returns the value of the LDR and nothing else):
Where 192.168.1.10 is the IP Address of your Arduino.
hans
I understand what you are telling me there and you’re right, but, the sketch I uploaded is a simple one but the end result of this project will be to present the data as a realtime graph which will will be putting a lot of stress on Arduino, that is why I opted to use a PC as my web server.
All I need to know is, how can the contents of my HTML <p> tag be substituted through a PHP script, with a real-time upload from Arduino.
kcardona
Somehow I need to use the $_POST method in my php script according to this http://www.w3schools.com/php/php_forms.asp
kcardona
You can read the value passed in the URL with
But … if you’d open that page on your PC, it would not have a value. With $_POST that would not work either.
It would only have a value when the Arduino would call for that page, and pass the LDR value. The PC would not know this value, unless you use a database, or pull data in like I showed in the previous answer.
To show a graph, even realtime, you’d probably be best off with the use of a database that is constantly being filled by the Arduino. Your page, the one you’re looking at on your PC, should constantly try to get fresh data from the database.
The database call could be limited to the last 10 results for example with:
$result = mysql_query("SELECT * FROM temperature ORDER BY id ASC LIMIT 10");This code would display all (database) data in your HTML:
But … maybe I’m not quite understanding your question, in that case: my apologies.
As far as I understand you have an Arduino, with LDR, hooked to Ethernet.
You want a webpage that shows the LDR values over time, as recent and quick as possible (almost realtime).
In that case the database option is probably the only well working option.
In JavaScript (for example with jQuery) you could refresh the data frequently by loading new data into the <DIV>. But that’s probably a topic that we should move to the Forum.
hans
Hans, I’m taking your advice and I’m going to use a database. I created a database ‘results’ manually using phpMyAdmin through MAMP with a table called ‘LDR’ having rows ldr_value and sec and I added a dummy row with both values set to 0.
I tried to add a row manually using
but the browser returned an error: The website encountered an error while retrieving http://localhost/add_data.php?value=999&sec=999. It may be down for maintenance or configured incorrectly.
Obviously, MAMP is up and running. These are the php scripts I added in the root folder of the server, review_data was not added as for now I am monitoring the database manually.
dbconnect:
add_data:
I also added the header part in the index.html
kcardona
First thing is your add_data.php: it loads nothing after submitting the data.
Uncomment:
header("review_data.php");Second problem is that your index.html will probably not execute it’s PHP code.
Save it as index.php instead.
Third problem is that your index .html (to be called index.php) does not finish with
Finally: I would start with a simple HTML document to make your server is actually running. Something like this test.html
hans
</body> and </html> were not missing I just didn’t paste all the code, I found the issue with my error, very simple fix and frustrating when I consider what I did.
I had a ‘;’ missing in the db_connect script just right after $db = “results”
kcardona
one last thing, I am using the below for my add_data script path:
client.print("GET MAC_HD/Users/kcardona/Desktop/Web_App/add_data.php?");But my SQL database is not updating, am I suing the right approach ?
I tried to do a manual data insert with the url link below and it worked so that way I confirmed that my scripts are running correctly:
kcardona
below is the server code to update a fixed data.
kcardona
Hi Kcardona,
Thank you for posting your solution.
I’m a little surprised about the path to your add_data.php file (MAC_HD/Users/kcardona/Desktop/Web_App/add_data.php).
Seems you placed the document on your desktop in the directory “Web-App”.
Usually MAMP htdocs are located in “/Applications/MAMP/htdocs/” (see MAMP documentation of the MAMP Pro documentation), so that files should have been accessed as http://localhost:8888/add_data.php when accessed for testing on your Mac itself.
OR, on the Arduino, “localhost” should be replaced with the IP address of the Mac you’re using. For example http://192.168.1.106:8888/add_data.php.
Port 8888 seems to be the default port for MAMP.
Not sure if this will be useful to you, just thought I’d mention it ….
hans
Glad you found the problem!
Happens to the best of us …
hans
I used your php files on my page with a slight modified example wifi client on an ESP8266-12e on a NODEMCU DEVKIT 1.0. My DS18B20 has gnd and 3.3v from those outs on the board, and the data pin is connected to d3(gpio 0). Polls/posts every minute. All done in Arduino 1.6.6 with ESP libraries installed, posting to a namecheap hosted page. I did modify review_data.php line 43 to read
$result = mysql_query("SELECT * FROM temperature ORDER BY id DESC LIMIT 30");so that it would show most recent on top, and only show the last half hour of results.
Jamie
Awesome! Thanks for sharing Jamie!
I have a WiFi shield laying around, but have yet to play with it.
hans
Hi Hans,
Thanks for your tutorial that really help me very much. I am confusing about url of add_data.php file on server . I succeed on localhost because add_data.php was located on htdocs on my xampp, but on server i dont know how to make a right url. The location of add_data.php file on server is /var/www/wsm/add_data.php. Sorry about my bad english.
Jack
Hi Jack,
It will probably be something like:
Where “192.168.1.123″ is the IP address of your computer (in your local network).
I also assumed that “wsm” is the “website” you’ve created with XAMPP.
I have not worked much with XMAPP, but some AMP servers need to be set “online” for the page to be reachable from another computer.
Also: the IP address only works within you home network. So that will not work when you try to access it from the Internet (ie. from the outside world). For that to work you will need port forwarding in your router/modem.
hans
did you try raspberry pi to make the webserver and connect to the arduino so that it will be no longer the need of the ethernet? how can I send data without it? thank you
it will be a great help!
adam
Hi Adam!
I have not tried that yet, but in essence Raspberry Pi will run Linux, and the Arduino will be connected over USB as a serial port (com-port).
Talking to the serial port shouldn’t be too hard, but I’m afraid you’ll need an “in-the-middle” program to capture the data and push it into the MySQL database that is running on the Raspberry Pi. It will take a little work to get that done.
Additionally; the Raspberry Pi has it’s own PIO pins, so you probably would not even need an Arduino for that.
However, this would become a whole new different project if we’d pursue that approach.
hans
Hans is right, this would be better served using the Pi alone.You could load light Raspbian & C++ implementation of the sketch and not have to deal with the hardware troubles of having several different modules stacked together, and the additional software to interpret Arduino -> Pi without ethernet.
Looking into this just a little, http://wiringpi.com/ seems to be the C++ library to use GPIO. They mention using the arduino as a GPIO expander in the abstract, but unless you are filled up on the GPIO I don’t think I would bother.
If C++ is not your thing, Adafruit has a tutorial to read the D18b20 in Python, after that it’s a simple task to point that to the webserver.
For my temp logger, I chose the ESP8266 because 7 bucks gets a NODEMCU. Onboard wifi, ftdi and voltage regulator means just plug into usb power and go. And if something smokes it, I am out 7 bucks. Word of warning to anyone that plays with the ESP, drop a biggish cap 100uF across the supply rails to kill any spikes in the supply, I killed one esp with a cheap usb charger.
Jamie
Thanks Jamie!
I had not read too much about the ESP8266 yet, but it sure looks cool for just a few bucks! I better order a few …
What do you use for programming it?
hans
Can the ESP8266 be used standalone as well?
hans
Man that little thing looks awesome.
Look at this: AdaFruit Info.
hans
And you can use the Arduino IDE … (see this AdaFruit link)
hans
It really fits the bill for simple projects. They will run a very simple webserver, and read a sensor or two. They are a bit fragile, but that can be worked around. For a few bucks, they rock. I have both the ESP alone, and the NODEMCU devkit 1.0 breakout. The breakout makes them really spectacular standalone. Just throw a Cap at the p/s rails and it’s ready to deploy.
The Arduino IDE is the easy way to program them. We are all familiar with that, and they have a load of example sketches.
Cut and paste my post from last month into the IDE and with the appropriate fields (ssid/password/webserver addr) it should fire right up. I am running one right now reporting to http://boat.750carbs.com/review_data.php I modded it to respond in degrees F, because my family doesn’t speak C. And the Sensor Serial field has been modified to report wifi connection failures so I can monitor the dropouts.
I see you have looked at the Adafruit Huzzah, I went with the NODEMCU devkit for the microusb interface. http://www.ebay.com/itm/121811389556 this is the seller I have used, gone up 2 bucks per unit since my first buy.
Jamie
Thanks Jamie!
I’ll take a look at the one you got, see how I can use that one! Looks awesome for small projects indeed!
hans
hi, i’m trying your code on a free hosting server, but when i try open the add_data.php file i got an error like this
“Access denied for user ‘root’@’localhost’ (using password: NO)”
help me find the problem please..
when i first run the code it ask me to change mysql to mysqli, after i change it, i got that error. i have no problem when opening review_data.php file
Feri
Hi Feri,
I removed your other comments (they seemed duplicates).
As for the access denied: you will need to setup a proper username/password on your MySQL database. Root will definitely not work on most host servers. Root is however often used on a local (at home) server.
To set up a username, you can use PHPMyAdmin.
hans
sorry about the duplicates, i think it’s not sent… thanks for the
answer, i have found the error, its because the code use mysqli , but
for the error message i use mysql_error()..
but now i have another problem, i hope you or anyone here can help me..
for
my project i use arduino, ethernet shield, a router, and a gsm modem. i
want to send my data to database, the data will be sent to different
table based on sim card attached on gsm modem. is it possible to read
sim card number used in gsm modem? or can i use ip address?
feri
Hi Feri,
I have not experimented with GSM modems yet, but I assume you have to use the IP address.
Not sure what you mean with reading sim card number?
hans
sorry if i’m not clear, i mean is how to know the sim card number… i have searched about ip address, i think i cant use it because it changes when i disconnect and connect it again.
feri
Hi Feri,
I don’t think you could eve do anything with the SIM card number, you would need the IP address.
What you can do, since the IP address changes each time you disconnect/connect, is use a service like NoIP (they say its free) or DynDNS (better supported but not free). Ideally your router should support one of these 2.
Both services link your changing IP address to a domain name that you can define on their websites.
Your router has to be setup properly, to refresh the IP address when it changes, and most modern routers at least support DynDNS.
hans
Hello guys,
I am looking for someone who help me with my Arduino+Android project. I want to send data from arduino (Arduino Uno+Ethernet shield+Sound/Temperature sensors+button like doorbell) to the virtual server with PHP. My vision is – arduino sends measured data to the server, there will be caught and processed with PHP script. I dont need save data into SQL table, only catch and process it for next Android processing. How can I achieve this goals (send data, catch data, process data) ? Can anybody help me with this? Do you have some tutorial or example? Thank you very much.
JohnyJJ
Hi JohnyJJ,
That does sound like an interesting project!
First of all, I would recommend starting a topic in our forum. Once you started a topic there, please post the link here for those interested.
When thinking about what you’d like to do, I can’t help wondering what kind of processing you’d like on the Android device. If you plan to write an app for that purpose (on the Android device), then I think buffering a little bit of the data in a database might still be a good thing to do, to overlap time differences. Unless, … you have you Android app pull data straight from the Arduino (you’d have to open some ports on your router for “public” access – ie. access outside of your home/business) which might be more effective/realtime.
hans
how i can check weather a file is available or not in the server?
i want user to input number and that number will be generated as file name in the server. ex: myserver.com/123.php if its available the lcd will show “id available?
feri
I would assume that your webserver, if setup right, would return a 404 error. That would be one way.
Another way would be generating the content with PHP, by using 1 file only and passing a parameter which you test against data in a database.
For example http://myserver/checkid.php?id=123, in that case use $_GET[‘id’] to read the value. (not 100% secure though, but your method wouldn’t be very secure either)
hans
how can i know it return an error?
i’m tried using “if (client.connect(server, 80)) {” and set the server as myserver.com/123.php. but the value always true, my lcd always show “id available”
and if i use your method, how can the arduino know whether the id is available or not in the database?
feri
It probably returns a 404 document, which means: it did connect to the server and did get a reply – even though it’s not the reply you were hoping for.
I think this post in the Arduino Forum shows a little bit more insight in what you’re looking for.
It show an example of a request that fails (like in your case it either shows 400 or 404), and it shows how to read data from a webserver.
I hope this helps.
hans
[…] //www.tweaking4all.com/hardware/arduino/arduino-ethernet-data-push/ […]
Hi….
I didt have sensors..So..i am just sending data by putting values in arduino code…But its not working..
Firstly..I use http://yourserver/add_data.php?serial=288884820500006b&temperature=20.79
This successfully save data in database…But its not sending from arduino ..waiting for ur reply
This is arduino code.
Abdullah
This is what showing on serial monitor of arduino..
But data is not showing at database
Tweaking4All.com – Temperature Drone – v2.0
-=-=-=-=-=-=-=-=-=-=-=-=-=-=-=-=-=-=-=-=-=-
IP Address : 192.168.10.11
Subnet Mask : 255.255.255.0
Default Gateway IP: 192.168.10.1
DNS Server IP : 192.168.10.1
-> Connected
-> Connected
-> Connected
-> Connected
-> Connected
-> Connected
Abdullah
You’re not saying anything about the webserver software you’re using, so I’ll just assume you have something like WAMPserver running on a Windows machine?
First thing to try the link on a different computer (so not the computer where the webserver is running).
Most common issues happen when folks try the link on the same computer where the webserver is running, and that usually works well. However, for another computer (or the Arduino in this case) to be allowed to do this, you’d need to set the webserver open to other computers in your network.
If I recall correctly, with WAMPServer as example, you’d need to set it to “online” (not to be confused with “the Internet”). It allows access to the webpages by other computers …
hans
Yeah..I am using wampserver on laptop…I tried to put data from arduino from different laptop and wampserver is running on different computer. but its not working. I also make sure that wampser is online..BY clicking on put online.
.Plz..just say..something..I am doing wrong..
Abdullah
Could it be that you have a firewall running on the computer that is running WAMPServer?
Putting WAMPServer to “online” should already do the trick.
Well, at least we know in what direction to start looking … the server is not accessible by other computers.
Double check and make sure that:
– You use the right port number when trying to access the WAMPServer (as configured in WAMPServer)
– Both computers are in the same network so they can see each other.
hans
Tnx Bro…I have done it.The issue was….I am not putting right IP. Tnx again…
Now..i have to do back communication from From DATABASE to arduino…Can u guide me..How can i do that..? waiting for your reply
Abdullah
Good to hear it works now …
Reading a webpage, is something I’m afraid would take another article to write – which I might do in the near future.
In the meanwhile you might find some good help in this Arduino Forum post or in one of the examples included with the library.
hans
Tnx bro
Abdullah
You’re welcome – wish I could have been more helpful.
hans
First of all, thanks a lot for posting in detail. This will be a real help for my thesis.
I have a query. I use a W5100 Ethernet Shield. Then, will the UIPEthernet library work for me?
Thanks in advance
Sami
Hi Sami,
As far as I know, the W5100 uses the standard “ethernet” library, which comes with the Arduino IDE.
UIPEthernet is more specific for the ENC28J60 and could be sen as an almost drop-in replacement for the standard ethernet library.
I have not been able to test this (I don’t own a W5100), but you can probably just replace UIPEthernet with the standard Ethernet library.
Maybe other can chime in that did use the W5100.
hans
hi……
i need to store the LDR sensor values. how?
D.Maheswari
Hi!
I’m not sure what you’re asking for.
I assume you’re using one or more LDR’s and you wish to store the values read in a database, like I’ve done here with a temperature sensor?
Since this is rather unrelated to this article; please start a topic in the forum.
hans
First of all thanks for the great tutorial.
When connecting my 1-wire sensors I got strange output for the 1-wire address – probably found one minor error:
In line 134 and 139 you are adding a leading zero if the byte in adr[counter] is <10.
If the byte is 0x0C you won’t add the leading 0.
It should be addr[counter]<17
Thomas
Thanks Thomas!
And … good catch. It’s been a while that I wrote this code, I probably meant <0x10 and used 10 instead. So yes, <17 would be the correct value. I’ll update the code
hans
hello , can you help me to fix my problem ?i try to send a data to my database but no one display… i use arduino uno,ethernet shield and xampp for database
#include<SPI.h>
#include<Ethernet.h>
byte mac[] = {0xDE, 0xAD, 0xBE, 0xEF, 0xFE, 0xED};
byte ip[] = {192, 168, 0, 101};
byte server[] = {192, 168, 0, 100};
byte subnet[] = {254, 254, 254, 0};
EthernetClient client;
float sensor1 = 0;
float sensor2 = 0;
float sensor3 = 0;
void setup() {
Ethernet.begin(mac, ip, server, subnet);
Serial.begin(9600);
}
…
include(“connection.php”);
$sensor1 = $_GET[“sensor1”];
$sensor2 = $_GET[“sensor2”];
$sensor3 = $_GET[“sensor3”];
$sql_insert = “insert into panel (sensor1, sensor2, sensor3) values (‘”.$sensor1.”‘, ‘”.$sensor2.”‘, ‘”.$sensor3.”‘)”;
mysqli_query($sql_insert);
if($sql_insert)
{
echo “connection success”;
}
else
{
echo “connection failed”;
}
?>
marlo
Hi Marlo,
at first glance your code looks OK. Did you try entering the link manually on a different computer? (ie. not the computer XAMPP is running on)
For example, enter this in your browser:
and then check for error messages or check the database if it did get stored.
Some AMP setups by default only work locally (WampServer is one of those), meaning it only works when you access the webpage from a browser on the same computer as where you have XAMPP running. So you might want to check if it’s set to accessible from other computer (sometimes referred to as “online”).
Also, are you sure your subnet is correct? You’re using 254.254.254.0, where as 255.255.255.0 is more common.
hans
thank you for answering.. i try it to input manually and it send to my
database but my problem are when i run it to my arduino only the id, and
time are printed?
here my new code
#include <SPI.h> #include <Ethernet.h>... if (client.connect(server, 80)) { Serial.println("connected");
sensor1 = sensor3 + 5; sensor2 = sensor1 + 5; sensor3 = sensor2 + 5; client.println("GET /project/data.php?"); client.print("sensor1="); client.print(sensor1); client.print("&sensor2="); client.print(sensor2); client.print("&sensor3"); client.print(sensor3); client.println("HTTP/1.1"); client.println("Host: 192.168.0.100"); client.println("Connection: close"); ...
marlo
Try using “&&” instead of a single “&”. Something like this:
p.s. please post only relevant code, otherwise this pages becomes super long and unreadable for other.
Optionally start a topic in the forum (I monitor the forum constantly).
hans
You could try adding an “echo” in your PHP code, just to see if ANY data is passed on …
ie:
hans
sorry sir… same output ,only the id, and time are printed?
marlo
when i assign a value in arduino it can send to my database..what are the possible problem sir?
client.println(“GET /project/data.php?sensor=300&sensor2=500&sensor3=100”);
marlo
Did you try:
hans
[…] Usamos Push: Arduino se comunica con el servidor para mandarle los datos //www.tweaking4all.com/hardware/arduino/arduino-ethernet-data-push/ […]
[…] //www.tweaking4all.com/hardware/arduino/arduino-ethernet-data-push/ […]
Hi,
I am trying to follow the tutorial but I am getting lots of errors such as:
Deprecated: mysql_query(): The mysql extension is deprecated and will be removed in the future: use mysqli or PDO instead in C:\wamp\www\review_data.php on line 43
is there an updated version of the tutorial anywhere ?
Thanks
Stuart
Acestu
Hi Stuart,
the use of mysql_query() and mysqli_query() depends on the PHP version you’re using.
mysqli_query() is pushed for in recent PHP version.
See this comment for details for your newer PHP version.
Hope this helps.
hans
Hi,
thank you very much for this great page – I did learn a lot of new things here! With some parts of the code I did try to upload integers and decimals to a mysql-database. It worked fine!
In addition I developped a code for some measurements – the analysis of the data and showing it at the serial monitor works as well!
And now my problem: I wanted to merge these two codes and send my data to the webspace. But the code crashes, not even the serial monitor is working properly any more. Unfortunately the “smaller” codes are working fine, and as far as I could read you do not want full codes to be uploaded. Would someone of you be willing to help me with my “full” code?
Thank you very much!
Christoph
Hello,
I tried to use a function to show my problem:
Typically the code is working properly until it reaches
This decimal-number is partly printed, the point is the last character I do see in the serial monitor. The variable itself is properly avaiable in the function – if I do add the “Serial.print”-lines several times, the data is written the first times properly.
Theoretically I would not have to print all these lines but if I do leave away some parts of the code, the controller again crashes several lines avove the “client.connect”-part.
Has anybody had a similar problem?
Thanks a lot!
Christoph
Hi Christoph,
As far as I recall, printing float/double variables can cause issues when using print and println.
See for example this topic in the Arduino forum.
Hope this helps.
hans
Hello,
everything works perfectly with your codes php and mysql database,thanks!
I want to update the 2 values of the sensors and not add 2 new lines every single time. I saw a previous post with 2 changes that had to be done: a)Remove the field ID from the table,b) Rewrite the query in adddata.php with the UPDATE staff.
I did it and it shows this error: Warning: mysql_fetch_array() expects parameter 1 to be resource, boolean given in C:\wamp64\www\review_data.php on line 49
Is there any other change to be made in other php files or the arduino code so as for this to work perfectly?
Thanks in advance!
Nick
Nick
Hi Nick,
I’m not 100% sure wha you’re trying to do. Do I understand this correctly that you’d like to submit 2 temperature readings and submit them into one table row? Something like that each table row has an ID, value1, value2, and date/time?
hans
Let me explain,
I use 2 sensors just like you,and I would like to update the 2 records every time with the new values , so as to have totally 2 only tables to be shown continuously at the server ,and not add 2 new tables every single time .
At a previous post(12 Jul 14) you suggested 2 changes that i made, and it showed the error above.What are any other changes that should be made in php code or arduino code?
Nick
Oh I see – sorry for not getting that right away (still needed more coffee I guess to wake up).
I’d create two rows in the table, one with ID=1, and one with ID=2.
The you can use the UPDATE statement.
For example:
You can then use the REPLACE statement as if it’s an UPDATE statement (if no matching sensor ID is found, then it will INSERT instead of UPDATE), in PHP something like this:
$SQL = "REPLACE INTO test.temperature (sensor ,celsius) VALUES ('".$_GET["serial"]."', '".$_GET["temperature"]."')";Date and time should automatically populate, but in case it doesn’t:
$SQL = "REPLACE INTO test.temperature (sensor, event ,celsius) VALUES ('".$_GET["serial"]."', NOW(), '".$_GET["temperature"]."')";Note that I have not tested this yet – I’m in the middle of moving to another country.
As for the error message did you use mysqli_fetch_array($result) ?
Can you post the PHP part of the code? (ideally in the forum, but if it’s not too long, then here will be fine as well)
hans
Hi and thank you so much for this tutorial. I have a question I am using an arduino atmega 2560 the wifi shield (instead of the ethernet shield) and I am doing an example to see if it works just sending data to a table. this is my arduino code:
#include <SPI.h>
#include <WiFi.h>                  // For the Wifi Shield of Arduino


// MySQL database connection:
byte mac_addr[] = { 0xDE, 0xAD, 0xBE, 0xEF, 0xFE, 0xED };  // It can be anything as long as it follows this structure
char server_addr[]= "192.168.137.200";  // IP of the MySQL server here (ipconfig in cmd and look IPV4)
char user[] = "dsm501a_project";        // MySQL user login username
char password[] = "12345";              // MySQL user login password

// Wifi connection
char ssid[] = "tuhhmechatronicssebas";            // your SSID
char pass[] = "12345678901";         // your SSID password

int status = WL_IDLE_STATUS;
WiFiClient client;


int A = 1;

void setup() {

  Serial.begin(9600);
  while (!Serial); // wait for serial port to connect. Needed for Leonardo only

  // check for the presence of the shield:
  if (WiFi.status() == WL_NO_SHIELD) {
    Serial.println("WiFi shield not present");
    // don't continue:
    while (true);
  }

  // check firmware version
    String fv = WiFi.firmwareVersion();
  if (fv != "1.1.0") {
    Serial.println("Please upgrade the firmware");
  }

  // Begin WiFi section
  int status = WiFi.begin(ssid, pass);
  while (status != WL_CONNECTED) {
    Serial.print("Attempting to connect to SSID: ");
    Serial.println(ssid);

  // Connect to WPA/WPA2 network. Change this line if using open or WEP network:
    status = WiFi.begin(ssid, pass);

  // wait 10 seconds for connection:
    delay(10000);
  }

  Serial.println("Connected to wifi");
  printWifiStatus();

}

void loop() {

    if (client.connect(server_addr, 80)) {
      Serial.println("Connected to server");

      // Make a HTTP request:
      client.print("GET /write_data.php?"); // This
      client.print("value="); // This
      client.print(A); // And this is what we did in the testing section above. We are making a GET request just like we would from our browser but now with live data from the sensor
      client.println(" HTTP/1.1");
      client.println("Host: 192.168.137.200");  // try this (2)
      client.println("Connection: close");
      client.println();
      client.println();
      client.stop();
      Serial.println(A);
  }

  else {
    // If Arduino can't connect to the server (your computer or web page)
    Serial.println("--> connection failed\n");
    client.stop();
  }


  // Give the server some time to recieve the data and store it. I used 10 seconds here. Be advised when delaying. If u use a short delay, the server might not capture data because of Arduino transmitting new data too soon.

  delay(20000);
  A++;
}

void printWifiStatus() {
  // print the SSID of the network you're attached to:
  Serial.print("SSID: ");
  Serial.println(WiFi.SSID());

  // print your WiFi shield's IP address:
  IPAddress ip = WiFi.localIP();
  Serial.print("IP Address: ");
  Serial.println(ip);

  // print the received signal strength:
  long rssi = WiFi.RSSI();
  Serial.print("signal strength (RSSI):");
  Serial.print(rssi);
  Serial.println(" dBm");
}
The php code is the following:
<?php

    // Prepare variables for database connection
	$host     = "localhost";
	$port     = 3306;
	$socket   = "";
	$user     = "dsm501a_project";
	$password = "12345";
	$dbname   = "test_arduino";

	// Connect to your database

	$con = new mysqli($host, $user, $password, $dbname, $port);

    // Prepare the SQL statement

    $sql = "INSERT INTO `test_arduino`.`test` (`Value`) VALUES ('".$_GET["value"]."')";

    // Execute SQL statement

    mysqli_query($con,$sql);

?>
The php code works for example if I enter http://localhost/write_data.php?value=100 in my web browser the value 100 enters in my database. But when In try with the arduino code, nothing happens no data is inserted in my database, it seems that the get part is not working or I don’t know I am stuck in this problem for a few days and I don’t know what else to do could you help me?
Best regards,
Sebastian
Sebastian Silva
Hi Sebastian,
What kind of server did you setup? Something like WAMPServer? In that case, you might want to check if the server can be reached from another computer first. With WAMPServer for example, you have to set it “online” first before it can be reached from other computers than “localhost”.
Best tested with another computer, and using the IP address of your computer, for example: http://192.168.1.100/write_data.php?value=100 (fill in the IP of your computer of course).
WAMPServer (for example) by default is not visible by other computers, only from the computer it’s running on.
hans
Hi!First, yes I have WAMP server (wamp64 for 64 bits to be more exact) I think I don’t need to do it from another computer I am doing it from the same computer where I have the WAMP server and the arduino. The php code works for example when I enter http://localhost/write_data.php?value=1 in my web browser my database is filled with the value 1, so it works. By the way I don’t have XXAMP I have MySQL Workbench, but it works. But when I try to do the same with the arduino code it does not work, that’s my problem. Do I need to enable something in my arduino IDE to get the “GET” request work????? I enabled in the firewall the app of the arduino desperately looking if that’s the solution. I am using an arduino atmega2560 and a WIFI shield for my purposes….. What else can I do??? Please help me…. because I don’t know what else to do…. in the arduino forum nobody helped me….
Sebastian Silva
Hi Sebastian,
the problem is that WAMPServer will not allow “outside” access (ie. another computer, or in your case the Arduino) by default. So you will have to set it to online. So by default the Arduino will not even reach your webserver.
Test the link (replacing “localhost” with an IP address) from another computer in your network, or a tablet or smartphone. You’ll see that it cannot reach the server. This is why it will not work with the Arduino either.
When clicking the WAMPServer icon in the systray, you’ll see the “put online” option at the bottom of the popup menu. After doing that, test with a computer/tablet/smartphone to see if your webserver is actually reachable …
hans
Hi thanks for your help I saw a video right now on youtube that talk about what you told me: https://www.youtube.com/watch?v=1fZOssGt–U, but I don’t have the option of “put online” when I click the icon of wamp server in the systray….. Is there another way to enable the put online???
Sebastian Silva
I made right click on the wamp server button and I put Menu item: Online/offline and Allow VirtualHost Local IP’s others than 127.* , but it didn’t work…… Please help me what else should I do?
Sebastian Silva
after all of this I tried from my cellphone to access 192.168.137.200 (the Ip address of the server) and it says it is forbidden
Sebastian Silva
First off, I do not really use WAMPServer, but have used it in the past and have seen quite a few people running into the same problem.
Also, I’m assuming port 80 is indeed the right port (since http://localhost worked) …
Per the documentation, “online” should work right away as it allows connections from any source. As far as I know, no changes should be made in the config file, as WAMPServer should handle this automatically. However … if that doesn’t work, I did find this tip:
Replace Require local by Require all granted.
See if that works?
hans
[…] I found what looks like the original that the user in the forum post used to create their code. This goes into more depth on how it works […]
[…] Fonte e mais detalhes aqui […]
I prefer to upload data from Arduino to MYSql directly rather than relying on PHP to upload
Sanjeev
That’s what I’d prefer as well.
Just two minor issues with this approach:
a) Where did you get mysql.h? (here ?)
b) At the time that I wrote this article, the library for direct MySQL access was enormous (memory space) and not 100% reliable.
However, definitely a better way to do it, if the library is reliable (by now) and less memory consuming.
hans
Hello Hans,
We can always expand memory space by adding EEPROM . sometimes these are accompanied with the starter kits, did a search online I found its quite cheap.
Sanjeev
Thanks Sanjeev!
Very nice find, probably very cheap, but maybe a little too advanced for users when it comes to using the eeprom space? Did you try this yet?
hans
I haven’t given it a try yet, but if I feel the need of using it I will keep you posted (y)
Sanjeev Kumar
Hello, the tutorial is great help but i am having issues uploading to mysql. I can manually input http://yourserver/add_data.php?serial=288884820500006b&temperature=20.79 and the mysql updates with the correct values. Though even though arduino is saying connected no data is being add to the server.
I am using the wampserver and the arduino is connected to a router which the pc that is the host of server is also connected. I am using the example code for the http get and using hard values to verify that the arduino can speak to the server.
Bellrose
Hi Bellrose,
First thing I’d do is test the hard coded HTTP line on a different computer – unless that is what you already did – just to verify that WAMP is actually accessible from another computer. WAMPServer is known to need to be set “Online” for it to be reachable by other computers. See also this comment.
The next thing, if the first test worked, is looking at the Apache Log files – just to see if the connection is being made and such and why it might be rejecting data.
Third thing to try is using “&&” versus “&” in the link – seems some setups prefer “&” and other prefer “&&” to separate values in the link.
Feel free to ask if none of this worked – I’d be happy to help.
If you’d want to post code and/or log files, please consider starting a forum topic in the Arduino Forum here.
hans
Thanks, I seeing data coming from my arduino to mysql. I however ran into another problem i can’t access the server from say my laptop or another device. I believe that its cause i using the with my desktop ip address Local Databases. I tried creating a virtual host called project.dev but it says I don’t have permission. How do i set up a wamp server that is not local host with ip 127.0.0.1. I don’t plan to have any traffic but would like to test arduino outside my local network.
Bellrose
Update: while try to create another virtual host my arduino stop sending data to localhost. I don’t know what happend but now i have a option on the wamp tray to have the server either online or local right now its says its online.
Bellrose
As far as I recall, you’ have to set the WAMPServer to “online” – that’s what I’d first try before tinkering with the config files.
I did find a much more extensive article here … but I doubt you’d need that.
I did find another post in the wampserver forum that might be helpful.
In all honesty, I don’t recall WampServer to be that complicated, but I haven’t used WampServer in quite a while.
hans
I had to go to wampserver settings but i was able to get the online/offline button added to the tray. I can now toggle between both online and offline. I can not though still access the server from another device. For example i took pc ip address i got from config command and can go to my server and myphpadmin on the pc browsers instead of using localhost or 127.0.0.1. I can not though use the same ip address from external device. I did find that same post yesterday and thats when i tried to create virtual host but had no luck.
Bellrose
Are you able to find the Apache log files? It might show a message that an attempt was made from another PC to get content, but that it was rejected for some reason.
Another possible reason would be:
– You have a firewall running that actively blocks these requests
– You’re using the wrong IP address
What is the message you see in the browser on the other computer?
hans
whether it is warm-server or apache or nguni, what you need to fix is on the mysql server configuration on linux it is located at /etc/mysql/my.conf but I do not know where it would be located in case of window, sounds like you are using MS Window.
Here is what you need to fix it : http://www.devilsan.com/blog/upload-to-remote-mysql-database-from-arduino-client
Sanjeev Kumar
How did you set up your mysql server for step one? I got traffic going to the default Local Databases for my localhost but cant access it outside my local network?
Bellrose
in your mysql server configuration, locate bindAddress it will be pointing to 127.0.0.1 comment this line or
add anoter line that points to external IP of machine that is running mysql. (the later is explicit strict binding)
Sanjeev
Hi, I wanted to give an update and I was able to get the arduino working. Had to use a friends mysql but everything is working. I did want to ask how the best way to send data for even time. I have tried both the delay and creating a loop with millis() function but my timing is off. For example the most reliable method using the millis() function I get an error of 5 seconds if i take reading every 15 minutes. How do i correct for this, also i do plan to be able to take different time readings but 15 minutes is what i was testing.
Bellrose
Hi Bellrose,
glad to hear you’re making progress …
As for timing: the Enc28J60 is not know to be the most reliable ethernet shield, hence the reset after an error (line 62: Enc28J60.init(mac);). Norbert has done a ton of work though to make his library a good as possible (thanks again Norbert!!).
Timing is indeed tricky and the fact that the Arduino doesn’t really have a realtime clock (date and time) and the fact that some work needs to be done in the background is not helping either. One of the reasons that I added
to the table structure so time would be measured by the server.
Now I’m not sure how accurate your timing needs to be, but if it’s just a matter of cosmetics, then you could take a look at this forum post I just posted with an SQL example. Basically a trigger that rounds the current time as such:
Unfortunately, this can not be used to set the default value, so we need an after insert and an after update trigger – see the example and feel free to ask if you need some help with that.
You’ll notice that some of this has been discussed before (see this comment by Norbert and other comments).
I know it might be a lot of info to dig through. If I’d had my ENC28j60 and Arduino nearby, I’d do some tests as well – but that is unfortunately not the case.
hans
Hey, I’m having a problem with linking the ethernet and calling the file uploaded to my website.
I really don’t know what Im doing wrong. Tried the manual method of typing the URL/add1.php?(values) and it works so Im guessing it has something to do with the Ethernet part of the project.
CpE
Hi CpE,
could you try using the actual IP address of the server, instead of www.****.**** ?
This would only work of course if it’s a dedicated IP address for your webserver (try typing http://www.***.*** in your browser and see if it shows the correct page). The issue is that the name will most likely not get resolved.
hans
Hey Hans,
I’m not really sure where to find the webserver’s IP address. It works though when I type the (webserver)/add1.php?(data), the data were uploaded successfully into the database. I’m thinking that it could be something to do with the connection between the arduino and the webserver where I can access the PHP file.
CpE
Hey Hans,
Scrap that I’ve found the webserver’s IP address and when I type it, it just results in a 404 error. The webserver’s main address still works though so yeah. Just an update
CpE
You could contact your web-host and ask for a dedicated IP address for your website.
Most offer this for free or for a dollar or so extra a month.
hans
Is the IP address really required? Can’t the arduino output the main webserver address?
CpE
According what I could find, the UIPEthernet library should be able to resolve the name properly when using the DNS library which comes with UIPEthernet. This offers the GetHostByName function (I have not been able to test this yet though).
An example (source)
So in our code, the following might work, by modifying the client.connect line from
if (client.connect(server, 80)) {to:
Don’t forget to include dns.h at the beginning of your code.
Note: I have not had the chance to test this.
hans
It’s been 2 weeks since i’ve been trying to solve this problem. I will post the code I’m using here as I’m really confused why my code is working when used in XAMPP but does not upload when used with my free hosting site.
Manually updating the database by typing edmarborromeo.x10host.com/add1.php/(…data here) so I think it has something to do with the GET part or the Server part of the code.
Fresh eyes to look into my code would greatly help.
CpE
Sorry. The char server should just be edmarborromeo.x10host.com and not ftp
CpE
Hi CPE,
I still don’t see any name resolving in your code.
With the example in this article we use the IP address dedicated to the web server (your XAMPP server).
With your “final” code however, you’re trying to go to a shared host, which means that the IP address of that host (which you do not resolve with the DNS function) is not unique for your website. I suspect that the only [easy] fix is to ask your host for a dedicated IP address for your website, and use that instead.
hans
Hello, congratulations to the site, you have no idea how it helps.
Please, I am using the code below to write to a database via php.
The problem is that he has a lot of flaws, he has an hour that he writes and he does not have time.
IF I put it to write every 1 minute ok, but if almento the interval there begin these failures.
It seems to me to be some hardware or library problem.
Is there any way to check if the package was sent and if it failed to resend?
Thank you
—————
// Demo using DHCP and DNS to perform a web client request.
// 2011-06-08 <jc@wippler.nl> http://opensource.org/licenses/mit-license.php
#include <EtherCard.h>
// ethernet interface mac address, must be unique on the LAN
static byte mymac[] = { 0x74,0x69,0x69,0x2D,0x30,0x31 };
byte Ethernet::buffer[1000];
uint32_t timer;
String readString; //used by server to capture GET request
const char website[] PROGMEM = “sergiolinux.sytes.net”;
//const char website[] PROGMEM = “”;
// called when the client request is complete
static void my_callback (byte status, word off, word len) {
Serial.println(“>>>”);
Ethernet::buffer[off+300] = 0;
//Serial.print((const char*) Ethernet::buffer + off);
//Serial.println(“…”);
readString = String((char*) Ethernet::buffer + off);
Serial.println(“—————————————-“);
// Serial.println(readString);
// if(readString.indexOf(“OK”) >0){ Serial.println(“okkkkkk”); } else { Serial.println(“eeerrrrrrooooorrrrrrrrrrrrrrrr”);}
// return(readString);
}
void setup () {
Serial.begin(57600);
Serial.println(F(“\n[webClient]”));
if (ether.begin(sizeof Ethernet::buffer, mymac, 10) == 0)
Serial.println(F(“Failed to access Ethernet controller”));
if (!ether.dhcpSetup())
Serial.println(F(“DHCP failed”));
ether.printIp(“IP: “, ether.myip);
ether.printIp(“GW: “, ether.gwip);
ether.printIp(“DNS: “, ether.dnsip);
ether.hisport = 8080;
#if 1
// use DNS to resolve the website’s IP address
if (!ether.dnsLookup(website))
Serial.println(“DNS failed”);
#elif 2
// if website is a string containing an IP address instead of a domain name,
// then use it directly. Note: the string can not be in PROGMEM.
char websiteIP[] = “192.168.1.1”;
ether.parseIp(ether.hisip, websiteIP);
#else
// or provide a numeric IP address instead of a string
byte hisip[] = { 192,168,1,1 };
ether.copyIp(ether.hisip, hisip);
#endif
/*
static byte hisip[] = { 189,42,108,20 };
char websiteIP[] = “189.42.108.20”;
ether.parseIp(ether.hisip, websiteIP);
ether.copyIp(ether.hisip,hisip);
*/
// ether.printIp(“SRV: “, ether.hisip);
}
void loop () {
ether.packetLoop(ether.packetReceive());
if (millis() > timer) {
timer = millis() + 240000;//240000; //40minutos //1800000;// 30 minutos
readString = “”;
Serial.println();
Serial.print(“<<< REQ “);
ether.browseUrl(PSTR(“/arduino/salvardados.php?”), “temp1=0&umi1=0&temp2=22.00&umi2=39.40&temp3=22.00&umi3=39.40”, website, my_callback);
//Serial.println(“saindo”);
/*
while (true){
ether.packetLoop(ether.packetReceive());
if (readString.length() != 0) {
Serial.println(readString);
Serial.print(“— diferente de 0”);
readString = “”;
false;
} else {
Serial.println(readString);
Serial.print(“— igual a 0”);
}
}
*/
}
}
SERGIO
Hi Sergio,
I don’t think it’s a library issue though, rather a hardware limitation/issue of the ENC28J60.
One of the things I did in my example code, is test if there is a connection, and if not, reset the connection, which I’m not seeing in your code. (see as of line 58 of my Arduino sketch):
Hope this helps.
hans
Thank you very much for your reply.
I understand, from what I read on the internet the enc28j60 is even limited. And I see that it is not 100% reliable.
It does not have this line because I’m not using UIPEthernet, I’m using Ethercard.
Thank you very much, I’m still looking for a solution. If you find it post here
Thanks
SERGIO
Hi Sergio,
I’m not sure if the standard Ethernet library supports it, but you could consider applying the same trick?
Is there a connection? If no: reset the connection. If yes; then keep doing what you’re doing
hans
Hi there, your work is very much detailed, and am very grateful for such work you have put out here. Good job well done.
Emmauel
Hi Emmauel!
Thank you very much for the compliment – it’s much appreciated!
Glad you found the article helpful!
hans
Hi, I would like to change the sensor with water pressure sensor (bar)
What model of sensor and what should I change in the project?
lucio
Hi Lucio,
Well, first of all, I have no experience with water pressure sensors. But when trying to find you one, I realized that you need to be more specific in the requirements (ie. max Bar and such).
I did find this Arduino Forum post that might get you started.
hans
Hi Hansaplast.
I came across your site from a post you made on the uipethernet GitHub when you was having trouble with the enc28j60 maybe locking up your Arduino.
I’ve as you tried many power supplies and ran it from USB off notebooks. Also used a breadboard power supply souley for the enc28 as to check if my sensors was dragging the 3.3 rail down.
However what’s strange for me in serial monitor information is displayed fine until it crashes then it’s blank which doesn’t help me.
My project is similar like yours however I’m doing http POST to a influxdb server on another machine on the network.
Did you ever find a stable fixture for this at all? I’ve had mine drop down after a few minutes and also run for around 3 days maximum.
I’m about to give up and buy the w5100 board.
Regards.
nyzrox.
nyzrox
Hi Nyzrox,
the only fix I found is what I did in my code;
1) if the server is available; do send the data,
2) if not; reset the ENC28J60 and try again.
If I’d be choosing something right now for a stable or production like environment, then I’d most certainly go for something like the W5100 board. The ENC28J60 is cheap and fun to play with, great for home and hobby use, but the limited stability would make me use a W5100 as well.
hans
Thanks for taking time to reply.
I run a connection to the server first then run a IF to see if it connected so could be worth me adding the reinitialize within this statement.
It’s not for anything professional just a diy project that I require constantly running as sometimes I can’t reset immediately.
At present we have been running since I commented to other day. I have serial monitor open again and not printing my servers reply incase this could of been crashing the module.
nyzrox
Good to hear that this seems to work in an acceptable way
hans
if my page url is xampp/htdocs/pass/config2.php
what is the direccion of the GET??
GET pass/config2.php?status=hola HTTP/1.1 ??
and the server, is mi ip direccion, Right??
javier
That sounds about right yes …
Note: if you’re using WampServer (and some other WAMP like setups), you might need to set it “online” for other computers and devices to reach your link. Best way to test this is by using an other computer, tablet or phone that is using the same network and sed if you can reach it.
hans
I am getting connection failed results in my serial monitor.
the server IP is correct and I can ping the ethernet shield on cmd.
Here is my code
Kim Carlo
Hi Kim,
what are you using as the server? WAMPServer? Can the server be reached from another computer?
hans
Thanks alot for the example. I used it to send rfid id data. I’m using latest xampp and have to change the code syntax a bit to make it work….
<?php
$server = “www.myserver.com”;
$user = “xxxx”;
$pass = “xxxxxxxx”;
$db = “rfid1db”;
$dbh = new mysqli($server, $user, $pass, $db)or die(“cant connect to database”);
//$selected = mysqli_select_db(“rfid1db”,$dbh);
echo”connection ok”;
?>
bram ibe
Thanks Bram!
Awesome – and thanks for posting the code!
hans
Hello,
My name is Niko and i am from Greece
first of all i have to congrats you for your effort on this project over a year now.
i am a big fun of learning by doing and since i found your approach much more flexible than others on the net
i decided to build it.
There was no problem at all to make it work in half an hour.
My approach consists of many esp8266 ‘s sending data on my php server on the net.
these work autonomous with li ion 18650 batteries with small 6v solar panel charging them.
Up to 10 pieces until now work for 5 days with no problem.
The goal for me is to alter all coding things so i can have indepentent readings on columns on review data
the main problem as i see before touching anything is the long difference between each sensor’s timestamp.
well i will start putting things down and i let you know my progress.
Regards
Niko
Niko
Hi Niko!
Thank you very much for the compliments
Working with ESP8266 is on my list of things to do
Are you running them as standalone (Arduino compatible etc)?
As for using 10 sources and wanting to make them in columns; I think that can be fixed by adapting your SQL query. I carefully assume that the timing is (minute wise) roughly in the same range for all sensors. So you could group my minute or something like that.
Of course, without looking at the data this assumption might be wrong haha. But I’d be happy to help, so feel free to ask. If we get a little deeper into the details, you may want to start a forum topic so we can share sources and data example without cluttering this page too much.
Keep us posted!
hans
Hi there,
so far i have made many changes around coding .
Updates will come soon.
so far i have done some mods to the code inserting ESP.deepsleep for not making the router full all the time.
the esp’s are connecting every 20 seconds for about 2 seconds to give data to my sql server and then go off.
I use wemos d1 mini because they are cheap and have usb support.
with deep sleep and a 18650 battery (salvaged from laptop) and update data every 30 minutes well it gets over a month till now.
because everything is a mess with code i will not provide yet… when i have time to clean it up i will post.
here is the link to my sql server and see every 20 seconds the page refreshes and gives you data of some sensors around my place and a refrigerator……
http://nikoskir.eu/temp.php
regards Niko
Niko
Hi Nico!
Thanks for taking the time to post your succes.
I definitely have to start playing with the ESP modules – they are so cool and so cheap!
Also a great idea to recycle a battery from a laptop! I like that!
hans
how to connect arduino to php. (send data from arduino to php)
reader card from arduino display to php web browser
latif
Hi Latif,
I’m not sure I understand what you’re asking?
hans
hi
tanks for this post.helped me a lot.
i wana use post method with esp8266 and wrote this code but it didnt work
plz help me.
#include <ESP8266WiFi.h>
char server[] = “http://www.ard.harmonyserver.net”; // IP Adres (or name) of server to dump data to
int interval = 5000; // Wait between dumps
const char* ssid = “P”;
const char* password = “======”;
WiFiClient client;
void setup() {
Serial.begin(115200);
Serial.println();
Serial.print(“connecting to “);
Serial.println(ssid);
WiFi.mode(WIFI_STA);
WiFi.begin(ssid, password);
while (WiFi.status() != WL_CONNECTED) {
delay(500);
Serial.print(“.”);
}
Serial.println(“”);
Serial.println(“WiFi connected”);
Serial.println(“IP address: “);
Serial.println(WiFi.localIP());
}
void loop() {
// if you get a connection, report back via serial:
if (client.connect(server, 80)) {
Serial.println(“-> Connected”);
// Make a HTTP request:
client.print( “GET /test/add_data.php?”);
client.print(“serial=”);
client.print( “288884820500006X” );
client.print(“&&”);
client.print(“temperature=”);
client.print( “12.3” );
client.println( ” HTTP/1.1″);
client.print( “Host: ” );
client.println(server) ;
client.println( “Connection: close” );
client.println();
client.println();
client.stop();
}
else {
// you didn’t get a connection to the server:
Serial.println(“–> connection failed/n”);
}
delay(interval);
}
mohamad
Hi Mohamad,
I’m not familiar with the ESP8266WiFi.h library (which I hope to start playing with in the next few weeks). I assume this (client) works similar to UIPEthernet.h? Have you tried the link straight in a browser? When I try this link I get an Internal server error?
hans
Hello i’m newbie to Arduino.
And i’m using RFID RC522 Reader and now only thing i must do is increase number by one in mysql database.
I have ENC28J60.I set up MYSQL Database using XAMPP.With PHP 7.2.11 version.
I have database looks like this:
ID First Name Last Name Card_ID Readed Reg_date
Only thing i must do is increase readed value using Card_ID then update Reg_date.Other values will remain fixed.
And i can’t figure out these php files.Can anyone help me? Thank you
Gombo
Hi Gombo,
I assume you’re getting stuck in the query part. Here we used “INSERT INTO”, but in your case you may want to use “REPLACE INTO” instead.
REPLACE works exactly like INSERT, except that if an old row in the table has the same value as a new row for a PRIMARY KEY or a UNIQUE index, the old row is deleted before the new row is inserted.
See also: MySQL Reference
Since I do not know very much about your table, which fields are unique and such, you may have to read up in the MySQL reference.
Basically you’ll do the same as an INSERT, but you make sure the primary key or a unique index is included. If the primary key, or unique value, already exists, then this record will be updated (actually, it will be deleted and a new updated row is inserted).
hans
I modified review_data.php and dbconnect.php to workable with my database.But i can’t figure out add_data.php.Can you help me to write add_data.php?
Here is my database:
Gombo
Hi Gombo,
this sounds more like something we’d want to work on in the Forum.
In order to use “REPLACE INTO”, you’d need to have a unique key. The ID you’re using is probably not going to work well for this, unless you retrieve the ID first.
I guess I’d need to know a little more about the application. It looks like you’re tracking when a card_id is being used for the last time (reg_date), and how often it has been used on a given day (Readed). The unique combination would be card_id and the DATE of reg_date. But since you’re using TIMESTAMP for reg_date, date and time are used, which makes it different each time a card is read. I’d refine that field so we can use a date, and maybe store datetime in a separate field. Let’s say we have the field reg_date (as you do right now) and a field just_date (just the DATE, no time fraction! – MySQL formats this as YYYY-MM-DD), so that when we do a “REPLACE INTO”, card_id and just_date are unique. You’ll need to create a unique index
The PHP then changes to something like this:
Since the field “ID” has no longer a purpose, you may want to drop it, and make the unique index the primary key.
In PHP you could generate the date yourself in the YYYY-MM-DD format using the date() function. Something like this:
$SQL = "REPLACE INTO my_table (card_id ,just_date) VALUES ('".$_GET["cardid"]."', '".date ("Y-m-d")."')";Obviously this needs refinement since I have no idea where the rest of the data is coming from and we’d still need to make sure “Readed” starts with “1” (default value), and gets increased when updating the row. For updating the row, you could try a sub-query, something like:
$SQL = "REPLACE INTO my_table (card_id ,just_date,Readed) VALUES ('".$_GET["cardid"]."', '".date ("Y-m-d")."', (SELECT Readed FROM my_table WHERE card_id='".$_GET["cardid"]."' AND just_date='".date ("Y-m-d")."')+1 )";You’ll need to play with this a little to get it right, it’s a little challenging to give you a complete answer without having more information.
Hope this gets you started in the right direction. Personally I’d consider how my tables are defined and redesign this particular table.
Also; using Firstname and Lastname each time in the same table may not be the best way to do this either – I’d try to normalize my tables and create a separate table that links card_id to Firstname and Lastname. Just a thought
hans
Thanks for you answer.
By the way i managed to connect and push data to server.All thanks to your project.
As you know i’m trying to push RFID card data to MYSQL server.And i’m testing it 2 cards.
But i had a problem again.When i try to push first data it won’t work.After first try it sends data.But the again one more problem is when i change the card it sends same information and after it sends changed card data.
— Long source code removed – please review in the forum —
any advices will be apprecieted.
Gombo
Hi Gombo,
since the source code is getting too long for comments here, I’ve moved it to the forum. Sorry. See this forum post.
hans
hello sir,
I followed your code and it successfully run. I have to control arduino through web page virtual switch. but i do not have any idea regarding received data from php file or read data from php file in arduino. so, please sir help me regarding this
ur1995
Hi ur1995,
Your Arduino will not be able to handle PHP (since it needs to be interpreted on the Arduino).
Instead of using PHP on your Arduino, you should create your own “protocol” (eg. set of commands) your code on the Arduino can handle.
A good and well explained example can be found here: How to Control LEDs Through a Webpage With Arduino.
Hope this helps.
hans
[…] http://www.tweaking4all.com/hardware/arduino/arduino-ethernet-data-push/ […]
hello, I recovered the codes that works very well! except when I change the delay (last line).
Thank you for your help
Arnaud
Hi Arnaud,
good to hear you’ve got it wo work.
As for the delay; some ethernet cards (like the one used in this article) are not “the best”.
A lot of handling in the background isn’t handled by the card and the Arduino [library] may or may not be capable of dealing with this correctly or fast enough.
So the 5 second delay is not working but the 5 minute delay is?
hans
exactly! I made a WHILE loop for the 5 minute delay. I have enorment of reading error … I think the map do not know how to treat the background spots
arnaud
Hi, I am back from 2017 when I first posted in this article. Hans is great and very helpful in helping people with this article push forward. However as I stated back in 2017, I’d highly recommend people to use the W5100 it’s far most stable then the ENC, your code could work for weeks and then the ENC crashes for no reasons, I’ve yet to have issues with the W5100, it’s worth the extra costs.
nyzrox
@Nyzrox: Thanks for the very nice compliment, and for chiming in!
I agree with your statement; better spend a few bucks extra and get the good stuff right away.
The ENC is not the most stable shield I’ve ever seen and shields like the W5100 are super robust compared to the ENC.
hans
Hello!
Thank’s for this post! I use a similar code but after sending data to my server during 2hours, suddenly no more data are send… I only have « connexion failed ».
Do you even see this?
Thank’s a lot! A see W5100 is more stable, I think I buy them if I don’t find solution with ENC28J…
Lucas
Lucas
Hi Lucas,
I can confirm that the ENC28J60 is not the most reliable ethernet module out there.
A W5100 or something like an ESP8266 will be much more reliable.
Sorry …
Hans
hello sir, sorry for bothering you,, amazing tutorial and explanation ,,, thank you very much.
was wondering if u can give us an example of a push button syncing with a virtual on server push button ,,,
that would be great
thank you
murad
Hi Murad!
Thank you for the compliment!
I may not quite understand what you’re looking for – my apologies.
Did you mean that the state of a physical button is displayed (instead of a temperature)?
If that is the case, then I’d use the regular Button example (like this one), where the button state is stored in a variable (buttonState).
And then pass it as a parameter, see code above adding to, or replacing the temperature values;
client.print("buttonPressed=");if(buttonState==HIGH) { client.print("true"); } else { client.print("false"); }
And have your server read the “buttonPressed” value.
Hans
first i appreciate ur help for me ur a good person
i have a code that updates the status of relays from php,
im trying to install a physical buttons also so when i press the physical button it will update the web php that the status changed.
so next time the php sync with the arduino wont rechange the relay status again according to the php sync only.
is that good enough ? should i past the code ?
thank you
murad
Hi Murad,
Maybe you can start a forum topic in the Arduino Forum?
It would be easier to discus code and such.
Hans
i would be happy to do so :)
murad
Hans