IP Address of a Default Gateway?
What is a Default Gateway?
In short: it’s the connection to the Internet for all devices in your network. At home, or small offices, this is typically your modem/router.
Wiki – A default gateway, is the node in a computer network, using the Internet protocol suite that serves as the forwarding host (router) to other networks when no other route specification matches the destination IP address of a packet. (more details in this Lifewire article)
There are several reasons why you’d want to know the IP address of your default gateway.
The most common reason is probably so you can access the modem or router and do some verifications or configurations.
But the default gateway can also be instrumental in fixing problems in your network, as it is the “center” of your (small) network.
For my project, I’m actually researching if I can reliably identify a network based on the MAC address of the Default gateway. Once I know the IP address, I can retrieve the MAC address, for example with arp <ip address> .
Ad Blocking Detected Please consider disabling your ad blocker for our website.
We rely on these ads to be able to run our website.
You can of course support us in other ways (see Support Us on the left).
Find the IP Address of your Default Gateway
In the next few paragraphs, I’ll describe how to get the IP address of your default gateway for several platforms.
Since most users that are willing to go this deep into their OS, I’ll start with the command line (Shell/Terminal/DOS) method, if available, followed by the graphical method.
Tip: You can try this website WhatsMyRouterIP.com. They will do a good attempt to determine the IP address of your router, which commonly is also your Default Gateway. Depending on the complexity of your Internet connection though, this may produce the wrong result though.
Windows
Command Prompt
When in DOS (Shell, Command Prompt, etc), you’ll end up using the ipconfig command to determine the IP address of the Default Gateway.
Open a Command Prompt (PowerShell works just as well), type “ipconfig”, and press Enter. You’ll see something like this.
Since this is my laptop, I have an Ethernet and a WiFi connection available – both using the same default gateway.
It can happen of course, in a situation like this, that Ethernet and WiFi use a different default gateway IP address. At most homes and small offices though this is not very likely (but not impossible).

Windows Command Prompt – ipconfig
Tip: you can use the “findstr” function to just get the line(s) with Default Gateway in to like so: ipconfig | findstr "Default Gateway" .
Graphical User Interface
Finding the Default Gateway through clicking buttons and opening windows, very much depends on the Windows version you’d using.
In short, for Windows 10 and 11: You want to go to the Control Panel Network and Internet Network and Sharing Center …
Other Windows versions work in a similar fashion, with possible some minor differences in nomenclature.
Tip: Under Windows 10/11, you can use a shortcut by pressing + R , type ncpa.cpl and press ENTER.
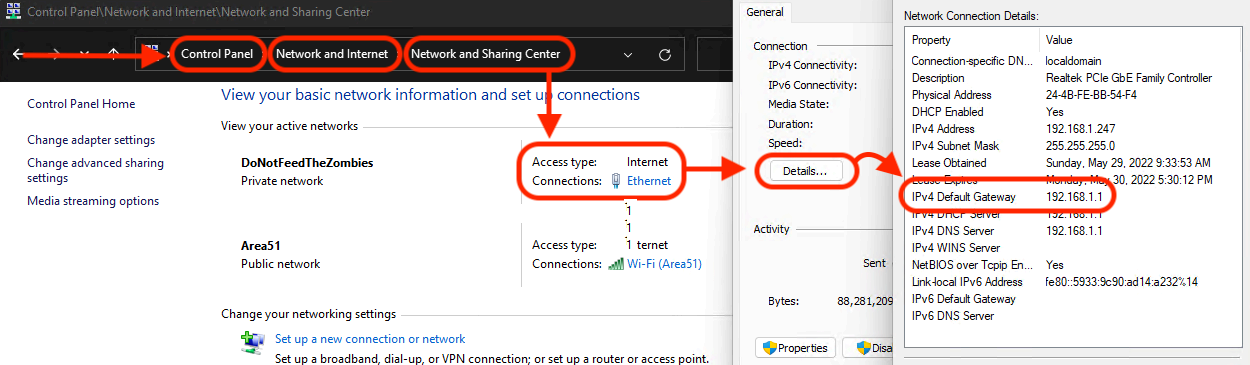
Windows Graphical User Interface
Linux
Terminal
For Linux terminal commands we can use several tools to determine the IP Address of the default gateway.
Caution: ifconfig, netstat, route and arp are considered deprecated
From what I could find online, some of the very common network tools, like ifconfig, netstat, route and arp, have been considered deprecated for quite a long time already (several decades!) in favor of tools like ip and iproute2. Reference: ifconfig wiki page.
However, these “older” tools are still actively being used and developed.
For some Linux distros this means that these tools may or may not be available on your system, and if you really want to use them, you may have to install them manually.
Some distro’s, for example Arch-Linux variants, refer to the core/net-tools as the package that contains these command line tools.
route
The “route” command can be used as shown below, where the column “Gateway” tells us what the IP address of the Default Gateway is (192.168.1.1):route -n or just route .
1
2
3
4
5
| $ route
Kernel IP routing table
Destination Gateway Genmask Flags Metric Ref Use Iface
0.0.0.0 192.168.1.1 0.0.0.0 UG 100 0 0 ens33
192.168.1.0 0.0.0.0 255.255.255.0 U 100 0 0 ens33 |
netstat
The “netstat” command can be used as such, where the column “Gateway” tells us what the IP address is (192.168.1.1): netstat -nr .
Notice the same output as “route” gave us? 
1
2
3
4
5
| $ netstat -nr
Kernel IP routing table
Destination Gateway Genmask Flags Metric Ref Use Iface
0.0.0.0 192.168.1.1 0.0.0.0 UG 100 0 0 ens33
192.168.1.0 0.0.0.0 255.255.255.0 U 100 0 0 ens33 |
ip
We can also use the “ip” command ip route show or short ip r , where the IP address of your default gateway appears in the first sentence, right after “default via“:
1
2
3
| $ ip r
default via 192.168.1.1 dev ens33 proto dhcp metric 100
192.168.1.0/24 dev eth1 proto kernel scope link src 192.168.1.100 metric 100 |
Graphical User Interface
Fortunately, or unfortunately, the Linux GUI and available tools can be very different per distro. My lack of experience with all these distros doesn’t make it any easier. So I’m skipping that … 
macOS
Terminal
Some of the Linux Terminal/Shell commands work under macOS, showing some of its “Unix” roots, and still has the older network tools, but also comes with Apple specific tools.
Route
We can use the “route” command under macOS, but it seems to want different parameters to get some info: route -n get default .
1
2
3
4
5
6
7
8
9
10
| $ route -n get default
route to: default
destination: default
mask: default
gateway: 192.168.1.1
interface: en0
flags: <UP,GATEWAY,DONE,STATIC,PRCLONING,GLOBAL>
recvpipe sendpipe ssthresh rtt,msec rttvar hopcount mtu expire
0 0 0 0 0 0 1500 0 |
As you can see, the line “gateway” gives it away (note: the “-n” parameter is so we see an IP address instead of a network device name).
To make it limit to what we really want, use this: route -n get default | grep gateway .
1
2
3
| $ route -n get default | grep gateway
gateway: 192.168.1.1 |
networksetup
This tool, networksetup, can produce some very clean info, but can be a little weird at times.
First we need to know what the name is of our network connection.
These names are not your typical “en0” and “en1” device names. They are looking for names like “Ethernet 1“, “Ethernet 2” or “Wi-Fi” (these name are quite commonly used – mind your spelling!).
A list of these name can be retrieved with networksetup -listallhardwareports like so:
1
2
3
4
5
6
7
8
9
10
11
12
13
14
15
| $ networksetup -listallhardwareports
Hardware Port: Ethernet 1
Device: en0
Ethernet Address: 00:3e:e1:c7:0f:e8
Hardware Port: Wi-Fi
Device: en2
Ethernet Address: 80:00:6e:f4:eb:aa
Hardware Port: Thunderbolt 1
Device: en3
Ethernet Address: 82:0e:12:d7:0e:05
... etc ... |
Now that we know the network name, we can use it to retrieve the IP address of the default gateway.
Shown below with networksetup -getinfo "Ethernet 1" (use the proper network name for your setup!).
The line “Router:” show the IP address we’re looking for …
1
2
3
4
5
6
7
8
9
10
11
| $ networksetup -getinfo "Ethernet 1"
DHCP Configuration
IP address: 192.168.1.245
Subnet mask: 255.255.255.0
Router: 192.168.1.1
Client ID:
IPv6: Automatic
IPv6 IP address: none
IPv6 Router: none
Ethernet Address: 00:3e:e1:c7:0f:e8 |
netstat
The “netstat” command can be used as such, where the column “Gateway” tells us what the IP address is (192.168.1.1).
However, on a Mac you will potentially see a long list of entries, and we’d only like to see the default gateway.
For this purpose we will use grep to only show those lines: netstat -nr | grep default .
1
2
3
| $ netstat -nr | grep default 17:39
default 192.168.2.1 UGScg en0
default 192.168.2.1 UGScIg en1 |
Note that you may see a lot more than just these two (like Bluetooth and Thunderbolt connections – even if you do not use them).
Graphical User Interface
You can find the IP address of your default gateway, by opening your macOS Preferences and opening the network settings.
Goto System Preferences … Network and select the desired network connection.
The IP Address of your default gateway will now be revealed as “Router:“.
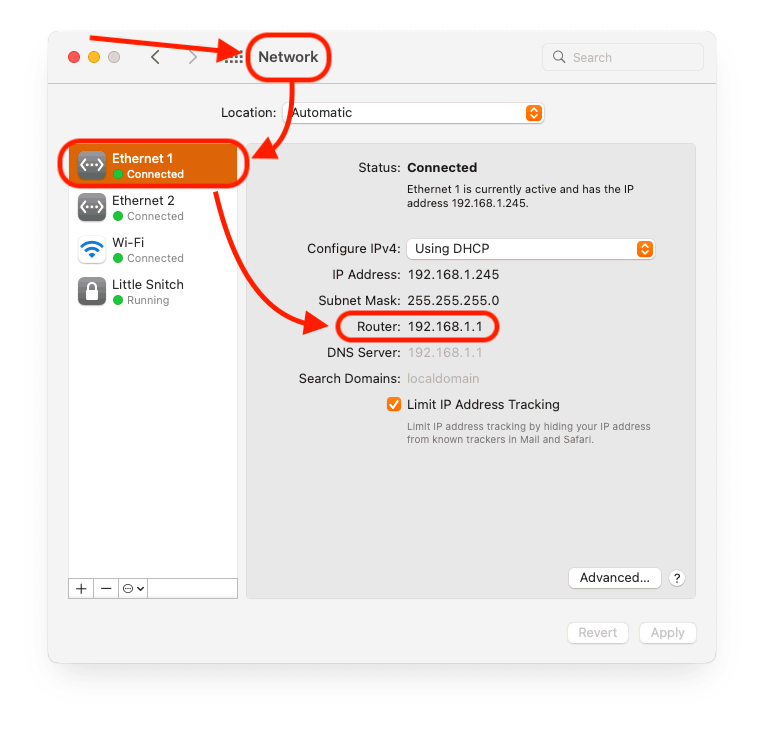
macOS Default Gateway in the GUI
Cell phones and Tablets
I’m just adding iOS and Android just for completeness ….
And with these kind of devices, updates seem more frequent, and in some cases devices will be “stuck” on older older OS versions, making it nearly impossible to cover them all.
iOS
In iOS 15, you’ll find it in Settings Wi-Fi info icon next to the word “Router” …
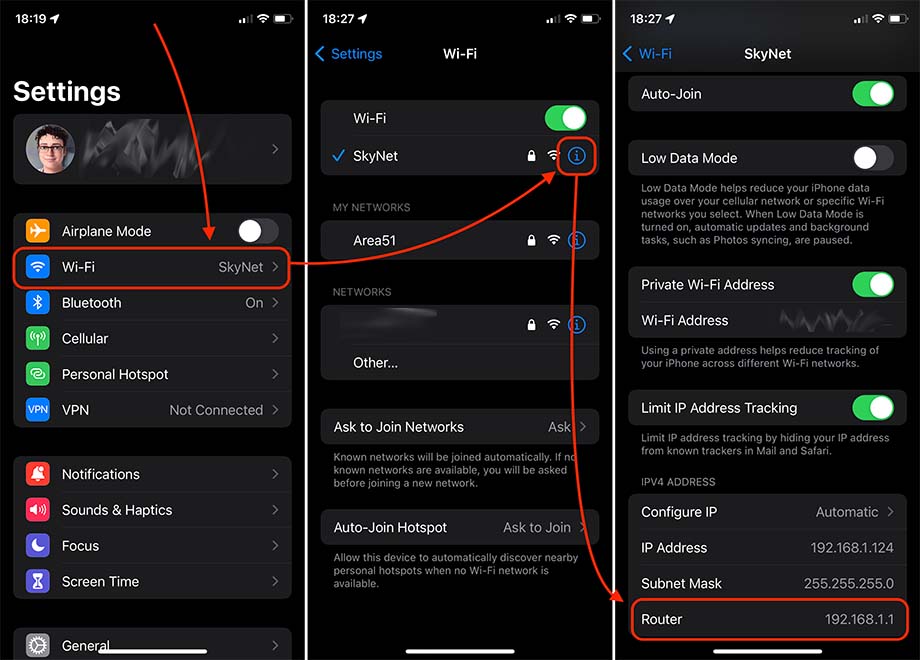
iOS – IP Address Default gateway
Android
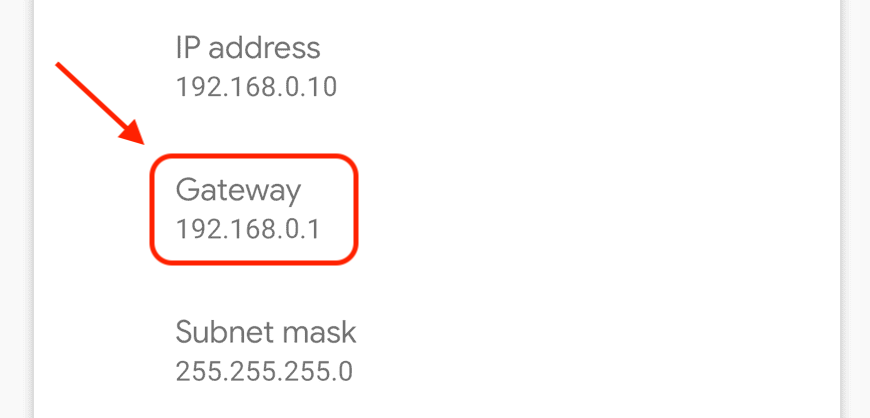
Unfortunately, I do not have any Android devices near me so I have to write this down from what I have found online.
Go to Settings Network & internet Wi-Fi – tap the icon next to your active WiFi connection. In the upcoming screen tap “Advanced” which should reveal the “Gateway” …

Android Default Gateway

Comments
There are 7 comments. You can read them below.
You can post your own comments by using the form below, or reply to existing comments by using the "Reply" button.
On macOS I would find the Network Service Order first, like this:
The reason that USB Ethernet devices appears first in the list is that they should override WiFi, if they are connected, At least that is default behaviour.
This list will also show the device, like en0. Back in the day, Ethernet was the default network enterface, but that has been Wi-Fi (AirPort) for a long time.
Then I can do as the article describes:
But all of this only find how it is configured. What if we want to know the DHCP value?
And even more info like this:
I would expect `ipconfig` as well as `ifconfig` to work on Linux as well.
Søren Theilgaard
Hi Søren!
thank you very much for sharing the additional info – it is very much appreciated.
I definitely didn’t realize there was an “ipconfig” under macOS (probably because I’ve gotten used to ifconfig when I started working with Linux and macOS uses this as well).
Here we see; we learn something new every day.
Thanks again!
Hans
What do you think of this approach?
Hans
Haha, I had to laugh at Figure 4 … “SkyNet”
Andrew
Hans
Do you mean, i want to change like this option?
$ networksetup -getinfo “Ethernet 1”
kedihas445
Not sure what you’re trying to ask?
Note:
When doing a copy and paste, make sure the double quotes are normal quotes.
The ones used in your message (probably placed automatically) are not the correct double quotes.
It should be the ones used here, or use single quotes:
Both assume of course that your Mac has an Ethernet 1.
Hans