Boblight Config Maker
Boblight Config Maker look the same for Windows, MacOS X and Linux and allows you to create a … Boblight Config file.
See also my article on how I created my Boblight setup for OpenElec and WS2811/WS2812 LED strands.
As of version 1.3, you can choose between a comma or a period as a decimal separator.
Boblight Config Maker for MacOS X
Boblight Config Maker for Linux (Ubuntu)
Boblight Config Maker for Windows
You can download the version matching your Operating System – Linux users might have to set the file to have “Execute” permission.
Installation is not required and the application should be portable, and remembers your last settings – for Windows 7 or newer, if you install the application in “Program Files”, this might cause access rights issues – but I doubt anyone would install this application permanently.
Download - Boblight Config Maker MacOSX (32 bits)
Download - Boblight Config Maker Windows (32 bits)
Download - Boblight Config Maker Linux
Ad Blocking Detected Please consider disabling your ad blocker for our website.
We rely on these ads to be able to run our website.
You can of course support us in other ways (see Support Us on the left).
Test Video
While building my Boblight setup and working with Boblight Config Maker, a test video was most certainly welcome.
I did find some test videos at YouTube, but in the end I created my own (in Photoshop!).
It’s really small, only 1.8 Mb, yet at 1080p, and you can watch it here, and download it here as well.
Download - T4A AmbiLightTest
Using Boblight Config Maker
Using the Boblight Config Maker is pretty straight forward and the order in which you enter information is really not important, so you can deviate from my proposed order.
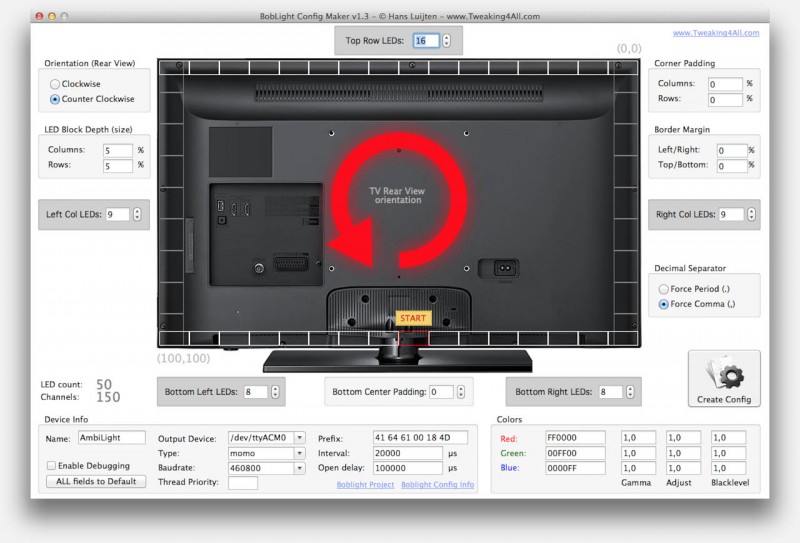
Step 1 – Enter the counted LEDs for each side of the TV
One thing that kept confusing me was: What side, front or back, of the TV am I looking at when creating a config file. I mean really, I did not find a shred of information explaining that to me clearly, so I had to find out the hard way.
This is the reason why you see the back of a TV in Boblight Config Maker.
Imagine you’re looking at the back of your TV, with the LEDs facing you.
Now we enter the number of LEDs you used for each side. Top, Left and Right are obvious, but the bottom part could use a little explaining.
I’ve split the bottom part in 3 sections. The Left, the Right and some space in the middle. The space in the middle is thought for those TV’s where you can’t have LED’s at the bottom center since the foot of the TV is blocking your way. I refer to this “space” as the “Bottom Center Padding”, where the “width” is measure in number of LEDs. I did this so you can hold a piece of your LED strands there to see how “wide” it is.
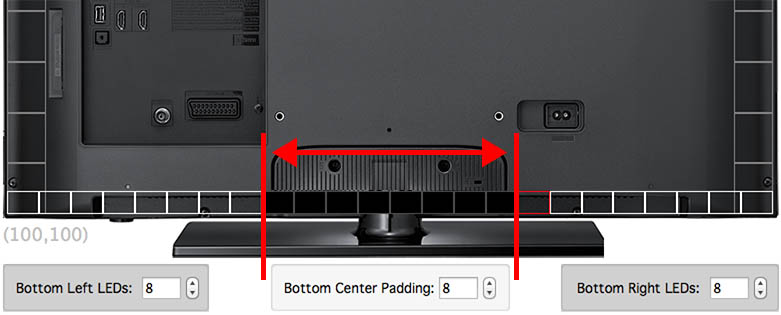
Boblight Config Maker – Padding for the TV Stand
“Bottom Center Padding” expresses, in “number of LEDs”, the width of the area at the bottom where you cannot place LEDs – if applicable for your situation, otherwise just set it to zero. In the illustration above: a width of 8 “LEDs” is kept clear.
OK now enter the LED counts …

Boblight Config Maker – Enter the LEDs for each side of your TV
After you’ve entered the number of LEDs per side, you’ll need to take a look at the “direction” of your LEDs.
Tip – Starting in a corner, instead of in the middle
Fields CAN have a count of zero LEDs, which can be used for example for situations where your setup starts in a corner, instead of in the middle (at the bottom). Some examples of configurations that start in a corner:
Start lower left corner, going up: set bottom left LEDs to zero, check “Clockwise”.
Start lower left corner, going right and then up: set bottom left LEDs to zero, check “Counter Clockwise”.
Start lower right corner, going up: set bottom right LEDs to zero, “Counter Clockwise”.
Start lower right corner, going left and the up: set bottom right LEDs to zero, “Clockwise”.
Step 2 – Set the proper Direction
Boblight starts with LED-1 (first LED connected to your Arduino), and continues going through your strand, one LED at a time, until it reaches the last defined LED. It needs to know this order, since for each LED a “zone” will defined in your video, so that Boblight can determine the average color of that zone and send the correct data to your Arduino. This data will be sent in a sequence, starting with LED-1.
As you can see: These “zones” are drawn with squares so you can see where the “zone” roughly is on your TV.
The start LED is drawn as a red rectangle and has the yellow “Start” tag hovering over it (see illustration below).
This would be the place where a wire from the LED strand goes to your Arduino.
If your strand goes the opposite direction, no problem! Simply select either “Clockwise” or “Counter Clockwise” in the “Orientation” box.

An example of a counter clockwise flow
Step 3 – Set the Depth of your color zones
We need to tell Boblight the zone we’d like to assign for a given LED and for this purpose we can set the “depth” of an LED.
For a LED in a column (vertical, so the left and right sides) this would mean the WIDTH. Height after all is already “fixed” and based on the position of the LED.
For a LED in a row (horizontal, so the top and bottom strands) this would mean the HEIGHT.
The illustration below gives you an idea what this means.
If you would lower the LED Depth for the column, then the column would get more narrow.
Same goes for the LED Depth or a row.
When you set the depth of your LEDs too deep, you will encounter some weird colors, not matching the “edge” of your video feed.
I’ve found that 5% actually works pretty good, but that’s with 290 LEDs.
If you find yourself using much less LEDs then you might want to increase these values – either way, it’s fun to play with these values.

Implications of setting LED Depth
Step 4 – Corner Padding (Optional)
As you might have noticed in previous screenshot: LED strands seem to overlap each other in corners, which is probably not what would really happen. After all, one strand would then “block” the other strand. That’s why I’ve added Corner Padding.
In the illustration below you see how this works.
The first picture show the top row and the right column overlap in the corner, which is most likely not desirable.
Adding some “padding” makes it that we can position the LED zone’s more like what they really are.
Please keep in mind that the rectangles represent the size of the “zone” for a given LED, and that is NOT the same as the physical size of a LED! Overlapping of these zones can be just fine!
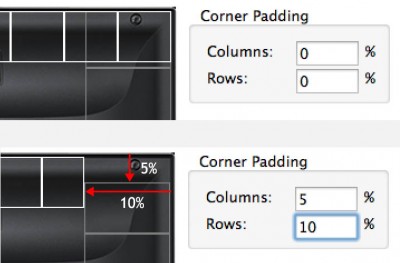
Optionally set Corner padding
Step 5 – Margins (Optional)
Like with Corner Padding, we can also define an offset from the edge of the TV. Now granted, this is a much less likely tool you’d want to use but the option is there.
Note that these margins will shift the zones more inwards of the picture of your video!
Colors are less likely to match.
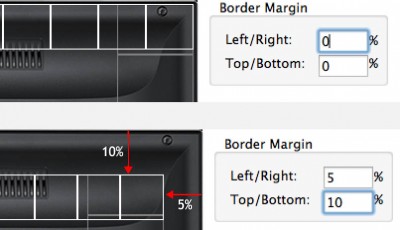
Optionally set Margins
Step 6 – Enter Device Info
Boblight will need some crucial device information, which must be entered correctly otherwise your Boblight will NOT work.
Reading the details on the Boblight Wiki is recommended, but hovering over the fields will give you some additional information as well.
Boblight Config Device Info
| Field |
Purpose |
Notes |
| Name |
This can be any name to identify your LED strand. Avoid spaces and special characters! |
|
| Output Device |
This is the output device Boblight talks to on your XBMC box. It represents the USB serial connection from your XBMC box to your Arduino. |
|
| Type |
Specifies the type of device. Momo is commonly used with the Arduino setup. |
|
| Baudrate |
Here we enter the speed in which Boblight will talk over the USB serial connection to your Arduino. |
This has to match the speed in your Arduino Sketch! |
| Thread priority |
This setting, a value from 1 to 99, identifies the priority Boblight gets on your computer. |
|
| Prefix |
The prefix “code” gives the Arduino the means to indetify the “start” of a new sequence of colors. |
This has to match the code in your Arduino Sketch! |
| Interval |
Identifies the update interval for your LED strands – if you see your LEDs can’t seem to keep up (specially at the end of the strand) then this value might be too low. Value is in milli seconds. 20,000 means 50x per second. |
|
| Open Delay |
This is the initial time Boblight will wait before sending data for the first time to your Arduino.
A value of 1,000,000 (1 second) is typically good. |
|
| Debugging |
This option, for the die-hards under us, will allow some debugging. |
|

Boblight Device Information
Optional : Magic Word Calculation
For certain setups a so called “Magic Word” is used, followed by the number of LEDs (low and high byte) and a checksum number (of the low and high byte). This method is for example seen with the Adafruit setup and the advantage would be that you would not have to re-program your Arduino when the LED count changes. Once you check the option “Use Magic Word”, calculations will be done automatically to determine the prefix.
Calculations are triggered by changing the number of LEDs or by checking this option.
Step 7 – Base Colors (Red, Green, Blue) corrections
This section is something you should probably not play with until you have your Boblight up and running.
Here you can tweak the colors, and Boblight actually allows much more than just the tweaking of the 3 base colors.
Step 8 – Generate the Boblight Config File
This step is obvious, you click on the “Create Config” button and Boblight Config Maker will ask you where to save the file.
What is however helpful is understanding the content of the file, specially when trying to trouble shoot.
Decimal Separator: period or comma?
Some users have ran into issues with a decimal separator being a period vs a comma.
I’d always start with testing by using a period as the decimal separator. If that doesn’t work in your setup, try a comma.
The issue behind the decimal separator is depending on your locale of the computer that runs boblightd and the version of boblightd you’re using.
Ad Blocking Detected Please consider disabling your ad blocker for our website.
We rely on these ads to be able to run our website.
You can of course support us in other ways (see Support Us on the left).
More insight in the Boblight Config file
The Boblight Config file could be divided in four basic sections: Global, Device, Color and Lights.
Boblight Config: [global]
In this section, I’ve added a comment so you see the date and time you generated this code, just in case you forgot which config file is which.
Here you’ll also find the interface IP address and IP port – leave these as they are. Changing them only makes sense if you’re doing some very advanced work with Boblight.
1
2
3
4
5
6
7
8
| # config file created with BobLight Config Maker v.1.0
# (C) Hans Luijten - //www.tweaking4all.com
# Orientation naming as seen from the REAR of the TV
# Date: 8-3-14 20:34:33
[global]
interface 127.0.0.1
port 19333 |
Boblight Config: [device]
This section reflects the device data we just entered, for example:
1
2
3
4
5
6
7
8
9
10
| [device]
name Ambilight
type momo
output /dev/ttyACM0
channels 867
prefix 41 64 61 00 18 4D
interval 10000
rate 115200
debug off
delayafteropen 10000 |
Boblight Config: [color]
As mentioned before, probably not the area you’d like to be tinkering with until you have a better grasp of your Boblight setup.
Here we see the 3 base colors defined, but you can define tons of other colors here as well and correct them if needed.
Note that the “name” of the color is only so humans can read it. Boblight only looks at the hex-code.
Below an example of the most basic color setup:
1
2
3
4
5
6
7
8
9
10
11
| [color]
name red
rgb FF0000
[color]
name green
rgb 00FF00
[color]
name blue
rgb 0000FF |
Boblight Config: [light]
This is the part why I’ve create this program. Here LED’s are linked to “zones” on the screen. Where, if looking at the fron of your TV, the top left has the (x,y) coordinates (0,0) and the bottom right corner has the coordinates (100,100). You see those coordinates also in the application printed above and below the picture of the TV back.
These coordinates (expressed in percentage) are used to identify a rectangle on your screen.
Keep in mind that Boblight Config Maker works assuming you’re looking at the BACK of your TV – the main reason why I did that, is because … well, I worked mostly behind the TV trouble shooting ….
Each sub section is marked with a comment, so you can easily find which side of your TV is being defined.
Not only that, the LED names will also tell you where on that strand the defined LED can be found.
Sections
Each LED has a name with a number in it. This number indicates it’s position in the strand of LEDs for that particular side, moving along the direction your strands goes (increasing as we move further away from the “start” position).
Bottom Start – This is where your Arduino is connected to your LED strands, the starting point. Hence the LED naming “start” followed by a number.
The LED called “start1” will be the first LED your Arduino “sees” in the strand.
Right Side – This is the right side of your TV when looking at the back of your TV. Or … the Left side when sitting in front of the TV.
LED’s are named “left” followed by a number.
Top – The top row is defined in this part and each LED’s name starts with “top” followed by a number.
Left Side – Defines the LED’s on the left side of your TV when looking at the back of your TV. LED’s are named “left” followed by a number.
Bottom End – This is the last piece of your LED strands, at the bottom of your TV. Here the name used is “end” followed by a number.
Finding the zone
As you can see, each LED has a “hscan” and a “vscan” value.
Think of the “hscan” as the X coordinates (horizontal) for the starting point and the ending point of the zone.
The “vscan” values represent the Y values (vertical) for the coordinates, from start to end.
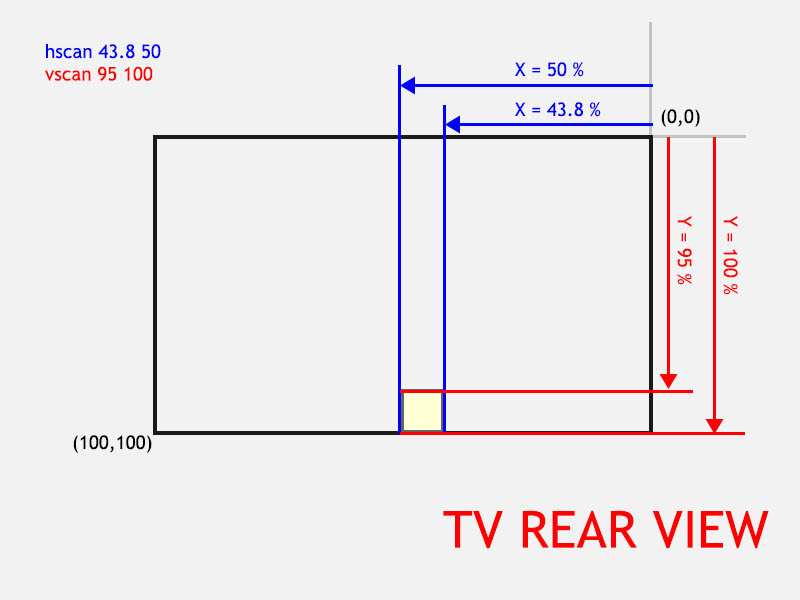
Boblight Config: hscan and vscan values (seen from the REAR of the TV)
Below an example Boblight Config file for the [light] section (with some lights removed, otherwise the file would be huge):
1
2
3
4
5
6
7
8
9
10
11
12
13
14
15
16
17
18
19
20
21
22
23
24
25
26
27
28
29
30
31
32
33
34
35
36
37
38
39
40
41
42
43
44
45
46
47
48
49
50
51
52
53
54
55
56
57
58
59
60
61
62
63
64
65
66
67
68
69
70
71
72
73
74
75
76
77
78
79
80
81
82
83
84
85
86
87
88
89
90
91
92
93
94
95
96
97
98
99
100
101
102
103
104
105
106
107
108
109
110
111
112
113
114
115
116
117
118
119
120
121
122
123
124
125
126
127
128
129
130
131
132
133
134
135
136
137
138
139
| # Bottom Start
[light]
name start1
color red AmbiLight 1
color green AmbiLight 2
color blue AmbiLight 3
hscan 43.8 50
vscan 95 100
[light]
name start2
color red AmbiLight 4
color green AmbiLight 5
color blue AmbiLight 6
hscan 37.5 43.8
vscan 95 100
...
[light]
name start8
color red AmbiLight 22
color green AmbiLight 23
color blue AmbiLight 24
hscan 0 6.2
vscan 95 100
# Right Side
[light]
name right1
color red AmbiLight 25
color green AmbiLight 26
color blue AmbiLight 27
hscan 0 5
vscan 88.9 100
[light]
name right2
color red AmbiLight 28
color green AmbiLight 29
color blue AmbiLight 30
hscan 0 5
vscan 77.8 88.9
...
[light]
name right9
color red AmbiLight 49
color green AmbiLight 50
color blue AmbiLight 51
hscan 0 5
vscan 0 11.1
# Top
[light]
name top1
color red AmbiLight 52
color green AmbiLight 53
color blue AmbiLight 54
hscan 0 6.2
vscan 0 5
[light]
name top2
color red AmbiLight 55
color green AmbiLight 56
color blue AmbiLight 57
hscan 6.2 12.5
vscan 0 5
...
[light]
name top16
color red AmbiLight 97
color green AmbiLight 98
color blue AmbiLight 99
hscan 93.8 100
vscan 0 5
# Left Side
[light]
name left1
color red AmbiLight 100
color green AmbiLight 101
color blue AmbiLight 102
hscan 95 100
vscan 0 11.1
[light]
name left2
color red AmbiLight 103
color green AmbiLight 104
color blue AmbiLight 105
hscan 95 100
vscan 11.1 22.2
...
[light]
name left9
color red AmbiLight 124
color green AmbiLight 125
color blue AmbiLight 126
hscan 95 100
vscan 88.9 100
# Bottom End
[light]
name end1
color red AmbiLight 127
color green AmbiLight 128
color blue AmbiLight 129
hscan 93.8 100
vscan 95 100
[light]
name end2
color red AmbiLight 130
color green AmbiLight 131
color blue AmbiLight 132
hscan 87.5 93.8
vscan 95 100
...
[light]
name end8
color red AmbiLight 148
color green AmbiLight 149
color blue AmbiLight 150
hscan 50 56.2
vscan 95 100 |


Comments
There are 167 comments. You can read them below.
You can post your own comments by using the form below, or reply to existing comments by using the "Reply" button.
[…] Appending my first post on OpenELEC / XBMC and Lightpack using Boblight, user Hansaplast on the XBMC forums has released his incredible and configurable Boblight Configuration Maker. […]
See also this post in the awesome XBMC forums ….
hans
Adjust field for red gives me a invalid float when saving config, can’t save config when selection OK.
schumi2004
Thanks for the feedback – What OS are you running?
And probably more important: Is a decimal point in your region a period or a comma?
(I’ll look into it right away)
hans
hi, why when trying to create config under win 7 64 bit i get the message :” 1.0 is an invalid float.Press ok to ignore and risk data corruptionPress cancel to kill the program.”
When i ignore it – i don’t get the config file , on cancel it’s closing the program. Thank you 4 ur help.
Matthias
i tried on a 32 bit win 8 and got the same info
Matthias
What region settings do you use (decimal point, is it a comma or a period)?
hans
a comma
Matthias
Thanks Matthias, I can now test under different regional settings,…
hans
For all Windows users: I’ve just uploaded a new version that resolves the “1.0 is an invalid float” error message when creating a conf file.
Booboo on my end, since decimal points in Europe are a comma, and in the USA a period – my apologies for the inconvenience.
hans
working great here after update. Thank you for the great conf maker.
Matthias
Thanks for the confirmation Matthias, and of course thanks for the kind words, glad to hear it works well now.
hans
I have 1 question, maybe you can see the differenz and help me out.
your boblight.conf maker is a way better. Everything is clear and i know what to do.
But the generated conf file doesn’t work with the boblightd.
So i need to stay with the conf generated with this https://www.dropbox.com/s/208t66tnninalzi/BoblightConfigCreator.jar
But i want somehow to get your conf working with it. what should i change (i know first ist is output device – but i change to com3)
Maybe when u generate with this one a conf file i see it you will propably knew much faster what is wrong them me trying to change or more copy each setting from old to ur conf. Getting crazy with it :)
Thank you 4 ur help
Matthias
Thanks for the nice compliment, and bummer it does not work for you …
I’ve had several people already use it and for them it seemed to work just fine with boblightd (I use boblightd myself).
I started a discussion in the forum (link), maybe you can post an example config file.
I can add COM ports to the dropdown list, what nottation is being used? COM1, COM2, etc. or COM1:, COM2, etc?
I haven’t worked with a Windows setup yet …
hans
it’s more like com1, com2 …
i dont really know what to post to show it, maybe i could upload bouth of them – the working one , and that i want to work :)
i will try on forum
Matthias
Update: Version 1.3 available, which should address issues with decimal points or comma’s.
hans
Seems like a great program – started poking around on it, unfortunately it doesn’t appear properly on laptops with 1366×7
68 resolution. I can’t resize or maximize the window, so many options appear to be cut off under my start bar and off the bottom of the screen. I’m using the software on my laptop to generate the conf files for my RasPi install, so I can try from the couch and upload the file to the Pi remotely.
Russ
Hi Russ,
I’m sorry to hear that you had to run in to this little snag. The form is actually 761 pixels in height (not counting the titlebar of the window), so I hope you might barely be missing info – maybe try setting your taskbar (assuming you’re running Windows) to autohide.
If you’d like, please post a screenshot of your screen (real size) in this Forum Post so I can gage better what the “max” height can be for your screen – maybe I can try nibbling a few pixels of to make it fit.
Just out of curiosity :
Do you need to reboot your RaspberryPi after uploading a new config?
Are you using OpenElec of Raspbmc?
Are you using the RaspberryPi GPIO or also an Arduino?
And what type of LED strands are you using?
(I do play with RaspberryPi’s as well, and with the latest OpenElec 4 beta’s things seem to run super smooth)
hans
Hi Russ – I moved your comment to the Boblight Config Maker article.
Others who have the same issue Russ runs into: please let me know.
hans
Hi Hans,
Thanks for the reply. I am not sure how to post an image on here but I did take a screenshot for you. The auto-hide function works, but its a bit bothersome when you’re poking at the bottom input fields as the mouse will keep bringing up the task bar. Squeezing a few pixels off the spacing would be a great fix, and hopefully not too much work for you. Feel free to email me with an address i can send the screen-cap, or let me know how/where to post it.
As for the rebooting my Pi – I’m not sure yet. I’m just starting to build my boblight setup – and I’m in the process of transitioning from a quad-core htpc solution, to the RasPi. I have a lot of learning to do still. But I will bookmark this and let you know when when I get to actually running it.
Russ
Forgot to answer the other questions…
OpenElec 3.95.3 is what i’m running as of this morning.
I have ordered some WS2812 SMD LED chips to test with. My plan is to implement using an arduino since i can’t find much in the way of people having success with the GPIO and the 2812’s tight timing requirements. But I do know of someone who has made it work – so once all the kinks are ironed out, i’ll probably convert it to straight GPIO. I was concerned the playback quality might suffer if the software to run the GPIO pins ended up using too much cpu time. I just bought a new 64″ TV and so I’m finally enjoying the large file 1080p rips out there.
I wanted the tighter density of LEDs the 2812 strings could offer vs the 2801 and other options where the chips are seperated from the led elements.
Russ
Hi Russ …
…
I’d need to figure out how many pixels of space I can use for the idea situation, or I could explore making the window resizable with the content scrollable … I’ll have to play around with that for a bit … would you be able to determine how many pixels of space you have available on your screen?
I’ve played with the Raspberry Pi as well, and with the OpenElec 4 (beta) being so much faster, I might reconsider using them again (my tiny AMD E-350 HTPC performs much better).
I read somewhere that some users had succes with the WS2801/GPIO combo, but you’re right about the challenging timing when using WS2811 or WS2812. Offloading this task to a small Arduino is indeed the easiest solution, I have some $4 Arduino Nano’s laying around which I eventually want to try for this purpose.
So far I’m loving the WS2812’s and I have yet to find a reason why I should use the WS2801’s.
Which ever you’d use (you already made your choice of course): Boblight Config Maker works for both …
…
hans
I’m not sure what the best way to determine available pixels is… If you have a suggestion, I’m all ears.
if there was a way for the contents of the window to dynamically adjust to fit the window that would be fantastic, but I suspect that might take a lot of extra work..
On a side note – is the OpenELEC 4 beta significantly faster than the 3.9.xx versions? Maybe I’ll try it out if that’s the case. Tomorrow I’m going to see if I can get the arduino end up and running on a 5V Pro Mini w/ the 328 processor. I’ve got a few kicking around and they’re small enough to stick into the 3d printed case for my Pi that I had a friend make up. Then I’ll start simulating the work load of the up to 300 LEDs that I’m going to run on the back of the TV. See if the frame rate drops/stutters… I may try overclocking the Pi if it needs it. Hopefully though, it won’t come to that.
Russ
Dynamic changing of the size of the window comes with a lot of work, but I could look at it – the TV picture will be distorted though.
Long version:
I’d take a screenshot of my screen (assuming you’re using Windows) and open it in paint. Then select the “visible screen area” of that image. Paint (MS Paint) might be indicating the height in pixels of your selection. Not that you’d have to do this though … I’m just curious how much space I can use for the app … (and future apps)
As for OpenElec 4: From what I hear online and a local friend, yes 4 should be MUCH faster than the 3.x versions. I heard the previous versions recompile XBMC original code, where as in 4 they use Raspberry Pi optimized code.
Doh! I just read at OpenElec that 3.9x is their internal beta name for 4.x. So I guess we’re talking about the same thing .
.
hans
Version 1.4, released today, allows resizing of the window.
Whatever content doesn’t fit can be reached by using the scroll bars (either right or bottom). Hope this helps …
…
hans
Downloaded the new version and was playing around with the setup this morning, seems to work good. I’m still waiting on my LEDs to arrive, but I got boblight going on the OpenELEC RasPi and talking to my arduino (currently using a Mega for testing). Took some messing around to figure out I’m supposed to leave the type set to “momo” in the config maker. Anyway – I can see it talking to my Arduino now, but with simulating ~260 LEDs, the RasPi isn’t playing video smoothly – the Serial RX LED on the arduino is almost on steady, so I’m curious if its a communication bottleneck that’s causing the video stutter. How many LEDs, and what refresh rates are you using with your setup? Do you find it smooth or does it affect your playback at all? (I realize you said you’re using a PC, not RasPi)
Russ
I’m using 292 LEDs (WS2812), Arduino Uno R3 and my XBMC box is a tiny AMD based PC (was like $100, AMD E350).
It works great, unless I use certain plugins that work during video playback – one of them keeps polling my network shares to see if there is something new and that really did not work well on this tiny PC.
I suspect that the Raspberry Pi will have a though time keeping up, but I’m sure that your current simulation is pretty on the ball – adding the LEDs won’t slow down the RPI … (the Arduino handles it ones it gets the data)
Maybe try overclocking the RPI? I have seen people accomplish 1000 Mhz … but I’d get nervous if I’d be doing that to my RPI, so maybe a headsink might not be a bad idea …
hans
Thanks for the answers – I realized after I posted that the 292 count in the .ino file was probably indicative of your setup.
Its a fresh install on the pi with only the boblight plugins installed, and I haven’t even setup the network shares yet. Was testing off a USB stick (which I ran the same video files from last night flawlessly – with no boblight). So it sounds like I’m definitely looking at overclocking. I’ve ordered a set of heatsinks, and I have really good thermal adhesive epoxy I’ll use to mount them. After that I suppose a fan. Maybe I’ll see if the arduino can handle temperature monitoring inside the case it will all be mounted in.
Ordered the LEDs out of China, so its going to be a couple weeks still before I see them – hopefully they come in quick and I’ll post back with my success/fails/findings.
Cheers.
Russ
Hi Russ!
What might be the case is that the USB is lacking when it’s being used for data from the USB stick and the Arduino. Maybe try how well it performs with a network share or the SD-card (not sure if either is connected to the USB controller or not).
I don’t envy that you have to wait … maybe one of these days I’ll try Bob light with the RPI as well. Just got my first B model and the latest OpenElec is supposed to be faster too … so who knows …
…
Oh my older A model always was overclocked at either 800 or 850 and never had any heat issues.
hans
I actually wondered the same thing after I posted. I will try the network share when I get home from work tonight.
I doubt that I’ll see much difference though, USB should be in the order of Megabits not kilobits. the data to the arduino is only running around 115kbit, so I don’t think it would be causing video trouble. But, in the pursuit of understanding and better performance, I will find out.
Russ
I released today v1.4 of Boblight Config Maker.
– Window is resizable (although not the greatest)
– Option to do the Magic Word (Adafruit) calculation automatically
Enjoy
hans
[…] (Boblight Config Maker) Tímhle udělat seznam/pčet LEDek a použít konfig pro umístění LEDek. http://www.tweaking4all.com/home-theatre/xbmc/boblight-config-maker/ Stručně jak na […]
Hi Hans,
thx for this cool software!
I use boblight on linux sat receiver.
2 things i have found:
The device name “AmbiLight” must named “Ambilight”.
The light name allowed only three sign (XX1 or 001 ….).
Is there a way to fix them?
greetz holymoly
holymoly
Hi HolyMoly!
I guess you’re the first one to run it for use with a sat-box …
…
In the next release, which might take a few days, I can fix the “Ambilight” name and look at the light names, assuming you mean something like this?
I am curious though; who ever compiled/created the sat box version of Boblight might not have used the original code and removed the ability to name lights differently. Might be something to bring up with them as well.
hans
For those with good ideas or suggestions …
I’m working on a new version of Boblight Config Maker (BCM), some features will be added and I’m exploring options to make it fit smaller screens (a handful of users have screens where the height of the BCM window is simply too heigh).
For a reduced height, one idea I had was to have a panel that can be made visible when needed, holding some of the options and device info. Not sure how much that would be appreciated.
One of the feautures I’m looking at is the use of “blur” or overlap between LEDs. In certain setups this helps make the color transitions nicer and/or less nervous.
Adding the option will not be too hard, but should I display these overlaps in graphic or not?
With a low number of LEDs this would not be a problem, but as soon as the LED count goes about say 100 (arbitrary number), it becomes very messy and you will not be able to distinguish any of the LEDs in the graphic.
Features:
– Support for Enigma boblight config files (lightnames)
– Reduced height of the window (if possible)
– Support for “blur” (overlap of LEDs)
Other suggestions and idea … please let me know.
hans
Hi Hans,
I wanted to run BCM on my Ubuntu 14.04 64-bit box, but it bombs out stating:
while that library is perfectly installed and available. Any thoughts?
Jeroen Brosens
Hi Jeroen!
I’m assuming this is because the app is 32 bits (a new version – also in 64 bits) should be released shortly.
Two options: one install the required 32 bit support (I’m not familiar enough with Linux to be able to tell you what needs to be done for that – it’s just something I found online, where they stated that 32 bit libs are needed next to the 64 libs), or wait until I release BCM v2.0.
I apologize for the inconvenience and the fact that my 32/64 bit knowledge under Linux is limited …
…
hans
No problem Hans,
I just thought I’d post it to inform you as a developer. I ran ldd against the binary and it was missing some more libs:
However, I downloaded the Windows version and ran it using wine, it worked right away :)
Jeroen Brosens
Thanks Jeroen!
I didn’t know about the “ldd” trick … I develop with Lazarus Pascal, so as a developer I’m not really exposed to any of these libs.
I was under the assumption that 32 bit binaries would run under 64 bit as well.
I guess I have to dig deeper in how to distribute apps under Linux …
I learn something new every day …
…
hans
This is really impressive work. Thanks for sharing!
I’m building my own AmbiLight clone and I plan to steal shamelessly from this project. ;’)
I have a question though. Because of my hardware decisions, I am going to write my own Arduino code. What I can’t find anywhere is information about the “Type” field in the BobLight config. For a custom system, what type do you choose? Is there an explanation of the choices anywhere?
My system will have 5 channels which means 5 groups of 3 RGB colour data. As far as I understand it, I just want BobLight to ouput a prefix of my choosing followed by 5 sets of 3 colour levels.
Anyone?
Christopher Gaul
You might be able to find more details about the effects of “type” in the Boblight Wiki.
As far as I understand, you’d be able to use “momo” when you’re using the Arduino. But as you already figured out: finding info about this field – you might have to browse through the source code on the Boblight Project page to see what “type” really does. I suspect that it has to do with the way data is formatted and sent to your device.
For your specific hardware choices, you’d indeed have to write a custom Arduino sketch, but I don’t think that part will be too difficult.
hans
Oh yeah, my system doesn’t use WS281x LED’s. I’m using a PWM shield and addressing RGB LED light strings by PWM channel. Channels are 1-15 (or 0-14).
Not sure if this matters for the Type choice, but I thought I’d throw it in there.
Christopher Gaul
[…] Boblightd nur die hälfte der LED’s leuchtet […]
Hi, great work on the config tool. This is an odd question but I mounted my lights incorrectly and the string starts at the top right instead of the bottom.. is there a way to set the config to start from there??
Regards,
Mathew.
Mathre
Hi Mathew,
As soon as I return from Europe (mid December), I’ll post a new version that allows this. .
.
Sorry for the long waiting time, I do not have my project files with to do the changes here
hans
I have been looking for an easier way to edit my conf file and this looks like a good choice.
In my configuration, I don’t have any LEDs along the bottom of the TV. WHen I try to set BobLightConfig Make up that way, I get some divide by zero errors.
I am not surprised by the error but if this this was an easy fix, an update to deal with that would be much appreciated.
Take Care
ijourneaux
Hi Ijourneaux!
Thanks for the compliment and feedback – I’m working on a new version that resolves this exact issue. Unfortunately, I’m traveling at the moment and won’t be back home until mid December. By that time I’ll have time to finish the last few steps for the new version.
hans
hi i am new at this i have installed my leds (ws2801) and made a boblight config file but i can not find a folder to put it into please help.
neil
Hi Neil,
you’ll have to be a little bit more specific.
Are you running Windows? MacOS X? Linux?
hans
Sorry I am using a raspberry pi using raspbmc from noobs
Neil
No problem!
I’ve not yet used RaspBMC with Boblight,… reading some online articles suggests it should be stored in the “/etc” directory. …
…
Unfortunately, I cannot confirm this
hans
Hi yes I have seen some tutorials on it and they say to put the folder in the etc dir but I do not have a boblight folder thanks anyway
Neil
Hi Neil!
It can be that you have to create to folder and/or file yourself,…? Just wondering.
Under OpenElec, I think the plugin creates it automatically, but you’ll have to edit the file.
Does RaspBMC not have a network share with config files, like OpenElec does?
Otherwise give it a try with OpenElec, since it also exists for the Raspberry Pi.
Sorry that I do not have a good answer …
…
If you find out how it works, would you mind posting it here?
hans
Hi hans thanks for the reply I will try on openelec see how that goes fingers crossed
Neil
[…] een programma zoals Boblight Config File voor het maken van een configuratie […]
Something that would be nice to add to your app, is the ability to smooth out the color over several pixels. As it stands right now sometimes the color changes on the on the edges are quite large and can be distracting
ijourneaux
Hi ijourneaux,
Thanks for the great suggestion.
My first idea would be to experiment with increasing the horizontal and vertical margins and padding, and position the LED strips accordingly. Effectively pushing the color selection away from the corners.
In a next release I will build in a “bleed” from one pixel to the other, … once I’m back home that is (traveling at the moment).
hans
I was wondering if you had been able build a new version
ijourneaux
Hi ijourneaux,
I have not been able to create a new build yet – Since August I have been traveling and do not have access to my source files. I should have copied them on my laptop, but I forgot … stupid.
Pretty soon I hope to be home again to grab the sources and create a new build. The new version will also include many improvements for other Boblight like Ambilight clones.
Sorry for the delay …
hans
Not a problem. Just curious or an update. I had used a couple of other tools to create a boblihgt config file but I always ahd to edit some potion of the config manually. i don’t have to do that with yours. Looking forward to the new features.
Ian
ijourneaux
Hi Ian,
Thanks and sure hope to get a new release soon … could be somewhere in March … hopefully earlier.
hans
I was wondering if there is any software for color adjustment.
I do feel boblight is not sending the right colors. When something is brown, boblight shows orange. If something is darker red, it just shows red.
Dennis
I have not seen any [yet],… you could play with the gamma parameter as well …?
hans
Hi to all,
I have a ws2811 led strip one raspi and arduino. In Raspi install arduino boblight in one stech of neopixel and it works but slow compared to the image. Could you please tell me how to install step by step hyperion and stech I enter in arduino led to this strip.
Forgive my English.
thank you very much for everything.
darknxt
Hi Darknxt,
Unfortunately I’m traveling and nowhere near my stuff, so I can’t research how to install Hyperion. With some help of Google, I did find this:
Install Hyperion as root on your Raspberry Pi (SSH into your Pi as root):
Next you’ll need a config file and, as far as I understand, Hyperion uses a JSON config file. The config file is very different from the files created by Boblight Config Maker. For this purpose I did find this editor, which is specifically for Hyperion.
I did also found a write up on how to install Hyperion with OpenElec.
hans
Great Tutorial!
I have been playing with the settings for some time now but can’t seem to get it to work!
I have installed boblightd on my htpc, where xbmc is also running.
I have installed the xbmc add-on.
I uploaded your script to my arduino,
I run the start.bat, it says boblightd is connected in XBMC.
boblightd outputs ERROR:abmiligt: dev/com3: tcgetattr() invalid argument
and then: ambilight dev/com3 had a non fatal error, it might still work.
But the ambilight is not working! Only showing original colour. Any tips or comments are welcome :)
TheJMan
Hi TheJMan!
I did some searching and found:
1) This might implicate that certain COM port values are incorrect. For example an invalid value for the baudrate. Try, just for testing, for example 9600 and see what happens. For example some Windows machines do not like high baudrates and cap at 115200.
(based on reading the source code – line 197 and further)
2) You might be talking to the wrong COM port. You could look in the Device Manager (I assume you’re running Windows) and see what ports exist.
3) It could be that FTDI drivers are needed on your Windows computer (see this Arduino link on how to install them).
Please let us know if any of these steps resolved the issue – others will benefit from it. It seems a relatively common question on multiple platforms, yet nobody seems to be posting answers on other forums/blogs.
hans
Thank you Hans, for the quick reply. Unfortunately I do not have as much time as I would like to work on this so this is the first opportunity i got to respond. I say this to make sure you know your response and help is very much appreciated.
1) I am using baud 115200 in the conf and arduino code. (also read it in code and set it to be sure) .
2) I also checked this a lot of times. It is set to COM3 everywhere.
3) This was something I had not tried yet, to be sure I reinstalled the software and restarted. Still no change.
I hope you have more ideas to help me with this issue, as I myself am running out.
This is what the boblightd is telling me :
TheJMan
No worries TheJMan! Much appreciate you taking the effort to clarify though
Time sure can be a hurdle …
Also thanks for the log dumb! It really seems like there is a communication issue between PC and Arduino. You managed to upload the Sketch and the test swirl worked, I assume, so communication should be good. Meaning: no hardware or cable issues.
I assume you’ve used the Arduino IDE on the same computer and that the IDE refers to the same com pot (com3). So that should not be an issue.
Can you match the com-port speed used by the Arduino IDE? (in Sketch and Boblight config)
Since you’re running Windows, you could pull up the properties of the com-port in the device manager and force it to the speed (initial) you’d like to use. Not sure if this is still an option under Windows though.
Another thing you could try is booting your HTPC with a USB stick with an OpenElec image on it and try the settings above. You’d need the write the image file to a USB stick and boot from the stick (it won’t screw up your Windows setup).
hans
Just checking in to9 see if you have had a chance to work on a new version.
Take Care
ijourneaux
Hi ijourneaux!
I’m actually working on a new version right now – however, I’m still traveling so it’s not quite going at the speed that I’d like to go. Testing is even harder since I do not have my Boblight with. If you’re up for beta testing, then please let me know.
hans
I can easily beta test for you. (and don’t mind thins breaking as I can always go back to previous version <grin>)
ijourneaux
I’ll email you a beta as soon as I have a reasonable version ready.
What platform are you working with (Win/Lin/Mac)?
And what kind of Boblight/Hyperion setup are you using?
(so I know what you’ll be focussing on)
hans
Hans
I was wondering if you ever got around to generating a new version that handled those few issue we discussed? My setup is windows using the BoblightD addin for XBMC.
ijourneaux
Hi Ijourneaux,
yes I did, but … I’m far from happy with the result. I think I went a little overboard with v2.
Right now I’m debating (better said: I have not made a decision yet) if I just should put it out there … or not.
Would you be interested in testing?
hans
I would be glad to test for you. Fully understand that it may not be perfect.
ijourneaux
In the next few days, I’ll look at the last version I created and sent you a copy by email to play with.
Like I said: I’m not exactly happy with that latest version, but feel free to test it.
hans
I am running WIn7 with XBMC and the BoblightD add-in. I don’t have the version number on the boblightd.exe file but the configurations created by Boblight Config Maker seem to work.
ijourneaux
Allright! I recall you’re lloking for config’s without LEDs at the bottom and possibly some color smoothing, right? Any other features you’d be interested in?
hans
I was able to figure out a wway to handle the bottom light correctly. with your existing tool. In an ideal world, the configuratino should handle no lights on the bottom.
What I am really looking for is the ability to smooth the color along the edges. Right not, I have scenes where the color changes along the edge are actualy distracting .
Take Care.
ijourneaux
Cool! Thanks for the details – this way I can focus on that (both have been implemented in the beta version already)!
I just need to find a way to test the config files, as I’m not having my setup anywhere near me.
hans
Hans
I was wondering if you had a new version available that had the features we discussed earlier in this thread.
Take Care
Ian
Ian Journeaux
Hi Ian,
well, yes I have a version 2.0 available, with some of the functions requested by users like yourself.
I’m not yet completely satisfied with how it works, and I’m in the middle of moving from the US to the Netherlands.
I could email you a copy, but for Windows or Linux I’d still have to compile it.
hans
Hello Hans,
I am trying to do it in english ;)
My first attemp of the ambilight project was succesful. With openelec and with your config it worked perfect. But i had one problem, the space on the usb stick was 64Gb but loading the openelec image on the stick, it was little less then 256Mb. Everything worked fine, but i could not install other addons because of the space.
So i was ready for a second try. Kodi installed on a windows 7 PC.
I have changed this in the boblight.conf
device /dev/ttyACM0 replaced with device /dev/com3
in the arduino file i have changed the baudrate to 115200 and also in the com port settings of the pc.
But i have the same error in the bob light deamon
(CDeviceRS232::OpenSerialPort) ERROR: ambilight: /dev/com3: tcgetattr() Invalid argument
(CDeviceRS232::OpenSerialPort) ambilight: /dev/com3 had a non fatal error, it might still work, continuing
(CClientsHandler::Process) 127.0.0.1:49853 connected.
I have tried everything but it does not work.
Only yesterday when i was going to stop to go to sleep it has worked for a couple of minutes. But i had the problem that my XBMC freezes all the time.
Now i am thinking could there be a problem with the com port. That it is used by more than one application(device)?
And is there a possibility that we can try to test the com port, so that we can see that the arduino gets his information en lights op the ambilight?
Dammm
I am having an headache en i”m out of options…….
Greetings
Steven
Hi Steven!
You’ve used a 64Gb USB stick for OpenElec and it’s full? That cannot be right …
I use a 32Gb SSD and I have about 30Gb free …? (see also: OpenElec Disk Requirements 90-125Mb)
Or was that just a typo?
Anyhow, back to your question …
You probably did this, but I’m just checking anyway: did you set the baudrate in the boblight.conf as well? (sketch and boblight.conf is where you set the baudrate speed)
Did you try a lower speed? For example 9600 (very low) or 38400? (see this comment)
There can be all kinds of reasons why higher speeds might fail.
I have yet to find a good way to test speeds, but I do know that Windows PC’s can be a headache when it comes to COM ports.
You could set the baudrate also in the device properties – although technically this should not matter.
hans
I have just tried this setup with raspberry pi 2 and arduino nano…
few tips… after reboot arduino is not detected on /dev/ttyUSB0 but if you replug it, it will be detected.
had to lower serial port baud rate to 115200 (both in arduino sketch and boblight.conf) in order for boblight to start to work. (with other baud rates LEDs (5m 300LEDS) where all white – like the sketch initialize them but boblight failed to connect.
with this lower baudrate I experience delay about 1.5 sec… thinking about hyperion…
Marini
Hi Marini,
Hyperion is most certainly a good option for the Raspberry Pi – When I get my hands on my stuff again (I’m traveling), I’ll most certainly will start playing with that and maybe even write an article about it.
It’s a little strange that the Raspberry Pi 2 does not recognize the Arduino Nano right away though. Maybe there is somethingwrong with the Nano? Not sure if you have one laying around, but could you try another Arduino? Maybe another Nano or an Uno?
hans
Hi
I recentlyy bought a bigger screen, and had to move all my leds to the new tv.
I´ve noticed that one of my leds is dead, or rather -blue color works only, so it is just flickering with the blue, and that is really annoying. I do have spare ones, but as it is on a strand its a bit tricky to switch, and I just dont have the motivation to get my tv down from the wall and start soldering out the broken one (1st one on the strand also, easy fix i know ;-)
The question. can i just “block” the dead one in my config file, so it wont lit up at all just put a “#” or “//” in the lines that indicates that one led?
Cheers
Martin
Hi Martin!
Well, I haven’t tried this, but you could try setting
for that particular LED … again, not sure if the LED will remain OFF and if Boblight will explode or not …
…
… or temporary a piece of electric (black) tape over it?
hans
Zeroing it out did not work.
When “#” none of them lit up. guess i have to stick with some tape for now ;P
Can u define color black, and then do like this?
Martin
That sucks,… oh well. Tape will work for sure …
…
Have you tried defining “black” for the lights?
I suspect you’ll have to define black in the color section then as well:
Not sure if it will work though … Not sure if you need to adjust these fields as well:
I’m guessing Gamma should be 0, the rest might work with “1” …?
hans
Yeah i did something like that, but gave up after some tries hehe.
tape worked fine ;P
Martin
hans
I could use some help here.
I am running current version of OpenELEC and Kodi on my Asus Chromebox. Seems to work with my 1 LP with 10 LEDS. When I connect the second LP so I would have 20 LEDS it doesn’t work. I have tried making new config files etc but no luck.
I need the 2 LP since using 65″ Samsung TV and need the extra LEDs. Any ideas?
Ray
Hi Ray!
I’m assuming you mean “LED strand” when you say “LP”? Sorry, I’m unfamiliar with the phrase.
Some thoughts that come to mind:
hans
LP = LightPack. I purchased 2 LightPacks from Lightpack.tv. The have 10 plugs each with 3 LEDS on them. So each is 10 x 3 = 30 LEDs. I have 2 of them so 60 LEDs.
After A LOT of messing around with these I think I have it kinda working. I had to add in the config Bus and address info for each LightPack.
Colors seem to be off. Not sure how this screen grabbing works but my guess grabbing from different than expected spots.
Ray
Here is what I am testing with now:
Code
Ray
Hi Ray!
I’m not familiar with LightPack – but the info you’ve just provided is actually pretty good to know.
In the new Boblight Config Maker, I did add LightPack parameters, but I wasn’t aware this needed to be done for each strand.
As for the colors being off, there could be a few reasons why this happens:
– Most likely, I’d guess, is the position. It might take some experimenting to see what and why. For regular LEDs and Boblight this never seemed to be an issue.
– Possible you might have to adjust Red, Green, Blue and/or Gamma.
Depends a little what you mean with colors being “off” .
.
hans
Could it be related to the padding? (ie. space from the border)
hans
Played your demo video. It seems pretty good till the black and white stuff. Then the rotating line is off by a long ways.
Ray
The vertical/horizontal bars are quite a challenge for most setups.
The rotating line however should work fine.
Could it be that your LightPack isn’t keeping up?
hans
so if I start in lower left corner going right how do I tell boblight where to start?
Ray Milyard
Hi Ray,
One option would be to set “Bottom Left” and “Center Padding” to zero. Assuming you meant, viewing the TV from the back and running the LEDs Counter Clockwise. In that case the “Bottom Right” LEDs will fill the bottom.
hans
I was thinking looking at TV from back starting in the bottom left corner and going right along the bottom to right corner. Then going up right side to top right corner. Then top right to top left corner. Then top left corner down left side.
Just not sure how put this in your program. Don’t see how to START changes. Maybe I am missing something.
Ray Milyard
I think I see what your saying now!
Ray
I assume you’ve got it to work now? Cool .
.
If not: feel free to ask for help.
hans
Hi Hans. Thanks for your Boblight config tool. Works nicely and has very helpful explanations of the parameters!
Some bugs I noticed:
A question regarding my setup: I have the LED stripes arranged in such a fashion, that the vertical stripes are longer than the horizontal ones (meaning the vertical stripes’ start and end LEDs are the “corner” LEDs). Thus I set “Corner padding”->”Rows” to the “LED Block Depth (size)”->”Columns” value, so the vertical LEDs “shrink”. Is this the correct way for my setup?!
Best Regards,
Bim
Bim
Hi BIM,
Thanks for the compliment and the input!
I’ve been (on and off) working on a new version.
This should solve the division by zero error, and overlap/spacing has been added.
However BCM 2.0 is not entirely to my liking yet, that’s why it’s not published yet.
Oh and your specific question is being addressed in the new version as well.
In that case I’d assume that corner padding for rows is indeed the one you’ll need to play with.
Although I have to admit that I’m not 100% sure if it will get the desired effect.
hans
hi Hans!
your tool looks awesome! as I’m moving from intel-atom windows based setup to raspberry-pi-2 openelec one, I think I’m gonna use it a lot! just a one thing – is there any possibility to change order of the leds via GUI? I’ve got two lightpacks [one original, one clone, 10 zones x3 leds both]. the lightpack’s prismatik software handles them with no hassle, and it’s easy to change the order of led zones – very important for me, as the clone box has shorter cables [and I mean VERY short, used with my 50″ TV], and I have almost no room for changing plugs order [believe me or not, almost impossible to connect other way..]. right now, prismatik can see this config: http://oh.daaa.mn/lightpack-prismatik.jpg and it’s good. I just want to know, if something like that is possible with your software/with boblight, or I need to have everything in perfect 1-20 order..
cheers!
PeeJay
Hi PeeJay,
Glad to see you’re playing with this as well
Right now there is no option to change the numbers. But … what you could do is pretend all the leds are in sequence, generate a config file and manually move the LEDs configs in the right position. You have only 20 LEDs so it wouldn’t be a too big a disaster (I hope). You’d have to move them in the right position in the config and update the sequence numbering.
Sorry I can’t offer an easier way out …
hans
hello!
thank you for replying to my questions. I thought so – good thing, that reordering by hand is possible, I was worried that boblight needs leds just in line..
so looks like I’m going to learn boblight configuration files scheme :D there are 20 LED strips [3 leds on each strip], so there’s 60 LEDs :D but if I’ll figure out the right way to number them, I hope it won’t be the hardest job to reorder them.
cheers!
PeeJay
It’s not all that hard,… just takes work.
For each LED we define the “block” the mimic of the video feed, the order can be random (I believe).
hans
phew! I finally had some time and worked it out. first of all – thank you again, your tool helped a lot! without it, I probably would gave up! :)
I’m getting some strange behaviour though. it seemed like I put correct numbers in the config, but I’m almost sure, that something is messed up with order. while playing videos I can see that not everytime and not every led-zone lights up with correct colour. but the real fun begins when I play some test videos [I made my own, with the placement and sizes of the zones like I have it connected]. few zones light-up almost randomly, and for example – two in a row [located at the opposite sides :D] – but I think that’s just my problem and I need to rethink number ordering in the config file, so I hope to solve that sooner or later ;)
“in the meantime” I’ve got another question – maybe you Hans, or maybe someone reading this can answer: AFAIK boblightd service can be installed on some remote machine and I can refer to that by entering the IP address in the config file – but does it mean that Lightpack should be connected to the very same unit? I mean this scenario: KODI + Boblight add-on installed on RaspberryPi and directed by configuration to the IP of a linux-based NAS-device with boblightd service installed & running and also with the both Lightpacks plugged into the NAS’ USB ports. whether the boblightd service can or cannot be run on the NAS-device is not the problem here [I think I can make it work], I’m just curious if that’s the sense of remote-installed boblightd. I’m having some power-related issues with my RPi2 [long story short: with two Lightpacks and bluetooth-dongle plugged in, only one Lightpack is turned on, even with USB ports “overclocked” to 1.2A; when I unplug the bluetooth, everything’s ok, but I like to have my BT option in case I want to use keyboard with Raspberry], I know I probably could solve it with stronger power source for RPi2, but unfortunately can’t do it because of the connections I need to have to get my entertainment system working in a way I like [RPi2 connected to another device, not to standalone power-source]. if I’m wrong – what’s the deal with remote boblightd installation? [besides the fact it’s not working under Windows]
cheers!
PeeJay
Hi PeeJay!
I’d try some test to see if all LEDs work properly. I’ve had it with just one LED where it acted “weird” at times, which seemed related to one of the 3 actual LEDs in the “LED” (the square white blocks on the strip) – so for example of Red, Green and Blue, one of these 3 kept failing.
The use of “remote” connecting with Boblight is most certainly an option.
I have no experience with that, but AFAIK, you do only need the Lightpack part on the machine that’s driving the LED hardware. One of our visitors, Mind12 (see this post) even uses a virtual machine to remotely work with Kodi and another machine to drive the LED hardware.
hans
Fast question!
Step 1 – Enter the counted LEDs for each side of the TV
Each led mean each strip or each led of strip?
I got 6 led x 10 strip. I should to have 60 “boxes” (like those: //www.tweaking4all.com/wp-content/uploads/2014/03/boblight_config_maker_corners-400×263.jpg) or 10
Thx
ne0x
Hi Neox,
Yes, you should have 60 of these “boxes”, each “LED” would be one of those little (often white) “blocks” that you count in the strip.
So in this image you will see in the top strip, 3 “LEDs” or “blocks” (technically each block has 3 LEDs, Red, Green and Blue – better ignore that notion for now).
The image you are referring to is for padding by the way …
hans
haha, this is probably also the answer for my problems.. I don’t know why, but I assumed that one “BOX” = one “strip of leds”.. and I aaaalmost had it done [just 4 “boxes” still looks like out of sync, so I’m still fighting with my setup]. will try to add more boxes to my config, we’ll see how it works in my config.
cheers!
PeeJay
Yeah it can be a little confusing, my apologies for that …
hans
Ok thx. I configured wrong then, i put 10 boxes like strips i have. I will set it again right.
Btw my strips have 6 leds each one. Its affect anything?
Ne0x
I repat all config again with 60 leds (180 channels) and boblight gives me an error and leds doesnt work. In service.log appears:
(CDeviceLightpack::SetupDevice) AmbiLight: found Lightpack at bus 1 address 8, serial is 85230333230351915081
(CDeviceLightpack::SetupDevice) ERROR: AmbiLight: error detaching interface 0, error:-5 LIBUSB_ERROR_NOT_FOUND
(CDevice::Process) ERROR: AmbiLight: setting up failed, retrying in 10 seconds
If I put back old “bad” config with only 30 leds, leds works “fine”
What can I do? Thanks
ne0x
I just had the same issue.
so one more time:
I have 20 led strips, 3 leds on each strip. each led is 3-color. that gives me 60 leds, 180 channels [I’m understanding, that one channel = one color, configured for example: Red or Blue or Green].
my config is top: 6 strips [18 leds], sides: 4 strips each [12 leds], 6 strips at the bottom [another 18 leds].
when I prepare config with 60 leds and 180 channels, Boblight addon CAN’T connect to the boblightd service.
when I prepare config with 20 leds [each 3-led strip counted as 1 led], with 60 channels [like each led on the strip is one channel/one color – but of course each led can display 3 colors so it has 3 channels each] – Boblight addon connects to the boblightd service & it works.
that means I still can’t understand what is the channel, what is the led [as understood by the config maker and the boblight itself] but the good and best thing is – I can make it work ;)
PeeJay
Hi PeeJay,
Lightpack is an analog sytem hardware and can’t read with every single LED on the stripe. you must see a stripe at one block/sector. So every LED on this block
get always the same color information from boblight. your config with 20 blocks are correct.
HolyMoly (didiTaler01)
hi,
thanks for clearing that up :)
yep, I noticed that the STRIPE=LED=BLOCK approach is the only one to go, now I know why :)
cheers!
PeeJay
Hi HolyMoly!
Good to see you here and thanks for jumping in
hans
Ops thx, this is te reason why doesn’t work too in my rasp2.
Anyway I have 10 strips of 6 leds each one. I configured each strip as one led and light pack works but very very bad. Only shows Red d green and blue. If TV shows brown, pink or orange, leds shows red, if tv shows soft blue, leds shows strong blue, etcc
Can affect the number of leds each strip? I have 6 and my bobligth.conf shows like this : (only configs 3 leds of 6)
[light]
name start1
color red AmbiLight 1
color green AmbiLight 2
color blue AmbiLight 3
hscan 43.8 50
vscan 95 100
Any help plz. Thx a lot
Ne0x
AFAIK this is when the options like gamma, adjust and blacklevel come in handy.
unfortunately can’t tell you what’s the perfect setting, I’m still experimenting with mine [seems better than before, but still far from perfect].
this probably is internal boblightd “bug/feature”. AFAIR with prismatic colors were more accurate [yet still needed some tweaking], but this is probably based on the differencies with the method used by both softwares.
PeeJay
Did you tried hyperion? I don’t know if its my .conf file or boblight addon problrm, but my light pack work very bad. Poor accurate
Ne0x
didn’t tried hyperion yet. but I’ll add that to waiting list. I need few days of watching to be check the overall outcome of boblightd configuration – simple tests means one thing, but “real” movies often are different thing.
PeeJay
Oh thx for clear it.
Then, if ia standard lightpack of 1 strip of 3 leds=1led in boblight.conf right?
But if the strip have 6 leds? 1 strip = 1 led or 2 leds?
Thx in advantage
RocketL
hi!
like I wrote before – this 6-ledded strip is probably understood by boblightd as 1 led = 1 box. but you can always try a 2-led/2-box approach. worst case the led won’t light up.
cheers!
PeeJay
Deejay, you say before that one STRIPE=LED=BLOCK. Yours stripes have 3 leds, but my stripes have 6 leds, its the same? Or in my case 1 stripe = 2 leds = 2 blocks
Thanks
ne0x
I’d say that your stripe also equals led and block. I think that your system also will understand that as one piece. you can try all combinations, AFAIK it doesn’t make any harm to the system [unless mine was ok ;)], worst case scenario led won’t light with bad config.
[and watch out that typo in my nick, the handwritten font got you wrong – it’s PJ, like in my avatar :) just not to confuse us if anybody with nick “Deejay” shows up here :D]
PeeJay
Ops sorry for my mistake.
Finally, after to see very bad results with boblight in mi ligthpack clone I decided to install hyperion. Easier to configure and finally leds works very very fine with accurate colors.
If you cant get better results with bobligth try Hyperion.
regards
ne0x
thanks for the tip! I’ll try soon and then gonna choose the best effect :)
cheers!
PeeJay
Thanks guys for jumping in! .
.
It’s really great to see that you guys are helping out … awesome
hans
Hello,
really love the tool! I have a problem though. I need the prefix for a 300 led installation (with hyperion) but if i setup 299 leds (hyperion starts from 0) i get a weird prefix (41 64 61 01 2B 7F). Is this a bug or am I missing something? I noticed that low byte will change when you pass numbers that can’t be represented with 2 character hexes.
This is however not my main question since basic hex conversion is just a google away. My main question is how the checksum is calculated?
Daniel
OK, I (think I) figured out (with help from my colleague) that the checksum is lowbyte xor highbyte xor 0x55, and with a programming calculator I got the checksum
00 ^12B ^0x55 = 17E that I think is correct (can’t test right now).
Just putting the info here for someone else to find :)
Daniel
Hi Daniel,
Here is the code that calculates this in Pascal, it’s been a while that I actually did something with that haha:
Does this help?
hans
No sorry, Pascal is not my field :( Can you confirm that my previous reply is correct? It doesn’t work but I can’t yet exclude that prefix is the reason…
Daniel
It’s my direct conversion of the C and JavaScript code others have been using.
So far nobody has reported it not working … and I’m not a master in high/low/shifting … sorry
I do not even use the prefix that way in my own Sketch.
hans
Thank you. It seems that my calculation was correct, however I’ve come to the conclusion that the problem is in the sketch. The ledbuffer is in the type of ‘char’ so it will never take higher hex values than FF. I have to rewrite it to make it compatible with 255+ led strips. Haven’t looked into it yet so I really have no idea if that’s the only thing i need to do to make it work or if the hardware (led strip and rpi) needs changes on their ends to…In the end I really only need around 240 leds so I don’t think I will bother even if it would be cool to have the possibility to hookup 300 leds :)
Daniel
Hi Daniel!
Interesting, since I used 290 LEDs in my own Boblight project. But you are right, a ‘char’ would not go beyond 255 …
I’m assuming you’re not using the sketch I used in my own Boblight project. The LED count there is stored in a [compiler] constant and not type specific defined. So it’s rather fixed (unlike other sketches that use the prefix to be able to pass the number of LEDs variably) and doesn’t run into type limitations.
hans
Yes, might be that I use hyperion instead of boblight and only use this tool to get the prefix. Maybe I will look into the sketch and hyperion code in the future to see if I can eliminate the char. Boblight is great and easy to setup but is to laggy with my setup (rpi2 + openelec).
Daniel
[…] Boblight Config Maker for Prefix Calc […]
Hello,
I use Boblight with 2 lightpack; it works, but I color errors.
I would use Boblight Config Maker to refine my settings to my tv, but I can not find how to declare two lightpack in the software.
Here’s my conf file. current
[code][global] interface 127.0.0.1 port 19333
[device]
name LP2
channels 30
type light pack
interval 20000
bus 1
address 3
[device]
name LP1
channels 30
type light pack
interval 20000
bus 1
address 2
[color]
name red
rob FF0000
gamma 1.6
adjust 1.0
[color]
name gun
rob 00FF00
gamma 1.6
adjust 1.0
[color]
name blu
rob 0000FF
gamma 1.6
adjust 1.0[/code]
Thank you
Arck0s
Hi Arck0s,
Unfortunately, I’m not very familiar with LightPack. In an earlier attempt to make a new version of BCM, I did include the info I could find online and with the help of a few users. But … I’m totally not happy with the new version I created and that’s why I never published it.
I could post it here, but I’d have to compile it, and I have to give caution that I really do not lake what I have fabricated in this new version.
hans
Hello,
The software works, it lacks the ability to add other pack. I will try to declare one single package with 20 LED strips and modify the conf file by adding the 2nd case.
If you need a beta tester I volunteer :)
Best regards
Arck0s
What OS are you running? Windows, Mac or Linux?
For the Mac I’d have a version you could play with, for Linux or Windows I’d have to test and recompile it, but that can be arranged too. I can email you a version to play with. Just keep in mind: I’m not exactly happy with this new version and so far it has been lower on my priority list to give it another try. To be able to email you, please make sure you’re posting here with an email address that actually works – quite a few users use a fake email address here it seems.
hans
iLast question, in the software, what Type should you choose for lightpack ?
Thank you
Arck0s
Hi Arck0s,
I have no clue at this point, I’d have to dig into the code of v2 which has been dormant for a year now ….
hans
Hans
Would you object to posting your project on GitHub or other similar site so that other users can work on improving the software? There are very few options out there for configuring these light systems.
Wish you the very best in 2016
Ian
ijourneaux
Bet wishes to you too Ian!!
Posting it on GitHub … ehm … I have not yet done that ever before … I’ll have to think about it. Maybe the original version, but like I said v2 is not acceptable in my opinion.
hans
Pity ….
I have a concern probably very silly, but when I pass by the software to create my config, I have a concern, one of the pack does not work; but if I take another config works with 2 ca packs; I confess I do not understand why it does not work
The file that works but is not suited to my TV
The file that is suitable and that I have created with Boblight Config maker but turns a single pack
Here is the log
So if you need a beta tester, I am a volunteer, even if my English is poor, I know Google trad: D
Arck0s
Hi Arck0s,
I cleaned up your code a little bit to avoid that this page becomes huge (posting large code/log files is better done in the forum).
The difference between these 2 configs is that you define the type twice …
versus what you did in the first file:
That’s probably why you get errors.
For testing/playing, I can send you the v2 by email, I just need to know what Operating System you’re using.
And be aware that it’s a version I’m not 100% happy about.
hans
Good evening,
Sorry for the size of the post …
I just tried changing the file, and ca worked with a small color error; thank you very much :)
I’m running OS X 10.11.2
thank you very much
Arck0s
No worries …
I’ll try to email you v2 today for MacOS X.
hans
UPDATE:
I’ve just posted the beta of version 2 – this will most likely be the last version, I’m running out of time to work on this particular project.
hans
Hans
I downloaded your Beta 2. Unfortuantely it did not work it for me. Wasn’t able to successfully start boblight with the created ini file. I can appreciate that you don’t have enough time to work on it any more. If you do decide to abandone it, I hope you will consider posting to github or other open source code sharing site.
Your code would not be useful to me as I don’t know pascal but the meta code would be useful if trying to configure up a similar tool in C# or VB.
Thanks for posted what you have. It got my boblight setup working a couple of years ago
Take Care my friend.
Ian Journeaux
Thanks Ian!
I am considering making it open source, but not right now. I might pick up the project again, who knows, and I’m not the proudest about my programming skills …
Do you know why the ini failed in your setup?
Thanks again
hans
There were a few issues. I will post tonight. I didn’t post earlier as I wasn’t sure you were going to be working on it.. I liked many of the features you tried to implement.
ijourneaux
I’m not sure if and when I’d work on any of the issues,… but if it’s an easy fix, then I could spend an hour or so fixing it.
If you’d like you can also reply to the notification, or email me at webmaster at tweaking4all dot com.
hans
Hans
I had to go back to the older version. The colors were going in exactly the opposite direction of the original config. (I had noticed that the colors were off butactually ran a Ambilight config utility tonight and confirmed that they were going opposite of what I had selected in the config tool.
I couldn’t just correct the file anymore as the numbering was off from the first led instead of just the last few.
Ian
ijourneaux
Hi Ijourneaux!
Thanks for the heads up! As soon as I find time, I’ll try to fix some of the obvious issues in the new version. ….
….
At the moment I’m swamped and moving around a lot (travel).
I’ll post an update here when the time comes
hans
Don’t worry. I know when life gets in the way. Just keeping you posted. really like the new features you have been working on.
ijourneaux
[…] ma part, ça ne m’a pas aidé. Jai donc utilisé le logiciel BobLight ConfigMaker , prévu à la base pour le système […]
Greetings. Would anyone be able to modify the arduino code so that the boblight works even with HDR movies?
Boblight works with HDR movies, but the colors are washed out.
Thank you for your response.
I just bought a new TV and it would be a shame if the boblight didn’t work properly for HDR movies as well.
Mark
Hi Mark,
unfortunately, this is a quite old project. (9 years now)
The best way to accomplish this is by modifying the Boblight Raspberry Pi code, to my knowledge, Boblight is no longer maintained.
The Raspberry Pi may be fast enough to correct colors for HDR, but I very much doubt an Arduino can correct colors fast enough to accommodate for this.
Having said that:
I’d strongly recommend migrating to a Boblight alternative, like Hyperion which still seems maintained and seems to have a lot more options.
Hans