File Transfer Options
Certain methods rely on the Android version your device runs – if needed, read our article on how to determine your Android version.
I also included some Android version independent methods (FTP Server being the recommended option).
It’s totally up to you which method you’d like to use.
I have divided this guide in three groups:
Note : There have been very few, if any, devices put on the market with Android 3.x. The vast majority has either 2.x or 4.x.
Android 3.x is supposed to behave comparable to 4.x when it comes to transferring files to and from your Android device.
Applications that came with your Android …
Keep in mind that applications that come with your phone (like Samsung KIES, HTC Sync Manager, etc.) often allow transfer of files as well – but are often manufacturer specific and can be a source of problems (KIES notoriously causes issues on MacOS X).
File-size Limitations of Android!
The size of each individual file you’re trying to copy to your Android should not exceed 4Gb, as the file system of some Android models cannot handle larger files. More recent devices should be able to handle files larger than 4Gb, but your mileage may vary.
No Special Requirements needed!
None of the methods below require modification (i.e. root) of your Android device and are written with a stock Android device in mind.
Ad Blocking Detected Please consider disabling your ad blocker for our website.
We rely on these ads to be able to run our website.
You can of course support us in other ways (see Support Us on the left).
USB Cable – Android 2.x versions
Transferring files with older Android versions (pre 3.0) is so much easier than the newer versions of Android. Your Android device is connected to your computer through an USB cable (the one that came with your device) and with a few taps your computer will see the device as a regular hard disk.
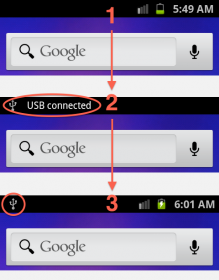
Illustrated:
Before connecting the USB cable you’ll see nothing USB related (1), after connecting the USB cable your Android device will identify this (2), and during normal operation after that the USB icon will remain visible (3).
Android Detects USB
The next step is to tell your Android device to connect as a storage device (note that the screens on your device might differ, but the essence is the same). Tap the USB icon and slide your finger down to open the notification area, where you will see a “USB connected” notification.
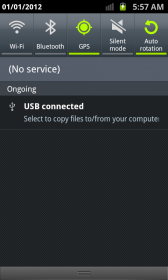
Android USB notification
Tap the “USB connected” notification and a window will open in which you’ll see a “Connect USB storage” – tap the button.

Enable Android as Storage for your computer
On your computer you will now see, after a few seconds, a new disk drive appear – this is your Android device.
Transferring files to and from your Android device is now as simple as when doing this with regular disk drives.
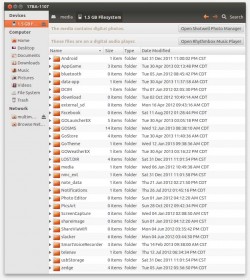
Folders like “DCIM” (regular photo camera folder – you’ll find your pictures and recorded videos here), “Screencapture” (your screenshots in case you made any), “download” (files downloaded from the Internet), “sdcard“, “SD” or “external_sd” (your memory card), “Pictures“, “Movies“, “Videos“, etc are relatively safe to work with. Other folders I’d recommend staying out of. Looking around won’t hurt too much, but don’t move, rename, copy files from those other folders.
Note : Movies you rented or bought through for example Google Play or Amazon might be encrypted and might not play on your PC.
Below some examples in Windows, MacOS X and Linux (Ubuntu) what that could look like.
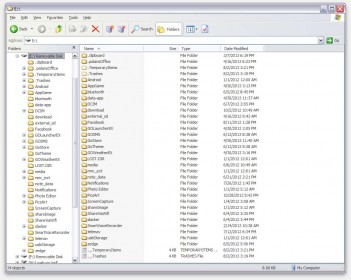
Windows and Android 2.x
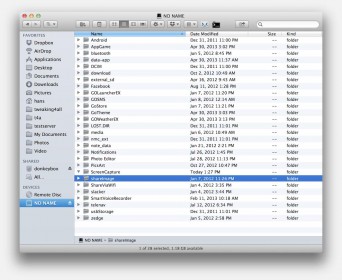
MacOS X and Android 2.x
Linux (Ubuntu) and Android 2.x
USB Cable – Android 4.x versions
With Android 4.x a new approach has been implemented and the old Android 2.x disk access method has been removed. It most certainly did not make things any easier – if anything it made it way more complicated with certain setups.
The “Mass Storage” (UMS) protocol, which made Android 2.x practical, has been replaced by MTP (Media Transfer Protocol) and PTP (Picture Transfer Protocol). The later is something you might have already used since most digital camera’s use this protocol and is intended for devices that cannot handle MTP.
That’s a lot of technical mumbo jumbo, with the bottom line being: the old mass storage method for Android 2.x no longer works.
Note : You might notice that the MTP protocol is slower than the old USB Mass Storage protocol.
Early and Custom Android 4.x versions …
Some of the earlier and/or custom Android 4.x versions might still offer the USB Mass Storage option which in some ocassions means that you have to enable the USB Debugging mode in the developer settings of your device. More recent 4.x versions no longer support this, unless the manufacturer customized their Android version to support this anyway.
Some of these versions allow you to set “USB Storage” under Settings Storage Menu Button USB Settings.
Windows
MTP is a protocol that finds it roots with those guys from Redmond – Microsoft. Obviously for Windows this should not a problem …
Windows XP
I know Windows XP is “old”, but hey, it makes for a fast and responsive OS even on old hardware or in a virtual machine. Since Windows XP is “old”, XP does not come with the proper MTP drivers, for this we need to first install the latest Windows Media Player, which for Windows XP is version 11 (get it here for free).
No additional drivers should be needed – so don’t install them, as they typically interfere with the proper working of the MTP drivers!
Once Windows Media Player is installed, plugin the USB cable of your Android device and you should be good to go.
Open “My Computer” and look under the “Other” group where you should see your Android device. When double clicking your device, you will likely see a drive appear called “Internal Storage”. Double click that drive to access the files.
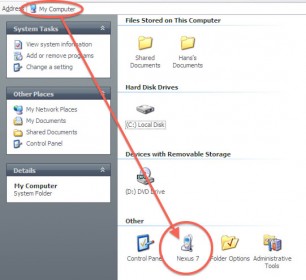
Android 4.x to Windows XP
Trouble Shooting XP
With my Asus Nexus 7, I encountered some issues getting the connection to work.
If after installing Windows Media Player 11, you still do not see you Android device appear, then try these steps:
- Connect your Android device to your PC via USB.
2. Right click on “My Computer” “Device Manager“.
3. Look for the entry corresponding to Android device (for example “Nexus 7”) – it will probably have a yellow exclamation mark.
4. Right click the entry and then select “Uninstall“.
5. Now unplug the cable of your Android device and count to 5.
6. Reconnect you Android again, which will automatically install the default drivers.
7. Open “My Computer” and see if your device now appears under “Other“.
Windows 7 or 8
Windows 7 and 8 recognize your phone or table right away as a “Portable Device”, and will often install a driver automatically. It’s seen as a media device which you can browse like any other drive. You will however not see all the Android folders – just the folders that are considered “safe” or media related.
Open “My Computer” (or the Windows Explorer – which is not the same as the Internet explorer!). Under “Portable Devices” you’ll see your Android device. Double click it and you will likely see a drive appear called “Internal Storage”. Double click that drive to access the files.
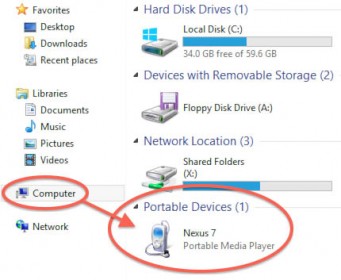
Android 4.x to Windows 8
MacOS X
MacOS X does not natively support MTP (10.8.4) so for this to work you’ll need a driver or tool to communicate. So far I’ve seen 3 options for the Mac:
- Use Manufacturer Software that came with your device
- Use Android File Transfer
- Use XNJB
I’m not going to write much about XNJB as it was not designed with Android in mind – rather for the Creative Nomad MP3 Player. It can be slow at refreshing at times, yet copies relatively fast, and it does do the trick most of the time. XNJB is free and can be downloaded from the XNJB website.
Manufacturer Software
I have heard good things and bad things about this approach, but key is to make sure that you always have the latest version of the software (most certainly when using Samsung KIES!). Since most of these applications are rather bloated with functionality I don’t even care for, I typically stay away from them, but that doesn’t mean that you should avoid them as well. The point of this article is that you can pick what works best for you personally.
Android File Transfer
Or AFT for short, is the tool I recommend and it’s provided for free by Google. You can download it from Google so you have the latest version. Of course you can download it here as well:
Download - Android File Transfer
Note : AFT has been reported by several Mac users as a little trouble maker that doesn’t really work. This is actually not the case, but you might need to do a little trouble shooting, see the trouble shooting notes for suggestions. AFT is also not the fastest in responding to connected devices, so patience is required!
After downloading, double click the DMG file and drag the application to your “Applications” folder, and start it from there. You have to do the starting only once, because after the first time, it will start automatically when you connect an Android Device that supports MTP (Android 3.0 and newer).
Usage is not unlike the use of Finder, you can copy, move, and delete files. It accepts drag and drop to and from the Finder as well.
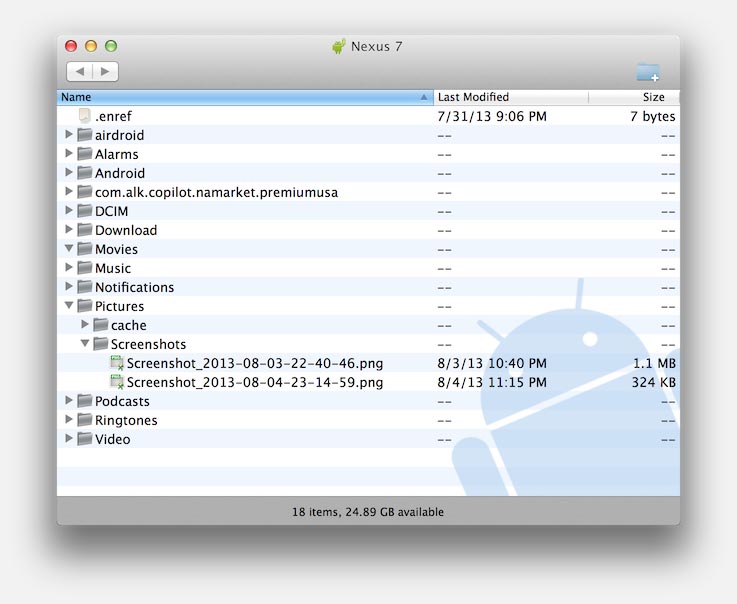
Android 4.x to MacOS X
Trouble Shooting Android File Transfer
A lot of users seem to be experiencing problems when using Android File Transfer and I’ve ran into a few myself.
Here a few tricks that helped many others:
- Samsung KIES is causing compatibility issues – uninstall KIES will resolve your issues (see below).
- Reboot your Mac – as trivial as it may sound …
- Make sure Your Android device is set to “MTP” in the USB settings.
Change the settings on your Android device by going to “Settings” “Storage” Tap the menu button in the upper right corner Select “USB computer connection” check “Media device (MTP)”.
- Reboot your Tablet or Phone …
How to Uninstall Samsung KIES
- Download the KIES installer (here). It comes with an uninstaller.
- Open the downloaded DMG file and double click the uninstall icon:
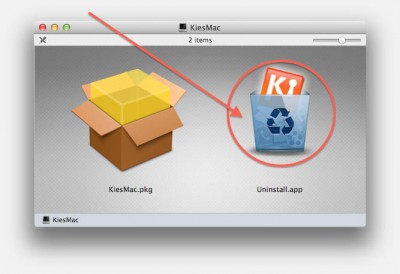
Uninstall Samsung KIES
- After uninstallation completed: Reboot your Mac.
Manual KIES driver removal
If you are still experiencing issues, this is the manual way of removing the KIES driver from the command line.
Open your “Applications” folder and click “Utilities” “Terminal” and enter the commands presented below. Note that the statement “sudo su” will ask for your usual password.
Be very careful when doing this – consequences of mistakes in the command-line when using “sudo su” are not to be underestimated!
1
2
3
4
| sudo su
kextunload ssuddrv.kext
cd /System/Library/Extensions
rm -rf ssuddrv.kext |
Linux (Ubuntu)
Things for Linux users, to my surprise, appear much more complicated as most of the current Linux distro’s do not come with MTP support. Ironic if you think about the fact that Android has Linux roots.
As a Linux (Ubuntu) user you will have to install a filesystem called GVFS (there are alternatives like MTPFS and GO-MTPFS but I was unable to get either to run stable). GVFS is a filesystem allowing access to multiple protocols (SFTP, FTP, WebDAV, SMB, OBEX, MTP etc.), where the MTP protocol is used by Android 4.x devices.
Ubuntu 12 users should use APT to get the latest version running on their computer – this might work on earlier Ubuntu versions as well, but I didn’t have a chance to test that.
Ubuntu 13 and newer are said to have MTP support build in – but I have been unable to verify this at this time.
1
2
| sudo add-apt-repository ppa:langdalepl/gvfs-mtp
sudo apt-get update |
It is recommended to run the “Update Manager” right after this, to make sure all the related packages are up to date.
After completing the update, reboot your computer, connect your Android device through the USB cable, unlock your device, and it should now appear in the file manager (Nautilus) as a drive.
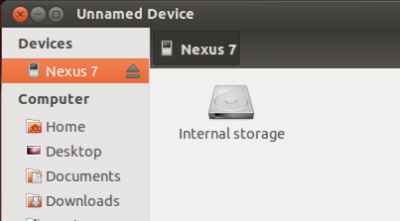
Android 4.x and Ubuntu 12
Not using an USB Cable – All Android versions
FTP Server
Personally I think running an FTP server on your Android device is pretty elegant – no need for wires and no need for weird protocol support and totally Operating System independent.
So what does “FTP Server” mean?
FTP stands for File Transfer Protocol – It’s an ancient (1971!) protocol to transfer files between two computers. Your Android is a computer as well so that should do exactly what we want, and it works like a charm for copying files. For FTP to work however, you will need a FTP Server (on your Android Device) and a FTP Client (on your computer). The server provides access to parts of it’s filesystem, so the client can download, upload, delete and rename files on the filesystem of the server.
In this example we will use your file browser as the FTP client – after all, it’s already installed on your computer. Under normal circumstances this should work great, but if you’d like you can use a dedicated FTP Client applications as well. Dedicated FTP clients can be found for free or commercially: here is a list of commonly used FTP Clients. I can highly recommend the free Filezilla (available for Windows, MacOS X and Linux) or the commercial Forklift (MacOS X).
- Do not leave the FTP Server running when you don’t need access to the files – it is a security risk.
- Copying files over WiFi is practical, but slightly slower than USB.
Step 1 – Get the FTP Server for your Android device
For the FTP Server part we are going to be using one of the easiest to use FTP Server apps for your Android, called FTP Server (Demo).
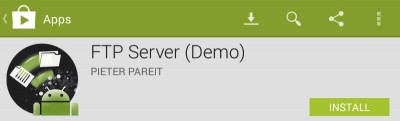
Android App – FTP Server (SwiFTP)
Kindle users and users that do not have Google Play access:
Instead of going to the Google Play store, you can go to the SwiFTP homepage and download and install it from there. On a normal Android device you might need to change your settings to allow apps from unknown sources (“Setting” “Security” Check “Unknown sources“) – strangely enough, I could not find this setting on my Kindle Fire HD, but it installed just fine.
Note : This app does not require a so called “rooted” device (a.k.a. jailbroken).
Install the FTP Server on your Android device: either by getting SwiFTP FTP Server from Google Play or download it straight from the SwiFTP homepage.
Step 2 – Starting the FTP Server
Start FTP Server and you will see a screen like illustrated below (I circled the changes you need to make or observe).
(1) Check optionally “Display password” (so you can read the password),
(2) Enter a “Username” and a “Password” if you do not like the default values (“ftp” for both),
(3) Start the FTP server by checking the checkbox next to “Running”,
(4) Here you will find the “address” of your FTP server. In this example: ftp://192.168.1.104:2121, we will need this information for the FTP Client.
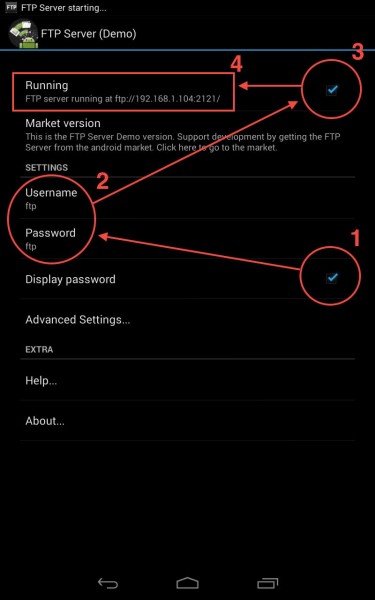
Start Android FTP Server
Step 3 – Connecting with the FTP Client
Most Operating Systems do allow you to access FTP servers through their file-manager (Windows Explorer, Finder, Nautilus, etc). For this to work (and for other FTP Clients) we will need the information found at point 4 in the illustration above of the FTP Server screen.
Let’s break that information down for a minute so we know what it all means:
In the example, FTP Server shows the FTP address as ftp://192.168.1.104:2121.
What this means, is that in this example (the numbers you see on your FTP Server screen will most likely be different):
- the IP address of the Host or Server is 192.168.1.104 and
- the IP Port or Port, used by the server, is 2121.
Keep in mind that with FTP access, you will not be able to open certain folders, or modify certain files – this is fine for our purposes as it serves as a certain level of protection for sensitive Android files (but it’s not a guarantee!). You can access your music, videos, documents, eBooks, etc just fine though. The folder “sdcard” is your way to find access to your files.
Don’t forget: When done transferring files, go to FTP Server and uncheck the “Running” checkbox and close the App.
For Windows:
Using Windows Explorer, type the full address (ftp://192.168.1.104:2121) in the address field and press ENTER.
Username and password will be asked when a connection has been established.
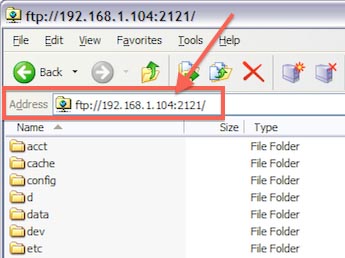
Windows Explorer as FTP Client
For MacOS X:
Using the Finder, click “Go” “Connect to server“, at “Server address” enter the full name we did see in FTP Server (ftp://192.168.1.104:2121) and click “Connect“.
Username and Password will be asked once a connection has been established.
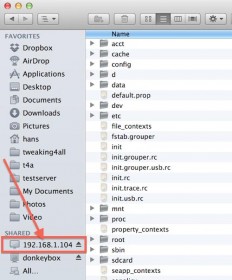
MacOS X Finder as FTP Client
For Linux:
Using Nautilus (file manager in Ubuntu), click “File” “Connect to server“, set “Type” to “FTP (with login)“, fill in “Server” (192.168.1.104), “Port” (2121), “Username” and “Password” and click “Connect“.
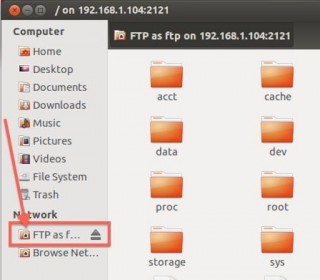
Linux Nautilus as FTP Client
For FTP Client programs:
In FileZilla (other FTP Client applications have similar settings), you will see a “Host:” field for the IP address, and a “Port:” field for the IP Port. Enter here the numbers you found in the FTP Server app. Don’t forget to enter here the “Username:” and “Password:” that you entered in FTP Server. Next click the “Quickconnect” button and you should be connected to your Android Device.
Future use after the first time …
Once you have gone through all these steps, step 1, 2 and most of step 3 are no longer needed for the next time you’d like to use FTP.
Simply start the FTP Server app on your Android device and check the “running” checkbox, and open your FTP client (Filezilla, etc.).
Once you done simply uncheck the “running” checkbox and close the app.
AirDroid
You can consider using AirDroid, a neat little tool to control your Android device through any web-browser, which makes it OS independent!
When you install the (free) AirDroid and start it, a message will be displayed on your phone or tablet what address you have to type into your browser. Once the page opens in your browser you’ll see a slick desktop representation of your phone.
I’m not a fan of using AirDroid for transferring files, as it is horribly slow. But it works, and it most certainly can be used as a last resort.
SD Card
Most Android devices have either a SD Card or a Micro SD cards – some, like my Nexus 7 and Kindle Fire HD, do not.
These memory cards are by the way pretty cheap these days and allow you to upgrade the storage capacity of your Android device on a dime.
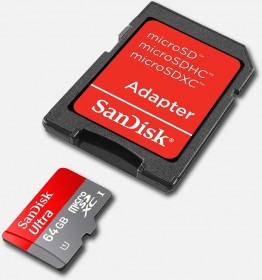
Micro SD Card with SD card adaptor
If you have access to the SD card, then you can use this to transfer files as well – albeit less practical at times. With most phones for example you’ll need to remove the battery first to be able to access the SD card. micro-SD cards on top of that need an adaptor to fit the SD card slot of your computer or memory card reader.
Once inserted into your computer, it will appear as a regular drive and allows you to copy files back and forth.
Note : For most Operating Systems you must use a safe eject of the memory card before you pull it out of your computer.


Comments
There are 4 comments. You can read them below.
You can post your own comments by using the form below, or reply to existing comments by using the "Reply" button.
I can’t transfer Android files to my Mac. I contacted AT&T, Android and Pantech and they couldn’t help me. The Pantech guy told me to get an iPhone . I found you on the Apple Community Support site. I was so relieved to find you because I’ve been working on this for days. Your’s is the best info out there
 . I have a MacBook Pro OS X 10.7.5. Here’s what I did before you. I downloaded the Android File Transfer app. Installed a micro SD card in my phone and got a high speed card reader. I followed the AFT and phone instructions exactly. All I got in the AFT window was empty files except for one that had a screenshot of my phone. Today I followed your instructions using the USB method and the iPhoto page opened allowing 2 out of 400 pictures to transfer. I was so excited when this happened, even though it was only 2 photos
 . I tried it again but when the iPhoto page opened nothing downloaded. Your method was the only one that worked so I am praying you can help me further. I am not very savvy with tech lingo so I would very appreciate it simplified. Your help will be so greatly appreciated. Thank you so very much
 .
.
Kat.B
Hi Kat.B,
Thank you for the very nice comments .
.
I’m unfortunately no where near my “stuff” (I’m traveling), but I’d be happy to see if I can help.
It is indeed a bit odd that it picks up only 2 pictures of 400. My first guess would be that the other 398 have been marked as “downloaded” before, or that communication fails after the first 2. The first scenario could be a setting in the picture import app, where an option might be available saying “download all” vs “download new” pictures.
For the second scenario, I’d expect a second or third attempt to give similar results, only 1 or 2 pictures get downloaded, which it didn’t.
SD Card
If however, you have an SD card in your phone, then you could consider taking the SD card out of the phone and connect it to your MacBook Pro (by the way: I highly recommend upgrading to a newer version of MacOS X if you MacBook Pro is still supported).
If you’d insert the SD card into your Mac/Card-reader, then you could open it like a regular “drive” and look for the pictures.
This browsing like a regular drive might take a little time to find the actual location of the JPG files (which are the pictures).
Some common locations:
It can be that one of these locations has a subfolder that you might want to look into and locate JPG files.
Wireless through Dropbox
Another, maybe even easier method, is the use of DropBox.
DropBox is a free cloud service that gives you storage space which you can access straight from your computer.
1. Setup a DropBox account (free)
2. Install the DropBox app on your phone (also free)
3. During DropBox setup, make sure to enable “Camera Upload“
Once done, you’ll need to install DropBox on your Mac as well – it’s free as well and can be downloaded here. During setup on your Mac you’ll need username and password of the Dropbox account you did setup in step 1.
After waiting for a bit, you’ll see your images appear in the Dropbox folder on your Mac in a folder called “Camera Uploads”.
I can imagine that this information is a bit overwhelming … so please feel free to ask if you have any questions.
In this day and age, transferring pictures should be much easier, shame on all smartphone manufacturers … “buy another phone” is never a good answer …
hans
Thank you for your help. I am using AirMore to transfer files between Android and PC. It works very well for me. It allows me to connect Android to Windows or Mac wirelessly. And the transferring is quite fast.
Terdia
Hi Terdia,
thank you for the good tip!
Seems to work with Android and iOS and pretty much any computer with a webbrowser. I have not tested this, but maybe others would like to give it a try. It seems one-way traffic, which is often enough. So it would allow downloading pictures and such from your phone.
For who is interested the AirMore website states:
What is AirMore web?
AirMore web replaces your USB cable with your web browser. It is a free web-based application which enables you to connect your Android or iOS device to your Windows/Mac PC through a wireless network.
It doesn’t require any installation on your computer.
Once connected, the application does not only support transferring files from your PC onto your device’s internal storage or SD card, but can also move music, photos, videos, or anything else from your mobile device onto your PC. The speed is mainly dependent on your router. You can transfer a large amount of files without any limits. The transferring process is quite simple as long as you follow the steps.
hans