SSH on QNAP
To be able to use SSH or SFTP, you will need to enable these services. Other servers and systems will work differently.
Go to “Control Panel” “Network Services” “Telnet / SSH“, check “Allow SSH Connection” and optionally check “Enable SFTP” and click “Apply“. That’s all there is to it.
Using SSH Clients
In this article I’ll cover some of the very basics of setting up a SSH Shell connection …
Since most of the references to our articles are based on trying to get SSH access to a device that has a SSH service enabled, we will mostly focus on that.
SFTP, FTPS, SCP and SSH
SSH, SFTP and SCP have a connection that’s fully encrypted.
SFTP (SSH File Transfer Protocol) is a secure File Transfer Protocol protocol, which uses SSH.
SFTP is used only for interactively working with files, i.e. Copy, Rename, Transfer, Delete, etc.
SCP (Secure CoPy) is similar to SFTP and also uses SSH, but with less options. It’s more designed to just transfer files.
FTPS (FTP over SSL) is a File Transfer Protocol (FTP) protocol but unlike SSH this one runs over a SSL connection.
Although often confused with SFTP, this protocol has nothing to do with SSH and is not compatible with SFTP.
Data in this protocol is encrypted using SSL.
Keep in mind that SFTP is very different than FTPS!
SSH Client
The SSH Client is the application on your computer that you will using for accessing the “other” computer or device.
Note that with each SSH Connection we need:
- Server: Often IP-Address or ComputerName, for example: 192.168.1.100
- Username: You username on the machine you’d like to access, for example: admin
- Password: The password on the machine you’d like to access, for example: mysecretpassword
In rare occasions you might need the used IP port number as well. The default port number is 22 (TCP).
Web Browser Extension for Google Chrome (Cross Platform)
Modern browsers have to option to add extensions, and believe it or not, there are SSH Client extensions for one of the most popular browsers: Google Chrome.
Now I can already hear the complaints: “What about FireFox? “.
Well … none of the plugins (FireSSH for example) is working in the latest FireFox versions … You can try searching for an SSH Shell extension or and try to install it, maybe you’re having more luck than I did.
Secure Shell is a neat little add-on for Google Chrome browsers and as far as I can see, you can use it on any Operating System. You can download it here for free.
The cool part is that it remembers your previous connections, you just have to enter the password again.
Things become pretty easy with Google Chrome when you add a shortcut to your toolbar.
To exit Secure Shell, either close the tab or type “exit” and press ENTER.
For making a connection we use at least 2 or 3 of the available fields:
– The top (wide) field is basically where you enter the “name” of your connection, for example “My Server” (visible if you want to connect again at a later time)
– Right under that we see the first field (username) and IP-Address (or device network name)
– A connection will be established once you press ENTER or click the button “[ENTER] Connect” and typically a password will be asked.
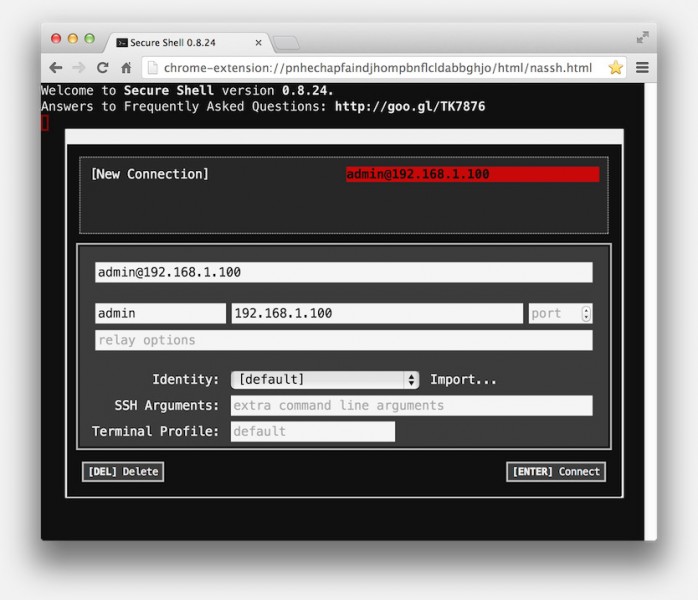
Google Chrome – Secure Shell – Open a connection
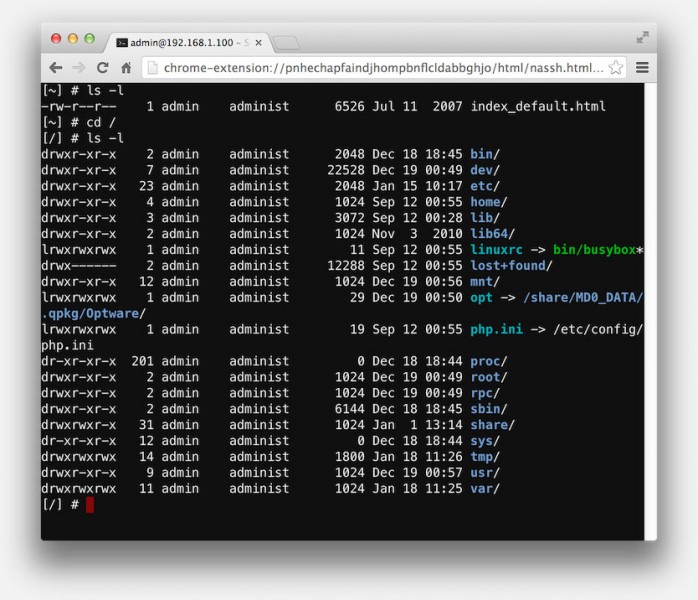
Google Chrome – Secure Shell – Example SSH Connection
FireSSH is also a cross-platform SSH Client and seems to be quicker on it’s feet than Secure Shell. You can download this one here and it’s free as well.
Like Secure Shell, FireSSH also remembers previous connections without password.
The only downside of FireSSH is that I have not been able to create a shortcut in the browser’s toolbar, and instead I need to use the Chrome App Launcher (which is something I really didn’t need – yet another App Launcher).
To exit FireSSH, simply close the window or type “exit”.
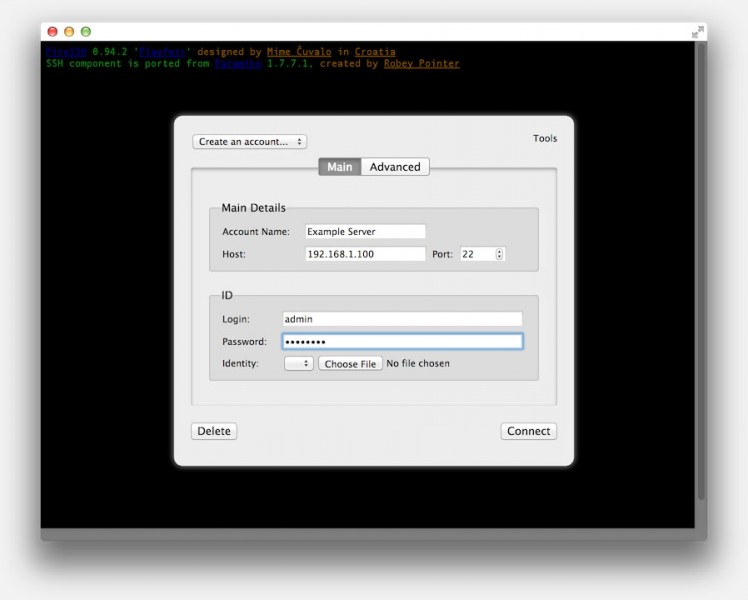
The important fields here are:
– Top left dropdown: select an existing SSH connection or “Create an account…” to create a new SSH connection.
– “Account Name” is used for future reference, so for example “My Server”.
– “Host” is where you enter IP-Address (or device network name) of the server you’d like to contact.
– “Login” will be your username on that device and “Password” obviously the password of this account (not saved).
– A connection will be established after clicking the “Connect” button.
FireSSH Shortcut Tip
MacOS X:
The FireSSH App can be found in ~/Applications/Chrome Apps/FireSSH.
From here you can make an alias (place it on your Desktop or in your “Applications” folder) or drag the App on the Finder Dock.
Windows:
In the “Google App Launcher” right click “FireSSH” and choose “Create Shortcuts” from the popup menu. In the upcoming window check “Desktop” and/or “Taskbar” and click the “Create” button to create a shortcut.
FireSSH – Open a Connection
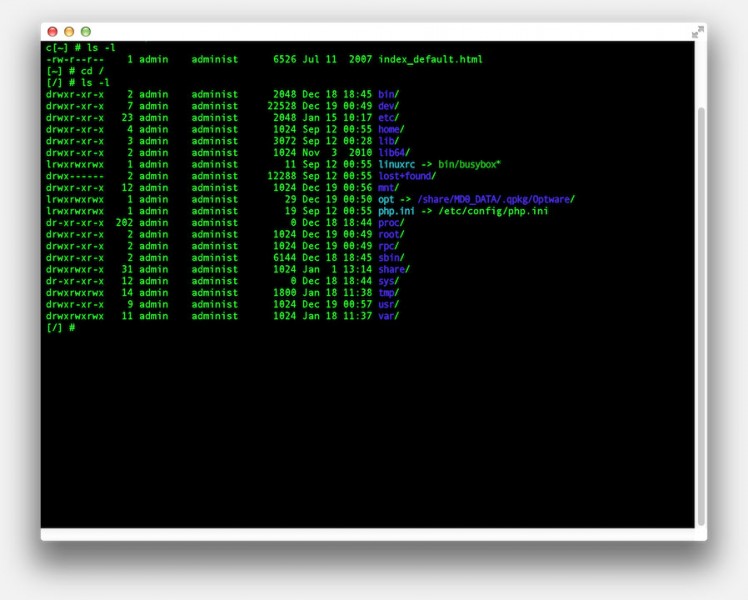
FireSSH – Example Connection
SSH Client for Windows
PuTTY is probably the easiest and most commonly used SSH Client for Windows users. You can download it for free from the PuTTY website.
Good an maybe interesting alternatives (free) are: MobaXTerm, FreeSSH, OpenSSH for Windows, WinSCP.
PuTTY
PuTTY can also be download from Tweaking4All but as usual we highly recommend getting it from the developers website.
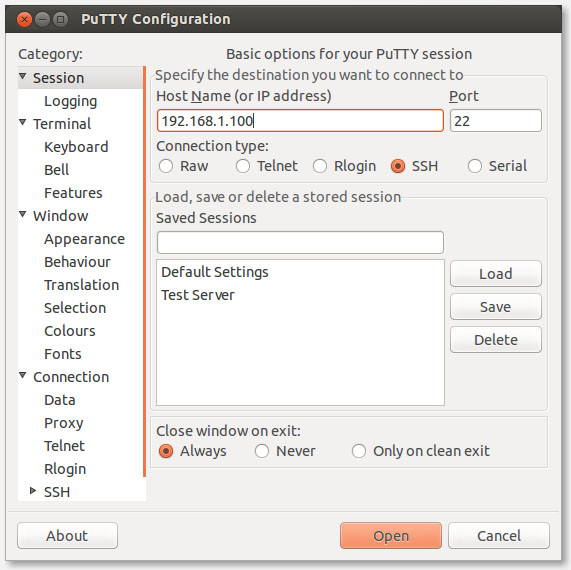
In the startup screen we only have to enter “username@serveripaddress“, in the “Host Name” field, to start a connection, where “username” is your username for SSH access on the device, and “serveripaddress” is the IP-Address of the device.
Optionally you can enter a name for this connection in the “Saved Sessions” field and click “Save” to easier recall the connection at a later time. Your password will not be saved as usual.
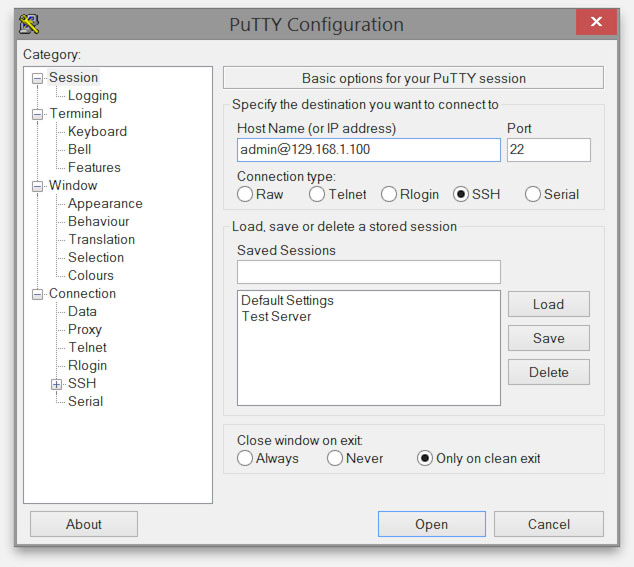
Windows – PuTTY – Setup SSH Connection
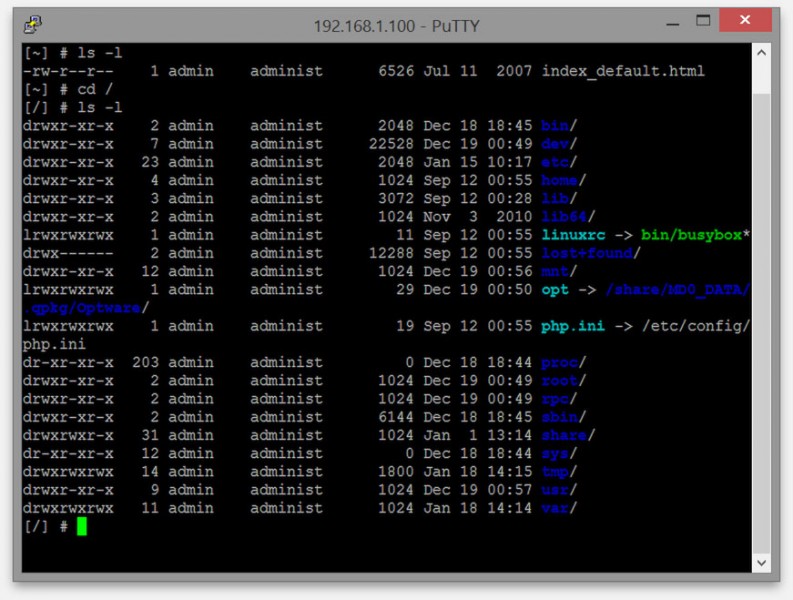
Windows – PuTTY – Active Connection
SSH Client for MacOS X
Although ports have been made of PuTTY, installation isn’t all that great (MacPorts offer is), but for SSH use MacOS X have better options.
As with Windows, several options are available, just to mention a few: iTerm2, CSSHX, JellyFissh, MacTerm.
Terminal SSH
In all honesty, I often use “ssh” simply in Terminal (“Applications” “Utilities” “Terminal“).
The usage is straight forward:
ssh username@computeripaddress
Here “username” is of course your username, or for example “root” or “admin”, and the “computeripaddress” is the IP-Address (or in some cases the computer name works as well) of the device you’d like to reach. I have noticed that the “computeripaddress” often has to be the IP-Address when you’re working in your local network, but that could be a flaw in the DNS service I’m running in my network …
If a password is required, SSH will ask you to enter it.
You can either close Terminal or enter “exit” to close the connection.
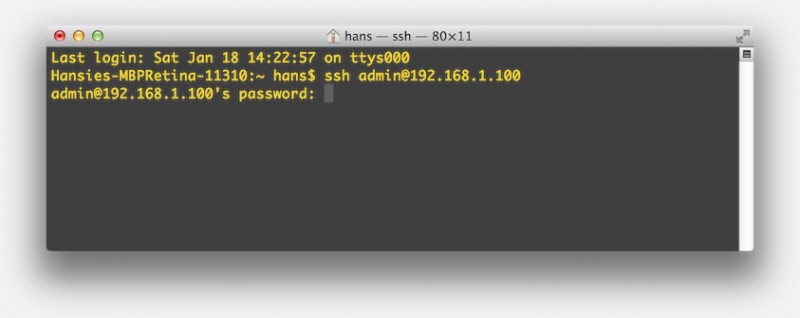
MacOS X – Terminal – Open a SSH Connection
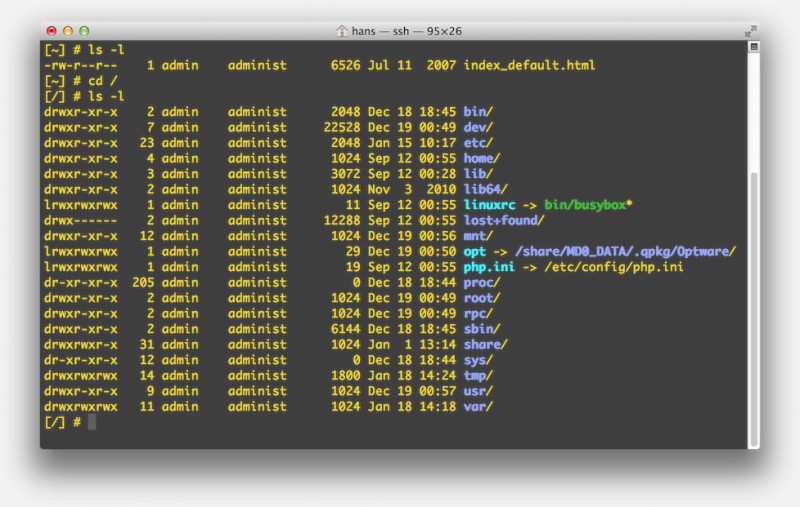
MacOS X – Terminal – Example SSH Connection
SSH client for Linux
Command-line
Linux users are probably more experienced with the use of SSH and most will use the command-line (Terminal) approach as seen under MacOS X:
ssh username@serveripaddress
PuTTY
To my (pleasant) surprise, PuTTY is also available under Linux, though it might be a bit harder to find.
For Ubuntu users, either user the “Ubuntu Software Center” and install “PuTTY SSH Client”.
Non-Ubuntu users, or Ubuntu version without the software center, can try (for some reason I had to run it twice to make it work):
sudo apt-get install putty
PuTTY can then be started from the command line (type: putty) or through the “PuTTY SSH Client” shortcut.
In the startup screen we only have to enter the server IP-Address in the “Host Name” field, to start a connection, here we seem to be unable to add “username@” in front of the connection, so just enter the IP-Address. Username and Password will be asked once the connection has been established.
Optionally you can enter a name for this connection in the “Saved Sessions” field and click “Save” to easier recall the connection at a later time. Your password will not be saved as usual.
Linux – PuTTY – Setup SSH Connection

Linux – PuTTY – Active Connection
How SSH works
For SSH to work, we will need two key elements:
– SERVER – the Software that can receive SSH requests over the network from another computer
– CLIENT – Software that can send SSH requests and setup a connection to a device that can accept SSH connections
To get such a connection started one would need software (often a so called Daemon that runs unnoticed in the background) that can received SSH requests: The Server.
The other side of the story is the SSH Client. The program that requests an SSH connection from the device that you like to remotely access.
Of course you will also need a username and password to gain access and the server needs to have the ability to check these. Some SSH servers use username and password sets as defined by the Operating System (common under Linux variants) and some maintain their own username and passwords.
During the initial handshake, so called keys will be exchanged between the server and the client.
One key (public key) is used for authentication and some clients save that key for future reference (for authentication – to make sure that in the future the client is talking to the same server).
The other key is used to encrypt the connection, so that nobody can listen into what you’re doing, obviously with the intend to prevent that others gain access to your SSH enabled device. Each time you setup a connection, a new key will be used.
As you can see: Privacy/Security are key!
Please keep in mind that this is a simplified explanation of what really is going on in the background!
Specially the handshake can be done in several ways. A more detailed explanation for example can be found here.
Tip
The request receiving party is often a device or computer that comes with SSH installed – in some cases you might need to enable it.
Most Linux/Unix/FreeBSD based devices it’s often already there.
As a rule of thumb I always disable the SSH service on a “server” and only enable it for the time that I need access (if this is an option).
Warning: Remote Host Identification has changed!
Since some SSH Clients save the key to authenticate a computer or device, linked to their computer name or IP-Address, a warning on occasion might occur.
For example when you re-install the operating system on the target computer, the computer will generate a new key, which will not match with the key your computer was expecting, and your SSH Client will complain about this with a message like this (depending on your system):
WARNING: REMOTE HOST IDENTIFICATION HAS CHANGED!

IT IS POSSIBLE THAT SOMEONE IS DOING SOMETHING NASTY!

Someone could be eavesdropping on you right now (man-in-the-middle attack)!
It is also possible that the RSA host key has just been changed.
....
If you did reinstall you target computer, or for some other reason the key got re-generated, then removing the existing entry in the list of known-SSH-servers will resolve this issue.
A great, in-depth, resource concerning RSS keys is SSH Keys at SourceForge.
Note : Most of these error messages will illustrate where this invalid key can be found, possibly with an explanation how to remove it – so read the message carefully!
If you’re unaware of any reasons why this key was changed, then please check first what’s going on! Make sure security has not been compromised!
Google Chrome webbrowser extensions
Secure Shell
If you know the index of the offending host entry (it’s usually reported by ssh if the connection fails) then you will have to open the JavaScript console, which is not something every user will know how to do.
With Secure Shell open, right click for example the “[ENTER] Connect” button and select “Inspect element” from the popup menu. You will no see the window of “split” – in the header of the new area look for “Console” and click it – this will open the JavaScript Console.
Now in the JavaScript console type: term_.command.removeKnownHostByIndex(index) where “index” needs to be replaced with the index number indicated in the error message.
If you don’t know the index, or you’d like to clear all known hosts, use: </span><span style="line-height: 1.5em;">term_.command.removeAllKnownHosts().
See also the Secure Shell FAQ.
FireSSH
Sorry — I was unable to find the location of the SSH keys, or how to modify them, for FireSSH.
Windows remove SSH key
PuTTY
For PuTTY under Windows we will need to edit the registry.
Open the registry (regedit) and go to HKEY_CURRENT_USER\Software\SimonTatham\PuTTY\SshHostKeys .
Here you’ll find the SSH keys. The “name” column will tell you the name or IP-Address of the server.
Remove the row that holds the offending servername or IP-Address.
MacOS X remove SSH key
Terminal SSH
MacOS X “ssh” stores the SSH Keys in ~/.ssh/known_hosts .
Locate the server name or IP address of the offending “server” in this file and delete this line.
Cleaner and better is using: ssh-keygen -R serveripaddress or ssh-keygen -R servername where “serveripaddress” is the IP address of the targeted server, or “servername” the name of the targeted server. These should match with how you call ssh.
Linux remove SSH key
Command-Line SSH
The keys for “ssh” are store in: ~/.shh/known_hosts .
The error message will give you a number, for example: Offending key in /home/user/.ssh/known_hosts:1 .
In this case you’ll have to look for the line that starts with |1| and remove this line.
Cleaner and better is using: ssh-keygen -R serveripaddress or ssh-keygen -R servername where “serveripaddress” is the IP address of the targeted server, or “servername” the name of the targeted server. These should match with how you call ssh.
PuTTY
For PuTTY you can find quite a lot of information on how to handle SSH keys, there is even a tool that can help you convert keys (puttygen).
PuTTY under Linux stores it’s SSH key here: ~/.putty/sshhostkeys
In this file, find the line that starts with the server-name or server IP-Address of the offending server and delete this line.


Comments
There are no comments yet.
You can post your own comments by using the form below, or reply to existing comments by using the "Reply" button.